1
A400/A400A / GBR / A31008-M2201-L101-2-7619 / Overview.fm / 27.04.2011
1
Gigaset A400/A400A
Display keys on handset:
Pressing a key launches the function that appears above that key in
the display.
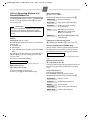
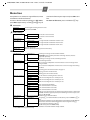
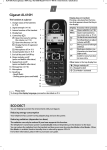
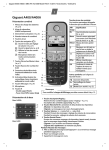
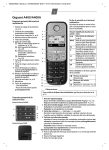
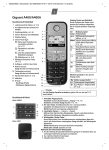
The handset at a glance
1 Charge status of
the batteries
(¢ page 6)
2 Answering machine icon (A400A
only)
3 Signal strength (¢ page 6)
4 Internal number of the handset
5 Using the display keys
6 Control key (p)
t: Open the menu for setting
the volume (¢ page 17)
s: Open the directory
(¢ page 8)
u: Display the list of registered
handsets
v: Microphone off (¢ page 7)
7 Accept/speaker key (¢ page 7)
8 End call key and On/Off key
9 Ringer melody on/off
(press and hold in idle status)
10 Keypad lock on/off
(press and hold in idle status)
11 Message key (¢ page 9)
12 Microphone
13 Recall key
- Recall (flash)
- Dialling pause (press and hold)
Display
1
2
3
4
б
V
INT 1
11.12.
11:56
Þ
Menu
5
Þ
Function when pressed
Open redial list ¢ page 8.
Menu Open main/submenu (see
“
U
T
6
˜
7
OK
8
menu tree ¢ page 17).
Go back one menu level.
Scroll up/down or adjust
volume with q.
Move cursor to left/right
with r.
Backspace deletes one
character at a time from
right to left.
Confirm menu function or
save entry.
Other icons in the top display line:
Ú
Ringer melody off
Ø Keypad locked
½ Eco Mode+ activated
(¢ page 2)
9
10
11
12
13
Please note
To change the display language, proceed as described on page 12.
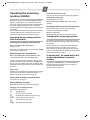
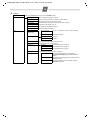
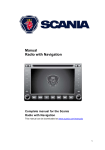
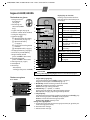
The base at a glance
Base A400A
2
7
1
6
5
4
3
Base A400
1
1 Registration/paging key:
Search for handsets (press briefly, paging ¢ page 11).
Register handsets (press and hold ¢ page 11).
2 On/Off key: switch answering machine on and off.
Lights up: answering machine is activated.
Flashes: message is being recorded.
3 Volume keys: (– = quieter; + = louder)
During message playback: adjust the speaker volume.
While phone is ringing: adjust ringer melody volume.
4 Play/Stop key:
Play back new messages from answering machine (press briefly), play
back all messages (press and hold), cancel playback.
Flashes: at least one new message is present.
Flashes very quickly: memory is full.
During message playback:
5 Skip to the start of the current message (press once) or go to the previous message (press twice).
6 Go to the next message.
7 Delete current message.
A400/A400A / GBR / A31008-M2201-L101-2-7619 / Overview.fm / 27.04.2011
2
Safety precautions
Be sure to read this user guide and the safety precautions in
detail before using your telephone. Explain their content
and the potential hazards associated with using the telephone to your children.
$
Only use the mains unit supplied.
Only fit the recommended, rechargeable batteries (¢ page 14), i.e. never use any other battery
type or non-rechargeable batteries as this could
result in significant health risks and personal
injury.
Using your telephone may affect nearby medical
equipment. Be aware of the technical conditions in
your particular environment, e.g., doctor's surgery.
Do not hold the rear of the handset to your ear
when it is ringing. Otherwise you risk serious and
permanent damage to your hearing.
The handset may cause an unpleasant humming
noise in hearing aids.
Do not install the phone in a bathroom or shower
room. The handset and base are not splashproof.
Do not use your phone in environments with a
potential explosion hazard, e.g. paint shops.
ƒ
If you give your Gigaset to a third party, make sure
you also give them the user guide.
Remove faulty bases from use or have them
repaired by our Service department, as they could
interfere with other wireless services.
Disposal
Batteries should not be disposed of in general
household waste. Observe the local waste disposal regulations, details of which can be obtained
from your local authority.
All electrical and electronic products should be
disposed of separately from the municipal waste
stream via designated collection facilities
appointed by the government or the local authorities.
This crossed-out wheeled bin symbol on the product means the product is covered by the European
Directive 2002/96/EC.
The correct disposal and separate collection of
your old appliance will help prevent potential negative consequences for the environment and
human health. It is a precondition for reuse and
recycling of used electrical and electronic equipment.
For more detailed information about disposal of
your old appliance, please contact your local
council refuse centre or the original supplier of the
product.
Emergency numbers cannot be dialled if the keypad lock
(¢ page 1) is activated!
Not all of the functions described in this user guide are available in all countries.
Gigaset service contact numbers:
For personal advice on our range of products and for
repairs or guarantee/warranty claims call:
Service Centre UK:
08453 6708 12
(local call cost charge)
Caring for your telephone
Wipe the base, charger and handset with a damp
cloth (do not use solvent) or an antistatic cloth.
Never use a dry cloth as this can cause static.
Contact with liquid
!
If the handset should come into contact with liquid:
u Switch the handset off and remove the batteries
immediately.
u Allow the liquid to drain from the handset.
u Pat all parts dry, then place the handset with the
battery compartment open and the keypad facing
down in a dry, warm place for at least 72 hours
(not in a microwave, oven or similar).
u Do not switch on the handset again until it is
completely dry.
When it has fully dried out, you will usually be able to
use it again
.
ECO DECT
You are helping to protect the environment with
your Gigaset A400/A400A.
Reducing energy consumption
Your telephone has a power-saving adapter plug
and uses less power.
Reducing radiation
The radiation from your telephone is reduced automatically:
Handset: the closer the handset is to the base, the
lower the radiation.
Base: the radiation is reduced to virtually zero when
only one handset is registered and the handset is
placed in the base.
You can reduce the radiation of the handset and
base even more by using Eco Mode/Eco Mode+
(see menu tree page 18):
u Eco Mode: 80% radiation reduction in standby
mode and during a call (the range of the base is
reduced).
u Eco Mode+: The radiation is switched off in
standby mode (top left display icon ½). Press
and hold the talk key c to check that the base
can be reached. You hear the ringing tone if the
base can be reached. WhenEco Mode+ is activated handset standby time is reduced by
approx. 50%.
Eco Mode/Eco Mode+ can be activated/deactivated
independently of one another. Registering handsets
that do not support Eco Mode+ will cause the mode
to be deactivated on the base and all other handsets.
A400/A400A / GBR / A31008-M2201-L101-2-7619 / Version 4, / starting.fm / 27.04.2011
3
First steps
Checking the package contents
u
u
u
u
u
u
u
One Gigaset A400/A400A base
One power adapter
One Gigaset handset
One phone cord
Two batteries
One battery cover
One user guide
If you have purchased a model with multiple handsets, the package should contain two batteries, a battery cover and a charging cradle with power adapter for each additional handset.
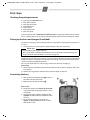
Setting up the base and charger (if included)
The base and charging cradle are designed for use in dry rooms in a temperature range of +5°C
to +45°C.
¤ Set up the base at a central point in the building on a flat, non-slip surface.
Please note
Pay attention to the range of the base.
This is up to 300 m in unobstructed outdoor areas and up to 50 m inside buildings. The
range is reduced when Eco Mode is activated (¢ page 18).
The phone's feet do not usually leave any marks on surfaces. However, due to the multitude of
different varnishes and polishes used on today's furnishings, the occurrence of marks on the
surfaces cannot be completely ruled out.
You can also mount the base and charging cradle on the wall (see packaging).
Please note:
u Never expose the telephone to the influence of heat sources, direct sunlight or other electrical devices.
u Protect your Gigaset from moisture, dust, corrosive liquids and fumes.
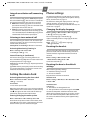
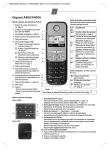
Connecting the base
¤ First, connect the telephone jack 2 and insert
the cables into the cable ducts.
¤ Then connect the power adapter 1.
Please note:
u The power adapter must always be connected,
as the phone will not operate without a mains
connection.
u Use only the power adapter and phone cord
supplied. Pin connections on telephone cables
can vary.
u The answering machine is ready for use
approx. 15 seconds after the base has been
connected or reset.
1
1
2
1
A400/A400A / GBR / A31008-M2201-L101-2-7619 / Version 4, / starting.fm / 27.04.2011
4
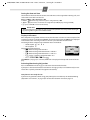
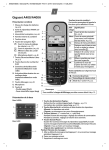
Connecting the charger (if included)
2
1
¤ Connect the flat plug from the mains adapter 1.
¤ Plug the power adapter into the plug socket 2.
4
To disconnect the plug from the charger, press the release button
3 and disconnect the plug 4.
3
Setting up the handset for use
The display is protected by a plastic film.
Please remove the protective film!
Inserting the batteries and closing the battery cover
Warning
Only use rechargeable batteries (¢ page 14) recommended by Gigaset Communications
GmbH, i. e. never use a conventional (non-rechargeable) battery, as this could result in significant health risks and personal injury. For example, the outer casing of the batteries
could be damaged or the batteries could explode. The phone could also malfunction or be
damaged as a result of using batteries that are not of the recommended type.
¤ Insert the batteries with the polarity
in the correct direction.
The polarity is indicated in/on the
battery compartment.
¤ Slide the battery cover back into the main casing until it clicks into place.
To reopen the battery cover, for instance to
replace the batteries, press the grooved
area at the top of the cover and slide it
downwards.
A400/A400A / GBR / A31008-M2201-L101-2-7619 / Version 4, / starting.fm / 27.04.2011
5
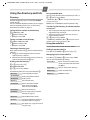
Initial charging and discharging of the batteries
The correct charge status can only be displayed if the batteries are first fully charged and discharged.
¤ Charge the handset in the base for 6 hours.
6h
Please note
The handset must only be placed in the designated Gigaset A400/A400A base or the corresponding charging cradle.
¤ After charging, remove the handset from the base and only replace it when the batteries
are fully discharged.
Please note
u The handset is pre-registered to the base. If you have purchased a model with multiple
handsets, all handsets will already be registered to the base. You do not need to register the handset again.
u After the first battery charge and discharge, you may place your handset in the charger
after every call.
u Always repeat the charging and discharging procedure if you remove the batteries
from the handset and reinsert them.
u The batteries may warm up during charging. This is not dangerous.
u After a while, the charge capacity of the batteries will decrease for technical reasons.
Changing the display language
If you do not understand the language that has been set, press:
Menu ¤ 421 ¤ q Select language ¤ OK (‰= selected)
¤ a (press and hold to return to idle status)
A400/A400A / GBR / A31008-M2201-L101-2-7619 / Version 4, / starting.fm / 27.04.2011
6
Setting the date and time
Set the date and time so that the correct date and time can be assigned to incoming calls, and
so that the alarm clock can be used.
Menu ¤ Settings ¤ OK ¤ Date/Time ¤ OK
¤ Date: ¤ ~ (enter the day, month and year in 6-digit format) ¤ OK
¤ Time: ¤ ~ (enter hours and minutes in 4-digit format) ¤ OK (display message: Saved)
¤ a (press and hold to return to idle status)
Please note
When entering the time and date, you can move the position of an entry to the left or right
by pressing left or right on the control button.
Display in idle status
Once the phone is registered and the time set, the idle status is shown as in this example. If the
answering machine is switched on (A400A), the answering machine icon ± will be displayed
in the header. Your answering machine is set with a pre-recorded announcement.
The strength of the reception signal between base and handset:
– Good to poor: Ð ¨ § ¦
– No reception: ¥
б
V
Charge status of the batteries:
INT
1
– U Batteries charged to over 66 %
11.12.
11:56
– V Batteries charged to between 34 % and 66 %
– e Batteries charged to between 11 % and 33 %
Þ
Menu
– = Flashes: batteries charged to below 11 %
= e V U Charging
–
If Eco Mode+ (¢ page 2) is activated, the ½ icon is displayed in the top left corner of the display.
Activating/deactivating the handset
Press and hold the end call key a to activate or deactivate the handset.
If you place a deactivated handset in the base or charging cradle, it will automatically be activated after a specific period of time (approx. 30 seconds).
Your phone is now ready for use!
If you have any questions about using your phone, please read the tips on troubleshooting
("Questions and answers", ¢ page 14) or contact our Customer Care team page 15.
A400/A400A / GBR / A31008-M2201-L101-2-7619 / main.fm / 27.04.2011
7
Making calls
Making external calls and ending
calls
External calls are calls using the public telephone network.
~ (Enter phone number) ¤ c.
The number is dialled. (Or you can first press and hold
c [dialling tone] and then enter the number.) During
the call you can adjust the earpiece volume using t
and set the volume with q.
End the call/cancel dialling:
Press the end call key a.
You can automatically insert a network provider dialling code before any phone number (see menu tree
"Preselection" ¢ page 18).
Accepting a call
The handset indicates an incoming call in three ways:
by ringing, by a display on the screen and by the
flashing accept/speaker key c.
Press the talk key c to accept the call.
When Auto Answer is activated, simply remove the
handset from the base/charging cradle (see menu
tree ¢ page 18).
Displaying the caller's number
When you receive a call, the caller's number will be
displayed on your handset; the caller's name will be
displayed if it is saved in the directory .
Prerequisites:
1 You have asked your network provider for the caller's number (CLIP) to be displayed on your handset screen.
2 The caller has asked the network provider for his
number to be identified (CLI).
In the display you will see External call if you have not
requested Calling Line Identification, Withheld if the
caller has withheld CLI or Unavailable if CLI has not
been requested.
Notes on calling line display (CLIP)
By default, the number of the caller is shown in the
display of your Gigaset telephone. You do not have to
make any other settings on your Gigaset telephone.
However, if the caller's number is not displayed, this
can be due to the following:
u You have not ordered CLIP from your network provider or
u Your telephone is connected via a PABX or a router
with an integrated PABX (gateway) that does not
transmit all information.
Is your telephone connected via a PABX/gateway?
You can establish this by checking for an additional
device connected between your telephone and
house connection, e.g., a PABX, gateway etc. In most
cases, simply resetting this device will remedy the
situation:
¤ Briefly disconnect the mains plug of your PABX.
Re-insert the plug and wait for the device to
restart.
If the caller number is still not displayed:
¤ Check the CLIP settings of your PABX and activate
this function if necessary. In the user guide for the
device, search for the term "CLIP" (or an alternative
term such as "calling line identification", "phone
number transmission", "caller ID", etc.). If necessary, contact the device manufacturer.
If this does not resolve the problem, it is possible that
your network provider does not provide the CLIP
service for this number.
Have you ordered the calling line display service
from your network provider?
¤ Check whether your provider supports calling line
display (CLIP) and that the function has been activated for you. If necessary, contact your provider.
Additional information on this subject can be found
on the Gigaset homepage at:
www.gigaset.com/service
Using speaker mode
Switching between earpiece and speaker mode:
During a call and when listening to the answering
machine (A400A only), press the accept/speaker key
d to activate or deactivate speaker mode. If speaker
mode is activated, the key is lit up.
During a call, use t to open the menu for setting the
speaker volume and use q to set the volume.
Muting
You can mute your handset during a call. Your caller
can no longer hear you.
Press the right-hand control key v during the call to
activate/deactivate the function.
A400/A400A / GBR / A31008-M2201-L101-2-7619 / main.fm / 27.04.2011
8
Using the directory and lists
Using speed dial keys
You can assign directory entries to the keys 0 and 2-9:
Directory
To open the directory: press and hold the bottom
control key s.
You can save up to 80 phone numbers (max. 32 digits)
with corresponding names (max. 16 characters).
Enter letters/characters ¢ page 13.
Saving the first number in the directory
s ¤ New Entry? ¤ OK
¤ ~ (Enter number) ¤ OK
¤ ~ (Enter name) ¤ OK
Saving a number in the directory
s ¤ Menu ¤ New Entry ¤ OK
¤ ~ (Enter number) ¤ OK
¤ ~ (Enter name) ¤ OK
Selecting a directory entry
Open the directory with s. You have the following
options:
u Use s to scroll through the entries until the
required name is selected.
u Enter the first character of the name, if necessary
scroll to the entry with the s key.
Dialling with the directory
s ¤ q (Select entry) ¤ c
Using other functions
s ¤ q (Select entry) ¤ Menu
The following functions can be selected with s:
New Entry
Save new phone number.
Show Number
Display the phone number.
Show Name
Display name.
Edit Entry
Edit selected entry.
Use Number
Edit or add to the number.
Then dial or select other
functions from the Menu.
Delete Entry
Delete selected entry.
Send Entry
Send a single entry to another
handset (¢ page 8).
Delete List
Delete all directory entries.
Send List
Send the complete directory to
another handset (¢ page 8).
Shortcut
For speed dial, assign the current
entry to a key.
s ¤ q (Select entry) ¤ Menu
¤ Shortcut ¤ OK ¤ ~ (Press the key to which you want
to assign the entry)
To dial, press and hold the required speed dial key.
Transferring the directory to another handset
Prerequisites:
u The sending and receiving handsets must both be
registered to the same base.
u The other handset and the base can send and
receive directory entries.
s ¤ q (Select entry) ¤ Menu
¤ Send Entry / Send List ¤ OK ¤ ~ (Enter the internal
number of the receiving handset) ¤ OK
Using the redial list
This list contains the last ten numbers dialled.
Dialling from the redial list
Press Þ or c (briefly) ¤ q (Select entry) ¤ c
Managing entries in the redial list
Press Þ or c (briefly) ¤ q (Select entry) ¤ Menu
You can select the following settings:
Use Number
Edit or add to the number. Then
dial or select other functions from
the Menu.
Copy to Dir.
Copy an entry to the directory.
Delete Entry
Delete selected entry.
Delete List
Delete all entries.
A400/A400A / GBR / A31008-M2201-L101-2-7619 / main.fm / 27.04.2011
9
Call List/Answering Machine List/
Network Mailbox List
An advisory tone sounds as soon as a new message
arrives in a list. When you press the f key, all the
lists are displayed.
Please note
If calls are saved in the network mailbox, you will
receive a message if the appropriate settings
have been set (depending on your network provider).
Using other functions
q (Select entry) ¤ Menu
The following functions can be selected with s:
Delete Entry
Delete current entry.
Copy to Dir.
Copy an entry to the directory.
Date/Time
Display date and time of call
(if set ¢ page 6).
Status
New Call: new missed call.
Old Call: entry already read.
Answ.: call accepted.
Delete List
Warning! All old and new entries
will be deleted.
Call list
Prerequisite: CLIP (¢ page 7)
Depending on the type of list set, the call list contains
(¢ page 18)
u Accepted calls
u Missed calls
u Calls recorded by the answering machine (A400A
only)
Depending on the type of list set, all numbers of the
last 25 incoming calls are saved or just the missed
calls are saved.
The call list is displayed as follows:
CallsList 01+02
Number of new entries + number of old, read entries.
Opening the calls list
f ¤ CallsList 01+02 ¤ OK
The last incoming call is displayed.
If necessary, use q to select another entry.
Calling back a caller from the call list
f ¤ CallsList 01+02 ¤ OK ¤ q (Select entry) ¤ c
Answering machine list (A400A only)
You can use the answering machine list to listen to
the messages that are on the answering machine.
The answering machine list is displayed as follows:
VoiceMail 01+02
Number of new messages + number of old, played back messages
Opening the voicemail list
f ¤ VoiceMail 01+02 ¤ OK
If you have new messages, playback will start with the
first new message, otherwise with the first old message.
Using other functions
During message playback:
Press the Menu display key, playback stops.
The following functions can be selected with s:
Dial Number
Call back a caller.
Continue
Resume paused playback.
Volume
Set the volume.
Copy to Dir.
Copy an entry to the directory.
Delete all old
Delete all old messages.
A400/A400A / GBR / A31008-M2201-L101-2-7619 / main.fm / 27.04.2011
10
Operating the answering
machine (A400A)
The answering machine is operated using the keys on
the base (¢ page 1) or from the handset. The telephone is supplied with a pre-recorded announcement. You can only record your own announcement
messages using the handset. This pre-recorded
announcement is used if no personal announcement
is available.
If the memory is full, the answering machine switches
itself off automatically. It switches itself on again
automatically when you delete old messages.
Operating the answering machine
from the handset
Switching the answering machine on/off
Menu ¤ Voice Mail ¤ OK ¤ Answ. Mach.
¤ OK (‰ = on)
When the answering machine is switched on, the ±
icon appears in the display.
Recording your own announcement
Menu ¤ Voice Mail ¤ OK ¤ Announcements ¤ OK
¤ Rec announce ¤ OK ¤ Strt recording? ¤ OK
You hear the ready tone (short tone). Now say your
announcement (at least 3 seconds). Press OK to confirm or press a or ” to reject your recording. After
recording, the announcement is played back for you
to check.
Please note:
Recording ends automatically when the max. recording time of 170 seconds is reached or if there is a
break in speaking of more than 2 seconds.
Playing back or deleting announcements
See menu tree ¢ page 17.
Playing/deleting messages
Open the voicemail list to play back messages.
Stopping and controlling playback
During message playback:
2
t
2xt
s
2xs
Stop playback.
Press 2 again to resume.
Go to the start of the current message.
Skip to the previous message.
Skip to the next message.
Skip ahead two messages.
Deleting individual messages
Press the ˜ display key during message playback.
Deleting all old messages
During playback or pause:
Menu ¤ Delete all old ¤ OK (Confirm the security
prompt)
Accepting a call from the answering machine
You can still accept a call while the answering
machine is recording the message:
Menu ¤ Accept ¤ OK
Recording stops and you can speak to the caller.
Setting up the answering machine
The answering machine has already been preset at
the factory. Individual settings can be adjusted using
the handset.
Details on how to set a delay time, after which the
answering machine is to answer a call, as well as
details on how to set the recording length and activate call screening during the recording, are available
from the menu tree ¢ page 17.
Assigning key 1 for speed dial to the
answering machine or network
mailbox
Simply press and hold key 1 on the handset and
you will be connected directly to the answering
machine/network mailbox.
See menu tree ¢ page 17.
A400/A400A / GBR / A31008-M2201-L101-2-7619 / main.fm / 27.04.2011
11
Remote operation when on the move
Registering handsets
You can check and activate your answering machine
from any other telephone ( hotel, pay phone etc.).
You can register up to four handsets on your base.
Each additional handset must be registered with the
base for it to work properly!
Prerequisites:
u You have set a system PIN other than 0000
¢ page 18.
u The phone you are using for remote operation has
tone dialling (DTMF) i. e., you hear different tones
when you press the keys.
Calling the answering machine and playing
messages
~ (Dial your own number) ¤ while listening to your
announcement: press the 9 key and enter the system
PIN
The following keys are used for operation:
A
B
3
0
Go to the start of the current message.
Press twice to go back to the previous
message.
Stop playback. Press again to resume.
Go to the next message.
Delete current message.
Activating the answering machine
~ (Enter your own number and allow the phone to ring
until you hear the message: "Please enter PIN") ¤ ~
enter system PIN
Your answering machine is activated. It tells you how
much capacity is left. The messages are played. The
answering machine cannot be deactivated remotely.
Locating a handset (paging)
You can locate your handset using the base.
u Briefly press the registration/paging key on the
base (¢ page 1).
u All handsets will ring simultaneously (paging),
even if the ringer melodies are deactivated.
End paging: briefly press the registration/paging key
on the base station (¢ page 1) or the talk key c on a
handset.
1) On the handset
Menu ¤ Settings ¤ OK ¤ Handset ¤ OK
¤ Register HS ¤ OK ¤ Enter the base system PIN
(default setting: 0000) ¤ OK
Registering flashes on the display.
2) On the base
Within 60 seconds of entering the system PIN,
press and (¢ page 1) hold the registration/paging
key (min. 3 seconds).
Registration takes approx. 1 minute.
Handsets are assigned the lowest available internal
number (1-4). If the internal numbers 1–4 are already
assigned to other devices, the number 4 is overwritten.
De-registering handsets
Menu ¤ Settings ¤ OK ¤ Handset ¤ OK
¤ De-register HS ¤ OK ¤ q Select handset ¤ OK ¤ Enter
the base system PIN (default setting: 0000) ¤ OK
The selected handset is de-registered.
Using multiple handsets
Making internal calls
Internal calls are free calls to other handsets that are
registered to the same base.
To make a call to other handsets, press
u u ¤ q (Select internal number of handset) or
~ (Enter internal number directly) ¤ OK, the
handset is called or
u u ¤ Call All ¤ OK, all handsets are called (alternatively you can also press and hold the control key
u or press u ¤ P).
To end the call, press the end call key a.
A400/A400A / GBR / A31008-M2201-L101-2-7619 / main.fm / 27.04.2011
12
Internal consultation call/connecting
a call
You are in conversation with an external participant.
Press the control key u and call one or all handsets.
The external participant hears the music on hold.
u Before the internal participant has answered,
press the end call key a; the call is diverted to the
participant who answers the call.
u After the internal participant has answered you
can talk to him. Then press the end call key a; the
call is diverted, or press the ” display key; you are
reconnected to the external participant.
Listening in to an external call
You are conducting an external call. An internal participant can listen in on this call and take part in the
conversation (conference).
Prerequisite: the Listening in function is activated.
Activating/deactivating listening in
Menu ¤ Settings ¤ OK ¤ Base ¤ OK
¤ Listening in ¤ OK (‰ = on)
Internal listening in (conference)
You want to listen in to an existing external call.
Press and hold the c key. You can listen in to the call.
All participants hear a signal tone.
To end: press the end call key a. All participants hear
a signal tone.
If the first internal participant presses the end call key
a, the handset that has "listened in" remains connected to the external participant.
Phone settings
For details on performing audio settings and activating/deactivating warning and advisory tones and key
tones, see menu tree ¢ page 17.
For details on setting the display contrast and large
dialling numbers, see menu tree ¢ page 18.
For details on setting the system PIN on the base, see
menu tree ¢ page 18.
Changing the display language
Menu ¤ Settings ¤ OK ¤ Handset ¤ OK ¤ Language
¤ OK ¤ q Select language ¤ OK
The current language is indicated by ‰.
If you accidentally choose a language you do not
understand:
Menu ¤ 421 ¤ q Select language
¤ OK (‰= selected)
Resetting the handset
You can reset individual settings and changes that
you have made. Entries in the directory, the call list
and the handset's registration to the base will be
retained.
Menu ¤ Settings ¤ OK ¤ Handset ¤ OK
¤ Reset Handset ¤ OK ¤ Reset? ¤ OK
Cancel the reset with a.
Resetting the base to the default
settings
Setting the alarm clock
When restoring factory settings:
u Individual settings are reset
u All lists are deleted
Only the date and time are retained.
Activating/deactivating the alarm clock
Software reset
Menu ¤ Alarm Clock ¤ OK ¤ Activation
¤ OK (‰ = activated)
Menu ¤ Settings ¤ OK ¤ Base ¤ OK ¤ Base Reset ¤ OK
¤ Reset? ¤ OK
If activated:
Hardware reset
Additionally
u All handsets are deregistered and
u The system PIN is reset to the original code 0000.
Disconnect the power cable from the base. Hold
down the registration/paging key (¢ page 1) on the
base and reconnect the power cable to the base at
the same time. Release the key after approximately
5 seconds.
¤ Enter wake-up time ¤ OK
When the alarm clock rings, press any key to switch it
off for 24 hours. If the alarm clock is set, the wake-up
icon l will appear on the screen and the wake-up
time will be displayed instead of the date.
Entering/changing the wake-up time
Menu ¤ Alarm Clock ¤ OK ¤ Wake-up time ¤ OK
Enter the wake-up time in hours and minutes, then
press OK. The alarm clock is automatically activated
after the wake-up time is entered/changed.
A400/A400A / GBR / A31008-M2201-L101-2-7619 / main.fm / 27.04.2011
13
Repeater mode
Appendix
With a repeater you can increase the range of your
base. You will need to activate repeater mode
(¢ page 18). Repeater mode and Eco Mode or Eco
Mode+ (¢ page 2) cancel each other out. The default
encrypted transmission setting is deactivated when
repeater mode is activated.
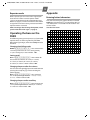
Entering letters/characters
After activating or deactivating the repeater, switch
your handset off and on again (¢ page 6).
Standard characters
Operating the base on the
PABX
The following settings are only necessary if your PABX
requires them, see the user guide for your PABX.
When entering the digits, enter them slowly one after
the other.
Changing the dialling mode
MENU ¤ P#Q5#11 ¤ The number for the
set dialling mode flashes: 0 = tone dialling (DTMF);
1 = pulse dialling (PD) ¤ enter number ¤ OK.
Setting recall
Menu ¤ P#Q5#12 ¤ The number for
the current recall flashes: 0 = 80 ms; 1 = 100 ms;
2 = 120 ms; 3 = 400 ms; 4 = 250 ms; 5 = 300 ms;
6 = 600 ms; 7 = 800 ms ¤ Enter number ¤ OK.
Changing the pause after line seizure
You can set the length of the pause inserted between
pressing the accept key c and transmitting the
phone number.
Menu ¤ P#Q5#1O ¤ The number for
the current pause length flashes: 1 = 1 sec.; 2 = 3 sec.;
3 = 7 sec. ¤ Enter number ¤ OK.
Changing the pause after recall key
Menu ¤ P#Q5#14 ¤ The number for the
current pause length flashes: 1 = 800 ms; 2 = 1600 ms;
3 = 3200 ms ¤ Enter number ¤ OK.
Press the relevant key the number of times indicated.
Briefly press the hash key # to switch from "Abc" to
"123" mode, from "123" to "abc" mode and from "abc"
to "Abc" mode.
1
2
I
4
5
L
M
N
O
Q
1x 2x 3x 4x 5x 6x 7x 8x 9x 10 11 12 13 14 15
£
b
e
h
k
n
q
u
x
1)
.
P * /
#
1
a
d
g
j
m
p
t
w
Abc
-->
123
1) Space
123
-->
abc
$
c
f
i
l
o
r
v
y
,
(
#
¥
2
3
4
5
6
s
8
z
?
)
@
¤
ä á à â ã ç
ë é è ê
ï í ì î
ö
7
ü
9
!
<
\
ñ
ß
ú
ÿ
0
=
&
ó ò ô õ
ù
ý
+
>
§
û
æ ø å
- : ¿ ¡
%
"
’
; _
A400/A400A / GBR / A31008-M2201-L101-2-7619 / main.fm / 27.04.2011
14
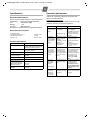
Specifications
Questions and answers
Recommended batteries
If you have any queries about the use of your telephone, visit our website at
www.gigaset.com/service
for assistance 24/7. The table below contains a list of
common problems and possible solutions.
Only use rechargeable batteries as described below.
Technology:
Nickel-metal-hydride (NiMH)
Size:
AAA (Micro, HR03)
Voltage:
1.2 V
Capacity:
400–800 mAh
The device is supplied with two approved batteries.
Base power consumption
In standby mode
- Charged handset in base
- Handset not in base
During a call
approx. 0.7 W
< 0.4 W
approx. 0.5 W
General specifications
DECT standard
GAP standard
Range
Base power supply
Environmental conditions in operation
Standby time
Talktime
Operating time for 1.5
hours of calls per day
- Without Eco Mode+
- With Eco Mode+
Charging time in
charger
Is supported
Is supported
(The Gigaset handset is only fully
functional on Gigaset bases)
Up to 300 m outdoors
Up to 50 m indoors
230 V ~/50 Hz
+5°C to +45°C, 20% to 75% relative
humidity
220 hours
20 hours
135 hours
90 hours
5.5 hours
Problem
Cause
Solution
Nothing
The handset is not Press the end call key
appears in the switched on.
a for approx.
display.
5 seconds or place the
handset in the base.
The batteries are Charge or replace the
batteries.
flat.
No wireless
The handset is out- Move the handset
connection to side the range of closer to the base.
the base, Base the base.
flashes in the The handset is not Register the handset
¢ page 11.
display.
registered.
Check the mains conThe base is not
nector on the base
switched on.
¢ page 3.
The phone cord
You cannot
Please always use the
hear a ringer supplied has not phone cord supplied or
melody/dial- been used or has ensure that the pin
ling tone from been replaced by a connections are corthe fixed line new cord with the rect when purchasing
network.
wrong pin connec- from a retailer: 3-4
assignment of teletions.
phone leads/EURO
CTR37.
Error tone
You have entered Reset the system PIN to
sounds after
the wrong system the default setting
system PIN
PIN.
0000 ¢ page 12.
prompt.
All handsets are deregistered. All settings
are reset. All lists are
PIN forgotten.
deleted.
Repeater actiDeactivate and
The connecvated/deactivated reactivate the handset
tion always
¢ page 6.
¢ page 13.
terminates
after approx.
30 seconds.
A400/A400A / GBR / A31008-M2201-L101-2-7619 / main.fm / 27.04.2011
15
Customer Service & Assistance
You have questions? As a Gigaset customer, you can take advantage of our comprehensive service offerings. You
can find help quickly in this User Manual and in the service pages of our Gigaset online portal.
Please register your phone right after purchase on www.gigaset.com/uk/service
thus enabling us to provide you even with better service in case of questions or in case of a warranty claim. Your
personal user account enables you to directly contact our customer service by email.
In our constantly updated online service on www.gigaset.com/uk/service you can find:
u Extensive information about our products
u FAQ compilations
u Keyword search to help find topics quickly
u Compatibility database: Find out which base stations and handsets can be combined.
u Product comparison: Compare the features of several products with each other.
u Downloads for user manuals and current software updates
u E-mail contact form for customer service
Our service representatives are available on the telephone for more advanced questions or in-person consultation.
Here you can get competent advice on questions regarding installation, operation and configuration:
UK: 0845 367 0812
(local call cost charge)
Please note that if the Gigaset product is not sold by authorised dealers in the national territory the product may
not be fully compatible with the national telephone network. It is clearly specified on the box near the CE mark
as well as on the bottom of the base station for which country/countries the equipment has been developed. If
the equipment is used in a manner inconsistent with this advice or with the instructions of the manual and on
the product itself, this may have implications on the conditions for warranty or guarantee claims (repair or
exchange of product).
In order to make use of the warranty, the product purchaser is asked to submit a receipt which proves the date
of purchase (date from which the warranty period starts) and the type of goods that have been purchased.
Authorisation
This device is intended for analogue phone lines in the UK.
Country-specific requirements have been taken into consideration.
We, Gigaset Communications GmbH, declare that this device meets the essential requirements and other relevant regulations laid down in Directive 1999/5/EC.
A copy of the 1999/5/EC Declaration of Conformity is available at this Internet address:
www.gigaset.com/docs
A400/A400A / GBR / A31008-M2201-L101-2-7619 / main.fm / 27.04.2011
16
Guarantee Certificate
United Kingdom
Without prejudice to any claim the user (customer)
may have in relation to the dealer or retailer, the customer shall be granted a manufacturer's Guarantee
under the conditions set out below:
u In the case of new devices and their components
exhibiting defects resulting from manufacturing
and/or material faults within 24 months of purchase, Gigaset Communications shall, at its own
option and free of charge, either replace the
device with another device reflecting the current
state of the art, or repair the said device. In respect
of parts subject to wear and tear (including but
not limited to, batteries, keypads, casing), this
warranty shall be valid for six months from the
date of purchase.
u This Guarantee shall be invalid if the device defect
is attributable to improper treatment and/or failure to comply with information contained in the
user guides.
u This Guarantee shall not apply to or extend to
services performed by the authorised dealer or
the customer themselves (e. g. installation, configuration, software downloads). User guides and
any software supplied on a separate data medium
shall be excluded from the Guarantee.
u The purchase receipt, together with the date of
purchase, shall be required as evidence for invoking the Guarantee. Claims under the Guarantee
must be submitted within two months of the
Guarantee default becoming evident.
u Ownership of devices or components replaced by
and returned to Gigaset Communications shall
vest in Gigaset Communications.
u This Guarantee shall apply to new devices
purchased in the European Union. For Products
sold in the United Kingdom the Guarantee is
issued by: Gigaset Communications UK Limited,
Quatro House, Lyon Way, Camberley, Surrey,
GU16 7ER.
u Any other claims resulting out of or in connection
with the device shall be excluded from this Guarantee. Nothing in this Guarantee shall attempt to
limit or exclude a Customers Statutory Rights, nor
the manufacturer's liability for death or personal
injury resulting from its negligence.
u The duration of the Guarantee shall not be
extended by services rendered under the terms of
the Guarantee.
u Insofar as no Guarantee default exists, Gigaset
Communications reserves the right to charge the
customer for replacement or repair.
u The above provisions does not imply a change in
the burden of proof to the detriment of the customer.
To invoke this Guarantee, please contact the Gigaset
Communications telephone service. The relevant
number is to be found in the accompanying user
guide.
A400/A400A / GBR / A31008-M2201-L101-2-7619 / main.fm / 27.04.2011
17
Menu tree
Your phone has an extensive range of features. These
are offered in the form of menus.
To select a function while the phone is in idle status,
press Menu (open menu), use the t and s keys to
scroll to the function you require and press OK to confirm.
To return to idle status: press and hold the a key.
é Alarm Clock
Activation
Wake-up time
Activating/deactivating the alarm clock.
Input format: HHMM.
è Audio Settings
Handset Volume
Earpiece
Speaker
Can be set to one of 5 levels.
Can be set to one of 5 levels.
Ringer Volume
Ringer Melody
5 levels + "crescendo" available.
20 ringer melodies available for external calls.
External Calls
Internal Calls
20 ringer melodies available for internal calls.
Alarm Clock
20 ringer melodies available for alarm clock.
Advis.Tones
Battery Low
Activate/deactivate.
Activate/deactivate warning tone for low battery.
ê Voice Mail
Play Messages
Net Mailbox *
Answ. Mach. *
Answ. Mach. **
Call Screening **
Listening to messages on the network mailbox.
Net Mailbox: your network provider's answering machine; must be
requested separately.
Listening to messages on the answering machine.
Activating/deactivating the answering machine.
You can use the loudspeaker on the handset to screen a message that is
Handset
being recorded.
Base
You can use the loudspeaker on the base to screen a message that is being
recorded.
Announcements **
Rec announce
Play announce
Del announce
Recording your own announcement ¢ page 10.
Playing your own announcement.
Deleting your own announcement.
Message Length **
Maximum
1 Minute
2 Minutes
3 Minutes
Do not limit the recording time for each call.
Limit the recording time to 1 minute per call.
Limit the recording time to 2 minutes per call.
Limit the recording time to 3 minutes per call.
Ring Delay **
Immediately
10 sec
18 sec
30 sec
Auto
Call is answered immediately.
Call is answered after 10 seconds.
Call is answered after 18 seconds.
Call is answered after 30 seconds.
If there are no new messages, the answering machine answers a call after 18
seconds. If new messages are present, the answering machine accepts a call
after just 10 seconds.
Netw. Mailbox
Entering or changing the number for the network mailbox.
Set Key 1 **
Net Mailbox
Assign key 1 to network mailbox (in idle status, press and hold key 1 to
dial).
The network mailbox list can be displayed if your network provider supports
this function and if the network mailbox has been assigned to key 1.
Answ. Mach.
Assign answering machine to key 1
(in idle status, press and hold to dial).
* Only a base with an answering machine and number of network mailbox already entered.
** Base with answering machine only.
A400/A400A / GBR / A31008-M2201-L101-2-7619 / main.fm / 27.04.2011
18
ç Settings
Date/Time
Handset
Base
Enter date (DDMMYY format), then time (HHMM format).
Language
Set the display language ¢ page 12.
Big Dial Font
Show the phone numbers in large font when dialling.
Contrast
The display contrast can be set to 9 levels.
Auto Answer
Automatically activate/deactivate auto answer ¢ page 7.
Register HS
Register the handset ¢ page 11.
De-register HS
De-register the handset ¢ page 11.
Reset Handset
Reset the handset ¢ page 12.
Audio Settings
(A400A only)
Call list type
Ringer Volume
5 levels + "crescendo" + level 0 ("off") available.
Ringer Melody
6 melodies available.
Missed Calls
All Calls
¢ page 9
¢ page 9
System PIN
Base Reset
Additional
Change system PIN (default setting is 0000).
Restore factory settings ¢ page 12.
Repeater
Activate/deactivate ¢ page 13.
Eco Mode+
Activate/deactivate ¢ page 2.
Eco Mode
Activate/deactivate ¢ page 2.
Listening in
Preselection
Activate/deactivate the function ¢ page 12.
Presel. Number
Network provider dialling code, should be
inserted automatically before the dialled phone
number.
With Preselect
First digits of the dialling codes, should be dialled
with preselection.
Without Presel
First digits of dialling codes, should be dialled
without preselection.
A400/A400A / GBR / A31008-M2201-L101-2-7619 / main.fm / 27.04.2011
19
A400/A400A / GBR / A31008-M2201-L101-2-7619 / main.fm / 27.04.2011
20
A400/A400A / GBR / A31008-M2201-L101-2-7619 / main.fm / 27.04.2011
21
A400/A400A / GBR / A31008-M2201-L101-2-7619 / main.fm / 27.04.2011
22
A400/A400A / GBR / A31008-M2201-L101-2-7619 / main.fm / 27.04.2011
23
A400/A400A / GBR / A31008-M2201-L101-2-7619 / main.fm / 27.04.2011
24
Issued by
Gigaset Communications GmbH
Frankenstr. 2a
46395 Bocholt, Germany
© Gigaset Communications GmbH 2011
All rights reserved. Subject to availability.
Rights of modification reserved.
www.gigaset.com
This user guide is made from 100 % recycled paper.