1
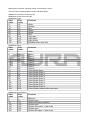
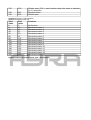
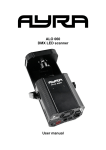
ALO 030 MKII
30 Watt DMX LED scanner
User manual
Safety instructions
WARNING!
Always keep this device away from moisture and rain! Hazardous electrical shocks may occur!
WARNING!
Only connect this device to a matching power outlet. This device is intended to work on a
specified AC currency. Connecting this device to power outlets with other voltages may result in
permanent damage and possible hazardous situations, such as fire or electrical shocks!
WARNING!
Be careful with every operation of this device. Touching live wires inside and outside the unit
may cause hazardous electrical shocks!
This unit must be operated by, or under the supervision of an adult. This device is not suitable for children.
Every person involved with the installation, operation and maintenance of this device has to:
- Be qualified
- Follow the instructions of this manual
- Make sure there is no damage caused by transport. If the device seems damaged from the outside, do not
use it and contact your dealer for more information and consultation.
- To make sure the device maintains in perfect condition and for safe operation, it is necessary for the user to
follow the instructions and warning notes of this user manual.
- Damage caused by improper use or modifications to the device are not covered by warranty.
- This device does not have any user-serviceable parts inside. Servicing of this device needs to be done by
qualified technicians.
Important notes regarding safety and health:
- Never let the power cord come in contact with other cables. Handle the power cord and all connectors with
the mains with caution.
- Never remove any warning or informative labels from the unit
- The ground contact always needs to be connected. Do not cover or remove the ground contact.
- Never leave cables lying around
- Do not open the device and do not modify any hard- or software of this unit.
- Do not insert this object into air vents.
- Do not connect this device to a dimmerpack.
- Do not switch the system on and off frequently as this will reduce the lifespan of the device.
- Do not drive the inputs of the fixture with a signal larger than required to work at full performance.
- Only use this device indoor, avoid contact with water, moist or other liquids. Do not place items filled with
liquids on top of the unit.
- Avoid nearby flames or heat sources, do not place this device near flammable liquids, gas or flammable
items.
- Always disconnect the device when it is not in use for a longer period or time, when servicing is needed or
when the device needs cleaning.
- Only handle the power cord by its connectors. Never pull the cable to remove a connector from its socket,
as this could lead to damage and electrical shocks.
- Always operate this device with a stable AC current.
- Always operate this device with the AC ground wire connected to the electrical system's ground.
- Never use other types of cables than specified in the manual, do not use defective or bad functioning
cables. Contact your dealer when the included or required cables do not work properly with this device.
- When the device has been exposed to large temperature differences (for example, transport from outdoor
to indoor), do not connect the device immediately. Do not activate the unit until it has reached room
temperature, as moist might build up inside the unit, which may cause shortcuts and/or electrical shocks.
Guidelines and types of use:
- This device is intented to be used by professionals on stage, in theatres, clubs and other equal venues.
- This device is not suitable for children and always needs to be operated by an adult.
- Only use the device when the environment is suitable and will not cause any damage. Do not use the
product in moist or dusty environments, or where long-term damage may occur such as:
- indoor swimming pools where chlorine is used.
- Beaches, where sand and salt are present.
- Outdoor, without roof protection
- Indoor areas where intense heat sources are present or where the temperature exceeds levels
which are comfortable for humans.
- Only use the included power adapter and only connect the device to a suitable power outlet with the correct
output voltage. Connecting the device to a power outlet with the wrong type of voltage or using the prodcut
with a wrong type of power supply may cause permanent damage to the device.
- Avoid shocks and collission during use and transport. Do not transport the device while in use. Avoid brute
force during the installation and operation of this device.
- Familiarise yourself with the functions of the device before use. Do not allow operation of the device by
unskilled or unqualified people.
- Use of the device in other ways than described in this user manual may cause damage and injury. Ayra
does not take responsibility for any damage or injury caused by improper use.
Storage and transport:
- This device is intended for mobile use. When transported, use the original packaging of the product, or a
fitting flightcase, preferably filled with foam.
- This device is not intended for permanent use. Operation breaks will ensure that the lifespan of the device
remains unchanged.
- If the device is not used for a longer period of time, disconnect it from its power source and store it in its
original packaging, or in a fitting flightcase.
- Store the device indoor, dry and do not expose the device to extreme temperature differences.
Housing:
- Inspect the housing of the device frequently. Severe dents, cracks and missing screws should be avoided
at all costs. Do not use the device when the housing is not in optimal condition. Contact your dealer or a
skilled technician when in doubt about the state of the device
- Check the fixture and screws for corrosion. Corrosion should not be present on the fixture. Contact your
dealer or a skilled technician when corrosion is found on the fixture
- Every power or signal chassis/connector should be mounted tightly. Do not use the device when connectors
are loose.
- Do not use the power cord when the cores are visible. Contact your dealer for a replacement if needed.
- Avoid the buildup of dust and dirt. Clean the exterior of the fixture every month with a dry or damp cloth.
When using the device intensively, the cleaning frequency needs to be increased.
Fuses:
- The main fuse of this device is to be found on the rear of the device. In most cases, directly next to the
power inlet.
- Only replace a fuse for a new one with the same type and rating! Do not use a fuse with a higher or lower
rating.
- Do not bridge the fuse with electrical wires, aluminum foil, as the fuse is used for protection against
electrical shocks and short circuit.
- Always mount the fuse cover back to the fuse compartiment.
Box contents
Box contents
1x ALO 030 fixture
1x power cable
Unit and accessory inspection
- Always use the supplied power cable to connect the unit to a power supply. If the cable appears broken or
has visible damage, do not use it.
- If the unit is not going to be used for a longer period of time, disconnect it from the power supply and store it
in a dust-free environment.
- Always check the unit for possible damage before use. If you suspect that something is wrong with the unit,
do not connect it to a power source! When you suspect that your unit is broken or damaged, contact your
local dealer or a certified technician to inspect the unit.
Device overview
1
7
2
9
10
3
4
6
5
8
11
12
4
1. Moving mirror
2. Beam output with manual focus
3. Standing/hanging adjustable bracket
4. Ventilation slots
5. IEC Power inlet with integrated fuse holder
6. IEC Power outlet (used to link several fixtures)
7. Control panel display with MENU, UP and DOWN buttons
8. Sound sensitivity potentiometer
9. Safety eye, for optional safety cable
10. Built-in microphone for sound active mode
11. DMX input (3P XLR)
12. DMX output (3P XLR)
This unit is equipped with an adjustable focus, which makes it possible to sharpen the beam when used at
small or large distance. The focus is positioned just underneath the mirror, around the lens. Turn the focus
slightly left or right and see if the sharpness of the beam increases or decreases.
Setting up the unit
To activate the unit, connect the included power supply with the unit and a suitable 230V, 50 Hz power outlet.
The unit will activate directly after it is plugged in to a wall outlet or other power source.
Give the scanner time to calibrate the stepping motors, which are used to determine the position of the
mirror. You may hear and see some shaking, which is normal. The stepping motors use an end point to
determine the beginning and end of their movement.
The status of the scanner is shown on the display. Certain values determine the current status and will
change when you push buttons on the control panel. The buttons each have their own function, for easy
navigation in the control panel.
Press the ‘MENU’ button to switch modes, so you can easily select the built-in master/slave, music controlled
or DMX mode.
Display codes:
DMX-Mode: A001:
This value represents the DMX channel where the scanner is currently set to. 001 stands for channel 1, but
can be changed with the UP and DOWN buttons to a value from 001 to 255.
When receiving DMX data, a small red dot on the display will blink continuously, regardless of what function
is being used.
Music controlled mode:
When no DMX-signal is detected in DMX-mode, or when you select the master-mode, the unit will turn itself
into music controlled mode. Use the microphone sensitivity potentiometer to adjust the sensitivity of the
internal microphone for optimal light to sound functionality. When no music is detected, the scanner will play
a slow automatic program until a beat or loud sound is detected.
Master/Slave mode: S-1- / D 1:
The D-value stands for the master-unit, which will use the internal microphone to perform music-controlled.
This fixture will send out a signal for slave fixtures, which you may connect using standard XLR male to XLR
female cables (not included).
The slave units show S-1- on the display, but a value of 0-4 can be chosen, using the UP and DOWN
buttons. These values represent certain setting, for example pan/tilt invert, so your fixtures work
synchronized while the mirror movements are inverted.
Pan and tilt mode: P 0 / T 0
The pan and tilt values of every fixture can be reversed. This makes synchronized, but movement-mirrored
lightshows possible. The pan and tilt of every fixture can be mirrored individually.
P 0 represents the Pan mode. The default is set to 0, which means a normal working mode. By using the UP
and DOWN buttons you are able to select 0 or 1, where 1 is the inverted mode.
T 0 represents the Tilt mode. The same settings apply here as described above.
LED display mode: d 0
The LED display of the unit can be turned off during use, which makes your light-show more attractive,
especially if the display is visible for your audience. When using the menu-buttons the display will be lit, but
after several seconds inactivity the display will be turned off. When pressing one of the menu buttons the
display will activate itself again. The 0 value means display OFF, the 1 value means display ON. The DMX
indicating dot will not turn off.
DMX control mode:
This fixture can be controlled using a DMX-controller and standard XLR male to XLR female cable. When
doing so, make sure your DMX-controller is capable of controlling your fixture. When in doubt, contact your
local dealer for advice.
Set the correct address on the digital display, you are able to choose a value between 001 and 255. When a
DMX-signal is received, a blinking red dot on the display is active.
This unit has the following DMX-channels and DMX-values:
Channel 1: Horizontal movement (pan)
Channel 2: Vertical movement (tilt)
Channel 3: Colors:
Start
value
0
15
30
45
60
75
90
105
120
128
End
value
14
29
33
59
74
89
104
119
127
255
Function
White
Orange
Blue
Green
Yellow
Pink
Light blue
Light green
Light yellow
Rainbow effect slow-fast
Channel 4: Gobos:
Start
value
0
8
15
22
29
36
43
50
57
64
71
78
85
92
99
106
113
120
128
End
value
7
14
21
28
35
42
49
56
63
70
77
84
91
98
105
112
119
127
255
Function
Open
Gobo 1
Gobo 2
Gobo 3
Gobo 4
Gobo 5
Gobo 6
Gobo 7
Gobo 8
Gobo Shake Open
Gobo Shake Gobo 1
Gobo Shake Gobo 2
Gobo Shake Gobo 3
Gobo Shake Gobo 4
Gobo Shake Gobo 5
Gobo Shake Gobo 6
Gobo Shake Gobo 7
Gobo Shake Gobo 8
Gobo Wheel rotation effect slow-fast
Channel 5: Shutter/Strobe:
Start
value
0
8
16
132
140
181
190
End
value
7
15
131
139
180
189
231
Function
Blackout
Shutter open
Strobe slow-fast (variable)
Shutter open
Shutter slow open -> fast close
Shutter open
Shutter fast open -> slow close
232
239
240
248
247
255
Shutter open (235 = reset function when the value is selected
for 3-5 seconds)
Random strobe
Shutter open
Channel 6: Dimmer: 0-255 (variable)
Channel 7: Movement macros:
Start
value
0
8
26
44
62
80
98
116
134
152
170
188
206
224
242
End
value
7
25
43
61
79
97
115
133
151
169
187
205
223
241
255
Function
No function
Movement macro 1
Movement macro 2
Movement macro 3
Movement macro 4
Movement macro 5
Movement macro 6
Movement macro 7
Movement macro 8
Movement macro 9
Movement macro 10
Movement macro 11
Movement macro 12
Movement macro 13
Movement macro 14
Channel 8: Macro movement speed, slow – fast (variable).
Technical specifications
-
Compact scanner with LED light source
LED module: 1x 30W LED chip
8 DMX-channels
3-pin XLR in- and output
Music controlled mode with internal microphone
Microphone sensitivity adjustable
Maximum flash rate: 18 Hz
Maximum ambient temperature: 45 degrees Celsius
Maximum distance from flammable surfaces: 0.5m
Power consumption: 50W max.
Fuse: 2A 250V 20mm glass fast blow
Power supply: 230V AC, 50 Hz
Dimensions: 370 x 200 x 150 mm (without bracket)
Weight: 4 kg
Connectors:
- DMX: 3p XLR male and female
- Power: IEC power inlet/outlet connector
Included accessories:
- Power cable with Schuko & IEC connectors
Connectors and wiring schematics:
DMX-connections:
Electrical wiring: