1
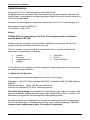
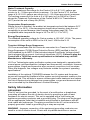
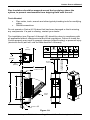
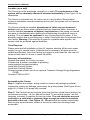
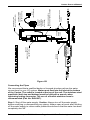
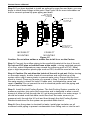
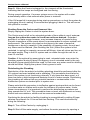
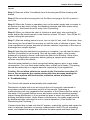
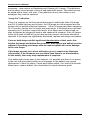
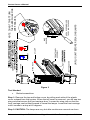
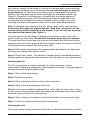
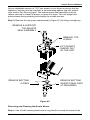
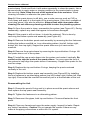
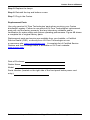
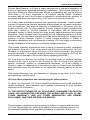
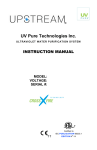
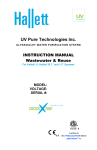
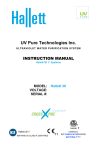
Owner’s Manual UV Pure Technologies Inc. WATER PURIFICATION SYSTEM MODEL: CACTUS Conforms to UL60335-1E:04. Certified to CAN/CSA-E60335-1/4E:03 Cactus Owner’s Manual OWNERS MANUAL Copyright UV Pure Technologies Incorporated 2014 All rights reserved. No part of this document may be photocopied, reproduced, transmitted or translated to another language without the prior written consent of UV Pure Incorporated. Crossfire Technology® is a registered trademark of UV Pure Technologies Inc. Publication Number: Z800011G Third Edition, May 2014 Notice THANK YOU for purchasing a UV Pure Technologies water purification system Model CACTUS. Please read the complete manual before installing or operating. Retain this manual and the purchase receipt for the unit. This UV system is engineered to provide effective UV dosage rates for the inactivation of pathogens, including: viruses bacteria cryptosporidium giardia legionella E. coli Total coliforms To be effective, the system must be installed in applications that meet minimum pre-treatment specifications. 1. About the UV System Cactus systems incorporate patented Crossfire Technology. Patented in US 6,707,048, Canada 2,463,503, Australia 2,002,333,084, Mexico 248805 Patent Pending in Japan, UK, Europe & Eurasia Patents are owned by UV Pure Technologies Inc. Crossfire Technology incorporates two proprietary high-output UV lamps, with elliptical reflectors, that target pathogens with radiation from 360º, to reduce UV shadowing and provide microbiologically safe drinking water. Changing lamps in the Cactus is as simple as opening the front of the system. There is no draining, no disassembly and no risk of quartz breakage. The UV lamps require replacement after 12 months of operation. Released on 1-May-14 - Z800011G Page 2 UV Pure Technologies Inc. © 2014 Cactus Owner’s Manual 1. About the UV System ......................................................................... 2 2. Installation Instructions...................................................................... 4 Before Beginning Installation.................................................................. 4 Water Conditions - Pre-treatment Parameters......................................... 4 Transient Voltage Surge Suppressor ...................................................... 5 Safety Information ................................................................................. 5 Parts Included ....................................................................................... 6 Other Materials Needed ......................................................................... 6 Tools Needed ........................................................................................ 7 Location (on a wall)................................................................................ 7 Time Required ....................................................................................... 8 Assembling the Cactus .......................................................................... 8 Connecting the Pipes............................................................................. 9 Parallel Installation ...............................................................................11 Locating the Receptacle and Optional TVSS .........................................11 Plugging in the Cactus ..........................................................................12 Flushing Instructions .............................................................................12 3. Operating Instructions ..................................................................... 12 Starting the Unit....................................................................................13 Shutting Down the Cactus and Seasonal Use ........................................14 Disinfecting the Plumbing......................................................................14 4. Troubleshooting ............................................................................... 15 5. Maintenance ..................................................................................... 17 Replacing and Cleaning UV Lamps .......................................................17 Draining the Unit ...................................................................................19 Cleaning the Unit ..................................................................................19 Inspection Procedure for Quartz Sleeve ................................................20 In-place Cleaning..................................................................................20 Disassembling the Unit .........................................................................22 Removing and Cleaning the Quartz Sleeve ...........................................25 Reassembling the Unit ..........................................................................26 Replacement Parts ...............................................................................27 6. Service Record Sheet ....................................................................... 28 7. Limited Warranty .............................................................................. 28 Released on 1-May-14 - Z800011G Page 3 UV Pure Technologies Inc. © 2014 Cactus Owner’s Manual 2. Installation Instructions Before Beginning Installation Water Conditions - Pre-treatment Parameters Note: it is very important that the Cactus is installed in conditions that meet the minimum specifications for pre-treatment. Please review the following pretreatment parameters prior to installation. Some of the specifications are technical in nature. If any specifications are of concern or unclear, please contact your dealer. IMPORTANT - IF THE CACTUS SYSTEM IS INSTALLED IN CONDITIONS THAT DO NOT MEET THE SPECIFICATIONS, IT MAY VOID THE MANUFACTURER’S WARRANTY. Water Parameters for Treating Drinking Water: The minimum water requirements for operating the CACTUS are: UV Transmittance – more than 85 percent transmission of ultraviolet light. (If there is color in the water, the UV transmittance may fall below 85 % and the system will not provide the necessary UV dose for safe drinking water.) It is recommended the water be tested for UV transmittance in any applications using cisterns, surface water or ground water under the influence of surface water. Level of Turbidity - or cloudiness - of less than or equal to 1 NTU (nephelometric turbidity unit). A 5 micron sediment filter is recommended before the unit to reduce turbidity. (The presence of a filter will also simplify disinfection of plumbing – see Disinfecting the Plumbing. For surface waters, a dual gradient 20 micron prefilter is also recommended.) Hardness – Hardness must be less than 7 grains (120 mg/L) Total Iron – Total iron must be less than 0.3 ppm (0.3 mg/L) Cactus Performance at 85% UVT with 12 month old lamps 60 50 Dose (mJ/cm2) X-8 X-12 40 30 20 10 0 0 5 10 15 20 25 Flow (US gpm) Chart 1 Released on 1-May-14 - Z800011G Page 4 UV Pure Technologies Inc. © 2014 Cactus Owner’s Manual Water Treatment Capacity: The water treatment flow range for the Cactus X-8 is 0-8.7 U.S. gallons per minute (or 0 – 33 liters per minute) maximum. For the Cactus X-12, the flow range is 0-13.3 U.S. gallons per minute (or 0 – 50.4 liters per minute) maximum The working pressure of the units is 0 to 100 psig (or 0 to 690 kPa). Chart 1 shows the Treatment Performance of the Cactus at 85% UV Transmittance (UVT) and at the end of lamp life (EOLL). Temperature Requirements: Where the unit is installed, the ambient air temperature should be between 34°F to 95°F (1º C to 35°C). If the temperature drops below freezing, drain the unit completely to prevent damage (see Draining Instructions page 19). The acceptable water temperature range is 34°F to 95°F (1ºC to 35°C). Energy Requirements: The standard operating voltage for Cactus system is 120 VAC, 60 Hz. The power consumption of the units is 93W for the X-8, and 114W for the X-12 Transient Voltage Surge Suppressor UV Pure recommends that the Cactus be connected to a Transient Voltage Surge Suppressor (TVSS)/Surge Protective Device (SPD) certified to the UL 1449 standard by an NRTL/C that includes integral Over/Under Voltage shutoff that is plugged into a ground –fault circuit interrupter (GFCI). Failure to plug the Cactus into a TVSS that meets specifications as indicated may void the Manufacturer’s Warranty. UV Pure Technologies water purification systems are designed to operate within normal power grid specifications (voltages and frequencies), worldwide. However, power spikes, surges and brownouts are a common occurrence in all countries. When that happens, line voltages may fluctuate outside the systems’ operating specifications. Installation of the optional TVSS/SPD between the UV system and the power source will increase the likelihood of the system surviving transient events on the AC power grid. This will help to ensure uninterrupted water treatment and reduce the risk of repairs due to damage from power spikes, surges and brownouts that are not covered by the Manufacturer’s Limited Warranty. Safety Information GROUNDING This UV unit must be grounded. In the event of a malfunction or breakdown, grounding will reduce the risk of electric shock by providing a path of least resistance for electric current. This unit is equipped with a cord having an appliance-grounding conductor and a grounding plug. The plug must be plugged into an appropriate outlet that is installed and grounded in accordance with all local codes and ordinances. The piping connected to the UV unit must also be properly grounded. Install a grounding lug or strap as required. WARNING - Improper connection of the equipment-grounding conductor can result in a risk of electric shock. Check with a qualified electrician or service Released on 1-May-14 - Z800011G Page 5 UV Pure Technologies Inc. © 2014 Cactus Owner’s Manual representative if you are in doubt whether the unit is properly grounded. Do not modify the plug provided with this unit; if it will not fit the outlet, have a proper outlet installed by a qualified electrician. GROUND-FAULT CIRCUIT-INTERRUPTER To comply with National Electrical Code, NFPA 70, the circuit where the UV unit(s) is connected must be protected by a ground-fault circuit-interrupter (GFCI). UV Pure recommends the use of Hubbell GFICs. WARNING: Potential Shock Hazard Use only a grounded electrical outlet when connecting the unit to a power source. If an extension cord is necessary, the cord should contain a ground and be rated for the same amperage as the unit or combined units. Do not plug in unit if water is present on the unit. WARNING: Ultraviolet Light Hazard The lamps in the UV system emit ultraviolet (UV) light that can cause permanent damage to the skin & eyes. Never look at the lamp when it is operating. Do not plug the Cactus in unless it is properly secured to a wall (see Installation Instructions) and the front panel and ballast enclosure are secure. Do not open the front panel or perform any service unless the Cactus has been unplugged. Never look into the unit or place any exposed skin into the illuminated areas when it is operating. Do not operate a Cactus that has been damaged or missing any components or safety devices. UV Note that service to the unit does not require the removal of the side aluminum panel or aluminum endplates and they must remain assembled. The Cactus unit is not intended for use by young children or infirm persons without supervision. Young children should be supervised to ensure that they do not play with the UV system. Parts Included Cactus UV water purification system, complete with integral wall brackets, instruction manual Ultraviolet lamps (two) – installed in the Cactus Power cord (located within packaging) Anti-Fouling System Other Materials Needed The UV requires four #12 to 1/4” diameter fasteners (not provided) to mount to a wall. It also requires female 1” NPT fittings for the manifold connections. These fittings, pipe insulation, and any piping compatible with the plumbing should be on hand before you begin installation. See Figure 1B and make a list of all necessary components including solder, paste and thread sealant. By-pass piping and valves that isolate the unit are optional, (but recommended) as is a drain valve for draining the unit. Using a union or a flexible stainless hose at the top and bottom port of the unit is recommended to allow easier maintenance of the unit. Released on 1-May-14 - Z800011G Page 6 UV Pure Technologies Inc. © 2014 Cactus Owner’s Manual Pipe insulation should be wrapped around the top piping, above the system, to prevent condensation from dripping back onto the unit. Tools Needed Pipe cutter, torch, wrench and other typical plumbing tools for modifying piping Slotted screwdriver Do not operate a Cactus UV System that has been damaged or that is missing any components. If a part is missing, contact your dealer. The installation (see Figures 1A through 1E) should be done in compliance with all applicable federal, state/provincial and local regulations. Failure to install the Cactus properly may result in property damage (leaks/flooding) or personal injury (electrical shock) and will void the Manufacturer’s Warranty. 7.8" [198mm] NPT MALE X-8 1" 27.3" [694] 19.8" [504] 16.9" [428] 11.0" [279] X-12 1" 32" [813] 24.5" [623] 20.1" [510] 15.7" [399] 7.5" QUARTZ SLEEVE 3.5" [89mm] WATER OUT, Ø CLEARANCE REQUIRED TO REMOVE QUARTZ [191mm] FRONT PANEL WATER IN, Ø WOOD Figure 1A Released on 1-May-14 - Z800011G Page 7 UV Pure Technologies Inc. © 2014 Cactus Owner’s Manual Location (on a wall) The Cactus must be positioned vertically on a wall. (The performance of the system will be adversely affected if mounted horizontally.) See Figure 1A for clearances. The Cactus is intended only for indoor use in a dry location. Should these minimum installation recommendations not be met, the system will not operate effectively. The Cactus should be installed downstream of (after) any pre-treatment devices such as filters, water softeners and any pressure tanks. However, it must be installed upstream of (before) any branches in the piping so that all the water is disinfected before splitting and distributing throughout a home or building. The unit must be upstream of any chlorine injection system. If the plumbing system has a grounding lug or strap, this should also be upstream from the Cactus. Warning: If connection is made to a potable water system, the system shall be protected against backflow. Time Required Please note that full installation of the UV requires shutting off the main water supply for up to several hours. If disinfection is necessary, all pipes must be treated and flushed. Once the Cactus is plugged in and turned on, the new UV lamps usually take 2-3 hours to reach full power. Summary of Installation: Unpack and attach the Cactus to a wall Connect top & bottom manifolds to plumbing Install optional by-pass plumbing Install Anti-Fouling System Install Anti-Fouling System Connect system power cord to an optional Transient Voltage Surge Suppressor (TVSS) Connect TVSS to GFCI Assembling the Cactus Step 1: Unpack the system, being careful to remove all packaging material. Inspect the system for damage, particularly the quartz sleeve (See Figure 4A on page 20.) Check if UV lamps fully inserted. Step 2: The Cactus has two keyhole slots (top) and two round holes (bottom) for convenient mounting – all four should be used. To mount the system, use the template, included, to position the two top holes. The unit should be secured vertically to a solid wall or plywood, large enough to cover the complete backside of the unit – See Figure 1C. Do not install the system horizontally. Remove the top and bottom covers of the unit to make the mounting holes accessible. Released on 1-May-14 - Z800011G Page 8 UV Pure Technologies Inc. © 2014 MANUAL SHUTOFF VALVE CACTUS MOUNTED VERTICAL AGAINST A WALL DEVICES OPTIONAL DRAIN VALVE OPTIONAL BY-PASS VALVES POWER CORD ENTRY & LOCATION OF SERIAL NUMBER ON / RE SE T PO WER OF F TRANSIENT VOLTAGE SUPPRESSOR (SUPPLIED BY OTHERS) GFCI 120VAC 50/60Hz COPPER TUBING OR EQUIVALENT (DO NOT USE PVC) PIPE INSULATION (MUST BE INSTALLED) Cactus Owner’s Manual Figure 1B Connecting the Pipes We recommend that a qualified dealer or licensed plumber perform the water connections for your UV system. Water must flow into the inlet at the bottom of the Cactus. The outlet is located at the top of the unit. The stainless steel manifolds (both top and bottom) must be held with a wrench when tightening mating connector. The use of a flexible stainless hose is recommended (Part No. R400007). Step 1: Shut off the water supply. Caution: Always turn off the water supply before modifying or disconnecting any piping. Always open a faucet after shutting off the water supply to relieve water pressure and ensure that the water has been completely shut off. Released on 1-May-14 - Z800011G Page 9 UV Pure Technologies Inc. © 2014 Cactus Owner’s Manual Step 2: If you have decided to install an optional by-pass line and drain, you may begin to install these fittings at this point. See Figure 1B for more information on how to connect optional by-pass piping and drain. MOUNT UNIT AGAINST SHIM OR PLYWOOD WOOD TO RISE AT LEAST TO TOP OF UNIT OR WOOD TO FALL AT LEAST TO BOTTOM OF UNIT INCORRECT MOUNTING CORRECT MOUNTING Figure 1C Caution: Do not allow solder or solder flux to fall in or on the Cactus. Step 3: Connect the outflow piping to the manifold located at the top of the unit. Do not use PVC pipe or braided hose at the outlet – during extended periods of no flow, water temperatures may exceed the softening point of PVC. Metal pipe or high temperature plastic pipe such as PEX, should be used at the outlet. Step 4: Caution: Do not allow the inside of the unit to get wet. Before turning on the water supply, double check all connections and cover the top of the system with a rag or some plastic to prevent water entry. Ensure that the front panel is closed. Close any faucets you opened in Step 1 and then slowly turn on the water supply to check for leaks. If leaks exist, investigate the cause and repair. Caution: Do not connect the unit to electrical power until the piping and unit are free of water leaks. Step 5: Install the Anti-Fouling System. The Anti-Fouling System consists of a pressure regulator, drip valve and connectors and is designed to allow a small amount of water to flow through the UV unit during periods of no water usage. It should be located such that water would flow from the water reservoir (or pressure tank) through the UV unit and then through the Anti-Fouling System. Detailed instructions for the system are provided within the kit. Step 6: Once the system is checked for leaks, install pipe insulation on all overhead outlet piping to prevent condensation from falling onto or into the unit. Released on 1-May-14 - Z800011G Page 10 UV Pure Technologies Inc. © 2014 Cactus Owner’s Manual Parallel Installation When more than one system is installed in parallel to increase treatment capacity (the flow is divided among systems), the systems must be installed with manual shutoff valves before and after each system. This allows one Cactus to be serviced without interrupting the flow to the other(s). See Figure 1D. MANUAL SHUTOFF VALVE - ESSENTIAL TYPICAL INSTALLATION PARALLEL UNITS OPTIONAL DRAIN 20" FILTER HOUSING MANUAL SHUTOFF VALVE - ESSENTIAL Figure 1D Locating the Receptacle and Optional TVSS Install the receptacle and optional TVSS in a sufficiently high location so that if the power cord is removed from the unit and drops, the end of it will not fall to the floor potentially in any water spills – See Figure 1E. If this is not possible, the power cord should be secured to the wall to prevent it from falling. O N/ RES ET P OW ER O FF O N/ RESE T PO W ER O FF INSTALL RECEPTACLE & TVSS HIGH TO KEEP END OF POWER CORD FROM FALLING INTO ANY WATER ON THE FLOOR CORRECT MOUNTING INCORRECT MOUNTING Figure 1E Released on 1-May-14 - Z800011G Page 11 UV Pure Technologies Inc. © 2014 Cactus Owner’s Manual Plugging in the Cactus Step 1: Ensure that the front panel of the unit is closed and the unit is securely fastened to the wall. (Note: You should not open the front panel unless the unit has been unplugged to prevent risk of electrical shock and exposure to UV light.) Caution: It is not recommended to operate the Cactus dry. Water should be in the treatment chamber when the unit is in operation. Step 2: Plug the female end of the power cord into the power entry module located on the right side of the front panel. Plug the male end of the power cord into the optional Transient Voltage Surge Suppressor. Plug the optional Transient Voltage Suppressor into a GFCI. Important: after the unit has been operating for a few hours, unplug the unit and check all connections for leaks (the top connections in particular). Repeat this procedure periodically. The installation is now complete. Important: After the unit has been operating for a few hours, unplug the unit and check all connections for leaks. Repeat this procedure periodically. Proceed to “System Operation” for further instructions and to ensure optimal performance. Flushing Instructions Flushing the system is required after installation or after any disassembly and cleaning. Flushing may also be required to remove colored water from the unit. Most filters (if installed) also require flushing prior to use – follow the manufacturer’s recommendations if filters are installed before the system(s). The system may be flushed in two ways. It can be done manually by disassembling the unit and filling and draining the unit by hand (see Cleaning the Unit). Flushing may also be done while the unit is operating. Plug in the unit, open a faucet closest to the unit, and run the water for a minimum of 15 minutes. 3. Operating Instructions The Cactus incorporates advanced Crossfire Technology, yet is simple to operate. Inspection of the quartz chamber is a simple visual inspection. The only required maintenance is the replacement of the two UV lamps every 12 months. (Note - If you shut your system down for seasonal use, the lamp life will be extended. Keep a record of usage to ensure UV lamps do not exceed their lifetime.) Periodic inspections of the quartz sleeve are recommended to ensure optimal unit performance (see Determining Need for Cleaning Section). Released on 1-May-14 - Z800011G Page 12 UV Pure Technologies Inc. © 2014 Cactus Owner’s Manual Unit Functions Lamp On Indicator Figure 2 There is a viewport on the front panel that projects visible light when the UV lamps are ON. If visible light can not be seen, the UV lamps are not energized and the system will not provide effective treatment. Starting the Unit Caution: Do not operate unit with the front carriage door or ballast enclosure door open. Do not try to open the front carriage door or ballast enclosure door when the unit is operating – Shut down and unplug the unit before opening either the front carriage door or ballast enclosure. The Cactus has a safety switch that will disable the lamp power supply if the front carriage door is not completely closed. Caution: Avoid continuously starting and stopping the unit within a 24 hr period, as this will accelerate the aging of the UV lamps (note: however shutting down the system for seasonal use will extend lamp life) Caution: It is not recommended to operate the Cactus dry. Water should be in the treatment chamber when the unit is in operation. In the event of a lack of water or if the water supply is turned off, shut down the system until the water supply is restored. In the event of a power failure, the unit will shut down automatically. When the power returns, the unit will automatically restart. Note that during a brownout, the supply voltage may drop low enough to cause the unit to shut down. If the unit does not automatically restart as described above, unplug the system, wait 10 seconds and plug it in again. This will “re-boot” the system and it will re-start automatically. Step 1: Make sure the system is plugged into a TVSS, and plug the TVSS into a GFCI to start the system. Caution: Never look into and never expose skin to the UV lamps when the unit is operating. Wait at least 10 seconds between system restarts. Released on 1-May-14 - Z800011G Page 13 UV Pure Technologies Inc. © 2014 Cactus Owner’s Manual Step 2: When the Cactus is plugged in, the viewport will be illuminated, indicating that the lamps are energized and functioning. During normal operation, if a power outage occurs, the system will re-start automatically within a few seconds after power is restored. If the UV lamps fail to energize during start-up procedures, re-boot the system by unplugging the unit, waiting 10 seconds then plugging it back in. This will cause the system to re-start. Shutting Down the Cactus and Seasonal Use Simply unplug the Cactus to shut the system down. The Cactus may be left on for extended periods of time without use of water as long as the system has water in it and has not been drained. Extended periods of no water usage however, may increase chances of quartz fouling. Periodic inspections of the quartz sleeve is recommended to ensure optimal unit performance. The system may also be shut down in the case of seasonal residences or during a vacation. If the possibility of freezing exists, the unit and any filters must be drained. (See Draining the Unit.) When the system is first restarted, in spring for example, reconnect all fittings, close all valves and turn on the water supply. Plug in the UV system and run water through the unit for at least 15 minutes. Caution: If the optional by-pass piping is used, untreated water may enter the plumbing system during by-pass. Emergency use of untreated water is the only time that by-pass piping should be used. In that case, any water used for drinking should be boiled. Unplug the system if the by-pass is used. Disinfecting the Plumbing Disinfection of the household or building plumbing should be performed after the UV system has been installed and is operating. This procedure should also be done if the system is not functioning normally, if a by-pass has been used, or if there has been a high background bacteria count in a water sample. Disinfecting the plumbing will ensure that any potential bacteria or contaminants in the distribution system are treated prior to system use. Please note that this procedure is ineffective against protozoa that can be found in surface water or shallow wells under the influence of surface water. Under these circumstances, it is important to perform the disinfecting procedure and then operate the UV unit. This procedure does not work with sediments or heavy biofilm and encrustations, which must be removed mechanically. Sanitizing the household or facility plumbing is accomplished by adding 50 ppm chlorine from bleach for 12 hours and then flushing. This can be achieved by doing the following: Step 1: Turn off the Cactus by unplugging it. Step 2: Shut off the water supply, and relieve the water pressure by opening a Released on 1-May-14 - Z800011G Page 14 UV Pure Technologies Inc. © 2014 Cactus Owner’s Manual faucet. Step 3: Remove a filter (if installed) from its housing and fill the housing with bleach. Step 4: Re-mount the housing (but not the filter) and plug in the UV system to turn it on. Step 5: When the Cactus is operating, turn on the water supply and run water to all faucets (hot and cold), toilets, the washing machine and other water-using appliances – the bleach must fill every inch of plumbing. Step 6: When you detect the odor of chlorine at each spot, stop running the water and let the bleach remain in the lines for at least 12 hours. Turn off the UV system during this procedure. Step 7: After the waiting period is over, turn on the UV unit, wait 15 minutes, then flush every line for at least five minutes or until the odor of chlorine is gone. See local regulations for proper disposal of chlorine residual, especially in the case of discharge into a septic system. Step 8: Now that the disinfection procedure is complete, you will need to return the filter (if installed) to its housing. Shut off the water supply, relieve water pressure by opening a faucet, and return the filter to the housing. Allow a few days after a disinfection procedure before getting a sample since residual chlorine may affect the results. Have the water tested by a local recognized testing agency prior to any water consumption. For your local water testing labs, contact your dealer. The testing should be performed on a regular basis as required by local regulations. Caution: Do not allow chlorine to remain in the Cactus for more than 12 hours. Do not operate the system during this time because heating the water in the system will increase the corrosive nature of chlorine. 4. Troubleshooting The Cactus will operate automatically and unattended. Disinfection of water will occur as long as the unit is properly maintained in accordance with the instructions set out in this manual. Operating a malfunctioning unit may jeopardize the operation of the Cactus and the safety of the water. If any system failure occurs and water enters the plumbing system without being disinfected, or if an optional by-pass is used, any water used for drinking should be boiled. Under these circumstances, the water supply should be disinfected after returning the unit to normal operation. (See Section on Disinfecting the Plumbing.) If water should drip or leak onto the UV system, unplug the system and repair the leak (or add pipe insulation to prevent condensation runoff). Dry all remaining water, and inspect the lamps and reflectors for water spots and clean them if Released on 1-May-14 - Z800011G Page 15 UV Pure Technologies Inc. © 2014 Cactus Owner’s Manual necessary– (see section on Replacing and Cleaning UV Lamps). The reflectors are the shiny curved panels in front of and behind the lamps. The reflectors may be wiped with a clean, soft cloth. If the reflectors do not come clean or are damaged, they must be replaced. “Lamp On” Indication There is a viewport on the front panel that projects visible light when UV lamps are ON. If visible light can not be seen, the UV lamps are not energized and the system will not provide effective treatment. If the UV lamps have been operating for 12 months, replace the UV lamps with new lamps. If the lamps have not been operating for 12 months, inspect the lamps. If the lamps are not discolored, restart the system by plugging it back in and observe the viewport. If the UV lamps either fail to start or start but go out after several minutes, the lamps should be replaced. If the lamps are significantly discolored, replace both lamps and ballast. If one or both lamps exhibit significant discoloration at their ends, this implies the lamps and ballast have expired. Both lamps and ballast must be replaced. Operating new lamps with an expired ballast will cause damage to the new lamps. If the lamps operate for a short while then go out, examine the filaments (electrodes). If the filaments are very black (and there is no discoloration on the bulbs), then only lamp replacement is required. If no visible light can be seen in the viewport, it is possible that there is no power to the unit; the door safety switch is not engaged; or the ballast may require replacement. Check for power. Check door safety switch. If no fault is found with these items, replace ballast. Use chart below for quick reference guide. Released on 1-May-14 - Z800011G Page 16 UV Pure Technologies Inc. © 2014 Cactus Owner’s Manual Unit Status Viewport illuminated Brief flash or momentary Illumination Viewport not illuminated Possible Cause Unit treating Corrective Action No Action Required Ballast is attempting to start lamps but lamps will not stay lit. UV lamps have exceeded 12 months Replace lamps. UV lamps have not exceeded 12 months Inspect lamps for discoloration. If lamps discolored, replace both lamps & ballast. If lamps not discolored, unplug unit & plug it in again after 10 seconds. Reduce the number of starts & stops on the unit – replace lamps. Voltage drops may cause ballast to cut out. Unplug unit and plug in again. No power to unit Check receptacle or GFI. Door safety switch not engaged Close front carriage door. Ballast expired Replace ballast. Confirm TVSS is installed and operating. Inspect lamps - if lamps discolored, they must be replaced as well. Water leaking onto unit Inspect unit and replace damaged components. Replace lamps. Note: If lamps discolored, ballast must be replaced as well. 5. Maintenance Replacing and Cleaning UV Lamps The system contains two ultraviolet (UV) lamps that emit high-intensity UV light in the germicidal frequency range, providing effective disinfection of the water flowing through the unit. The lamps will lose UV intensity over time and should be replaced every 12 months. It is recommended to run the UV lamps continuously since frequent starts and stops will accelerate the lamp expiration. The lamps can be easily replaced in minutes. Draining the system or removing it from the wall is not required. See Figure 3. Caution: The lamps in the unit emit ultraviolet (UV) light that can cause permanent damage to the skin and eyes. Never look at a lamp when it is operating. Always unplug the unit before replacing lamps. Caution: Never touch the bulb (transparent quartz portion) of a lamp with your fingers. Handle the lamp by its ceramic ends only. If the surface of the lamp becomes dusty or dirty, use a clean, lint-free cloth and some rubbing alcohol to remove the dirt. For more difficult stains such as water spots, use a scale remover to remove the stain and then rubbing alcohol afterward. The lamps are fragile and must be handled with care. Released on 1-May-14 - Z800011G Page 17 UV Pure Technologies Inc. © 2014 UNPLUG UNIT BEFORE REPLACING LAMPS BOTTOM COVER FRONT PANEL ASSEMBLY UV LAMP WING NUTS FACES OUT UV TOP COVER www.uvpure.com FACES IN LAMP SOCKETS USE A SCREW DRIVER TO PRY LAMP UP HERE NOTE: DO NOT TWIST/TURN THE LAMPS WHILE PINS ARE ENGAGED Cactus Owner’s Manual Figure 3 Tool Needed Slotted screwdriver Step 1: Remove the top and bottom cover by pulling each side of the plastic cover outward from the system. When the top cover is removed, you will see two wing nuts that secure the front carriage door. Loosen the wing nuts so that the front carriage can be tilted forward to reveal the lamps. Lower the front carriage until it comes to a stop at 45 degrees. Step 2. CAUTION: The lamps are very hot after continuous use and can burn Released on 1-May-14 - Z800011G Page 18 UV Pure Technologies Inc. © 2014 Cactus Owner’s Manual your skin on contact. Allow lamps to cool for five minutes before removing them. Slowly lift the old lamps out of the system. Do not twist the lamps as they are being removed. To help remove the lamps, insert a flat bladed screwdriver between the lamp base and its socket and lightly pry the lamps upward (see Figure 3). Dispose of the old lamps in the same way you would dispose of ordinary fluorescent lamps. Note that old lamps should be disposed of at a household waste management depot or transfer station; contact your local recycling and waste management authority for proper disposal procedures. Step 3: Install the new lamps into the unit, being careful not to touch the bulb. Ensure that the lamps are aligned with the “Stop Sign” printed on the top ceramic facing inward (towards quartz sleeve). If you can see the stop sign, the lamps are backward (See Figure 3). Once the pins of the lamp begin to engage into the lamp socket, push firmly down on the top of the lamp. Do not twist the lamps when they are inserted. The lamp will come to rest when the pins are fully seated into the socket. When pressing down, be sure to position the lamp ceramic end in the center of the hole in the lamp holders. Repeat this for the other side. Step 4: Return the front panel to the upright position and secure it by tightening the wing nuts. Replace the plastic covers. Step 5: Plug in the Cactus. The Lamp On viewport will be illuminated indicating that the lamps are energized and functioning. Note the date of lamp replacement. Draining the Unit The UV system does not require draining for routine operation or lamp replacement. Draining is necessary to disassemble the system, to protect against freezing or to remove poor-quality water. Step 1: Shut off the water supply. Step 2: Unplug the system. Step 3: Place a bucket under the unit to collect the water. Step 4: Open a faucet downstream of the unit. Step 5: If you have installed an optional drain valve, open the drain valve. If you do not have an optional drain valve, disconnect the water pipe below the unit and allow the system to drain for a few minutes. Step 6: When draining is complete, close the drain valve or reconnect the pipe. Step 7: Close any faucets that were previously opened. Cleaning the Unit If the quartz water column becomes fouled due to water chemistry that is outside Released on 1-May-14 - Z800011G Page 19 UV Pure Technologies Inc. © 2014 Cactus Owner’s Manual normal specified ranges, follow the steps below to inspect the quartz and for quartz cleaning. Caution: Always unplug the system before performing any maintenance. Never operate a system unless the front panel is completely secured. Tools Needed Slotted screwdriver Adjustable wrench or a 7/16” open end wrench or deep socket wrench driver Inspection Procedure for Quartz Sleeve Step 1: Unplug the unit. Step 2: Remove the plastic covers by pulling each side of the cover outward from the unit, and loosen the wing nuts holding the front carriage. Step 3: Tilt the front carriage open until it comes to rest at a 45 position. Step 4: Examine the quartz sleeve visually. If it is clean, no disassembly is required. Return the front panel to the upright position and tighten wing nuts. Plug in the unit and operate as normal. If the quartz sleeve is dirty on the outside, proceed to wipe it down with a clean, lint-free cloth and rubbing alcohol to remove the dirt. If the quartz sleeve is dirty on the inside, proceed with in-place cleaning or disassembly. Caution: The quartz sleeve can break or chip if mishandled. Always handle it with care and keep it in a safe place if it is removed from the unit. Do not strike the quartz sleeve with any tool, since even the smallest chip can cause it to break under pressure. In-place Cleaning There are instances where water chemistry outside minimum specification ranges requires manual quartz cleaning. This procedure will clean the quartz without its removal from the unit. This is a quick and easy procedure that works well in most cases. Step 1: Fill a bucket or container with water before shutting off the water supply since you will need the water later to clean the quartz sleeve. A squeeze bottle is useful for applying water or cleaning solution to the inside of the quartz sleeve. Step 2: Unplug the system and open the front panel so that it is tilted forward to reveal the lamps. Lower the front panel until it comes to rest at a 45 position. Released on 1-May-14 - Z800011G Page 20 UV Pure Technologies Inc. © 2014 Cactus Owner’s Manual PULL OUTWARDS AND LIFT REMOVE TOP COVER LOOSEN WING NUTS QUARTZ REMOVE BOTTOM COVER Figure 4A (Recommend inspecting quart sleeve every three months.) Step 3: Place another bucket under the unit and drain the unit until there is about 1” (3cm) of water left in the quartz sleeve (see Draining the Unit). Step 4: Disconnect the top pipe connection. Step 5: Add about 2 oz. (60cc) of cleaning solution through the top opening. The cleaning solution can be a citric acid, vinegar or other non-hazardous slightly Released on 1-May-14 - Z800011G Page 21 UV Pure Technologies Inc. © 2014 Cactus Owner’s Manual acidic solution. Any solution used should be thoroughly rinsed out afterwards- do not allow any solution to enter the plumbing system. Fill the rest of the quartz with water. Step 6: Let the cleaning solution remain in the quartz for at least 10-20 minutes. Step 7: It may be helpful to manually clean the inside of the quartz tube with a bottle brush. Step 8: Drain the system and inspect the quartz sleeve. If clean, flush the unit with clean water. If fouling remains, repeat the cleaning procedure. Step 9: Once the unit is clean, reassemble the system. Step 10: Slowly open the water supply and check for leaks. Step 11: Replace all covers and plug in the Cactus. Disassembling the Unit NOTE: This procedure is not recommended for individual household users. Please contact your certified water specialist for assistance if disassembly is required. Released on 1-May-14 - Z800011G Page 22 UV Pure Technologies Inc. © 2014 Cactus Owner’s Manual 8 12 9 11 1 4 7 6 3 9 4 8 2 Figure 4B – UV unit (Exploded view of parts - for reference only) Released on 1-May-14 - Z800011G Page 23 UV Pure Technologies Inc. © 2014 Cactus Owner’s Manual CACTUS PARTS LIST ITEM NO. PART NO. X-8 PART NO. X-12 QTY. DESCRIPTION 1 R300207 E300165 1 LAMPS (SHIPPED IN PAIRS) 1 BALLAST 2 3 4 Z100001A Z400000 R400001 Z400006 1 2 5 Z400001 Z400009 1 6 Z400007 Z400008 1 QUARTZ SLEEVE REPLACEMENT KIT (INCLUDES 2 O-RINGS) TOP/BOTTOM SS MANIFOLD REPLACEMENT REFLECTOR KIT (SHIPPED AND SOLD IN PAIRS) CABINET DOOR FOR BALLAST ENCLOSURE 7 Z400003 1 DOOR SAFETY SWITCH KIT 8 R400017 2 TOP OR BOTTOM CAP 9 Z400004 1 10 R400033 1 11 650164 2 WING NUTS – ¼-20 12 650102 8 LOCKING NUTS, ¼-20 - R400007 1 - 150207 1 - Z400005 1 SEAL KIT (CONTAINS TWO O RINGS) LAMP SOCKET WIRE HARNESS 1” FLEXIBLE STAINLESS STEEL HOSE TRANSIENT VOLTAGE SURGE SUPRESSOR FOR 115V SYSTEMS ANTI-FOULING SYSTEM Figure 4B – Parts List Step 1: Fill a bucket or container with water before shutting off the water supply since you will need the water later to clean the quartz sleeve (3). A squeeze bottle is useful for applying water or cleaning solution to the inside of the quartz sleeve. Step 2: Place another bucket under the unit and drain the unit (see Draining the Unit). Step 3: Open the front panel. The lamps may be removed to prevent them from getting dirty or damaged. Step 4: Disconnect the pipe from the top of the system and remove the top quartz seal assembly. Caution: Do not damage the sealing surfaces of the end caps (4). Handle these parts with care to prevent water leaks. Released on 1-May-14 - Z800011G Page 24 UV Pure Technologies Inc. © 2014 Cactus Owner’s Manual Use an adjustable wrench or 7/16” box wrench or nut driver to remove the four fasteners, securing the top manifold, in an alternating pattern (top left, bottom right, bottom left, then top right). The bottom quartz seal assembly does not require removal to clean the quartz, so leave it in place. This will support the quartz sleeve during cleaning and simplify the overall process. Step 5: Remove the top quartz seal assembly (Figure 4C) by lifting it straight up. REMOVE & SUPPORT TOP QUARTZ SEAL ASSEMBLY REMOVE TOP O-RING LIFT QUARTZ SLEEVE OUT OF THE UNIT REMOVE BOTTOM O-RING REMOVE BOTTOM QUARTZ SEAL ASSY. (IF REQUIRED) Figure 4C Removing and Cleaning the Quartz Sleeve Step 1: Use a bottle cleaning brush with a long handle to scrub the inside of the Released on 1-May-14 - Z800011G Page 25 UV Pure Technologies Inc. © 2014 Cactus Owner’s Manual quartz sleeve. Scrub and flush it with water repeatedly to clean the quartz. Use a squeeze bottle to apply water or cleaning solution to the quartz sleeve to keep the area tidy. Note: Keep the rest of the system free from moisture. When cleaning is finished, re-examine the quartz sleeve. Step 2: If the quartz sleeve is still dirty, use a scale remover such as CLR or Lime Away and apply it to the inside of the quartz sleeve. Citric Acid, available at most drug stores, may also be effective. Always flush with clean water after cleaning. Do not allow any cleaning solution to enter the plumbing system. Step 3: Once the quartz is clean, reassemble the system (see Figure 4C). During reassembly, replace any seals that appear to have been damaged. Step 4: If the quartz is still not clean, it should be replaced. This is done by removing the bottom quartz seal assembly (see Figure 4C). Step 5: Remove the bottom quartz seal assembly by removing the four fasteners holding the bottom manifold on, in an alternating pattern (top left, bottom right, bottom left, then top right). Support the quartz sleeve as you remove this manifold. Step 6: Remove the quartz sleeve by removing the top and bottom O-rings. Lift the quartz sleeve out of the system. Step 7: Install the new quartz sleeve into the system and center it vertically. Be careful not to chip the ends of the quartz sleeve. You may open the front of the system to help align the quartz sleeve if necessary. Support the quartz for the next two steps. Step 8: Replace the top and bottom O-rings, keeping the quartz centered vertically in the unit. Step 9: Replace the bottom quartz seal assembly (see Figure 4D) by installing the four fasteners in an alternating pattern (top left, bottom right, bottom left, then top right). Ensure that the manifold connection port is at the backside of the unit. Reassembling the Unit Step 1: Ensure the quartz O-ring seal is in place around the quartz sleeve and then replace the top quartz seal assembly. Step 2: Tighten the fasteners in an alternating pattern. Step 3: Reconnect the pipes, both top and bottom. Close and fasten the front panel. Step 4: Close any faucets and open the water supply. Inspect for leaks. Repair any leaks if necessary. Caution: Do not operate the system if there are any leaks at the piping connections or within the UV system. Released on 1-May-14 - Z800011G Page 26 UV Pure Technologies Inc. © 2014 Cactus Owner’s Manual Step 5: Replace the lamps. Step 6: Reinstall the top and bottom covers. Step 7: Plug in the Cactus. Replacement Parts Use only genuine UV Pure Technologies’ parts when servicing your Cactus disinfection system. Failure to use genuine UV Pure Technologies’ replacement parts will void the factory warranty, and any laboratory validation and/or certification for water safety and system operating performance. Figure 4B shows a complete list of original factory parts. Replacement parts and service are available from your Installer, a Certified Service Dealer (CSD), or directly from UV Pure Technologies on our e-commerce site: www.uvpuredirect.com . A complete list of Certified Service Dealers and their coverage areas is available on UV Pure’s website: www.uvpure.com . Date of Purchase: Dealer Name: Model: Serial Number (located on the right side of the front panel below power cord entry): Released on 1-May-14 - Z800011G Page 27 UV Pure Technologies Inc. © 2014 Cactus Owner’s Manual 6. Service Record Sheet Record lamp replacement dates and events in the space provided below. Date (MMM/DD/YYYY) Action System Installed 7. Limited Warranty Limited Warranty for UV Pure Technologies’® water purification systems and peripheral parts purchased in Canada, the United States, Australia and New Zealand. What this warranty covers: Defects in materials and workmanship in Products and Parts manufactured by UV Pure Technologies Inc. (UV Pure) including Hallett® systems, Upstream® systems, Cactus™ systems and parts such as replacement UV lamps other original equipment manufacturer components such as manifolds or NEMA cabinets sold or certified by UV Pure Technologies Inc. What the period of coverage is for UV Pure Products and Parts: Five-year Limited Warranty for structural, hardware, and mechanical components. Specifically, this includes the following UV Pure Parts: system casing (powder coated steel parts, machined and extruded aluminum parts, stainless steel parts, and ABS molded components), stainless steel and CPVC manifolds, NEMA cabinets, welded steel skids and structural components, stainless steel selfcleaning mechanism, mechanical fasteners, and stainless steel flexible connector hoses. Released on 1-May-14 - Z800011G Page 28 UV Pure Technologies Inc. © 2014 Cactus Owner’s Manual Three-year Limited Warranty for electrical components, reflectors, and quartz sleeve. Specifically, this includes the following UV Pure Parts: wiper motor, air blowers, circuit boards, ballast and micro-processor with digital display, wiring harnesses, lamp sockets, reflectors, quartz sleeve, and remote monitor (excluding any battery if included). One-year Limited Warranty for lamps, sensor probes, and remote lamp replacement reminder alarm. Specifically this includes the following UV Pure Parts: UV lamps, UV sensors and the circuit board they are mounted in, temperature probes, purge valves, and the remote lamp replacement reminder alarm. One –year Limited Warranty for all replacement lamps Ninety-day Limited Warranty or Balance of Original Warranty for replacement Parts or Products. Specifically this includes any UV Pure Parts or Products replaced or repaired under this Limited Warranty, and any Parts purchased for routine service or maintenance. This warranty period is for balance of the original warranty or for 90 days from the date the Product or Part is repaired and/or returned to the first end-user whichever is longer. An exception is all replacement lamps that are covered for one year from date of replacement. Who is covered: This Limited Warranty extends to you only if you are the FIRST END-USER PURCHASER and with respect to the ORIGINAL INSTALLATION; the warranty period shall commence upon the Date of Purchase. What we will do to correct problems covered by this Limited Warranty: During the warranty period, as set out above, UV Pure will repair or replace Products or Parts, at its sole discretion and cost, with the exception of shipping and handling charges. UV Pure may require that certain failed part be returned to UV Pure within 45 days for analysis and to facilitate continuous improvement; for example, circuit boards and sensors that fail must be returned to UV Pure. Replacement parts or systems may be functionally equivalent reconditioned/refurbished/pre-owned or new products or parts at UV Pure’s sole discretion. UV Pure may provide software updates, at its discretion, but is under no obligation to do so. Based on an agreement between UV Pure and its service providers, Certified Service Dealers, this warranty will be honoured by either UV Pure or a Certified Service Dealer. In North America, based on an agreement between UV Pure and its service providers, Certified Service Dealers, this warranty will be honoured by either UV Pure or a Certified Service Dealer. Outside North America UV Pure has appointed Distributors that will honour this warranty and that provide service directly or via local Certified Service Dealers. Released on 1-May-14 - Z800011G Page 29 UV Pure Technologies Inc. © 2014 Cactus Owner’s Manual How to get help: Call a Certified Service Dealer (CSD) or UV Pure’s Customer Service toll free line: 1-888-407-9997. A complete list of Certified Service Dealers and their coverage areas is available on UV Pure’s website: www.uvpure.com. Or, email UV Pure’s Customer Service Center: [email protected]. What this Limited Warranty does NOT cover: Maintain your original PROOF OF PURCHASE. UV Pure or its Certified Service Dealers reserve the right to deny warranty coverage if you cannot provide proof of original purchase including date of purchase, who you purchased the Product or Part from, and serial number. USE OF REPLACEMENT UV LAMPS THAT ARE NOT ORIGINAL UV PURE EQUIPMENT WILL VOID THIS WARRANTY. USE OF REPLACEMENT UV LAMPS THAT ARE NOT ORIGINAL UV PURE EQUIPMENT WILL INVALIDATE CERTIFICATION TO OR BY NSF, MENV, EPA, AND OTHER VALIDATION PROTOCOLS AND CERTIFYING BODIES. All UV lamps lose power over their usable lifetime; original equipment UV Pure lamps are engineered and tested to ensure that all of our systems achieve the minimum power for disinfection specified, at the end of lamp life. Lamps that are not made by, or that are not approved by UV Pure may not meet those same high standards. Of course UV Pure performs rigorous testing of its systems and original equipment components to its own high quality control standards, and external testing and certification protocols are performed with original equipment UV Pure lamps. NON-ORIGINAL EQUIPMENT UV LAMPS have not been approved by certifying bodies, thereby invalidating those tests and certifications. If you have a question as to whether UV Pure lamps are original equipment, please call our Toll Free Customer Service line at: 1-888-407-9997. UV Pure may source and supply equipment that is manufactured and warrantied by other companies (the Original Equipment Manufacturer) and offered as options in conjunction with UV Pure’s Products and Parts. For example: heaters or AC units used in NEMA cabinets, solenoid shut-off valves, filter housings and inserts, UPS power supplies, and on-line instrumentation or web-enabling communications equipment. Warranties for those components are solely the responsibility of the Original Equipment Manufacturer, and NOT UV Pure. UV Pure uses reasonable efforts to ensure that OEM options are of the highest quality possible and consistent with UV Pure’s high standards. UV Pure is not responsible for Parts or Products that are improperly installed, used and/or not maintained as set out in the Product Manual or as expressly advised by UV Pure. This Limited Warranty does not cover damage caused by accidents, acts of God, minor scratches or imperfections and normal wear and tear. This Limited Warranty is void if the Product is improperly installed, used in conditions that exceed UV Pure’s specifications as set out in the Manual or Released on 1-May-14 - Z800011G Page 30 UV Pure Technologies Inc. © 2014 Cactus Owner’s Manual Product Specifications, or if there is water damage due to improper installation or poorly or improperly tightened plumbing connections. This Limited Warranty is void if the Product or Parts have been altered or modified in any way by anyone other than a UV Pure technician or a Certified Service Dealer. Warranty coverage may be void if the Product is operated in combination with ancillary or peripheral equipment not approved by UV Pure for use with the Products. UV Pure’s water purification systems are technically advanced. Certain models include UV sensors that monitor treatment effectiveness via on-board computers. Like all computers, they may be sensitive to fluctuations in the power grid, like surges or brown outs. UV Pure supplies Tranient Voltage Surge Protectors (that have been certifed to UL1449 standard or equivalent) with its Hallett and Upstream models in North America to help protect against damage from power fluctuation. Those models must be plugged into the supplied protectors in North America, and into equivalent protectors outside North America (not supplied with systems in those markets). Failure to install voltage protection in Hallett or Upstream installations will void warranty coverage. UV Pure highly recommends that all installations of its systems incorporate voltage protection. This Limited Warranty excludes the cost of labour in removing and/or reinstalling any defective Product or Part. In the event that a Product is returned to UV Pure for repair or replacement under the terms of this Limited Warranty, the Product must be returned in its original shipping container and packaging. UV Pure will not be liable for damage to the Product during shipping otherwise. UV Pure does not assume any liability for personal injury or property damage caused by the use or misuse of any Product or Part. UV Pure is not liable for special, incidental, indirect or consequential damages. UV Pure’s liability is limited to repair or replacement of the defective Part or Product and this liability shall terminate upon the expiration of the applicable warranty period as set out above. This Limited Warranty may be amended or changed at any time, at UV Pure’s sole discretion, without notice. UV Pure offers inspection and refurbishing for older systems. To assist our customers, UV Pure’s certified technicians can provide inspection, recommendations, cost estimates, and complete refurbishing of older systems that may be out of warranty. TO THE EXTENT PERMITTED BY APPLICABLE CONSUMER PROTECTION LAWS, ANY WARRANTIES PROVIDED FOR HEREIN ARE IN LIEU OF ANY OTHER WARRANTY, AND ALL OTHER WARRANTIES ARE HEREBY DISCLAIMED, WHETHER EXPRESS OR IMPLIED. The information contained in this document is subject to change without notice. UV Pure Technologies Inc. shall not be liable for errors contained herein or for consequential damages from improper installation or operation of this unit. Released on 1-May-14 - Z800011G Page 31 UV Pure Technologies Inc. © 2014 UV Pure Technologies Inc. 60 Venture Drive, Unit 6 Toronto, Ontario M1B 3S4 www.uvpure.com