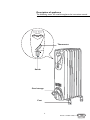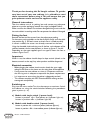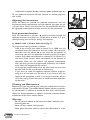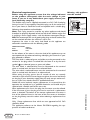
1
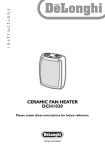
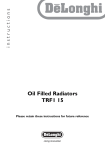
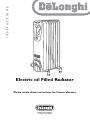
instructions
Electric oil Filled Radiator
Please retain these instructions for future reference
Description of appliance
The following terms are used throughout the instruction manual
Thermostat
Switch
Cord storage
Feet
2
Electric oil filled radiator
Thank you for choosing this De’Longhi radiator. To get the
very best out of your new radiator it is advisable to read
these instructions before using it.This will ensure that you
gain optimum results and use the appliance safely.
General instructions
Take the radiator out of its packing box and remove any polstyrene
pieces or any other packaging material that might be lodged inside it.
Make sure that the radiator has not been damaged during transit and that
the mains cable is in working order.Do not operate the radiator if damaged.
fig. 1
Fitting the feet
Remove the feet and the castors from the polystyrene packing.
Fit the castors to the spindles on the feet and push firmly until they click
into position (fig. 1). Pull each castor to check that it is fitted correctly.
In certain models, the castors are already mounted on the feet.
Using the threaded u-bolt and wing nuts, fit the feet to the bottom of the
radiator between the last two elements as shown in figures 2, 3 and 4.
Depending on the type supplied, type A or type B, mount the feet as
shown in figure 5 or 6.
fig. 2
Important
When in use, the radiator should always be kept vertical (wheels at the
bottom, controls at the top).Any other position could be dangerous!
Electrical connection
- Before plugging the radiator into the mains, check that your supply
voltage is the same as that shown on the rating plate of the appliance.
- If using more than one radiator at a time, it is important to ensure
that the ring main is adequate to cope with the power requirements.
- It is important to ensure that the socket is adequately earthed.
- This radiator complies with EEC Directive 89/336 relating to electromagnetic compatibility.
fig. 3
Switching on
Plug into the mains socket.Turn the thermostat to maximum. Switch
the radiator on using the switch/switches following the procedures
given in points a) - b).
fig. 4
A
a) Models with single switch (1 power level):
-button in position «I» = Total power on (indicator light on);
-button in position «O» = (indicator light off)
b) Models with double switch (3 power levels)
-button in position «l» = minimum power (indicator light on);
-button in position «ll» = intermediate power (indicator light on);
fig. 5
Electric oil filled radiator
3
-both buttons in position «l» «ll» = maximum power (indicator lights on)
To turn appliance off, switch off both switches or remove plug from
wall socket.
B
Adjusting the thermostat
*
Arrow indicator
With the thermostat in position
and the switches pressed, the
appliance maintains the room at a temperature of about 5˚C, preventing freezing with minimum energy consumption.
Single
notch
16 15 14
17
18
19
fig. 7
22 21 20
4
1
Electric oil filled radiator
2
- Do not use your radiator in the vicinity of showers, bathtubs, sinks,
swimming pools etc.
- Never use your radiator to dry laundry.
- Never place the power cable on top of the radiatorwhile it is hot.
3
Warnings
7
4
Before carrying out any maintenance, unplug the radiator from the mains
and wait for it to cool. The oil-filled electric radiator requires no particular maintenance. It is sufficient to remove the dust with a soft, dry cloth.
Never use abrasive powders or solvents. If necessary remove concentrated areas of dirt with a vacuum cleaner.
8
5
Cleaning and Maintenance
10 9
6
Operating
time
c) Models with a 24 hour time-clock (fig. 7)
To programme heating, proceed as follows:
- Look at the time on your clock or watch. If it is 10.00, turn the
numbered timer disk clockwise until the number 10 on the disk
coincides with the pointer ▲ on the timer. Set the periods of
time when you want the appliance to work by pushing the teeth
inwards. Each tooth corresponds to a period of 15 minutes.This
will leave visible sectors which correspond to the periods of
operation. When set, the radiator will operate automatically
each day during the times programmed (important: the radiator
must always be plugged into the socket).
- To change the programming, move the teeth back into the initial
position and set the new periods of functioning.
- If you want to make the appliance operate without programming, push all the teeth into the centre. In this case, to turn the
appliance off completely, as well as turning the switches off, you
must also unplug it from the mains to avoid continued operation
of the timer.
11
13
12
23
Frost protection function
fig. 6
24
When the room has reached the required temperature, turn the
thermostat slowly anticlockwise until the indicator light goes out (or
until you hear a "click") and no further.The set temperature will then
be regulated automatically and kept constant by the thermostat.
- Only use the heater in an upright position.
- The heater must be positioned at least 50cm from furniture or
other objects.
- If the supply cord is damaged, it must be replaced by the manufacturer, its service agent or similarly qualified persons in order
to avoid a hazard.
- It is normal for the heater to make 'crackling' noises during the first
time it is switched on (or in the case of infrequent use)
- The body of your radiator is filled with an exact quantity of oil. If
repairs are necessary which call for the opening of the radiator, they
must be done only by the manufacturer or an authorised service
centre. In the unlikely event of oil leakage, contact the manufacturer
or an authorised service centre.
- Do not use your radiator in rooms which have an area smaller than
4m2 as this may lead to overheating.
- The heater must never be placed immediately under a fixed mains socket.
- When scrapping the appliance, respect legislation on the disposal of oil.
- The use of an extension lead is not recommended, however if it is
neccessary then follow carefully the extension lead’s instructions, and
most importantly ensure that the extension lead is correctly rated in
accordance with the heater being used and NEVER overloaded.
- As with any electrical appliance, whilst the instructions aim to cover
as many eventualities as possible, caution and common sense should
be applied when operating your appliance, particularly in the vicinity
of young children.
ATTENTION: in order to avoid any danger caused by an accidental
resetting of the safety system, this appliance must not be powered
through an external timer.
WARNING: In order to avoid overheating, never under
any circumstances cover the appliances during operation.
If this recommendation is not respected, a safety device will
turn the radiator off. To reset, contact the technical assistance service.
IMPORTANT INFORMATION FOR CORRECT DISPOSAL OFTHE
PRODUCT IN ACCORDANCE WITH EC DIRECTIVE 2002/96/EC.
At the end of its working life, the product must not be disposed
of as urban waste. It must be taken to a special local authority
differentiated waste collection centre or to a dealer providing
this service.Disposing of a household appliance separately avoids
possible negative consequences for the environment and health
deriving from inappropriate disposal and enables the constituent materials to be recovered to obtain significant savings
in energy and resources.As a reminder of the need to dispose of household appliances separately, the product is marked with a crossed-out wheeled dustbin.
Electric oil filled radiator
5
Electrical requirements
Before using this appliance ensure that the voltage indicated
on the product corresponds with the main voltage in your
home, if you are in any doubt about your supply contact your
local electricity company.
The flexible mains lead is supplied connected to a B.S. 1363 fused plug
having a fuse of 13 amp capacity. Should this plug not fit the socket outlets in your home, it should be cut off and replaced with a suitable plug,
following the procedure outlined below.
Note: Such a plug cannot be used for any other appliance and should
therefore be properly disposed of and not left where children might find
it and plug it into a supply socket - with the obvious consequent danger.
N.B. We recommend the use of good quality plugs and wall sockets that
can be switched off when the machine is not in use.
important: the wires in the mains lead fitted to this appliance are
coloured in accordance with the following code:
Warning - this appliance
must be earthed
Green and Yellow to Earth
13 amp
Fuse
Blue to
Neutral
Brown
to Live
Cord Clamp
As the colours of the wires in the mains lead of this appliance may not
correspond with the coloured markings identifying the terminals in your
plug, proceed as follows:
The wire which is coloured green and yellow must be connected to the
terminal in the plug which is marked with the letter E or by the earth
symbol
or coloured green or green and yellow.
The wire which is coloured blue must be connected to the terminal
which is marked with the letter N or coloured black.
The wire which is coloured brown must be connected to the terminal
which is marked with the letter L or coloured red.
When wiring the plug, ensure that all strands of wire are securely
retained in each terminal. Do not forget to tighten the mains lead clamp
on the plug. If your electricity supply point has only two pin socket outlets, or if you are in doubt, consult a qualified electrician.
Should the mains lead ever require replacement, it is essential that this
operation be carried out by a qualified electrician and should only be
replaced with a flexible cord of the same size.
After replacement of a fuse in the plug, the fuse cover must be refitted.
If the fuse cover is lost, the plug must not be used until a replacement
cover is obtained. The colour of the correct replacement fuse cover is
that of the coloured insert in the base of the fuse recess or elsewhere
on the plug. Always state this colour when ordering a replacement fuse
cover.
Only 13amp replacement fuses which are asta approved to B.S. 1362
should be fitted.
This appliance conforms to the Norms EN 55014 regarding the suppression of radio interference.
Electric oil filled radiator
6
5708013300/03.06
GREEN ANDYELLOW EARTH
BLUE
NEUTRAL
BROWN
LIVE