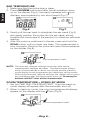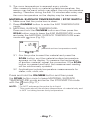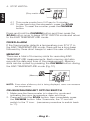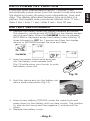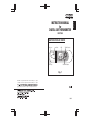
1
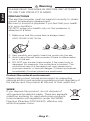
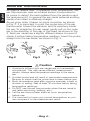
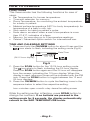
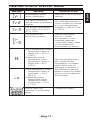
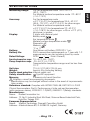
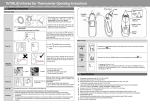
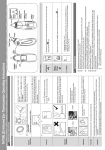
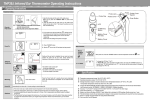
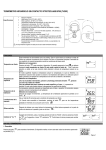
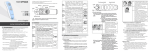
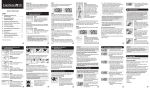
REF CT830
IDENTIFICATION OF PARTS
Probe lens
Probe
LCD
Probe Cap
"SCAN" button
"ON/MEM" button
Fig. 1
CITIZEN is a registered trademark of Citizen Holdings Co., Japan.
CITIZEN es una marca registrada de Citizen Holdings Co., Japón.
Design and Specification are subject to change without notice.
0801
English
INSTRUCTION MANUAL
for
DIGITAL EAR THERMOMETER
Warning
English
PLEASE READ THIS MANUAL BEFORE ANY ATTEMPT
TO USE THIS PRODUCT IS MADE.
PRECAUTIONS
The ear thermometer must be inserted correctly to obtain
correct temperature measurement.
Be sure to consult a physician if you feel that your health
is in poor condition.
DO NOT judge your health only on the presence or
absence of a fever.
1. Make sure that the probe lens is always clean.
KEEP PROBE LENS CLEAN
GOOD
NOT GOOD
2. Very carefully and gently insert the probe into the ear.
3. Avoid using the ear thermometer if there is inflammation
on or in the ear.
4. DO NOT use the ear thermometer if the main body is
damaged (for example, the probe lens is broken). The
continuous use of a damaged unit may cause injury,
improper results, or serious danger. Contact a physician
immediately if broken pieces are swallowed.
Protect the natural environment:
Please help protect natural environment by respecting
national and/or local recycling regulations when disposing of
the battery and the product at the end of their useful live.
WEEE
If you dispose this product, do not dispose of
with general household waste. There are separate
collection systems for used electronics products
in accordance with legislation under the WEEE
Directive (Directive 2002/96/EC), effective only
within European Union.
- Eng 2 -
- Eng 3 -
English
Caution
1. The body temperature measured in the ear may differ
from measurements taken under the armpits, in the
mouth, or in the rectum. Therefore, comparing them will
not be of value. Take temperature readings periodically
to determine the normal ear temperature measurement
with this instrument, then use that reading as the basis
for comparison with any measurement taken when you
suspect a fever.
2. Do NOT use this thermometer for measurements other
than as specified. This thermometer is designed for ear
measurement. Room temperature and material surface
temperature readings are approximate and are only for
reference.
3. Do NOT immerse the ear thermometer in water or any
other liquid and do NOT allow the unit to come into
contact with chemical solvents.
4. Do NOT drop the ear thermometer and do NOT
expose the ear thermometer to heavy shock. The ear
thermometer is not shock-protected.
5. Do NOT bend the ear thermometer.
6. Do NOT disassemble the unit, do NOT make any
modifications to it, and do NOT touch the circuitry.
7. Do NOT store the unit under the direct sunlight, do NOT
store it at high temperatures, and do NOT store it in areas
with a high degree of humidity and/or dust.
8. Do NOT boil the probe.
9. Do NOT use the ear thermometer if it operates irregularly
or shows signs of malfunction.
10. Do NOT use thinner or benzene to clean the ear
thermometer.
11. When removing the ear thermometer from storage at low
temperatures, place it in a warm area for 5 to 10 minutes
before use.
12. Keep the ear thermometer out of the reach of children.
13. Wipe the ear thermometer clean before storing.
English
About Ear Thermometers
All objects radiate heat. To measure body temperature, this
ear thermometer uses an infrared sensor incorporated in
its probe to detect the heat radiated from the eardrum and
the area around it. In general the ear canal (external auditory
canal) of an infant is relatively straight.
As we grow older, it takes on some curvature, as shown
in Fig. 2. It is important to point the probe lens of the ear
thermometer toward the eardrum and its periphery inside
the ear. To straighten the ear canal, gently pull on the outer
ear in the direction of the rear of the head, as shown in Fig.
3. Each ear canal has a slightly different shape, be sure to
check it before taking temperature readings. Insert the probe
straight into the ear canal, as shown in Fig. 4.
Fig.2
Fig.3
Fig.4
Caution
1. A person’s left and right ear canals are not necessarily
symmetrical. This may cause different measurement
results. Always take temperature readings in the same
ear.
2. A soiled probe lens will result in inaccurate measurement.
Be sure to check that the probe lens is clean before use.
3. Body temperature rises after vigorous exercise, a bath or
shower, or eating. Wait at least 30 minutes before taking
temperature readings.
4. Do NOT use the ear thermometer when the ear canal is
wet (after swimming, bathing, etc.).
5. Let the ear thermometer stand at room temperature
before use.
6. It is important to know your normal temperature so you
can compare it to the measurement result.
- Eng 4 -
FUNCTIONS
This thermometer has the following functions for care of
users.
• Ear Temperature: for human temperature.
• Time and calendar: for memory.
• Room Temperature: for monitoring the ambient temperature
for a baby or patient.
• Material surface temperature (NOT for body temperature): for
temperature of a baby's milk, etc.
• Stop watch: for taking a patient's pulse.
• Fever alarm: an alarm when a user's temperature is more
than 37.5°C, indicative of a fever.
• Memory: for recording up to 9 temperature readings.
• Celsius / Fahrenheit option switch: for international use.
TIME AND CALENDAR SETTINGS
1. Press and hold the ON/MEM button for about 5 sec and the
icon starts to flash, indicating the setting mode (Fig.5).
Date/Time
(24/12-hour display)
Fig.5
2. Press the SCAN button for the 12/24-hour setting mode.
The
icon starts to flash, indicating the 24-hour display.
Press the SCAN button again and the 24 icon will disappear
from the screen, indicating the 12-hour display. When this
display is used, afternoon times will be indicated with the PM
icon. Press the SCAN button to toggle between the 12 and
24-hour displays.
3. Press the ON/MEM button to cycle the flashing icons in the
sequence below to select the respective setting.
hoursminutessyearsmonthsdaysleave the setting screen
While the setting section is flashing, press SCAN button to
change the numbers. If no buttons are pressed in the
setting mode for 8 seconds, the display automatically
returns to the EAR TEMPERATURE mode.
- Eng 5 -
English
HOW TO OPERATE
English
EAR TEMPERATURE
1. Make sure that the probe lens is clean.
2. Press ON/MEM button and after the all indicators show
up on the display (Fig.6), the ready message with icon
displays, accompanied by two short beeps (Fig.7).
Fig.6
Fig.7
3. Gently pull the ear back to straighten the ear canal (Fig.3)
and gently position the probe into the ear canal, aiming
towards the membrane of the eardrum to obtain an accurate
reading.
4. After the probe is positioned in the ear, press and hold the
SCAN button until you hear one beep. The measurement is
now complete. Remove the probe and read the temperature
on the display (Fig.8).
(Ear temperature mark)
Fig.8
NOTE: The time and calendar settings should be done before
measurement readings are taken. The thermometer always
shuts off automatically in about one minute and the stand-by
mode display (room temperature and date/time) will be shown.
Without the time and calendar settings, the display will not show
any indications after the thermometer shuts off. Pressing the
buttons will NOT shut off the thermometer.
ROOM TEMPERATURE = STAND-BY MODE
1. Set the TIME AND CALENDAR FIRST. Then the stand-by
mode display will appear after the automatic shut-off.
2. When in stand-by mode, the room temperature will always
appear on the display with the
icon (Fig.9).
(Room temperature mark)
Fig.9
- Eng 6 -
MATERIAL SURFACE TEMPERATURE / STOP WATCH
1. Make sure that the probe lens is clean.
2. Press ON/MEM button to enter the EAR TEMPERATURE
mode.
3. MATERIAL SURFACE TEMPERATURE:
Press and hold the ON/MEM button and then press the
SCAN button once to leave the EAR EMPERATURE mode
and enter the MATERIAL SURFACE TEMPERATURE scan
icon (Fig.10).
mode with
(Material surface temperature mark)
Fig.10
3.1 Aim the probe torward the material and press the
SCAN button, and the material surface temperature
appears on the display. To measure the temperature
of another material, repeat the procedure. If the SCAN
button is pressed and held, the measurement reading
will be continuously updated.
3.2 Applications include temperature measurements for
water, milk, cloth, etc.
Press and hold the ON/MEM button and then press
the SCAN button once to leave MATERIAL SURFACE
TEMPERATURE mode and enter the STOPWATCH mode
with the
icon (Fig.11).
NOTE: * Do NOT submerge the probe tip in liquid.
* This mode shows the surface temperature of material only and
is NOT for taking human body temperature.
- Eng 7 -
English
3. The room temperature is renewed every minute.
After measuring body or material surface temperature, the
sensor may be warm which may affect the room temperature
reading. Therefore during the first 15 minutes after every use,
the room temperature on the display may be inaccurate.
English
4. STOP WATCH:
(Stop watch mark)
Fig.11
4.1 This mode counts from 0.01sec to 3 minutes.
4.2 To start and stop the stopwatch, press the SCAN
button. To reset the counter, press the ON/MEM
button.
Press and hold the ON/MEM button and then press the
SCAN button once to leave STOP WATCH mode and return
to the EAR TEMPERATURE mode.
FEVER ALARM
If the thermometer detects a temperature over 37.5°C in
the EAR TEMPERATURE mode, there will be a long beep
followed by three short beeps to warn the user of a fever.
MEMORY
There are a total of 9 memory slots for recording EAR
TEMPERATURE measurements. Each memory slot also
records the date and time of the measurement. Memory
slots can be cycled by pressing the ON/MEM button during
the EAR TEMPERATURE mode (Fig.12).
(Memory mark)
Fig.12
NOTE: Even when a Memory slot is being displayed, users can measure
ear temperature.
CELSIUS/FAHRENHEIT OPTION SWITCH
1. Make sure the thermometer is in stand-by mode and
indicating the room temperature, date, and time.
2. Press and hold the SCAN button, then immediately press
the ON/MEM button. After 3 seconds, the °C icon will
switch to the °F icon. (use same procedure to switch back
to °C).
- Eng 8 -
If this unit is left unattended for about 1 minute, it will
automatically power down from the current mode and enter
the stand-by mode, showing room temperature, time, and
date. The display alternates between time and date in a
pattern that repeats every minute as follows: time 11 sec /
date 4 sec / time 11 sec / date 4 sec / time 30 sec.
BATTERY REPLACEMENT
1. Replace the battery when the display behaves as follows:
The stand-by mode shows NOTHING on the display except
the time and date. When the ON/MEM button is pressed,
NOTHING is displayed except the battery mark blinking 12
times followed by OFF for 1 second and then the display
returns to NOTHING except the time and date.
s
ON/MEM
s
s
s
2. Insert a pointed object such as a pen
into the battery cover access hole
(Fig.13) while using your thumb to push
the battery cover out.
Fig.13
3. Hold the device and pry the battery out
with a small screwdriver (Fig.14).
Fig.14
4. Insert a new battery (CR2032) under the metal hook and
press down on the battery until you hear a click. The positive
(+) side should be up and the negative (-) side should be
down.
5. Replace the battery cover.
- Eng 9 -
English
AUTO POWER OFF FUNCTION
English
Caution
1. Remove and then reinstall the battery if the Er message
is displayed, if the display is abnormal, or if nothing is
displayed when the ON/MEM button is pressed.
2. To protect the environment, dispose of the used battery
according to local regulations.
3. Remove the battery if the ear thermometer will not be
used for a long time.
4. Keep the battery away from children.
CARE AND CLEANING, STORAGE
The probe is the most delicate part of the thermometer.
Use caution when cleaning the probe lens to avoid damage.
Holding the thermometer too long may cause the probe
to make a higher ambient temperature reading. This could
make the body temperature measurement lower than usual.
• After each use, clean the probe and probe lens with a cotton
swab or soft cloth moistened with 70% alcohol.
• Let the lens fully dry for at least 30 minutes.
• Keep the unit dry and away from where it might be exposed
to moisture, liquids, direct sunlight, high temperature, high
humidity, or excessive dust.
• Storing the thermometer at 10 to 40°C (50 to 104°F) allows
you to measure body temperature at any time. Storing
the thermometer below or above this temperature range
may cause it to display Er 3. In such a case, leave the
thermometer at 10 to 40°C (50 to 104°F) for at least 30
minutes before taking a measurement reading.
- Eng 10 -
DESCRIPTION OF DISPLAY MARK
Meaning
Measurement before
device stabilization.
The device showing a
rapid ambient temperature
change.
The ambient temperature
is not within 10 to 40°C
(50 to 104°F).
The system is not
functioning properly.
(1) Ear temperature mode:
Temperature taken is
higher than + 42.2°C
(108°F).
(2) Material surface
temperature mode:
Temperature taken is
higher than + 80°C
(176°F).
(1) Ear temperature mode:
Temperature taken is
lower than + 34°C
(93.2°F).
(2) Material surface
temperature mode:
Temperature taken
is lower than - 22°C
(- 7.6°F).
Device cannot be
powered on to the ready
stage.
- Eng 11 -
Corrective action
Wait until all the icons stop
flashing.
Allow the thermometer to
rest for at least 30 minutes
at a room temperature
between 10 and 40°C (50
to 104°F)
Remove the battery,
wait for 1 minute,
and reinsert it. If the
message reappears,
contact the retailer where
you purchased the
thermometer for service.
The thermometer might
have measured the
temperature of a nearby
object that it was not
designed to measure. If
the malfunction persists,
please contact the retailer
where you purchased the
thermometer.
Change the battery.
English
Message
English
Questions and Answers
Q1: Why is temperature measured in the ear different
from measurements taken under the armpit, in the
mouth, or in the rectum?
A1: Temperatures of different parts of body may vary. Compare
the measurement in question with a normal temperature
previously taken in the same ear.
Q2: The temperature differs each time I take a
measurement. Why? What can I do?
A2: Your method for straightening the ear canal may be
inconsistent, the way you insert the probe may be not
consistent, or you may be taking a second measurement too
soon. Pull the ear rearward to straighten ear canal, then very
gently insert the probe into the ear canal for measurement.
Once a measurement is taken, the temperature in the ear will be
affected. Therefore, wait at least 1 minute before taking another
measurement.
Q3: Can I measure temperature without the probe cover?
A3: This instrument is designed to measure temperature without
the probe cover. Do NOT attach the probe cover or any film or
covering.
Q4: Is it hygienically safe to use the ear thermometer
without the probe cover?
A4: The probe and probe lens should be kept clean by using
a cotton swab or soft cloth moistened with 70% alcohol.
Therefore, the thermometer can be used hygienically without the
probe cover.
Q5: Can I use the ear thermometer in cold/hot places?
A5: This instrument can be used in room temperature from 10
to 40°C (50 to 104°F). Error messages (Er 2 or Er 3) may be
displayed if the temperature during storage greatly differs from
that of the room temperature where you take a measurement
reading. In such a case, let the ear thermometer stand for a
while at room temperature before measurement.
Q6: Can I use the ear thermometer on an infant? Their
ear canals are very small.
A6: Do NOT attempt to force the probe into the ear canal. Use
caution and pay close attention while very gently inserting the
probe just into the entrance of ear canal.
Q7: Can I use the ear thermometer to measure
temperature under the armpit or in the mouth?
A7: No. This instrument is designed to measure temperature
only in the ear.
Q8: Can I use the ear thermometer on animals?
A8: No. This instrument is designed to measure temperature in
the ears of humans.
- Eng 12 -
SPECIFICATIONS
For Ear temperature mode 34.0~42.2°C
(93.2~108°F)
For Material surface temperature mode -22~80°C
(-7.6~176°F)
Accuracy:
For Ear temperature mode
±0.2°C (0.4°F) for temperatures 35.5~42.0°C
(95.9~107.6°F). ±0.3°C (0.5°F) for other ranges.
For Material surface temperature mode
±0.3°C (0.5°F) for temperatures 22~42.2°C
(-7.6~108°F) for other ranges. ±4% or ±2°C (4°F),
whichever is greater.
Display:
3 digits with decimal point
Battery mark
Ear temperature mode
Material surface temperature mode
Stopwatch
Memory
°C or °F
Battery:
One lithium cell battery (CR2032 X 1 pc)
Battery life:
3000 consecutive measurements or 1 year with 1-2
measurements per day including stand-by mode.
Rated Voltage:
DC3V
(
: Direct Current)
Operating temperature range: 10~40°C (50~104°F)
Storage temperature range: -20~50°C (-4~122°F)
Transportation temperature range must be less than
70°C.
Unit size:
115 (L) X 37 (W) X 29 (H) mm
Weight:
Approx. 60g (including battery)
Electric shock protection: Internal power unit
Safety classification:
Type BF equipment
Memory:
9 memory slot recall function
Attention, consult accompanying documents.
* Specifications may be changed without notice in the event of improvements
being made.
Reference standard: Complies with ASTM E1965-98, EN12470-5: 2003
Clinical thermometers-Part 5: Performance of infra-red ear thermometers
(with maximum device), IEC60601-1-2(EMC), EN60601-1(Safety) standards.
Manufacturer:
Name: Radiant Innovation Inc.
Address: 1F, No.3, Industrial East 9th Road, Science-Based Industrial Park,
HsinChu, Taiwan 300.
European Representative:
Name: Medical Technology Promedt Consulting GmbH
Address: Altenhofstrasse 80, D-66386 St. Ingbert, Germany
- Eng 13 -
English
Measuring Range:
REF CT830
IDENTIFICATION OF PARTS
Probe lens
Probe
LCD
Probe Cap
"SCAN" button
"ON/MEM" button
Fig. 1
CITIZEN is a registered trademark of Citizen Holdings Co., Japan.
CITIZEN es una marca registrada de Citizen Holdings Co., Japón.
Design and Specification are subject to change without notice.
0801
English
INSTRUCTION MANUAL
for
DIGITAL EAR THERMOMETER