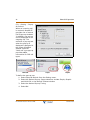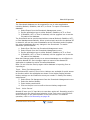
1
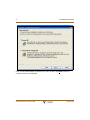
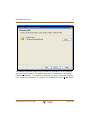
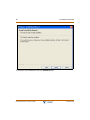
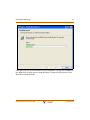
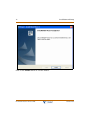
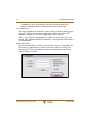
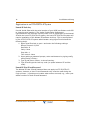
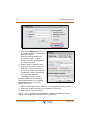
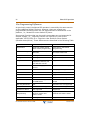
Station User Guide October 2007 - Issue 2.0 Note: Although this User Guide has information about using NomadSP with XTS systems, NomadSP produced as of the date of this issue is currently supported only on TeleniumIP systems. I Issue Release Changes 1.0 7-05 Initial Release 2.0 10-07 Significant product enhancements are added. Copyright © 2005 Vertical Communications, Inc. All rights reserved. ® Vodavi, XTS, and Telenium are registered trademarks of Vertical Communications, Inc. All other brand and product names are used for identification only and are the property of their respective holders. mlj/2007 Contents i Contents Introduction ..............................................................................................................1 Features............................................................................................................................................ 1 Installation and Setup..............................................................................................2 System Requirements ................................................................................................................. 2 Supported Operating Systems ................................................................................................ 3 Headset/Microphone Requirements..................................................................................... 3 Nomad SP Connection ............................................................................................................... 4 Nomad SP Application Installation ........................................................................................ 5 Registration in a TeleniumIP System ..................................................................................... 13 Nomad SP Lock-key ............................................................................................................. 13 Nomad SP User ID and Password.................................................................................... 13 Login and Registration Process ....................................................................................... 13 Registration in an XTS-IP/XTSc-IP System............................................................................ 16 Nomad SP Lock-key ............................................................................................................. 16 Nomad SP User ID and Password.................................................................................... 16 Registration Process ............................................................................................................ 17 Plantronics CS-50 USB Headset Integration ....................................................................... 20 Nomad SP Operation................................................................................................21 Application Menu Bar ................................................................................................................. 22 File.............................................................................................................................................. 22 View ........................................................................................................................................... 30 Tools Menu.............................................................................................................................. 30 Quick Call Menu Bar and Placing & Receiving Calls ......................................................... 34 Placing a Call .......................................................................................................................... 34 Receiving a Call...................................................................................................................... 36 Ending a Call........................................................................................................................... 36 Simple Favorites List.................................................................................................................... 37 Info Console.................................................................................................................................... 37 Logout ...................................................................................................................................... 37 Message Icons........................................................................................................................ 38 Clock/Calendar View ........................................................................................................... 38 Appointment Calendar....................................................................................................... 39 Call Recording........................................................................................................................ 40 Basic Call Control Menu Bar...................................................................................................... 41 Short Message Service in XTS-IP / XTSc-IP Systems ................................................. 41 Nomad SP Station User Guide October 2007 ii Contents Short Message Service in TeleniumIP Systems.......................................................... 42 ..................................................................................................................................................... 43 ..................................................................................................................................................... 43 ..................................................................................................................................................... 43 ..................................................................................................................................................... 43 ..................................................................................................................................................... 43 Volume Controls ................................................................................................................... 43 Call Handling Buttons ......................................................................................................... 43 Window View Icon Menu Bar ................................................................................................... 44 Phonebook.............................................................................................................................. 45 Call Log..................................................................................................................................... 47 Recorded Call List ................................................................................................................. 48 Scheduled Dial Window..................................................................................................... 49 IP Phone Window ................................................................................................................. 51 Flex Button Window ............................................................................................................ 52 Smart Tray Icon and Menu ........................................................................................................ 53 User Programming Differences ............................................................................................... 54 Nomad SP Station User Guide October 2007 Introduction 1 Introduction Nomad SP is a multi-media communication tool using a PC-based application to link the operation of an on-screen multi-button telephone with other communications-related PC applications. Nomad SP is visualized on the desktop and interfaced to the user via the mouse and keyboard. All the features of the traditional IP multi-button phone are available to the user. In addition, a Phonebook database with links to the user's PIM (Personal Information Manager), provides pop-up windows for incoming caller identification. Nomad SP users can employ the Phonebook to place calls as well as manage contact records. Other special functions available to Nomad SP users include: appointment scheduling, SMS support, e-mail, and call recording. Features The Nomad SP application includes the following features/functions: Login with ID and Password Local/Remote Connection Mode Flexible Buttons User Short Message Service (SMS) (TeleniumIP only) Automatic Database Synchronization Incoming Call Pop-up Window Hotkey Support Database Import/Export (MS Outlook, GoldMine, ACT!, Excel) User Connection Profiles Smart Tray Icon & Menu Quick Call Menu Simple Dial-pad Pop-up Display Mode (Clock, Calendar) Phone Book Calling Phone Book Management Scheduled Dial and Notification User Call Log Management Voice Recording E-mail with MS Outlook Simple Favorites Contact List Nomad SP Station User Guide October 2007 2 Installation and Setup Installation and Setup Set-up of the Nomad SP is a four step process: 1. 2. 3. 4. Connect the PC to the host Vodavi system. Install the Nomad SP application on the user’s PC. Install the system lock key. Login to complete registration of the Nomad SP application to the Vodavi system. Completing the registration process may require assistance of the system administrator to adjust settings of the Vodavi system. TeleniumIP requires a User ID and Password to log into Nomad SP. For remote applications, the Vodavi system will require entry of the MAC address of the PC running the Nomad SP. Also, for remote users, the Nomad SP will require entry of the host Vodavi system’s IP address. Prior to installation, the PC and operating system should be verified for compatibility with the Nomad SP application. Ensure that the PC and OS (Operating System) comply with the minimum requirements as stated in the following two sections. System Requirements The minimum requirements for the Nomad SP are described below. Pentium 4 or compatible CPU 1 GHz clock speed or higher 256 Mbytes RAM 200 Mbytes of free hard-drive space 1024 x 768 resolution monitor CD-ROM drive If you have WinDBA/XTS-IP Admin installed, uninstall it before installing Nomad SP because they are incompatible. Nomad SP Station User Guide October 2007 Installation and Setup 3 Supported Operating Systems The Nomad SP application can run under one of several Microsoft Operating Systems including: Microsoft Windows XP Home Microsoft Windows XP Professional Microsoft Windows 2000 Professional Headset/Microphone Requirements To use the Nomad SP, a USB headset/microphone is required. The USB headset needs to be connected to the PC prior to launching the Nomad SP application, otherwise the headset will not work properly. Nomad SP Station User Guide October 2007 4 Installation and Setup Nomad SP Connection The PC running the Nomad SP application may be connected to the Vodavi system either as a local or remote device. The connection as a local device requires the Nomad SP to be connected to the same LAN as the host Vodavi system. When connecting as a remote device in a TeleniumIP system, the User ID and Password must be preregistered in the MFIM database. When connecting as a remote device, the PC’s MAC address must be assigned as a Remote device in the Vodavi system for proper registration and operation. Figure 1 provides a pictorial view of the connections to the Vodavi system. Local Nomad SP TeleniumIP or Remote Nomad SP Figure 1: Nomad SP Connections Nomad SP Station User Guide October 2007 Installation and Setup 5 Nomad SP Application Installation When the Nomad SP CD-ROM is placed in the PC, an auto-execute install program will start. The InstallShield Wizard prepares the setup as shown in Figure 2. To abandon the installation, click Cancel. Figure 2: Nomad SP Setup Nomad SP Station User Guide October 2007 6 Installation and Setup Figure 3: Welcome to the InstallShield Wizard Click on the Next> button to continue with the installation. Nomad SP Station User Guide October 2007 Installation and Setup 7 Click in the User Name box and type in the name. Click in the Organization box and type the organization. Click on the desired radio button to select who the application is to be installed for. Then click on the Next> button to continue with the installation. Nomad SP Station User Guide October 2007 8 Installation and Setup Click on the radio button for Nomad SP, then click on the Next> button to continue with the installation. Nomad SP Station User Guide October 2007 Installation and Setup 9 The default destination folder for the Nomad SP application can be modified using the Change button. The default directory for installation is "C:\Program Files\Vodavi\Nomad\". It is possible to back-up one step in the install process or to cancel the installation. To continue the installation click the Next> button. Nomad SP Station User Guide October 2007 10 Installation and Setup To continue the installation click the Install button. Nomad SP Station User Guide October 2007 Installation and Setup 11 A progress bar will show the status of the installation. During the Installation, the Wizard will prompt you to install WinPcap. Follow the instructions of the Wizard to install WinPcap. Nomad SP Station User Guide October 2007 12 Installation and Setup Click on the Finish button to exit the wizard. Nomad SP Station User Guide October 2007 Installation and Setup 13 Registration in a TeleniumIP System Nomad SP Lock-key The Vodavi Inside Sales Department representatives will issue the lock-key code. Prior to registration of the Nomad SP with the host TeleniumIP system, the host TeleniumIP system will require installation of the Nomad SP software lock-key. The TeleniumIP system administrator installs the lock-key code under the system’s web Admin Maintenance window. The administrator should refer to the TeleniumIP Programming Manual for guidance. Nomad SP User ID and Password The TeleniumIP system administrator establishes the Nomad SP User ID and Password in Station User Login under Device Login in TeleniumIP Web Admin. Login and Registration Process To run the Nomad SP application and login: 1. Click on the Nomad shortcut icon. The Nomad SP application will start and the Login window will display. 2. In the Login window, enter User ID and Password, then click on the Login button to attempt to register with the host TeleniumIP system. You may check several option boxes to automate login and you may enter a desired Station number, which the system will honor if the number is available. Nomad SP Station User Guide October 2007 14 Installation and Setup In addition to Login information, the Login window accesses the Network Setting window for defining the device environment. LOCAL CONNECTION The initial registration is automatic, when locally connected, assuming the TeleniumIP system is set to allow registration. Refer to the TeleniumIP Installation Manual for the MFIM Registration Switch settings. Audio -- For a locally connected device, audio is from point to point over the LAN, NAT (Network Address Translation) is not supported, and IPSEC is not implemented. REMOTE CONNECTION When the Nomad SP is remotely connected the first time, registration will fail unless pre-registered in a local environment. When this occurs, the host TeleniumIP system IP address must be entered and the connection mode changed to remote. Nomad SP Station User Guide October 2007 Installation and Setup 15 1. Click on the Network button on the Login window to display the Network window. Network Settings define the connection mode, Local or Remote, and the IP address of the host TeleniumIP. 2. Select Local or Remote mode. 3. Enter the TeleniumIP system IP address, if remote connection. In the local mode, if the System IP Address is blank, Nomad SP will multi-cast discovery messages to locate a host. Defined Profiles can be selected from the drop-down list or added/ edited/deleted with the Profile Name Tool icons. 1. Select Profile Name add or edit icon in the Network Setting window. 2. Select the mode and enter the IP address of the host. 3. Select OK to enter the Profile. Audio -- For a remotely connected device, audio is handled through a system VoIP channel and remote NAT is supported. Nomad SP Station User Guide October 2007 16 Installation and Setup Registration in an XTS-IP/XTSc-IP System Nomad SP Lock-key Provide Inside Sales with the serial number of your MPB (use feature code 609 to view the serial number). The Vodavi Inside Sales Department representatives will issue the lock-key code. Prior to registration of the Nomad SP with the host XTS-IP/XTSc-IP system, the host XTS-IP/XTSc-IP system will require installation of the Nomad SP software lock-key. This is accomplished by the XTS-IP/XTSc-IP system administrator using HyperTerminal and the following steps. 1. Open HyperTerminal on port 1 and enter the following settings: Bits per second: 19,200 Data bits: 8 Parity: None Stop bits: 1 Flow control: None 2. Upon getting a password prompt, enter maintenance by typing config and pressing <Enter>. 3. Type S and press <Enter> to show licensing. 4. Type SF and type the lock-key code (no space between SF and the code). Nomad SP User ID and Password The Nomad SP User ID and Password does not apply to XTS-IP/XTSc-IP systems; however, a User ID and Password entry must be used during the Login process - it just does not matter what entries are used, e.g., enter your station number for both ID and Password. Nomad SP Station User Guide October 2007 Installation and Setup 17 Registration Process To run the Nomad SP application: Click on the Nomad shortcut icon. The Nomad SP application will start and attempt to register with the host XTS-IP/XTSc-IP system. 5. In the Login window, enter User ID and Password, then click on the Login button to attempt to register with the host TeleniumIP system. You may check several option boxes to automate login and you may enter a desired Station number, which the system will honor if the number is available. In addition to Login information, the Login window accesses the Network Setting window for defining the device environment. LOCAL CONNECTION The initial registration, when locally connected, is automatic. Audio -- For a locally connected device, audio is from point to point over the LAN, NAT (Network Address Translation) is not supported, and IPSEC is not implemented. REMOTE CONNECTION When the Nomad SP is remotely connected the first time, registration will fail unless pre-registered in a local environment. When this occurs, the host XTS-IP/XTSc-IP system IP address must be entered and the connection mode changed to remote. Audio -- For a remotely connected device, audio is handled through a system VoIP channel and remote NAT is supported. Nomad SP Station User Guide October 2007 18 Installation and Setup 1. Click on the Network button on the Login window to display the Network window. Network Settings define the connection mode, Local or Remote, and the IP address of the host TeleniumIP. 2. Select Local or Remote mode. 3. Enter the TeleniumIP system IP address, if remote connection. In the local mode, if the System IP Address is blank, Nomad SP will multi-cast discovery messages to locate a host. Defined Profiles can be selected from the drop-down list or added/ edited/deleted with the Profile Name Tool icons. 1. Select Profile Name add or edit icon in the Network Setting window. 2. Select the mode and enter the IP address of the host. 3. Select OK to enter the Profile. Audio -- For a remotely connected device, audio is handled through a system VoIP channel and remote NAT is supported. Nomad SP Station User Guide October 2007 Installation and Setup 19 To enter information in the dialog box, complete the following: System IP Address: 1. Select New IP Address box. 2. Enter new IP Address. Connection Mode: Select Local or Remote radio button. PC Network Interface Card: If the PC has multiple NICs, e.g., wired, wireless, VPN network support, etc., select the desired NIC from the drop down menu under In Use MAC. After changing characteristics in the message box it may be necessary to: 1. Select Retry to register. 2. Close the Nomad SP application. 3. Restart the application. Registration Error Messages that may be received include: No Response from System – there is no connection over the LAN to the host Vodavi system, the host IP address is incorrect, the Vodavi system is not set for local registration, the wrong NIC (MAC) is being used. Current Adapter NOT presently Available – the currently defined NIC is in use by another application, not connected, or has failed to properly connect to the LAN. Nomad SP Station User Guide October 2007 20 Installation and Setup Plantronics CS-50 USB Headset Integration Any compatible headset can be used; however, if a Plantronics CS-50 USB is used, complete the following procedure for successful integration. 1. Install Nomad SP. Verify connection to the TeleniumIP or XTS-IP system. 2. Install the "PerSonoCall" software that came with the Plantronics CS-50 USB headset. 3. Install the "cs50 event driver", which can be obtained from Plantronics or Vertical Communications, Inc. 4. Run PersonoCall and set the Nomad SP file path in the "Smart Button" option in PerSonoCall options. By default, this path is C:\Program Files\Nomad\Nomad.exe 5. Reboot the PC and log back into Windows. 6. Run the Nomad SP application and log onto the TeleniumIP or XTS-IP system. 7. Open File>>Setting>>CS 50 USB Headset Option. 8. Click "Use CS50 USB Headset". then click OK. Nomad SP Station User Guide October 2007 Nomad SP Operation 21 Nomad SP Operation Nomad SP interfaces with the user through the Nomad SP Main Window. The Nomad SP Main Window incorporates several elements in the User Interface as shown in Figure 4. Application Menu Bar Quick Call Menu Bar Simple Favorites List Info Console Basic Call Control Menu Bar Window View Icon Menu Bar Figure 4: Main Window Nomad SP Station User Guide October 2007 22 Nomad SP Operation Application Menu Bar The Application Menu bar includes File administration, View windows selection, Tools access, and Help access menus. File Selecting the File item from the Application Menu bar shows the File menu selections. File - Logout The Logout selection logs the active user out of the Nomad SP application and displays the Login screen. Closing the Login window terminates the application. Nomad SP Station User Guide October 2007 Nomad SP Operation 23 File - Setting The Setting selection displays the Setting sub-menu. You can establish the connection mode, change password, language, dialing rules, popup & Outlook configuration, Call Log On/Off, Differential ring tone, and Audio In/Out settings. File - Setting- System Connection Nomad SP can be registered to a host system in Local or Remote Mode. In the Remote Mode, the host system allocates a VoIP channel to support the call. The VoIP channel implements NAPT (Network Address & Port Translation) compatibility and packet forwarding to internal appliances. Selecting System Connection displays the System Connection window with the present mode (Local/Remote) checked. When either mode is selected, the Nomad SP will terminate and re-connect with the host system to establish the selected connection mode. Also in this window, the host system IP address and a Network Adapter Ethernet MAC address can be entered or selected. Nomad SP Station User Guide October 2007 24 Nomad SP Operation File - Setting - Password Change Selecting Password Change displays the Change Password window where the Nomad SP access password can be changed. The correct current password must be entered followed by the new password, which must also be confirmed. File - Setting - Language English is the default language. The Local Language option is reserved for future use. Selecting File> Setting>Language, will display the English/Local Language selection window with the present mode checked. Nomad SP Station User Guide October 2007 Nomad SP Operation 25 File - Setting - Dialing Rules When you place an outside call from the Phonebook or Call Log window, Nomad SP must include or remove certain dial codes to ensure proper dialing through the host system. When a number is selected from either window, the system will compare the number to the dialing rules codes. The dialing rules country and area codes are compared to the number and if matched are deleted from the number. If not matched, the appropriate LD or International codes are inserted preceded by the PBX and CO or IP line access codes. Codes are entered in the Dialing Rules dialog box, along with local codes for comparison. To enter codes: 1. Select Dialing Rules from the Setting menu. 2. Enter the various codes. 3. Select OK. For proper operation, Phonebook entries should follow normal conventions: "+country code (area code) number", e.g., "[+1(480)450-4636]" Nomad SP Station User Guide October 2007 26 Nomad SP Operation File - Setting - Popup & Outlook When an incoming call is received, Nomad SP provides one of several Call ID pop-up windows. In addition, the pop-up can be displayed for an outgoing call. The selection of pop-up and when the pop-up is displayed is assigned in the Popup & Outlook window. Note the "Multi-call" type pop-up provides added information for DID call types. Multi-Call Simple Graphic To define the pop-up use: 1. Select Popup & Outlook from the Setting menu. 2. Select the desired Pop-up. Popup selections include Simple, Graphic and Multi-Call or the Outlook Contact window. 3. Select the desired Pop-up Timing. 4. Select OK. Nomad SP Station User Guide October 2007 Nomad SP Operation 27 File - Setting Call Log (On/ Off) Nomad SP can maintain a list of all calls to the phone. Select Setting, then Call Log to display the On/ Off selection box with the present mode checked. When enabled, the Call Log is available for viewing and use. File - Setting Differential Ring When used in a TeleniumIP system, the Nomad SP can provide one of 4 different ring signals with separate assignments for internal and external calls. Each of the 4 ring signals is contained in a *.wav file. You may select one of the 4 predefined *.wav files (ring1.wav, ring2.wav, ring3.wav, or ring4.wav) or replace any of these files with a desired *.wav or *.mp3 file. To change a Ring tone file: 1. 2. 3. 4. Select Select Select Select the Search spyglass icon next to file to be replaced. the desired *.wav or *.mp3 file from the PC's file system. Change. Listen at any time to hear the ring tone. Nomad SP Station User Guide October 2007 28 Nomad SP Operation 5. Select OK to close the Ring tone files window and the new file may be selected for use. Note: Some wave or MP3 files are not supported. In this case an error message will be shown. To select a Ring Tone for use: 1. 2. 3. 4. 5. 6. Open the IP Phone window. Click the PGM fixed feature button. Dial 1 for Ring Tone Selection. Dial either 1 for Intercom Ring or 2 for CO/IP ring. Dial desired Ring Tone (1-4). A short burst of the tone is generated. Press SAVE. File - Setting - Audio Control Nomad SP can control the audio input/output device employed. The devices for audio input and output are selected in the Audio Setting screen. The audio output device (received audio) can be defined separately for voice and ring signals. Select the Audio device drop-down menu to display the device choices available. File - Stay On Top Check the Stay On Top item from the File menu to enable the Nomad SP Main Display to stay on top of other desktop displays. Thus, the Nomad SP application is always available to you. Nomad SP Station User Guide October 2007 Nomad SP Operation 29 File - Window Option - Move Sub-Window Together Check the Move Sub-Window Together item to have any optional windows (i.e., Phonebook, Call Log, Recorded Calls List, Scheduled Dial, IP Phone, and Flex Buttons) that are docked to the Main Window, move and remain docked whenever the Main Window is moved. File - Window Option - Restore Default Window Check the Restore Default Window item to close all optional windows that are open and return to the Main Window only. File - Go To Tray The Go To Tray selection minimizes the Nomad SP application to the system tray. File - Exit The Exit selection terminates and closes the Nomad SP application. Nomad SP Station User Guide October 2007 30 Nomad SP Operation View The View item allows access to the Nomad SP optional windows and controls display of the Window View Icon Menu bar. Optional windows available are: Phonebook (refer to page 45) Call Log (refer to page 47) Recorded Call List (refer to page 48) Schedule Dial (refer to page 49) IP Phone (refer to page 51) Flex Buttons (refer to page 52) Details on each optional window are provided starting on page 44. The last item in the View menu (View Toolbar) controls display of the Window View Icon Menu bar. Checking the View Toolbar enables display of the Icon Menu bar at the bottom of the Nomad SP Main Window. Tools Menu From the Tools menu you manage the Phonebook, Shortcut keys, Voice Record, Call Forward settings, and open a new e-mail window. Nomad SP Station User Guide October 2007 Nomad SP Operation 31 Tools - Phonebook Management Selecting Phonebook from the File menu will present the Phonebook menu where you can manage the Phonebook database. From this menu, you may select to open a new or existing database, save a database, import or export a database or maintain synchronization with an external database. Once a Phonebook is opened, operation of the window is as discussed in Phonebook on page 45. To open a new blank database for use with the Phonebook window: 1. Select New from the Phonebook Management menu. 2. Select a folder location. 3. Enter a filename. You can select the database to employ for the Phonebook window. Once selected, the database is used for the Nomad SP Phonebook until you make a new selection. To open a selected database: 1. Select Open from the Phonebook Management menu. 2. Select a database. The file format of the database must be consistent with the *.DB file format of the Nomad SP database; other file type selections will receive a warning message. You can save a copy of the Phonebook database as a backup copy or for future use. To save a copy of a database: 1. Select Save As from the Phonebook Management menu. 2. Select a folder, if different than the Nomad SP folder. 3. Select the filename. 4. Select Save. Various contact manager applications employ different data formats. To permit use of common formats, Nomad SP allows you to import databases from Outlook, GoldMine, ACT!, or Excel applications. When imported, the database format is modified to match the Phonebook database and is displayed in the Phonebook window. To import a database: 1. Select Import from the Phonebook Management menu. 2. Set the application type to either Outlook, GoldMine, ACT! or Excel. 3. If GoldMine, ACT! or Excel is selected, use the spyglass icon to set the file path to the database. Nomad SP Station User Guide October 2007 32 Nomad SP Operation The Phonebook database can be exported for use in other applications including Outlook, GoldMine, and ACT!, or Excel. To export a Phonebook database: 1. Select Export from the Phonebook Management menu. 2. Set the application type to either Outlook, GoldMine, ACT! or Excel. 3. If GoldMine, ACT! or Excel is selected, use the spyglass icon to set the file path to the database. The Phonebook can be synchronized with an external Outlook, GoldMine, ACT!, or Excel database automatically. When synchronized, each time the Nomad SP is started it will use the external database as the Phonebook and will update the external database after any changes in the Phonebook. To enable automatic synchronization: 1. 2. 3. 4. Select Sync DB from the Phonebook Management menu. Select Import from the Phonebook Management menu. Set the application type to either Outlook, GoldMine, ACT! or Excel. If GoldMine, ACT! or Excel is selected, use the spyglass icon to set the file path to the database. Note that changes made directly to an external database are not effective in an active Nomad SP. Such changes require a restart of the Nomad SP application to update the active Phonebook database. Note: Do not close the Excel program while database is importing from or exporting to. Tools - Short Cut Management While Nomad SP is active, Short Cut or Hotkeys are available for quick access to functions within the application as shown in the Hotkey Setting window. Hotkey settings can be modified to meet your needs. To modify the Hotkey assignments: 1. 2. 3. 4. Select Short Cut Management from the Phonebook Management menu. Select the desired Hotkey. Enter Hotkey combination. Click on the plus icon to confirm the new Hotkey assignment. Tools - Voice Record Nomad SP uses your PC hard drive to record an active call. Recording a call is controlled using the Voice Record selection in the Tools menu, the Ctrl-Alt-R Short-cut keys, or the Record button in the Info Console. For detailed operation, refer to Call Recording on page 40. Nomad SP Station User Guide October 2007 Nomad SP Operation 33 Tools - Forward You may select to re-route incoming calls to other stations (Internal Stations, Network Stations), station groups, the system Voice Mail, or over CO/IP resources. To activate Call Forward, Unconditional, Busy, No Answer, or Busy/No Answer: 1. From the Tools menu select Forward to display the Forward control window. 2. Select the desired Call Forward type. 3. Input the station or station group to receive calls. 4. Select OK. To activate Call Forward, Off Premise (to an external number): 1. Check SPEED from the Forward control window. 2. Select desired Call Forward type. 3. Input desired bin number. 4. Select OK. To activate Call Forward, Remote (Follow-me): 1. Select REMOTE from the Forward control window. 2. Select desired Call Forward type. 3. Input the station's Authorization Code (Station number & password), 4. Input the station or station group. 5. Select OK. To deactivate Call forward: 1. Select Clear as the Forward type 2. Select OK. Tools - e-mail You can access the Outlook application via Nomad SP to send ad hoc e-mails. Access to the e-mail application is provided by the e-mail item in the Tools menu, which calls your Outlook e-mail application. The e-mail application can also be called from the Phonebook window (refer to Phonebook on page 45). Nomad SP Station User Guide October 2007 34 Nomad SP Operation Help - About The About item from the Help menu displays the software version, release date, and copyright date of the Nomad SP. Quick Call Menu Bar and Placing & Receiving Calls You can place a call by pre-dialing a number with a mouse in the Simple Dial-pad pop-up, by selecting a party from the Smart Recent Calls List or the Simple Favorites List, or by using the PC keyboard to enter a number or Phonebook name. Placing a Call Placing a call with the Quick Call Menu is quick and efficient. For your convenience, a number of calling options are available. To place a call: Option 1 - Simple Key Pad pop-up. 1. Select the Simple Key Pad pop-up with the Key Pad icon. 2. Use the mouse to select and click digits which are then displayed in the pre-dial box. 3. Click on the Call button to place the call. Option 2 - Smart Recent Call List, maintains a list of calls. Simple Key Pad pop-up control Drop-down arrow in pre-dial box 1. Select the Smart Recent Call List with drop-down arrow in the pre-dial box. 2. Select the desired entry. 3. Click on the Call button to place the call. Nomad SP Station User Guide October 2007 Nomad SP Operation 35 Option 3 - Simple Favorites Contact List. Double-click an entry from the Simple Favorites List to place the call. Simple Favorites List Option 4 - PC Keyboard dialing. 1. Use the PC keyboard to enter digits or Phonebook name; entries appear in the pre-dial box as entered. 2. Click on the Call button to place the call. Calls may also be placed directly from the Phonebook or Call Log windows. In addition, opening the IP Phone window permits placing calls as with any IP phone. Calls can be placed from other applications while the Nomad SP is active or minimized. To place a call from another application: 1. Select the desired digit string. 2. Copy the desired digit string (Ctrl + C). 3. Press "Ctrl + Shift + D". Nomad SP Station User Guide October 2007 36 Nomad SP Operation Receiving a Call When a call is received, the phone will "ring" and the selected Caller Information pop-up window will appear (refer to File - Setting - Popup & Outlook on page 26). The window shows the caller ID delivered from the host system and the name associated from the Phonebook database. If Nomad SP is minimized, the Caller Information window will pop-up to display the incoming call information or the Nomad SP icon in the Windows tray will flash to indicate the new call. In the later case, Nomad SP must be opened to answer the call. To answer the call with Nomad SP active: Click on the Telephone icon from the Basic Call Control Menu bar. To answer the call with Nomad SP minimized: Click on the Telephone icon or Nomad SP icon from the Caller Information pop-up window. Multi-Call Simple Graphic Ending a Call Click the Telephone icon on the Basic Call Control Menu bar. Nomad SP Station User Guide October 2007 Nomad SP Operation 37 Simple Favorites List The Simple Favorites List is a list of names and corresponding numbers. To simplify dialing of commonly used numbers, you can populate the Simple Favorite List with a name and number only. Double-clicking on a name in the list places the call. Simple Favorites List From this window, a Favorite contact can be added, modified or deleted. To add or modify the contact list: 1. If modifying a contact, select the contact. 2. Select the add icon to add a new contact or to modify a contact selected in step 1. 3. If adding a new contact, click to remove the checkmark next to "Modify". 4. Enter the Display Name and Phone Number. 5. Select OK to add a contact to the Simple Favorites Contact List. Add Icon Info Console Logout The Logout button, located in the upper left area of the console, logs the current user out of the Nomad SP application and returns the Login screen. Nomad SP Station User Guide October 2007 38 Nomad SP Operation Message Icons Icons at the top right of the Info Console maintain a count of SMS messages not read and a count of new missed calls. The icons may be used to access the Message List window for simple access to a list of unopened messages or missed calls. No unread SMS messages 2 missed calls 1. Click on either of the icons to display the Message List window, then select the desired folder in the left side of the window to see the list of either SMS messages or Missed Calls. 2. Select the message or missed call, then use the icons above the right side of the window to delete or respond to the message or missed call. Clock/Calendar View The Console displays either the time of day or a monthly Calendar, which will show appointment dates in bold numbers. The Calendar links to Outlook scheduler, allowing appointments to be added from Nomad SP. Clock / Calendar selection icons Nomad SP Station User Guide October 2007 Nomad SP Operation 39 Appointment Calendar The Nomad SP Calendar displays a monthly calendar with the current date in green and any date with appointments in bold text. By right-clicking the mouse over a bold date on the calendar, an Appointment Summary window is displayed over the Schedule window. The Calendar display permits on-screen access to Outlook scheduler in two ways: Double-click on a date in the Calendar display to create a new appointment. Enter a new appointment following the Outlook instructions. When complete, save and close the Appointment. This saves the Appointment in Outlook and updates the Nomad SP database. Nomad SP Station User Guide October 2007 40 Nomad SP Operation -or1. Right-click the mouse over a calendar date shown in bold text to reveal an Appointment Summary window. Appointments for12/20/06 display 2. In the after right-clicking on bold 20 Summary window, double-click an existing appointment. Modify the appointment following the Outlook instructions. When complete, save and close the Appointment. This saves the Appointment in Outlook and updates the Nomad SP database. Call Recording Nomad SP uses your PC hard drive to record an active call. The recorded files are then managed in the Recorded Calls List accessed from the View menu or directly from the Recorded Calls List button in the Window View Icon Menu, refer to Recorded Call List on page 48. A recording is initiated using the Record button, which illuminates to indicate recording in progress. Nomad SP Station User Guide Record Button October 2007 Nomad SP Operation 41 Speaker Button Hold Button Conference Button Transfer Button Volume Controls SMS Slider Button Basic Call Control Menu Bar Short Message Service in XTS-IP / XTSc-IP Systems Short Message Service (SMS) is typically provided in GSM mobile networks and is a service permitting users to share (send and receive) text messages with other users (refer to page 42 for information on SMS in TeleniumIP). A text message is comprised of an alphanumeric combination of up to 60 characters when used in XTS-IP / XTSc-IP systems. An SMS can be sent employing the Text Message Window or as a reply to a received message (refer to Message Icons on page 38). The Nomad SP can maintain an unlimited number of messages when used in XTS-IP / XTSc-IP systems. To send a text message to other users: 1. Select the SMS Slider Button. 2. Click in lower portion of SMS window and type message. 3. Type the desired station number in the area of SMS Slider the window Button above the message. To send to more than one station, type a comma between station numbers. Do not insert a space after the comma. 4. Click on "Send". The message is delivered. Nomad SP Station User Guide October 2007 42 Nomad SP Operation Short Message Service in TeleniumIP Systems Short Message Service (SMS) is typically provided in GSM mobile networks and is a service permitting users to share (send and receive) text messages with other users (refer to page 41 for information on SMS in XTS-IP and XTSc-IP systems). A text message is comprised of an alphanumeric combination of up to 100 characters when used in TeleniumIP systems. An SMS can be sent employing the Text Message Window or as a reply to a received message (refer to Message Icons on page 38). When an SMS message is received, the Message Wait indication will activate and the user of the Nomad SP can review the received message. The Nomad SP can maintain up to 10 received messages in TeleniumIP systems, after which new messages are not stored. To send a text message to other users: 1. Select the SMS Slider Button. 2. Enter text message. 3. Click on the Station List button. The Member window appears. SMS Slider Button Nomad SP Station User Guide October 2007 Nomad SP Operation 43 4. Select the desired recipients with the check boxes or check the box labeled All Members. Then click OK to return to the SMS window 5. Click the Send button to deliver the message. Volume Controls Separate slide controls are provided for adjusting the Speaker and Microphone volume levels; with the mouse drag the slide button right to increase volume, drag left to decrease volume. Call Handling Buttons On the Basic Call Control Menu Bar are several buttons for quick access to common call handling features. These buttons are: Transfer - to initiate a call transfer. Conference - to initiate and set-up a conference call. Hold - to place the active call on Hold. Speaker - to answer and end calls. Nomad SP Station User Guide October 2007 44 Nomad SP Operation Flex Buttons Button IP Phone Button Scheduled Dial Button Button Recorded Calls Call Log Button The Window View Icon Menu Bar can be displayed at the bottom of the Main Window to easily access the Optional Windows. Phonebook Button Window View Icon Menu Bar Only one of the database windows (Phonebook, Call Log, Recorded Calls, and Schedule Dial) can be opened at a time. A database, IP Phone and Flex Buttons windows can be opened simultaneously. The window size is adjustable except for the IP Phone window. Each of the Optional Windows is described in the following sections. Nomad SP Station User Guide October 2007 Nomad SP Operation 45 Phonebook Nomad SP maintains a Phonebook database of your contacts; both other Nomad SP users and external contacts may be included. You can place calls and send e-mails to contacts selected from the database employing the search, sort, and record management tools on the Phonebook Tool bar. When a record is added, edited, or deleted in the Phonebook, Nomad SP can also update (synchronize) the original source database (refer to Tools - Phonebook Management on page 31). Add New Edit Delete Send To Email Make A Call To call a number from the Phonebook: 1. Right-click on the desired record (see search & sort below). 2. Select the desired function from the drop-down menu: Make a Call, Transfer (Screened), Transfer (Unscreened), Make a Conference, etc. -or1. Select the desired record. 2. Click the Telephone icon in the Phonebook Tool bar. -orDouble-click on the desired record or phone number field. Nomad SP Station User Guide October 2007 46 Nomad SP Operation To send an e-mail from the database: 1. Select the desired record. 2. Select the e-mail icon from the Phonebook Tool bar. The Outlook e-mail program is called and loaded with the selected recipient. 3. Type in subject, message, and send the e-mail. To search the Phonebook database: Enter an alphanumeric string in the search box. To sort records in the Phonebook: Click on the header field at the top of the Phonebook to sort alphabetically/numerically; click again for reverse order. To add or edit a record: 1. Either click on the Add icon or select the desired record for edit and then click on the Edit icon to view the Contact Record form. Nomad SP Station User Guide October 2007 Nomad SP Operation 47 2. Fill in the form - Name is a required field. 3. To add an image from the contact record, double-click in the image field (upper left of the Contact Record form), then navigate to the desired graphic and click on the Open button. 4. Select OK to save the record in the Phonebook and synchronize the source database. To delete a record: 1. Select the desired record(s). 2. Click the delete icon in the Phonebook Tool bar. Call Log Add New (Phonebook) Delete Delete All Make A Call The Call Log window is a log of all calls placed or received by the Nomad SP. If Call Log is enabled under the File - Setting menu, each call, initiated or received, will generate a record, which will contain information on the call as well as data derived from the Phonebook. Once the call terminates, a record is stored in the Call Log database. The record will contain the following fields: Date & Time: date and time of the call from the user's PC Name: name of connected party from the Phonebook Phone: the called or calling party phone number, from the host system or carrier Call Type: type of call icon, incoming/outgoing and answer/no answer Duration: duration the call was connected or ringing in hours, minutes and seconds Nomad SP Station User Guide October 2007 48 Nomad SP Operation The Toolbar at the top of the Call Log window, allows you to place a call and manage the Call Log database. To place a call from the Call Log window: Double click on the record to place the call. -or1. Select a record. 2. Click the Telephone icon, Nomad SP will place a call to the phone number of record. To copy a record to the Phonebook: 1. Right-click on the desired record. 2. Click Add New (Phone Book). Selecting the Delete icon will remove the selected record(s); selecting the Delete All icon will delete all records in the Call Log. Recorded Call List Nomad SP permits recording of a conversation onto the PC's hard drive. Recorded conversations can be reviewed after recording. In addition, voice memos can be added to the recording and the recording with memo sent by e-mail as attached .wav files. Recording can be activated from the Nomad SP Tools item in the Application Menu bar or from the Info Console Record button. Nomad SP sends a single "record-start" tone; you should notify the other parties of any recording. The Recorded Call List window includes playback controls for playing a selected file. You can delete a file, record a comment, and/or e-mail the recording using the Playback window controls. Nomad SP Station User Guide October 2007 Nomad SP Operation Scheduled Dial Window Add New 49 Edit Delete Delete All Make A Call Scheduled Dialing permits you to enter a phone number for dialing at a later scheduled time. When the scheduled time is reached, the Confirm window will appear and you must confirm before dialing will begin. The Scheduled Dial window contains a list of the phone numbers and schedules you enter. The window Tool bar permits you to manage the Scheduled dialing feature. Nomad SP Station User Guide October 2007 50 Nomad SP Operation To add or edit a Scheduled Dial: 1. Click the Add New or Edit icon on the window Tool bar and the Scheduled Dialing Manager dialog box appears. 2. Click the pull-down Date/Time menu. 3. Select a date from the calendar and the time (in 24 hour mode) menu. Date & time are required entries. 4. Input or edit the telephone number. The telephone number is a required entry. 5. If desired, enter or edit Name and Company. 6. Select OK to save the schedule and number for later dialing. To delete an entry from the Scheduled Dial folder: Select the Delete or Delete All icon to remove the record. You will be asked to confirm deletion of the record. Nomad SP Station User Guide October 2007 Nomad SP Operation 51 IP Phone Window With the IP Phone Window you have complete access to all of the system features as well as the features available to the traditional IP phones, with the few exceptions based on the differences in the user platform (refer to User Programming Differences on page 54). The fixed feature keys operate in the same manner as the IP phones except the mouse is used to select dial pad and feature buttons. For operation of the features, refer to the IP Phone User Guide. Nomad SP Station User Guide October 2007 52 Nomad SP Operation Flex Button Window The Flex Button window provides access to the 24 Flex buttons in the screen. Each button includes a status icon, which displays the status of the CO Line or station associated with the button. The button also displays a designation from the host system database, such as CO 001, SPD 001, etc. A further label, which will be displayed in the button, can be assigned in Nomad SP. Selecting a Flex button with the left mouse button will access a CO line, call a station, or activate a feature based on the function assigned to the Flex Button in the host system database. To enter and assign a Station Speed Dial number to a Flex button: 1. Place the mouse pointer over the desired Flex Button. 2. Right-click the mouse, then click on "Set Attribute" to display the Flexible Button entry window. 3. Click to enter a check mark in the CO box. 4. Use the pull-down menu to assign the Speed Dial bin number. 5. Enter the number to be dialed in the Phone Number box. 6. Enter an optional label for the Flex Button in the Description box. 7. Select Save to store the number and return to the Flex Button window. Nomad SP Station User Guide October 2007 Nomad SP Operation 53 To assign a station number or feature code to a Flex button: 1. Place the mouse pointer over the desired Flex Button. 2. Right-click the mouse, then click on "Set Attribute" to display the Flexible Button entry window. 3. Enter the station number or feature code in the Phone Number box. 4. Enter an optional label for the Flex Button in the Description box. 5. Select Save to store the number and return to the Flex Button window. Smart Tray Icon and Menu When the Nomad SP application is executed, a tray icon is created. The icon is displayed in the Windows system tray. The Smart Tray Icon will display the status of the connection with the host system (Online or Offline), as well as message events as shown. A right-click on the Smart Tray Icon opens the Smart Tray Menu. Selections in this menu include: Tray Popup Cancel - select to close the Smart Tray Menu Favorite Contact Dialer- select to open a small version of the Simple Favorites List. Speaker Button - select to control the speakerphone. Show Main Window - select to open the Nomad SP Main Window. Exit - select to close the Nomad SP application. Nomad SP Station User Guide October 2007 54 Nomad SP Operation User Programming Differences As previously noted, the Nomad SP operates in essentially the same manner as the traditional Vodavi IP phone. However, there are several user programmable functions which are not supported due to differences in the platform, i.e., Nomad SP versus Vodavi IP phone. Also several functions that can be used in one system are not supported in another system, i.e., TeleniumIP versus XTS-IP/XTSc-IP (refer to the applicable XTS-IP/XTSc-IP or TeleniumIP User Guide for other feature operation descriptions). These differences are described in the following Table. Feature XTS-IP/XTSc-IP TeleniumIP Registration Code from Vodavi Inside Sales & flash programming Lock Code in web-based programming Differential Ring One ring tone for CO/IP & ICM calls Different ring tones possible for CO/IP & ICM calls OHVO Not supported Supported Background Music Not supported Supported Ring Tone Selection Feature code 695 is not supported; however, can use different wav file Supported Pages Can make a page, but can’t receive Can make and receive pages PGM Button Function H-P-T button User programming ICM Button No current function Supported SAVE Button No current function Supported Audio Source Control N/A Sta PGM 6 is not supported Sta Answer Mode H-T-P function supported via PGM button Tone mode only; Sta PGM 13 is N/A Sta Ring Download N/A Sta PGM 15 is not supported Local/Remote Mode Remote mode is supported Both modes are supported Conference Room Not supported Supported Flex Button Programming Supported via XTS-IP/ XTSc-IP method and feature codes Supported via TeleniumIP method and feature codes Station List on SMS Not supported Supported Nomad SP Station User Guide October 2007