1
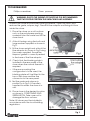
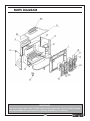
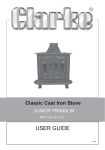
Classic Cast Iron Stove
JUNIOR FRANKLIN
PART NO: 6910120
USER GUIDE
GC0909
INTRODUCTION
Thank you for purchasing this CLARKE Classic Cast Iron Stove.
Before attempting to instal or use the stove, please read this manual
thoughout and follow the instructions carefully. Thoroughly familiarise yourself
with this stove & it’s operation in order to ensure the safety of yourself and
others around you. Henceforth, you can look forward to the stove giving you
long and satisfactory service.
GUARANTEE
This product is guaranteed against faulty manufacture for a period of 12
months from the date of purchase. Please keep your receipt which will be
required as proof of purchase.
This guarantee is invalid if the product is found to have been abused or
tampered with in any way, or not used for the purpose for which it was
intended.
Faulty goods should be returned to their place of purchase, no product can
be returned to us without prior permission. This guarantee does not effect
your statutory rights.
SPECIFICATION
JUNIOR FRANKLIN
Part Number
6910120
Weight
102 kg
Dimensions (w x h x l)
755 x 658 x 540 mm
Flue Size
170 mm o/d
Max BTU Output
54,000
Efficiency
78% @ 9 kw
Fuel
Multi fuel
Nominal Heat Output
10 kw
Class
1
Operation
Intermittent
Please note that the details and specifications contained herein, are correct at the
time of going to print. However, CLARKE International reserve the right to change
specifications at any time without prior notice.
2
GENERAL SAFETY RULES
WARNING: Do not use in mobile homes. This stove must be
connected to a suitable flue outlet. Due to high temperature this
stove should be located well away from furniture and curtains.
Children and adults should be alerted to the hazards of hot
surfaces. Young children should be carefully supervised when they
are in the same room with the stove. Do not place clothing or other
flammable material on or near the stove. Keep the stove area clear
of combustible materials, flammable liquids or vapours.
1. ALWAYS read and understand the manual before installing and
commissioning the fire.
2. ALWAYS ensure the stove is installed in accordance with local regulations.
3. ALWAYS ensure that the stove is correctly installed and positioned as
described under POSITIONING AND INSTALLATION on page 5, and that the
immediate area is kept clear.
4. ALWAYS check for damage before using the stove. Check for breakage of
parts and any other condition that may affect the stoves performance.
Any damage should be properly repaired or the part replaced. If in doubt,
DO NOT use the stove. Consult your local dealer.
5. ALWAYS keep children and visitors at a safe distance from the stove.
6. NEVER direct water, or any other liquid on to the stove, particularly when it
is hot.
7. NEVER use gasolene or other flammable liquids for fire starting.
8. NEVER use the stove to incinerate materials other than the recommended
fuels.
9. The installation of the stove and chimney MUST comply with all national,
European and local building regulations. It is the responsibility of the owner
and the installer to ensure that the installation complies.
10. NEVER carry out any modifications to this product. If experiencing difficulty
of any kind consult your local dealer.
UNPACKING & ASSEMBLY
Before assembling, please check contents against the following list and
advise your dealer immediately if any parts are missing.
1 x Stove body
4 x Legs
1 x Fixings Kit
1 x Flue Connection c/w Fireproof Gasket
1 x Flue Adaptor
1 x Baffle Plate
1 x Ash-pan & Handle
1 x Grate
1 x Flue Blanking Blate
3
TOOLS REQUIRED
Phillips screwdriver
13mm spanner
WARNING: DUE TO THE WEIGHT OF THE STOVE IT IS RECOMMENDED
THAT TWO PEOPLE PERFORM THE UNPACKING AND ASSEMBLY.
Unpack the stove and remove packing materials. Open the doors and
remove the grate, ashpan, legs, Flue with flue adaptor and fixings kit from
inside the stove.
1. Place the stove on a soft surface
such as the polystyrene packing
materials from the crate and tilt the
stove back.
2. Attach the legs using the bolts and
large washers supplied as shown in
Fig 1.
3. Sit the stove upright and attach the
flue adaptor as shown in Fig 2 using
the screws supplied. Ensure the
fireproof gasket is correctly seated
in the base of the flue adaptor.
4. Check that the blanking plate is
installed in the rear panel of the
stove when the normal flue exit is
required.
• If the rear mounting flue
configuration is to be used, the
blanking plate will be fitted to the
top of the stove and the flue
connector to the rear panel.
5. Set the grate and ashpan in
position as in Fig 3. A handle is
supplied for when the stove is in
use.
5. Place stove in the desired location
as shown in POSITIONING AND
INSTALLATION. Take care not to
damage the floor surface.
Note; All stoves must be installed in
accordance with the local building
regulations.
Fig 3
4
POSITIONING & INSTALLATION
All local regulations, including those referring to national and European
Standards need to be complied with when installing this appliance.
WARNING: IF THIS STOVE IS NOT PROPERLY INSTALLED, A
HOUSE FIRE MAY RESULT. FOR YOUR SAFETY, CONTACT THE
LOCAL BUILDING OR FIRE OFFICIALS ABOUT RESTRICTIONS AND
INSTALLATION REQUIREMENTS IN YOUR AREA.
POSITIONING
The stove must only be installed on floors with an adequate load bearing
capacity and if the existing construction is not suitable, aditional measures
such as a load distributing plate must be provided.
The stove should only be placed on a wooden floor if it has been covered by
a protective metal plate at least 5mm thick or other non-flammable floor
protector such as 20mm ceraform board or other non-combustable material
having a conductivity of K=0.84 BTU/FT2 HR-IN-degF.
Combustable materials such as carpet or linoleum must be removed from
beneath the stove.
When the stove is positioned near a wall constructed of flammable material,
the distances shown on Fig 4 must be adhered to. Alternatively, a heat shield
may be used, mounted according to the position of the fireplace. A firewall
must be at least 100 mm thick and typically made of brick, or concrete/
stone.
It is recommended that the stove be installed 800 mm from furniture and
serious consideration should be given to the positioning of any furniture that
could be adversely affected by heat. The clearance to any combustable
materials should also be a minimum of 800mm.
Fig 4
5
The stove must have a minimum clearance of 1200 mm to a combustable
ceiling above.
Due to the heat of a hot stove, a suitable fire guard should be used to
provide additional protection.
Note; All stoves should be installed in accordance with the local building
regulations.
THE CHIMNEY
The stove is supplied with a flue pipe for top mounting with the fixing screws
supplied. The stove should never be connected to a shared chimney/flue
system.
When sections of the flue pipe fit into one another, the end facing upwards
must be the end with the larger internal dimensions with the downward
facing pipe fitting into it such that deposits do not collect on the joint or allow
condensation to weep at the joints. Flue pipes with a smaller cross-sectional
area than that of the stove outlet should never be used. Flue pipes must not
project into the chimney connector, such as to cause a restriction to the gas
flow.
Ensure the joints are completely sealed as air leakage will lead to poor
performance. Avoid having more than two bends in the flue system. Any
offset between bends should be minimised and the flue should be equipped
with suitable access doors for inspection & cleaning.
A range of suitable flue pipes,
cowls and fire cement are
available from your Clarke
dealer.
Special methods are required
when passing through a wall or
ceiling. Please refer to your local
building regulations and/or fire
department.
Assuming that when the stove is
first installed, the chimney is
clean, and sound, then the
chimney & flue should be
inspected part way through the
burning season to establish the
regularity of sweeping required.
This should always be less than
one year.
Fig 5
6
USING YOUR STOVE
CONTROLS
The amount of heat emitted by
the stove is regulated using
two air controls.
A) The primary air supply is
controlled using the two
lower air controls built into
the doors.
B) A second air inlet provides
a constant, pre-heated air
supply to the combustion
just above the fire. This is
controlled using the upper
air controls mounted at the
top of the doors. This air
supply will not normally
need to be regulated so will
usually be kept open.
Fig 6
FIRST USE
Following installation, and before regular use, the stove must be seasoned to
prevent cracking of the metal castings. This procedure should also be
followed if the stove has not been used for prolonged periods (during the
summer months for example), and is carried out as follows:
1. Light a small fire in the middle of the stove, well away from the sides.
2. Allow the stove to warm up slowly and evenly with the air controls almost
closed, avoiding intense flames.
3. Keep the fire burning for three hours or so, gradually increasing the size of
the fire using larger logs which will burn naturally but slowly, keeping the
stove on a low setting.
4. After a couple of days burning at this level, increase the brightness &
intensity of the fire gradually over the next 10 days.
Full strength fires should not be used until completion of approx 20 days of
mild use. Only from this time will the stove have been properly seasoned.
It should be remembered that this procedure should be carried out at the
beginning of each season of use in order to remove the moisture retained by
the metal during the period of non-use.
When used for the first time the fireplace may smell a little, due to gas being
given off. The gas is not toxic but the room should be thoroughly ventilated.
Let the fire burn with a high draught until no smells can be detected.
7
Take care not to open the stove doors too vigorously in case of causing
smoke spillage. If smoke spillage occurs when the fire doors are opened this
could be due to poor chimney draft. SEE TROUBLESHOOTING.
FIRE-LIGHTING WITH WOOD
1. Open the air controls.
2. Lay firelighters or rolled up newspapers on the grate with a reasonable
quantity of dry kindling wood. Place 2 or 3 small logs on top.
3. Light the newspaper or firelighters using a long taper and close the doors.
4. When the fire is burning strongly, add further logs up to 10mm diameter.
5. When the stove is really hot, close the air controls as required.
6. The burn rate can be reduced by partially closing the air controls. Ensure
there are lasting flames until the wood becomes charcoal.
FIRE-LIGHTING WITH SOLID FUEL
1. Open the air controls.
2. Lay firelighters or rolled up newspapers in the stove with a reasonable
quantity of dry kindling wood. Place a small quantity of solid fuel on top.
3. Light the newspaper or firelighters using a long taper and close the doors.
4. When the fire is burning strongly, add further fuel.
5. When the stove is hot, close the top air controls.
6. The burn rate can be reduced by partially closing the lower air controls.
REFUELLING
1. Open the doors and add fuel. Always open the doors slowly to avoid a
sudden rush of intake air and smoke escaping into the room.
2. Open the air controls and leave open for a few minutes to allow the
gasses in the wood to burn before closing.
3. Ensure the doors are kept closed to contain fumes except when lighting
up, refuelling or removing ash.
• The rate of refuelling and heat available are dependant upon individual
requirements based upon the user’s experience. When reloading, it is
normally necessary to burn the stove fast initially, to drive off any gasses
and moisture before closing the air vents to control the burn rate.
• Overnight burning is achieved by driving off any gasses or moisture as
before, following a full charge of fuel and then closing the air vents fully.
Experience will indicate the optimum setting.
• It is not recommended to leave the stove alight at night or to continue
using the stove in mild weather which gives poor combustion leading to a
greater buildup of soot.
8
A mixture of fuels can be used in conjunction with wood, provided the base
of the fire remains as wood or compressed block fuels, with coal products
being added to this with the volume of coal products being less than that of
other fuels.
With solid fuels, there is less need to burn the stove hard after refuelling. The
rate of refuelling will also be less often than with wood.
WARNING: OVER-FIRING THE STOVE MAY CAUSE A HOUSE FIRE. IF THE
CHIMNEY IS SEEN TO BE GLOWING THE STOVE IS OVER-FIRED.
TYPES OF FUEL
This stove will function with all kinds of either solid fuel or wood but in general
all fuel should be dry and timber should be well seasoned so as to have a
moisture content below 20%. The use of damp wood will result in more soot
and deposits being left in the chimney, flu and stove and will not release
heat if thermal energy is being used to drive out moisture from the fuel.
Avoid using the stove to incinerate other materials including household
waste.
Avoid using ‘green’ unseasoned wood, treated wood such as telegraph
poles, or plywood or chipboard containing glues and resins which pollute the
environment and cause the fire to burn too quickly. Such materials can
produce excessive tar or creosote which can be damaging and in extreme
cases cause a fire inside the chimney.
The dryness of wood can be assessed by looking at the end of the log. Radial
cracks, deep enough to be considered as splits should be present in dry,
seasoned logs. This level of dryness may take up to two years to achieve.
The maximum length of fuel suitable for this stove is approx 26 cm so as to lay
flat over the embers. Logs of greater than 10cm diameter should be split.
Suitable solid fuels may include smokeless fuels such as Phurnacite, Coalite
Nuts or Extracite. Confirm with your fuel provider as to which type will suit
best. Larger fuels will allow a greater draught in the firebox which will speed
up combustion. Household coal is not well suited as it produces excessive ash
and chimney deposits.
ASH REMOVAL
Keep the stove free from a heavy buildup of ash. The frequency of this is
dependant upon the type and quality of fuel being used. Ash should be
removed before it builds up to the underside of the grate, at which point, the
grate would be burning hot on both sides, shortening its life expectancy.
When disposing of ashes, ensure they have cooled and always place in a
metal container. Be sure to remove the ash when the fire is at its lowest point
such as first thing in the morning.
9
MAINTENANCE
The stove and flueway should be inspected and maintained when in a cold
condition.
CHIMNEY SWEEPING
Inspect the flue and chimney for a buildup of deposits especially following
prolonged periods without use. The entire chinmey/flue should be swept
frequently from top to bottom by a registered chimney sweep to remove
any buildup of soot etc, the frequency being dependant upon the usage
and the fuels being burnt. If the chimney is swept after a few weeks of
regular use, the condition found will give an indication of the frequency
required. On an annual basis, the chimney is best swept just before the main
winter burning season.
CLEANING
The inside of the stove may require regular cleaning, especially during
periods of peak use, the frequency of this being indicated by experience. It is
advisable to wear a dust mask, protective gloves and safety glasses when
cleaning.
Use a stiff brush and industrial type vacuum cleaner to dislodge and remove
as much material as possible, starting at the top of the stove and working
down to the bottom. Particular attention should be given to the air inlet
controls which can become obstructed.
GENERAL MAINTENANCE
Take this opertunity to check for any damaged parts inside the stove. In the
event of damage or broken components, replacements can be obtained
from your Clarke dealer. Unauthorised spare parts should on no account be
used.
Inspect the fireproof door seals where fitted, to ensure there is an effective
seal around the door and re-fix it if loose using stove rope adhesive. If in poor
condition it should be replaced.
If the stove is purely ornamental, painting will provide a durable, attractive
finish. If the stove is used for heating and cooking, a high temperature heat
resistant paint must be used, in either aerosol or brush applied form. Should
rust become apparent, clean thoroughly with a wire brush and apply a
suitable anti-rust treatment.
The window glass should remain clean during normal use but it can become
blackened if the stove is being operated with either damp fuels or at a
slowburn rate. The blackening may be dispersed by burning briefly at a much
higher temperature, or it may be cleaned off using specialist glass cleaner.
10
In the event of the glass being broken, it can be removed by unscrewing the
retaining clips, taking care not to damage the fireproof seal. The
replacement glass should be carefully placed against the seal and the
retaining clips re-tensioned. Take care to tension these evenly or there is a risk
of breaking the new glass pane.
During prolonged periods out of use, the air inlets should be left open and the
door left slightly ajar in order to circulate fresh air and discourage
condensation from forming which could encourage corrosion.
If disposing of this product, do not dispose of with general waste. Metal
products should be taken to your local civic amenity site for recycling
of metal products.
11
TROUBLESHOOTING
PROBLEM
CAUSE
SOLUTION
Fire difficult to
start.
Wood green, too damp
or poor quality.
Use recommended fuel.
Logs are too big.
When lighting the fire use small, dry
twigs. To maintain the fire use split logs.
Air starvation.
Open upper and lower air controls.
Insufficient draught.
Check that flue is not obstructed,
sweep flue if necessary.
Too much draught.
Ensure that the lower air control is
closed. Partially close the top air
control.
Excessive draw.
Install a draught stabiliser. Consult your
dealer.
Poor quality wood.
Do not continuously burn small wood,
sticks, carpentry offcuts, plywood etc.
Flue duct is cold.
Burn paper and kindling wood to
increase heat.
Room is at negative air
pressure to the outside.
In houses equipped with mechanical
ventilation, open a window until the
fire is well established.
Low heat
output.
Incorrect fuels.
Use recommended fuels.
Smokes while
burning.
Draught is insufficient.
Consult a chimney specialist. Check
that flue is not obstructed. Sweep if
necessary.
Downdraught.
Install an anti-downdraught cowl.
Consult your dealer.
Room is at negative
pressure to outside.
In houses equipped with mechanical
ventilation, an outside air intake must
be installed in the chimney.
Chimney not tall enough
to be clear of roof line.
Increase height of chimney.
Poor sealing of flue-pipe
joints.
Re-connect flue or replace jointing
material.
Flue is partially blocked
with soot.
Arrange to have chimney swept.
House too tightly sealed.
Ensure a fresh air supply is reaching the
stove.
Fire goes out.
Fire burns too
quickly.
Stove smokes
when lighting
up.
Smoke spillage
when opening
door.
12
PARTS DIAGRAM
IMPORTANT:
The use of parts other than CLARKE replacement parts may result in safety hazards,
decreased appliance performance and may invalidate your warranty.
13
COMPONENT PARTS LIST
No Description
No Description
1 Bottom Plate
14 Control Knob
2
Base Plate
15 Lefthand Door
3
Back Plate
16 Righthand Door
4
Rear Firebrick
17 Fireproof Gasket
5
Left Side Plate
18 Window Glass
6
Right Sideplate
19 Primary Air Control
7
Front Plate
20 Control Knob
8
Top Plate
21 Leg
9
Grate
22 Flue Base
10 Left Firebrick Panel
23 Door Handle
11 Right Firebrick Panel
24 Upper Flue (not shown)
12 Baffle Assembly
25 Blanking Plate
13 Secondary Air Control
14
NOTES
__________________________________________________________________________
__________________________________________________________________________
__________________________________________________________________________
__________________________________________________________________________
__________________________________________________________________________
__________________________________________________________________________
__________________________________________________________________________
__________________________________________________________________________
__________________________________________________________________________
__________________________________________________________________________
__________________________________________________________________________
__________________________________________________________________________
__________________________________________________________________________
__________________________________________________________________________
__________________________________________________________________________
15