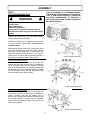
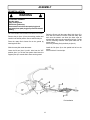
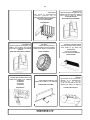
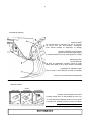
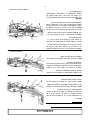
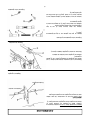
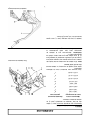
1
OWNER’S MANUAL
Model Number
700312-1
BERCO
Rotary Tiller
Universal mount for
YARD & GARDEN
Tractors
* ASSEMBLY
* REPAIR PARTS
* OPERATION
* MAINTENANCE
CAUTION:
READ & FOLLOW ALL SAFETY RULES & INSTRUCTIONS
BEFORE OPERATING YOUR EQUIPMENT
104307
G-05
LIMITED WARRANTY
Conditions and Products Covered:
Owner’s Responsibilities:
BERCOMAC guarantees any part of the product or accessory
manufactured by BERCOMAC and found in the reasonable
judgment of BERCOMAC to be defective in material and or
workmanship will be repaired or replaced by an authorized
dealer without charge up to our maximum labor rates and preestablished times. For replacement parts only standard
ground freight services are covered. This warranty extends to
the original retail purchaser only and is not transferable to any
subsequent purchasers.
BERCOMAC’s defective equipment or part must be returned
to an authorized dealer within the warranty period for repairs.
In the event that defective merchandise must be returned to
manufacturer for repairs, freight fees are prepaid and a
written authorization from BERCOMAC must be obtained by
dealer prior to the shipment. This warranty extends only to
equipment operated under normal conditions. To validate a
warranty claim, it is the user’s responsibility to maintain and
service the unit as specified in the owner’s manual at their
expense.
Warranty Period
(from date of the original retail purchase):
• Residential use: 1 year
• Commercial or rental use: 90 days
General Conditions:
Exceptions Noted Below: the following items are
guaranteed by the original manufacturer and have their own
warranty, conditions and limited time:
• Tire Chains: 90 days
• Engines (supplied with BERCOMAC equipment): 2 years
Please refer to the engine manufacturer’s warranty
statement included with the unit. BERCOMAC is not
authorized to handle warranty adjustments on engines.
Items and Conditions NOT Covered:
This warranty does not cover the following:
• Pick-up or delivery charges or in-home services fees.
• Any damage or deterioration of the unit, parts and or finish
of these due to normal use, wear and tear, or exposure.
• Cost of regular use or maintenance service or parts, such
as gas, oil, lubricants, tune-up parts, and adjustments.
• Any part or accessory which has been altered, modified,
misused, neglected, accidentally damaged or not properly
installed, maintained, stored or repaired not in accordance
with the instructions in the owner’s manual.
• Repair due to normal wear and or any wear items such as
shear pins, bolts, belts, etc.
• Expedited freight fee services for replacement parts.
• Shear bolts and shear pins are to be considered as a
preventive measure not as an assured protection, any
damages resulting from the lack of shear bolts breakage
are not covered.
The sole liability of BERCOMAC with respect to this warranty
shall be strictly and exclusively repair and replacement as
mentioned herein. BERCOMAC shall not have any liability
for any other costs, loss or damage, including but not limited
to, any incidental or consequential loss or damage.
In particular, without being limited to, BERCOMAC shall have
no liability or responsibility for:
• Travel time, overtime, after hours time or other
extraordinary repair charges or relating to repairs and or
replacements outside of normal business hours.
• Rental of like or similar replacement equipment during the
period of any, repair or replacement work.
• Any communicating or travel charges.
• Loss or damage to person or property other than that
covered by the terms of this warranty.
• Any claims for lost revenue, lost profit or any similar costs
as a result of damage or repair.
• Attorney’s fees.
BERCOMAC’s responsibility in respect to claims is limited to
making the required repairs or replacement without charge
up to our maximum labor rates and pre-established times
and no claim of breach of warranty shall be cause for
cancellation or rescission of the contract of sale of any
product or accessory.
This warranty gives you specific legal rights. You may also
have other rights, which vary from state to state.
NOTE: All warranty work must be performed by an authorized
dealer using original (manufacturer) replacement parts.
Note:
Bercomac reserves the right to change or improve the design of any part or accessory without assuming any obligation to modify
any product previously manufactured.
Instructions for Obtaining Warranty Services:
Contact dealer where equipment was purchased or any other BERCOMAC Service Dealer to arrange service at their dealership. To
locate a dealer convenient to you, access our website at www.bercomac.com.
Bring the product and your proof of purchase (sales receipt) to the BERCOMAC dealer.
Bercomac Limitée
92, Fortin Nord, Adstock, Québec, Canada, G0N 1S0
TABLE OF CONTENTS
PAGE
INTRODUCTION ...................................................................................................................................................
2
SAFETY PRECAUTIONS .....................................................................................................................................
3
SAFETY DECALS .................................................................................................................................................
5
ASSEMBLY
Step 1: Tractor Preparation ....................................................................................................................
Step 2: Rotary Tiller Preparation ............................................................................................................
Step 3: Rotary Tiller Installation, (Primary installation) ..........................................................................
Primary Belt Adjustment ............................................................................................................
Clutch Cable Installation ............................................................................................................
Verify the Rotary Tiller’s Secondary Belt Adjustment ..............................................................
Re-Installation ............................................................................................................................
6
7
9
10
11
12
13
OPERATION
Before Tilling .............................................................................................................................................
Operating the Rotary Tiller .......................................................................................................................
Transporting the Rotary Tiller ..................................................................................................................
Inspecting, Cleaning or Parking the Rotary Tiller ...................................................................................
15
15
15
15
MAINTENANCE
Belt Replacement .....................................................................................................................................
Primary Belt Adjustment ..........................................................................................................................
Secondary Belt Adjustment .....................................................................................................................
Maintenance .............................................................................................................................................
Replacing the Tines .................................................................................................................................
16
16
16
16
17
DISMOUNTING
Dismounting the Rotary Tiller ..................................................................................................................
End of Season Storage ...........................................................................................................................
18
18
TROUBLESHOOTING ..........................................................................................................................................
19
PARTS BREAKDOWN AND LISTS
Rotary Tiller (Frame) ................................................................................................................................
Rotary Tiller (Head) ..................................................................................................................................
20
24
TORQUE SPECIFICATION TABLE .....................................................................................................................
27
ATTACHMENTS ....................................................................................................................................................
28
INTRODUCTION
TO THE PURCHASER
This new attachment was carefully designed to give years of dependable service. This manual has been provided to
assist in the safe operation and servicing of your attachment.
NOTE: All photographs and illustrations in the manual may not necessarily depict the actual models or attachment, but
are intended for reference only and are based on the latest product information available at the time of publication.
Familiarize yourself fully with the safety recommendations and operating procedures before putting the machine to use.
Carefully read, understand and follow these recommendations and insist that they be followed by those who will use
this attachment.
7
THIS SAFETY ALERT SYMBOL IDENTIFIES AN IMPORTANT SAFETY MESSAGE IN THIS MANUAL
THAT HELPS YOU AND OTHERS AVOID PERSONAL INJURY OR EVEN DEATH. DANGER,
WARNING, AND CAUTION ARE SIGNAL WORDS USED TO IDENTIFY THE LEVEL OF HAZARD.
HOWEVER, REGARDLESS OF THE HAZARD, BE EXTREMELY CAREFUL.
DANGER: Signals an extreme hazard that will cause serious injury or death if recommended precautions are
not followed.
WARNING: Signals a hazard that may cause serious injury or death if the recommended precautions are not
followed.
CAUTION: Signals a hazard that may cause minor or moderate injury if the recommended precautions are not
followed.
Record your attachment serial number and purchase date in the section reserved below. Your dealer requires this
information to give you prompt, efficient service when ordering replacement parts. Use only genuine parts when
replacements are required.
If warranty repairs are required please present this registration booklet and original sales invoice to your selling dealer
for warranty service.
This manual should be kept for future reference.
Please check if you have received all the parts for your kit with the list of the
bag and the list of the box.
SERIAL NUMBER :
___________________________
PURCHASE DATE :
___________________________
In this manual, right and left sides are determined by sitting on the tractor seat facing forward.
In this manual, "attachment" means accessories that you install on the tractor, such as, snowblower, rotary
broom, blade, rotary tiller, cab, subframe, etc...
2
SAFETY PRECAUTIONS
Careful operation is your best insurance against an accident. Read this section carefully before operating the tractor
and rotary tiller . All operators, no matter how experienced they may be, should read this and other manuals related to
the tractor and rotary tiller before operating. It is the owner's legal obligation to instruct all operators in safe operation of
rotary tiller.
5. Never attempt to make any adjustments while the
engine (motor) is running (except when specifically
recommended by manufacturer).
TRAINING
7
This symbol, "Safety Alert Symbol", is used
throughout this manual and on the rotary tiller
safety labels to warn of the possibility of personal
injury. Please take special care in reading and
understanding the safety precautions before
operating the rotary tiller or the tractor.
6. Always wear safety glasses or eye shields during
operation or while performing an adjustment or
repair to protect eyes from foreign objects that may
be thrown from the machine.
7. Do not wear audio headphones while operating the
tiller.
1. Read this owner's manual carefully. Be thoroughly
familiar with the controls and proper use of the
rotary tiller. Know how to stop the unit and
disengage the controls quickly.
8. Wear appropriate protective device such as
earplugs or earmuffs to protect ears from loud
noises which can cause hearing impairment or
even loss of hearing.
2. Never allow children to operate rotary tiller. Never
allow adults to operate rotary tiller without proper
instructions.
OPERATION
3. No one should operate the unit while intoxicated or
while taking medication that impairs the senses or
reactions.
1. Do not put hands or feet near or under rotating
parts.
4. Keep the area of operation clear of all persons,
particularly small children and pets.
PREPARATION
2. Exercise extreme caution when operating on or
crossing gravel drives, walks, or roads. Stay alert
for hidden hazards or traffic. Do not carry
passengers.
1. Thoroughly inspect the area where the rotary tiller is
to be used and remove rocks, wood, all foreign
objects and the like.
3 After striking a foreign object stop the machine and
inspect for damage. Repair any damage before
restarting and operating.
2. Disengage all clutches and shift into neutral before
starting engine.
4. If the unit should start to vibrate abnormally, stop
the engine (motor) and check immediately for the
cause. Vibration is generally a warning of trouble.
3. Do not operate the rotary tiller without wearing
adequate garments such as close fitting clothing
and adequate footwear that will improve footing and
protect your toes.
5. Stop the engine (motor) whenever you leave the
operating position.
6. Take all possible precautions when leaving the
machine unattended. Disengage the power take-off,
lower the attachment, set the parking brake, stop
the engine and remove the key. Wait for all moving
parts to stop before leaving the driver’s seat.
4. Handle fuel with care, it is highly flammable.
a) Use approved fuel container.
b) Never add fuel to a running engine or hot engine.
c) Fill fuel tank outdoors with extreme care. Never
fill fuel tank indoors.
d) Replace fuel cap securely and wipe up spilled
fuel.
3
SAFETY PRECAUTIONS
7. Before cleaning, unclogging, repairing or inspecting,
make certain all moving parts have stopped.
Disconnect wire from the spark plug(s) and keep
wire away to prevent accidental starting.
MAINTENANCE AND STORAGE
1. Never store the machine with fuel in the fuel tank
inside a building where ignition sources are
present such as hot water and space heaters,
clothes dryers, and the like. Allow the engine to
cool before storing in any enclosure.
8. Do not run the engine indoors, except when
starting the engine and for transporting the rotary
tiller in or out of the building. Do not operate or let
motor run in a storage area without ventilation
because gas contains carbon monoxide which is
odourless, colorless and can cause death.
2. Always refer to the owner’s manual when you store
the rotary tiller.
3. Maintain or replace safety and instruction labels,
as necessary.
9. Do not till across the face of slopes. Exercise
extreme caution when changing direction and slow
down on slopes. Do not attempt to till steep slopes,
(more than 10%), near the edge of a ditch or a
bank since the tiller can push the tractor.
10. Never operate the rotary tiller without proper
guards, plates, or other safety protective devices in
place. Never operate the rotary tiller with the
deflector in the raised position. Never remove the
deflector from the back of the tiller.
11. Never operate the rotary tiller near glass
enclosures, automobiles, window wells, drop-offs.
Keep children and pets away.
12. Never operate the rotary tiller at high transport
speed. Use special care when backing up.
WHENEVER YOU SEE THIS SYMBOL
7
13. Disengage power to the rotary tiller when it is
transported or not in use.
14. Use only accessories approved by the
manufacturer of the tractor (such as wheel chains,
front counterweights, cabs and the like).
IT MEANS:
WARNING!
15. Never operate the rotary tiller without good visibility
or light.
BECOME ALERT !
YOUR SAFETY IS INVOLVED!
4
SAFETY DECALS
REPLACE IF DECALS ARE DAMAGED
SEE PARTS BREAKDOWN FOR DECAL LOCATION
Decal #103432
Decal #103435
Decal #103433
Decal #103455
5
Decal #103434
Decal #103464
ASSEMBLY
STEP 1
TRACTOR PREPARATION:
7
WARNING
THIS ATTACHMENT IS A UNIVERSAL MOUNT.
THE MANUFACTURER DOES NOT GUARANTEE
THAT IT CAN BE SUCCESSFULLY INSTALLED
ON EVERY BRAND/MODEL OF TRACTOR. A
BELT SIZE OTHER THAN THE BELTS SUPPLIED
MAY BE NECESSARY.
7
TO PREVENT INJURIES:
Stop the motor.
Apply parking brake.
Remove the ignition key.
Disconnect the wire from the spark plug(s) and
keep away from spark plug(s) to prevent accidental
starting.
Remove the mower deck. See the tractor owner’s
manual for dismounting instructions.
Measure the height (item 1) between the tractor’s rear
tow hitch and the ground. This measurement is
needed for Step 2.
Block the front wheels of the tractor. Using a jack, lift the
rear end of the tractor and remove the wheels. Block in
place with an axle stand (item 4) under each side.
Determine which bolt holes measure 16 1/4” center to
center (item 3) in order to bolt the mounting brackets. If
bolts (item 2) are already installed, remove them.
Remove wheels and bolts
Tractors with parallel transaxle:
Install the mounting brackets (item 2), the 90° end
towards the front with the hole (item 3) towards the
center as shown. Shim with flat washers or sleeves
(item 4) as needed between the mounting bracket and
the transaxle so that the mounting bracket is parallel
with the transaxle. Secure with the appropriate length
bolts and nuts as shown. Do not tighten.
Install mounting brackets
Tractors with angled transaxle:
Install the mounting brackets (item 2), the angled end
towards the front with the hole (item 4) towards the
center. If needed, shim with flat washers (item 3)
between the mounting bracket and the transaxle so that
the mounting bracket is parallel with the transaxle.
Secure with the appropriate length bolts and nuts as
shown. Do not tighten.
Install mounting brackets
6
ASSEMBLY
STEP 2
ROTARY TILLER PREPARATION
Determine the set of holes (item 1) to use to attach the
tiller’s hitch (item 2) by using the following chart:
*Measurement from the
ground to the tow hitch
Set of holes
from the top
7.00" to 7.63"
8th
7.63" to 8.25"
7th
8.25" to 8.87"
6th
8.87" to 9.5"
5th
9.5" to 10.12"
4th
10.12" to 10.75"
3rd
10.75" to 11.37"
2nd
11.37" to 12.00"
1st
*These measurements are given as a reference only.
Attach the tiller’s hitch
After installing the rotary tiller, the frame should be 4.5"
to 5.5" off the ground.
Note: If the tiller’s frame touches the back of the tractor,
you may add one to four shims (item 3) between the
tiller’s back wall and the tiller hitch (item 2). If using more
than two shims, use the 3/8 x 2" hex bolts.
Verification: Make sure the tiller’s frame will pass under
the transaxle when dismounting the tiller.
Install the lift arm (item 1) with four 5/16 x 3/4" bolts
(item 2) and flange nuts.
Install the lift arm
7
ASSEMBLY
For Installation Purposes Only:
Remove the pin (item 1) from the working position and
insert it in the locked position (item 2). Secure in place
with a hair pin (item 3).
IMPORTANT:
To avoid damage to the tiller, never use tiller with
pin in locked position.
Locked Position
Working Position
Move the pin to locked position
Loosen the square head set screw (item 1) that holds
the mounting pin (right and left) (items 2 & 3).
Slide the mounting pins towards the back of the frame.
Unscrew and remove the hitch pin (item 4).
Prepare the pins
Prepare the adjusting link as shown.
Apply grease on the adjusting rod (item 1).
Insert the two nuts (item 2) on the adjusting rod and
screw to the middle.
Install the two links (item 3) on each end of the adjusting
rod.
Insert a flange nut (item 5) (head first) on the bolt (item
6) and screw down to the end of the threads as shown
(item 4).
Prepare the adjusting link
8
ASSEMBLY
STEP 3
ROTARY TILLER INSTALLATION:
(Primary installation)
Lower the lift arm to place the rotary tiller’s frame flat on
the ground. Slide the rotary tiller under the tractor.
Lower the lift arm (item 1) until it locks in the "UP"
position (item 2) to lift the front portion then lower the
support (item 3) onto the ground.
Raise the lift arm until the rotary tiller’s hitch (item 4) is
even with the tractor’s tow hitch. Slide the rotary tiller
hitch onto the tractor’s tow hitch (the holes must be
aligned). Secure by screwing the hitch pin (item 5)
firmly.
Line up the rotary tiller’s frame with the tractor’s frame.
Lift and slide the mounting pins (item 6) into the
mounting bracket’s holes (item 7) (both sides previously
installed on transaxle). Lightly tighten the square head
screws on the mounting brackets (item 8).
Install the tiller to tractor
To install the adjustable link, locate or if needed drill a
hole in the tractor’s frame directly above the hole on the
tiller’s frame as shown.
Note: Check the primary belt alignment before drilling
the hole.
Install the special bolt (item 1) from the outside of the
frame and secure in place with a flange nut (on the
inside of the tractor frame). Tighten firmly. Do the same
on the rotary tiller’s frame.
Attach the link (item 2) on the bolts (item 1) installed.
Secure with two 2.5 mm. hair pins (item 3).
Install the adjustable link
9
ASSEMBLY
Install the primary belt (item 1) on the engine pulley
(item 2).
Note: Choose the appropriate belt among the ones
supplied. However, the rotary tiller being a universal
mounting, a belt size other than the ones supplied
may be necessary.
Align the belt by raising or lowering the front end of the
rotary tiller using the adjusting link (item 3).
Tighten the nuts on the links very firmly.
Lift the support (item 4).
Install primary belt
Make sure both sides of the rotary tiller’s frame (item 1)
are at the same height from the ground.
Tighten firmly the bolts that hold the mounting brackets
to the transaxle.
Tighten the square head set screws (item 2) very firmly
on the mounting pins (both sides of tractor).
TIP: To make sure the frame is even, the bottom portion
(item 3) of the mounting pins must measure equally on
both sides. Tire pressure in both rear tractor tires must
be identical.
Tighten the screws
PRIMARY BELT ADJUSTMENT
Tractors with an electric clutch mechanism:
Adjust the tension on the primary belt by loosening the
square head set screw (item 1). Pull the tension rod
(item 2) to stretch the spring (item 3) by 3/4" to 1".
Tighten the square head screw securely.
Adjust spring
10
ASSEMBLY
CLUTCH CABLE INSTALLATION
Tractors with manual clutch mechanism:
Disengage the clutch:
If your cable (item 1) does not have a spring at the end,
attach the cable to the spring (item 3) on the tiller and
attach the cable on the adjustable tension rod (item 2).
Secure in place.
Note: The tension rod (item 2) can be adjusted or
inverted (as shown) to accommodate the length of the
cable.
Note: If you have a cable with a spring at the end, go to
the next step.
Install cable
If your clutch cable has a spring at the end, you must
remove the original spring from the tiller.
Attach the cable’s spring (item 1) to the extension bar
(item 2). Attach the cable shield on the tension rod (item
3) and secure in place with a hair pin.
Note: The tension rod can be adjusted and rotated to
accommodate the length of the cable.
Install spring
Install the spring (item 2) that releases the tension on
the belt, the short hook in the idler arm (item 3) and the
long hook on the rod (item 4).
Adjust the cable when the clutch is engaged. The spring
(item 5) should be stretched to approx. 3/4" to 1"
Install the stopper (item 1) with a 5/16 x 3/4" bolt, flat
washer on the slot and flange nut. Adjust the stopper in
order to be sure the belt does not fall off the engine
pulley when the P.T.O. is disengaged. However, the belt
must be loose enough to allow tiller to stop turning
immediately when P.T.O. is disengaged.
OPTION
If your tractor does not have a clutch cable or the cable
is too short, a "clutch mechanism kit" under model
number #700319 is available as an option.
Install spring and stopper
11
ASSEMBLY
VERIFY THE ADJUSTMENT OF THE ROTARY
TILLER’S SECONDARY BELT:
When the belt is correctly adjusted, you should barely
see the hole in the tension gauge (item 1).
If the hole is exposed (item 2), readjust the belt by
screwing the nut (item 3) until well adjusted (item 1).
Adjustment
Requires
adjustment
Well adjusted
Adjust tension
Reinstall the rear wheels on the tractor.
Move the lift arm (item 1) to the hole (item 2) identified
"0 depth".
Loosen the bolt (item 3) and slide it down in the slot till it
touches the lift arm (item 4).
Tighten firmly.
Remove the pin (item 5) from the locked position and
install it in the working position.
Secure with the hair pin.
Raise the rotary tiller and let it run under supervision.
Make sure everything is running smoothly and that both
V belts do not touch the belt guides.
Last adjustments
12
ASSEMBLY
RE-INSTALLATION:
7
WARNING
7
TO PREVENT INJURIES:
Stop the motor.
Apply parking brake.
Remove the ignition key.
Disconnect the wire from the spark plug(s) and
keep away from spark plug(s) to prevent accidental
starting.
On a level surface remove the mower deck from tractor.
Raise the lift arm until the rotary tiller’s hitch (item 5) is
even with the tractor’s tow hitch. Slide the rotary tiller
hitch onto the tractor’s tow hitch (the holes must be
aligned) and make sure the mounting pins (item 7) slide
into the mounting bracket’s holes (both sides left on
tractor frame).
Secure by screwing firmly the hitch pin (item 6).
Remove the pin (item 1) from the working position and
install it in the locked position. Secure with the hair pin.
Place the rotary tiller’s frame flat on the ground by
lowering the lift arm.
Slide the rotary tiller under the tractor.
Install the link (item 8) on the special bolt left on the
tractor.
Secure with a 2.5 mm hair pin.
Lower the lift arm (item 2) until it locks into the "UP"
position (item 3) to lift the front portion then lower the
support (item 4) to rest the tiller’s frame on the ground.
Re-installation
13
ASSEMBLY
Install the drive belt (item 1) on the engine pulley (item
2).
Lift the support (item 3).
If your tractor is equipped with a manual clutch, install
the spring (item 4) at the end of cable to the extension
bar (Item 5). Attach the cable shield to the adjustable
tension rod (item 6).
Secure in place with a hair pin.
Install belt and cable
Raise the tiller and remove the pin (item 7) from locked
position and insert it in the working position (item 8)
inside of the plate.
Secure with a hair pin (item 9).
Locked position
Working position
Move the pin to working position
14
OPERATION
7
CAUTION
7
OPERATING THE ROTARY TILLER
-Lower the tiller and adjust the tilling depth to 1" or
deeper after first pass.
-Push the throttle lever to the medium position.
-Disengage the parking brake.
-Put the P.T.O. control in the ON position to engage the
rotary tiller. (See tractor’s owner’s manual for
instructions).
-Engage the transmission in first gear or move forward
slowly if the tractor has a hydro transmission.
-Till the ground at a shallow depth and at slow traveling
speed.
TO PREVENT INJURIES:
-Remove all objects and keep people away from
the working area.
-Never let children operate the rotary tiller or
tractor.
-Never let children ride on the tractor or rotary
tiller.
-Never operate the rotary tiller without the guards
and shields in place.
7
WARNING
FRONT
WEIGHT
IS
COUNTERBALANCE THE
ROTARY TILLER.
REQUIRED
WEIGHT OF
7
7
TO
THE
IMPORTANT
7
TO PREVENT INJURIES
Tiller may push tractor forward when tilling in
firm soil.
BEFORE TILLING:
-Mow the grass and weeds before tilling, these can wrap
around the tines or tine shaft.
-Remove all objects that can damage the rotary tiller
such as rocks, branches, etc…
-Check the tines before tilling. Repair or replace any
loose, bent or broken tines.
-Do not till when the ground is too wet (if the soil forms a
ball in your hand when squeezed). The wet soil will
stick to the tines and tine shaft.
7
CAUTION
TRANSPORTING THE ROTARY TILLER:
Always lift the rotary tiller off the ground by lowering the
lift arm as far as it will go when moving from one tilling
area to another. Drive at a safe traveling speed when
the tiller is off the ground because of the extra weight
due to the rotary tiller, the tractor is unbalanced. Drive
slowly on slopes and rough ground. Even with front
weights, it is dangerous to climb slopes greater than
10%. Never work across the face of a slope
INSPECTING, CLEANING OR PARKING THE
ROTARY TILLER
7
7
AVOID DAMAGE TO THE ROTARY TILLER
Never back up or make sharp turns with the
rotary tiller in the ground.
CAUTION
7
TO PREVENT INJURIES
Always stop the engine and wait for all moving
parts to stop before leaving the driver’s seat to
avoid injuries from the tines.
When breaking ground, it is recommended to till in
two to four stages. The first pass should be tilled at a
shallow depth then progressively deeper with each
pass.
7
WARNING
7
TO PREVENT INJURIES:
Stop the motor.
Apply parking brakes.
Remove the ignition key.
Disconnect the wire from the spark plug(s) and
keep away from spark plug(s) to prevent accidental
starting.
Lower the tiller to the ground.
When only a small area is to be tilled, make a pass
through the middle, then circle the pass going
towards the outside.
Whenever possible, till straight ahead, tilling in circles
will leave ridges.
15
MAINTENANCE
7
WARNING
7
PRIMARY BELT ADJUSTMENT
Tractors with an electric clutch mechanism:
TO PREVENT INJURIES:
Stop the motor.
Apply parking brake.
Remove the ignition key.
Disconnect the wire from the spark plug(s) and
keep away from spark plug(s) to prevent accidental
starting.
Adjust the tension on the front belt by loosening the
square head set screw (item 10). Pull the adjustable
tension rod (item 11) to stretch the spring by 3/4" to 1".
Tighten the screw securely.
Tractors with a manual clutch mechanism:
BELT REPLACEMENT:
Adjust the cable so that the spring is stretched by 3/4" to
1" when the clutch mechanism is engaged.
Primary belt:
-Remove the belt from engine pulley.
-Remove the bolt (item 1) that holds the idler (item 2).
-Remove the belt (item 3) and reinstall the new one on
the double pulley (item 7) as shown.
-Reinstall the idler (item 2) and belt guide (item 4) in the
same manner as removed. Make sure the belt guide is
90° with the idler arm.
-Reinstall the belt on the engine pulley.
SECONDARY BELT ADJUSTMENT
When the belt is correctly adjusted, you should barely
see the hole in the tension gauge (item 1).
If the hole is exposed (item 2), adjust the belt by
screwing the nut (item 3) until well adjusted.
Adjustment
Replace belts
Requires
adjustment
Well adjusted
Adjust tension
Secondary Belt:
-Unscrew the belt tension nut (item 5).
-Remove the bolt (item 6) and remove the double
pulley (item 7).
-Remove the belt guard (item 9).
-Remove the belt (item 8) and install the new one.
Make sure it is routed as shown.
-Reinstall as dismounted by reversing the steps.
-Screw the tension nut to adjust the V-belt until you
barely see the hole in the tension gauge.
-See secondary belt adjustment instructions
MAINTENANCE
After every hour:
-Remove trash from the tines if necessary.
After every 4 hours:
-Check belt tension
-Adjust if needed
-Clean under the belt.
After every 8 hours or once a year:
-Grease the tiller drive shaft.
a) Provide adequate blocking before working under the
tractor or rotary tiller when in raised position.
b) Check mounting bolts at frequent intervals for proper
tightness in order to prevent costly repairs. Make
sure your rotary tiller is in good working condition.
Secondary belt
16
MAINTENANCE
7
REPLACING THE TINES
7
WARNING
7
CAUTION
7
TO PREVENT INJURIES:
Always safely block the tiller if you have to work
under it. It is not recommended to work under the
tiller because it could fall on you and cause very
serious injuries.
TO PREVENT INJURIES:
Stop the motor.
Apply parking brake.
Remove the ignition key.
Disconnect the wire from the spark plug(s) and
keep away from spark plug(s) to prevent accidental
starting.
Note: To facilitate replacing the tines,
you may remove the tiller from the tractor and turn it
upside down.
-Park the tractor safely.
-Raise the tiller as high as it will go and put some blocks
under the tiller.
Note: Each group of tines must have two left tines and
two right tines.
Left group of tines
For reference purposes:
-Alternate left and right tines in each group.
-A bolt with no spacer is 3/8 x 1 1/4" long.
-A bolt with one spacer is 3/8 x 1 3/4" long.
-A bolt with two spacers is 3/8 x 2 1/4" long.
LEFT GROUP OF TINES:
Remove the nuts (item 1), bolts (item 2) spacers (item
3), two left tines (4) and two right tines (item 5).
Install the new tines with same hardware in exactly the
same position as the old ones were installed.
MIDDLE GROUP OF TINES:
Remove the nuts (item 6), bolts (item 7), spacers (item
8), two left tines (item 9) and two right tines (item 10).
Install the new tines with same hardware in exactly the
same position as the old ones were installed.
Middle group of tines
RIGHT GROUP OF TINES:
Remove the nuts (item 11), bolts (item 12) spacers (item
13), two left tines (item 14) and two right tines (item 15).
Install the new tines with same hardware in exactly the
same position as the old ones were installed.
Right group of tines
17
DISMOUNTING
DISMOUNTING THE ROTARY TILLER
7
WARNING
END OF SEASON STORAGE:
a) Clean the rotary tiller.
7
b) Check the belts.
TO PREVENT INJURIES:
Stop the motor.
Apply parking brake.
Remove the ignition key.
Disconnect the wire from the spark plug(s) and
keep away from spark plug(s) to prevent accidental
starting.
c) Replace damaged or worn parts.
d) Paint scratched surfaces to prevent rust.
e) Lubricate the grease points.
f)
On a level surface, park the tractor and apply the
parking brake.
a) Install the pin (item 1) in the locked position.
b) Lower the tiller to the ground.
c) Remove the V-belt from the engine pulley (item 9).
d) Disconnect the clutch cable if installed.
e) Lower the front support (item 4).
f)
Remove the link (item 8) from the tractor frame.
g) Raise the tiller’s lift arm (item 2) to support the tiller
frame.
h) Unscrew the pin (item 6) from the hitch.
i)
Pull out the tiller from the tractor hitch.
j)
Using the lift arm, lower the tiller to the ground and
raise the front support.
k) Place the lift arm so the tiller rests flat on the
ground.
l)
Slide out the tiller from the tractor.
18
Store the tiller on a hard level surface in a clean,
dry place. If tiller must stay outside, wrap it in a
waterproof cover.
TROUBLESHOOTING
PROBLEM
Tiller will not turn.
Tiller operates irregularly.
POSSIBLE CAUSES
CORRECTIVE ACTION
Belt is damaged.
Replace the belt.
Belt is broken.
Replace the belt.
Belts are loose.
Tighten belts.
Belts are damaged.
Replace belts.
A group of tines may be packed up.
Remove any debris from the tines.
Till at a slow steady speed.
Make more than one pass. Start by
shallow pass then gradually deeper.
Replace damaged or bent tines.
Tiller is noisy or bouncing at the Tines are damaged or too many Replace bent or damaged tines.
back of tractor.
rocks.
Remove any rocks from tilling area.
19
PARTS BREAKDOWN / NOMENCLATURE DES PIÈCES
ROTARY TILLER (FRAME) / ROTOCULTEUR (CHÂSSIS)
20
PARTS LIST / LISTE DES PIÈCES
Ref.
Réf.
English description
Description française
Qty.
Qté.
Part #
Pièce #
1 Frame
Châssis
1
103436
2 Hitch
Attache
1
103437
3 Hitch pin
Goupille d'attache
1
103438
4 Hex. bolt 3/8" n.c. x 3/4"
Boulon hex. 3/8" n.c. x 3/4"
2
O/L
5 Flange nut 3/8" n.c.
Écrou à bride 3/8" n.c.
15
O/L
6 Hex. bolt 3/8" n.c. x 3"
Boulon hex. 3/8" n.c. x 3"
1
O/L
7 Belt guard
Garde-courroie
1
103439
8 Nylon insert lock nut 3/8" n.c.
Écrou à garniture de nylon 3/8" n.c.
2
O/L
9 Spacer
Douille
1
103429
10 Flat pulley
Poulie plate
1
102765
11 Spacer
Espaceur
1
102241
12 Support
Support
1
103440
13 Spring
Ressort
1
102892
14 Nylon insert lock nut 5/16" n.c.
Écrou à garniture de nylon 5/16" n.c.
5
O/L
15 Hex. bolt 5/8" n.c. x 5 1/2"
Boulon hex. 5/8" n.c. x 5 1/2"
1
O/L
16 Flat washer 11/16" hole
Rondelle plate 11/16" trou
1
O/L
17 Hex. bolt 5/16" n.c. x 1 3/4"
Boulon hex. 5/16" n.c. x 1 3/4"
1
O/L
18 Square head set screw 3/8" x 1/2"
Vis à pression à tête carré 3/8" x 1/2"
3
O/L
19 Mounting plate
Plaque de montage
1
103441
20 Flange washer
Rondelle à bride
2
102081
21 Hex. bolt 3/8" n.c. x 1"
Boulon hex. 3/8" n.c. x 1"
2
O/L
22 Spring
Ressort
1
102152
23 Idler arm
Bras de tension
1
103442
24 Idler arm
Bras de tension
1
103443
25 Flat washer 3/8" hole
Rondelle plate 3/8" trou
7
O/L
26 Belt guide
Guide-courroie
1
102840
27 Flat pulley
Poulie plate
2
102839
28 Hex. bolt 3/8" n.c. x 2"
Boulon hex. 3/8" n.c. x 2"
7
O/L
29 Spacer
Espaceur
1
102753
30 Bearing
Roulement à billes
2
102736
O/L = Obtain locally/obtenir localement
21
PARTS LIST / LISTE DES PIÈCES
Ref.
Réf.
English description
Description française
Qty.
Qté.
Part #
Pièce #
31 Nylon insert lock nut 1/4" n.c. (thin)
Écrou à garniture de nylon 1/4" n.c. (mince)
2
O/L
32 Extension bar
Barre d'extension
1
103444
33 Hex. bolt 1/4" n.c. x 3/4"
Boulon hex. 1/4" n.c. x 3/4"
1
O/L
34 Double pulley inc. 102736 & 102782
Poulie double inc.102736 & 102782
1
103416
35 Sleeve
Douille
1
102782
36 Nylon insert lock nut 5/8" n.c.
Écrou à garniture de nylon 5/8" n.c.
1
O/L
37 Clamp
Crampe
2
103445
38 Right mounting pin
Goupille de montage droite
1
103446
39 Left Mounting pin
Goupille de montage gauche
1
103447
40 Right mounting bracket
Support de montage droit
1
103448
41 Left mounting bracket
Support de montage gauche
1
103449
42 Shim
Cale
4
103450
43 Hex. bolt 5/16" n.c. x 3 1/2"
Boulon hex. 5/16" n.c. x 3 1/2"
4
O/L
44 Spring
Ressort
1
102861
45 Sleeve
Douille
1
102418
46 Arm
Bras
1
103451
47 Pin-lock
Goupille de barrure
1
103398
48 Hex. bolt 1/4" n.c. x 1 3/4"
Boulon hex. 1/4" n.c. x 1 3/4"
1
O/L
49 Spring
Ressort
1
102868
50 Lift mechanism
Mécanisme de relevage
1
103452
51 Flange nut 5/16" n.c.
Écrou à bride 5/16" n.c.
6
O/L
52 Hex. bolt 5/16" n.c. x 3/4"
Boulon hex. 5/16" n.c. x 3/4"
5
O/L
53 Cable shield
Gaine de câble
1
104304
54 Cable
Câble
1
104305
55 Handgrip
Poignée
1
103453
56 Lever w/104304 - 104305 - s. screw
Levier a/104304 - 104305 - v. pression
1
104306
57 Lift arm
Bras de relevage
1
103454
58 V-belt, B-99 (sb)
Courroie en v, B-99 (sb)
1
103414
59 V-belt, A-53
Courroie en v, A-53
1
103400
60 Decal depth
Décalque profondeur
1
103455
O/L = Obtain locally/obtenir localement
22
PARTS LIST / LISTE DES PIÈCES
Ref.
Réf.
English description
Description française
Qty.
Qté.
Part #
Pièce #
61 Left Bracket
Plaque de fixation gauche
1
103456
62 Nylon bushing
Coussinet en nylon
1
103087
63 Hex. socket set screw 1/4" n.c. x 1/4"
Vis à pression hex. 1/4" n.c. x 1/4"
2
O/L
64 Spring 1/2"
Ressort 1/2"
1
102003
65 Spring
Ressort
1
102304
66 Adjustable tension rod
Tige de tension ajustable
1
103457
67 Tie wrap 7"
Attache de nylon 7"
2
O/L
68 Special bolt
Boulon spécial
2
103458
69 Link
Lien
2
103459
70 Hex. nut 1/2" n.c. (thin)
Écrou hex. 1/2" n.c. (mince)
2
O/L
71 Adjusting rod
Tige d'ajustement
1
103460
72 Spacer
Douille d'espacement
4
103463
73 Hair pin 2.5mm
Goupille à ressort 2.5mm
2
102013
74 Spacer
Douille
1
103461
75 Sleeve
Douille
1
102322
76 Tension gauge
Indicateur de tension
1
103462
77 Hex. bolt 3/8" n.c. x 1 1/4"
Boulon hex. 3/8" n.c. x 1 1/4"
4
O/L
78 Decal belt adjustment
Décalque ajustement de la courroie
1
103464
79 Stopper
Butée
1
103486
80 Flat washer 5/16" hole
Rondelle plate 5/16" trou
13
O/L
81 Hex. bolt 5/16" n.c. x 4"
Boulon hex. 5/16" n.c. x 4"
4
O/L
82 V-belt, A-58
Courroie en v, A-58
1
103518
83 V-belt, A-62
Courroie en v, A-62
1
104299
O/L = Obtain locally/obtenir localement
23
PARTS BREAKDOWN / NOMENCLATURE DES PIÈCES
ROTARY TILLER (HEAD) / ROTOCULTEUR (TÊTE)
24
PARTS LIST / LISTE DES PIÈCES
Ref.
Réf.
English description
Description française
Qty.
Qté.
Part #
Pièce #
1 Frame
Châssis
1
103417
2 Tine shaft
Arbre des dents
1
103418
3 Left tine
Dent gauche
8
103419
4 Right tine
Dent droite
8
103420
5 Spacer
Douille
12
103421
6 Nylon insert lock nut 3/8" n.c.
Écrou à garniture de nylon 3/8" n.c.
18
O/L
7 Hex. bolt 3/8" n.c. x 1 1/4"
Boulon hex. 3/8" n.c. x 1 1/4"
6
O/L
8 Hex. bolt 3/8" n.c. x 1 3/4"
Boulon hex. 3/8" n.c. x 1 3/4"
8
O/L
9 Hex. bolt 3/8" n.c. x 2 1/4"
Boulon hex. 3/8" n.c. x 2 1/4"
2
O/L
10 Drive shaft
Arbre d'entraînement
1
103422
11 Sprocket assembly
Pignon assemblé
1
103423
12 Chain guard
Garde-chaîne
1
103424
13 Deflector
Déflecteur
1
103425
14 Rod
Tige
1
103426
15 Roller chain #50 x 66 links/conn. link
Chaîne #50 x 66 mailles/maille acc.
1
103427
16 Connecting link #50
Maille d'accouplement #50
1
104324
17 Carriage bolt 1/4" n.c. x 5/8"
Boulon à carrosserie 1/4" n.c. x 5/8"
10
O/L
18 Flange nut 1/4" n.c.
Écrou à bride 1/4" n.c.
10
O/L
19 Flangette
Flangette
1
102680
20 Bearing with collar and set screw
Roulement à billes avec collet & vis à pres.
2
103466
21 Dust cover
Protège poussière
2
103428
22 Carriage bolt 5/16" n.c. x 1 1/4"
Boulon à carrosserie 5/16" n.c. x 1 1/4"
4
O/L
23 Flangette
Flangette
2
102213
24 Flange nut 5/16" n.c.
Écrou à bride 5/16" n.c.
4
O/L
25 Nylon Insert Lock nut 7/16" n.c.
Écrou à garniture de nylon 7/16" n.c.
2
O/L
26 Hex. bolt 7/16" n.c. x 2" GR8
Boulon hex. 7/16" n.c. x 2" GR8
2
O/L
27 Cotter pin 5/32" x 1"
Goupille fendue 5/32" x 1"
1
O/L
28 Shim washer
Rondelle d'espacement
1
103430
29 Grease fitting 1/4" n.f.
Graisseur 1/4" n.f.
1
O/L
O/L = Obtain locally/obtenir localement
25
PARTS LIST / LISTE DES PIÈCES
Ref.
Réf.
English description
Description française
Qty.
Qté.
Part #
Pièce #
30 Seal
Joint d'étanchéité
1
103431
31 Needle bearing
Roulement à aiguilles
2
103465
32 Spring
Ressort
1
103291
33 Hex. bolt 3/8" n.c. x 1"
Boulon hex. 3/8" n.c. x 1"
2
O/L
34 Key 3/16" x 3/16" x 1.000"
Clé 3/16" x 3/16" x 1.000"
1
102379
35 V pulley
Poulie en V
1
103415
36 Hex. socket set screw 5/16" n.c. x 5/16"
Vis à pression hex. 5/16" n.c. x 5/16"
2
O/L
37 Pin
Goupille
1
102188
38 Hair pin 3mm
Goupille à ressort 3mm
1
102617
39 Hex. bolt 3/8" n.c. x 3/4"
Boulon hex. 3/8" n.c. x 3/4"
1
O/L
40 Flange nut 3/8" n.c.
Écrou à bride 3/8" n.c.
1
O/L
41 Nylon insert lock nut 5/16" n.c.
Écrou à garniture de nylon 5/16" n.c.
4
O/L
42 Tensioner
Tensionneur
1
103289
43 Decal attention
Décalque attention
1
103433
44 Decal warning
Décalque warning
1
103434
45 Decal important
Décalque important
1
103435
46 Berco decal
Décalque Berco
1
102471
47 Decal danger
Décalque danger
2
103432
48 Serial number
Numéro de série
1
REF
O/L = Obtain locally/obtenir localement
26
TORQUE SPECIFICATION TABLE
GENERAL TORQUE SPECIFICATION TABLE
USE THE FOLLOWING TORQUES WHEN SPECIAL TORQUES ARE NOT GIVEN
NOTE: These values apply to fasteners as received from supplier, dry or when lubricated with normal oil. They do not apply if
special graphited or moly disulphide greases or other extreme pressure lubricants are used. This applies to both UNF and UNC
threads.
SEE Grade No.
BOLT HEAD
IDENTIFICATION
MARKS AS PER GRADE
NOTE MANUFACTURING
MARKS WILL VARY
BOLT SIZE
Inches
2
5
8*
TORQUE
TORQUE
TORQUE
POUNDS FEET
Millimetre
Min.
Max.
NEWTON-METERS
Min.
Max.
POUNDS FEET
Min.
NEWTON-METERS
POUNDS FEET
NEWTON-METERS
Max.
Min.
Max.
Min. Max.
Max.
Min. Max.
Max.
1/4"
6.35
5
6
6.8
8.13
9
11
12.2
14.9
12
15
16.3
30.3
5/16"
7.94
10
12
13.6
16.3
17
20.5
23.1
27.8
24
29
32.5
39.3
3/8"
9.53
20
23
27.1
31.2
35
42
47.5
57
45
54
61
73.2
7/16"
11.11
30
35
40.7
47.4
54
64
73.2
86.8
70
84
94.9
113.9
1/2"
12.7
45
52
61
70.5
80
96
108.5
130.2
110
132
149.2
179
9/16"
14.29
65
75
88.1
101.6
110
132
149.2
179
160
192
217
260.4
5/8"
15.88
95
105
128.7
142.3
150
180
203.4
244.1
220
264
298.3
358
3/4"
19.05
150
185
203.3
250.7
270
324
366.1
439.3
380
456
515.3
618.3
7/8"
22.23
160
200
216.8
271
400
480
542.4
650.9
600
720
813.6
976.3
25.4
250
300
338.8
406.5
580
696
786.5
943.8
900
1080
1220.4
1464.5
1"
*Thick nuts must be used with grade 8 bolts
METRIC BOLT TORQUE SPECIFICATIONS
Size Screw
Grade No.
Pitch (mm)
M6
4T
7T
8T
4T
7T
8T
4T
7T
8T
4T
7T
8T
4T
7T
8T
4T
7T
8T
4T
7T
8T
4T
7T
8T
1.00
M8
M10
M12
M14
M16
M18
M20
1.25
1.50
1.75
2.00
2.00
2.00
2.50
COARSE THREAD
Pounds Feet
Newton-Meters
3.6
5.8
7.2
7.2
17
20
20
34
38
28
51
57
49
81
96
67
116
129
88
150
175
108
186
213
-
5.8
9.4
10
14
22
26
25
40
46
34
59
66
56
93
109
77
130
145
100
168
194
130
205
249
4.9
7.9
9.8
9.8
23
27.1
27.1
46.1
51.5
37.9
69.1
77.2
66.4
109.8
130.1
90.8
157.2
174.8
119.2
203.3
237.1
146.3
252
288.6
27
-
7.9
12.7
13.6
19
29.8
35.2
33.9
54.2
62.3
46.1
79.9
89.4
75.9
126
147.7
104.3
176.2
196.5
136
227.6
262.9
176.2
277.8
337.4
Pitch (mm)
FINE THREAD
Pounds Feet
Newton-Meters
-
1.00
1.25
1.25
1.50
1.50
1.50
1.50
12
19
22
20
35
40
31
56
62
52
90
107
69
120
140
100
177
202
132
206
246
-
17
27
31
29
47
52
41
68
75
64
106
124
83
138
158
117
199
231
150
242
289
16.3
25.7
29.8
27.1
47.4
54.2
42
75.9
84
70.5
122
145
93.5
162.6
189.7
136
239.8
273.7
178.9
279.1
333.3
-
23
36.6
42
39.3
63.7
70.5
55.6
92.1
101.6
86.7
143.6
168
112.5
187
214.1
158.5
269.6
313
203.3
327.9
391.6
ATTACHMENTS
SNOWBLOWER
ROTARY TILLER #700312
Mounts to the rear of yard & garden
tractors 14 to 25 HP. Comes complete
with drive & manual lift mechanisms
& mounting hardware.
ROTARY BROOM
#700380 with nylon brush.
#700381 with polypropylene brush.
Fits o n same subframe
snowblower & utility blade.
Requires an adaptor.
as
48’’ UTILITY BLADE #700266
Mounts on the same subframe as the
snowblower & rotary broom.
TIRE CHAINS
Two link spacing. Required
traction and safety.
Pkg. of 2
for
COUNTERWEIGHT
TRACTOR SCREEN CAB
#700313
Protects in summer conditions.
Universal type fits on a wide variety
of lawn and garden tractors.
#700240 Universal rear weights
#700246 Electrolux tractors
Required for safety and traction.
Counterbalances weight of
attachment.
28
#700210 40"
#700211 44"
#700255 40’’
#700300 48’’
Fits on same subframe as rotary
broom and utility blade.
TRACTOR WINTER CAB
#700271
Protects in winter conditions.
Universal type fits on a wide variety
of lawn and garden tractors.
ACCESSOIRES
SOUFFLEUSE
ROTOCULTEUR #700312
S’installe à l’arrière des tracteurs
de cour & jardin de 14 à 25 cv.
Inclus
le
mécanisme
d’entraînement & de relevage
manuel ainsi que le nécessaire de
montage.
BALAI ROTATIF
#700286 avec brosse de nylon.
#700316 avec brosse
polypropylène.
Se monte sur le même souschâssis que la souffleuse et la lame
utilitaire. Requiert un adapteur.
LAME UTILITAIRE #700266
S’installe sur le même sous-châssis
que la souffleuse & balai rotatif.
CHAÎNES À PNEUS
Espacement à chaque deux mailles.
Requises pour une meilleure traction
et une plus grande sécurité.
Emb. de 2
#700210 40"
#700211 44"
#700255 40"
#700300 48"
S’installe sur le même sous-châssis
que le balai rotatif et la lame utilitaire.
CABINE D’HIVER POUR TRACTEUR
#700271
Protège des intempéries et des rudes
hivers. Type universel qui s’adapte
sur la plupart des tracteurs de jardin,
cour & pelouse.
CONTREPOIDS
CABINE MOUSTIQUAIRE POUR
TRACTEUR #700313
Protège du soleil, la pluie et les
insectes. Type universel qui s’adapte
sur la plupart des tracteurs de jardin,
cour & pelouse.
#700240 type universel
#700246 tracteurs Electrolux
Requis pour une plus grande sécurité
et une meilleure traction.
Co n tr eb al an c e le p o i ds des
attachements.
20
PROBLÈME
Le rotoculteur ne tourne plus.
DÉPANNAGE
CAUSES POSSIBLES
Courroie est endommagée.
La courroie est brisée.
ACTION CORRECTIVE
Remplacer la courroie.
Remplacer la courroie.
Le rotoculteur travaille de façon
Mettre plus
Courroies ne sont pas assez tendues.
irrégulière.
courroies.
Courroies endommagées.
de
tension sur
les
Remplacer les courroies.
Un groupe de dents pourrait être Nettoyer le groupe de dents.
bourré par des débris .
Bêcher à une vitesse lente.
Faites plus d’une passe. Bêcher peu
profondément la première fois.
Remplacer le
endommagées.
dents
pliées
ou
La bêcheuse est bruyante ou fait Les dents sont endommagées ou il y Remplacer les dents pliées ou
des bonds derrière le tracteur.
a trop de roches.
endommagées.
Enlever les roches de la surface de
travail.
19
DÉMONTAGE DU ROTOCULTEUR
7
ATTENTION
DÉMONTAGE
ENTREPOSAGE DE FIN DE SAISON:
7
a) Nettoyer le rotoculteur.
b) Vérifier les courroies.
f) Entreposer le rotoculteur sur une surface dure et
plane dans un endroit sec et propre. Si le
rotoculteur doit être entreposé à l’extérieur,
envelopper-le avec une toile à l’épreuve de l’eau.
Sur une surface plane, stationner le tracteur et
appliquer le frein de stationnement.
a) Installer la goupille (item 1) dans la position
bloquée.
e) Lubrifier les points de graissage.
POUR PRÉVENIR DES BLESSURES:
Arrêtez le moteur.
Appliquez le frein de stationnement.
Enlevez la clé du contact.
Débranchez le fil de la ou des bougie(s) et gardez-le éloigné de la ou des bougie(s) pour prévenir un démarrage accidentel.
c) Remplacer les pièces endommagées ou usées.
d) Peinturer les surfaces égratignées afin de prévenir
la rouille.
b) Abaisser le rotoculteur au sol.
c) Enlever la courroie de la poulie du moteur (item 9).
d) Déconnecter le câble d’entraînement si installé.
e) Abaisser le support avant (item 4).
f) Enlever le lien (item 8) du châssis du tracteur.
g) Lever le bras de relevage (item 2) afin de
supporter le châssis du rotoculteur.
h) Dévisser la goupille (item 6) de l’attache.
i) Retirer le rotoculteur de la barre de remorquage.
j) En utilisant le bras de relevage, baisser le
rotoculteur au sol et relever le support avant.
k) Placer le bras de relevage afin que le rotoculteur
soit plat contre le sol.
l) Retirer le rotoculteur en le glissant de sous le
tracteur.
18
REMPLACER LES DENTS
7
ATTENTION
ENTRETIEN
7
POUR PRÉVENIR DES BLESSURES:
Arrêtez le moteur.
Appliquez le frein de stationnement.
Enlevez la clé du contact.
Débranchez le fil de la ou des bougie(s) et
gardez-le éloigné de la ou des bougie(s) pour
prévenir un démarrage accidentel.
7
PRÉCAUTIONS
7
POUR PRÉVENIR DES BLESSURES:
Toujours bloquer sécuritairement le rotoculteur
si vous devez travailler sous celui-ci. Il n’est pas
recommandé de travailler sous le rotoculteur
parce qu’il pourrait tomber sur vous et causer
des blessures très sérieuses.
Note: Pour faciliter le remplacement des dents, vous
pouvez retirer le rotoculteur du tracteur et le tourner à
l’envers.
-Stationner le tracteur sécuritairement.
-Lever le rotoculteur aussi haut qu’il peut aller et
placer des blocs en-dessous.
Note: Chaque groupe de dents doit avoir deux dents
gauche et deux dents droite.
Groupe de dents de gauche
Pour référence:
-Alterner les dents gauche et droite dans chaque
groupe.
-Un boulon avec aucune douille: 3/8 x 1 1/4" long.
-Un boulon avec une douille:
3/8 x 1 3/4" long.
-Un boulon avec deux douilles: 3/8 x 2 1/4" long
Groupe de dents gauche:
Enlever les écrous (item 1), boulons (item 2) douilles
(item 3), les deux dents de gauche (item 4) et les
deux dents de droite (item 5). Installer les nouvelles
dents avec la même quincaillerie exactement comme
les anciennes étaient installées.
Groupe de dents du centre:
Enlever les écrous (item 6), boulons (item 7) douilles
(item 8), les deux dents de gauche (item 9) et les
deux dents de droite (item 10). Installer les nouvelles
dents avec la même quincaillerie exactement comme
les anciennes étaient installées.
Groupe de dents du centre
Groupe de dents droite:
Enlever les écrous (item 11), boulons (item 12)
douilles (item 13), les deux dents de gauche (item 14)
et les deux dents de droite (item 15). Installer les
nouvelles dents avec la même quincaillerie
exactement comme les anciennes étaient installées.
Groupe de dents de droite
17
7
ATTENTION
ENTRETIEN
7
POUR PRÉVENIR DES BLESSURES:
Arrêtez le moteur.
Appliquez le frein de stationnement.
Enlevez la clé du contact.
Débranchez le fil de la ou des bougie(s) et gardez-le éloigné de la ou des bougie(s) pour prévenir un démarrage accidentel.
REMPLACEMENT DES COURROIES:
Courroie primaire:
-Enlever la courroie de la poulie du moteur.
-Enlever le boulon (item 1) qui retient la poulie (item 2).
-Enlever la courroie (item 3) et installer la nouvelle sur la
poulie double (item 7) tel qu’illustré.
-Réinstaller la poulie (item 2) et le guide-courroie (item
4) de la même façon que démontré. Assurez-vous que
le guide-courroie est à 90º avec le bras.
-Réinstaller la courroie sur la poulie du moteur.
AJUSTEMENT DE LA COURROIE PRIMAIRE:
Tracteurs munis d’un mécanisme d’embrayage de la
P.D.F. électrique:
Ajuster la tension sur la courroie avant, en desserrant
la vis à pression à tête carrée (item 10). Tirer la tige
de tension ajustable (item 11) afin d’étirer le ressort
de 3/4" à 1".
Serrer la vis fermement.
Tracteurs munis d’un mécanisme d’embrayage de la
P.D.F. manuel
Ajuster le câble afin que le ressort soit étiré de 3/4" à
1" lorsque le mécanisme d’embrayage est embrayé.
AJUSTEMENT DE LA COURROIE SECONDAIRE.
Lorsque la courroie est bien ajustée, vous devriez à
peine voir le trou dans l’indicateur de tension (item 1).
Si le trou est exposé (item 2) ajuster la courroie en
vissant le boulon (item 3).
Remplacer les courroies
Courroie secondaire:
-Dévisser l’écrou (item 5) qui applique la tension sur la
courroie.
-Dévisser le boulon (item 6) et enlever la poulie double
(item 7).
-Enlever le garde-courroie (item 9).
-Enlever la courroie (item 8) et installer la nouvelle.
Assurez-vous qu’elle est installée tel qu’illustré.
-Réinstaller tel que démontré en inversant les
opérations.
-Visser l’écrou de tension afin d’ajuster la courroie
jusqu’à ce que vous voyez à peine le trou dans
l’indicateur de tension.
-Voir les instructions ajustement de la courroie
secondaire.
Courroie secondaire
Ajustement
Ajustement
requis
Bien ajusté
Ajuster la tension
ENTRETIEN:
À toutes les heures:
-Enlever les débris des dents si nécessaire.
À toutes les 4 heures:
-Vérifier la tension de la courroie.
-Ajuster si nécessaire.
-Nettoyer sous la courroie.
À toutes les 8 heures ou une fois l’an:
-Graisser l’arbre d’entraînement.
a) Pourvoir un blocage adéquat avant de travailler en
dessous du tracteur ou du rotoculteur lorsqu'il est
en position relevée.
b) Vérifiez les boulons de montage fréquemment afin
de prévenir une réparation coûteuse. Assurezvous que votre accessoire est en condition de
travailler sécuritairement.
16
7
PRÉCAUTIONS
OPÉRATION
7
POUR PRÉVENIR DES BLESSURES:
-Enlever tous les objets et gardez les gens loin de
surface de travail.
-Ne jamais laisser les enfants opérer le
rotoculteur ou le tracteur.
-Ne jamais laisser les enfants se promener sur le
tracteur ou sur le rotoculteur.
-Ne jamais opérer le rotoculteur sans les gardes
et écrans en place.
7
ATTENTION
7
AJOUTEZ DES POIDS À L’AVANT DU TRACTEUR
POUR CONTREBALANCER LE POIDS DU
ROTOCULTEUR.
AVANT DE BÊCHER:
-Tondre la pelouse et les mauvaises herbes avant de
bêcher, ceux-ci peuvent s’envelopper autour des
dents ou l’arbre des dents.
-Enlever tous les objets qui peuvent endommager le
rotoculteur tels que les roches, branches, etc...
-Vérifier les dents avant de bêcher. Réparer ou
remplacer toutes les dents qui ont du jeu, qui sont
tordues ou qui sont brisées.
-Ne pas bêcher lorsque le sol est détrempé (si la terre
forme une boule dans votre main lorsque pressée).
-La terre détrempée collera aux dents ou à l’arbre des
dents.
7
IMPORTANT
7
ÉVITER LES DOMMAGES AU ROTOCULTEUR:
Ne jamais reculer ou faire des virages brusques
avec le rotoculteur dans le sol.
Lorsque vous bêchez de la terre vierge pour la
première fois, il est recommandé de bêcher en deux à
quatre étapes. La première passe devrait être bêchée
à la surface et plus profondément à chaque passe.
Lorsque seulement une petite surface doit être
bêchée, faites une passe au milieu puis faire des
passes en cercle par l’extérieur.
Si possible, bêcher en ligne droite, puisque bêcher en
cercle laissera des sillons.
OPÉRER LE ROTOCULTEUR:
-Abaisser le rotoculteur et ajuster la profondeur de
bêchage à 1" pour la première passe ensuite ajuster
plus profondément pour les passes suivantes.
-Placer le levier de l’accélérateur à un régime moteur
moyen.
-Débrayer le frein de stationnement.
-Placer le contrôle de la P.D.F en position de marche
« ON » afin d’embrayer le rotoculteur. (Voir le
manuel du propriétaire du tracteur pour plus
d’instructions).
-Embrayer la transmission en première vitesse ou
avancer lentement si le tracteur est muni d’une
transmission hydrostatique
-Bêcher le sol par couches minces et à une vitesse
réduite.
7
PRÉCAUTIONS
7
POUR PRÉVENIR DES BLESSURES:
Rotoculteur peut pousser le tracteur vers l’avant
lors qu’utilisé dans la terre ferme.
TRANSPORTER LE ROTOCULTEUR:
Toujours relever le rotoculteur du sol en abaissant le
bras de relevage aussi loin qu’il peut aller lorsque
vous vous déplacer d’une surface de travail à une
autre. Conduire à une vitesse réduite lorsque le
rotoculteur est soulevé de terre, parce que le poids
supplémentaire du rotoculteur déséquilibre le tracteur.
Conduire lentement sur les pentes ou terrains
accidentés. Les poids avant ne diminuent pas le
danger lorsque vous montez des collines de plus de
10%. Ne jamais travailler sur le côté transversal de la
pente.
INSPECTER, NETTOYER OU STATIONNER LE
ROTOCULTEUR:
7
PRÉCAUTIONS
7
POUR PRÉVENIR DES BLESSURES:
Toujours arrêter le moteur et attendre que toutes
les pièces mobiles soient arrêtées avant de
quitter le siège du conducteur pour prévenir des
blessures causés par les dents.
7
ATTENTION
7
POUR PRÉVENIR DES BLESSURES:
Arrêtez le moteur.
Appliquez le frein de stationnement.
Enlevez la clé du contact.
Débranchez le fil de la ou des bougie(s) et
gardez-le éloigné de la ou des bougie(s) pour
prévenir un démarrage accidentel.
15
ASSEMBLAGE
Installer la courroie d’entraînement (item 1) sur la
poulie du moteur (item 2).
Relever le support (item 3).
Si votre tracteur est muni d’un embrayage manuel
attacher le ressort du câble (item 4) à la barre
d’extension (item 5). Attacher l’enveloppe du câble à
la tige de tension (item 6).
Sécuriser en place avec une goupille à ressort.
Installer courroie et câble
Relever le rotoculteur et retirer la goupille (item 7) de
la position bloquée et insérer-la dans la position en
marche (item 8).
Sécuriser avec une goupille à ressort (item 9).
Position bloquée
Position en marche
Déplacer la goupille
14
ASSEMBLAGE
RÉINSTALLATION
7
ATTENTION
7
POUR PRÉVENIR DES BLESSURES:
Arrêtez le moteur.
Appliquez le frein de stationnement.
Enlevez la clé du contact.
Débranchez le fil de la ou des bougie(s) et gardez-le éloigné de la ou des bougie(s) pour prévenir un démarrage accidentel.
Sur une surface de niveau, retirer la tondeuse du
tracteur.
Retirer la goupille du rotoculteur (item 1) de la
position en marche et l’insérer dans la position
bloquée. Sécuriser avec une goupille à ressort.
Placer le châssis du rotoculteur plat au sol en
abaissant le bras de relevage.
Relever le bras de relevage jusqu’à ce que l’attache
du rotoculteur (item 5) soit égale avec la barre de
remorquage du tracteur. Glisser le châssis du
rotoculteur sur la barre de remorquage (les trous
doivent être alignés) et assurez-vous que les
goupilles de montage (item 7) glissent dans les
trous des supports de montage (de chaque côté,
installé sur le châssis du tracteur préalablement).
Sécuriser en vissant fermement la goupille d’attache
(item 6).
Glisser le rotoculteur sous le tracteur.
Abaisser le bras de relevage (item 2) jusqu’à ce qu’il
se bloque dans la position ‘’Haut’’ (item 3) pour
relever la portion avant, ensuite abaisser le support
(item 4) afin qu’il supporte le devant du châssis du
rotoculteur.
Installer le lien (item 8) sur le boulon spécial déjà
installé sur le tracteur. Sécuriser avec la goupille à
ressort de 2.5 mm.
Réinstallation
13
ASSEMBLAGE
VÉRIFIER L’AJUSTEMENT DE LA COURROIE
SECONDAIRE DU ROTOCULTEUR.
Lorsque la courroie est bien ajustée, vous devriez à
peine voir le trou dans l’indicateur de tension (item 1).
Si le trou est exposé (item 2) vous devez ajuster la
courroie en vissant le boulon (item 3).
Ajustement
Ajustement
requis
Bien ajusté
Ajuster la tension
Réinstaller les roues arrière sur le tracteur.
Déplacer le bras de relevage (item 1) dans le trou
(item 2) identifié "0" profondeur''.
Desserrer le boulon (item 3) et le glisser vers le bas
dans la rainure jusqu’au mécanisme du bras de
relevage (item 4).
Serrer fermement.
Retirer la goupille (item 5) de la position bloquée et
l’insérer dans la position en marche.
Sécuriser avec la goupille à ressort.
Relever le rotoculteur et faites-le tourner sous
surveillance. Assurez-vous que tout tourne en
douceur et que les courroies ne touchent pas les
guide-courroies.
Derniers ajustements
12
ASSEMBLAGE
INSTALLATION DU CÂBLE D’EMBRAYAGE:
Tracteurs munis d’un mécanisme d’embrayage de la
P.D.F. manuel;
Débrayer.
Si votre câble (item 1) ne se ternmine pas par une
ressort, attacher le câble au ressort (item 3) du
rotoculteur et attacher le câble sur la tige de tension
ajustable (item 2). Sécuriser en place.
Note: Cette tige (item2) peut être ajustée ou inversée
tel qu’illustré afin de s’adapter à la longueur du câble.
Note: Si vous avez un câble se terminant par un
ressort, allez à l’étape suivante.
Installer le câble
Si le câble d’embrayage se termine par un ressort,
enlever le ressort original du rotoculteur.
Attacher le ressort du câble (item 1) à la barre
d’extension (item 2). Attacher l’enveloppe du câble à
la tige de tension (item 3) et sécuriser en place avec
une goupille à ressort.
Note: Cette tige peut être ajustée ou inversée pour
s’adapter à la longueur du câble.
Installer le ressort
Installer le ressort (item 2) qui sert à réduire la tension
sur la courroie, le crochet court dans le bras de
tension (item 3) et le crochet long sur la tige (item 4).
Ajuster le câble lorsque le mécanisme est embrayé,
le ressort (item 5) devrait être étiré de 3/4" à 1"
approximativement.
Installer la butée (item 1) avec un boulon de 5/16 x
3/4", rondelle plate sur la rainure et un écrou à bride.
Ajuster la butée afin de s'assurer que la courroie ne
débarque pas de la poulie du moteur lorsque la
P.D.F. est débrayée. Assurez-vous que la courroie se
relâche suffisamment afin que le rotoculteur arrête
immédiatement lorsque vous débrayez la P.D.F.
OPTION
Si le tracteur n’est pas muni de câble d’embrayage ou
si le câble est trop court, vous aurez besoin de
l’option "ensemble du mécanisme d’embrayage"
modèle #700319.
Installer le ressort et la butée
11
ASSEMBLAGE
Installer la courroie primaire (item 1) sur la poulie du
moteur (item 2).
Note: Veuillez utiliser la courroie de longueur
appropriée parmi celles incluses. Cependant,
puisque le rotoculteur est un montage universel,
une longueur de courroie autre que celles fournis
pourrait être nécessaire.
Relever ou abaisser la partie avant du rotoculteur
avec le lien ajustable (item 3) afin que la courroie soit
alignée.
Serrer les écrous du lien très fermement.
Relever le support (item 4).
Installer la courroie primaire
Assurez-vous que les deux côtés du châssis (item 1)
du rotoculteur sont à la même hauteur du sol.
Serrer fermement les boulons sur les supports de
montage sur la transmission.
Serrer très fermement les vis à pression à tête carrée
(item 2) qui retiennent les goupilles de montage (les
deux côtés).
TRUC: Pour s’assurer que le châssis est au niveau,
la portion inférieure (item 3) de la goupille de
montage doit absolument avoir la même mesure des
deux côtés. La pression dans les deux pneus arrière
du tracteur doit être identique.
Serrer les vis
AJUSTEMENT DE LA COURROIE PRIMAIRE:
Tracteurs munis d’un mécanisme d’embrayage de la
P.D.F. électrique:
Ajuster la tension sur la courroie primaire en
desserrant la vis à pression à tête carrée (item 1).
Tirer la tige de tension ajustable (item 2) afin d’étirer
le ressort (item 3) de 3/4" à 1".
Serrer la vis à tête carrée fermement.
Ajuster le ressort
10
ASSEMBLAGE
ÉTAPE 3
INSTALLATION DU ROTOCULTEUR
(Première installation)
Placer le châssis du rotoculteur à plat au sol en
abaisssant le bras de relevage. Glisser le rotoculteur
sous le tracteur.
Abaisser le bras de relevage (item 1) jusqu’à ce qu’il
se bloque dans la position "Haut" (item 2) afin de
relever la portion avant, ensuite abaisser le support
(item 3) afin qu’il supporte le devant du châssis du
rotoculteur.
Relever le bras de relevage jusqu’à ce que l’attache
du rotoculteur (item 4) soit égale avec la barre de
remorquage du tracteur. Glisser l’attache du
rotoculteur sur la barre de remorquage du tracteur,
(les trous doivent être alignés). Sécuriser en vissant
fermement la goupille d’attache (item 5).
Aligner le châssis du rotoculteur avec celui du
tracteur.
Lever et glisser les goupilles de montage (item 6)
dans les trous des supports de montage (item 7) (des
deux côtés, installer préalablement sur la
transmission). Serrer légèrement les vis à pression à
tête carrée sur les supports de montage (item 8).
Installer le rotoculteur au tracteur
Localiser ou si nécessaire percer un trou dans le
châssis du tracteur directement au-dessus du trou
situé sur le châssis du rotoculteur
afin d’installer le lien ajustable.
Note: Vérifier l’alignement de la courroie avant de
percer le trou.
Installer le boulon spécial (item 1) à l’extérieur du
châssis du tracteur. Sécuriser en place (à l’intérieur
du châssis du tracteur) avec un écrou à bride. Serrer
fermement. Faire la même chose sur le châssis du
rotoculteur.
Installer le lien (item 2) sur les boulons que vous
venez d’installer. Sécuriser avec deux goupilles à
ressort de 2.5 mm (item 3).
Installer le lien ajustable
9
ASSEMBLAGE
Pour fins d’installation seulement:
Retirer la goupille (item 1) de la position bloquée et
l’insérer dans la position en marche (item 2).
Sécuriser en place avec la goupille à ressort (item 3).
IMPORTANT:
Pour éviter les bris au rotoculteur: Ne pas utiliser
celui-ci lorsque la goupille est en position bloquée.
Position en marche
Position bloquée
Déplacer la goupille
Desserrer la vis à pression à tête carrée (item 1) qui
retient les goupilles de montage (items 2 & 3) (droite
et gauche).
Glisser les goupilles vers l’arrière du châssis.
Dévisser et retirer la goupille d’attache (item 4).
Préparer les goupilles
Préparer le lien ajustable tel qu’illustré.
Mettre un peu de graisse sur la tige d’ajustement
(item 1).
Insérer les deux écrous (item 2) sur la tige
d’ajustement et les visser jusqu’au milieu.
Installer les deux liens (item 3) à chaque bout de la
tige d’ajustement.
Insérer un écrou à bride (item 5) (tête première) sur le
boulon (item 6) et visser jusqu’à la fin des filets tel
qu’illustré (item 4).
Préparer le lien ajustable
8
ASSEMBLAGE
ÉTAPE 2
PRÉPARATION DU ROTOCULTEUR
Déterminer quel ensemble de trous (item 1) utiliser
afin de fixer l’attache du rotoculteur (item 2) en
utilisant le tableau ci-dessus.
1er
11.37" à 12.00"
2e
10.75" à 11.37"
3e
10.12" à 10.75"
4e
9.5" à 10.12"
5e
8.87" à 9.5"
6e
8.25" à 8.87"
7e
7.63" à 8.25"
8e
7.00" à 7.63"
Ensemble de trous à
partir du haut
*Mesure du sol à la
barre de remorquage
*Ces mesures sont données à titre de référence
seulement.
Après avoir installé le rotoculteur, le châssis devrait
être de 4.5" à 5.5" du sol.
Note: Si le châssis du rotoculteur touche l’arrière du
tracteur, vous pouvez ajouter une à quatre cales (item
3) entre le mur arrière du rotoculteur et l’attache (item
2). Si vous utilisez plus que deux cales, utiliser les
boulons hex 3/8 x 2".
Vérification: Assurez-vous que le châssis du
rotoculteur peut être retiré par-dessous la
transmission lors du démontage.
Fixer l’attache du rotoculteur
Installer le bras de relevage (item 1) avec quatre
boulons 5/16 x 3/4" (item 2) et écrous.
Installer le bras de relevage
7
ÉTAPE 1
PRÉPARATION DU TRACTEUR:
7
ATTENTION
ASSEMBLAGE
7
POUR PRÉVENIR DES BLESSURES:
Arrêtez le moteur.
Appliquez le frein de stationnement.
Enlevez la clé du contact.
Débranchez le fil de la ou des bougie(s) et
gardez-le éloigné de la ou des bougie(s) pour
prévenir un démarrage accidentel.
CET ACCESSOIRE EST UN MONTAGE
UNIVERSEL.
LE
MANUFACTURIER
NE
GARANTIE PAS LE SUCCÈS DU MONTAGE SUR
TOUTES LES MARQUES ET/OU MODÈLES DE
TRACTEURS. UNE LONGUEUR DE COURROIE
NON FOURNIS POURRAIT ÊTRE NECESSAIRE.
Retirer la tondeuse du tracteur. Voir le manuel du
propriétaire du tracteur pour les instructions de
démontage.
Mesurer la hauteur (item 1) entre la barre de
remorquage du tracteur et le sol. Cette mesure est
nécessaire pour l’étape 2.
Bloquer les roues avant du tracteur.
Soulever l’arrière du tracteur avec un cric. Enlever les
roues arrière et installer une chandelle ‘support’ (item
4) sous chaque essieu.
Déterminer quel ensemble de trous (item 3) sont
situés à 16 1/4’’ centre en centre afin de boulonner
les supports de montage. S’il se trouve des boulons
(item 2) déjà en place, veuillez les retirer.
Enlever les roues et boulons
Tracteur muni de transmission parallèle:
Installer le support de montage (item 2), le bout à 90°
vers l’avant et le trou (item 3) vers le centre tel
qu’illustré. Placer des rondelles plates ou des douilles
(item 4) au besoin entre le support de montage et la
transmission afin que le support soit parallèle avec la
transmission. Sécuriser avec les boulons de la
longueur approprié et écrous tel qu’illustré. Ne pas
serrer.
Installer les supports
Tracteur muni de transmission en angle:
Installer le support de montage (item 2) le coin en
angle vers l’avant et le trou (item 4) vers le centre tel
qu’illustré. Si nécessaire, placer des rondelles plates
(item 3) entre le support de montage et la
transmission, afin que les supports soient parallèles
avec la transmission. Sécuriser avec les boulons de
la longueur appropriée et écrous tel qu’illustré. Ne
pas serrer.
Installer les supports
6
DÉCALQUES DE SÉCURITÉ
REMPLACER LES DÉCALQUES SI ENDOMMAGÉS.
VOIR LA NOMENCLATURE DES PIÈCES POUR L’EMPLACEMENT DES
DÉCALQUES
Décalque #103432
Décalque #103435
Décalque #103433
Décalque #103455
Décalque #103434
Décalque #103464
5
PRÉCAUTIONS SÉCURITAIRES
Ne jamais bêcher le côté transversal d’une pente.
Prenez toutes les précautions lorsque vous changez
de direction dans une pente. Ne pas tenter de
bêcher une pente abrupte (plus de 10%), près des
bords de fossés ou talus puisque le rotoculteur peut
pousser le tracteur.
9.
Ne faites pas tourner le moteur à l’intérieur, excepté
pour démarrer, entrer ou sortir du bâtiment. Ne pas
opérer ou faire tourner le moteur dans un endroit
sans ventilation car l’essence contient du monoxyde
de carbone qui est sans odeur, sans couleur et peut
causer la mort.
8.
Avant de nettoyer, déboucher, réparer ou inspecter
le rotoculteur, soyez assuré que toutes les pièces
rotatives sont arrêtées. Débranchez le fil de la ou
des bougie(s) et gardez-le éloigné de la ou des
bougie(s) afin de prévenir des démarrages
accidentels.
7.
Prenez toutes les précautions nécessaires lorsque
vous quittez subitement votre tracteur: débrayez et
abaissez l’accessoire, placez la transmission en
position neutre, appliquez le frein de stationnement,
arrêtez le moteur et enlevez la clé. Attendez que
toutes les pièces mobiles soient arrêtées avant de
quitter le siège du tracteur.
6.
10. Ne jamais utiliser le rotoculteur sans que les écrans
protecteurs et les dispositifs de sûreté soient bien en
place. Ne jamais utiliser le rotoculteur avec le
déflecteur en position relevé. Ne jamais enlever le
déflecteur de l’arrière du tracteur.
11. Ne jamais opérer le rotoculteur près des fenêtres,
automobiles, etc... sans avoir ajusté l’angle de la
chute. Gardez les enfants et animaux domestiques
au loin.
ENTRETIEN ET ENTREPOSAGE:
1. Ne jamais entreposer la machine avec de l’essence
dans le réservoir à l’intérieur d’une bâtisse où il y a
des sources d’ignition comme des réservoirs d’eau
chaude, sécheuses, source de chaleur, etc... Laisser
refroidir le moteur avant de l’entreposer à l’intérieur.
2. Toujours se référer au manuel d’instructions de
l’opérateur lorsque vous entreposez le rotoculteur.
3. Maintenir ou remplacer les décalques de sécurité et
d’instructions au besoin.
LORSQUE VOUS VOYEZ CE SYMBOLE
7
CELA SIGNIFIE:
SOYEZ PRUDENT!
13. Débrayez le pouvoir du rotoculteur lorsqu’il doit être
transporté ou qu’il n’est pas utilisé.
ATTENTION!
12. Ne jamais opérer le rotoculteur à une vitesse
excessive.
14. Utilisez seulement les accessoires approuvés par le
manufacturier du tracteur (tels chaînes pour les
pneus, cabines, contrepoids et autres).
VOTRE SÉCURITÉ EST EN CAUSE!
15. Ne jamais opérer le rotoculteur sans une bonne
visibilité.
4
4
PRÉCAUTIONS SÉCURITAIRES
Une opération prudente est votre meilleure assurance contre un accident. Lisez cette section attentivement avant
d'opérer le tracteur et le rotoculteur. Tous les opérateurs, peu importe leur expérience, devraient lire ce manuel et tout
autre manuel relatif au tracteur et au rotoculteur avant l'opération. C'est l'obligation légale du propriétaire d'enseigner à
tous les opérateurs comment utiliser le rotoculteur d'une façon sécuritaire.
FORMATION:
7
Ce symbole d’avertissement sécuritaire est utilisé
partout dans ce manuel et sur les décalques de
sécurité du rotoculteur pour vous aviser des
possibilités de blessures personnelles. S.V.P.
portez une attention particulière à la lecture et à
la compréhension des précautions sécuritaires
avant d’opérer le rotoculteur ou le tracteur.
1. Lisez ce Manuel du Propriétaire attentivement. Soyez
complètement familier avec les contrôles et l'utilisation
du rotoculteur. Sachez comment arrêter l'unité et
débrayer les contrôles rapidement.
2. Ne permettez jamais à un enfant d'opérer le
rotoculteur. Ne permettez jamais à un adulte
d'opérer le rotoculteur sans qu'il ait la formation
nécessaire.
3. Personne ne doit opérer le rotoculteur, si cette
personne est sous l’influence de l’alcool, des drogues
ou médicaments. Ceux-ci affaiblissent les facultés et
diminuent le temps de réaction.
4. Gardez l’endroit d’opération libre de toute personne,
particulièrement de jeunes enfants ou animaux
domestiques.
PRÉPARATION:
1. Faites une inspection complète de l’endroit où le
rotoculteur sera utilisé et enlevez les roches,
morceaux de bois ou tout autre objet étranger.
2. Débrayez tous les embrayages et passer au neutre
avant de démarrer le moteur.
3. Ne jamais opérer le rotoculteur sans porter des
vêtements ajustés et des chaussures adéquats qui
vont améliorer l’équilibre et protéger vos orteils.
4. Manipulez l’essence avec
extrêmement inflammable.
précaution,
il
5. Ne faites aucun ajustement lorsque le moteur est en
marche (excepté lorsque cela est recommandé par le
manufacturier).
6. Toujours porter des lunettes de sécurité durant
l’opération, pendant les ajustements ou des
réparations pour protéger les yeux de tout objet qui
pourrait être projeté par la machine.
7. Ne portez jamais de casque à écouteurs lorsque vous
utilisez le rotoculteur.
8. Portez des appareils protecteurs adéquats tel que
serre-tête ou protège-tympans afin de protéger vos
oreilles contre des bruits excessifs qui pourraient
causer la diminution de l’ouïe ou même la surdité.
OPÉRATION:
1. Ne mettez jamais vos mains ou vos pieds près de ou
sous les pièces rotatives.
2. Soyez prudent lorsque vous opérez sur ou que vous
traversez les entrées en gravier, trottoirs, ou chemins.
Redoublez de vigilance face aux dangers cachés ou
au trafic. Ne jamais transporter de passagers.
3. Après avoir touché un objet étranger, arrêtez la
machine et inspecter afin de détecter des dommages.
Réparer tout dommage avant de repartir et de
travailler avec l’accessoire.
4. Si l’unité commence à vibrer anormalement, arrêtez le
moteur et vérifiez la cause immédiatement. Les
vibrations sont généralement des signes de
problèmes.
5. Arrêtez le moteur lorsque vous quittez la machine.
est
a) Utilisez un contenant à essence approuvé.
b) Ne jamais ajouter de l’essence quand le moteur est
chaud ou en marche.
c) Remplissez le réservoir à essence à l’extérieur
avec extrême prudence. Ne jamais remplir le
réservoir à l’intérieur.
d) Fermez le couvercle du réservoir fermement et
essuyez les éclaboussures.
3
INTRODUCTION
À L'ACHETEUR
Ce nouvel accessoire a été soigneusement conçu pour vous donner plusieurs années de bons services. Ce manuel a
pour but de vous aider à utiliser prudemment votre accessoire.
NOTE:Toutes les photographies et illustrations de ce manuel peuvent ne pas être du modèle ou de l'accessoire en
main et ne sont présentées qu'à titre de référence. Elles sont basées sur les dernières informations disponibles lors de
la publication.
Familiarisez-vous avec les recommandations de sécurité et les procédures d'utilisation avant d'utiliser l’accessoire
Lisez et suivez attentivement ces recommandations et insistez pour qu'elles soient suivies par ceux qui se serviront de
l’accessoire avec vous.
7
DANS CE MANUEL, CE SYMBOLE D'AVERTISSEMENT SÉCURITAIRE IDENTIFIE UN MESSAGE
DE SÉCURITÉ IMPORTANT QUI VOUS AIDERA AINSI QUE TOUTE AUTRE PERSONNE À ÉVITER
DES BLESSURES GRAVES ET MÊME LA MORT. DANGER, ATTENTION, PRÉCAUTION SONT DES
MOTS D’AVERTISSEMENT POUR IDENTIFIER LES NIVEAUX DE DANGER. TOUTEFOIS, SOYEZ
TOUJOURS EXTRÊMEMENT PRUDENT.
Signifie un danger qui peut causer des blessures graves ou même la mort, si les précautions
recommandées ne sont pas respectées.
ATTENTION:
Signifie un danger extrême qui causera des blessures graves ou même la mort, si les
précautions recommandées ne sont pas respectées.
DANGER:
PRÉCAUTION: Signifie un danger qui peut causer des blessures mineures si les précautions recommandées
ne sont pas respectées.
Notez le numéro de série avec la date d’achat de votre accessoire dans la section réservée ci-dessous. Votre détaillant
exige cette information afin d'assurer un service rapide et efficace lorsque des pièces de rechange sont à commander.
Remplacez les pièces défectueuses par des pièces d'origine seulement.
Si des réparations sur garantie sont nécessaires, veuillez présenter ce livret d'enregistrement et la facture de vente
originale à votre concessionnaire.
Ce manuel devrait être conservé pour référence future.
S.V.P. Vérifier si vous avez reçu toutes les pièces de votre ensemble avec la
liste du sac et liste de la boîte.
___________________________
DATE D’ACHAT:
___________________________
NUMÉRO DE SÉRIE:
Dans ce manuel, le côté droit et le côté gauche sont déterminés en étant assis sur le siège du tracteur et
regardant vers l’avant.
Dans ce manuel, "accessoire" veut dire instrument que vous pouvez installer sur le tracteur comme,
souffleuse, balai rotatif, lame, rotoculteur, cabine, sous-châssis etc...
2
TABLE DES MATIÈRES
PAGE
20
ACCESSOIRES .....................................................................................................................................................
19
......................................................................................................................................................
DÉPANNAGE
18
18
DÉMONTAGE
Démontage du rotoculteur .......................................................................................................................
Entreposage de fin de saison ..................................................................................................................
16
16
16
16
17
ENTRETIEN
Remplacement des courroies .................................................................................................................
Ajustement de la courroie primaire .........................................................................................................
Ajustement de la courroie secondaire ....................................................................................................
Entretien ...................................................................................................................................................
Remplacer les dents ................................................................................................................................
15
15
15
15
OPÉRATION
Avant de bêcher .......................................................................................................................................
Opérer le rotoculteur ................................................................................................................................
Transporter le rotoculteur ........................................................................................................................
Inspecter, déboucher ou stationner le rotoculteur ..................................................................................
6
7
9
10
11
12
13
ASSEMBLAGE
Étape 1: Préparation du tracteur .............................................................................................................
Étape 2: Préparation du rotoculteur ........................................................................................................
Étape 3: Installation du rotoculteur, (Première installation) ...................................................................
Ajustement de la courroie primaire ..........................................................................................
Installation du câble d’embrayage ...........................................................................................
Vérifier l’ajustement de la courroie secondaire du rotoculteur ................................................
Deuxième installation ................................................................................................................
5
DÉCALQUES DE SÉCURITÉ ..............................................................................................................................
3
PRÉCAUTIONS SÉCURITAIRES ........................................................................................................................
2
INTRODUCTION ...................................................................................................................................................
RÉFÉREZ-VOUS À LA SECTION ANGLAISE POUR:
27
TABLE DES SPÉCIFICATIONS DE COUPLE ....................................................................................................
20
24
NOMENCLATURE ET LISTE DES PIÈCES
Rotoculteur (Châssis) ..............................................................................................................................
Rotoculteur (Tête) ....................................................................................................................................
1
GARANTIE LIMITÉE
Couverture des Produits et Conditions
BERCOMAC garantit toute pièce ou accessoire fabriqué par
BERCOMAC et trouvé, selon la discrétion raisonnable de
BERCOMAC, être défectueux en matériel ou dans sa
fabrication, sera réparé, remplacé ou ajusté par un marchand
autorisé sans frais, jusqu'à concurrence maximale du taux
horaire et du temps de réparation pré-établi. Pour le
remplacement des pièces, seuls les frais de transport mode
régulier sont couverts. Cette garantie est valide pour le premier
propriétaire et ne peut être transféré à un autre propriétaire. La
période de garantie débute à la date d’achat au détail.
Période de Garantie
(à partir de la date d’achat au détail):
• Usage Résidentiel: 1 an
• Location ou usage commercial: 90 jours
Voir exception:
Les items suivants sont garanties par le manufacturier d’origine
et ont leurs propres conditions et durée limitée.
• Chaînes à pneus: 90 jours
• Moteurs (fourni avec les équipements BERCOMAC): 2 ans
Veuillez vous référer à la garantie du manufacturier incluse
avec l’unité. Bercomac n’est pas autorisé à agir concernant
les garanties d’ajustement des moteurs.
Conditions et Items Non Couverts:
Cette garantie n’inclut pas ce qui suit:
• Frais pour ramassage, de livraison, ou service à domicile.
• N’importe quel dommage ou détérioration de la marchandise,
pièce ou finition due à l’utilisation normale, l’usure, bris et
déchirure, ou l’exposition.
• Frais relatifs à l’usage et à la maintenance régulière tels que
lubrifiants, gazoline, huile, pièces de mise au point et
ajustements.
• N’importe quel pièce ou accessoire qui à été altéré, modifié,
négligé, brisé accidentellement, mal installé, mal entretenu,
remisé ou réparé non conformément aux instructions dans le
manuel du propriétaire.
• N’importe quelle réparation due à l’usure normale des pièces
tel que les goupilles de sécurité, boulons, courroies, etc.
• Frais de transport en mode accéléré pour pièces de
remplacement.
• Boulons et goupilles de sécurité sont considérés comme une
mesure préventive et ne sont pas une protection assurée.
Tout dommage provenant d’un non fonctionnement n’est pas
couvert.
Note: Tout travail effectué sur garantie doit être exécuté par un
marchand autorisé BERCOMAC utilisant des pièces de
remplacement d’origine.
Responsabilités du Propriétaire
Tous les produits ou pièces défectueuses BERCOMAC
doivent être retournés chez un marchand de service autorisé à
l’intérieur de la période de garantie, pour réparation. Dans le
cas où la marchandise doit être retournée au manufacturier
pour réparation, le marchand doit d’abord obtenir une
autorisation écrite de BERCOMAC, frais de transport payé
d’avance. Cette garantie s’étend uniquement à l’équipement
qui est opéré sous condition normale. Pour q’une réclamation
soit valide, l’opérateur a la responsabilité d’entretenir et
d’effectuer les routines de maintenance tel que spécifié dans le
manuel du propriétaire ou de les faire effectuer chez un
marchand autorisé à ses frais.
Conditions Générales
L’engagement exclusif de BERCOMAC en regard de cette
garantie s’arrête à la réparation et au remplacement tel que
mentionné ci-dessus. BERCOMAC ne doit avoir aucune
responsabilité pour aucun autre frais, perte ou dommage,
incluant mais sans se limiter à, aucun dommages-intérêts
ou perte ou dommage subséquent.
En particulier, BERCOMAC n’a aucun engagement ou
responsabilité pour:
• Temps pour transport, surtemps, temps après les heures
d’ouverture ou autre frais extraordinaire de réparation ou
charges relatives aux réparations ou remplacement en
dehors des heures normales de travail.
• Location d’équipement de remplacement similaire durant la
période de garantie, réparation ou remplacement des
travaux.
• N’importe quel frais téléphonique ou télégramme ou frais de
transport.
• Perte ou dommage à une personne ou propriété autre que
ceux couverts par les termes de cette garantie.
• N’importe quelle réclamation pour perte de revenus, perte
de profits ou coûts additionnels résultant d’une réclamation
d’un bris de garantie.
• Frais juridiques.
La responsabilité de BERCOMAC, en respect de la présente,
se limite à couvrir la réparation et les pièces de remplacement
et aucune réclamation d’un bris de garantie doit être la cause
pour annulation ou résiliation de contrat de vente pour
n’importe quel pièce ou accessoire.
Cette garantie vous donne des droits légaux spécifiques et
vous pouvez également avoir d’autres droits qui varient d’état
en état.
Note: BERCOMAC se réserve le droit de changer ou améliorer la conception de toute pièce et / ou accessoire sans assumer aucune
obligation à modifier les produits fabriqués auparavant.
Instructions pour Obtenir le Service sur Garantie
Contactez le marchand où vous avez acheté le produit ou tout autre marchand de service BERCOMAC pour fixer un rendez-vous à leur atelier. Pour localiser un
marchand de votre choix, visiter notre site web au www.bercomac.com. Apporter le produit et votre preuve d’achat (facture) chez votre marchand de service
BERCOMAC.
Bercomac Limitée
92 Fortin Nord, Adstock, Québec, Canada, G0N 1S0
MANUEL DU PROPRIÉTAIRE
Modèle Numéro
700312-1
BERCO
Rotoculteur
Montage universel pour tracteurs de
COUR ET JARDIN
* ENTRETIEN
* OPÉRATION
* PIÈCES DE RÉPARATION
* ASSEMBLAGE
ATTENTION:
LIRE & SUIVRE TOUTES LES RÈGLES DE SÉCURITÉ & INSTRUCTIONS
AVANT D’UTILISER CET ÉQUIPEMENT
104307
G-05
1