1
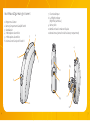
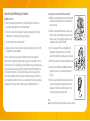
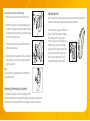
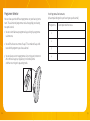
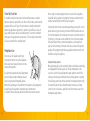
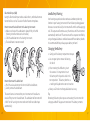
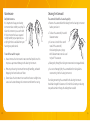
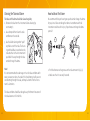
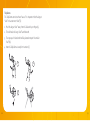
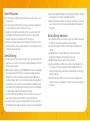
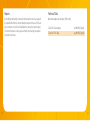
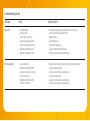
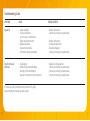
User Guide ReSound ZigaTM BTE ZG71-DVI, ZG71-DI, ZG71-VI ReSound ZigaTM Contents Your new digital ReSound Ziga hearing instruments will enable you to hear sounds that you may not have heard in years because of your hearing loss. Practice and a positive attitude are important in learning to use hearing instruments. While some people adjust quickly to wearing hearing instruments in their ears and hearing the new sounds, other people may need more time. TM The intent of this user guide is to provide information on the many aspects of using hearing instruments. Your hearing instruments have been adjusted to your hearing loss by your hearing care professional. Familiarising yourself with the functions of your new hearing instruments will help you get optimal benefit. Page Illustration of the hearing instrument . . . . . . . . . . . . . . . . . . . . . . . . . . . . . 4 Adjusting to a world of new sounds . . . . . . . . . . . . . . . . . . . . . . . . . . . . . . . 6 New sounds . . . . . . . . . . . . . . . . . . . . . . . . . . . . . . . . . . . . . . . . . . . . . . . . . . . . . . . . 6 How to adjust . . . . . . . . . . . . . . . . . . . . . . . . . . . . . . . . . . . . . . . . . . . . . . . . . . . . . . . 7 How to use the hearing instrument . . . . . . . . . . . . . . . . . . . . . . . . . . . . . . . 8 On/off function . . . . . . . . . . . . . . . . . . . . . . . . . . . . . . . . . . . . . . . . . . . . . . . . . . . . 8 Inserting the hearing instrument . . . . . . . . . . . . . . . . . . . . . . . . . . . . . . . . . . 9 Removing the hearing Instrument . . . . . . . . . . . . . . . . . . . . . . . . . . . . . . . 10 Volume control . . . . . . . . . . . . . . . . . . . . . . . . . . . . . . . . . . . . . . . . . . . . . . . . . . . 11 Programme selector . . . . . . . . . . . . . . . . . . . . . . . . . . . . . . . . . . . . . . . . . . . . . . 12 Stand-by function . . . . . . . . . . . . . . . . . . . . . . . . . . . . . . . . . . . . . . . . . . . . . . . . 14 Telephone use . . . . . . . . . . . . . . . . . . . . . . . . . . . . . . . . . . . . . . . . . . . . . . . . . . . . 14 Direct audio input . . . . . . . . . . . . . . . . . . . . . . . . . . . . . . . . . . . . . . . . . . . . . . . . 16 Low battery warning . . . . . . . . . . . . . . . . . . . . . . . . . . . . . . . . . . . . . . . . . . . . 17 Changing the battery . . . . . . . . . . . . . . . . . . . . . . . . . . . . . . . . . . . . . . . . . . . . 17 Maintenance . . . . . . . . . . . . . . . . . . . . . . . . . . . . . . . . . . . . . . . . . . . . . . . . . . . . . 18 Daily maintenance . . . . . . . . . . . . . . . . . . . . . . . . . . . . . . . . . . . . . . . . . . . . . . . 18 Cleaning the earmould . . . . . . . . . . . . . . . . . . . . . . . . . . . . . . . . . . . . . . . . . . . 19 Cleaning the Tube and dome . . . . . . . . . . . . . . . . . . . . . . . . . . . . . . . . . . . . . 20 How to apply the dome . . . . . . . . . . . . . . . . . . . . . . . . . . . . . . . . . . . . . . . . . . 21 Warnings and precautions . . . . . . . . . . . . . . . . . . . . . . . . . . . . . . . . . . . . . . . 24 Repairs . . . . . . . . . . . . . . . . . . . . . . . . . . . . . . . . . . . . . . . . . . . . . . . . . . . . . . . . . . . . 26 Technical data . . . . . . . . . . . . . . . . . . . . . . . . . . . . . . . . . . . . . . . . . . . . . . . . . . . . 27 Troubleshooting . . . . . . . . . . . . . . . . . . . . . . . . . . . . . . . . . . . . . . . . . . . . . . . . . . 28 Key word index . . . . . . . . . . . . . . . . . . . . . . . . . . . . . . . . . . . . . . . . . . . . . . . . . . . 32 ReSound ZigaTM is a trademark of GN ReSound A/S. 2 3 Your ReSound Ziga Hearing Instrument 1. Programme Selector 2. Battery Compartment & On/Off Switch 3. Sound Outlet 4. 1 st Microphone Sound Inlet 5. 2nd Microphone Sound Inlet 6. Volume Control - Only on DVI and VI 5 7. Direct Audio Input 8. Left/Right indicator (Right=Red, Left=Blue) 9. Battery lock 10. Model and serial number on ID-plate 11. Manufacturer (printed inside the battery compartment) 4 4 1 ZG71-DI 3 8/9 10 6 7 8/9 2 2 11 4 5 Adjusting to a World of New Sounds New Sounds A hearing loss is typically acquired gradually over many years. You may have become accustomed to an everyday life with fewer sounds, which also means hearing less noise than people with normal hearing. 6 How to adjust If you are inexperienced with hearing instruments it is advisable to: 1.Use your hearing instruments every day. 2.Wear your hearing instruments for just a couple of hours a day during the first week. With your new hearing instruments you will experience many sounds that you may not have heard for years. It will take time to get used to all these sounds again. Some examples of these sounds are: 3.Gradually increase the time you wear your hearing instruments. • • • • • • • It can take several months for your brain to get used to all the “new” sounds around you. Start using your hearing instruments in mainly quiet surroundings and start with a comfortable volume (the hearing care professional will ensure this). Listen to and get familiar with all sounds in your home, such as a ticking clock, water running in the sink, or silverware used on a plate. In quiet surroundings, converse with a person you know well. Listen to a TV or radio at home. After you have used the hearing instruments for a while you will be ready for more demanding listening situations, like conversation with a group of two or three people. The clock ticking Turning pages of the newspaper Children’s voices Whispers and soft speech Car noise Birdsong The sound of your own footsteps 7 How to Use the Hearing Instrument On/Off Function 1. When the battery compartment is fully closed, the instrument is turned on and programme 1 will be activated. 2. To turn the instrument off, open the battery compartment. Many individuals use their finger tips to pull it open. 3. The instrument is then switched off. 4. Whenever you are not using the instrument, remember to turn it off to stop battery consumption. You can turn on your hearing instrument once you have placed it behind your ear and inserted the tube in your ear. If you prefer not to have the device ”on” while placing it behind your ear, your hearing care professional can activate a function (SmartStart) which will delay the instrument turning on. This function will prevent the hearing instrument from squealing while the tube or mould is being inserted in the ear. It delays the switch-on time by 10 seconds after closing the battery compartment. A beep each second is presented during this time. Inserting the Instrument (with earmould) 1. Hold the earmould between your thumb and index finger and position its sound outlet in your ear canal. 2. Slide the earmould all the way into your ear with a gentle, twisting movement (insertion can be easier if you gently pull your ear up and back with your other hand). 3. Turn the top-part of the earmould gently backwards and forwards so that it tucks behind the fold of skin above your ear canal. 4. Place the hearing instrument behind your ear. 5. Move the earmould up and down and press gently to ensure it is positioned correctly in the ear. 6. When the earmould and hearing instrument are correctly positioned, and you have not already turned it on, switch on your instrument by closing the battery door. Tip Opening and closing your mouth can ease insertion. 8 9 Inserting the Instrument (with dome) 1. Place the hearing instrument behind the ear. 2. Hold the tube where it bends and gently push the dome into your ear canal (the dome should be placed far enough into the ear that the tube lies flush with your head). 3. It is important that the tube and the dome fit correctly into your ear. 4. When the dome is placed correctly, you should not be able to see the tube sticking out when you face a mirror. Volume Control When using the instrument you can increase the volume by turning the volume control up, and reduce volume by turning it down. For each volume step, you will hear a “beep” signal indicating the change. The loudness of the “beeps” will increase as you turn the volume up and decrease as you turn it down. If you reach the upper or lower limit of the volume control range, there will be a more prominent “beep” signal indicated by a lower pitch. Note You should never attempt to bend or modify the shape of the tube. Removing the Hearing Instrument To remove the hearing instrument, simply pull the tube outward with your thumb and forefinger. Consult your hearing care professional if you have difficulties removing the hearing instrument. 10 11 Programme Selector You can have up to four different programmes on your hearing instrument. The selection of programmes can be changed by your hearing care professional. 1. You can switch between programmes by pushing the programme selector once. 2. You will then hear one or more “beeps”. The number of beeps indicates which programme you have selected. 3. You can always return to programme 1 by turning your instrument off and then on again, or by placing it in stand-by mode and then returning to its operating mode. 12 Your Programme Environments: (to be completed together your hearing care professional): Programme Description of when to use 1 2 3 4 13 Stand-by Function In stand-by mode, the hearing instrument will not process sound or deliver an acoustic signal to the ear. When in this mode, a small amount of power will be used. To put the instrument in stand-by mode, hold down the programme selector for 5 seconds. You will hear a series of beeps and the device will be in stand-by mode. To return to standard mode, press the programme selector once. This can only be done after at least 5 seconds in the stand-by mode. Telephone Use Your can use the telephone with your hearing instruments. Using the telephone while using your hearing instruments may require some practice. By selecting the optional telecoil programme you can improve understanding of speech when using a telecoil compatible phone. Rather than picking up the sound from the telephone, this programme only picks up the telephone’s magnetic signal and converts it to sound. Your hearing care professional can activate the telecoil. 14 When using the telecoil programme, the receiver of the telephone should be held as shown in the drawing. You may need to move the handset around slightly to find the best reception. If you do not wish to have a telecoil programme, you may still use the phone while using your hearing instrument. Hold the phone close to the front microphone of the hearing instrument, but not directly on it. If it whistles, it may take a few seconds for the instrument to adapt. If the whistling continues, move the telephone 2-3 cm away from your ear. Some hearing instruments also have an acoustic telephone program. This program might decrease problems with acoustic feedback when using the telephone. Using tele-loop systems Many gathering places such as schools, theatres and houses of worship, are equipped with tele-loop systems. To take advantage of such a system, select the telecoil program to pick up direct sound. If the hearing instrument goes dead when the telecoil program is selected, the tele-loop system may not be turned on or not operating correctly. If a school, theatre or house of worship does not have a tele-loop system, try to sit as close as possible to the front and use one of the microphone programmes. 15 Direct Audio Input (DAI) Using the Direct Audio Input socket enables direct, undisturbed connection to facilities such as: Television - Radio - Remote microphone. How to connect the Audio boot to the hearing instrument: 1. Make sure the tip of the audio boot is placed firstly in the HAI (Hearing instrument Accessories Interface). 2. Click the audio boot on to the hearing instrument. 3. The Audio boot is now connected. Low Battery Warning Your hearing care professional can activate a Low Battery Warning function in your hearing instruments. When the battery voltage/power decreases to a certain level, the instrument will emit five soft beeping signals. This sequence will continue every five minutes until the instrument automatically switches off. The occurrence of the sequence can differ by using rechargeable batteries and also between different battery brands. It is recommended that you keep a spare battery on hand. Changing the Battery 1 2 3 4 5 1. Gently push the battery compartment to open. 2. Use a magnet pin to remove the battery, if at hand. How to disconnect the Audio boot: 4. Push the release button on the front side of the Audio boot. 5. Gently remove the Audio boot. The sound source is connected to your instrument with a cable or a wireless FM system to the audio boot. The audio boot will connect with a “click” to the hearing instrument and switch to Direct Audio Input automatically. 16 3. After removing the old battery, insert the new one. It is important to insert the battery with the positive side in the correct position. The battery door has a + marking to help determine correct insertion. 4. Always use Zinc-Air or rechargeable batteries size 13. Tip Removing the battery when you are not wearing the instrument for a longer period will help prevent corrosion of the battery contacts. 17 Maintenance Cleaning the Earmould Daily Maintenance It is important to keep your hearing instrument clean and dry every day. To clean the instrument, use a soft cloth. If the instrument has been exposed to high humidity or perspiration, use a drying kit that is available from your hearing care professional. The earmould should be cleaned regularly: 1. Remove the earmould and the tubing from the hearing instrument before you clean it. To avoid the need for repairs: 1.Never immerse the instrument in water or other liquids since this may cause permanent damage to the hearing instrument. 2.Protect your hearing instrument from rough handling, and avoid dropping it on hard surfaces or floors. 3.Do not leave the instrument in or near direct heat or sunlight since excessive heat can damage the instrument or deform the casing. 18 2. To clean the earmould, rinse with lukewarm water. 3. If ear wax is stuck in the sound canal of the earmould, the cleaning loop or a syringe with lukewarm water can be used to “push” the wax out. 4. Blow gently through the tubing to remove moisture trapped inside. 5. Be sure to thoroughly dry the earmould and its tubing before reconnecting it to the hearing instrument. The tubing connecting the earmould to the hearing instrument should be changed if it becomes stiff or brittle. Contact your hearing care professional to change the tubing when needed. 19 Cleaning the Tube and Dome How to Mount the Dome The tube and the dome should be cleaned regularly: 1. Remove the tube from the instrument before cleaning by unscrewing it. We recommend that your hearing care professional changes the dome for you, since failure to change the domes in accordance with the instructions could result in injury. If you choose to change the dome yourself: 2. Use a damp cloth to clean the tube and dome on the outside. 3. Use the black cleaning rod to “push” any debris out of the tube. The cleaning rod should be inserted where the tube attaches to the instrument and pushed all the way through the tube and out through the dome. Note! It is not recommended to submerge or rinse the tube and dome with water, as water can close the tube. If this should occur, it will prevent sound coming through the tube, and may be harmful for the instrument’s electronics. 1 2 1. Push the dome over the grooves on the tube to mount it (1) + (2). 2. Make sure that it is securely fastened. The tube and dome should be changed every third month or sooner if the tube becomes stiff or brittle. 20 21 Tulip Dome The Tulip-Dome consists of two “leaves”. It is important that the largest “leaf” is the outermost “leaf” (C): 1. Push the largest “leaf” away from the Tube with your finger (A). 2. This will make the large “leaf” bend forward. 3. Then you push it back and it will be placed on top of the smaller “leaf” (B). 4. Now the Tulip-Dome is ready for insertion (C). A B C 22 23 General Precautions 1. Do not leave your hearing instrument in the sun, near an open fire or in a hot, parked car. 2. Do not wear your instrument while showering, swimming, in heavy rain or in a moist atmosphere such as steam bath or sauna. 3. Should your instrument become moist, put it in a closed container with a drying agent. Your hearing care professional can provide a specially designed container, a so called desiccator for this purpose. 4. Remove your hearing instrument when applying such things as cosmetics, perfume, aftershave, hair spray, and suntan lotion. These might get into the instrument and cause damage. General Warnings 1. Consult a physician if you discover a foreign object in your ear canal, if you experience skin irritation or if excessive ear wax accumulates with the use of the hearing instrument. 2. Different types of radiation, e.g. from NMR, MRI or CT scanners, may damage the hearing instrument. Therefore, do not wear the hearing instrument during these or other corresponding scanning procedures. Other types of radiation (burglar alarms, room surveillance systems, radio equipment, mobile telephones, etc) contain less energy and will not damage the hearing instrument. They could however momentarily affect the sound quality or create strange sounds from the hearing instruments. 3. Do not wear the hearing instrument in mines, oil fields or other explosive areas, unless those areas are certified for hearing instrument use. 4. Do not allow others to use your hearing instrument. It may cause permanent damage to the hearing instruments as well as to the hearing Impaired. 24 5. Due to choking hazard hearing instrument usage by children or mentally challenged persons should be supervised at all times. 6. Hearing instruments should be used only as prescribed by your hearing care professional. Incorrect use may result in sudden and permanent hearing loss. Battery Warning Information 1. Do not put batteries in your mouth as they can be harmful if swallowed. If a battery is swallowed, seek medical help immediately. 2. Keep batteries away from children and mentally challenged persons and pets. 3. Do NOT attempt to recharge batteries which are not specifically designated rechargeable as they may leak or explode. 4. Do NOT attempt to dispose batteries by burning them. 5. Replace spent batteries and do not leave them in the instrument for a prolonged period. If your hearing instrument is equipped with a low battery warning feature, replace battery immediately after low battery warning is reached. 6. Used batteries can be harmful to the environment. Please dispose of them according to local regulations or return them to your hearing care practitioner. 25 26 Repairs Technical Data If your ReSound hearing instrument malfunctions it must be repaired by a qualified technician. Do not attempt to open the case of the hearing instrument since this will invalidate the warranty. If your hearing instrument requires service, please contact your hearing care professional for assistance. Maximum Output (2cc Coupler / IEC 60118-7) ZG71-DVI - Classic/open ZG71-DVI - Thin Tube 126 dB SPL (Typical) 129 dB SPL (Typical) 27 Troubleshooting Guide 28 SYMPTOM CAUSE POSSIBLE REMEDY No sound • Stand By Mode • Not turned on • Dead single use battery • Dead rechargeable battery • Battery improperly inserted • Blocked earmould or tube • Blocked sound outlet filter • Re-activate by pushing the programme selector once • Turn on by closing the battery door • Replace battery • Recharge battery • Insert battery properly • Clean earmould or tube blockage • Consult your hearing care professional Not loud enough • • • • • • • • • • • • Loose earmould Blocked earmould or dome Change in hearing sensitivity Excessive ear wax Blocked sound outlet filter Volume set too low Reinsert carefully or consult your hearing care professional Clean earmould or dome Consult your hearing care professional Consult your physician Consult your hearing care professional Consult your hearing care professional 29 Troubleshooting Guide SYMPTOM CAUSE POSSIBLE REMEDY Squealing • Loose earmould • The Dual Stabilizer II system needs re-initialization • Dome not placed correctly • Build-up of earwax • Tube connection loose • Instrument settings not optimal • Remove and reinsert • Consult your hearing care professional • • • • Remove and reinsert Consult your physician Tube to be changed Consult your hearing care professional Sound not clear or distorted • • • • Replace or recharge battery Consult your hearing care professional Consult your hearing care professional Consult your hearing care professional • • • • Weak battery Poorly fitting earmould or dome Hearing instrument damaged Hearing instrument settings not optimal If there are any other problems not mentioned in this guide, please contact your hearing care professional. 30 31 Key Word Index Advice/Adjusting to the hearing aid . . . . . . . . . . . . . . . . . . . . . . . . . . . . . . . 6 Battery change . . . . . . . . . . . . . . . . . . . . . . . . . . . . . . . . . . . . . . . . . . . . . . . . . . . . 17 Battery compartment . . . . . . . . . . . . . . . . . . . . . . . . . . . . . . . . . . . . . . . . . . 4,17 Cerumen/earwax . . . . . . . . . . . . . . . . . . . . . . . . . . . . . . . . . . . . . . . . . . . . . . . . . 19 Cleaning the instrument . . . . . . . . . . . . . . . . . . . . . . . . . . . . . . . . . . . . . . . 18-20 Direct audio input (DAI) . . . . . . . . . . . . . . . . . . . . . . . . . . . . . . . . . . . . . . . . . . . 16 Distortion of sound . . . . . . . . . . . . . . . . . . . . . . . . . . . . . . . . . . . . . . . . . . . . . . . 30 Dome change . . . . . . . . . . . . . . . . . . . . . . . . . . . . . . . . . . . . . . . . . . . . . . . . . . 21-22 Earmould /Dome . . . . . . . . . . . . . . . . . . . . . . . . . . . . . . . . . . . . . . . . . . . . . . . 19-22 Programmes . . . . . . . . . . . . . . . . . . . . . . . . . . . . . . . . . . . . . . . . . . . . . . . . . . . 12-13 Inserting the hearing instrument . . . . . . . . . . . . . . . . . . . . . . . . . . . . . . . . . . 9 Low battery warning . . . . . . . . . . . . . . . . . . . . . . . . . . . . . . . . . . . . . . . . . . . . . 17 Maintenance . . . . . . . . . . . . . . . . . . . . . . . . . . . . . . . . . . . . . . . . . . . . . . . . . . . . . . 18 On/off switch . . . . . . . . . . . . . . . . . . . . . . . . . . . . . . . . . . . . . . . . . . . . . . . . . . . . . 4,8 Precautions . . . . . . . . . . . . . . . . . . . . . . . . . . . . . . . . . . . . . . . . . . . . . . . . . . . . . . . 24 Programme Selector . . . . . . . . . . . . . . . . . . . . . . . . . . . . . . . . . . . . . . . . . . . . 4,12 Removing the hearing instrument . . . . . . . . . . . . . . . . . . . . . . . . . . . . . . . 10 Repairs . . . . . . . . . . . . . . . . . . . . . . . . . . . . . . . . . . . . . . . . . . . . . . . . . . . . . . . . . . . . 26 32 Sound dissapeared . . . . . . . . . . . . . . . . . . . . . . . . . . . . . . . . . . . . . . . . . . . . 28,30 Stand-by mode . . . . . . . . . . . . . . . . . . . . . . . . . . . . . . . . . . . . . . . . . . . . . . . . . . . 14 Technical data . . . . . . . . . . . . . . . . . . . . . . . . . . . . . . . . . . . . . . . . . . . . . . . . . . . . 27 Telecoil use . . . . . . . . . . . . . . . . . . . . . . . . . . . . . . . . . . . . . . . . . . . . . . . . . . . . . 14-15 Telephone use . . . . . . . . . . . . . . . . . . . . . . . . . . . . . . . . . . . . . . . . . . . . . . . . . 14-15 Troubleshooting guide . . . . . . . . . . . . . . . . . . . . . . . . . . . . . . . . . . . . . . . . 28-31 User operated controls . . . . . . . . . . . . . . . . . . . . . . . . . . . . . . . . . . . . . . . . . . . 4,8 Volume control . . . . . . . . . . . . . . . . . . . . . . . . . . . . . . . . . . . . . . . . . . . . . . . . . 4,11 Warnings . . . . . . . . . . . . . . . . . . . . . . . . . . . . . . . . . . . . . . . . . . . . . . . . . . . . . . . . . . 24 Squealing . . . . . . . . . . . . . . . . . . . . . . . . . . . . . . . . . . . . . . . . . . . . . . . . . . . . . . . . . 30 33 34 35 Worldwide Headquarters GN ReSound A/S Lautrupbjerg 7 DK-2750 Ballerup, Denmark Tel.: +45 45 75 11 11 Fax: +45 45 75 11 19 www.resound.com 16703200-GB-07.12 Rev.A United Kingdom GN ReSound Ltd. 1 Landscape Close Weston Business Park Weston-on-the-Green Oxon OX25 3SX Tel.: 0 1869 352 800 Fax: 0 1869 343 466 www.gnresound.co.uk Any issues relating to the EU Medical Device Directive 93/42/EEC should be directed to GN ReSound A/S. Australia GN ReSound Pty. Ltd. Unit R1 Regent Park Estate 391 Park Road Regent Park NSW 2143 Tel.: (free) 1800 658 955 Fax: 02 9743 7472 www.gnresound.com.au New Zealand GN ReSound (NZ) Ltd. 12 Parkway Drive Mairangi Bay Auckland Tel.: (free) 0800 900 126 Fax: (free) 0800 007 695 www.gnresound.co.nz