1
3
1
M
7
TME
6
SET
CHR
MODE
TMR
AL-1
AL-2
B
2
8
-10 0 10
SUN
TU20
E
40
U
30 TH
AM
5
TEMP.
SET
50 60
SAT
OFF
9
A
4
English
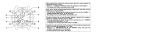
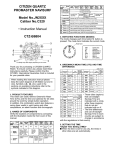
This watch is a combination quartz watch with a world time
function, which displays the time in 30 world cities and the
UTC (Coordinated Universal Time), and a thermometer
function. It also includes an EL (electroluminescence) light
function.
1
CONTENTS
1.
2.
3.
4.
NAMES OF PARTS . . . . . . . . . . . . . . . . . . . . . . . . . . . . . . . . . . . . . . . . . .4
CHANGING MODES (FUNCTIONS) . . . . . . . . . . . . . . . . . . . . . . . . . . . . .6
SETTING THE HANDS . . . . . . . . . . . . . . . . . . . . . . . . . . . . . . . . . . . . . . . .8
TIME/CALENDAR MODE . . . . . . . . . . . . . . . . . . . . . . . . . . . . . . . . . . . . . .9
A. Changing the display . . . . . . . . . . . . . . . . . . . . . . . . . . . . . . . . . . . . . .9
B. Changing the display city . . . . . . . . . . . . . . . . . . . . . . . . . . . . . . . . .10
C. Adjusting the time and calendar . . . . . . . . . . . . . . . . . . . . . . . . . . .12
5. ZONE SET MODE . . . . . . . . . . . . . . . . . . . . . . . . . . . . . . . . . . . . . . . . . .15
A. How to set the zone . . . . . . . . . . . . . . . . . . . . . . . . . . . . . . . . . . . . . .16
6. ALARM 1 & 2 MODES . . . . . . . . . . . . . . . . . . . . . . . . . . . . . . . . . . . . . . .17
A. How to set the alarms . . . . . . . . . . . . . . . . . . . . . . . . . . . . . . . . . . . .17
B. Alarm ON/OFF and alarm monitor . . . . . . . . . . . . . . . . . . . . . . . . . .18
7. TIMER MODE . . . . . . . . . . . . . . . . . . . . . . . . . . . . . . . . . . . . . . . . . . . . . .19
A. How to set the timer . . . . . . . . . . . . . . . . . . . . . . . . . . . . . . . . . . . . . .19
B. Timer countdown . . . . . . . . . . . . . . . . . . . . . . . . . . . . . . . . . . . . . . . .20
2
8. CHRONOGRAPH MODE . . . . . . . . . . . . . . . . . . . . . . . . . . . . . . . . . . . . .22
A. Total elapsed time measurement . . . . . . . . . . . . . . . . . . . . . . . . . . .23
B. Split time measurement . . . . . . . . . . . . . . . . . . . . . . . . . . . . . . . . . .23
9. THERMOMETER . . . . . . . . . . . . . . . . . . . . . . . . . . . . . . . . . . . . . . . . . . .25
A. Methods of measurement . . . . . . . . . . . . . . . . . . . . . . . . . . . . . . . . .25
B. Temperature measurement range and accuracy . . . . . . . . . . . . . .26
C. Switching between Celsius/Fahrenheit display . . . . . . . . . . . . . . .27
10. LOW BATTERY INDICATOR . . . . . . . . . . . . . . . . . . . . . . . . . . . . . . . . . .28
11. ALL RESET . . . . . . . . . . . . . . . . . . . . . . . . . . . . . . . . . . . . . . . . . . . . . . .29
12. PRECAUTIONS . . . . . . . . . . . . . . . . . . . . . . . . . . . . . . . . . . . . . . . . . . . .30
13. SPECIFICATIONS . . . . . . . . . . . . . . . . . . . . . . . . . . . . . . . . . . . . . . . . . .36
3
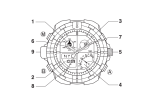
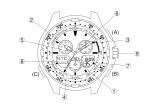
1. NAME OF PARTS
Mode
Name
Time display
Press once
Button A Press more
than 2 seconds
Press once
Button B
Press more
than 2 seconds
Button M Press once
Time • Calendar
Calendar/temperature display City selection display
EL light goes on
To calendar/
temperature display
To city selection
display
To time/calendar adjustment mode
To <SET> mode
1: Mode mark display
To <SET> mode
Zone Set
EL light goes on
Alarm 1 or
Alarm 2
Timer
Chronograph
Switching ON/OFF
Start/Stop
Start/Stop
To timer adjustment
mode
Split/Reset
Alarm monitor
Displayed city
changes
Displayed city
changes
Displayed city
changes
Displayed city
changes quickly
To city setting
adjustment mode
To alarm adjustment
mode
To time display
To <AL-1> mode
To <TMR> mode
To <CHR> mode
To <TME> mode
SET
AL-1 or AL-2
TMR
CHR
TME
2: Digital display [1]
Hour, minute, city
Month, day, city
Hour, minute, city
Hour, minute, city
Alarm time, city
Measured time
(hours, minutes)
Hour, minute, second
3: Digital display [2]
Second
Temperature
Second
Time difference from UTC
ON or OFF
Temperature
1/1000 second
Temperature (Celsius)
Day of week
Temperature (Celsius)
SET or OFF
4: Graphic display
4
Graphic display
5
5: Crown
6: Hour hand
7: Minute hand
Mode mark
(blinking)
To set analog time
Always indicates time (hours)
Always indicates time (minutes)
M
Mode mark
Mode (function)
TME
Time/Calendar
SET
SET
Zone Set*1
AL-1
AL-1
Alarm 1
TME
CHR
MODE
8: Second hand
Always indicates time (seconds)
TMR
AL-2
9: Thermosensor
Measures temperature,
shown on the digital display
2. CHANGING MODES (FUNCTIONS)
This watch has the modes (functions) listed in the next page.
Each time button g is pressed, the mode changes. The current mode is
indicated by the mode mark. For details on how to use each mode, see the
appropriate section.
AL-2
Alarm 2
TMR
Timer
CHR
Chronograph
*1: Zone Set mode
This mode ables to set, for each of 30 world cities and the UTC (Coordinated
Universal Time), a display (SET)/non-display (OFF) setting and a summer time
setting.
* If the watch is left in the Zone Set mode, Alarm 1 or Alarm 2 mode for
approximately 2 minutes, it will automatically return to Time/Calendar mode.
6
7
[Time display]
City
[Calendar, temperature
display]
Temperature
City (blinks)
Second
TME
TME
SET
CHR
B
AL-1
AL-2
Hour, minute
-10 0 10
AM
MODE
TMR
Second
TME
SET
CHR
AL-1
B
C
AL-2
50 60
40
THU
MODE
TMR
AL-1
AL-2
SAT
30
TU
E
20
30
B
SET
CHR
MODE
TMR
[City selection
display]
A
Hour, minute
Temperature Month, day Day of the week
Setting position
40
50 60
20
Second hand
AM
-10 0 10
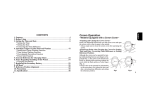
(1) Pull the crown out to stop the
hands.
(2) Turn the crown to set the correct
Normal position
time.
(3) Press the crown back in to restart.
4. TIME/CALENDAR MODE
SUN
3. SETTING THE HANDS
M
Temperature
A. Changing the display
• The “time display” changes to “calendar, temperature display” when button B
is pressed.
• The “calendar, temperature display” changes to “city selection display” when
button B is pressed.
8
9
• The “city selection display” changes to “time display” when button g is pressed.
• When you change to “calendar, temperature display,” the temperature will be
measured and displayed at 2-second intervals for approximately 2 minutes.
(Temperature measurement by button operation)
• The graphic display in “time display” and “city selection display” is an
approximate indication of the latest measured temperature.
• In each of the displays, the EL light goes on when button N is pressed.
B. Changing the displayed city
• During the “city selection display” (city name blinks), every time button O is
pressed, the displayed city will change according to the sequence shown in
the chart on the next page.
• If button A is pressed while button B is being pressed, the displayed city will
change in the opposite order.
* After changing the displayed city, press button M to return to time display.
* A city for which OFF has been selected in the Zone Set mode will not be
displayed.
* In the chart, cities (regions) with summer time system are indicated by K, M
without summer time system.
* Time difference and summer time for cities, are subject to change. (The chart
shows the situation in 1997.)
10
<The time difference between the cities and UTC time>
No. Indication
1 UTC
2 LON
3
PAR
4 ROM
5
CAI
6
IST
7 MOW
8
KWI
9 DXB
10 KHI
11 DEL
12 DAC
13 BKK
14 SIN
15 HKG
16 PEK
Time SummerCity
difference time No. Indication
Universal time coordinated
±0
17 TYO
Tokyo
–
K
London
±0
18 SYD
Sydney
K
Paris
+1
19 NOU
Nouméa
K
Rome
+1
20 AKL
Auckland
K
Cairo
+2
21 HNL
Honolulu
K
Istanbul
+2
22 ANC
Anchorage
K
Moscow
+3
23 LAX
Los Angeles
M
Kuwait
+3
24 DEN
Denver
M
Dubai
+4
25 CHI
Chicago
M
Karachi
+5
26 MEX
Mexico City
M
New Delhi
+5.5
27 NYC
New York
M
Dacca
+6
28 YUL
Montreal
M
Bangkok
+7
29 CCS
Caracas
M
Singapore
+8
30 RIO
Río de Janeiro
M
Hong Kong
+8
31 BUE
Buenos Aires
M
Beijing
+8
City
Time Summerdifference time
M
+9
K
+10
M
+11
K
+12
M
–10
K
–9
K
–8
K
–7
K
–6
M
–6
K
–5
K
–5
M
–4
K
–3
M
–3
11
C. Adjusting the time and calendar
If the time and calendar settings for any of the 30 cities or the UTC are adjusted,
those for all of the other cities will automatically be adjusted.
[Normal time display]
Seconds
City
TME
SET
CHR
MODE
TMR
AL-1
AL-2
40
50 60
B
Hour, minute
12
AM
-10 0 10
20
30
A
Temperature
(1) Display the adjusting city.
(2) Press button B continuously for more
than 2 seconds in time or
calendar/temperature display. It will then
become possible to adjust the figures.
The blinking figures can be adjusted.
(3) Each time button B is pressed, the
blinking figures will change according to
the following sequence: summer time c
second c minute c hour c 12-hour/
24-hour c month c day c year.
(4) Press button A to adjust the figures. By
continuously pressing button A, the
figures change quickly.
• Each time button A is pressed when SUMMER is blinking, the summer time
setting will alternatively switch on (ON) or (OFF).
• The seconds will return to 00 and start again if button A is pressed.(Moreover,
if the seconds are between 30 and 59, the minutes will increase by 1.)
• 12-hour/24-hour system will alternately switch, each time button A is pressed.
(5) Press button M to return to normal display.
* After the summer time setting is switched ON, “SUMMER” and a time one hour
ahead of the regular time (the time when the summer time setting was OFF)
will be displayed. (This only applies to cities with summer time settings ON.)
* Be careful to set AM and PM correctly in 12-hour system.
* The year can be set from 2000 to 2099. (The year is only displayed at time of
adjustment.)
* Setting the year, month and day automatically sets the day of the week.
* If a non-existent date (for example, February 30) is set, the first day of the next
month is displayed automatically by returning to the normal display.
* This watch has an automatic calendar, so it is not necessary to make
adjustments for the ends of months, even in leap years.
13
* When the watch is left for approximately 2 minutes in the adjustment mode
(blinking display), it will automatically return to normal display.
* If button M is pressed in the adjustment mode, the watch will immediately
return to normal display.
5. ZONE SET MODE
For each of the 30 cities and the UTC this watch displays, it is possible to set a
display/non-display setting, as well as a summer time setting (except for UTC).
Only cities with a SET setting will be displayed in Time/Calendar mode and
Alarm modes.
[Zone setting display]
City (blinking)
Time difference
from UTC
TME
SET
CHR
SUMMER
MODE
TMR
• When button A is pressed during the
normal display, the EL light goes on.
AL-1
OFF
AL-2
B
Hour, minute
14
A
AM
SET
SET
15
6. ALARM 1 & 2 MODES
Alarm 1 and Alarm 2 differ only in the sounds they make. They are used and set
in exactly the same way. When the alarm is set (ON) once, it sounds for 20
seconds same time everyday. The alarm sounds stop by pressing any button.
City (blinking)
ON or OFF
TME
SET
CHR
MODE
TMR
* If the watch is left in the adjustment mode for approximately 2 minutes, it will
automatically return to normal display (the city blinks).
* If button M is pressed in adjustment mode, the watch will immediately return to
normal display.
A. How to set the alarms
[Normal alarm
setting display (ON)]
AL-1
AL-2
50 60
40
SAT
U
30 TH
B
AM
OFF
(1) Press button B to display the zone setting city.
(2) Press button B continuously for more than 2 seconds. In the graphic display,
SET (display) or OFF (non-display) will blink.
(3) Press button A and select SET or OFF for the displayed city.
(4) Press button B. “SUMMER” and ON or OFF will blink.
(5) Press button A and select ON or OFF for the summer time setting.
• If you wish to input settings for other cities, press button B again. The watch
will enter the adjustment mode for the next city. Then carry out, in order, the
same steps, selecting SET (display) or OFF (non-display) and a summer
time setting.
(6) After completing the settings, press button M to return to normal display.
-10 0 10
SUN
TU20
E
A. How to set the zone
SET
A
When you set an alarm time for one city, the
same alarm time will automatically be set
for every other city.
(1) Press button B to display the alarm
setting city .
(2) Press button B continuously for more
than 2 seconds. The “Hours” will blink.
(3) Press button A to set the “Hours”. By
continuously pressing button A, the
figures change quickly.
Alarm time (Hour, minute)
16
17
(4) Press button B. The “Minutes” figure will blink.
(5) Press button A to set the “Minutes”.
(6) Press button M to return to normal display.
* When Time/Calendar mode is on 12-hour system, alarms operate on the same
system. Please pay attention to AM/PM when setting alarm times.
* After alarm is set, the alarm time will not change even if Time/Calendar mode
is set to summer time.
* If the watch is left in adjustment mode for approximately 2 minutes, it will
automatically return to normal display (the city blinks).
* If button M is pressed in adjustment mode, the watch will immediately return to
normal display.
7. TIMER MODE
The timer can be set, in increments of 1 minute, for up to 100 hours. After a set
time elapses, a time-up signal sounds for approximately 5 seconds. The timer
then returns to the set time and stops.
[Timer setting display]
Temperature
TME
SET
CHR
MODE
TMR
AL-1
C
B. Alarm ON/OFF and alarm monitor
A
18
B
-10 0 10
SUN
TU20
E
Each time button A is pressed during the normal alarm display, alarm setting
switches alternately between ON and OFF. Also, the alarm sound can be
confirmed by continuously pressing button A.
50 60
40
SAT
U
30 TH
SET
OFF
AL-2
A. How to set the timer
(1) Press button B. The “Minutes” will blink.
(2) Press button A to set the “Minutes”. By
continuously pressing button A the figures
changes quickly.
(3) Press button B. The “Hours” will blink.
(4) Press button A to set the“Hours”.
(5) Press button M to return to the timer
setting display.
A
Timer time
19
B. Timer countdown
(1) Press button A to start the timer at the set time.
(2) If button A is pressed during timer countdown, the timer stops. If button A is
pressed again, the timer restarts.
(3) If button B is pressed when the timer stops, the display returns to the timer
set time.
Automatically returns to the set time.
Set time
<Confirmation sound>
At the time of start, stop, reset or timer restart operation in timer mode, a
confirmation sound is heard.
<Changing modes during timer countdown>
If button M is pressed in timer mode to change the mode, the time countdown is
continued internally. If the mode is changed again to timer mode, the time
continuously counted down by the timer is displayed. However, if the timer time
is up, the display returns to timer set time.
*1 B
A
Countdown
B
Time up
A
Stop
*1: Timer restart function
If button B is pressed during timer countdown, the mode immediately changes
to timer set time display and restarts.
20
21
8. CHRONOGRAPH MODE
A. Total elapsed time measurment
The chronograph is capable of measuring and indicating a maximum of 23
hours, 59 minutes, 59 seconds and 999 milliseconds in increments of 1/1000
second. After 24 hours, it stops with a reset display of “00°00'00"000”. The
chronograph can also measure split time (elapsed time).
B. Split time measurment
[Chronograph reset display]
M
TME
SET
CHR
(1) The chronograph starts or stops each time button A is pressed.
(2) Press button B during a time measurement, and the watch shows a split
time for 10 seconds. While a split time is shown, “SPLIT” will blink.
Each time button B is pressed, the chronograph shows the latest split time.
(3) To reset chronograph, press button B after it is stopped.
Measured time
(milliseconds)
MODE
TMR
(1) The chronograph starts or stops each time button A is pressed.
(2) To reset the chronograph, press button B after it is stopped.
AL-1
B
AL-2
B
SET
Reset
OFF
Measured time
(hours, minutes, seconds)
-10 0 10
SUN
TU20
E
50 60
40
SAT
U
30 TH
A
A
Measurement
B
*1
Split time
22
A
Stop
*1: Automatically returns
to measurement mode
after 10 seconds.
B
23
<Changing the mode during time measurement in chronograph mode>
Even if button M is pressed during a time measurement in chronograph mode
and mode is changed, time measurement is continued internally. The measured
time is shown when the mode is returned to chronograph again. However, if the
time measurement is continued for more than 24 hours, the chronograph stops
at the reset state.
* Confirmation sound and EL light
At the time of start, stop, split time check or reset operation in chronograph
mode, a confirmation sound is heard.
At the time of stop or a split time measurement, the EL light is turned on with
the sound.
Split time: Elapsed time from start point
Split time
24
A. Methods of measurement
As described below, there are two methods of measuring temperature.
The most recently measured temperature is displayed in the Time mode
(approximate temperature is graphically displayed in both the “time display” and
the “city selection display”) and in the Timer mode. Also, switching between
Celsius display (°C) and Fahrenheit (°F) display is possible.
<Automatic temperature measurement>
Temperature is automatically measured every hour on the hour, with the
temperature display then being updated. However, measurement will not be
carried out if the Chronograph mode or Time/Calendar mode is in the
adjustment mode (blinking display) at measurement time.
<Temperature measurement by button operation>
If you change to the “calendar, temperature display” in the Time/Calendar mode,
the temperature will be measured at 2-second intervals for 2 minutes.
Split time
Start point
9. THERMOMETER
Goal
25
B. Temperature measurement range and accuracy
In Celsius (°C)
In Fahrenheit (°F)
Temperature display range
–9.9°C to +59.9°C
14°F to 139°F
Measurement unit
0.1°C
1°F
Measurement accuracy
20°C to 30°C: ±1°C
–5°C to +40°C: ±2°C
68°F to 86°F: ±2°F
23°F to 104°F: ±4°F
(Notes)
• If the watch is worn on the wrist durning temperature measurement, the body
temperature affects measurement.
For accurate temperature measurement, take the watch off and leave it in the
measuring environment at least for 20 to 30 minutes. The influence of body
temperature depends on environmental conditions such as difference between
atmospheric temperature and body temperature before taking the watch off,
etc.
• Do not use the thermometer out of the display range. Extremely hot or cold
temperature may cause malfunction of the watch.
26
C. Switching between Celsius/Fahrenheit display
In the Time mode’s “Date, calendar display,” by
pressing button M for more than 2 seconds while
button A is pressed, the temperature display will
switch from Celsius (°C) to Fahrenheit (°F) or vice
versa.
If button M is pressed first, however, the display will
not change.
A+M
C
Celsius
display
F
Fahrenheit
display
<About the graphic display of approximate temperature>
Approximate temperature is graphically displayed in the Time mode’s “time
display” and “city selection display.”
The graphic display always shows Celsius temperature, even when the
numerical display has been set to Fahrenheit.
27
10. LOW BATTERY INDICATOR
11. ALL RESET
When the battery gets weak, the low battery indicator function appears in the
display as shown below.
• The second hand moves at 2-second intervals (moves by 2 increments every 2
seconds).
• The temperature display starts to blink “- - -” continuously.
After replacement of the battery, be sure to perform the all reset operation as
shown below.
If the watch malfunctions or shows an abnormal display as a result of an
excessive shock or static electricity (for example, the watch indicates nothing,
continuously sounds alarm, etc.). Perform the all reset operation.
(1) Pull the crown out.
(2) Simultaneously press buttons A, B and M.
(3) Release the three buttons.
(4) Press the crown back. (A confirmation sound
is heard.)
All reset operation is complete.
M
Before use, reset the watch for the correct time
in all modes.
Crown
TME
CHR
SET
SUMMER
AL-1
F C
MODE
TMR
AL-2
B
AM PM
SPLIT
-10 0 10
SUN
TU20
E
50 60
40
SAT
U
30 TH
SET
OFF
Blinking
Even when the watch falls into such condition, it
still displays the time but the EL light,
thermometer and alarm will not function.
Immediately replace the battery with new one.
A
2 seconds
28
29
12. PRECAUTIONS
CAUTION: Water-resistance performance
There are several types of water-resistant watches, as
shown in the following table. For correct use within the
design limits of the watch, confirm the level of waterresistance of your watch, as indicated on the dial and case,
and consult the table.
(The unit “bar” is roughly equal to 1 atmosphere.)
Indication
Dial
WATER RESIST
or
No indication
WR50 or
WATER RESIST
50
WR100/200 or
WATER RESIST
100/200
30
Case (case back)
WATER
RESIST(ANT)
Examples of use
Specifications
Minor exposure to
water (washing
face, rain, etc.)
Moderate exposure
to water (washing,
kitchen work,
swimming, etc.)
Marine sports
(skin diving)
Scuba diving
(with air tank)
Operation of the
crown or buttons
with moisture
visible
Water-resistant to
3 atmospheres
OK
NO
NO
NO
NO
OK
OK
NO
NO
NO
OK
OK
OK
NO
NO
WATER RESIST(ANT)
Water-resistant to
5 bar or
5 atmospheres
WATER RESIST(ANT)
WATER RESIST(ANT) Water-resistant to
10/20 bar or
10/20
WATER RESIST(ANT)
atmospheres
* WATER RESIST(ANT) xx bar may also be indicated as W.R. xx bar.
31
• Water-resistance for daily use (to 3 atmospheres): This type of watch is waterresistant to minor exposure to water. For example, you may wear the watch
while washing your face; however, it is not designed for use underwater.
• Upgraded water-resistance for daily use (to 5 atmospheres): This type of watch
is water-resistant to moderate exposure to water. You may wear the watch
while swimming; however, it is not designed for use while skin diving.
• Upgraded water-resistance for daily use (to 10/20 atmospheres): This type of
watch may be used for skin diving; however, it is not designed for scuba or
saturated diving using helium gas.
CAUTION
• Be sure to use the watch with the crown pressed in (normal position). If your
watch has a screw-type crown, be sure to tighten the crown completely.
• Do NOT operate the crown or buttons with wet fingers or when the watch is
wet. Water may enter the watch and compromise water-resistance.
• If the watch is used in seawater, rinse with fresh water afterward and wipe with
a dry cloth.
• If moisture has entered the watch, or if the inside of the crystal is fogged up
and does not become clear within a day, immediately take the watch to your
dealer or Citizen Service Center for repair. Leaving the watch in such a state
will allow corrosion to form inside.
32
• If seawater enters the watch, place the watch in a box or plastic bag and
immediately take it in for repair. Otherwise, pressure inside the watch will
increase, and parts (crystal, crown, buttons, etc.) may come off.
CAUTION: Keep your watch clean.
• Leaving dust and dirt deposited between the case and crown may result in
difficulty in pulling the crown out. Rotate the crown while in its normal position,
from time to time, to loosen dust and dirt and then brush it off.
• Dust and dirt tend to be deposited in gaps in the back of the case or band.
Deposited dust and dirt may cause corrosion and soil your clothing. Clean the
watch occasionally.
Cleaning the watch
• Use a soft cloth to wipe off dirt, perspiration and water from the case and
crystal.
• Use a soft, dry cloth to wipe off perspiration and dirt from the leather band.
• To clean a metal, plastic, or rubber watchband, wash away dirt with mild soap
and water. Use a soft brush to remove dust and dirt jammed in the gaps in the
metal band. If your watch is not water-resistant, take it to your dealer.
NOTE: Avoid using solvents (thinner, benzine, etc.), as they may mar the finish.
33
WARNING: Handling of the battery
• Keep the battery out of the reach of small children. If a child swallows the
battery, contact a physician immediately.
CAUTION: Replacing the battery
• For replacement of the battery, take your watch to your dealer or Citizen
Service Center.
• Replace the battery as soon as possible if the service life of the battery has
expired. Leaving a depleted battery in the watch may result in leakage, which
can damage the watch severely.
CAUTION: Operating environment
• Use the watch within the operating-temperature range specified in the
instruction manual.
Using the watch where temperatures are outside the specified range, may
result in deterioration of functions or even stoppage of the watch.
• Do NOT use the watch in places where it is exposed to high temperature, such
as in a sauna.
Doing so may result in a skin burn.
34
• Do NOT leave the watch in a place where it is exposed to high temperature,
such as the glove compartment or dash-board of a car.
Doing so may result in deterioration of the watch, such as deformation of
plastic parts.
• Do NOT place the watch close to a magnet.
Timekeeping will become inaccurate if you place the watch close to magnetic
health equipment such as a magnetic necklace or a magnetic latch of a
refrigerator door or handbag clasp or the earphone of a mobile phone. If this
has occurred, move the watch away from the magnet and reset the time.
• Do NOT place the watch close to household appliances that generate static
electricity.
Timekeeping may become inaccurate if the watch is exposed to strong static
electricity, such as is emitted from a TV screen.
• Do NOT subject the watch to a strong shock such as dropping it onto a hard
floor.
• Avoid using the watch in an environment where it may be exposed to
chemicals or corrosive gases.
If solvents, such as thinner and benzine, or substances containing such
solvents come in contact with the watch, discoloration, melting, cracking, etc.
may result. If the watch comes in contact with mercury used in thermometers,
the case, band or other parts may become discolored.
35
13. SPECIFICATIONS
1. Caliber No.: C720
2. Type: Combination (analog + digital) quartz watch
3. Time accuracy: within ±20 sec/month (at a normal temperature of +5°C/41°F
to +35°C/95°F)
4. Operating temperature range: –10°C to +60°C (14°F to 140°F)
5. Display functions
• Time/Calendar: Hour, minute, second, month, day, day of week, city,
temperature
• Zone Set: SET (display)/OFF (non-display) settings, and summer time
settings
• Alarm 1: Hour, minute, ON/OFF, city
• Alarm 2: Hour, minute, ON/OFF, city
• Timer: 100-hour meter (1-minute increments)
• Chronograph: 24-hour meter (increments of 1/1000 second), split time
measurement
36
6. Additional functions
• World time function: Displays time in 30 cities and UTC
• Thermometer function: Measures and displays temperature in either Celsius
or Fahrenheit
• EL light function
• Low battery warning function
7. Battery used: Battery No. 280-44. Battery code: SR927W.
8. Battery life: Approximately 2 years (when used under the following conditions:
alarm sound, 30 seconds/day; EL light, 2 seconds/day; temperature
measurement by button operation, 3 minutes/day; timer time-up sound, 5
seconds/week)
* A newly inserted battery will run the watch for approximately 2 years when
the watch is used under ordinary conditions (the conditions described
above). However, battery life will vary according to the frequency of use of
the timer, chronograph, EL light, etc.
* Specifications may be changed without prior notice due to product
modification.
37