1
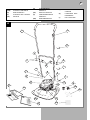
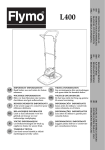
(GB)
(D)
(F)
(NL)
®
INSTRUCTION MANUAL
BEDIENUNGSANWEISUNG
MANUEL D’UTILISATION
GEBRUIKSAANWIJZING
HVT40
(N)
(SF)
(S)
(DK)
BRUKSANVISNING
KÄYTTÖHJE
BRUKSANVISNING
BRUGSANVISNING
D
WICHTIGE INFORMATION
Bitte vor dem Benutzen des Gerätes
durchlesen und gut aufbewahren
F
RENSEIGNEMENTS IMPORTANTS
A lire avant usage et à conserver pour
référence ultérieure
NL
BELANGRIJKE INFORMATIE
Leest u deze informatie voor het
gebruik en bewaar ze voor
toekomstige raadpleging
N
VIKTIG INFORMASJON
Les bruksanvisningen før bruk og
oppbevar denne for senere bruk.
SF
TÄRKEÄÄ TIETOA
Lue tämä ennen käyttöä ja säilytä
myöhempää tarvetta varten
S
VIKTIG INFORMATION
Läs anvisningarna före användningen
och spara dem för framtida behov
VIGTIGE OPLYSNINGER
DK De bør læse dette før brug og gemme
til senere henvisning
E
INFORMACIÓN IMPORTANTE
Léase antes de utilizar y consérvela
como referencia en el futuro
P
INFORMAÇÕES IMPORTANTES
Leia antes de utilizar e guarde para
consulta futura
I
INFORMAZIONI IMPORTANTI
Leggere prima dell’uso e conservare
per consultazione futura
MANUAL DE INSTRUCCIONES
INSTRUÇNÕES PARA O USO
ISTRUZIONI PER L’USO
IMPORTANT INFORMATION
Read before use and retain for future
reference
(E)
(P)
(I)
GB
GB - CONTENTS
1. Start/Stop Switch
2. Upper Handle
3. Tie Wrap (x2)
4. Washer (x8)
5. Locknut (x6)
6. Upper Handle Fixing
Bolt (X4)
7. Lower Handle Fixing
Bolt (x2)
8. Starting Handle
9. Fuel Tank Cap
10.Air Filter
11. Debris Guard
12.Primer
13.8 spare cutting lines
(coloured green)
14.Spark Plug Lead
15.Instruction Manual
16.Guarantee Card
17.International Service
Directory
18.Large Spacer
19.Small Spacer
20.Spanner
ENGLISH PAGES (2-9)
D - INHALT
1. Start-/Stoppschalter
2. Oberer Griff (x2)
3. Kabelhalter (x8)
4. Unterlegscheibe (x6)
5. Sicherungsmutter
6. Befestigungsbolzen
oberer Griff (x4)
7. Befestigungsbolzen,
unterer Griff (x2)
8. Starterseil
9. Tankkappe
10.Luftfilter
11. Schmutzfånger
12.Primer
13.8 Ersatzfaden (grün)
14.Zündkerzenzuleitung
15.Bedienungsanleitung
16.Garantiekarte
17.Internationales
Kundendienstverzeichnis
18.Kleines Abstandsstück
19.Großes Abstandsstück
20.Schraubenschlüssel
DEUTSCHE SEITEN (10-17)
F - TABLE DES MATIÈRES
1. Interrupteur de
marche/arrêt
2. Poignée supérieure (x2)
3. Attache (x8)
4. Rondelle (x6)
5. Contre-écrou
6. Boulon de fixation de la
poignée supérieure (x4)
7. Boulon de fixation de la
poignée inférieure (x2)
8. Poignée de démarrage
9. Capuchon du réservoir
de combustible
10.Filtre à air
11. Protection contre les
débris
12.Dispositif d’amorçage
13.8 lignes de coupe de
réserve(de couleur verte)
14.Fil de bougie
15.Manuel d’instructions
16.Carte de garantie
17.Répertoire d’entretien
international
18.Petite entretoise
19.Grande entretoise
20.Clé
LES PAGES EN LANGUE
FRANÇAISE (18-25)
NL - INHOUD
1. Start/Stopschakelaar
2. Bovenste duwboom
3. Bindveter (x2)
4. Borgschijfje (x8)
5. Borgmoer (x6)
6. Bevestigingsbout voor
bovenste duwboom (x4)
7. Bevestigingsbout voor
onderste duwboom (x2)
8. Starthendel
9. Dop voor benzinetank
10.Luchtfilter
11. Beschermkap
12.Ontsteking
13.8 reservemaaikoorden
(groen)
14.Bougiekabel
15.Handboek
16.Garantiekaart
17.Internationale serviceadressen
18.Kleine pasring
19.Grote pasring
20.Sleutel
NEDERLANDSE
PAGINA’S (26-33)
N - INNHOLD I ESKEN
1. Start/stopp bryter
2. Øvre håndtak
3. Kabel strips (2 stk)
4. Skiver (8 stk)
5. Låsemutter (6 stk)
6. Festebolt for øvre
håndtak (4 stk)
7. Festebolt for nedre
håndtak (2 stk)
8. Starthåndtak/snor
9. Bensintanklokk
10.Luftfilter
11. Motordeksel
12.Primer
13.Ekstra tråd (8 stk)
(grønne)
14.Ledning/hette for
tennplugg
15.Bruksanvisning
16.Garantikort
17.Servicestasjonsliste
18.Lite avstandsstykke
19.Stort avstandsstykke
20.Skiftenøkkel
NORSKE SIDER (34-41)
SF - SISÄLTÖ
1. Käynnistys/
pysäytyskatkaisin
2. Ylävarsi
3. Kiinnityskappale (2 kpl)
4. Pultin välirengas (8 kpl)
5. Lukitusmutteri (6 kpl)
6. Ylävarren kiinnityspultti
(4 kpl)
7. Alavarren kiinnityspultti
(2 kpl)
8. Käynnistyskahva
9. Polttoainesäiliön korkki
10.Ilmansuodatin
11. Roskasuojus
12.Rikastin
13.Kahdeksan (vihreää)
varaleikkuusiimaa
14.Sytytystulpan johdin
15.Käyttöohjeet
16. Takuukortti
17.Kansainvälinen
huoltohakemisto
18.Pieni välike
19.Suuri välike
20.Mutteriavain
SUOMALAISET SIVUT
(42-49)
S - INNEHÅLL
1. Start/stoppkontakt
2. Övre handtag
3. Kabelband (2 st)
4. Bricka (8 st)
5. Låsmutter (6 st)
6. Övre handtagets
fästbultar (4 st)
7. Nedre handtagets
fästbultar (2 st)
8. Starthandtag
9. Tanklock
10.Luftfilter
11. Skräpskydd
12.Flödare
13.8 kaplinor i reserv
(grönfärgade)
14.Tändkabel
15.Instruktionsbok
16.Garantikort
17.Internationell
servicekatalog
18.Liten mellanläggsbricka
19.Stor mellanläggsbricka
20.Skiftnyckel
SVENSKA SIDOR (50-57)
DK - INDHOLD
1. Start/stopkontakt
2. Øvre håndtag
3. Kabelklemme (2 stk.)
4. Spændskive (8 stk.)
5. Låsemøtrik (6 stk.)
6. Fastgøringsbolt til øvre
håndtag (4 stk.)
7. Fastgøringsbolt til nedre
håndtag (2 stk.)
8. Starthåndtag
9. Benzindæksel
10.Luftfilter
11. Affaldsskærm
12.Primer
13.8 ekstra klippesnører
(grønne)
14.Tændrørsledning
15.Brugsvejledning
16.Garantibevis
17.International
servicetelefonbog
18.Lille afstandsstykke
19.Stort afstandsstykke
20.Skruenøgle
DANSKE SIDER(58-65)
E - CONTENIDO
1. Interruptor de contacto
2. Manillar superior
3. Amarra (x2)
4. Arandela (x8)
5. Tuerca inaflojable (x6)
6. Perno de fijación de
manillar superior (x4)
7. Perno de fijación de
manillar inferior (x2)
8. Manilla de arranque
9. Tapa del tanque de
combustibles
10.Filtro de aire
11. Protector contra
desechos
12.Cebador
13.8 repuestos de cuerdas
para cortar (color verde)
14.Cable de la bujía
15.Manual de Instrucciones
16.Tarjeta de Garantía
17.Directorio de Servicio
Internacional
18.Espaciador pequeño
19.Espaciador grande
20.Llave de tuercas
PAGINAS EN
CASTELLANO (66-73)
P - LEGENDA
1. Interruptor de
Ligar/Desligar
2. Cabo Superior
3. Presilha (x2)
4. Arruela (x8)
5. Porca de Aperto (x6)
6. Parafuso de Fixação do
Cabo Superior (x4)
7. Parafuso de Fixação do
Cabo Inferior (x2)
8. Pega de Arranque
9. Tampa do Depósito de
Combustível
10.Filtro de Ar
11. Resguardo contra
detritos
12.Bomba de Injecção
Manual
13.8 Linhas de Corte
Sobresselentes (de cor
verde)
14.Fio da vela de ignição
15.Manual de Instruções
16.Cartão da Garantia
17.Lista de Assistência
Internacional
18.Espaçador Pequeno
19.Espaçador Grande
20.Chave inglesa
PÁGINAS
PORTUGUESAS (74-81)
I - NOMENCLATURA
1. Interruttore
acceso/spento
2. Manico superiore
3. Fermo (x2)
4. Rondella (x8)
5. Controdado (x6)
6. Bullone di fissaggio per
manico superiore (x4)
7. Bullone di fissaggio per
manico inferiore (x2)
8. Maniglia di avviamento
9. Tappo serbatoio
carburante
10.Filtro aria
11. Protezione antidetriti
12.Primer (innesco)
13.8 lamelle di scorta (di
colore verde)
14.Conduttore candela
15.Manuale d’istruzioni
16.Cartolina di garanzia
17.Elenco centri assistenza
internazionali
18.Distanziale piccolo
19.Distanziale grande
20.Chiave
TALIANO (82-89)
1
(N)
KARTONGENS
INNHOLD
KARTONINHALT
(SF)
PAKETIN SISÄLTÖ
(F)
CONTENU DU CARTON
(S)
(NL)
INHOUD
FÖRPACKNINGENS
INNEHÅLL
(DK)
KARTONINDHOLD
(GB)
CARTON CONTENTS
(D)
(E)
CONTENIDO DEL
CARTON
(P)
LEGENDAS DOS
DESENHOS
(I)
DEL CARTONE
A
2
1
3
4
4
5
5
6
3
4
7
5
4
8
7
11
9
10
17
18
19
16
20
12
14
15
13
2
If not used properly this trimmer can be dangerous! This trimmer can cause
serious injury to the operator and others, the warnings and safety instructions
must be followed to ensure reasonable safety and efficiency in using this trimmer.
The operator is responsible for following the warning and safety instructions in
this manual and on the trimmer.
Explanation of Symbols on the HVT40
(GB) SAFETY
Warning
Fuel Safety
WARNING - Petrol is highly flammable
- Store fuel in a cool place in a container
specifically designed for the purpose.
- Only use a container that is specially
designed for mixing fuel.
- Your trimmer has a 2stroke engine which runs
on fuel of 1 part of oil to
25 parts of petrol.
- Do not use standard 2-stroke
mixture as supplied by garages, neat petrol
or multi grade oil.
- Use a good quality 2-stroke oil or a quality
SAE 30 oil mixed with fresh REGULAR
grade unleaded petrol.
- Refuel outdoors only and do not smoke
while refuelling.
- Wipe dirt and grass clippings from the fuel
tank filler cap to avoid getting dirt into the
fuel tank.
- Add fuel BEFORE starting the engine.
Never remove the cap of the fuel tank or
add fuel while the engine is running or
when the engine is hot.
- If petrol is spilled, do not attempt to start the
engine but move the machine away from
the area of spillage and avoid creating any
source of ignition until petrol vapours have
dissipated.
- Never use stale fuel left from last season or
fuel which has been stored for long periods.
- Replace all fuel tanks and container caps
securely.
- Fuel should be stored in a cool place away
from naked flames.
- Your carburettor is pre-set. Normally no
further adjustment is required.
Preparation
1. Do not trim barefoot or in open sandals.
Always wear suitable clothing, gloves, and
stout shoes.
2. Make sure the area to be cut is clear of
sticks, stones, bones, wire and debris; they
could be thrown by the cutting line.
3. Before using always visually inspect to see
that cutting lines, disc bolts and disc
assembly are not worn or damaged.
Replace worn or damaged cutting lines
together with their fixings in sets to preserve
balance.
4. Have faulty silencers replaced
25
Read the user instructions
carefully to make sure you
understand all the controls and
what they do.
The use of ear protection is
recommended.
Disconnect the spark plug before
attempting any maintenance,
cleaning or adjustment, or if you
are going to leave the trimmer
unattended for any period.
Never allow children or people
unfamiliar with these instructions
to use the trimmer. Local
regulations may restrict the age
of the operator.
Never use, or attempt to fit, a
metal/bar blade with this product.
General
1. Only use the trimmer in the manner and for
the functions described in these
instructions.
2. Keep bystanders away. Do not trim whilst
people, especially children or pets, are in
the trimming area.
3. Never operate the trimmer when you are
tired, ill or under the influence of alcohol,
drugs or medicine.
4. The operator or user is responsible for
accidents or hazards occurring to other
people or their property.
3
18. Switch off the engine, wait
until the cutting disc has
stopped, disconnect the
spark plug lead and wait
until the engine has
cooled:-
-
before leaving the trimmer unattended
for any period;
before refuelling
before clearing a blockage;
before checking, cleaning or working
on the trimmer;
if you hit an object. Do not use your
trimmer until you are sure that the
entire trimmer is in a safe operating
condition;
if the trimmer starts to vibrate
abnormally. Check immediately.
Excessive vibration can cause injury.
19. If the engine is provided with a shut-off
valve, turn the fuel off at the conclusion of
trimming.
Maintenance and storage
1. Keep all nuts, bolts and screws tight to be
sure the trimmer is in safe working
condition.
2. Replace worn or damaged parts for safety.
3. Only use the replacement cutting disc,
cutting line, disc bolt, spacer and impeller
specified for this product.
4. Never store the trimmer with fuel in the tank
inside a building where fumes can reach an
open flame or spark.
5. Allow the engine to cool before storing in
any enclosure.
6. To reduce fire hazard, keep the engine,
muffler and fuel storage area free of grass,
leaves or excessive grease.
7. If the fuel tank has to be drained, this
should be done outdoors.
8. Be careful during adjustment of the
machine to prevent entrapment of the
fingers between moving parts and fixed
parts of the machine.
(GB) SAFETY
Use
1. Do not operate the engine in a confined
space where exhaust fumes (carbon
monoxide) can collect.
2. Use the trimmer only in daylight or good
artificial light.
3. Avoid operating your trimmer in wet grass,
where feasible.
4. Take care in wet grass, you may lose your
footing.
5. On slopes, be extra careful of your footing
and wear non-slip footwear.
6. Exercise extreme caution when changing
direction on slopes.
7. Trimming on banks and slopes can be
dangerous. and you should use extreme
caution if using the trimmer in this manner.
When operating the trimmer on banks or
steep slopes it is important that the feet of
the operator remain firmly on level ground.
8. Do not walk backwards when trimming, you
could trip. Walk, never run.
9. Never cut grass by pulling the trimmer
towards you.
10. Stop the engine before pushing the trimmer
across surfaces other than grass and when
transporting the trimmer to and from the
area to be mowed.
11. Do not overspeed the engine or alter
governor settings. Excessive speed is
dangerous and shortens trimmer life.
12. Always start the trimmer carefully with feet
well away from the cutting lines.
13. Do not tilt the trimmer when starting the
engine, except if the trimmer has to be tilted
for starting. In this case, do not tilt more
than absolutely necessary and lift only the
part which is away from the operator.
Always ensure that both hands are in the
operating position before returning the
appliance to the ground.
14. Never pick up or carry a trimmer while the
engine is running
15. Spark plug lead may be hot - handle with
care.
16. Do not attempt any maintenance on your
trimmer when the engine is hot.
17. Cutting disc continues to rotate after the
machine is switched off. Wait until all
machine components have completely
stopped before touching them.
4
Product Rating Label
B
Product Number . . . . . . . . . . . . . . . . . .
Model Number . . . . . . . . . . . . . . . . . . . .
Serial Number . . . . . . . . . . . . . . . . . . . .
Date of Purchase . . . . . . . . . . . . . . . . . .
Place of Purchase . . . . . . . . . . . . . . . . .
•PLEASE KEEP PROOF OF PURCHASE•
Your product is uniquely identified by a silver
and black product rating label. To ensure
you have full product information when
obtaining spares or advice from one of our
approved service centres or if you need to
contact our customer service department
you should make a note in the space
provided of the information shown in Fig B
Fuel Mixing Instructions
(GB) ASSEMBLY
1.
2.
3.
4.
5.
•
Ensure mixing bottle and cap are clean and standing on a level surface.
Add fresh regular grade unleaded petrol up to the 1 litre mark on the bottle.
Add a good quality 2 stroke oil, to the 25 : 1 mark (40 ml of oil) on the bottle.
Screw cap on, shake container until petrol and oil are thoroughly mixed.
Clean fuel tank filler cap and fill fuel tank.
UK ONLY:- Electrolux Outdoor Products manufacture a specially designed fuel mixing bottle.
For further information contact your local Electrolux Outdoor Products Service Centre/Stockist
or contact the Electrolux Outdoor Products Customer Careline on 01325 300303
Assembly and Adjustment
4
C
3
2
2
1
5
D
4
5
6
2
3
E
F
Assembly of lower handle to deck
(Fig C)
With the trimmer on the ground:1. Remove the bolts (C1), washers (C2)
and lock nuts (C4) from the polythene
bag.
2. Place one washer (C2) on to the bolt
(C1) and secure the lower handle (C4)
by placing bolt (C1) through deck
bracket (C5) and lower handle (C4).
3. Place washer (C2) on bolt and secure
with lock nut (C3).
Assembly of upper handle to lower
handle (Fig D)
Assemble upper handle (D5) to lower handle
(D4) by fitting bolts (D6) and washers (D2)
and securing with lock nuts (D3).
Handle Position
The handle position can be altered by
moving it forward for the park position (Fig
E) or back for the trimming position (Fig F).
5
Starting and Stopping
G
H
J
STOP -
STOP
START -
K
L
(GB) USE
Before Starting your Trimmer
Filling the Fuel Tank
1. Clean around fuel cap (See fig A).
2. Remove cap.
3. Add fuel mix (See Fuel mixing
instructions)
4. Never use stale fuel left from last season
or fuel which has been stored for long
periods.
5. Refit fuel tank cap and wipe up any spilled
fuel.
USING THE ENGINE PRIMER (Fig G)
FIRST START - or after running the fuel
tank dry. Press the primer 20 times and then
follow steps 1 - 6 in ‘To Start your Trimmer’.
If the engine fails to start after 5 pulls of the
starting handle, leave the product to stand for
15 minutes. Press the primer a further 10
times and follow steps 1 - 6 again.
COLD START - if the engine is cold and
there is fuel in the tank. Press the primer 8 10 times .
WARM START - if the engine is warm and
there is fuel in the tank - DO NOT USE THE
PRIMER. If the engine has run out of fuel,
refil tank and prime 8 - 10 times.
To Start your Trimmer
1. Move the handle to the Parking position
(See Fig E).
2. Connect the spark plug lead (See Fig H).
3. Move the start/stop switch to 'start'
position (See Fig J).
4. Place your right foot on the deck and
grasp the top of the lower handle with your
left hand. Tilt the trimmer towards you
(See fig. K). This prevents an unsightly
ring being cut in your lawn.
5. Pull the starting handle (see fig A) gently
until you feel a resistance, return the
starting handle slowly.
6. Pull the starting handle firmly towards you
to its full extent to start the engine and
then return the starting handle slowly.
7. Allow the engine to reach its full running
speed then gently lower the trimmer onto
the ground.
To Stop your Trimmer
1. Move start/stop switch to 'stop' position. (See
Fig J)
2. As the engine dies, tilt the trimmer to one side
(See fig L). This prevents a ring being cut in
your lawn.
3. When the engine has stopped, lower the
trimmer onto the ground.
4. Put the handle in the Parking position (See Fig
E).
6
Removing and Fitting Cutting Line Height Adjustment
•
M
N
P
R
6
5
4
2
(GB) USE
3
1
S
Highest
height of
cut
T
U
Lowest
height of
cut
The cutting line is sharp, wear gloves
and take care when handling it.
•
Check the cutting line frequently
during use and on completion of
trimming.
Removing the Cutting Line
1. Switch machine off and disconnect spark
plug lead.
2. Push the line towards the centre of the
cutting disc and carefully remove. See
Fig M.
Fitting the Cutting Line
1. Holding the line with thumb and
forefinger and using other thumb as a
guide, curve around centre portion of the
cutting disc (as illustrated in Fig N) and
thread through the hole on the rim of the
cutting disc.
2. Carefully pull the line into place as
illustrated in Fig. P.
•
At all times the amount of line extending
beyond the edge of disc should be of an
even length. If there is a variation of
more than half an inch between the four
lengths of line replace immediately with 2
full new lengths.
•
Only use Green coloured cutting line
on the HVT 40.
Changing the height of cut
1. Loosen bolt (R1), using the spanner
provided. Remove bolt (R1), spring
washer (R2), washer (R3) cutting disc
(R4) and spacer (R5) (if fitted).
2. Carefully remove impeller (R6) from
engine shaft.
3. Select required height of cut,
(See Figs S, T, & U) and replace any
cutting lines required.
•
Important:- Cutting line must be on
the side of the disc facing the grass
when fitted.
4. Replace impeller (R6) on to engine shaft
ensuring that it is correctly located.
Replace spacer (R5) (if fitted), cutting
disc (R4), washer (R3), spring washer
(R2) and bolt (R1).
5. Secure assembly with bolt (R1), making
sure complete assembly is tight, (if in
doubt, contact your service dealer).
7
Caring for your Trimmer
W
If you do not intend to use your trimmer
for long periods it is advisable to follow
this procedure after use:1. Move the start/stop switch to stop.
2. The engine will begin to stop, tilt the
trimmer (See Fig L).
3. Once the engine has stopped,
disconnect the spark plug lead (See fig
H).
4. Remove all fuel from the fuel tank.
Cleaning
•
Keep your trimmer clean - grass
clippings left in any of the air intakes,
around the engine or under the deck
could become a potential fire hazard.
•
Do not clean with chemicals,
including petrol, or solvents - some
can destroy critical plastic parts.
1. Remove grass from under the deck with
a piece of wood or similar.
2. Using a soft brush - remove grass
clippings from around the engine and
from all air intakes.
3. Remove the fan, See 'Height
adjustment', and clean with a soft
brush.
4. Wipe over the surface of your trimmer
with a dry cloth.
Storing Your Trimmer
Store in a cool, dry, damp-proof and safe
place. Service your trimmer after the last cut
of the year as follows:-
(GB ) MAINTENANCE
Carrying your Trimmer
•
Never carry a trimmer when it is
running
Carry the trimmer at the point of balance
with the cutting system facing away from you
(See Fig W).
At the end of the Trimming Season.
•
Switch off the engine, wait until the cutting
disc has stopped and disconnect the spark
plug lead BEFORE attempting any
maintenance or adjustment.
1. Allow the engine to cool. Drain the fuel tank
(Fuel left in the engine becomes stale and
causes difficult starting.)
2. Remove the spark plug lead and spark plug.
Pour one teaspoon (5ml) of oil through the
spark plug hole. Pull the starting handle 2 or 3
times. This will distribute oil on the internal
surfaces of the engine. Inspect, clean and
replace the spark plug. If a new spark plug is
required contact your local approved Service
Centre/Dealer.
Do not re-connect the spark plug lead.
3. Clean the air filter. See 'Cleaning the Air
Filter'.
4. Renew the cutting disc if it is cracked,
damaged or bent. Renew the disc bolt if
necessary. See 'Height Adjustment' for
complete instructions.
5. Use only genuine parts and accessories
specified for this product.
6. Clean your trimmer thoroughly. See
'Cleaning'.
7. Your local approved Service Centre/Dealer will
carry out any service or repairs required.
8. Store your trimmer in a cool, dry, damp-proof
and safe place.
8
Cleaning the Air Filter
•
•
X
5
•
2
•
3
•
Air
1.
2.
3.
1
4
4.
5.
Your Tecumseh engine is equipped with
a dry paper cartridge air filter (see Fig.
A).
Every 10 operating hours check
condition of paper cartridge.
Every 50 operating hours or more
regularly - (see Air Filter Cleaning
Instructions number 1).
If engine is operating in dusty or dirty
areas the air filter system will require
shorter maintenance intervals.
Do not attempt to wash, clean, or oil the
paper cartridge.
Filter Cleaning Instruction
Turn cover (X3) (anti-clockwise). Remove
cover and filter (X2) from flange (X1).
Discard paper cartridge (See Fig X).
Clean cover and flange thoroughly.
Insert new cartridge (X2) onto flange
(X1).
Position cover (X3) against flange (X1)
with tab (X4) on cover inserted into slot
(X5) in flange.
Push cover firmly against flange and turn
it (clockwise) as far as it will go. Be sure
retainers are locked around flange.
Cooling system debris guard
Cooling system air-intake
✖
Y
2
(GB ) MAINTENANCE
Never operate the engine without the
debris guard and foam filter being
fitted, failure to fit the debris guard
and foam filter will cause premature
engine failure.
1.
Ensure the debris guard is kept clean,
check frequently during use.
2.
Clean the debris guard using a soft
brush.
3.
If debris guard is very dirty, unscrew
wing knob (Y1) and remove washer (Y2),
debris guard (Y3) and foam filter (Y5).
4.
Wash foam filter in clean soapy water,
rinse, wrap in a clean dry cloth and
'squeeze dry'.
5.
Re-assemble ensuring that the recoil
rope (Y6) passes through the slot (Y4) in
the foam filter.
✔
1
3
4
•
5
6
9
Guarantee, Fault Finding Hints, Service Recommendations,
Environmental Information
Guarantee & Guarantee Policy
If any part is found to be defective due to faulty
manufacture within one year of original purchase, Electrolux
Outdoor Products, through its Authorised Service Repairers
will effect the repair or replacement to the customer free of
charge providing:
(a) Where the machine is used commercially the guarantee
is 90 days.
(b) The fault is reported directly to the Authorised Repairer.
(c) Proof of purchase is provided.
(d) The fault is not caused by misuse, neglect or faulty
adjustment by the user.
(e) The failure has not occurred through fair wear and tear.
(f) The machine has not been serviced or repaired, taken
apart or tampered with by any person not authorised by
Electrolux Outdoor Products.
(g) The machine has not been used for hire.
(h) The machine is owned by the original purchaser.
(i) The machine has not been used outside of the country
for which it was specified.
* This guarantee is additional to, and in no way diminishes
the customers statutory rights.
Failures due to the following are not covered, therefore it is
important that you read the instructions contained in this
Operator's Manual and understand how to operate and
maintain your machine:
Failures not covered by guarantee
* Replacing worn or damaged cutting lines and cutting
disc.
* Failures as a result of not reporting an initial fault.
* Failures as a result of sudden impact.
* Failures as a result of not using the product in
accordance with the instructions and recommendations
contained in this Operator's Manual.
* Machines used for hire are not covered by this
guarantee.
* The following items listed are considered as wearing
parts and their life is dependent on regular maintenance
and are, therefore not normally subject to a valid
warranty claim: Cutting lines, cutting disc, belts, cables,
recoil ropes, filters.
* Caution!
Electrolux Outdoor Products does not accept liability
under the warranty for defects caused in whole or part,
directly or indirectly by the fitting of replacement parts or
additional parts that are not either manufactured or
approved by Electrolux Outdoor Products, or by the
machine having been modified in any way
Fault Finding Hints
Engine Will Not Start
1. Ensure that the start/stop switch is in the start position.
2. Check that there is sufficient fuel of the correct mix in the fuel tank.
3. The engine may have flooded. Remove and dry the spark plug.
4. Fuel mixture may be incorrect or stale - if so - replace with fresh
mixture.
5. Check that the disc bolt is tight. A loose disc bolt could cause
difficult starting.
6. If the engine will still not start - disconnect the spark plug
lead and consult your local approved Service Centre/Dealer.
Poor Flotation or Lack of Power
1. Disconnect the spark plug lead.
2. Clean the underside of the hood, the air filter, the fan, around the
engine and the air intakes.
3. Fuel mixture may be incorrect or stale - if so - replace with fresh
mixture.
4. If poor flotation or lack of power persists - disconnect the
spark plug lead and consult your local approved Service
Centre/Dealer.
Excessive Vibration
1. Disconnect the spark plug lead.
2. Check that the cutting disc and cutting lines are correctly fitted.
See ' Cutting Line and Height Adjustment'.
3. If the cutting lines or cutting disc are damaged or worn replace
them with a new ones.
4. If vibration persists - do not use - disconnect the spark plug
lead and consult your local approved Service Centre/Dealer.
Service Recommendations
We strongly recommend that your product
is serviced at least every twelve months,
more often in a professional application.
ENVIRONMENTAL INFORMATION
Do NOT dispose of used fuels/oils with
household waste
Waste fuels/oils are harmful, but can be
recycled and should be disposed of through
the recognised facilities.
Do NOT dispose of used fuels/oils to water.
Do NOT incinerate
(GB ) MAINTENANCE
Electrolux Outdoor Products are manufactured under an Environmental Management System (ISO 14001) using, where
practical, components manufactured in the most environmentally responsible manner, according to company procedures,
and with the potential for recycling at the end of the products’ life.
•
Packaging is recyclable and plastic components have been labelled (where practical) for categorised recycling.
•
Awareness of the environment must be considered when disposing of ‘end-of-life’ product.
•
If necessary, contact your local authority for disposal information.
DISPOSAL OF FUELS AND LUBRICATING OILS
•
Wear protective clothing when handling any fuels and lubricants.
•
Avoid contact with skin.
•
Remove petrol and engine oil before transporting the product.
•
Contact your local authority for information of your nearest Recycling/Disposal Station.
CERTIFICATE OF CONFORMITY
KONFORMITÄTSZERTIFIKAT
CERTIFICAT DE CONFORMITE
CERTIFICAAT VAN CONFORMITEIT
KONFORMITETSATTEST
TUOTTEEN HYVÄKSYMISTODISTUS
KONFORMITETSCERTIFIKAT
VARECERTIFIKAT
CERTIFICADO DE CONFORMIDAD
CERTIFICADO DE CONFORMIDADE
CERTIFICATO DI CONFORMITA
I, the undersigned M. Bowden of Electrolux
Outdoor Products, Aycliffe Industrial Park,
NEWTON AYCLIFFE, Co. Durham. DL5 6UP.
Certify that a sample of the above product has
been tested and found to comply with directives:
98/37/EEC, 89/336/EEC
& applicable standards:
EN836:1997, EN ISO14982:1998
I, the undersigned M. Bowden of Electrolux Outdoor
Products, Aycliffe Industrial Park, NEWTON
AYCLIFFE, Co. Durham. DL5 6UP
Certify that a sample of the above product has
been tested using directive 81/1051/EEC as a
guide. The maximum A-weighted sound pressure
level recorded at operator position under free field
semi anechoic chamber conditions was :-
I, the undersigned M. Bowden of Electrolux
Outdoor Products, Aycliffe Industrial Park,
NEWTON AYCLIFFE, Co. Durham. DL5 6UP
Certify that a sample of the above product has
been tested using ISO 5349 as a guide. The
maximum weighted root mean square value of
vibration recorded at operator’s hand position
was:-
Ich, der Unterzeichnete M. Bowden von
Electrolux Outdoor Products, Aycliffe Industrial
Park, NEWTON AYCLIFFE, Co. Durham, DL5
6UP, bestätige hiermit, dass eine Probe des
obigen Produkts geprüft wurde und die
Anforderungen der Direktiven: 98/37/EEC,
89/336/EEC und Normen EN836:1997, EN
ISO14982:1998
Ich, der Unterzeichner M. Bowden von Electrolux
Outdoor Products, Aycliffe Industrial Park,
NEWTON AYCLIFFE, Co. Durham, DL5 6UP,
bescheinige hiermit, daß eine Probe des obigen
Produkts getestet wurde und dabei Direktive
81/1051/EWG als Richtschnur verwendet wurde.
Der maximale A-gewichtete Schalldruckpegel, der
an der Bedienerposition unter Freifeld-HalbschalltotKammerbedingungen gemessen wurde, betrug:
Ich, der Unterzeichner M. Bowden von Electrolux
Outdoor Products, Aycliffe Industrial Park, NEWTON
AYCLIFFE, Co. Durham, DL5 6UP, bescheinige
hiermit, daß eine Probe des obigen Produkts getestet
wurde und dabei ISO 5349 als Richtschnur
verwendet wurde. Der maximale gewichtete
Vibrationseffektivwert, der an der Handposition des
Bedieners gemessen wurde, betrug:
Je soussigné M. Bowden, d’Electrolux Outdoor
Products, Aycliffe Industrial Park, NEWTON
AYCLIFFE, Co. Durham, DL5 6UP, GrandeBretagne, certifie qu’un échantillon du produit cidessus a été essayé et trouvé conforme aux
directives: 98/37/EEC, 89/336/EEC et aux
normes EN836:1997, EN ISO14982:1998
Je soussigné M. Bowden, d’Electrolux Outdoor
Products, Aycliffe Industrial Park, NEWTON
AYCLIFFE, Co. Durham, DL5 6UP, GrandeBretagne, certifie qu’un échantillon du produit cidessus a été essayé selon les indications de la
directive 81/1051/EEC. Le niveau maximum
pondéré de pression acoustique enregistré à la
position de l’opérateur en champ libre en chambre
demi-sourde était de:
Je soussigné M. Bowden, d’Electrolux Outdoor
Products, Aycliffe Industrial Park, NEWTON
AYCLIFFE, Co. Durham, DL5 6UP, GrandeBretagne, certifie qu’un échantillon du produit cidessus a été essayé selon les indications de la
norme ISO 5349. La moyenne quadratique
pondérée des vibrations enregistrées à la position
de la main de l’opérateur était de:
Ik, ondergetekende M. Bowden van Electrolux
Outdoor Products, Aycliffe Industrial Park,
NEWTON AYCLIFFE, Co. Durham, DL5 6UP,
verklaar dat een exemplaar van het hierboven
genoemde product is getest en voldoet aan de
volgende richtlijnen: 98/37/EEC, 89/336/EEC en
aan de volgende normen: EN836:1997, EN
ISO14982:1998
Ik, ondergetekende M. Bowden van Electrolux
Outdoor Products, Aycliffe Industrial Park,
NEWTON AYCLIFFE, Co. Durham, DL5 6UP,
verklaar hierbij dat een proefexemplaar van het
bovengenoemde product is getest volgens richtlijn
81/1051/EEC. Het maximale A-belaste
geluidsdrukniveau dat is geregistreerd bij de positie
van de bediener in een semi geluiddichte ruimte bij
vrije veld condities bedraagt:
Ik, ondergetekende M. Bowden van Electrolux
Outdoor Products, Aycliffe Industrial Park,
NEWTON AYCLIFFE, Co. Durham, DL5 6UP,
verklaar hierbij dat een proefexemplaar van het
bovengenoemde product is getest volgens ISO
5349 als richtlijn. De maximale belaste effectieve
waarde van trilling, geregistreerd bij de positie van
de hand van de bediener, bedraagt: -
Undertegnede, M. Bowden i Electrolux Outdoor
Products, Aycliffe Industrial Park, NEWTON
AYCLIFFE, Co. Durham, DL5 6UP bekrefter at
et eksemplar av ovennevnte produkt er testet og
funnet å være i overensstemmelse med følgende
direktiver: 98/37/EEC, 89/336/EEC – og
standarder: EN836:1997, EN ISO14982:1998
Undertegnede, M. Bowden i Electrolux Outdoor
Products, Aycliffe Industrial Park, NEWTON
AYCLIFFE, Co. Durham, DL5 6UP bevitner at en
prøve av ovennevnte produkt er testet, med direktiv
81/1051/EEC som rettledning. Maksimum Abelastede lydtrykksnivå, registrert ved brukerens
plassering, under fritt felt halvveis ekkofritt
kammerforhold, var:
Undertegnede, M. Bowden i Electrolux Outdoor
Products, Aycliffe Industrial Park, NEWTON
AYCLIFFE, Co. Durham, DL5 6UP bevitner at en
prøve av ovennevnte produkt er testet, med
direktiv ISO 5349 som rettledning. Maksimum
belastede effektivverdi av vibrering, registrert ved
plasseringen av brukerens hånd, var:
Minä allekirjoittanut M. Bowden Electrolux
Outdoor Products, Aycliffe Industrial Park,
NEWTON AYCLIFFE, Co. Durham DL5 6UP,
vakuutan, että edellä mainitun tuotteen
näytekappale on testattu ja se vastaa seuraavia
direktiivejä: 98/37/EEC, 89/336/EEC sekä
standardeja: EN836:1997, EN ISO14982:1998
Minä allekirjoittanut M. Bowden Electrolux Outdoor
Products, Aycliffe Industrial Park, NEWTON
AYCLIFFE, Co. Durham DL5 6UP, vahvistan, että
yllä mainitun tuotteen näytekappale on tarkastettu
käyttäen EU-direktiiviä 81/1051/ETY viitteenä.
Suurin A-painotettu käyttäjän kohdalla mitattu
äänenpaineen taso puolikaiuttomassa huoneessa
käyttäjän tasolla oli seuraava:
Minä allekirjoittanut M. Bowden Electrolux
Outdoor Products, Aycliffe Industrial Park,
NEWTON AYCLIFFE, Co. Durham DL5 6UP,
vahvistan, että yllä mainitun tuotteen näytekappale
on tarkastettu käyttäen ISO 5349 -standardia
viitteenä. Suurin painotettu käsivarsitärinä
käyttäjän käden kohdalla oli seuraava:
Jag, M. Bowden från Electrolux Outdoor Products,
Aycliffe Industrial Park, NEWTON AYCLIFFE, Co
Durham, DL5 6UP, som undertecknat detta
doukment, intygar härmed att ett prov på denna
produkt har testats och berfunnits vara i enlighet
med följande direktiv: 98/37/EEC, 89/336/EEC,
samt följande standarder: EN836:1997, EN
ISO14982:1998
Jag, undertecknad M. Bowden från Electrolux
Outdoor Products, Aycliffe Industrial Park,
NEWTON AYCLIFFE, Co Durham, DL5 6UP,
betygar att ett exemplar av ovan nämnda produkt
har testats med bestämmelse 81/1051/EEC som
riktlinje. Det maximala A-vägda ljudtrycknivån som
uppmättes vid körplatsen under förhållanden i en
frifälts halvt ekofri kammare var:
Jag, undertecknad M. Bowden från Electrolux
Outdoor Products, Aycliffe Industrial Park,
NEWTON AYCLIFFE, Co Durham, DL5 6UP,
betygar att ett exemplar av ovan nämnda produkt
har testats med bestämmelse ISO 5349 som
riktlinje. Det maximala vägda kvadratiska
medelvärdet för vibration som uppmätts vid
förarens handläge var:
Undertegnede, M. Bowden, fra Electrolux
Outdoor Products, Aycliffe Industrial Park,
NEWTON AYCLIFFE, Co. Durham DL5 6UP,
bekræfter hermed, at en prøve af ovenstående
produkt er blevet afprøvet og opfylder
direktiverne: 98/37/EEC, 89/336/EEC og
standarderne: EN836:1997, EN ISO14982:1998
Undertegnede, M. Bowden, fra Electrolux Outdoor
Products, Aycliffe Industrial Park, NEWTON
AYCLIFFE, Co. Durham DL5 6UP, attesterer
herved, at en prøve af ovenstående produkt er
blevet testet, idet direktiv 81/1051/EØF er blevet
anvendt som vejledning. Det maksimale A-vægtede
lydtryksniveau, som er blevet målt på
brugerpositionen i et frifeltshalvlyddødt rum var:
Undertegnede, M. Bowden, fra Electrolux Outdoor
Products, Aycliffe Industrial Park, NEWTON
AYCLIFFE, Co. Durham DL5 6UP, attesterer
herved, at en prøve af ovenstående produkt er
blevet testet, idet ISO 5349 er blevet benyttet som
vejledning. Den maksimale vægtede effektivværdi
for vibration som er blevet registreret ved
brugerens håndposition var:
El abajo firmante, M. Bowden de Electrolux
Outdoor Products, Aycliffe Industrial Park,
NEWTON AYCLIFFE, Co. Durham DL5 6UP,
certifica que se han hecho pruebas en una
muestra del producto anterior y se ha hallado que
tiene conformidad con las directivas: 98/37/EEC,
89/336/EEC, y con las normativas: EN836:1997,
EN ISO14982:1998
Yo, el firmante más abajo M. Bowden de Electrolux
Outdoor Products, Aycliffe Industrial Park,
NEWTON AYCLIFFE, Co. Durham DL5 6UP.
Certifico que ha sido probada una muestra del
producto anteriormente mencionado utilizando la
directiva 81/1051/EEC como guía. El máximo nivel
de presión de sonido ponderado A registrado en la
posición del operario bajo condiciones de cámara
anecóica de semi campo fue de:-
Yo, el firmante más abajo M. Bowden de
Electrolux Outdoor Products, Aycliffe Industrial
Park, NEWTON AYCLIFFE, Co. Durham DL5 6UP.
Certifico que ha sido probada una muestra del
producto anteriormente mencionado utilizando
como guía ISO 5349. El valor máximo ponderado
de la media de la raíz cuadrada de la vibración
registrada en la posición de la mano del operario
fue de:-
Eu, abaixo assinado, M. Bowden da Electrolux
Outdoor Products, Aycliffe Industrial Park,
NEWTON AYCLIFFE, Co. Durham, DL5 6UP,
certifico que uma amostra representativa do
produto acima foi testada e considerada em
conformidade com as directivas: 98/37/EEC,
89/336/EEC, e com as normas: EN836:1997, EN
ISO14982:1998
Eu, abaixo assinado, M. Bowden da Electrolux
Outdoor Products, Aycliffe Industrial Park,
NEWTON AYCLIFFE, Co. Durham, DL5 6UP,
Certifico que uma amostra do produto acima foi
testada tendo como guia a directiva 81/1051/CEE.
O valor máximo da média pesada A do nível de
pressão do som registado na posição do operador,
em condições de câmara semi-anecóica de campo
livre foi:
Eu, abaixo assinado, M. Bowden da Electrolux
Outdoor Products, Aycliffe Industrial Park,
NEWTON AYCLIFFE, Co. Durham, DL5 6UP,
Certifico que uma amostra do produto acima foi
testada tendo como guia a norma ISO 5349. O
valor máximo da média quadrática pesada da
vibração registado na posição da mão do
operador foi:
Il sottoscritto, M. Bowden della Electrolux
Outdoor Products, Aycliffe Industrial Park,
NEWTON AYCLIFFE, Co. Durham, DL5 6UP,
dichiara di aver testato un campione del suddetto
prodotto e di averlo trovato conforme alle
direttive: 98/37/EEC, 89/336/EEC – e alle
normative:- EN836:1997, EN ISO14982:1998
Il sottoscritto, M. Bowden della Electrolux Outdoor
Products, Aycliffe Industrial Park, NEWTON
AYCLIFFE, Co. Durham, DL5 6UP, dichiara che un
campione del suddetto prodotto è stato testato in
base alla direttiva 81/1051/CEE. Il livello massimo
di pressione sonora categoria A rilevato in
corrispondenza della posizione di guida in
condizioni di camera semianecoica in campo libero
era di:
Il sottoscritto, M. Bowden della Electrolux Outdoor
Products, Aycliffe Industrial Park, NEWTON
AYCLIFFE, Co. Durham, DL5 6UP, dichiara che
un campione del suddetto prodotto è stato testato
in base alla direttiva ISO 5349. Il valore ponderale
massimo di vibrazione sonora efficace rilevato in
corrispondenza delle mani dell’operatore era di:
F
G
H
J
HVT40
K
88.9 dB(A)
3.94 m/s2
F -TYPE
G - IDENTIFICATION OF SERIES
H - LEVEL
J - VALUE
K - SEE PRODUCT RATING LABEL
F -TYP
G - IDENTIFIZIERUNG DER REIHE
H - HÖHE
J - WERT
K - SIEHE PRODUKTTYPENSCHILD
F -TYPE
G - IDENTIFICATION DE LA SERIE
H - NIVEAU
J - VALEUR
K - VOIR LA PLAQUETTE D’IDENTIFICATION
F -TYPE
G - IDENTIFICATIE VAN SERIE
H - NIVEAU
J - WAARDE
K - ZIE PRODUCTLABEL
F -TYPE
G - SERIEIDENTIFIKASJON
H - NIVÅ
J - VERDI
K - SE PRODUKTETS
KLASSIFISERINGSETIKETT
F -TYYPPI
G - SARJAN TUNNUS
H - TASO
J - ARVO
K - KATSO TUOTTEEN ARVOKILPEÄ
F -TYP
G - IDENTIFIERING AV SERIE
H - NIVÅ
J - VÄRDE
K - SE PRODUKTIDENTIFIERINGSETIKETT
H - NIVEAU
F -TYPE
G - IDENTIFIKATION AF SERIE
J - VÆRDI
K - SE PRODUKTMÆRKAT
F - TIPO
G - IDENTIFICACIÓN DE LA SERIE H - NIVEL
J - VALOR
K - VER ETIQUETA DE IDENTIFICACIÓN
DEL PRODUCTO
F -TIPO
G - IDENTIFICAÇÃO DA SÉRIE
H - NÍVEL
J - VALOR
K - CONSULTE A ETIQUETA DE
ESPECIFICAÇÕES DO PRODUTO
F -TIPO
G - IDENTIFICAZIONE SERIE
H - LIVELLO
J - VALORE
K - VEDI ETICHETTA DATI PRODOTTO
2000
Electrolux Outdoor Products
Aycliffe Industrial Park
NEWTON AYCLIFFE
Co.Durham DL5 6UP
ENGLAND
Telephone - (00) 44 1325 300303 Fax - (00) 44 1325 310339
UK Customer Helpline- 01325 300303 Fax - 01325 310339
Our policy of continuous improvement means that the specification of products may be altered from time to time
without prior notice. Electrolux Outdoor Products manufacture products for a number of well known brands under
various registered patents, designs and trademarks in several countries.
© Electrolux Outdoor Products Ltd. Registered Office, Electrolux Works, Oakley Road, Luton LU4 9QQ
Registered number 974979 England
From the Electrolux Group. The world’s No.1 choice.
The Electrolux Group is the world’s largest producer of powered appliances for kitchen, cleaning and outdoor
use. More than 55 million Electrolux Group products (such as refrigerators, cookers, washing machines, vacuum
cleaners, chain saws and lawn mowers) are sold each year to a value of approx. USD 14 billion in more than 150
countries around the world.
5118542-03