1
BSB7T82-A0607
7T82
http://www.seiko-watch.co.jp/
お客様相談窓口〔全国フリーダイヤル〕0120-612-911(下記の最寄地に着信いたします)
http://www.seiko-watch.co.jp/
お客様相談室
東京
〒101-0044 東京都千代田区鍛冶町 2-1-10
大阪
〒550-0013 大阪市西区新町 1-4-24
大阪 四ツ橋新町ビルディング 8階
I N S T R U C T I O N S
1/100-SECOND
1/100秒 クロノグラフ
G-4
この度は弊社製品をお買い上げいただき、
誠にありがとうございました。
ご使用の前にこの説明書をよくお読みの上
正しくご愛用くださいますよう、
お願い申し上げます。
なお、
この説明書はお手元に保管し必要に応じてご覧ください。
※ お買い求めの際の金属バンドの調整は
お買い上げ店・弊社お客様相談窓口
(裏表紙に記載)にて承っておりますが、
その他のお店では有料もしくはお取扱
いいただけない場合があります。
※ 保証期間内でも電池交換は
有料となります。
お買い上げの時計には検査用のモニター
電池が入っています。所定の年数よりも
早めに電池が切れることがあります。
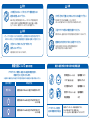
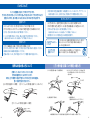
取扱いを誤った場合に、重傷を負うなどの重大な
結果になる危険性が想定されることを示します。
警告
以下の場所での携帯・保管は避けてください
時計から電池を取り出さないでください
注 意
警 告
乳幼児の手の届くところに時計本体や部品を置かないでください
警 告
○ 揮発性の薬品が発散しているところ
(除光液などの化粧品・防虫剤・シンナーなど)
○ 5℃∼35℃から外れる温度に長期間なるところ ○ 高湿度なところ
○ 磁気や静電気の影響があるところ ○ ホコリの多いところ ○ 強い振動のあるところ
※ 電池が切れた状態で長時間放置しないでください。電池が漏液するおそれがあります。
電池や部品を乳幼児が飲み込んでしまうおそれがあります。
万一飲み込んだ場合は、身体に害があるため、
ただちに医師とご相談ください。
アレルギーやかぶれを起こした場合
注 意
ただちに時計の使用をやめ、皮膚科など専門医に相談してください。
注意
次のような場合、
ご使用を中止してください
警 告
取扱いを誤った場合に、軽傷を負う危険性や物質的
損害をこうむることが想定されることを示します。
注意
その他のご注意
○ 時計本体やバンドが腐食等により鋭利になった場合
○ バンドのピンが飛び出してきた場合
注 意
※ すぐに、
お買い上げ店・弊社お客様相談窓口(裏表紙に記載)にご相談ください
○ 提げ時計やペンダント時計のひもや
○ 乳幼児に時計が触れないように
チェーンが衣類や手・首などを傷つける
おそれがありますのでご注意ください。
ご注意ください。ケガやアレルギー
をひき起こすおそれがあります。
○ 商品の分解・改造はしないでください。
2
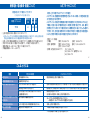
目 次
操作について
特長
各部の名称
時刻合わせ・ストップウオッチ針の0位置合わせ
6
7
9
(基本時計・ストップウオッチ針)
日付の合わせかた
ストップウオッチの使いかた
ストップウオッチのデモンストレーション運針について
電池交換後のお願い(システムリセット)
製品仕様
14
15
21
22
23
ご注意いただきたいこと
アフターサービスについて
保証について
お手入れについて
防水性能について
耐磁性能について(磁気の影響)
バンドについて
特殊な中留の使い方について
使用電池・電池寿命・精度について
ルミブライトについて
こんなときには
4
26
28
30
32
36
38
40
46
47
48
操 作 に つ い て
3
特長
各部の名称
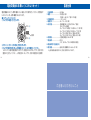
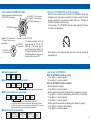
この時計は、基本時計とストップウオッチ機能を備えたアナログ時計です。
●基本時計は、時・分・小秒針で表示します。
●ストップウオッチは、専用の針(1/100秒、1/10秒、秒、分)で表示する1/100秒単位での計測
が可能な40分計です。
●スプリット計測が可能です。
●1/100秒針は、1秒間に10周回る高速運針をします。ストップウオッチは、2時間経過で自動的
にストップします。
●クロノグラフ分針(40分計)はレトログラード式です。41分になると針が1分の位置に戻り、継
続して計測できます。81分経過時にも針が戻り、120分経過で自動停止します。
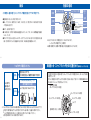
時針
ストップウオッチ1/10秒針
ストップウオッチ1/100秒針
ボタン
A
分針
小秒針
ストップ
ウオッチ
分針
りゅうず
2段目
(時刻合わせ、針位置合わせ)
1段目(日付合わせ)
ボタン
通常位置
ストップウオッチ秒針
B
※りゅうずにはネジロック構造を持っているものがあります。
(→「りゅうずをご確認下さい」を参照)
※以降の説明では、説明に不要な部分の針を省略することがあります。
6
7
りゅうずをご確認ください
回る
通常のりゅうずです。
そのまま引き出して操作する事ができます。
※
「ねじロック式りゅうず」
です
りゅうずを
右に回して
みてください。
時計を操作する場合
りゅうずを左に回してゆるめてください。
回らない
時刻合わせ・ストップウオッチ針の0位置合わせ(基本時計・ストップウオッチ針)
この時計の時刻合わせ(基本時計)
とストップウオッチ針の0位置合わせは、共にりゅうず2段目
位置で行ないます。
そのため、時刻合わせ等でりゅうずを2段目に引き出した際は、下記の2つの項目を確認または
合わせ直してから、
りゅうずを押し込んでください。
・基本時計の時刻
・ストップウオッチ針の0位置
ストップウオッチ1/100秒針
ゆるめる
ストップウオッチ1/10秒針
8
※ りゅうずが誤って引き出される事を防止するため、時 計本体にねじ止めできるりゅうずです。
○ 時計の操作後は必ずりゅうずを押し付けながら右に回して元通りに締めてください。
○ りゅうずを締める時、
回しにくい場合は元に戻してからやり直してください。
○ 無理に締めますとねじを壊す恐れがあります。
ストップウオッチ秒針
りゅうず
締める
基本時計(時、分、小秒針)
ストップウオッチ分針
9
●時刻の合わせかた(基本時計)
②りゅうずを回して、
「基本時計」の時刻を合わせます。
①りゅうずを2段目まで引き出してください。小秒針が止まります。小秒針は12
時の位置に止めてください。
2段目
りゅうず
小秒計
このとき合わせる時刻は、今から数分後の時刻に合わせることをお勧めします。
その理由は、
この後「ストップウオッチ針の0位置の合わせ」を行なうためです。
すべての合わせが終わってから、
リュウズを押し込むことになるので、数分先の時刻に合わせて
おく必要があります。
2段目
※日付が変わるところが、午前0時です。午前または午後を間違えないように合わせてください。
※この時、正確に合わせるために分針を正しい時刻より4∼5分進めてから針を戻して合わせてください。
※ストップウオッチ計測中の場合は、
ストップウオッチが強制的にリセットされます。
10
11
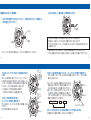
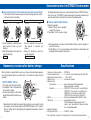
③2本の「ストップウオッチ針」の0位置合わせを行
います。
ボタンAを約2秒押し続けてください。
「ストップウオッチ
1/10秒針と1/100秒針」が回ります。ボタンBを押して、
スト
ップウオッチ1/10秒針と1/100秒針を両方とも0位置に合わ
せてください。ボタンBを押し続けると、早送りします。
※1/10秒針は、1/100秒針に連動して動きます。
1/10秒針と1/100秒針は、0位置で重なります。
④ボタンAを約2秒押し続けると、
ストップウオッチ秒針が1周回ります。
ボタンBを押して、
ストップウオッチ秒針を「0秒位置」に合わ
せてください。
ボタンBを押し続けると、早送りします。
12
ストップ
ウオッチ
1/10秒針と
1/100秒針
ボタンA
ボタンB
ストップ
ウオッチ
秒針
ボタンA
⑤ボタンAを約2秒押し続けてください。ストップウオッチ分針が1周回ります。
ボタンBを押して、
ストップウオッチ分針を0分の位置に合わせてください。ボタンBを押し
続けると、早送りします。
※ストップウオッチ分針は、0位置合わせの時のみ40分
目盛りを越えて1周します。修正中は目盛りのないと
ころにも針が進みます。0分位置に合わせてください。
※次に、ボタンAを2秒以上押すと、
「ストップウオッチ
1/100秒針と1/10秒針」の「0位置合わせ」に戻ります。
「ボタンAを2秒以上押す」ことで、以下のような修正
順番で「0位置合わせ」が可能です。
1/100秒と1/10秒針
秒針
ボタンA
ボタンB
分針
ストップウオッチ分針
ボタンB
⑥すべての合わせができたら、時報と同時にリュウズを押し込みます。
※時刻合わせは、電話の時報サービスTEL.117が便利です。
13
日付の合わせかた
ストップウオッチの使いかた
・時刻合わせができてから、
日付を合わせてください。
・1ヶ月が31日でない=小の月(2,
4,
6,
9,
11月)の翌月のはじめに、
日付を合わせ直すときに行な
います。
①りゅうずを1段目まで、引き出してください。
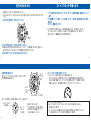
○1/100秒単位40分計のストップウオッチです。2時間作動後、自動的にストップ
します。
○12時位置の1/10秒針、1/100秒針、センターの秒針と6時位置の分針で読み
取ります。
○スプリット機能があります。
※1/100秒針と1/10秒針は、
スタート後3分間は運針しますが、
その後は00へとどまり、
ストップおよびスプリット操作があった場合、
その計測時間を示します。再スタート
後およびスプリット解除後も、最大3分間は作動します。
1段目
②りゅうずを右に回して、日付を合わせてください。
※午後9時から午前1時までは日付を合わせないでください。この時間帯に合わせると、翌日になって
も日付が変わらないことがあるので、
この時間帯外で日付を合わせてください。
③合わせ終わったら、
りゅうずを押し込んでください。
14
15
〈計測時間の読みかた〉
ストップ
ウオッチ
秒針
4本のストップウオッチ針(1/100秒、1/10秒、秒、分針)
で計測時間を読み取ります。
〈ストップウオッチ分針の動きについて〉
・ストップウオッチ分針は40分までは、通常に運針します。
・41分(および81分=1時間21分)になると、1分目盛位置に戻り計測を続けます。
・120分(2時間)経過で、
ストップウオッチが自動停止しますので、最終的に下図の
位置で止まります。
(再び使用する際には、ボタンBでリセットしてください。)
ストップ
ウオッチ
分針
10分12秒82 《10'12"82》
特に、1/100秒針と1/10秒針の読みかたには、
ご注意ください。
ストップウオッチ
1/100秒針
16
ストップ
ウオッチ
1/10秒針
左図は、
「19」とよみます。
1/100秒単位が大きな値の場合、
1/10秒針が次の目盛に近づくので、
「29」とは読まないでください。
〈ストップウオッチ針の0位置について〉
・ストップウオッチをリセットしても、
ストップウオッチ針が0位置に戻らない場合、
0位置合わせが必要です。
・ストップウオッチ針の0位置合わせは、基本時計の時刻合わせと同時に行ないます。
(→「時刻合わせ・ストップウオッチ針の0位置合わせ」を参照)
17
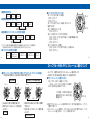
●通常の使用方法
●ストップウオッチのリセット方法
ボタン A
ボタン A
ボタン B
スタート → ストップ → リセット
・ストップウオッチ針が動いている場合、
①ボタンAでストップ
②ボタンBでリセット
・ストップウオッチ針が止まっている場合、以下の3つの
場合があります。
【ストップ状態で止まっている】
①ボタンBでリセット
【スプリット表示でストップウオッチが計測中】
①ボタンBでストップウオッチ針が早送りし、
その後計測状態になる。
②ボタンAでストップ
③ボタンBでリセット
【スプリット表示でストップ状態】
①ボタンBでストップウオッチ針が早送りし、
その後止まる。
②ボタンBでリセット
●時間計測を積算で行なう場合
ボタン A
ボタン A
ボタン A
ボタン A
ボタン B
スタート → ストップ → 再スタート → ストップ → リセット
何回でも繰返すことができます。
●途中経過(スプリットタイム)を計測する場合
ボタン A
ボタン B
ボタン B
スタート → スプリット → スプリット解 除
ボタン A
ボタン B
→ ストップ → リセット
何回でも繰返すことができます。
※「スプリット」状態で、計測時間が2時間になると、自動停止がはたらきます。スプリットは解除され、
「40分00秒00」を示しますので、次の計測をする前にボタンBでリセットしてください。
●2人のタイムを計測する場合
18
ボタン B
ボタン A
1人目がゴール
スタート → 1人目のタイム
ボタン A
ボタン B
ボタンA
ボタンB
ボタン B
→ 2人目がゴール → 2人目のタイム → リセット
19
ストップウオッチ針のデモンストレーション運針について
●タキメーター(TACHYMETER)の使い方(タキメーターがついている場合)
○時速や単位時間あたりの出来高などが簡単に測定できます。
時速の測定
スタート
A
スタート
A
1km
①1km走るのに要した時間を計測します。
②秒針が指しているタキメーターの数字を読
みとります。
80km/時
20
●デモンストレーション運針のしかた
1時間あたりの出来高の測定
ストップ
ストップ
A
・ストップウオッチ専用の4本の針が、
デモンストレーション運針を行います。
・4本の針がそれぞれ高速に運針し、最後にリセット位置に戻ります。
A
1個
①製品1個が出来あがるのに要した時間を
計測します。
②秒針が指しているタキメーターの数字を読
みとります。
200個/1時間あたり
①ストップウオッチをリセット状態にしてください。
詳しくは、→「ストップウオッチの使いかた」を参照
②ボタンBを2秒以上押し続けてください。
1/100秒針、1/10秒針、秒針は、高
速運針分針は、0分∼40分までを往
復運針します。
ボタンB
※約3秒でデモンストレーション運針が終わります。終了後は通常のストップウオッ
チ操作が可能です。
※デモンストレーション運針中に、ボタンAまたはボタンBの操作があると、デモン
ストレーション運針を中止し、リセット状態に戻ります。
21
電池交換後のお願い(システムリセット )
電池交換後または、万一異常な動きになった場合、以下の操作を行ってください。時計内部が
システムリセットされ、正常に機能するようになります。
●システムリセットのしかた
①りゅうずを2段目に引き出します。
ボタンA
2段目
ボタンB
②ボタンAとボタンBを3秒以上同時に押します。
③りゅうずを通常位置に戻し、通常運針になっているかを確認してください。
システムリセット後は、初期状態になりますので、時刻合わせおよびストップウオッチ針の「0位
置合わせ」を行なってください。→「時刻合わせ・ストップウオッチ針の0位置合わせ」を参照
製品仕様
1. 水晶振動数・・・・・・・・・・・・・32,768Hz
2. 精度・・・・・・・・・・・・・・・・・・・平均月差±15秒
(気温5℃∼35℃において腕につけた場合)
3. 作動温度範囲・・・・・・・・・・・・−10℃∼+60℃
4. 駆動方式・・・・・・・・・・・・・・・ステップモーター式:4個
5. 表示内容・・・・・・・・・・・・・・・
【時刻機能】時、分、小秒針(1秒ステップ運針)
【ストップウオッチ機能】
ストップウオッチ1/100秒針(1/100秒ステップ、0.1秒/1周)
ストップウオッチ1/10秒針(1/100秒ステップ、1秒/1周)
ストップウオッチ秒針(1秒ステップ運針、60秒/1周)
ストップウオッチ分針(1分ステップ運針、40分/2・3周)
6. 使用電池・・・・・・・・・・・・・・・小型酸化銀電池 SB−BP:1個
7. 電池寿命・・・・・・・・・・・・・・・約3年
ただし、1日にストップウオッチ2時間以内の使用。
8. 電池寿命切れ予告機能つき
9. 電子回路・・・・・・・・・・・・・・・発振、分周、駆動回路(C−MOS−IC)
:1個
※上記の製品仕様は改良のため、予告なく変更することがあります。
22
23
ご 注 意 い た だ き た い こと
アフターサービスについて
修理用部品について
○ この時計の修理用部品の保有期間は通常7年間を基準としています。
○
修理の際、一部代替部品を使用させていただくことがありますのでご了承ください。
オーバーホール(分解掃除)について
時計は精密機械です。部品の油切れや磨耗により止まり遅れが生じることがあります。
その際にはオーバーホールをご依頼ください。オーバーホールの際にはパッキンやバネ棒の
交換もご依頼ください。
電池交 換について
電池交換はお買い上げ店・弊社お客様相談窓口にご依頼ください。
(交換の際に電池の回収をおこなっております。)
その際防水性能を維持するためパッキン交換をご依頼ください。
○ 電池交換は保証期間内でも有料となります。
○ 10気圧防水以上の時計は、
防水検査をご依頼ください。
防水検査は日数を要しますので期間をご確認ください。
○ 電池交換してもすぐ止る場合はオーバーホールが必要です。
保証と修理について
○
○
修理やオーバーホールの際は、
お買い上げ店・弊社お客様相談窓口にご相談ください。
○
保証期間内の場合は必ず保証書を添えてください。
○
保証内容は保証書に記載したとおりです。よくお読みいただき大切に保管してください。
26
27
保証について
取扱説明書にそった正常な使用により、お買い上げ後1年以内に
不具合が生じた場合には、下記の保証規定によって無料で修理・調整いたします。
保証は、保証書に明示した期間・条件のもとにおいて、無料修理をお約束するものです。
これによりお客様の法律上の権利を制限するものではありません。保証書は日本国内のみ有効です。
保証の対象部分
保証を受ける手続き
○
時計本体(ムーブメント・ケース)及び金属バンドです。
保証の適用除外(保証期間内あるいは保証対象部分であっても、次のような場合には有料になります)
○
電池交換及び皮革・ウレタン・布等のバンドの交換
○
事故または不適切な取扱いによって生じた故障および損傷
○ お買い上げ店の保証が受けられない場合には、
「セイコーウオッチ株式会社
お客様相談窓口」に保証書を添えてご依頼ください。
その他
○
火災・水害・地震等の天災地変による故障及び損傷
○ 修理のとき、
ムーブメントを交換させていただいたり、
ケース・文字板・針・ガラス・
バンドなどに、
一部代替部品を使用させていただくこともありますので、
ご了承ください。
ご使用部品の保有期間は本取扱説明書(P.26)
をご参照ください。
○
保証書記載項目の全てが記入された保証書のみが有効です。
故意に字句を書き換えた場合は規定の無償修理は受けられません。
○ 金属バンド等の調整は、
お買い上げ店または弊社お客様相談窓口に
ご依頼ください。上記以外の販売店での調整は有料になります。
○ ご使用中に生じるキズ・汚れ等
28
○ 保証対象の不具合が生じた場合は、
時計と別紙保証書をご持参の上、
お買い上げ店にご依頼ください。
29
時計の裏ぶたでも性能と型式の確認ができます
お手入れについて
防水性能
日頃からこまめにお手入れしてください
水分や汗、汚れはこまめに柔らかい布で拭き取るように心掛けてください。
○ すきま
(金属バンド、
りゅうず周り、裏ぶた周りなど)の汚れは柔らかい歯ブラシが有効です。
耐磁性能
りゅうずは時々回してください
WATER RESISTANT 10 BAR
「 耐磁性能に
ついて」
を参照
型式番号
○ りゅうずの錆び付きを防止するために、
時々りゅうずを回してください。
○ ねじロック式りゅうずの場合も同様です。
(りゅうずを引く必要はありません)
AT
E
W
7N01-0B40 R2 AG
R
○ 海水に浸けた後は、
必ず真水でよく洗ってから拭き取ってください。
その際、
直接蛇口から水をかけることは避け、容器に水をためるなどしてから洗ってください。
7N
お客様の時計の
種類を示す番号
A
○
RR
E SISTA N T
010
B
10
G
B 40 R 2 A
※上記の図は例であり、
お買上げいただいた時計とは異なります。
30
31
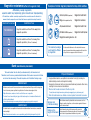
防水性能について
お買い上げいただいた時 計の防水性能を
下記の表でご確認の上ご使用ください。
(「P.31」をご覧ください)
裏ぶた表示
表示なし
WATER RESISTANT
WATER RESISTANT 5 BAR
WATER RESISTANT 10 (20) BAR
32
注意
○ 防水性能を維持するため、
電池
交換の際は必ずパッキン交換を
ご依頼ください。
防水性能
非防水です。
日常生活用防水です。
日常生活用強化防水で5気圧防水です。
日常生活用強化防水で10(20)気圧防水です。
○ また電池交換の際、
10気圧
防水以上の時計は防水検査
をご依頼ください。
お取扱方法
水滴がかかったり、汗を多くかく場合には、使用しないで下さい。
日常生活での「水がかかる」程度
の環境であれば使用できます。
警告 水泳には使用しないで下さい。
水泳などのスポーツに使用できます。
空気ボンベを使用しないスキンダイビングに使用できます。
33
警告
注意
この時 計はスキューバダイビングや飽和潜 水には
絶対に使用しないで下さい
BAR(気圧)表示防水時計はスキューバダイビングや飽和潜水用
の時計に必要とされる苛酷な環境を想定した様々な厳しい検査を
行っていません。専用のダイバーズウオッチをご使用下さい。
水や汗、汚れが付着したままにしておくのは避けて下さい
防水時計でもガラスの接着面・パッキンの劣化や、
ステンレスが錆びることにより、防水不良になる恐れがあります。
入浴やサウナの際はご使用を避けてください
注意
※ 万一、ガラス内面にくもりや水滴が発生し、長時間消えない場合は防水不良です。
お早めに、お買い上げ店・弊社お客様相談窓口(裏表紙に記載)にご相談ください。
蒸気や石けん、温泉の成分などが防水性能の劣化を早めてしまうからです。
直接蛇口から水をかけることは避けてください
水分のついたまま、りゅうずやボタンを
操作しないで下さい
水道水は非常に水圧が高く、
日常生活用強化防水の
時計でも防水不良になる恐れがあります。
時計内部に水分が入ることがあります。
34
35
耐磁性能について(磁気の影響)
時計に影響を及ぼす身の周りの磁気製品例
アナログクオーツ時計は、身近にある磁気の影響を受け、
時刻が狂ったり止まったりします。
携帯電話(スピーカー部)
磁気健康バンド
バッグ(磁石の止め金)
磁気ネックレス
交流電気かみそり
磁気健康マット
携帯ラジオ(スピーカー部)
磁気健康枕
電磁調理器
など
※磁気により時刻が狂っても、
遠ざければ正常に動きます。時刻を合わせ直してお使いください。
裏ぶた表示
表示なし
お取扱方法
磁気製品より10cm以上遠ざける必要があります。
磁気製品より5cm以上遠ざける必要があります。
(JIS水準1種)
磁気製品より1cm以上遠ざける必要があります。
(JIS水準2種)
36
アナログクオーツ時計が
磁気の影響を受ける理由
内蔵されているモーターは磁石を使用しており、
外からの強い磁力で互いに影響し合い、
モーターを止めたり、無理に回転させてしまうためです。
37
バンドについて
バンド は直接肌に触れ、汗やほこりで汚れます。
そのため、
手入れが悪いとバンドが早く傷んだり、
肌のかぶれ・そで口の汚れなどの
原因になります。長くお使いになるためには、
こまめなお手入が必要です。
金 属 バンド
○ ステンレスバンドも水・汗・汚れをそのままにしておくとさび易くなります。
○ 手入れが悪いとかぶれやワイシャツの袖口が黄色や金色に汚れる原因になります。
○ 水や汗・汚れは、早めに柔らかな布で取り除いてください。
○ バンドのすき間の汚れは、水で洗い、柔らかな歯ブラシ等で取り除いてください。
○ 時計本体が日常生活強化防水(10気圧防水)
になっているものでも、
アクアフリーバン
ド以外の皮革バンドは、入浴中や水泳、水仕事などでのご使用はお控えください。
ポリウレタンバンド
○ 光で色が褪せたり、溶剤や空気中の湿気などにより劣化する性質があります。
○ 特に半透明や、
白色、淡色のバンドは、他の色を吸着し易く、
また変色をおこします。
○ 汚れたら水で洗い、乾いた布で良く拭き取ってください。
(時計本体は水にぬれないように台所用ラップなどで保護しておきましょう)
○ 弾力性がなくなり、
ひび割れを生じたら取り替え時期です。
(時計本体は水にぬれないように台所用ラップなどで保護しておきましょう)
皮 革 バンド
○ 水や汗、直射日光には弱く、色落ちや劣化の原因になります。
○ 水がかかった時や汗をかいた後は、
すぐに乾いた布などで吸い取るように軽く拭いてください。
○ 直接日光にあたる場所に放置しないでください。
○ 色味の薄いバンドは、汚れが目立ちやすいので、
ご使用の際はご注意ください。
バンドによるかぶれは、金属や皮革が原因となるアレルギー反応や、
汚れもしくはバンドとのすれなど不快感が原因となる場合など、
いろいろな発生原因があります。
かぶれやアレルギー
について
バンドサイズの
目安について
バンドは多少余裕をもたせ通気性をよくしてご使用ください。
時計をつけた状態で、指一本入る程度が適当です。
38
39
A三ツ折中留(皮革バンド専用)の使い方
特殊な中留の使い方について
皮革バンド、および、メタルバンドの一部に
特殊な中留を用いたものがございます。
お買い上げの時計の中留が下記のいずれかに当てはまる場合は、
各々の操作方法をご覧ください。
A三ツ折中留(皮革バンド専用)
Bワンプッシュ三ツ折中留(皮革バンド、
メタルバンド)
1)バンドを定革、遊革から抜いて、中留を開きます。
3)
ピンをバンドのアジャスト穴から外し、バンドを左右にスラ
イドさせて適切な長さのところでピンをアジャスト穴にもう
一度入れます。
上箱
遊革
定革
2)上箱の底板を下に開きます。
底板
ピン
アジャスト穴
4)底板を閉めます。
(底板を押し込みすぎないようにしてください。)
Cワンプッシュ三ツ折中留(皮革バンド専用)
※中留を装着するときは、バンドの剣先(先端)
を定・遊革に入れてから、中留をしっかり留めて下さい。
40
41
Bワンプッシュ三ツ折中留(皮革バンド、メタルバンド)の使い方
1 時計の着脱方法
2 バンドの長さ調整方法
1)両方のプッシュボタンを押しながら
バンドを定革・遊革から抜いて、中
留を開きます。
2)バンドの剣先(先端)を定革・遊革
に入れてから、上箱の上面位置をし
っかり押さえ留めます。
プッシュボタン
定革
遊革
1)両方のプッシュボタンを押しながら
バンドを定革・遊革から抜いて、中
留を開きます。
2)もう一度プッシュボタンを押し上箱
を下に開きます。
プッシュボタン
定革
遊革
上箱
上箱
※メタルバンドの場合は、定革がないものがございます。
42
43
Cワンプッシュ三ツ折中留(皮革バンド専用)の使い方
3)ピンをバンドのアジャスト穴から外
し、バンドを左右にスライドさせて
適切な長さのところでピンをアジャ
スト穴に入れます。
4)プッシュボタンを押しながら上箱を
閉めます。
1)プッシュボタンを押しながら中留を
開きます。
2)バンドのアジャスト穴をピンから外し、バン
ドを左右にスライドさせて適切な長さのと
ころでピンをアジャスト穴にもう一度入れ
プッシュボタンを押しながら中留をしっか
り抑え留めます。
プッシュボタン
ピン
アジャスト穴
アジャスト穴
ピン
44
45
使用電池・電池寿命・精度について
機 種は裏ぶたでご確認 いただけます。
(「 お手入れについて」をご覧ください)
機種 (例:7T82-0AC0)
使用電池
SB-
7 T82
BP
型式番号の前4桁
電池 精度
平均
寿命( )
月差
約3年 ±15秒
○ 上記の電池寿命は新しく電池を入れたときのものです。
※ただし、ストップウオッチの使用を1日2時間以内を基準としていますので、それ以上使用した場
合は上記の期間に満たないうちに電池寿命が切れる場合があります。
○ お買い上げ時の電池は検査用のモニター電池ですので、
上記期間より早く切れる事があります。
○ 秒針が2秒おきに動くのは、電池が切れる合図です。この場合でも時刻は正常です。
○ 精度は常温(5℃∼35℃)
において腕につけた場合のものです。
○ 作動温度範囲は−10℃∼+60℃です。
ルミブライトについて
〔お買い上げの時計がルミブライトつきの場合〕
ルミブライトは、放射能等の有害物質を全く含んでいない、環境・人に安全な畜光(蓄
えた光を放出する)物質です。
ルミブライトは、太陽光や照明器具の明かりを短時間(10分間:500ルクス以上)
で吸収して蓄え、暗い中で長時間(約3∼5時間)光を放つ夜光です。なお、蓄えた
光を発光させていますので、輝度(明るさ)は時間が経つに従ってだんだん弱まっ
てきます。また、光を蓄える際のまわりの明るさや時計との距離、光の吸収度合い
により、光を放つ時間には多少の誤差が生ずることがあります。
〈照度データ〉
(目安値)
①太陽光 [晴天]100,000ルクス [曇天]10,000ルクス
②屋内(昼間窓際) [晴天]3,000ルクス以上 [曇天]1,000∼3,000ルクス
[雨天]1,000ルクス以下
③照明(白色蛍光灯40Wの下で) [1m]1,000ルクス
[3m]500ルクス(通常室内レベル)
[4m]250ルクス
46
47
こんなときには
現象
考えられる原因
このようにしてください
時計が止まった
電池の容量がなくなった。
小秒針が2秒運針している。
電池寿命切れが近づいた。
時計が一時的に進む/遅れる
暑いところ、または、寒いところへ放置した。
常温に戻れば元の精度に戻ります。時刻を合わせ直してください。この時計は気温5℃∼35℃で腕につけたときに安定した時間精度が得られるように調整してあります。
磁気を発生するもののそばに置いた。
磁気を遠ざけると、元の精度に戻ります。時刻を合わせ直してください。元に戻らない場合には、お買い上げ店にご相談ください。
落としたり強くぶつけたりまたは激しいスポーツをした。
強い振動が加えられた。
時刻を合わせ直してください。
元に戻らない場合には、お買い上げ店にご相談ください。
磁気や外部からの衝撃が加えられた。
ストップウオッチ針の0位置合わせをしてください。
→「時刻合わせ・ストップウオッチ針の0位置合わせ」を参照
ガラスのくもりが消えない
パッキンの劣化などにより時計内部に水分が入った
お買い上げ店にご相談ください。
日中、日付が切り替る
時刻合わせが12時間ずれている
ストップウオッチをリセットしても
0に戻らない。
電池交換をお買上げ店にご依頼ください。
12時間、針を進めて時刻を合わせ直してください。
※その他の現象は、お買い上げ店にご相談ください。
48
49
Thank you very much for choosing a SEIKO watch.
For proper and safe use of your SEIKO watch,
please read carefully the instructions
in this booklet before using.
Keep this manual handy for easy reference.
※Length adjustment service for metallic
bands is available at the retailer from
whom the watch was purchased or
SEIKO CUSTOMER SERVICE CENTER
(listed on the back cover). The service
may also be available on a chargeable
basis at other retailers, however, some
retailers may not undertake the service.
WARNING
To indicate the risks of serious consequences such as severe injuries
unless the following safety regulations are strictly observed.
CAUTIONS
WARNING
CAUTIONS
Care should be taken to prevent a baby or a child accidentally swallowing the
battery or accessories.
If a baby or child swallows the battery or accessories, immediately consult a
doctor, as it will be harmful to the health of the baby or child.
○ If the watch body or band becomes edged by corrosion etc.
○ If the pins protrude from the band.
※Immediately consult the retailer from whom the watch was purchased or SEIKO CUSTOMER SERVICE CENTER (listed on the back cover).
52
To indicate the risks of light injuries or material damages unless the
following safety regulations are strictly observed.
○ Places where volatile agents (cosmetics such as polish remover, bug repellent,
thinners etc.) are vaporizing
○ Places where the temperature drops below 5 °
C or rises above 35 °
C for a long time
○ Places of high humidity ○ Places affected by strong magnetism or static electricity
○ Dusty places ○ Places affected by strong vibrations
Keep the watch and accessories out of the reach of babies
and children.
Immediately stop wearing the watch in following cases.
WARNING
The battery in the watch at the time of
purchase is a monitor battery inserted
in the watch at the factory for
performance checks.
Therefore, the battery may run down
earlier than the specified period.
Avoid the following places for wearing or keeping the watch.
Do not remove the battery from the watch.
WARNING
※Battery replacement is at cost
even within the guarantee
period.
※ Do not leave a dead battery within the watch for a long time as leakage might occur.
If you observe any allergic symptoms or skin irritation
CAUTIONS
Stop wearing the watch immediately and consult a specialist such as a dermatologist
or an allergist
注意
Other cautions
CAUTIONS
○ Keep the watch out of the reach of
○ Note that there is a risk of damaging
your clothes, hand or neck with the
babies and children. Extra care should
band, cord or chain of the pocket watch
be taken to avoid risks of any injury or
or pendant watch.
allergic rash or itching that may be
caused when they touch the watch.
○ Do not disassemble or tamper with the watch.
53
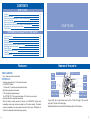
CONTENTS
HOW TO USE
Features
Names of the parts
Setting the time and adjusting the STOPWATCH hand position
How to set the date
How to use the stopwatch
Demonstration function of the STOPWATCH hand movement
Necessary procedure after battery change
Specifications
56
57
59
64
65
71
72
73
HOW TO USE
TO PRESERVE THE QUALITY OF YOUR WATCH
After-sale service
Guarantee
Daily care
Water Resistance
Magnetic resistance(affect of magnetic field)
Band(maintenance procedure)
Special Clasps
Battery/Battery life/Accuracy
Lumibrite
Trouble shooting
76
78
80
82
86
88
90
96
97
98
54
Features
TIME/CALENDER
Hour, minute and small second hands
STOPWATCH
・40-minute measurement in 1/100-second increments
・4 STOPWATCH hands
1-100-second,1/10-second,second and minute hands
・Split time measurement on demand
・1/100-second high-speed movement
The STOPWATCH 1/100-second hand makes 10 full circles in one second.
・40-minute dial with a retrograde minute hand
When the minute counting reaches 40 minutes, the STOPWATCH minute hand
immediately returns and continues counting from 41 minutes onward. The minute
counting is repeated in the same manner for another rotation, up to 1200minutes, at
that time the stopwatch automatically stops counting.
56
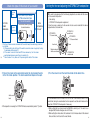
Names of the parts
Hour
Hand
STOPWATCH 1/10-seond hands
STOPWATCH 1/100-seond hands
ButtonA
Small
Second
Hand
STOPWATCH
Minute Hand
Minute
Hand
Crown
ButtonB
STOPWATCH
Second Hand
・If your watch has a screw down crown, refer to "Check the type of the crown of
your watch" section on the next page.
・Simplified illustrations are used in the following sections of this manual.
57
Check the type of the crown of your watch
The crown
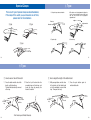
turns.
Turn the
crown
clockwise.
The crown of your watch
is *the screw lock type.
To set the watch
The crown
does not turn.
Unscrew the crown by turning
it counterclockwise.
Unscrew.
Go to
"Instructions
for use"
Setting the time and adjusting the STOPWATCH hand position
●This watch is designed so that the following adjustments are made with the crown
at the second click position:
・time setting
・STOPWATCH hand position adjustment
Once the crown is pulled out to the second click, be sure to make both the above
adjustments at the same time.
STOPWATCH
1/10-second hand
Screw up.
※This type of crown can be screwed into the watch body to avoid being pulled out
by mistake.
○ After completing all settings of the watch, screw the crown in again by turning
it clockwise while pressing it.
○ If the crown turns out to be too stiff to be screwed up, turn the crown
counterclockwise once and then give another try.
58 ○ Do not screw it in by force as it may damage the slots of the crown.
①Pull out the crown to the second click when the small second hand is
at the 12 o'clock position. The small second hand stops on the spot.
Small second
hand
※If the stopwatch is measuring, the STOPWATCH hands are automatically reset to "0" position.
60
Hour hand
Minute hand and
Small second hands
STOPWATCH
second hand
STOPWATCH
1/100-second hand
Crown
STOPWATCH
minute hand
59
②Turn the crown to set the main time hands to the desire time.
It is recommended that the hands be set to the time a few minutes ahead of the
current time, taking into consideration the time required to set the alarm hands and to
adjust the STOPWATCH hand position if necessary.
※When setting the hour hand, check that AM/PM is correctly set. The watch is so
designed that the date changes once in 24 hours.
※When setting the minute hand, first advance it 4 to 5 minutes ahead of the desired
time, and then, turn it back to the exact minute.
61
⑤Press button A for 2 seconds.
③Reset the two STOPWATCH hands to "0" position.
Press Button A for 2 seconds. The
STOPWATCH 1/10- second and 1/100second hands turns a full circle.
Press button B repeatedly to reset the
STOPWATCH 1/10- second and 1/100-second
hands to "0" position.
It moves quickly if button B is kept pressed.
ButtonA
ButtonB
※STOPWATCH minute hand turns a full circle passing the 40-ninute marker
only during the STOPWATCH hand position adjustment.
※If Button A is pressed again for 2 seconds, you can go back to the
adjustment of 1/10- and 1/100-second hands and so on in the following order.
STOPWATCH
1/10- and 1/100-second
hands
④Press button A for 2 seconds.
The STOPWATCH second hand turns a full circle.
Press button B repeatedly to reset the
STOPWATCH second hand to "0" position.
It moves quickly if button B is kept pressed.
The STOPWATCH minute hand turns a full circle.
Press button B repeatedly to reset the STOPWATCH minute hand to "O" position.
It moves quickly if button B is kept pressed.
STOPWATCH
second hands
ButtonA
STOPWATCH
minute hand
ButtonB
ButtonA
⑥After all the adjustments are completed, push the crown back in to the
normal position in accordance with a time signal.
※Check that the main time hands and alarm hands indicate the identical time, and then, push the crown back in to
ButtonB
the normal position.
※The telephone time signal service (TEL. 117) is helpful in setting the hands accurately.
62
63
How to set the date
How to use the stopwatch
○Be sure to set the main time before setting the date.
○It is necessary to adjust the date on the first day of March and months following 30-day months.
・The stopwatch features a 40-minute dial with a retrograde minute hand.
・The stopwatch can consecutively measure up to 120 minutes in 1/100-second
increments. When the measurement reaches 120 minutes, the stopwatch
automatically stops counting.
・Split time measurement is possible.
※After 3 minutes of timing from a start, the STOPWATCH 1/100-second and
1/10-second hands remain pointing to the "0" position until the watch is
stopped or split time measurement is made, at such a time, they move to
display the measured time. They start to move for a maximum of three minutes
after the watch is restarted or the split time display is released.
①Pull out the crown to the first click.
②Turn the crown clockwise to set the date.
※Do not set the date between 9:00 p.m. and 1:00 a.m. Otherwise, the date may not
change properly. If it is necessary to set date during that time period, first change
the time to any time outside it, set the date and then, reset the correct time.
64
③After all the adjustments are completed, push the crown back in to the normal position.
〈Note on adjusting the STOPWATCH hand position〉
・If the STOPWATCH hands do not return to "0" position when the stopwatch is reset,
follow the procedure in "Time setting and adjusting the stopwatch hand position" to
reset them.
・In that case, be sure to adjust the main time hands to the current time.
65
<How to read the STOPWATCH hands>
The time measured is indicated by the four
STOPWATCH hands below.
STOPWATCH 1/100-second hand
STOPWATCH 1/10-second hand
STOPWATCH second hand
STOPWATCH minute hand
Reading the 1/100-second and
1/10-second hands requires
extra attention.
10 minutes 12 seconds 82 (10'12"82)
STOPWATCH
1/10-second hand
STOPWATCH
1/100-second hand
66
*The display illustrated at the left
should be read as "19" not "29".
When the 1/100-second hand is
moving toward larger numbers, the
1/10 second hand comes close to the
next marker, which may cause you to
wrongly read the hands as "29".
● Standard measurement
Button A → Button A → Button B
START
STOP
RESET
● Accumulated elapsed time measurement
Button A → Button A → Button A → Button A → Button B
RESTART
START
STOP
STOP
RESET
Restart and stop of the stopwatch can be repeated by pressing button A.
● Split (intermediate) time measurement
Button A → Button B →
Button B
Button A
Button B
SPLIT
START
SPLIT RELEASE → STOP → R E S E T
・Measurement and release of split time can be repeated by pressing Button B.
If the time measured reaches 120 minutes while the split time is being displayed, the stopwatch
automatically stops counting and releases the split time display, showing "40'00"00". Before starting
the next measurement make sure to reset the stopwatch by pressing Button B.
● Measurement of two competitors
68
<Remarks on the STOPWATCH minute hand movement>
・When the minute counting reaches 40 minutes, the STOPWATCH minute hand
immediately returns and continues counting from 41 minutes onward. The minute
counting is repeated in the same manner for another rotation, up to 120 minutes, at
that time the stopwatch automatically stops.
・The final position of the STOPWATCH minute hand, after completing 120 minutes
of counting, is illustrated below.
Button B
Button B
Button A
Button A → FINISH TIME OF → SECOND RUNNER → FINISH TIME OF → Button B
START
RESET
FIRST RUNNER
SECOND RUNNER
FINISH
・Before starting to use the stopwatch again, make sure to reset the stopwatch by
pressing Button B.
67
<How to reset the STOPWATCH>
While the STOPWATCH hands are moving
1. Press Button A to stop the stopwatch.
2. Press Button B to reset the stopwatch.
While the STOPWATCH hands are stopped
(When the stopwatch is stopped)
1. Press Button B to reset the stopwatch.
(When the split time measurement is displayed while the stopwatch is measuring.)
1. Press Button B to release the split time display and return to the normal display
2. Press Button A to stop the stopwatch
3. Press Button B to reset the stopwatch
(When the split time measurement is displayed and the stopwatch is stopped.)
1. Press Button B to release the split time display.
2. Press Button B to reset the stopwatch.
69
Demonstration function of the STOPWATCH hand movement
● How to use the tachymeter(For the models with a tachymeter scale on the dial)
○The tachymeter can be used to measure the hourly average speed of a vehicle
and the hourly rate of operation.
To measure the hourly average speed of a vehicle
START
STOP
To measure the hourly rate of operation
START
STOP
1km
One product
・The demonstration function allows you to view the movement of the four STOPWATCH hands.
・Each of the four STOPWATCH hands demonstrates high-speed movements and
when the demonstration is finished, they return to the original position.
● How to view the demonstration 1. Reset the stopwatch.
※Refer to "How to use the stopwatch"
section of this manual.
2. Press Button B for 2 seconds or longer.
ButtonB
70
①Use the stopwatch to determine how
many seconds it takes to go one
kilometer.
②Read the tachymeter scale where the
second hand points.
80km/h
①Use the stopwatch to measure the
time required to complete one
product.
②Read the tachymeter where the
second hand points.
200 products/hour
※After approximately 3 seconds, the demonstration finishes, and the stopwatch is
reset for the next use.
※If either Button A or B is pressed during a demonstration, the demonstration will
be stopped and the stopwatch will be reset.
71
Necessary procedure after battery change
Specifications
After the battery is replaced with a new one, or when an abnormal display appears,
follow the procedures below to reset the built-in IC. The watch will resume its normal
operation.
1. Frequency of crystal oscillator-------- 32,768 Hz
2. Loss/gain (monthly rate)-------------- ± 15 seconds at normal temperature range (5℃∼35℃)
3. Operational temperature range------- −10℃∼+60℃
4. Driving system-------------------------- step motor, 4 pieces
5. Display system
Time/calendar----------------------- Hour, minute and small second hands
Date is displayed in numerals.
Stopwatch--------------------------- STOPWATCH 1/100-second hand (0.1 second/360 degree)
STOPWATCH 1/10-second hand (1 second/360 degrees)
STOPWATCH second hand (60 seconds/360 degrees)
STOPWATCH minute hand (40 minutes/240 degrees)
6. Battery---------------------------------- Miniature silver oxide battery SB-BP 1 piece
7. Battery life------------------------------ Approximately 3 years
If the stopwatch is used for longer than 2
hours a day, the battery life may be shorter
than the specified period.
8. Battery life indicator
9. IC (Integrated Circuit)------------------ C-MOS-IC, 1 piece
<HOW TO RESET THE IC> 1. Pull out the crown to the second click.
2. Press Button A and B at the same time
for 3 seconds or longer.
3. Push the crown back in to the normal
position and check if the hands move as
normal.
Button A
CROWN
Button B
※Resetting the IC will initialize the watch. Before starting to use the watch, it will be
necessary to set the time and adjust the STOPWATCH hands to the "0" position.
Refer to "Setting the time and adjusting the stopwatch hand position" section of
this manual.
※The specifications are subject to change without prior notice for product improvements.
72
73
TO PRESERVE THE QUALITY OF YOUR WATCH
After-sale service
Repair parts
○
○
The repair parts of this watch will be retained usually for 7 years.
Some alternative parts may be used for repair if necessary.
Battery replacement
Contact the retailer from whom the watch was purchased or SEIKO CUSTOMER
SERVICE CENTER to have the battery replaced with a new one.
It is recommended to exchange the gasket at the same time to maintain the water
resistant performance.
○ Battery replacement will be at cost even within the guarantee period.
○ For a water resistant watch with 10 BAR or above, a water resistant performance
check is also recommended.
Please note that it may take some days to conduct the check.
○ If the watch runs down on a new battery, it requires an overhaul.
Notes on overhaul
The watch is a precision device. If the parts run short of the oil or get worn out,
the watch may stop its operation or lose time. In such a case, have the watch
overhauled. In the case of overhaul, be sure to have the gasket and push-pin
replased with new ones.
Notes on guarantee and repair
○
76
Contact the retailer the watch was purchased from or SEIKO CUSTOMER
SERVICE CENTER for repair or overhaul.
○
○
Within the guarantee period, present the certificate of guarantee to receive repair services.
○
Guarantee coverage is provided in the certificate of guarantee. Read carefully and retain it.
77
Guarantee
Within one year from the date of purchase, we guarantee free repair/adjustment service
Free repair services are guaranteed only under the period and conditions specified
against any defects according to the following guarantee regulations,
in the certificate of guarantee. It does not affect specific legal rights of a consumer.
○ The watch body (movement・case) and metallic band.
Exceptions from guarantee
In following cases, repair/adjustment services will be at cost even
within the guarantee period or under guarantee coverage.
○ Battery replacement and change of leather/urethane/cloth band
○ Troubles or damage caused by accidents or improper usage
Procedure to claim free repair services
○ For any defects under guarantee, submit the watch together with the attached
certificate of guarantee to the retailer from whom the watch was purchased.
○ If repair services cannot be provided by the retailer from whom the watch was
purchased, contact SEIKO CUSTOMER SERVICE CENTER. In this case,
the attached certificate of guarantee is also needed.
Others
○ Scratches or grime caused by use
○ Problems and damage caused by acts of god, natural disasters including fire,
floods or earthquakes.
○ The certificate of guarantee is valid only if all the necessary items are properly
filled in. We will not honor an altered or tampered certificate of guarantee for free
repair services.
78
Daily care
○ The case, dial, hands, glass and bracelet, or parts thereof may be repaired with substitutes
if the originals are not available. If necessary, movements will be replaced.
Refer to the page 76 of this booklet for the retention period of the parts.
○ For length adjustment service of a metallic band, ask the retailer from whom the
watch was purchased or SEIKO CUSTOMER SERVICE CENTER.
Other retailers may undertake the service on a chargeable basis.
The case back shows the caliber and performance of your watch
Water resistant
performance
The watch requires good daily care
Refer to "Water
resistance".
Wipe away moisture, sweat or dirt with a soft cloth
○ To clean the clearances (around the metallic band, crown or case back),
a soft toothbrush is convenient.
○ After soaking the watch in seawater, be sure to wash the watch in clean
pure water and wipe it dry carefully.
○
Turn the crown from time to time
Magnetic resistant performance
WATER RESISTANT 10 BAR
Refer to "Magnetic
resistance".
AT
E
W
7N01-0B40 R2 AG
In order to prevent corrosion of the crown, turn the crown from time to time.
○ The same practice should be applied to a screw lock type crown.
(No need to pull out the screw lock type crown.)
○
79
R
Guarantee coverage
The certificate of guarantee is valid only in Japan.
Caliber Number
The number to identify
the type of your watch
7N
A
provided that the watch was properly used as directed in this instruction booklet.
RR
E SISTA N T
010
B
10
G
B 40 R 2 A
※The figure above is one example. Performance of your watch is different from above sample.
80
81
Water Resistance
Refer the table below for the description of each degree of
water resistant performance of your watch before using.
(Refer to " P.81 ")
Indication on the case back
No indication
WATER RESISTANT
WATER RESISTANT 5 BAR
WATER RESISTANT 10 (20) BAR
Water resistant performance
Non-water resistance
Water resistance for everyday life
Water resistance for everyday life at
5 barometric pressures
Water resistance for everyday life at
10(20) barometric pressures.
Cautions
○ In order to maintain the water resistant
performance at factory-adjusted level,
make sure to replace the gasket when
changing the battery.
○ For a water resistant watch with
10 BAR or above, be sure to have the
water resistant performance check
when changing the battery.
Condition of Use
Avoid drops of water or sweat
The watch withstands accidental contact
with water in everyday life.
WARNING Not suitable for swimming
The watch is suitable for sports such as swimming.
The watch is suitable for diving not using an air cylinder.
82
83
WARNING
Do not use the watch in scuba diving or
saturation diving.
The various tightened inspections under simulated harsh environment, which are
usually required for watches designed for scuba diving or saturation diving, have
not been conducted on the water-resistant watch with the BAR (barometric
pressure) display. For diving, use special watches for diving.
CAUTION
※
If the inner surface of the glass is clouded with condensation or water droplets appear
inside of the watch for a long time, the water resistant performance of the watch is
deteriorated. Immediately consult the retailer from whom the watch was purchased or
SEIKO CUSTMER SERVICE CENTER (listed on the back cover).
Do not turn or pull out the crown when the
watch is wet.
Water may get inside of the watch.
84
CAUTION
Do not leave moisture, sweat and dirt on the
watch for a long time.
Be aware of a risk that a water resistant watch may lessen its water
resistant performance because of deterioration of the adhesive on
the glass or gasket, or the development of rust on stainless steel.
Do not wear the watch while taking a bath or a sauna.
Steam, soap or some components of a hot spring may accelerate the
deterioration of water resistant performance of the watch.
Do not pour running water directly from faucet.
The water pressure of tap water from a faucet is high enough to
degrade the water resistant performance of a water resistant watch
for everyday life.
85
Magnetic resistance(affect of magnetic field)
Examples of common magnetic products that may affect watches
Affected by nearby magnetism,
a quartz watch may temporarily gain or lose time or stop operating.
Cellular phone
※This defective condition caused by magnetism will be corrected soon after the watch is
removed from the magnetic source. Reset the time once again before using the watch.
Indication on the case back
No indication
(speaker)
Magnetic health belt
Bag (with magnet buckle)
Magnetic necklace
AC-powered shaver
Magnetic health mat
Portable radio
Magnetic health pillow
Condition of use
Keep the watch more than 10 cm away from
magnetic products.
Magnetic cooking device etc
Keep the watch more than 5 cm away from
magnetic products. (JIS level-1 standard)
Keep the watch more than 1 cm away from
magnetic products. (JIS level-2 standard)
(speaker)
The reason why analogue
quartz watch is affected
by magnetism.
It is because the built-in motor of the watch, which harnesses
magnetic power and external strong magnetism, affect each other
to stop the motor or suppresses the turn of the motor.
86
87
Band (maintenance procedure)
The band touches the skin directly and becomes dirty with sweat or dust.
Therefore, lack of care may accelerate deterioration of the band or cause skin irritation
or stain on the sleeve edge. The watch requires a lot of attention for long usage.
Metallic band
○ Moisture, sweat or soil will cause rust even on a stainless steel band if they are left for a long time.
○ Lack of care may cause a yellowish or gold stain on the lower sleeve edge of shirts.
○ Wipe off moisture, sweat or soil with a soft cloth as soon as possible
○ To clean the soil around the joint gaps of the band, wipe it out in water and then brush it
off with a soft toothbrush.
(Protect the watch body from water splashes by wrapping it up in plastic wrap etc.)
Leather band
○ A leather band is susceptible to discoloration and deterioration from moisture, sweat and
direct sunlight.
○ Wipe off moisture and sweat as soon as possible by gently blotting them up with a dry cloth.
88
Polyurethane band
○ A polyurethane band is susceptible to discoloration from light, and may be
deteriorated by solvent or atmospheric humidity.
○ Especially a translucent, white, or pale colored band easily adsorbs other colors,
resulting in color smears or discoloration.
○ Wash out dirt in water and clean it off with a dry cloth.
(Protect the watch body from water splashes by wrapping it up in plastic wrap etc.)
○ When the band becomes less flexible or cracked, replace the band with a new one.
Notes on skin
irritation and allergy
Skin irritation caused by a band has various reasons such as
allergy to metals or leathers, or skin reactions against friction on
dust or the band itself.
Notes on the
length of the band
Adjust the band to allow a little clearance with your wrist to
ensure proper airflow. When wearing the watch, leave enough
room to insert a finger between the band and your wrist.
89
A Type
Special Clasps
There are 3 type of special clasps as described below;
If the clasp of the watch you purchased is one of them,
please refer to the indications.
3)Take the pin out of the adjustment hole, adjust the
size of the strap by sliding it back and forth, and
then put the pin back into the appropriate
adjustment hole.
1)Lift up the clasp to release the buckle.
Fixed loop
A type
B type
Pin
Moveable loop
2)Open the flap.
Adjustment hole
4)Close the flap.
C type
Flap
Flap
90
91
B Type
1 How to wear or take off the watch
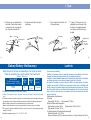
1)Press the button on both sides of the
buckle ; pull the buckle up.
The band will automatically come out
of the loop.
※Fixed loop
Moveable
loop
2 How to adjust the length of the leather band
2)Place the tip of the band into the
moveable loop and fixed loop, and
fasten the clasp by pressing the
frame of the buckle.
Push button
Buckle
1)With pressing buttons on both sides
of the buckle, pull the leather band
out of the moveable loop and fixed
loop. Then open the clasp.
Fixed loop
Moveable
loop
2)Press the push buttons again to
unfasten the buckle.
Push button
Buckle
※No Fixed loop with Metal Bracelets.
92
93
C Type
3)Pull the pin out of a adjustment hole
of the band. Slide the band to adjust
its length and find an appropriate
hole. Place the pin into the hole.
4)Fasten the buckle with pressing the
push buttons.
1)Press the button on the buckle, and
lift to open the clasp.
2)To adjust : Pull the pins out of the
adjustment holes on the band. Slide
the band to the appropriate length.
Push the pins into the new holes on
the band.
Push button
Pin
Adjustment hole
Adjustment hole
Pin
94
95
Battery/Battery life/Accuracy
Battery life and its accuracy vary depending on the type of your watch.
Check the case back of your watch to identify the type of watch.
(Refer to " Daily care ".)
Type of watch
(The first four digits of the caliber
number of your watch Ex. 7T82-0AC0)
Battery
SB−
Battery
life
7 T82
BP
Approx.
3 years
Loss/Gain
(per month
)
±15 seconds
○ The battery life shown above is for a watch with a new battery.
※ However, if the stopwatch is used for more than 2 hours a day, the battery life may be less than three
years.
○ The battery in the watch at the time of purchase is a monitor battery inserted in the watch at the factory
for performance checks, therefore, the battery may run down earlier than the above-specified period.
○ When the battery is exhausted, the second hand moves at two-second intervals.
While the small second hand is moving at two-second intervals, the time accuracy is not affected.
○ The accuracy is under the condition that the watch is worn on the wrist in a normal temperature range
between 5 ℃ and 35 ℃.
○ Operational temperature range is -10 ℃∼+60 ℃(14<∼140<)
96
Lumibrite
[If your watch has lumibrite]
LumiBrite is a luminous paint that is completely harmless to human beings and natural environment, containing no noxious materials such as radioactive substance.
LumiBrite is a newly-developed luminous paint that absorbs the light energy of the sunlight
and lighting apparatus in a short time and stores it to emit light in the dark.
For example, if exposed to a light of more than 500 lux for approximately 10 minutes,
LumiBrite can emit light for 5 to 8 hours. Please note, however, that, as LumiBrite emits
the light it stores, the luminance level of the light decreases gradually over time. The duration of the emitted light may also differ slightly depending on such factors as the brightness of the place where the watch is exposed to light and the distance from the light
source to the watch.
<Reference data on the luminance>
(A) Sunlight
[Fine weather]: 100,000 lux [Cloudy weather]: 10,000 lux
(B) Indoor (Window-side during daytime)
[Fine weather]: more than 3,000 lux [Cloudy weather]: 1,000 to 3,000 lux
[Rainy weather]: less than 1,000 lux
(C) Lighting apparatus (40-watt daylight fluorescent light)
[Distance to the watch: 1m]: 1,000 lux
[Distance to the watch: 3m]: 500 lux (average room luminance) [Distance to the watch: 4m]: 250 lux
97
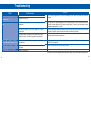
Troubleshooting
Trouble
Possible causes
Solutions
Have the battery replaced with a new one immediately by the retailer from whom the watch was
purchased.
The watch stops operating
The small second hand moves at two
second intervals
The battery has run down.
The watch temporarily gains or loses
time.
The watch has been left or worn in extremely high or low
temperatures.
Return the watch to a normal temperature so that it works accurately as usual, and then reset the time.
The watch has been adjusted so that it works accurately when it is worn on your wrist under a normal
temperature range between 5℃ and 35℃.
The watch has been left close to an object with a strong
magnetic field.
Correct this condition by moving and keeping the watch away from the magnetic source. If this action does
not correct the condition, contact the retailer from whom the watch was purchased.
You drop the watch, hit it against a hand surface,or wear itwhile
playing active sports. The watch is exposed to strong vibrations.
Reset the time. If the watch does not return to its normal accuracy after resetting the time, contact the
retailer from whom the watch was purchased.
The watch has been affected by magnetism or exposed to
strong vibrations.
Moisture has entered the watch because the gasket has
deteriorated.
AM/PM is not properly set.
Reset the stopwath hands to the "0" position. Follow the procedure in "Setting the time and adjusting the
STOPWATCH hand position."
Contact the retailer from whom the watch was purchased.
The STOPWATCH hands do not return to
the "0" position when the stopwatch is reset.
The inner surface of the glass is clouded.
The date changes at 12 o'clock noon.
The battery nears its end.
Advance the hour hands for 12 hours to correctly set the time and date.
※In the event of any other problem, please contact the retailer from whom the watch was purchased.
98
99