1
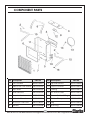
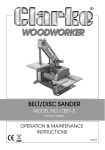
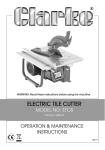
CERAMIC HEATER
Model: Devil 350
Part No: 6920262
OPERATING & MAINTENANCE
INSTRUCTIONS
GC11/11rev1
INTRODUCTION
Thank you for purchasing this CLARKE Ceramic Heater.
Please read this manual thoroughly and follow the instructions carefully.
Before attempting to use the heater, thoroughly familiarise yourself with the
heater & its operation. In doing so you will ensure the safety of yourself and
that of others around you, and you can look forward to the heater giving you
long and satisfactory service.
GUARANTEE
This product is guaranteed against faulty manufacture for a period of 12
months from the date of purchase. Please keep your receipt which will be
required as proof of purchase.
This guarantee is invalid if the product is found to have been abused or
tampered with in any way, or not used for the purpose for which it was
intended.
Faulty goods should be returned to their place of purchase, no product can
be returned to us without prior permission.
This guarantee does not effect your statutory rights.
ENVIRONMENTAL PROTECTION
Do not dispose of this product with general household waste. This
product contains valuable raw materials and must be disposed of
according to the laws governing Waste Electrical and Electronic
Equipment at a recognised disposal facility.
2
Parts & Service: 020 8988 7400/E-mail:[email protected] or [email protected]
GENERAL SAFETY RULES
WORK AREA
1. This heater is for INDOOR USE ONLY.
2. Do not expose the heater or power cable to rain or wet conditions. Any
water entering the heater will increase the risk of electric shock. DO NOT
use this heater in a bathroom, shower room or any other wet environment.
3. NEVER locate the heater near combustible materials such as curtains,
furniture etc. Allow at least 1 metres clearance.
4. DO NOT locate the heater close to an adjacent wall or low ceiling. Allow
a distance of at least 1 metre from a wall or ceiling. Avoid placing the
heater directly below power socket outlets.
5. Take care to ensure that the front guard cannot be covered.
6. Do not operate heater in explosive atmospheres such as in the presence
of flammable liquids, gases or dust such as in a paint spray booth or any
explosive environment.
7. Never stand the heater on a movable vehicle where it could tip over.
8. Do not allow the heat elements to become covered with dust which
could become a fire hazard. If used in a dusty workplace it should be
cleaned as described under Cleaning and Maintenance.
9. NEVER touch the heating elements for at least 15 minutes after switching
off.
10. DO NOT leave the heater unattended.
11. If children are present always use with a fireguard.
12. Store the heater out of the reach of children and do not allow persons
unfamiliar with these instructions to operate it.
13. Do not use this heater with a programmable timer used to switch it on
automatically.
14. This heater must only be located on a firm, level, surface but is fitted with
an anti-tilt switch which will switch the unit off should it tip over.
ELECTRICAL SAFETY
1. Electrical appliances must match the power outlet. Never modify the plug
in any way. Do not use adaptor plugs with earthed (grounded)
appliances. Correct plugs and outlets will reduce the risk of electric shock.
2. Do not abuse the electrical cable. Never use the cable for pulling or
unplugging the heater. Keep the cable away from sources of heat, oil,
sharp edges or moving parts. Damaged or tangled cables increase the
risk of electric shock.
3
Parts & Service: 020 8988 7400/E-mail:[email protected] or [email protected]
3. ALWAYS disconnect from the mains supply before moving the heater, or
performing any cleaning or maintenance tasks.
4. Keep the mains cable well away from machines and ensure an adequate
electrical supply is close at hand so that the operation is not restricted by
the length of the cable.
5. Inspect the mains cable regularly for signs of damage. DO NOT use if it is
damaged, and ALWAYS keep it away from the source of heat.
6. Check the heater for damage before use. Any damage should be
properly repaired or the part replaced. If in doubt, DO NOT use. Consult
your local Clarke dealer.
SERVICE & REPAIRS
1. If necessary, have your heater repaired by a qualified person using
identical replacement parts. This will ensure that the safety of the heater is
maintained.
Please keep these instructions in a safe place for future reference.
4
Parts & Service: 020 8988 7400/E-mail:[email protected] or [email protected]
ELECTRICAL CONNECTIONS
WARNING! Read these electrical safety instructions thoroughly
before connecting the product to the mains supply.
Before switching the machine on, make sure that the voltage of your
electricity supply is the same as that indicated on the rating plate. This
product is designed to operate using 230 VAC mains power. Connecting it to
any other power source may cause damage.
This product may be fitted with a non-rewireable plug. If it is necessary to
change the fuse in the plug, the fuse cover must be refitted. If the fuse cover
becomes lost or damaged, the plug must not be used until a suitable
replacement is obtained.
If the plug has to be changed because it is not suitable for your socket, or
due to damage, it should be cut off and a replacement fitted, following the
wiring instructions shown below. The old plug must be disposed of safely, as
insertion into a mains socket could cause an electrical hazard.
WARNING! The wires in the power cable of this product are
coloured in accordance with the following code:
Blue = Neutral
Brown = Live
Yellow and Green = Earth
If the colours of the wires in the power cable of this product do not
correspond with the terminal markings of your plug, proceed as follows.
• The wire which is coloured Blue must be connected to the terminal
which is marked N or coloured Black.
• The wire which is coloured Brown must be connected to the
terminal which is marked L or coloured Red.
• The wire which is coloured Yellow and Green must be connected to
the terminal which is marked E or
or coloured Green.
Plug must be BS1363/A approved
Earth
(Green and Yellow)
Always fit a 13 Amp fuse.
Neutral
(Blue)
Live
(Brown)
Ensure that the outer sheath of the cable is firmly held by the clamp
We strongly recommend that this machine is connected to the mains supply
via a Residual Current Device (RCD).
If in doubt, consult a qualified electrician. DO NOT attempt repairs yourself.
5
Parts & Service: 020 8988 7400/E-mail:[email protected] or [email protected]
UNPACKING AND ASSEMBLY
Before assembling, please check contents against the following list and
advise your dealer immediately if any parts are missing.
1 x Heater
Handle
2 x Legs
1 x Handle
6 x Screws (supplied fitted)
Screws
1. Remove the screws from their
locations in the heater and use
them to attach each leg.
Legs
2. Repeat with the two remaining
screws to fit the handle as shown.
3. DO NOT use the heater without fitting the legs.
INSTRUCTIONS FOR USE
1. Place the heater on a firm, level
surface and following all safety
precautions, plug into a suitable
mains supply. The neon indicator
will illuminate.
Switches
2. Set one, or both switches to the I
(On) position as required.
• Two power settings are available.
Each switch will illuminate to show
that the upper or lower heat
element is in use.
Neon Indicator
• The output of each heating element is 1200 W (4100 BTU).
CAUTION; PLEASE NOTE THAT THE HEATING ELEMENTS OF THIS PRODUCT
DO NOT GLOW WHILST IN OPERATION. ANY PICTURES SHOWING THIS
IN ADVERTISING MATERIAL ARE FOR ILLUSTRATION ONLY.
NOTE: The heater is equipped with an anti-tilt switch that automatically
shuts the power off should the heater tip over. If this happens,
simply place the heater in its correct position and it will
immediately restart.
6
Parts & Service: 020 8988 7400/E-mail:[email protected] or [email protected]
CLEANING & MAINTENANCE
ALWAYS allow the heater to cool down for at least 15 minutes and disconnect
it from the mains supply before performing any maintenance tasks.
PERIODICALLY
1. Inspect the mains cable for damage. Undue heat will cause the cable to
stiffen and crack. If this is found, have the cable replaced. Check cable
routing and ensure it is well away from the heat source.
2. Should the heater become dirty, disconnect from the mains supply,
remove the guard and wipe the reflector and elements with a clean
damp cloth. DO NOT use abrasive cleaners. Take care that no moisture
enters the heater.
• Refer to your CLARKE dealer if internal maintenance is required.
• When storing the heater, allow it to cool down, then place it for storage in
a dry, ventilated place.
HEAT ELEMENT REPLACEMENT
Ceramic heat elements are long lasting and should not need replacing under
normal circumstances. Should this become necessary take the heater to your
Clarke dealer.
7
Parts & Service: 020 8988 7400/E-mail:[email protected] or [email protected]
FAULT FINDING
Problem
Heater does not
operate, although
plugged in and
switched on.
Heating element
glowing hot.*
*Please note that the
image on the carton
shows a glow for
illustration purposes
only.
Possible Cause
Remedy
Plug is loose/bad
connection.
Pull the plug out & check the
connection of the plug and
socket.
Fuse blown
Replace if necessary and
investigate cause. If fuse blows
re p e a t e d l y , c o n s u l t y o u r C L A R K E
dealer.
No power at socket
outlet.
Insert the plug in a suitable
socket.
Input voltage too high Use a power supply in
or too low.
a c c o rd a n c e w i t h t h e r a t i n g
on the label.
E n s u re t h e h e a t e r i s k e p t a w a y
f ro m a n y o b j e c t s o r m a t e r i a l s
which could partially cover the
air inlet or be drawn into it.
Air inlet is partly
blocked.
8
Parts & Service: 020 8988 7400/E-mail:[email protected] or [email protected]
COMPONENT PARTS
No Description
1
Front Guard
2
Part No
No Description
WSDEV35001
9
Part No
T ip-over Switch
WSDEV35009
M6x15 Pan Pozi Screw WSDEV35002
10 ON/OFF Switch
WSDEV35010
3
Top Panel
WSDEV35003
11 Casing
WSDEV35011
4
Heat Element
WSDEV35004
12 S/t Screw-small
WSDEV35012
5
Neon Indicator
WSDEV35005
13 Power Cable & Plug
WSDEV35013
6
Reflector Panel
WSDEV35006
14 Cable Clamp
WSDEV35014
7
No10x1/2" Pan Pozi
WSDEV35007
15 Leg
WSDEV35015
8
Handle
WSDEV35008
16 End Plug
WSDEV35016
9
Parts & Service: 020 8988 7400/E-mail:[email protected] or [email protected]
TECHNICAL SPECIFICATION
Part No
6920262
Weight
5.45 kg
Dimensions (L x W x H)
375 x 370 x 560 mm
Max. Heat Output
1200/2400 W
Rated Input Current
10.5 A
Supply Voltage
230v / 50 Hz / 1 ph
Fuse rating
13 A
Insulation Class
IP20
Please note that the details and specifications contained herein, are correct
at the time of going to print. However, CLARKE International reserve the right
to change specifications at any time without prior notice.
A selection of suitable extension leads & plugs is available from your nearest
CLARKE dealer, for further information, contact your nearest dealer, or
telephone CLARKE International Sales department on 01992 565300.
10
Parts & Service: 020 8988 7400/E-mail:[email protected] or [email protected]
DECLARATION OF CONFORMITY
11
Parts & Service: 020 8988 7400/E-mail:[email protected] or [email protected]