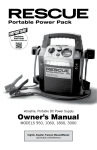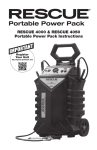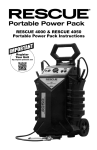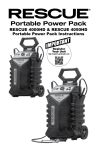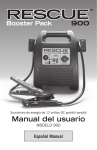
1
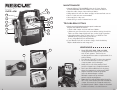
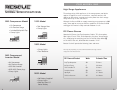
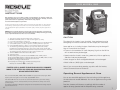
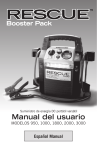
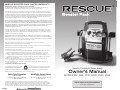
RESCUE BOOSTER PACK LIMITED WARRANTY
Do Not Return the Booster & Power Supply To the Place Of Purchase.
The Manufacturer warrants this product against defects in material or workmanship for one (1)
year from the date of original retail purchase. At our option we will repair or replace.
This warranty does not apply to the battery or compressor. All battery and compressor replacements will
be at the sole discretion of the manufacturer, and subject to visual and internal inspection. Any battery or
compressor replacement will be on a prorated, escalating cost basis to the purchaser, prorated monthly for a
12 month period from the date of purchase (with proof of purchase), and increasing in 1/12th increments
monthly up to the retail battery price set by the manufacturer. Batteries returned with melted terminals,
due to under/over charging or misuse, will not be covered under warranty.
EXCEPT FOR THIS LIMITED WARRANTY, THE MANUFACTURER HAS NOT MADE AND SPECIFICALLY
DISCLAIMS ANY WARRANTY OR REPRESENTATION OF ANY KIND, EXPRESS OR IMPLIED, DIRECT OR
INDIRECT, INCLUDING BUT NOT LIMITED TO ANY IMPLIED WARRANTY OF MERCHANTABILITY, AND
ANY IMPLIED WARRANTY OF FITNESS FOR A PARTICULAR PURPOSE. THIS LIMITED, CONDITIONAL
WARRANTY PROVIDES THE EXCLUSIVE REMEDY FOR ANY CLAIM OR DAMAGE EXCEPT AS
OTHERWISE REQUIRED BY LAW.
This warranty excludes and does not cover defects or failures of your BOOSTER PACK due to any cause
other than defects in material or workmanship, including without limitation any malfunctions or failures
caused by repairs made by an unauthorized person, mishandling, modifications, normal wear, improper
storage and unreasonable use or damage.
IN NO EVENT SHALL THE MANUFACTURER BE LIABLE FOR CONSEQUENTIAL OR INCIDENTAL
DAMAGES. Some states do not allow the exclusion or limitation of incidental or consequential damages
so the above limitations or exclusions may not apply to you. This warranty gives you specific legal rights
and you may also have other rights which vary from state to state.
Any claim relating to the Booster Pack must be submitted within one (1) year of purchase
and must be sent to Quick Cable in the U.S.A or Canada.
If any portion of this warranty or limitation of rights and remedies is found to be unenforceable, then the
remainder of this document shall remain in full force and effect.
To obtain service under this warranty:
1. Call Technical Service toll free in U.S.A. 1 (800) 558-8667 or in Canada 1 (800) 728-1742. Have
your booster & power supply near the phone and a technician will help you diagnose the problem.
2. When an in-warranty battery is in need of replacement, you must send or fax a copy of your
purchase receipt to Technical Service. They will provide you with the fax number or address. A
replacement battery will be sent to you freight prepaid, and you will be charged for the prorated
amount on your credit card.
3. When an out of warranty battery is in need of replacement, the replacement battery will be
sent to you freight collect or prepaid and added to your invoice.
4. You are responsible for the replacement of the battery and taking the defective battery to the
proper site for recycling.
5. Any misuse of this unit will void this warranty.
IT IS ILLEGAL TO DISPOSE OF LEAD
ACID BATTERIES IN THE TRASH!
For disposal and/or recycling in your area, please
call 800.253.2687 or go to www.cleanup.org.
If your booster & power supply is out of warranty, and fails, it may not be economical to repair.
Before disposing of unit, disassemble, remove battery and recycle.
Quick Cable Corporation
Quick Cable Canada Limited
3700 Quick Drive
Franksville, WI U.S.A. 53126-0509
1.800.558.8667
6395 Kestrel Road
Mississauga, Ontario Canada L5T 1Z5
1.800.728.1742
Copyright ©2007 Quick Cable Corporation & Quick Cable Canada Limited. All rights reserved. Quick Cable & the
Quick Cable logo, Bilfro, Brute, Cub, Hammer Crimper, HexCrimp, HexCrimp Jr., FlexTube, Fusion, Gardian, HexCrimp,
HexCrimp Jr., MagnaLug, MagnaTube, MAX, Quick, Quick Connector, QuickCote+, QuickCutter, QuickDrive, QuickFlux,
QuickFlex, QuickFuse, QuickHarness, QuickHeat, QuickHold, QuickLink, QuickPower, QuickStrip, QuickTap, Quick
Technologies, Rescue, SBC, SBF, StrongBox, & Truck Tough are all trademarks of Quick Cable Corporation. All rights reserved.
X890084
Versatile, Portable DC Power Supply
Owner’s Manual
MODELS 950, 960, 1000, 1800, 2000, 3000
English, Español, Français Manual/Manuel
quickcable.com/reference
MAINTENANCE
8
OVERVIEW
VIEW
15
10
16
4
14
5
• Keep at HIGH or FULL CHARGE status at all times. Refer to
the RECHARGING INSTRUCTIONS of this manual for details.
• Keep the cable clamps clean and free of debris.
• Always protect the unit from direct sunlight, moisture and heat sources.
• No oil or lubricants are recommended.
• Store upright in a dry area.
• Avoid storing in areas of extreme heat or cold.
6
TROUBLESHOOTING
13
16
2
3
7
1
9
• Check your vehicle battery terminals or posts to make sure
they are clean and free of corrosion.
• Check cable clamps are clean and free of debris.
• Make sure your connections are secure before starting the vehicle.
Twist or rock the clamps slightly until you can feel a tight connection.
• Check the battery status to make sure it is at HIGH or FULL
CHARGE prior to jump starting your vehicle.
If not, charge Booster Pack immediately.
• If your Booster Pack will not hold a charge, check the battery.
Replace dead batteries and charge unit.
WARNINGS
11
•
12
•
•
•
RUBBER CAP REMOVED FOR CLARITY
17
•
•
110 VOLT CORD
•
12/24 SWITCH (MODEL 2000 ONLY)
2
Model 950, 960, 1000, 1800 and 3000
are designed to be used only with vehicles
with 12-volt systems. These units are
not designed to be used as a replacement for a
vehicle battery.
Turn Booster Pack OFF to store; store upright.
Do not use the Booster Pack if the cable,
clamp or power cord is damaged.
Avoid short circuit of the product: Don’t
touch the clamps to any conductive material.
Don’t store Rescue Booster Pack in places
where the temperature could exceed 120ºF.
Repairs should be carried out by experts
(only use authorized repair centers).
Attempts to repair unit by untrained
persons may be very dangerous.
Always attach clamps to battery when the unit is
OFF. If the alarm sounds you have reversed the
clamps. Disconnect the clamps & reattach to
the opposite posts.. When clamps are attached
& there is no alarm, it is safe to turn on.
11
GET STARTED
Charge the Rescue Booster Pack before use. It is best to charge the
Booster Pack until the full charge light 7 on the control panel turns on.
Please read all instructions before use.
RECHARGING
Recharge every 30 days and after each use. Failure to do so will result in possible damage to the internal
battery and result in poor performance or failure to work at all.
1. Plug the AC Charging Cord supplied into the 120 Volt-in connection on the back
of the Booster Pack.
2. Plug the other end of the cord into a 110/120-volt AC outlet.
3. The Red charging LED light will glow and will remain ON during the charging
process. When the internal battery is completely full the Green FULL CHARGE
LED light on the control panel will turn on automatically. This can take up to 72
hours depending on the condition of your internal battery. You can unplug your AC
Charging Cord at this time OR leave it plugged in indefinitely as the
CUL™ listed internal charger is float charge equipped to maintain the internal battery.
IMPORTANT: Your BATTERY LEVEL can be at a HIGH CHARGE STATUS 14 when you push your red
Battery Level Test Button 6 . This does not necessarily indicate that the battery is FULLY CHARGED.
To be at the “Full Charge Level” the Green FULL CHARGE light on the control panel 7 will turn on
during the charging process indicating FULL CHARGE status.
To ensure maximum battery life, charge at least every 30 days, and
after each use. Extreme fluctuations of either hot or cold outside
temperatures may require re-charging more often.
All models feature an Audible Safety Alarm. When the unit is OFF
and you hook-up your clamps, you will hear a loud, steady beep (this
indicates a polarity problem), disconnect the booster clamps from the
battery. Reverse the clamps and the audible signal should stop. It is
now safe to turn the unit on and jump your vehicle.
The audible safety alarm will have an intermittent beep signaling that
the unit is ON and the clamps have power. This should remind you
to turn the unit OFF after starting your vehicle, saving the battery for
future use.
COMPONENTS
1
PERFORMANCE GUIDELINES
For best results when using your Booster Pack:
• Clean the battery terminals or posts before connecting the clamps to the vehicle
battery. Use a battery post cleaner brush to remove corrosion from the battery
terminals or posts. Two QuickCable cleaners are recommended for cleaning
terminals, posts and cables. Solutions 510420 and 510430 will neutralize the
gray/white powdery corrosive material (see quickcable.com for more information).
WARNINGS: Possible explosion hazard. Contact with battery acid may cause severe burns and
blindness. KEEP OUT OF REACH OF CHILDREN.
• Always wear safety glasses when working with or around lead acid batteries.
• If splashed by battery acid, immediately flush the area of the splash with clean
water; if a burning sensation is felt or any blistering occurs, seek medical help.
If acid is splashed in the eyes, flush eyes with clean water continuously and seek
medical help.
• All lead acid batteries generate hydrogen gas during normal operation. This process
increases during a rapid discharge period such as when using for jump-starting.
Hydrogen gas and battery acid (sulfuric acid) can be:
• Explosive
• Poisonous to breath
• Corrosive and will burn skin, eyes and hair • Highly flammable
• Damaging to unprotected metals
• Damaging to natural fiber clothing
To avoid exposure to battery acid or the possibility of an explosion:
• Follow all instructions in this manual and your vehicle’s manual.
• Only use your Booster Pack in a well-ventilated area.
• Observe all warnings.
www.quickcable.com
10
2
Positive (+) Jumper Cable
Negative (_) Jumper Cable
3
Clamp Lights ON/OFF Switch (Models 950, 960, 1000, 1800 and 3000)
4
Power ON/OFF Switch
5
Charge Status Indicator Lights
6
Battery Level Test Button
7
Full Charge Light
8
Reverse Connection Warning LED Light
9
Charging Light
10
12 Volt DC Power Outlet
11
120 Volt AC Charging Port (back of unit)
12
AC Cord
13
Worklight Safety Switch ( 3 Position: ON, Flashing, OFF)
14
Battery Status Meter
15
Audible Signal and Light
16
Clamp Lights (Models 950, 960, 1000, 1800 and 3000)
17
Rear View of 12/24 Unit (Model 2000 Only 12/24 switch)
3
FOR MODEL 960
High Surge Appliances
MODEL SPECIFICATIONS
400
• Tool Storage Area
• Clamp Lights
1000
500
A M P S
Booster Pack will operate the following items and more:
1800 Model
Air Compressor
Air Pressure Gauge
300 Watt Inverter
USB & AC Power plugs
Clamp Lights
700
CRANK
•
•
•
•
•
1500
PEAK
• Clamp Lights
• Dual Batteries
960 Compressor/
Inverter Model
CRANK
400
A M P S
4
Time may vary depending on product manufacturer/model being used and
charge level of the Booster Pack.
DC- Powered Product
Watts
Estimated Time
Lap Top Computer
40
5 Hours
Cellular Phone
6
34 Hours
12V Portable TV
60
3 Hours
Portable Stereo
50
4 Hours
Spotlight
55
3.7 Hours
12V Car Vacuum
85
2.4 Hours
A M P S
PEAK
3000 Model
900
DC Power Source
Operate Cell Phones, Lap Top Computers, Radios, TV’s, Camcorders,
Spot Lights, Electric Tools, Air Compressors, Vacuums, Sump Pumps,
etc., simply plug the male plug into the 12 Volt DC Power Outlet 10
on the front of the unit, identified with the words “12 V”.
A M P S
CRANK
900
Although the Rescue 960 can supply momentary surge power up to 900
watts, some appliances may exceed the capabilities of the Rescue 960
and trigger the inverter’s safety overload shutdown circuit.
PEAK
Air Compressor
Air Pressure Gauge
Includes Multiple Air Tips
Clamp Lights
PEAK
•
•
•
•
1000 Model
CRANK
950 Compressor Model
The wattage rating of AC appliances is the average power used by the
appliance. Appliances such as televisions, computer monitors and
appliances with motors consume much more power than their average
rating when they are first switched on.
• No Battery Supplied
• Clamp Lights
• Add Your Own U1
Series Battery
9
FOR MODEL 960
Operating an AC Appliance
2000 Model 12 or 24 Volt
If you ignore the warning, the Rescue 960 automatically turns off a few
minutes later to prevent battery damage.
In the event of an overload, low battery voltage or overheating, the Rescue
960 automatically shuts down.
900
400
A M P S
24V
1500
Run Time on Typical AC Appliances
Note: The fewer watts an AC appliances uses, the longer the Rescue 960
will operate before recharging is required. Listed below are typical AC
appliances that can be used on the Rescue 960 and their run times.
AC-powered Products
Watts
Run time (hours)*
Cordless telephone
Fluorescent work light
Laptop computer
Table lamp
13” color TV
3/8” drill
5
14
40
40
60
190
40
15
5
5
3
30 min.
*Operating times assume a fully charged 18 Ah battery and may vary based on
model/brand used.
8
700
CRANK
Understanding AC Appliances – Model 960
AC appliances are rated by how much electrical power (in watts) they
consume. Rescue 960 can power most appliances within its continuous
power rating (300 watts).
Some appliances may be difficult or impossible to operate from the
Rescue 960. They may have surge requirements or should not be run
from the Rescue 960.
PEAK
• Extra Long 62” Cables
• Parrot Clamps
• Shunted Clamps (both clamps
are live for better conductivity)
PEAK
1. Turn the AC outlet ON/OFF switch to the ON position. The GREEN LED
illuminates to indicate AC power is available at the AC outlets.
2. Plug the AC appliance into one of the AC outlets and turn the
appliance on.
3. Recharge the Rescue 960 as soon as possible after each use.
When using the Rescue 960 to operate an AC appliance and the low
battery warning sounds, the warning gives you time to shut your AC
appliance off before loss of AC power.
CRANK
Before operating your AC appliance, ensure that the battery of the Rescue
960 is fully charged. To operate an AC appliance:
A M P S
12V
SPECIAL
MODEL 2000 INSTRUCTIONS:
1. Charge this unit in 12V position only.
2. Turn voltage switch on back panel to match the
voltage of the battery being boosted (12V or 24V).
3. Make sure ON/OFF switch is in the OFF position.
4. Connect RED positive (+) clamp to positive (+)
battery terminal or post
5. Connect the BLACK negative (-) clamp to a nonmoving metal part of the engine.
6. Turn ON/OFF switch to ON.
7. Start vehicle.
8. Turn ON/OFF switch to OFF.
9. Disconnect BLACK negative (-) clamp first,
disconnect RED positive (+) clamp second.
10. Observe all warnings on the unit.
5
FOR MODEL 960
INSTRUCTIONS
After approximately 10 seconds of continuous cranking of your motor/ignition, stop and wait for 1 minute. This
prevents any damage that could occur to your Booster Pack or vehicle battery due to overheating. You can turn
your Booster Pack back on in approximately 1 minute after this cooling off period.
You can then resume attempts to start your vehicle.
The Rescue Booster Pack has a powerful compact sealed lead acid battery. When it is fully charged, it
has the ability to start multiple vehicles with a 3 to 5 minute wait between each use. Extreme hot or
cold temperatures will vary the performance. The unit will operate, however, the power output will be
lessened.
WARNING: Failure to follow the instructions below may result in personal injury, damage to your vehicle and
the possibility of an explosion. Read the entire Owner’s Manual before use. Always wear safety glasses during
use. Use only in well ventilated areas. Indoor use is not recommended.
1.
2.
3.
4.
5.
6.
7.
Turn vehicle ignition off before making cable connections.
DO NOT touch RED positive (+) clamp to black negative (-) clamp.
Use in well ventilated area, shield eyes.
Prior to connection, make sure Booster Pack ON/OFF switch is in the OFF position.
Connect RED positive (+) clamp to positive (+) battery terminal or post first.
Connect BLACK negative (-) clamp to a non-moving metal part of the engine.
The Audible Signal and Light will alert you if you have hooked the clamps
backward onto the battery terminals or posts. If the alarm sounds and the light
blinks on the handle, unhook the Booster Pack clamps and reverse the connection.
The alarm should stop indicating it is safe to turn your vehicle on.
8. Turn the ON/OFF Power Switch to the ON position.
9. Start your vehicle.
10. After starting vehicle, turn Booster Pack ON/OFF switch to OFF position.
11. Disconnect BLACK negative (-) clamp first, then disconnect the RED positive (+) clamp.
12. Always wrap Jumper Cables securely into place after use.
13. After use, recharge your Booster Pack.
14. Frequently check charge level of battery by pushing the red
Battery Level Test Button 6 on control panel.
IF BATTERY LEVEL IS ALLOWED TO DROP BELOW LOW LEVEL, PERMANENT
DAMAGE TO THE BATTERY WILL OCCUR AND YOUR RESCUE BOOSTER PACK
WILL NOT OPERATE EFFECTIVELY.
CAUTION
The output of the inverter is non-sinusoidal. Some equipment may be
damaged by the inverter’s modified sine wave output (non-sinusoidal).
Some appliances, including the types listed below, may be damaged if
they are connected to the inverter.
• Electronics that modulate RF (radio frequency) signals on the AC line
will not work and may be damaged.
• Speed controllers found in some fans, power tools, kitchen appliances,
and other loads may be damaged.
• Some chargers for small rechargeable batteries can be damaged.
• Metal halide arc (MHI) lights can be damaged.
Note: If you are unsure about powering any device with the inverter,
contact the manufacturer of the device.
Operating Several Appliances at Once
Rescue models 950, 960, 1000, 1800 and 3000 are equipped with clamp lights. When
required, turn these lights on via the Clamp Lights ON/OFF switch.
Turn switch OFF when not in use. Do not store the Booster Pack in your vehicle during
extreme periods of hot or cold temperatures; this may diminish the ability of the unit to
operate properly.
For optimum performance always store upright at room temperature and recharge every 30
days and after each use.
6
You can run several AC appliances if the total rating of all the appliances
(in watts) does not exceed 300 watts. You can run appliances using an AC
power bar.
Run time, however, will decrease accordingly with the number of
appliances being operated and the AC power being consumed.
7