1
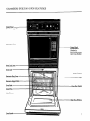
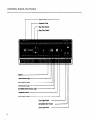
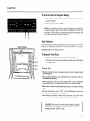
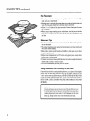
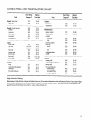
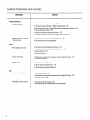
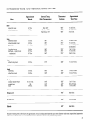
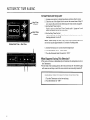
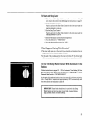
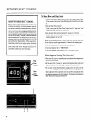
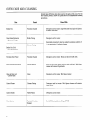
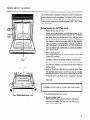
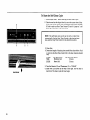
MODEL
CM02743
Use and Care Guide
IMPERIAL MAJESTY
Built-In Self-Clean
Electric Microwave/Single
Oven
with Retained Heat”” Cooking
TABLE
OF CONTENTS
3
Microwave
Oven and Ownership
Registration
Cards. ..................
4
Important
Precautions
for Safe Microwave
Cooking. ...................
4-6
.......................................
Important
Safety Instructions
7-8
Oven and Control Panel Features ...................................
9
Clock Operation
and Minute Minder ..................................
..lO
HowtoUsethe
Lower Oven.. .....................................
Baking.........................................................ll-l
2
13
Baking Time and Temperature
Chart. ..............................
Roasting..........................................................l
5
16
Roasting Time and Temperature
Chart .............................
Broiling...........................................................l
7
18
Broiling Time and Temperature
Chart. .............................
Rotisserie......................................................19-2
0
21
Rotisserie Time and Temperature
Chart. ...........................
..22-2 3
......................................
AutomaticTimeBaking
24-25
Retained Heat” Cooking ........................................
26
Oven Care and Cleaning. ............................................
.27-30
..............................................
Oven Self-Cleaning
SpecialInformation..................................................3
1
Back Cover
When You Need Service .....................................
BackCover
Warranty ...................................................
TAKE A MINUTE..
.
Before using your oven, please fill out and mail your microwave
istration card and ownership
registration
card.
Microwave
Oven Registration
oven reg-
Card
IMPORTANT:
Your Microwave
Oven Must Be Registered.
Federal law requires that records be maintained
on the location
of all microwave
ovens. Please fill out and mail the microwave
oven registration
card packed in the literature.
l
If you move, please renew your registration
by writing
us:
Chambers Division
Customer Relations Dept.
P.O. Box 558
St. Joseph, Michigan 49085-0558
l
If you are not the original
establish your ownership
l
When writing to us about your microwave
sure to include:
Model number
Serial number
Date of purchase
to
purchaser of this appliance, please
by writing to the above address.
oven, please be
Ownership
Registration
Also, please fill
will enable us
notification
and
Products Safety
out and mail your ownership
registration
card. This card
to contact you in the unlikely
event of a product safety
assist us in complying with the provisions
of the Consumer
Act. THIS CARD DOES NOT VERIFY YOUR WARRANTY.
Card
Keep a copy of the bill of sale, showing the date of purchase.
PURCHASE WILL INSURE YOU OF IN-WARRANTY
SERVICE.
PROOF OF
Write down the following information. You will
need it if your oven ever requires service.
Model Number*
Serial Number*
Date Purchased
Dealer’s Name
Address
Phone
*Model and Serial Numbers are located on a label
at the left side of the lower oven door opening.
3
IMPORTANT
PRECAUTIONS
FOR SAFE MICROWAVE
COOKING
The Chambers Microwave
Oven is designed and thoroughly
the exacting safety standards of UL and FCC requirements,
with safety performance
standards of the U.S. Department
Human Services.
Before using the Chambers Microwave
for microwave
cooking in the separate
Microwave
Oven.”
tested to meet
and complies
of Health and
Oven, please read the instructions
booklet titled “Use and Care of Your
Precautions
to Avoid Possible Exposure to Excessive Microwave
Energy
1. Do not attempt to operate this oven with the door open since
open door operation can result in harmful exposure to microwave
energy. It is important
not to defeat or tamper with the safety
interlocks.
2. Do not place any object between the oven front face and the door
or allow soil or cleaner residue to accumulate on sealing surfaces.
3. Do not operate the oven if it is damaged. It is particularly
portant that the oven door closes properly
and that there
damage in the:
a. Door (bent)
b. Hinges and Latches (broken or loosened)
c. Door Seals and Sealing Surfaces
4. THE OVEN SHOULD
ANYONE
EXCEPT
PERSONNEL.
IMPORTANT
imis no
NOT BE ADJUSTED
OR REPAIRED BY
PROPERLY
QUALIFIED
SERVICE
SAFETY INSTRUCTIONS
When using electrical
appliances,
lowed, including the following:
basic safety
WARNING:
To reduce the risk of burns,
injury to persons or exposure to excessive
General
Cooking
precautions
should
be fol-
electric shock, fire,
microwave
energy:
Precautions
1. Read all instructions
before
using the appliance.
2. Read and follow the specific “PRECAUTIONS
TO AVOID POSSIBLE EXPOSURE
TO EXCESSIVE
MICROWAVE
ENERGY”
above.
3. Install or locate this appliance
vided installation
instructions.
only in accordance
with
the pro-
4. DO NOT LEAVE CHILDREN
ALONE -Children
should not be
left alone or unattended
in area where appliance is in use. They
should never be allowed to sit or stand on any part of the appliance.
5. CAUTION:
Do not store items of interest in cabinets above your
oven. Children climbing on the oven door to reach items could
be seriously injured.
4
IMPORTANT
SAFETY INSTRUCTIONS
(continued)
6. Flammable
materials
should
not be stored
in or on either
oven.
7. Keep oven vent ducts unobstructed.
8. Wear proper apparel-loose-fitting
or hanging
never be worn while using the appliance.
garments
9. Do not operate this appliance if it is not working
it has been damaged or dropped.
properly,
should
or if
10. User servicing - Do not repair or replace any part of the appliance unless specifically
recommended
in the manual. All other
servicing
should be referred to a qualified technician.
11. This appliance should be serviced
sonnel. Contact nearest authorized
tion, repair or adjustment.
only by qualified service perservice facility for examina-
12. Know where your main oven electrical
switch is located. It is
important
to know this in case the electrical power to your oven
needs to be turned off. Have the installer
show you where it is
located.
13. Clean your ovens regularly.
14. Use this appliance
owner’s manuals.
Microwave
See care and cleaning
only for its intended
instructions.
use as described
in the
Oven Precautions
1. Some products such as whole eggs and sealed jars-for
example,
closed glass jars-may
explode and should not be heated in the
microwave
oven.
2. When cleaning surfaces of door and oven that come together
on closing the door, use only mild, nonabrasive
soaps or detergents applied with a sponge or soft cloth.
3. To reduce
the risk of fire in the microwave
oven cavity:
a. Do not overcook food. Carefully attend appliance when paper,
plastic or other combustible
materials are placed inside the
oven to facilitate
cooking.
b. Remove wire twist ties from paper
placing bag in microwave
oven.
or plastic
bags before
c. If materials
inside the oven should ignite, keep the oven
door closed, turn oven off, and disconnect the power cord,
or shut off power at the fuse or circuit breaker panel.
5
Thermal
1. Never
Oven Precautions
use your appliance
for warming
or heating
2. DO NOT USE WATER ON GREASE FIRES-Smother
or use dry chemical or foam-type
fire extinguisher.
the room.
fire or flame
3. Use only dry potholders-Moist
or damp potholders
on hot surfaces may result in burns from steam. Do not let potholder touch
hot heating elements. Do not use a towel or other bulky cloth.
4. Use care when opening door-Let
removing
or replacing food.
hot air or steam escape before
5. Placement of oven racks-Always
position oven racks in desired
location while oven is cool. If rack must be moved while oven is
hot, do not let potholder
contact hot heating element in oven.
6. Do not touch heating elements or interior surfaces of the oven
- Heating elements may be hot even though they are dark in
color. Interior surfaces of an oven become hot enough to cause
burns. During and after use, do not touch, or let clothing or other
flammable
materials
contact heating elements or interior
surfaces of oven until they have had sufficient
time to cool. Other
surfaces of the appliance may become hot enough to cause burns
- among these surfaces are oven vent openings and surfaces
near these openings, oven doors and windows.
7. Never
let aluminum
foil touch heating
elements.
8. Never touch an oven light bulb with a damp cleaning cloth unless
the power is turned off to your oven and the bulb is cool to the
touch.
9. Do not heat unopened food containers - Buildup
may cause container to burst and result in injury.
of pressure
10. Do not clean door gasket-It
is essential for a good seal. Care
should be taken not to rub, damage or move the gasket. Hand
clean only areas recommended
in this booklet.
11. Do not use oven cleaners-No
commercial
liner protective
coating of any kind should
any part of the oven.
oven cleaner or oven
be used in or around
12. Before self-cleaning
the oven, remove broiler pan, broiler grid,
oven racks and other utensils.
(Do not use your oven to clean
miscellaneous
parts.)
SAVE THESE INSTRUCTIONS
CHAMBERS
Microwave
BUILT-IN
OVEN FEATURES
Oven -m
Control Pane1
for Microwave
(Detailed in
Separate Microwave
Use 6 Care Booklet)
Oven Lock Lever -Oven Lock
Broiler Element
Rotisserie Plug Cover
ven Light
Rotisserie Support Rack
Oven Rack
ven Door Gasket
Serial Plate
Bake Element
Bake View Window
Door Handle
CONTROL PANEL FEATURES
Minute Minder and Clock Set Control
~:.::::::I
Selector
Clean Indicator Light
Serve Indicator Light
Lock Indicator Light
RETAINED HEAT Indicator Light
Thermostat Control
Oven Indicator Light
J
Oven Light Switch
RETAINED HEAT Switch
Panel Light Switch
CLOCK OPERATION
AND MINUTE
MINDER
Your oven has two time of day clocks. The digital clock on the upper control
panel controls all timed operations
in the lower oven. The electronic clock
located in the microwave
control panel controls the microwave
oven.
How to Set Clocks:
Digital Clock
Push in and turn the Minute Minder timer knob to the left until the correct
time appears. NOTE: The timer hand will also turn. Reset this hand by
turning the knob (do not push the knob in) to the “OFF” position.
Electronic
Clock
1. Touch “CLEAR”
2. Touch “TIME
3. Enter
faster
pad.
OF DAY”
pad.
numbers on control
than time on digital
4. When digital
on microwave
panel
clock.
to indicate
a time
one minute
clock registers the same time as numbers touched
control panel, touch “TIME OF DAY” pad again
NOTE: Flashing lights in the display panel of the microwave
oven indicate that there has been a power interruption
to the
microwave
oven. Power to the microwave
oven is interrupted
when the selector is moved into or through the “CLEAN”
position or when there is an electrical power failure.
If the clock is stopped for 18 hours or more, customer programmed
recipes
may be lost. The preprogrammed
recipes will not be affected. Follow above
instructions
to reset both clocks, since power interruption
will also affect
the digital clock.
The two clocks operate independently
and if they occasionally
get out of
phase with the other, there is no cause for alarm - simply reset the electronic clock as indicated above.
How to use the Minute
Minder:
The Minute Minder is located on the left side of the clock. To use the
Minder, turn the knob to the right until the white hand points to the
number of minutes, up to a maximum of 60. At the end of the set
buzzer will sound and the white hand will point to “0.” After the
signal, turn the knob until the white hand points to “OFF.” This
minder only and will not turn the oven “ON” or “OFF.”
Minute
desired
time, a
buzzer
is a re-
HOW TO USE THE LOWER OVEN
The lower oven is used for baking, roasting, rotissing and broiling.
It has
two controls-a
Selector and a Thermostat-and
both must be set for the
oven to work.
Selector
The Selector
has five settings:
Broil -Use
this setting for broiling or rotissing.
Only the upper element will be on.
Clean Time Bake -
Bake Off-Use
Use this setting
for self-cleaning
Use this setting for Automatic
Heat Cooking. Both the upper
on.
only.
Time Baking and Retained
and lower elements will be
Use this setting for baking and roasting.
and lower elements will be on.
this setting
Both the upper
to turn the oven off.
When both the upper and lower elements are on, the upper element operates at 25 percent power to aid in more uniform
baking. The upper
element does not turn red like the lower element which operates at full
power.
Thermostat
The adjustable Thermostat can be set at any temperature
from 170°F (LOW)
to 550°F. Settings LOW to 225°F are suggested for warming
and holding
foods.
Preheating
the Oven
For best results, preheat the oven unless the recipe states otherwise.
Set
the Selector to “BAKE”
and Thermostat
to the desired temperature.
Exercise care in turning the Thermostat
not to go past the desired set point.
If setting is past, return dial to low-end
stop and reset dial to desired
setting. The Oven Light will go out when the desired temperature
has been
reached.
Be sure that the Selector is turned to “OFF”
the low-end stop when oven is not in use.
Thermostat
10
and the Thermostat
is set at
BAKING
To Use the Oven for Regular
1. Turn the Thermostat
ing chart, page 13.
2. Turn the Selector
Baking
(1) at the recommended
temperature,
see bak-
(2) to “BAKE.”
NOTE: Your Chambers oven has a built-in temperature controlled fan
to remove moisture
and cool the electrical
components
so they will
last longer. The fan will run continuously
during oven operation
and
for a short time after the oven is turned off.
Rack Positions
Your Chambers oven has four rack positions. Rack position 4 is the highest
position, or farthest from the bottom of the oven, and position 1 is closest
to the bottom of the oven. Be sure to arrange the oven rack(s) before
preparing
foods or turning the oven on.
Rack Positions
To Remove Oven Rack
No.4
1. Pull rack out until bar on back of rack touches
No. 3
2. Lift front of rack up until rear position
two front stops.
first stop.
of rack slides out between
No. 2
No. I
Baking
Tips
l
Set the oven controls
positioning
pans.
and, if necessary,
l
Use the Minute Minder to time cooking
ommended baking times.)
l
Avoid opening the oven door during baking. Heat is lost and improper
baking may result. Use the Bake View Window to conserve energy.
l
Wait until the shortest
food.
l
Be sure the Selector is set at “OFF”,
and the Thermostat
end stop when cooking has been completed.
l
When baking two sheets of cookies at the same time, each sheet should
be removed when the desired degree of doneness is reached.
recommended
allow
the oven to preheat
functions.
baking
before
(See page 13 for rec-
time is over before
checking
is at the low
CAUTION: The Oven Lock Lever should always be unlocked
(positioned
to the left) except when
mostat are in the “CLEAN”
mode.
the Selector
and TherI
11
Pan Placement
l
l
l
l
Use only one rack when baking in a large
rack, such as a cookie sheet.
Stagger pans in opposite directions when
used. No two pans should be be directly
Allow 1% to 2 inches of air space around
air circulation.
When using a large roasting pan or cookie
long side is parallel to the oven door for
air flow.
Bakeware
l
l
l
l
l
l
flat pan that covers most of the
two racks and several pans are
above each other.
all sides of each pan for even
sheet, turn the pan so that the
the best heat distribution
and
Tips
Use the proper baking pans to insure good results. Old or darkened pans
are not desirable.
Tin coated, stainless steel, warped or dented pans do not heat evenly and
will cause uneven baking.
Bake cakes, cookies, quick breads and muffins in shiny pans to give them
a tender, golden crust.
Reduce oven temperature
by 25OF when using glass pans, except when
baking pies or yeast breads.
Cookies, biscuits and cream puffs bake best on medium weight aluminum
sheets with no sides or very low sides.
Use the recommended
pan size given in recipes.
Using Aluminum
Foil Correctly
in the Oven
If you wish to use foil to catch possible spillovers,
cut a piece of foil slightly
larger than the pan being used and turn up the edges. Position the foil
“tray” on the oven rack below the pan. NEVER COVER AN ENTIRE OVEN
RACK OR OVEN BOTTOM WITH FOIL. FOIL CAN OBSTRUCT NORMAL
HEAT FLOW, CAUSE COOKING FAILURES AND DAMAGE
THE OVEN
INTERIOR.
NOTE: Moisture from normal oven cooking may appear on the
grill located below the microwave
control panel where the oven
is vented. The moisture collection will be more noticeable when
cooking large moist oven loads. It will disappear as the oven
heats up, except in the case of an extremely
moist load.
12
BAKING
TIME AND TEMPERATURE
Food
Breads: Yeast-loaf
rolls, pan
Breads: Quick-biscuits
muffins
popovers
corn bread
nut bread
gingerbread
Oven Temp.
Degrees F.
Time-Mm.
Approx.
375
30-40
400
12-15
450
400
450
425
350
350
10-15
20-25
20-25
25-30
60-75
25-30
375
350-375
350-375
350
350
350
300
300
30-40
15-20
20-30
35-45
35-45
35-40
Z-Z’/1 hrs.
25-35
Cakes:
angel cake
cup cake
layer cake
loaf cake
sponge cake
pound cake
fruit cake
sheet cake
Cookies:
drop
rolled and refrigerated
chocolate
fruit and molasses
High Altitude
375
375
375
375
CHART
10-15
8-12
10-15
10-15
Oven Temp.
Degrees F.
Food
Approx.
Time-Mm.
Cookies:
brownies
macaroons
350
350
20-30
12-15
375
300
50-60
5-6 hrs
325
325
400
45-60
30-45
60-90
350
375
325
350
350
45-60
30-40
40-60
60-90
50-60
400
350
450
35-40
30-40
10-12
400
400
350
25-30
40-50
10-15
Miscellaneous:
apples, baked
beans, baked
custard
casserole
cup
potatoes, baked
pudding
bread
cottage
rice
scalloped dishes
souffle
Pastries:
cream puffs
custard and pumpkin
pastry shell
two crust fruit pie
cooked filling
uncooked fiIling
meringue topping
pie
Baking
When baking at high altitudes, recipes and baking times vary. For accurate information,
write the Extension Service of your state
or university
or Extension Service, Colorado State University,
Fort Collins, Colorado 80523. There may be a cost for the bulletins-do
specify the type of information
you want (i.e. cakes, cookies, breads, etc.).
college
13
BAKING
PROBLEMS AND CAUSES
PROBLEMS
CAUSES
Cookies and biscuits:
l
too brown
on top
l
l
l
l
l
l
l
browning
more on one side
than the other
l
l
OR
the pan was set too high in the oven
OR
the selector switch was left on “BROIL” during baking
if aluminum foil is used, it may distfibute
the heat unevenly in the oven
the pan sides are too deep
OR
OR
the pan is too wide or too long for the oven
the oven rack is overcrowded-see
pan placement on page 12.
the pan was set too close to one side of the oven
the oven door was not closed properly.
OR
Cakes:
l
rises higher
on one side
l
l
l
l
l
burns on the sides
l
l
l
cracks on top
l
l
l
OR
the batter was spread unevenly in the pan
the pans were set too close to the sides of the oven
oven is not level
OR
pans were warped.
OR
there were too many pans or the pans were too large for the oven
the oven was too hot.
OR
the batter was too thick
OR
the pan was not the correct size
OR
the pan was not centered in the oven
Pies:
l
burns around
the edges
l
l
l
l
too light in color on the top
l
l
14
the oven was too hot
OR
there were too many pans or the pans were too large for the oven
the pans were too dark.
the oven was not hot enough
the oven was too full, cutting
OR
off even heat distribution.
OR
OR
ROASTING
Roasting is a dry heat cooking method and recommended
tender cuts of beef, lamb, pork and veal.
for poultry
and
To Use the Oven for Roasting
1. Arrange
oven racks in desired
positions.
2. Set the Thermostat
(1) at the recommended
roasting chart, page 16.
3. ‘l?~rn the Selector
Roasting
GlT
see
(2) to “BAKE”.
Tips
l
Roast meats in a shallow
l
Use a roasting pan that fits the size of the item to be roasted. Meat will
overflow a pan that is too small, and a too large pan will result in increased
oven spatter.
Spatter can be reduced by lining the bottom of the roasting pan with
lightly crushed aluminum foil.
l
Meat Thermometer
temperature,
pan with
a roasting
rack
l
A foil “tent” will slow down surface browning
for long-term
roasting, as
when roasting a turkey. Place tent-shaped
foil loosely over meat to allow
for air circulation.
Do not seal foil or meat will be steamed.
l
Use an accurate meat thermometer
to determine when meat has reached
desired degree of doneness. Insert thermometer
into the center of the
thickest portion of the meat or inner thigh or breast of poultry. For an
accurate reading, the tip of the thermometer
should not touch fat, bone
or gristle.
l
After reading the thermometer
once, push it further into the meat % inch
or more and read again. If the temperature
drops, return the meat to the
oven for more cooking.
l
Remove standing rib roasts from the oven when the thermometer
registers 5” to 10°F lower than the desired doneness. The meat will continue
to cook after removal from the oven.
l
Roasts will be easier to carve
removal from the oven.
if allowed
to stand
lo-15
minutes
after
15
ROASTING
TIME AND TEMPERATURE
CHART
Weight
in
Pounds
Oven
Thermostat
Setting
Approx.
Minutes
Per Lb.
Meat Thermometer
Temp. Degrees F.
5-6
5-6
5-6
325
325
325
30
35
45
140
150
170
6-7
6-7
6-7
325
325
325
25
30
40
140
150
170
4-6
4-6
325
325
25
30
150
170
3-4
6-7
325
325
35
30
160
180
4-5
4-5
325
325
35
40
170
185
3-4
5-7
10-12
6-10
400
350
325
325
40
30
25
25
**Turkey
lo-16
18-25
325
325
20
18
170-175
170-175
Fully Cooked Ham
3-5
8-10
325
325
18
15
130
130
3-4
5-6
325
325
35
45
170
170
Meat Cut
Beef Rolled Rib
rare
medium
well done
Standing Rib
rare
medium
well done
Rump Roast
medium
well done
Lamb Leg (half)
Fresh Pork
Loin
Shoulder
Poultry
‘Chicken
Duck
Goose
Veal
Loin
Shoulder
*Add 15 minutes if chicken is stuffed
**Add 30 minutes if turkey is stuffed
***The muscles are not usually large enough
16
to use a thermometer
l **
t+t
l **
***
BROILING
Broiling, a quick-cook
brown on the outside
method for tender cuts, will produce
and moist and juicy on the inside.
foods that are
To Use the Oven for Broiling
1. Arrange the oven racks in the desired positions. Place food on grid
on broiler pan and place in the center of the oven rack.
2. Set the Thermostat
(1) at the recommended
broiling chart, page 18.
3. Turn the Selector
(2) to “BROIL.”
temperature,
Do not preheat
see
the broiler.
4. Close the oven door.
Broiling
Tips
l
Always
place food on a cold broiler
l
It is best not to pierce
will be retained.
l
Broil food on one side for slightly more than half the recommended
time,
then season and turn it. Season the second side just before you remove
it from the broiler.
l
Trim the outer layer
l
Slit fatty
l
Brush food with
during broiling.
l
When broiling
oil to prevent
meat with
pan for even broiling.
a knife
or fork so more natural
of fat from steaks and chops before
edges to prevent
butter,
juices
broiling.
meat from curling.
sauce or seasoning,
fish or seafood,
sticking.
grease the broiler
if desired,
several
pan grid with
times
butter
or
CAUTION:
COVERING
THE BROILER GRID WITH FOIL IS
NOT RECOMMENDED.
POOR DRAINAGE
OF HOT FAT MAY
RESULT IN A BROILER FIRE. If foil must be used, make sure
slots are cut in foil to correspond to all openings in the broiler
grid. Fat can then drip away from meat and cool in the pan.
17
BROILING
TIME AND TEMPERATURE
CHART
Recommended rack position number lowest (1) to highest (4)
Approximate
Total Time
Rack
Position
Thermostat
setting
3
3
3
550”
550”
550”
13-15 min.
15-20 min.
20-25 min.
1% thick
rare
medium
well done
3
3
3
550”
550”
550”
15-20 min.
20-25 min.
20-25 min.
Hamburger Patties
3
450”
15-20 min
Lamb Chops-
3
400”
20-30 min.
3
400”
20-25 min.
Bacon
3
400”
5-7 min.
Frankfurters
3
400”
lo-12
Chicken Pieces
4
400”
60-70 min.
Fish
2
350”
20-25 min.
Calves Liver
3
350”
lo-12
Tomato Halves
3
550”
8-10 min.
Orange or Grapefruit Halves
2
550”
8-15 min.
Food
Steakrare
1” thick
medium
well done
Steak-
Ham Slice-
18
1” thick
1” thick
min.
min.
ROTISSERIE
Rotissing, which is roasting food on a revolving
spear while exposed to a
heat source, is suitable for meats that can be broiled or roasted. Select
tender cuts of meat and prepare them as for oven roasting.
To Use the Oven for Rotissing
1. Position the rotisserie
support rack in rack position three so spear
will fit into the drive socket located at the back of the oven.
2. Place the broiler
catch drippings.
pan on the oven rack in the lowest
position
to
3. Remove the prong nearest the pointed end of the spear. Center
the meat on the spear. Slide the prong which was removed back
onto the spear. Slide both prongs into the meat and tighten
thumbscrews.
4. Place spear with food on the support rack. Swing the cover plate
at the back of the oven cavity to the side and insert the spear into
the drive socket. The rotisserie
motor will start when the spear is
inserted all the way.
5. Set the Thermostat
to the recommended
serie chart on page 2 1.
6. ‘Run the upper oven selector
see rotis-
to “BROIL’
7. Close the oven door. Do not preheat
Th
temperature,
the oven.
8. To remove the rotisserie
spear from the oven, grasp the support
rack with a potholder
and pull it out. REMOVE SPEAR AND SUPPORT RACK CAREFULLY. THEY WILL BE HOT.
Spear
19
Rotissing
20
Tips
l
Rolled roasts are ideal for rotissing because they are easy to balance on the
spear. Insert the spear through the center of the meat. Meat cuts with
bones require planning for even weight distribution.
l
Leave space between food when rotissing more than one item or a long
item such as a spare rib strip. Browning
and cooking are slowed where
foods touch each other.
l
Weave the spear in and out to form accordian
tween each fold, when rotissing ribs.
l
Season, stuff (if desired) and truss poultry as for oven roasting. Also close
any openings with skewers or string. For best results, baste poultry with
butter or broth every 20-30 minutes during rotissing time.
l
Meat can be marinated
before
several times during cooking.
l
Foods for rotissing
should
ameter of 7 inches or less.
l
Make sure thumbscrews
cooking, the spear will
trated on one side.
l
Meats will be Juicier and easier to carve if allowed
spear 10-l 5 minutes after the heat is turned off.
l
When oven has cooled, be sure cover plate is over drive socket opening.
rotissing
be no longer
or prongs
turn within
folds,
or basted
leaving
with
than rotisserie
a space be-
a favorite
spear with
sauce
a di-
are tight. If prongs loosen during
the meat and heat will be concento stand or rotate on the
ROTISSERIE
TIME AND TEMPERATURE
CHART
Approximate
Total Time
Internal Temp.
With Thermometer
Thermostat
Settings
4-7 lbs.
4-7 lbs.
Rate 140”
Medium 160”
Well Done 170”
400"
400"
400"
l%to 2 hrs.
1% to 2% hrs.
2 to 3 hrs.
3-5 lbs.
3-6 lbs.
l'/z-4 lbs.
185"
185”
185"
375"
375"
375"
3-4 lbs.
6-7 lbs.
6-7 lbs.
185"
140°
160”
375"
375"
375"
1% to 2% hrs.
1% to 3 hrs.
time will depend
on leanness
1 to 1 l/z hrs.
1% to 2 hrs.
2 to 2% hrs.
rump roast
3-5 lbs.
170"
400"
1% to 2% hrs
leg
loin roast
3-5 lbs.
3-5 lbs.
180"
180"
400"
400"
1% to 2% hrs.
1% to 2% hrs.
ZM-3% lbs
1 lb.
5-6 lbs.
190”
190”
190”
425"
425"
425"
1 to 1% hrs.
50 to 55 min.
1% to 2 hrs.
Bologna roll
400"
heat thru
Frankfurters
425"
15 to 20 min.
Kabobs
425"
heat thru
Approximate
Weight
Meat
Beef
rolled
rolled
rib roast
rump roast
Pork
rolled loin roast
rolled shoulder roast
spareribs
Canadian bacon
half ham-ready
tenderized
Veal
rolled
to eat
Lamb
rolled
rolled
Poultry
chicken-broiler-fryer
cornish hen
duck
Rotisserie times given in the chart are approximate,Actual
cooking time depends upon meat diameter
of fat to lean). It is best to use a meat thermometer
to determine doneness by interior temperature.
and meat composition
(proportion
21
AUTOMATIC
TIME BAKING
To Start Now and Stop Later
1. Arrange
oven racks in desired
positions
and place food in oven.
2. Check to see if the digital clock is set at the correct time of day. If
not, reset to the correct time following
the instructions
on page 9.
Stop Time
Control
3. Set the Start Time Control.
Push in and turn the Start Time Control
shows the same time as the oven clock.
Start Time
4. Set the Stop Time Control.
Push in and turn the Stop Time Control
heating element to turn off.
Control
until
it “pops
out”
and
to the time you want the
NOTE: When setting the Start Time or Stop Time Controls,
Setting Start Time-Stop
on the dial equals approximately
Time
5. Set the Thermostat
6. ‘Iurn the Selector
15 minutes
(1) to the desired
df cooking
each click
time.
temperature.
(2) to “TIME-BAKE.”
7. ‘Iurn the Retained
Heat (3) switch
What Happens During
to “OFF.”
This Selection?
l
The oven will come on immediately
the Thermostat.
and maintain
l
At the end of the cooking period, the oven will
will come on and stay on until the oven controls
the temperature
shut off. The Serve Light
are manually turned off.
REMEMBER, WHEN YOU REMOVE FOOD FROM THE OVEN:
1. Turn the Thermostat
to the low-end
2. ‘Iurn the Selector to “OFF.”
22
stop.
set on
To Start and Stop Later
1. Check to see if the digital clock is set at the correct time of day. If
not, reset to the correct time following
the instructions
on page 9.
2. Set the Start Time Control.
Push in and turn the Start Time Control
heating element to come on.
to the time you want the
3. Set the Stop Time Control.
Push in and turn the Stop Time Control
heating element to turn off.
to the time you want the
4. Set the Thermostat
5. ‘Run the Selector
6. Turn the Retained
to the desired
temperature.
to “TIME-BAKE.”
Heat switch
What Happens During
to “OFF.”
This Selection?
l
The oven will come on at the start time selected
temperature
for the selected number of hours.
l
At the end of the cooking period, the oven will shut off. The Serve light
will come on and stay on until the oven controls are manually turned off.
To Use The Keep Warm Feature
Baking:
and maintain
With Automatic
Follow instructions
on pages 22 - 23 for Automatic
Time Baking
Now or To Start Later. After turning the Selector to “TIME-BAKE,”
Retained Heat Switch to “RETAINED
HEAT.”
the set
Time
To Start
turn the
At the end of the selected cooking time, the oven will cool down and maintain a “Keep Warm” temperature
(approximately
165°F) automatically
until
the oven controls are manually turned off.
IMPORTANT:
Warm feature
eggs, poultry,
Some foods should not be used with the Keep
as they may spoil. Avoid milk, creamed dishes,
meats, fish and stuffings.
23
RETAINED
HEAT’I” COOKING
To Start Now and Stop Later
1, Check to see if the digital clock is set at the correct time of day.
If not, reset to the correct time following
the instructions
on page
9.
ABOUT RETAINED HEAT’ COOKING.. .
When an oven is used for normal cooking methods, such
as baking and roasting, the heating element heats the
oven cavity to maintain the temperature set on the thermostat. Certain amounts of this heat escape from the
oven and are wasted. The CHAMBERS RETAINED HEAT
oven is specially insulated around the oven cavity and
door so that this heat is “retained” inside the oven and
used for cooking food. This means that you can heat your
Chambers oven to the required temperature, turn it off
and cook food by “Retained Heat.” When using the Retained Heat method for your regular recipes, the baking
time must be shortened and the baking temperature
raised. Please refer to the “Recipes for Success” Retained Heat Cookbook for more information.
2. Set the Start Time Control.
Push in and turn the Start Time Control
shows the same time as the oven clock.
until
it “pops
out”
and
3. Set the Stop Time Control (length of “power on” period).
Push in and turn the Stop Time Control to the time you want the
heating element to turn off.
NOTE: When setting the Start Time or Stop Time Controls, each click
on the Control equals approximately
15 minutes of cooking time.
4. Set the Thermostat
5. Turn the Selector
(1) to the desired
temperature.
(2) to “TIME-BAKE.”
6. ‘Iurn the Retained
Heat Switch
What Happens
During
(3) to “RETAINED
HEAT.”
This Selection?
l
The oven will come on immediately
set on the thermostat.
l
At the end of the “power on” period, the Retained Heat Light will
come on and the oven will begin cooking by Retained Heat.
. At the end of the Retained
and maintain
the temperature
Heat cooking time, the oven will be
maintained
at 165°F by the Keep Warm thermostat.
The Retained
Heat Light and Oven Light will cycle on and off in conjunction
with
the heating elements until the Selector, Thermostat
and Retained
Heat Switch are manually turned off.
24
To Start and Stop Later
1. Check to see if the digital clock is set at the correct time of day.
If not, reset to the correct time following the instructions on page
9.
2. Set the Start Time Control.
Push in and turn the Start Time Control to the time you want the
heating element to come on.
3. Set the Stop Time Control (length of “power on” period).
Push in and turn the Stop Time Control to the time you want the
heating element to turn off.
4. Set the Thermostat to the desired temperature.
5. Rn-n the Selector to “TIME-BAKE.”
6. Turn the Retained Heat Switch to “RETAINED HEAT.”
NOTE: The maximum combined start time delay plus cook
time is 11% hours. This means the oven cannot be set at 8
p.m. (in the evening) to come on the next day at 2 p.m. (in the
afternoon). Instead, the oven would come on at 2 a.m. in the
morning.
What Happens
l
l
l
During
This Selection?
The oven will come on at the start time selected and maintain the set
temperature for the selected number of hours.
At the end of the “power on” period, the Retained Heat Light will come
on and the oven will begin cooking by Retained Heat.
At the end of the Retained Heat cooking time, the oven will be maintained
at 165°F by the Keep Warm Thermostat. The Retained Heat Light and
Oven Light will cycle on and off in conjunction with the heating elements
until the Selector, Thermostat and Retained Heat Switch are manually
turned off.
25
OVEN CARE AND CLEANING
Several types of finishes have been used on the parts of this oven. For the
best cleaning results, follow the guide below for recommended
cleaning
procedures.
Finish
Part
Broiler
Porcelain
Pan
Oven Racks Rotisserie
Spear and Prongs
Nickle
Enamel
Plating
Chrome
Plating
Clean With
Detergent
of water.
and hot water.
Rinse well.
Detergent
and hot water.
Soap-filled
steel wool pad with plenty
Removable plated parts may be soaked in ammonia
1 cup ammpnia to 2 gallons of water.
solution
of
Broiler Pan Grid
Oven Front Frame
Porcelain
Door Panel
Satin Chrome
Door Panel
Porcelain
Chrome
Enamel
Plating
Detergent
and hot water.
Soap and hot water. Rinse and dry with
cleaner will remove fingermarks.
Glass in Door and
Control Panel
Glass
Control
Frame
Chrome
Control
Knobs
Plated Plastic
Detergent
Pyrolytic
Enamel
See Self-Cleaning
Oven Interior
26
Detergent
Plating
Porcelain
Rinse and dry with
Detergent
fmgermarks.
and hot water.
and hot water.
Mild
soft cloth.
Mild
glass
glass cleaner.
Mild
glass
and hot water.
Section
soft cloth.
(Pages 27-301
cleaner
will
remove
OVEN SELF-CLEANING
The self-clean feature is designed to eliminate the need for scrubbing and
scouring soil baked onto the oven interior. Food spatters on the oven walls
become harder to remove each time the oven is heated, however, the SelfClean cycle heats these soils to a higher temperature
(850%900°F)
where
soil is “burned off.”
Before Starting
the Self-Clean
Cycle
1. Remove all items from the oven.
Remove oven racks according
to instructions
on page 11. It is
recommended
that the oven racks be removed as they will discolor
and darken during the self-clean
cycle. If the racks were left in
the oven during the clean cycle, wipe the sides with vegetable oil
after cleaning so they will slide easily. BROILER PAN, BROILER
GRID OR COOKING UTENSILS SHOULD NOT BE CLEANED IN
THE OVEN. HEAVY GREASE BUILDUP ON THESE ITEMS WILL
PRODUCE SMOKE AND ODORS WHICH CAN BE DISCHARGED
INTO THE KITCHEN.
Rotisserie Plug
Cover
Window Shield
2. Wipe up large spillovers.
Wipe up large spillovers on the bottom and sides of the oven with
a damp cloth or sponge.
NEVER USE CHEMICAL
OVEN CLEANERS
INSIDE
SELFCLEANING
OVEN OR ON RAISED PORTION OF THE DOOR.
The smoke eliminator
will handle the normal flow of odors during
the clean cycle, however, minor smoke may be noticed when soil
buildup is heavy.
3. Wipe Soil from Oven Frame and Door outside of Gasket. Wash
with detergent and hot water, rinse well with a mixture of vinegar
and water and wipe dry. A non-scratch
scouring pad may be used
on heavily
soiled areas. Wash surfaces frequently
to minimize
overall cleaning as these areas are not cleaned during the selfclean cycle.
CAUTION: DO NOT SCRUB OR CLEAN
Window Shield Levers
4. Be sure Rotisserie
Plug Cover
OVEN DOOR GASKET.
is down.
5. Close the Window Shield.
With the door fully opened, move the Window Shield Levers
to the top of the window. The Oven Lock Lever will not lock
unless Window Shield is up.
27
To Start the Self-Clean
1. Follow
steps under
Cycle
“Before
Starting
the Self-Clean
Cycle.”
2. Check to see that the digital clock is set at the correct time of day.
If not, reset to the correct time following
the instructions
on page
9. Push in and turn Start Time Control (3) until it “pops out” and
shows the same time as the oven clock
NOTE: The self-clean cycle can be set to start at a later time
automatically.
Set the Start Time Control to the desired start
time and the Stop Time Control to the desired stop time.
3. Close door.
4. Determine
length of cleaning time needed from chart below. Push
in and turn the Stop Time Control (4) to the hour cleaning should
stop.
CLEAN
TIME
GUIDE
Soil Description
Moderate
Soil
Heavy Soil
5. ‘IWn the Selector
Lock Lever
28
Set Stop Time Ahead
2 hours
3 hours
(2) and Thermostat
(1) to “CLEAN.”
6. Slide Oven Lock Lever all the way to the right.
loud click. The clean cycle will now begin.
You will
hear a
What Happens
After
the controls
During
the Self-Clean
Cycle
are set:
l
The Clean and Oven Lights will glow to tell you the oven is slowly
to the clean temperature.
l
The Lock Light will come on when the temperature
600” F (approximately
15 minutes).
At the End of the Cleaning
reaches
heating
575”.
Cycle
l
The Oven Light will
go out.
l
The Clean Light will
stay on.
l
The Lock Light will continue to glow until the oven temperature
drops
below 550°F (approximately
45 minutes). The oven door cannot be opened
until Lock Light goes out.
l
After a clean cycle any powdery residue can be wiped away with a damp
cloth. If white spots remain in the oven after a clean cycle, remove them
with a non-scratch
scouring pad before using the oven again. These spots
are usually salt residues that cannot be removed during the Self-Clean
cycle.
l
If the soil removal was not complete,
time in the next cycle.
To Interrupt
Before
Cleaning
increase
the length
of the clean
Cycle
lock light comes on:
1. Iurn
Stop Time Dial Control
2. Slide Lock Lever
3. Turn Selector
until
it pops out
all the way to the left.
to “OFF”
and Thermostat
to the low-end
stop.
DO NOT REVERSE ORDER OF STEPS OR DOOR WILL NOT OPEN.
29
After
Lock Light
1. Iurn
Comes On:
Stop Time Control
until
it pops out.
2. Wait for Lock Light to go out.
3. Slide Lock Lever
4. Turn Selector
5. Allow
To Return
all the way to the left.
to “OFF”
and Thermostat
to the low-end
stop.
oven to cool.
Oven to Regular
1. Slide the Lock Lever
Use
all the way to the left.
2. ‘horn the Selector to “OFF” and the Thermostat
to the low-end stop.
DO NOT REVERSE ORDER OF STEPS OR DOOR WILL NOT OPEN.
3. Allow
oven to cool. Open door and lower
Oven Self-Cleaning
time
window
shield to use oven,
Tips
l
Evening
is a good
completed.
to clean
l
Small amounts of smoke escaping
oven is heavily soiled. Excessive
have not been wiped up.
the oven,
after
normal
oven
use is
from the oven vent are normal when
smoke may indicate heavy spillovers
. THE MICROWAVE
OVEN WILL NOT OPERATE WHEN THE LOWER
OVEN IS IN THE SELF-CLEAN
CYCLE. After the cycle is complete, the
Microwave
Oven clock will need to be reset. See instructions
on
page 9.
30
l
Do not force the Oven Lock Lever open when the Lock Light is on. Damage
to the lock mechanism
may result.
l
Clean the lower oven regularly,
before it becomes “excessively
oven is not clean after one cycle, repeat cleaning cycle.
dirty.”
If
SPECIAL
INFORMATION
To Replace Oven Light Bulb
CAUTION: make sure oven is cool before
l
Remove
l
Lift holder,
three
l
Unscrew
l
Replace
screws
in lens holder
glass lens and gasket
with
screwdriver.
out.
oven light bulb and replace
gasket,
a Phillips
starting.
lens and holder,
with
a 40 watt
and tighten
appliance
bulb.
screws.
To Replace Panel Light Bulb
l
POSITION
Turn off power and oven at electrical
supply box before changing the
light bulb. Remove bezel nut on oven light and panel light switch by
turning counterclockwise.
l
Remove
l
Remove the Phillips
the lock lever.
all other knobs by pulling
l
Remove the front three Phillips screws under the control frame and the
two Phillips screws located on the top portion of the control frame, being
careful to hold the control frame in place.
straight
out.
under the lock lever knob to remove
l
Pull control
l
Remove
the bulb by twisting
l
Replace
twisting
used bulb with a GE F85T5
and pushing in.
l
Replace control frame, screws,
nuts. Turn on the power.
l
Reset digital
/
frame
screw
knob off
forward.
and electronic
and pulling
forward.
(8 watt)
bulb
(or equivalent)
by
knob and oven light and panel light bezel
clocks according
to instructions
on page 9.
To Remove Oven Door
Use caution
as oven
doors
are heavy.
1. Open door completely.
2. Depress finger tab in oven door hinge area and push toward
oven. Lift tab away from door lining and slide toward top of
oven door.
3. Repeat
step 2 on opposite
4. Close door to stop position
5. Lift the door off the hinge
Replace
door
1. Replace
by using
side of door.
(door will
arm assemblies.
the opposite
door on hinge
be open 6 inches).
procedure.
arm assemblies.
2. Open door completely.
3. Push fmger tabs toward
toward top of door.
oven.
4. Close and open the door slowly
nronerlv.
Depress
the tabs
and slide
to make sure it is replaced
31
COOKING
EQUIPMENT
LENGTH OF WARRANTY:
CHAMBERS WILL PAY FOR:
TWO YEAR
FULL WARRANTY
Replacement
parts and labor to
correct defects in material
or
workmanship.
Service must be
provided
by a Chambers
authorized servicing outlet.
FIVE YEAR
LIMITED WARRANTY
Replacement
parts (labor costs
not included) for any part other
than a glass part or the finish
of a porcelain
enameled,
painted or bright metal part, if
defective
in material
or
workmanship.
TWO YEAR FULL
PLUS
THIRD THROUGH
FIFTH YEAR
LIMITED
FROM DATE
OF INSTALLATION.
WARRANTY
CHAMBERS WILL NOT PAY FOR:
A. Service calls to:
1. Correct
the installation
of the cooking
equipment.
2. Instruct you how to use the cooking equipment.
3. Replace house fuses or correct house wiring.
B. Repairs when cooking equipment
than normal home use.
is used in other
C. Damage resulting
from accident, alteration,
misuse, abuse, improper
installation
or installation
notin accordance with local electrical
codes.
D. Any labor costs during
limited
warranty.
E. Any glass part or the fmish of a porcelain
enameled, painted or bright metal part during the limited warranty.
CHAMBERS DOES NOT ASSUME ANY RESPONSIBILITY FOR INCIDENTAL OR CONSEQUENTIAL DAMAGES. Some
states do not allow the exclusion or limitation of incidental or consequential damages, so this exclusion or limitation may
not apply to you.
This warranty gives you specific legal rights and you may also have other rights which vary from state to state.
l
l
l
t
*
l
l
t
+
l
HOW TO ARRANGE FOR SERVICE
First call your dealer or repair service he recommends.
All service should be handled locally by the dealer from whom you purchased the unit or an authorized Chambers
servicing outlet. If your local service is not satisfactory, contact the Customer Relations Department, Chambers Division,
P.O. Box 558, St. Joseph, Michigan 49085-0558.
WHEN YOU NEED SERVICE
Follow
These
Division
steps
1. If your oven should fail to operate, review the following
list before calling your dealer. You could save the cost of a service call.
l Is the
fuse or circuit breaker open? l Is selector control in
correct mode?
2. If the problem is not due to one of the above items, see “How
To Arrange For Service” listed in the Warranty Statement.
3. If you art?not satisfied with the action taken, contact the Major
Appliance Consumer Action Panel (MACAP). MACAP is a group
of independent consumer experts that voices consumer views at
the highest levels of the major appliance industry. Contact them
only when the dealer,
F-8582A
:.
authorized
servicing
outlet,
and Chambers
have failed
to resolve
your problem.
Major Appliance Consumer Action Panel, 20 North Wacker Dr.
Chicago, IL 60606
MACAP
will
in turn inform
In all correspondence
include:
Date
Your Name, Address,
Telephone Number
l lype
of Appliance
@Brand
l Model
Number
l Serial
Number
l Date Purchased
about
l
l
l
us of your action.
and
l
your
oven,
please
Dealer from which purchased (include address)
Servicing Agent (include
name and address if differ-
ent from dealer)
l
l
Location of Appliance
A Clear Description
of the
Problem and the Service
Required
(K487)