1
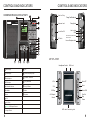
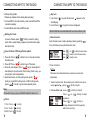
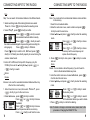
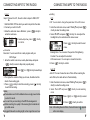
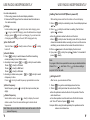
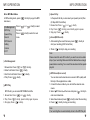
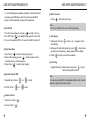
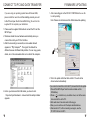
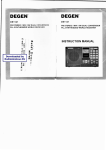
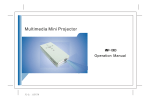
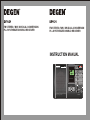
FM STEREO / MW / SW DUAL CONVERSION
PLL SYNTHESIZED WORLD RECEIVER
FM STEREO / MW / SW DUAL CONVERSION
PLL SYNTHESIZED WORLD RECEIVER
INSTRUCTION MANUAL
ST
1
2
3
DE1121
MP3
23
MUSIC
N
Z
Z
N
00:04:28
33
My Heart Will Go On.mp3
MP3 128K
00:\003
MP3/RECORDER
A-B
EQ
FM
FM STEREO/SW.MW.LW DUAL CONVERSION SYNTHESIZED WORLD
RECEIVER MP3 PLAYER DIGITAL RECORD
MW
SW
SSB/400 MEM
RADIO
FOREWORD
Accessoires:
KEY FEATURES
RADIO AND MP3 CAN WORK INDEPENDENTLY.
TIME TURN ON/OFF RADIO; MP3 PLAY; MIC/FM RECORD.
Carrying Pouch
LW/MW/SW DUAL CONVERSION TECHNOLOGY.
100 MEMORIES, 400 FREQUENCIES PRESETTING.
External Adaptor
PC DOWNLOAD, EDIT, UPDATE STATION NUMBER AND
AA x 3 Battery and DF6 x 1 Ni-MH Battery
FM: 70.0-108.0MHZ, STEP IS 50K/100K.
FREQUENCY.
AM(SW, MW, LW): 150-1640KHZ, STEP IS 1K/9K;
Stereo Earphones
3000-29999KHZ, STEP IS 1K/5K.
FIVE TUNING MODES: STATION NUMBER/BAND/KNOB/
USB Cable
Line in Cable
Installation CD
AUTO SCAN/DIRECT ENTRY.
BROWSE THE STATION NUMBER AND FREQUENCY.
40 LEVELS VOLUME CONTROLLING, MUTE FUNCTION.
CHARGING FUNCTION(MP3/RADIO BOTH CAN BE
CHARGED).
External Antenna
SSB, FINE TUNING.
FM MONO/STEREO SELECTABLE.
User Manual
Simple Operating Guide
Warranty Card
AM WIDE BAND/NARROW BAND SELECTIVITY.
SLEEP POWER OFF TIME(10~60 MIN SETTING AND
INDICATING).
KNOB FAST/SLOW/LOCK FUNCTION.
LOCAL-NOR-DX SWITCH.
EXTERNAL ANTENNA JACK.
KEY FEATURES
CONTENTS
128x64 DOTS LCD.
CONTROLS AND INDICATORS.................................................... 1
PLAY MP3, WAV, WMA.
PREPARATION FOR USE............................................................. 3
MP3/MIC RECORD.
CONNECTING MP3 TO THE RADIO............................................ 5
A-B REPEAT FUNCTION.
SETTING THE CLOCK.............................................................. 5
FOUR CYCLE MODES, SIX EQ MODES.
VOL+/-....................................................................................... 5
MENU INTERFACE.
KEY LOCK................................................................................ 6
USB JACK(USB 2.0 HIGH SPEED).
MENU FUNCTION.....................................................................6
BATTERY LEVEL INDICATOR.
TUNE STATIONS..................................................................... 14
BUILT-IN SPEAKER(D77mm).
QUICK OPERATIONS............................................................. 15
USE AA x 3 BATTERIES, DF6 X 1 Ni-MH BATTERY.
AMPLIFIER.............................................................................. 16
EDIT FREQ.TXT FILE............................................................. 16
USE RADIO INDEPENDENTLY................................................... 17
LISTEN TO THE RADIO............................................................... 19
LOCAL-NOR-DX SELECTIVITY...............................................19
FM MONO/STEREO................................................................ 19
AM NARROW BAND/WIDE BAND.......................................... 20
SSB/CW................................................................................... 20
MP3 OPERATION........................................................................ 21
USE MP3 INDEPENDENTLY....................................................... 27
CONNECT TO PC....................................................................... 29
DATA TRANSFER........................................................................ 29
UPGRADE FIRMWARE............................................................... 30
SPECIFICATIONS........................................................................ 31
CONTROLS AND IN DICATORS
CONTROLS AND IN DICATORS
COMBINED RADIO-DISPLAY/MP3
Hole for Strip
ST
1
2
DE1121
RADIO
Antenna Jack
Tuning Knob
Local-Nor-DX
Line in Jack
SSB
N
00:04:28
NOR.
LO
DC:6V
DC Jack
AM: SSB, Wide Band/Narrow Band
FM: Mono/Stereo
AM
MP3/RECORDER
FINE
DX
00:\003
LINE IN
TUNE
My Heart Will Go On.mp3
MP3 128K
STEREO
MONO
Z
33
WIDE
NAR.
Z
SSB
N
ANT
MP3
23
MUSIC
Tuning Fast/Slow/Lock
3
Line out/Earphone Jack
A-B
EQ
FM
MW
11
SW
FM STEREO/SW.MW.LW DUAL CONVERSION SYNTHESIZED WORLD
RECEIVER MP3 PLAYER DIGITAL RECORD
SSB/400 MEM
12
MP3 PLAYER
18
17 16
15
14 13
Headphone Socket
Main Display
12
VOL-
Small Display
13
Select, Frequency Step
Radio Adaptor
14
EQ Mode, SW Band
MP3 Adaptor
15
Stop, MW Band
0-9 Number Buttons
16
Play, FM Band
Exit/Mute
17
Menu
Enter
18
Speaker
VOL+
USB Jack
VOL+
Select/FF
VOL-
Menu
Select/RW
Off/Stop
Turn On/
Play/
Pause
A-B Repeat/
Record
Lock, Save
Record, A-B Repeat, Browse
11
1
Charge, Delete
MP3-radio Connecting Jack
2
PREPARATION FOR USE
Inserting the Batteries
PREPARATION FOR USE
Connecting the Power-adaptor to the Radio
Insert Batteries for Radio
ANT
DX
NOR.
LO
1. Open the lid of the battery compartment which is at the back of
the radio.
2. Insert 3 AA dry batteries(or re-chargeable batteries) making sure
that they are correctly oriented and switch on the radio.
3. Close the lid of the battery compartment.
6V
Insert Battery for MP3
1. Open the lid of the battery compartment which is at the back of
the MP3.
2. Insert the supplied Ni-MH battery making sure that it is correctly
oriented and switch on the MP3.(You can remove the battery of
MP3 by patting on the soft surface).
3. Close the lid of the battery compartment.
Note: When use MP3 and Radio combined, MP3 is powered
from the radio, but also needs the internal battery
remaining installed.
Notes on Using Batteries
Never charge the dry batteries. They get hot, cause to burn or even explode.
Don't use the new and old batteries or different kind of batteries
together.
To prevent leakage, take out the batteries if you don't use the unit for a
long time.
Don't plug in the adaptor while using the batteries as a powersupply.
Never put the chargeable batteries and coins or other metal together,
as a shortcircuit could occur causing heat, fire or explosion.
3
1. Plug the supplied adaptor into an AC outlet.
2. Plug the other port of the adaptor into the DC Jack
DC Jack
of the unit.
When using the external adaptor, it is normal that the adaptor
gets warm.
When using the external adaptor, the batteries will be switched
off automatically.
Plug out the adaptor when not using.
If you use the external adaptor for a long time, please remove
the batteries from the radio to prevent leakage.
Only use the supplied adaptor otherwise damages may occur.
4
CONNECTING MP3 TO THE RADIO
Combined Using Radio:
1. Please pay attention to the display while operating.
2. Connect MP3 to the radio correctly, make sure that the MP3 is
inserted completely.
3. Insert batteries into radio and MP3 as well.
CONNECTING MP3 TO THE RADIO
Key Lock
1. Lock: Press <
> long and the lock icon
appears on the
small display.
2. Unlock: Press <
> long, the lock icon disappears.
Note: All buttons are inaccessible until you remove the key lock.
Setting the Clock
In power off status, press
mode. When small display
and set the time.
shortly to enter the setting
appears, press the button again
Menu Function
Enter the main menu in radio operating mode by pressing
for a short time to pop up the radio main menu:
Press <
Press <
Press <
Power On/Power Off/Change Working Mode
1. Power On: Press <
> shortly to turn on the unit and enter
the radio mode.
2. Power Off: Press <
> shortly to turn off the radio.
3. Close the main display: Press <
> long to close/open the
main display in the radio mode. When closing, that's to say, you
are using the radio independently.
4. Switch work mode: In radio working mode, press <
>
shortly to go into MP3 working mode. In MP3 working mode,
press <
> shortly to go into radio operating mode.
MP3
RADIO
MP3
RADIO
MP3
RADIO
MP3
MP3
Note:
Please don't plug or plug out the MP3 when the radio is on.
1. VOL+: Press <
2. VOL-: Press <
3. Mute: Press <
5
> shortly.
> shortly.
> shortly.
Search Stations
Memory
There are one hundred memories, each one can save four
frequencies.
RADIO
RADIO
VOL+/-
> or <
> shortly to select menu.
> shortly to enter the next menu.
> shortly to exit.
1. Select search mode: After entering the radio's main menu,
select Search , press <
> shortly to enter.
2. Select Memory , press <
> shortly to confirm.
Pre ss <
> or <
> shortly to select
a memory.
Pre ss <
> or <
> s hortly to
change between stored frequencies
within one memory.
6
CONNECTING MP3 TO THE RADIO
Store
Step
Step: You can search for broadcast stations in the different bands.
1. Select searching mode: After entering the main menu select
Search . Press <
> shortly to enter the selecting mode.
2. Select Step , press <
> shortly to confirm.
Press <
> or <
> shortly to search
a receivable broadcast station manually.
Press <
> or <
> shortly to search
the station automatically(will stop searching when reaching the
strong signal).
Press <
> shortly to FM band.
Press <
> shortly to switch to LW , MW band; press <
>
shortly to SW band; press shortly repeatly to convert among the
common meter bands.
3. Enter LW: In MW band, first input LW frequency (only 50~
510KHz), then use the Tuning Knob (or press <
> or
<
> shortly) to search.
Station
Browse
Browse: Look over the receivable broadcast stations without any
affect on the current working.
1. Enter the radio main menu,then select Station , press
<
> shortly to go into the next menu.
2. Select
Browse
Browse
7
CONNECTING MP3 TO THE RADIO
, press <
> shortly to confirm.
Press <
> or <
> shortly to browse
the station;
Press <
> or <
> shortly to browse
stored frequencies within one memory.
Press <
> shortly to exit from the menu.
Store: You can store the found broadcast stations and recall them
in the memory.
1. Search for a broadcast station.
2. Enter the radio main menu, select a station and press<
>
shortly to enter the next menu.
3. Select Store and press <
> shortly to enter the selecting
mode.
Press <
> or <
> shortly to choose
a memory name;
Press <
> or <
> shortly to choose
a memory and the new frequency will
replace the old frequency.
4. Press <
and exit.
Delete
> shortly to store, press <
> shortly to unstore
Delete: You can delete a stored frequency if you don't want to
listen to the broadcast station anymore.
1. Enter the radio's main menu to select Station , press <
>
short to enter the next menu.
2. Select Delete and press <
> shortly to enter the selecting
mode.
3. Press <
Press <
> or <
> shortly to select
the memory name;
Press <
> or <
> shortly to search
for the broadcast station you want to delete.
> shortly to confirm the deleting.
Note: To delete or change a memories name, please refer to the
procedure of changing the FREQ.TXT file.
8
CONNECTING MP3 TO THE RADIO
Import
Setting
Import: Connect to a PC, the unit is able to import a FREQ.TXT
file.
1. Edit the FREQ.TXT file which you want to import into the radio.
2. Connect your unit to the PC.
3. Enter the radio main menu Station , press <
> shortly to
enter the next menu.
4. Select Import , press <
to confirm.
> shortly
Recorder
Recorder: You can record from a radio program with your
MP3-Player.
1. Enter the radio's main menu, select Recorder and press
<
> shortly to select a kbps rate (a quality level).
Press <
> or <
> shortly to select kbps;
2. The higher the number of kbps you choose, the better but the
shorter the recording gets.
3. Press <
> shortly to start the recording, press <
> shortly
to exit from recording.
Notes
Please make sure that the batteries have enough power before
you start to record.
You can find your recording in the MP3 file management.
While recording, the quality of the receiving the broadcast will
get a little worse.
Suggest that each recording might not be longer than one hour.
9
CONNECTING MP3 TO THE RADIO
LCD
LCD: You are able to change the parameter of the LCD screen.
1. Enter the radio main menu, select Setting and press <
>
shortly to enter the setting mode.
2. Select LCD and press <
> shortly. You can adjust the
backlight time, the contrast and the screen saver.
Press <
menu.
> shortly to enter the next
Backlight time: You can select the period of the lightening.
Contrast: You can adjust the contrast.
LCD screen saver: You can open or close this function.
3. Press <
> shortly to confirm.
Auto Off
Auto Off: You can choose the auto off time. When reaching the
auto off time, the radio will turn off automatically.
1. Enter the radio main menu, select Setting and press <
>
shortly to enter the setting mode.
2. Select Auto Off and press <
> shortly to enter selecting
mode.
Press <
> or <
> shortly to select.
3. Press <
> shortly to confirm.
Note: After setting the auto off time, the count down icon
on the main display.
appears
10
CONNECTING MP3 TO THE RADIO
CONNECTING MP3 TO THE RADIO
Time
Time: You can adjust for clock, or set the alarm to turn on/off, etc.
Clock
1. Enter the radio main menu, select Setting and press
<
> shortly to enter setting mode.
2. Select Time , press <
> shortly to enter the selecting mode,
select Clock .
Press <
Press <
> or <
> shortly to select.
> shortly to enter the next menu.
3. Press <
> shortly to enter the time setting mode. For direct
entry press <
> shortly.
Note: You can not adjust Y/M/D in this menu. Please look in
FREQ.TXT for further explanation.
Alarm 1
1. Enter the radio's main menu to select Setting , press <
shortly to enter the setting mode.
2. Select Time , press <
> shortly to enter the selecting
mode, select Alarm 1 .
>
Turn On Frequency: Firstly press the band button to select the band
you desired, then press <0-9> button to input the frequecncy directly.
If you want to acquiesce the previous default, press <
> shortly
to enter the next setting option (Open/Close).
Open/Close: Press <
> shortly, show
is open and
is close. Press <
> shortly to enter the next setting option (Exit).
Exit: Setting reveal this
place, press <
> shortly to exit;
press <
> shortly to continue and enter the next setting option
(Set Turn On Status).
Select Turn On Status
turn on and enter the radio mode;
turn on and enter the radio mode, at the same time the radio
records;
turn on and the built-in MIC records;
turn on and
play the music. Press <
> shortly to change the selection, the
next setting option is Turn On Volume.
Turn On Volume: Press <
> and <
> shortly to adjust, the
highest is 40 levels. After setting it, press <
> shortly to enter
the last setting option (Auto Off).
Auto Off: Press <0-9> button to input the time (two numbers) and then
exit the setting automatically. If you want to acquiesce the previous
default, press <
> shortly to exit.
4. If the settings are successful, the small display shows
18:00 107.10M
Press <
> or <
change the selection.
> shortly to
16
1
Exit
3. Press <
> shortly to enter
Alarm 1
18:00
05 107.10M
1
.
Turn On Status
Turn On Tiime
Turn On Frequency
16
Turn On Volume
Open/Close
05
Auto Off
setting;
Turn On Time: Press <0-9> button shortly to input the time directly,
if you want to acquiesce the previous default, press <
>
shortly to enter the next setting option (set the Turn On Frequency).
11
12
CONNECTING MP3 TO THE RADIO
CONNECTING MP3 TO THE RADIO
Tuning into a station
Note
You can make the radio signal stronger by extending the
anternna, changing the direction of the antenna or the position
of the unit. The reception also improves if an external soft
antenna connects to the unit.
Next setting for 'Alarm 2' & 'Alarm 3', please follow the step of
''Alarm 1' instruction as for reference.
Please be reminded that if the 'Time' setting for 'Record', the
'Momory' size will be filled shortly, because the unit will turn on
every time for 'Record' automatically for the time being set, suggest
not to use the 'Record' frequently or to use it when necessary.
Direct frequency entry
Finding a broadcast station directly with the frequency.
Charge(Radio Charge)
1. Press <
> shortly to delete frequency from the display and
continue searching.
2. Press <band button> to select a band. Example: For FM you
have to press <
> shortly.
3. Press <0~9> button shortly to input the frequency.
Example: Input <1> <0> <7> <1> to get the frequency
FM107.1 MHz.
4. Press <
> to confirm.
Before charging, connect the AC adaptor correctly and insert the
rechargeable batteries.
Method One:
With the radio turned off, press <
charge.
> shortly to enter radio
Method Two:
1. Enter the radio main menu, select Setting and press <
shortly.
2. Select Charge and press <
> shortly.
Press <
3. Select
4. Press <
Radio
> or <
Note: To correct a number which you enter, press <
>
Knob Searching
> shortly to select;
(if you want to charge the MP3, please select
> shortly.
MP3
> shortly to start charging, the power indicator
appears on the display.
).
Normal tuning using the tuning knob
Using the tuning dial you can tune your radio to any station. You
can set the tuning to coarse or fine steps, by pressing then button
located above the tuning dial. Each time the button is pressed it
switches from fine to coarse to off. Off disables the tuning dial
such preventing the current frequency to be changed
unintendedly.
Note
The recommended full charging time for AA batteries is ten
hours around.(for radio)
13
14
CONNECTING MP3 TO THE RADIO
Browse station fast
1. Press <
Edit FREQ.TXT File
> shortly to enter the browse interface.
2. Press <
> or <
> shortly to browse the station name.
3. Press <
> or <
> shortly to browse between each
frequency of the same station name.
4. Press <
> shortly to exit, press <
> shortly to select the
frequency.
Open the FREQ.TXT file which is in the CD. Please refer to the
notes in the FREQ.TXT before editing. When it is saved please
do not change the file name.
Connect the MP3 to PC and then copy the FREQ.TXT file
into MP3 folder.
With source of amplifier
You can play audio of external voice sourcing equipment
(e.g. MP3, CD, etc.) via the unit.
Store station fast
1. Search for a broadcast station.
2. Press <
> shortly to enter the frequency storing mode.
Press <
> or <
> shortly to select a station name or
press number buttons shortly to get the number of station
name.
Press <
> or <
> shortly to select one stored position
for frequency, this frequency will be covered by the new
frequency automatically.
3. Press <
and exit.
CONNECTING MP3 TO THE RADIO
> shortly to store, press <
1. Turn on the external voice sourcing equipment and the unit
seperately.
2. Connect the Line-out Jack of external voice sourcing
equipment to the Line-in Jack of the unit by using the
supplied Line-in Cable.
Note: It works only in the radio mode.
> shortly to unstore
Delete station fast
1. Press <
> shortly to enter the delete.
Press <
> or <
> shortly to select a station name.
Press <
> or <
> shortly to select the frequency you
want to delete.
2. Press <
15
> or <
> shortly to delete.
16
USE RADIO INDEPENDENTLY
USE RADIO INDEPENDENTLY
Use radio independently:
1. When using, please note the small display indication.
2. Remove the MP3 player from the radio and insert the batteries in
the radio accurately.
Charge
In turn on state, press <
> shortly to enter radio charging, press
<
> long to enter MP3 charging, when the batteries have stopped
charging, press <
> shortly to exit charging. If you set two kinds
of charging, when turning on the unit, MP3 charging will stop.
Turn On/Turn Off
Turn On: Press <
to turn off.
MP3
RADIO
> shortly to turn on; Press <
MP3
RADIO
> shortly
Search Station
1. Press <
> shortly to switch between the different searching
modes (according to band, station name).
2. According to band, press <
> or <
> shortly to search station.
Press <
> shortly to FM band;
Press <
> shortly to MW band;
Press <
> shortly to SW band.
3. According to station name, press <
> or <
> shortly to select
a frequency to store.
Press <
> shortly to watch frequency opposite station number.
Store Frequency
Select frequency, press <
digits).
> shortly, then input a number (two
Delete Frequency
Select station number, press<
> shortly to display the current
station number. Press the same button again to delete stored
frequencies.
Note: When only use in radio, the station name will be used on the first
received frequency.
17
Setting Time Turn On/Off (When in power off)
While setting please note the information on the small display.
1. Press <
SET .
2. Press <
symbol
> shortly to enter setting mode, the small display shows
> shortly to enter timer one setting, 1then the timer
flashes.
Press the particular number buttons to set the timer.
Press <
> shortly to enter the setting mode. At first you have to
choose the broadcast station, secondly you have to set the volume
and finally you can decide on the moment the unit shall turn on.
1
3. When
appears in the1 small display the timer is set.
4. If you press <
> shortly the symbol 1 flashes. To close Alarm 1
press <
> shortly.
Note:
To program further times operate the same way as described before.
'Alarm 2' for <
>, and 'Alarm 3' for <
> the above setting is
only turn 'On' for the radio.
Setting Auto Off
After turn on, you can set auto off time.
1. Press <
2. Press <
> long so the small display shows the time.
> shortly and show the current auto off time.
Press the particular number buttons to fix the period of time the
radio should be on.
If no other operation is set the radio turns off after 60 minutes.
No 'Time off' function if press <
> shortly.
Compare: When using the radio separately the operations are the
same as in combined use.
18
LISTENING TO THE RADIO
LISTENING TO THE RADIO
Narrow/Wide Band
FM Mono /Stereo
When listening to a FM broadcasting station you can switch
between mono and stereo by pressing FM: Mono/Stereo .
In both modes the main display shows
and in stereo mode
there also appears ST in the small display.
Normally "Stereo" is selected, if a strong signal without noise is
received.
"Mono" is selected, if too much noise is heard in setting "stereo".
Note: The unit has news/music selecting, with the mono/stereo in
the same place. Mono(News), Stereo(Music).
Press AM: W/N button repeatedly to select wide band or narrow
band when listening MM, SW or LW broadcasting.
In AM band, press W/Nbutton short to switch between
Wide and Narrow .
Wide band has a better tone reception than narrow band, but it
is noiser than narrow band reception.
SSB/CW
Local-Nor-DX Selectivity
By selecting LO-NOR.-DX the unit can be tuned perfectly to the
particular listening.
Nor: For normal use.
Local: You should change to LO if you want to listen to a
local broadcast station or if there is a strong interference
while listening.
DX: If you want to listen to a broadcast station with a very weak
signal, please change to DX.
LO-NOR.-DX
Antenna Attentuator
19
DX
NOR
LO
FM
0dB
-15dB
-30dB
SW
0dB
-3dB
-25dB
LW/MW
0dB
0dB
0dB
1. After turning on the radio,select Step searching mode,and
press <
> shortly to enter SW band.
2. Press <SSB Button> shortly until the main display shows
and enter SSB working mode.
3. Turn <Knob> to tune to one frequency of approximate SSB.
4. Turn <SSBFINE Knob> slowly to have the best reception.
20
MP3 OPERATION
MP3 OPERATION
If you want to use MP3 and radio combined:
1. Please pay attention to the display while operating.
2. Connect the MP3-Player and the radio correctly.
3. Insert the batteries correctly in the radio.
4. Insert the batteries correctly in the MP3-Player. (You have to
charge the batteries before using.)
5. Connet your unit to the PC and import your song files.
Charge(MP3 Charge)
Connect the external power adaptor to the unit, turn off the unit,
press <
> long to charge the MP3-Player, press <
>
shortly to exit from charging.
Note:
Make sure that you have inserted the batteries correctly. The
batteries should be totally charged within about 4.5 hours.(for MP3)
Play Music
Select File
Press <
> or <
Play/Pause
Press <
> shortly.
Stop Play
Press <
> shortly.
Select Memu
Press <
> shortly.
> shortly.
Select EQ
Press <
> shortly to select EQ. There appear further
information on the main display.
A-B Repeat
Turn On/Off/Switch Working Mode
1. Turn On: Press <
> shortly to turn on,then enter the MP3
working mode.
2. Turn Off: In MP3 mode press <
> shortly to turn off.
3. Switch working mode: In the radio working mode press <
>
shortly to enter the MP3 working mode; In the MP3 working
mode press <
> shortly to enter the radio working mode.
MP3
RADIO
MP3
RADIO
MP3
MP3
1. Set start A: Press <
> shortly, the display shows A.
2. Set end B: To fix B press <
> shortly again. The display
shows A-B .
3. Press <
> shortly to cancel the repetition.
RADIO
RADIO
Adjust Volume
1. Volume Up: Press <
> shortly.
2. Volume Down: Press <
> shortly.
3. Mute: Press <
> shortly.
Note: The volume process bar and the volume level are shown
on the main display.
21
22
MP3 OPERATION
MP3 OPERATION
Enter MP3 Main Menu
In MP3 working mode, press <
main menu;
File Management
MP3 Play
Speech Play
Record
MP3 Record
Setting
Version
EXIT
Press <
the menu.
Press <
menu.
Speech Play
> shortly to pop up the MP3
> or <
> shortly to select
> shortly to enter the next
File Management
1. Browse files: Press <
> or <
> shortly.
2. Enter Sub Folder: Press <
> shortly.
3. Exit from Sub Folder: Press <
> shortly.
4. Play: Press <
> shortly.
MP3 Play
MP3 file list, you can select MP3/WMA format file.
1. Browse files: Press <
> or <
> shortly.
> shortly, press it shortly again to pause.
2. Play: Press <
3. Stop play: Press <
> shortly.
In the speech file list you can select your speech (record) files
(32 kbps WAV format files).
1. Browse files: Press <
> or <
> shortly.
2. Play: Press <
> shortly, press it shortly again to pause.
3. Stop play: Press <
> shortly.
Record(MIC Record)
1. After selecting the record file menu press <
start your recording (WAV format files).
2. Press <
> shortly to
> shortly to stop your recording.
Note:
Please cancel the auto off function if you want to avoid a sudden
stop of your recording. Make sure that the batteries have enough
power before recording. Your record files are stored in the speech
play list.
MP3 Record(Line record)
You can also record external voice sources in MP3-quality with
the help of the supplied line-in-cable.
1. Connect the line-in-cable to your unit and the external voice
source.
2. Select MP3 Record in the menu and press <
> shortly to
enter record baud rate.
3. Select baud rate and press <
> shortly to start the recording.
4. Press <
> shortly to stop your recording.
Note:
Your recording files are automatically stored in the MP3 Play list.
23
24
MP3 OPERATION
MP3 OPERATION
LED
Setting
The setting of LED in MP3 is similar to the setting in radio mode.
EQ Effect
Choose one of the umpteen EQ modes in the unit and pay
attention to further information on the main display afterwards.
1. After entering the MP3 main menu, press <
> shortly to
enter the setting mode.
2. To select and EQ effect press <
> shortly.
3. Press <
> or <
> shortly to select the EQ which you
want to select.
4. Press <
> shortly to confirm.
Note:
There are four different EQ modes: Normal, Classic, Jazz, DBB.
You can press <
> shortly directly to select.
Auto Off
The setting of automatically off in MP3 is similar to the setting in
radio mode.
Delete Archives
There are two delete modes:
(1). To delete a single file choose delete archives .
(2). To delete all files choose format .
Caution: After confirming the delete the file(s) can not be restored.
1. After entering the MP3 main menu press <
enter the setting mode.
2. Select
Delete Archives , press <
> shortly to
> shortly to enter selecting:
Delete Archives
Replay
Choose one of the umpteen play modes and pay attention to
further information on the main display afterwards.
1. After enter the MP3 main menu, select Setting
<
> shortly to enter the setting mode.
2. Press <
> shortly to select Replay .
3. Press <
> or <
> shortly to select.
4. Press <
> shortly to confirm.
Note:
25
, press
You can choose between four different modes:
Normal Play
Repeat All
Repeat One Play
Random
Press <
> or <
> shortly to select Delete Archives .
Press <
> shortly to enter the selectting mode to delete a
file. On the main display ERASE? appears and you can
select the file you want to delete.
Press <
> shortly to confirm the file deletion.To exit press
<
> shortly.
Format
Press <
> or <
> shortly to select Format .
Press <
> shortly to enter confirming mode. To confirm
the deletion select Yes , to exit the format deletion
select No .
Press <
> shortly to confirm.
Note: If an error message appears in the display, connect the unit
to a pc in order to format it.
26
USE MP3 INDEPENDENTLY
USE MP3 INDEPENDENTLY
To use the MP3 player separately actuate the Shortcut button
and edge up the MP3 player ball. Then take down the MP3
player, insert the batteries and plug in the earphones.
Menu Function
Press <
> shortly to enter menu.
Note
You can record MP3 when you use MP3 separately.
Turn On/Off
1. Turn On: Press (above 2 seconds ) <
> shortly to turn on.
2. Turn Off: Press <
> until BYE BYE appears on the LCD.
3. If you don't operate to MP3 for 5 minutes, the MP3 will turn off.
Play/Pause/Stop
1. Play: Press <
> shortly to start playing music.
2. Pause: When playing, press <
> shortly to pause. Press
the button again to continue playing.
3. Stop: Press <
> shortly to stop playing.
A-B Repeat
1. Setting srart A: Press < > shortly, Aappears on the
small display.
2. Setting end B: After setting start A, press <
> shortly when
you want to end repeating. A-B appears on the display.
3. Press <
> shortly to cancel the repetition.
Recording
Outright Recording: Press (above 2 seconds) <
> long to
start recording (MIC Record).
Selected Song/FF, RW
1. Selected Song: Press <
2. FF, RW: Press <
> or <
> or <
> shortly.
Note:
You can only record MP3 in combination with the radio. Consult
page 24 to get to know how to record.
> down.
Volume Control
1. Volume Up: Press <
2. Volume: Press <
27
>.
>.
28
CONNECT TO PC AND DATA TRANSFER
If you are using an operating system below Windows 98SE,
please install the need driver. After installing connect your unit
to the PC and open the 98 driver/af98drv5lng_04.exe from the
supplied CD to complete your installation.
1. Please use the supplied USB cable to connect the PC and the
MP3-Player.
2. Windows checks the new hardware automatically when you
connect the unit to your PC the first time.
3. After the connecting is successful, a removeable disk will
appears in My Computer . The sign of the disk will be
different because of different disk partition. You can copy, paste,
delete, etc. in the removeable disk as in a disk of the computer.
FIRMWARE UPDATING
1. After connecting put on the CD DE1121MP3RadioVxx.exe file
to start updating.
Note: Please do not disconnect the USB cable while updating.
Upgrade
2. When the update is finished click confirm. The unit will be
disconnected automatically.
4. Before you disconnect the USB-cable, you have to click
Unpull or Eject Hardware and wait until the safety indicator
appears.
29
If you cannot connect the unit to the PC proceed like this to update:
1. Take off the MP3-Player from the radio and take out the
DF6-Battery.
2. Press <
> and other any one button down, and at the same
time connect the unit to PC.
3. After wait about 3 seconds and let the key go.
4. Now you can continue with the steps described above.
5. Disconnect to PC, after connecting over again, use the
PC FAT32 format to MP3.
30
LYRIC DISPLAY
1. Run the Winamp.exe file (Music play software, support MP3,
WAV etc. Multi-audio format) in CD directory, follow the clews
of appearance complete installation.
2. Run Lyrie.exe file (Lyric convert tool) in the CD directory, you
need to install it to under the Winamp root directory.
3. After the installation completed, open Winamp player software
and run: file/Lyrie to open lyric convert tool.
4. Click the toolbox which is at the bottom of the convert tool
interface, select Edit Lyric , then you can input the lyrics.
LYRIC DISPLAY
The player only support above format time labels
[00:05] Love
[00:08] Singer: Andy
If one lyric show [00:05.10] Love, you must to edited it to
[00:05] Love
6. Save the lyric file(After the lyrics will incorporate to *.MP3 file).
5. Click toolbox, select Import From/.LRC or .TXT, open lyric file
of .LRC or .TXT format (need to with time label), then the lyric
convert tool interface will show the opened lyric, user can edit
lyric file for yourself.
31
32
SPECIFICATIONS OF RADIO
1. Frenquency Range
FM
70.00 - 108.00 MHz
LW-MW
50 - 1719 KHz
49m
41m
31m
25m
22m
19m
5.800 - 6.400 MHz
6.900 - 7.500 MHz
9.300 - 9.900 MHz
11.500 - 12.100 MHz
13.300 - 13.900 MHz
15.100 - 15.700 MHz
16m
13m
11m
17.400 - 18.000 MHz
21.400 - 22.000 MHz
25.500 - 26.100 MHz
2. Preset Frequencies/Stations: 400 Frequencies; 100 Stations
3. Noise Limit Sensitivity
FM
5 V
MW
1mv/m
SW
20 V
4. SW Selectivity
Wide Band excelled 20dB
5. AM Second IF BW
Wide Band Less Than 9KHz
500mV
7. Power Supply
Built-in Battery
External Power Supply
AA*3
6V 300mA
8. Built-in Loudhailer
9. External Earphone
D77mm
D3.5mm
33
About
About
FLASH Memory
256M/512M
Max Record Time
Approx. 16H/32H
Music Format
MP3/WMA
Record Format
MP3/WAV
Microphone
Capacitive Microphone
Battery Consumption
DF6 Approx. 3H
Earphone Output
>3mW*2
Communication Standard
USB2.0
MP3/WMA Access Rate
32Kbps - 320Kbps
Battery
DF6*1
Weight
Approx. 36g(excl. Battery)
Dimensions
58*36*15mm
Narrow Band excelled 80dB
Narrow Band Less Than 4KHz
6. Most Line Import
10. Dimensions
11. Weight
SPECIFICATIONS OF MP3
163 * 32 * 103mm
300g(excl.Battery)
34