1
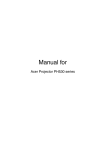
Introduction Product Features This product is an XGA single chip 0.7” DLPTM projector. Outstanding features include: uTrue XGA, 1024 x 768 addressable pixels u Single chip DLPTM technology u NTSC3.58/NTSC4.43/PAL/SECAM and HDTV compatible (480i/p, 576i/p, 720p, 1080i) u Dual resolution support: High-tech HDMI and DVI connection for digital signal -15:9 (1280 x 768) with HDCP function and supports 480p, 576p, 720p and 1080i formats -16:9 (1280 x 720 ) u User friendly and powerful Acer Empowering key including: Acer eView Management, Acer eTimer Management and Acer eOpening Management. u Full function remote control with laser pointer u Advanced digital keystone correction and high quality full screen image re-scaling u User friendly control panel u SXGA, XGA compression and VGA, SVGA re-sizing u Support HDMI input with HDMI 1.0 compliant u Supports High bandwidth Digital Content Protection – HDCP 1.1 on HDMI input uMac compatible ... English Introduction Connection Ports 1 2 4 3 5 6 poor image and font quality 17 For PD726W only 10 16 15 14 13 7 8 9 11 12 1. 2. 3. 4. 5. 6. 7. 8. 9. 10. USBConnector HDMIConnector DVIInputConnector VGAInputConnector(PCAnalogSignal) ComponentVideoInputConnector S-VideoInputConnector RS232Connector KensingtonTMLockPort PowerSocket VGAOutputConnector(MonitorLoop-throughOutputConnector) 11. AudioInputConnector 12. CompositeVideoInputConnectort Below items are for PD726W only: 13. Lan(RJ45Portfor10/100MEthernet) 14. AudioOutputConnector 15. ResetButton 16. StatusIndicator 17. Antenna 9 ... English Installation Connecting the Projector For Wireless function poor image and font quality 4 3 2 1 Internet 1......................................................................................................................PowerCord 2......................................................................................................................... LanCable 3...................................................................................................AudioCableJack/Jack 4............................................................................................................................ Antenna (for PD726W only, need to attach the antenna by user) English ... User Controls Color 4 Press “Color” to adjust the color temperature of image. Contrast 4 Press “Contrast” to control the difference between the lightestand darkest parts of the picture. VGA 4 Press “VGA” to change source to VGA-In connector. This con- nector supports Analog RGB, YPbPr (480p/576p/720p/ 1080i), YCbCr (480i/576i) and RGBsync. Component 4 Press “Component” to change source to component connec tor. This connector supports YPbPr (480p/576p/720p/1080i) and YCbCr (480i/576i) Video 4 Press “Video” to change source to Composite Video source. S-Video 4 Press “S-Video” to change source to S-Video source. DVI 4 Press “DVI” to change source to DVI connector. This connector supports Digital RGB, Analog RGB, YPbPr (480p/576p/720p/ 1080i), YCbCr (480i/576i) and HDCP signal. HDMI 4Press “HDMI” to change source to HDMI. This connector can support to carry all standard and high-definition consumer electronics video formats. English ... 20 User Controls Image (Computer / Video Mode) H. Keystone (Horizontal Keystone) Press the or button to adjust image distortion horizontally and makes a squarer image. V. Keystone (Vertical Keystone) to adjust image distortion vertically Press the or button Auto : Keep the image with original and makes a squarer image. width-higth ratio and maximize the image to fit native horizontal or vertical Aspect Ratio pixels. Use this function to choose your desired aspect ratio. Full : Resize image to fit full screen. 16:9 : The input source will be scaled to fit the width of the screen and narrowed the height to make the displayed image becomes 16:9 ratio. 4:3 : The input source will be scaled to fit the projection screen and becomes 4:3 ratio. 1:1 : Keep image at the center of screen with its original pixel resolution without scaling. Projection Front-Desktop 4 The factory default setting. English ... 24 4 Front-Ceiling When you select this function, the projector turns the image upside down for ceiling-mounted projection. 4 Rear-Desktop When you select this function, the projector reverses the image so you can project behind a translucent screen. 4 Rear-Ceiling When you select this function, the projector reverses and turns the image upside down at same time. You can project from behind a translucent screen with ceiling mounted projection. User Controls Image (Computer / Video Mode) “H. Position”, “V. Position”, “Frequency” and “ Tracking” functions are not supported under DVI and Video mode. H. Position (Horizontal Position) Press the to move the image left. Press the to move the image right. V. Position (Vertical Position) Press the to move the image down. Press the to move the image up. Frequency “Frequency”changes the display data frequency to match the frequency of your computer’s graphic card. If you experience a vertical flickering bar, use this function to make an adjustment. Tracking “Tracking” synchronizes the signal timing of the display with the graphic card. If you experience an unstable or flickering image, use this function to correct it. “Sharpness” functions Sharpness is not supported under Adjusts the sharpness of the image. DVI and Computer Press the to decrease the sharpness. mode. “Signal Type” is only available for Component, HDMI and SCART signal sources. Press the to increase the sharpness. Signal Type Press the or button to change source to RGB, YPbPr or YCbCr. 25 ... English User Controls Management (Computer / Video Mode) Lamp Reminding Choose this function to show or to hide warning message when the changing lamp message is displayed. The message will show up 30 hours before end of life. Security Press to start “Security” setting. If the “Security” function is enabled, your must enter “Administrator Password” first before Security setting. Security This projector provides an excellent security function for the administrator to manage the usage of the projector. Select “On” to enable the security function. User have to enter password depending on the " Security Mode" . Please refer to "User Password" section for details. can switch on the projector Select “Off” then user request. without password. English ... 28 Once the security function is enabled, the projector will request user to enter password when switch on the projector or enter security setting. Both “User Password” and “Administrator Password” can be accepted for this dialogue. User Controls Management (Computer / Video Mode) The projector provide two options of "Security Mode". Select “Request password only after plugging power cord”, the project will request user to input password only for the first time plugging on power cord of the projector. Select “Always request password while projector turns on”, user have to input password every time when switching on the projector. Administrator Password “Administrator Password” can be accepted by both “Enter Administrator Password” and “Enter Password” dialogues. Press to change “Administrator Password”. Projector will request “Administrator Password” before changing password. Should be "Set Administrator Password" dialogue. English ... 30 The factory default of “Administrator Password” is “1234”. User Controls Management (Computer / Video Mode) If user or administrator forgot “User Password” or even “Administrator Password”, do the following to retrieve the “Administrator Password”: 1.Press “MENU” for more than 4 seconds when any of “Enter Password” or “Enter Administrator Password” dialogue is currently displayed. Reset 2.Write down the “Unlock ID” and contact with Acer service center. They will give you new Administrator Password according to the Unlock ID. 3.Once the new “Administrator Password” retrieved from Acer has been logged into the projector, old “Administrator Password” will be replaced by the new password. Press the button after choosing “Yes” to return the display parameters on all menus to the factory default settings. 31 ... English Wireless projection Introduction This section will introduce wireless projection function for this projector. The wireless projection function is only available for the model which is equipped with integrated Acer Wireless Presentation Gateway (WPG) module. Acer WPG enables multiple users to connect to an Acer projector wirelessly. This eliminates the need to plug and unplug cables, enabling more efficient use of meeting time, especially when there is more than one presenter in a meeting. To perform wireless projection, you have to change the input source type to "Wireless" by pressing the "Wireless" button on the remote control or the "Source" button on the control panel or remote control. System Requirements: - Operating system: Windows® 2000 or Windows® XP - CPU: Intel® Pentium® III at 750 MHz or equivalent with 128 MB of RAM - Wireless LAN: IEEE 802.11b/g enabled - Internet Browser: Internet Explorer 5.0 or above I/O Interface: Improve graphic and text quality 1 2 3 4 5 No. Item Description 1 2 Antenna connector Status LED 3 Reset button 4 Audio-out jack 5 RJ-45 Ethernet jack For attaching the external antenna. Indicates the WPG’s status. A quick press on the the Reset button will reset the WPG without changing any user's settings. Press and hold Reset button for more than 4 seconds to reset the WPG to its factory default settings. For outputting audio signals received wirelessly from the PC. For connecting the WPG to the Internet via a LAN. 35 ... English Appendices Specifications The specs specified below are subject to change without notice. Regarding the final specs, please refer to Acer accounced marketing specs. Light Valve Lamp Number of Pixels Displayable Color Contrast Ratio Uniformity Noise Level Projection Lens - - 1024 - - 2500 - - - - 24.6 Projection Screen Size (Diag.) - Projection Distance - Video Compatibility - H. Frequency V. Frequency Power Supply I/O Connectors - - - - - - - - - - - - - - - Weight Dimensions (W x H x D) Environmental - - - - Safety Regulation - Single Chip DLPTM Technology by Texas Instruments 300W User Replaceable Lamp 1280 pixels(H) X 768 lines(V) 16.7M colors 2300:1 (Full On/Full Off) 90% 30dB(A)(standard mode / 28dB(A)(ECO mode) F/2.4~2.6 f=28.0~33.6mm with 1.2X Manual zoom lens 36 to 300 inches Diagonal 3.94 to 40.03 feet (1.2 to 12.2 meters) NTSC 3.58/NTSC 4.43/PAL/SECAM and HDTV compatible Composite video & S-Video capability 31.5kHz~100kHz horizontal scan 56Hz~85Hz vertical refresh Universal AC input 100-240V ; Input Frequency 50/60Hz Power: AC power input socket One DVI connector One 15-pin D-sub for VGA, component and HDTV signal One HDMI input for Digital Video input RS232: For projector remote control VGA Output: One 15-pin D-sub Video Input: One Composite video RCA input One S-Video input One set (3 RCA) of component input USB:One USB connector Audio Input: One phone jack for audio input Audio Output: One phone jack for wireless audio output (forPD726W only) Lan Output: One Lan port (RJ45 connector for 10/100M Ethernet) (forPD726W only) 7.6 lbs (3.5kg) 13.9 x 11.10 x 4.68 inches (350 xo282 x 119 mm) o Operating Temperature: 41~95 F (5~ 35 C) Humidity: 80% maximum (Non-condensing) o o Storage Temperature: -4~140 F (-20~60 C) Humidity: 80% maximum (Non-condensing) FCC Class B, CE Class B, VCCI-II, UL, cUL, ETL-GS, C-tick, PSB, PSE, CB Report, CCC 51 ... English ETL, cETL Appendices 4. Do not place this product on an unstable cart, stand or table. If the product falls, it could be seriously damaged. 5. This product should be operated from the type of power indicated on the marking label. If you are not sure of the type of power available, consult your dealer or local power company. 6. Do not allow anything to rest on the power cord. Do not locate this product where people will walk on the cord. 7. Never push objects of any kind into this product through cabinet slots as they may touch dangerous voltage points or short-out parts that could result in a fire or electric shock. Never spill liquid of any kind onto or into the product. 8. Do not attempt to service this product yourself, as opening or removing covers may expose you to dangerous voltage points or other risks. Refer all servicing to qualified service personnel. 9. Unplug this product from the wall outlet and refer servicing to qualified service personnel under the following conditions: a. When the power cord or plug is damaged or frayed. b. If liquid has been spilled into the product. c. If the product has been exposed to rain or water. d. If the product does not operate normally when the operating instructions are followed. Adjust only those controls that are covered by the operating instructions, since improper adjustment of other controls may result in damage and will often require extensive work by a qualified technician to restore the product to normal condition. e. If the product has been dropped or the case has been damaged. If the product exhibits a distinct change in performance, indicating a needfor service. 10. To avoid hazard of unexpected electrical shock, use the AC adapter only when the wall socket is properly grounded. English ... 56 Add wireless section, copy from the last pages of PD5XX