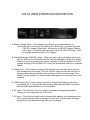
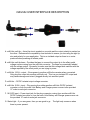
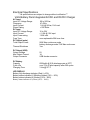
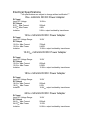
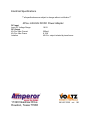
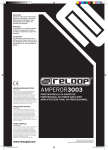
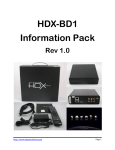
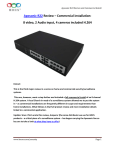
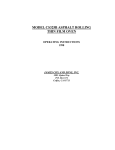
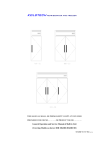
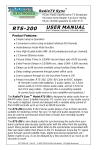
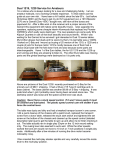
1
Thank you for purchasing the Voltz Pedal Power Pack. Please read the entire manual
prior to setting up and using this device. If there are any questions about this product
that you might have that are not covered in this manual, please feel free to call Amperor
Voltz Tech Support at 281-807-3320 ext 106 or email [email protected]
Features
•
•
•
•
•
•
•
•
Included Voltz battery pack has self-contained charging system that can be
charged by 115VAC or 230VAC (plug it into the wall in the states or abroad) or
10~32VDC (plug it into your car).
Easy to read gas gauge for battery pack allows you to easily read how much
power is left in the battery.
Included milliVoltz power adapter lets you power your 9VDC and 18VDC pedal
effects with simple plug and play integration.
Interchangeable tips allow you to power all of your pedals without the need to
buy extra input adapters.
Available milliVoltz and Voltz accessories allow you to power the more exotic
effect pedals with input voltage requirements of 12.0VDC, 15.0VDC, 18.0VDC,
24.0VDC and 40.0VDC.
Power as many effects pedals with one power supply because of the 90W power
output (that can power over 20 pedals twenty-four hours straight with a full
charge).
Completely silent design. No connection to regular 115VAC means no 60cycle
hum and all isolated outputs mean no cross talk or ground loops to deal with.
Protection circuitry makes it safe to use with any effect pedal.
Inspection
Make sure your package includes the following items:
•
•
•
•
•
•
•
•
•
Voltz integrated battery pack and charger.
3 each of the 9VDC milliVoltz power adapters with interchangeable tips.
1 each of the 18VDC milliVoltz power adapter with interchangeable tips.
12 inch Voltz to milliVoltz male-to-male tip cord.
AC power cable
Car Accessories power cable
Compatibility guide
Warranty Card
Manual
Safety Precautions
Please read the following WARNINGS carefully before operating the Voltz and milliVoltz
battery-powered system.
WARNINGS
•
Do not disassemble product (there is a risk of shock and also voids the warranty).
•
Do not use Voltz in temperatures below 32 F (0 C) or above 104 F (40 C)
because this will shorten the life of the battery.
Do not store Voltz in temperatures below –4 F (-20 C) or above 140 F (60 C)
because this will shorten the life of the battery.
Avoid exposing Voltz to water or wet conditions (if this occurs, unplug power and
all accessories immediately).
Do not expose Voltz to open flame or incinerate because battery may explode.
•
•
•
O
O
O
O
O
O
O
O
Getting Started
***Before initial use, fully charge the Voltz battery.
•
•
•
•
Plug Voltz unit into wall or car accessory voltage supply with provided AC cord or
DC car accessories adapter.
Turn CHARGE / DISCHARGE switch on Voltz to CHARGE position.
Allow charging for at least four hours or until FUEL GAUGE light has been
illuminated to GREEN for at least 30 minutes.
Make sure that none of the milliVoltz accessories are attached to Voltz for initial
charging.
Choosing the right milliVoltz to power your effects
•
•
•
•
90% of effect pedals are going to require a 9VDC power input. These pedals
include most of the BOSS, LINE6, Dunlop, DOD and Digitech units. Usually you
can tell if a pedal pedal runs off of 9VDC if it requires a 9V battery for normal
operation. It is also advised that you read through the owner’s manual of the
effect pedal itself. Also for a quick reference you can look in the compatibility
chart provided with your Voltz unit.
If the pedal is not equipped with a battery compartment then usually it requires an
input voltage larger the 9VDC. Look at the DC input located on the effect pedal,
the owner’s manual of the effect pedal, the power supply that came with the
effect, or the compatibility chart provided with your Voltz unit.
It is very important that you use the correct milliVoltz adapter for your effect
pedal. Damage to the pedal and/or milliVoltz may occur if the wrong setup is
used.
If you are unsure of which milliVoltz power adapter your individual effect pedal
requires, please call Amperor Voltz tech support at 281807-3320 ext 106 or email
at [email protected].
Choosing the right interchangeable tip for your effect.
•
•
•
•
There are only two things to consider while selecting an interchangeable tip for
you affects pedal. One is the actual physical size of the tip (barrel length and
barrel width). Polarity of the tip is the most important factor though while
choosing a tip for you affects pedal.
Please read the owners manual of the effect pedal or the enclosed Voltz
compatibility chart to determine proper tip size and polarity.
For the actual size of the tip, looks at the effect pedal DC input or the power
supply that came with the effect pedal and find the size of the included
interchangeable tip the matches up the closest. Insert the tip (make sure the tip
is not connected to any power source) and lightly wiggle the tip around to make
sure there is no excessive play in the connection.
Determine the polarity of the tip needed by checking your owner’s manual for the
effect pedal, the power supply that came with the effect, the Voltz compatibility
chart or by looking at the label on the DC input of the effects pedal you are trying
to power.
Important Operating Instructions
***Make sure the polarity marked on the milliVoltz tip matches that of you effect pedal***
***Make sure that the voltage marking on the milliVoltz tip matches the voltage
requirement of your effect pedal***
***Only use patch and guitar instrument cables that are grounded to avoid loss of
signal***
***Be sure that the Voltz unit is switched to CHARGE if equipment is not in use to avoid
the battery from being drained***
***When charging in AC or DC mode, make sure that the Voltz unit is switched to the
CHARGE position prior to plugging in***
***To play while charging, first turn switch to CHARGE position and then plug in AC or
DC power source***
***To play using only battery power, just flip the Voltz switch to DISCHARGE and you
will have hours of isolated power at you disposal… make sure you turn the Voltz unit
back to CHARGE after you are finished to avoid draining the battery***
***Make sure you periodically plug and unplug mechanical connections on your pedal
board and turn knobs such as volume and trim pots (monthly). This will keep
connections and knobs clean preventing failure during performance***
VOLTZ USER INTERFACE DESCRIPTION
A. Battery Charge Status – This indicator light will give you precise status as to
how much juice is left in your Voltz battery unit. Green light – you have full power
(100-85% charge) Yellow light – still good to go (85-20% charge) Flashing
yellow light – It’s getting near the end my friend (20-10%) Red Light – Time
to recharge before you rock (<10% charge)
B. Charge/Discharge (ON/OFF) switch – When you want to play with battery power, just
turn the switch to the ON position and the unit will discharge to power your effects.
When you are done jamming and need to recharge, just flip the switch to the OFF
position and plug it into the wall or DC outlet (car accessories outlet a.k.a. cigarette
lighter).
C. Output Jack – This is where you plug in the milliVoltz units into the Voltz to give you
that complete hum-free setup. This is an 18VDC output so make sure you do not
plug any effects directly into this output (unless you have a power hungry 18VDC
Pedal). Use the included 12” male-to-male power patch to connect the Voltz to the
milliVoltz.
D. USB Charging Port – Have a device you want to charge while playing (cell phone,
mp3 player, etc.)? Just plug the USB charging cable that came with your device
into the USB output and presto, you have power!
E. DC Input – Plug Voltz into your car using the included car charger plug adapter.
Literaly you can charge this unit on the road.
F. AC Input – Plug Voltz into a wall outlet to charge while switch is in the charge position.
Or in a pinch and you forgot to charge your voltz unit? Flip the switch to charge,
plug Voltz into the wall and charge while you are playing.
milliVoltz USER INTERFACE DESCRIPTION
A. milliVoltz multi-tip – Actual tip size is marked on one side and the output polarity is marked on
the other. Reference the compatibility chart included to ensure you are using the right tip
size and polarity for your application. This is an isolated output so there is no noise
produced when powering an effects pedal.
B. milliVoltz multi-tip base – Provides the base to connect the output tip to the effect pedal
voltage source coming from the milliVoltz converter. The base is conveniently labeled
with the voltage output. Be careful to make sure that this voltage label matches with the
voltage required by the effect pedal you are trying to power.
C. milliVoltz 18.5VDC output – Gives power to another milliVoltz converter when connected.
Only plug this output into another milliVoltz unit. This is a non-isolated DC output and
may cause damage and noise if plugged directly into an effect pedal.
D. milliVoltz – DC/DC isolated output voltage converter.
E. milliVoltz 18.5VDC input – Plug coming from either another milliVoltz DC/DC isolated
converter or from the main Voltz Battery and Charger power source via the provided
12” male-to-male jack connector.
F. 18.5VDC input – Power input jack for the plug connector coming from another milliVoltz
DC/DC isolated converter or from the main Voltz Battery and Charger power source via
the provided 12” male-to-male jack connector.
G. Status light – If you see green, then you are good to go.
there is power present.
The light only comes on when
DAISYCHAIN ADAPTER INSTRUCTIONS
1
Make sure the pedals you are powering with the daisy chain have all the same polarities
and voltage requirements.
2
If your set-up requires less then five outputs, be sure to put electrical tape over the
conductors of the remaining unused outputs so you don’t short anything out.
3
If you are experienced enough with electrical and musical equipment, you could cut the
remaining unused outputs off for a cleaner look. Make sure that you cut the wire with sharp wire
cutters as close the rubber molding on the last daisy chain output you are using. After the cut is
made, make sure that the ground and positive conductors from the power wire are not frayed or
extruding past the plastic. If it is a clean cut, then make sure to tape everything up with 3M
electrical tape to avoid shorting the outputs.
9V BATTERY ADAPTER
1
Make sure the tip you are using is a negative (-) center / positive barrel (+) for the
connection from the milliVoltz to the input of the 9V Battery Adapter.
2
When the connections are made, attach the battery output side of the adapter into the
battery connection of the effect pedal you are powering.
Voltz and milliVoltz illustrated set-up Plastic
Insulator cap
Electrical Specifications
***all specifications are subject to change without notification***
Voltz Battery Pack Integrated AC/DC and DC/DC Charger
AC Input
Input AC Voltage Range
Frequency
Input Current
Power Rating
DC Input
Input DC Voltage Range
Input Current
Input Power rating
Fuse Type
DC Output (main)
Total Output Power
90 to 265Vac 47-63Hz 1.6A @ 90Vac; Full Load <130 Watts. 10 to 32V
<11.0A @ 10V input
110W max
user replaceable 30A buss fuse
Thermal Shutdown
90W Max continuous mode
battery discharge mode 75W Max continuous .
Yes
DC Output (USB)
Output Voltage
Max Output Current
Output Connector
5V
1A
USB female connector
DC Battery
Capacity
Cycle Life
Charging Time
6000mAh @ 0.2A discharge rate at 25OC
over 70% of initial capacity after 300 cycles
3 Hrs @ 25O C
LED DISPLAY
Battery fully discharge indicator (Red) (<10%) Battery status indicator #1 (Blinking Amber) (10% ~ 20%) Battery status indicator #2 (Amber) (20% ~ 85%) Battery status indicator #3 (Green) (85% ~ 100%)
Electrical Specifications
***all specifications are subject to change without notification***
9VDC milliVoltz DC/DC Power Adapter
DC Input
Input DC Voltage
DC Output
9.6VDC Max Current
9.6VDC Max Power
Isolation
18.5VDC
500mA
4.8W
9.6VDC output isolated by transformer
12VDC milliVoltz DC/DC Power Adapter
DC Input
Input DC Voltage Range
DC Output
12.6VDC Max Current
12.6VDC Max Power
Isolation
18.5V
750mA
9.45W
12.6VDC output isolated by transformer
15.0VDC milliVoltz DC/DC Power Adapter
DC Input
Input DC Voltage Range
DC Output
15.6VDC Max Current
15.6VDC Max Power
Isolation
18.5V
600mA
9.36W
15.6VDC output isolated by transformer
18VDC milliVoltz DC/DC Power Adapter
DC Input
Input DC Voltage Range
DC Output
18.6VDC Max Current
18.6VDC Max Power
Isolation
18.5V
500mA
9.3W
18.6VDC output isolated by transformer
24VDC milliVoltz DC/DC Power Adapter
DC Input
Input DC Voltage Range
DC Output
24.6VDC Max Current
24.6VDC Max Power
Isolation
18.5V
500mA
12.3W
24.6VDC output isolated by transformer
Electrical Specifications
***all specifications are subject to change without notification***
40VDC milliVoltz DC/DC Power Adapter
DC Input
Input DC Voltage Range
DC Output
40.6VDC Max Current
40.6VDC Max Power
Isolation
11320 Neeshaw Drive
Houston, Texas 77065
18.5V
200mA
8.12W
40.6VDC output isolated by transformer
281-807-3320
ext
106