1
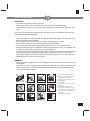
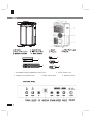
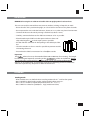
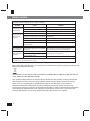
INSTRUCTION MANUAL
PLVM
16000E
PORTABLE AIR CONDITIONER
ENGLISH
THANK YOU!
Thank you for choosing this innovative Amcor air conditioner. We suggest that you keep
this manual in a safe place for future reference. It describes the many benefits and advanced
features this unique product has to offer. Before you use your new air conditioner you should
carefully read these instructions to maximise this product’s performance.
For over 60 years Amcor has specialised in complete indoor environmental control,
manufacturing and marketing; dehumidifiers, portable air conditioners, coolers, air purifiers,
ionisers and aroma therapy scent diffusers. These world class products incorporate the latest
technological developments.
ELECTRIC CONNECTION
For your safety please read the following information.
Warning: This appliance must be earthed.
The appliance is supplied with a moulded 13 amp 3 pin mains plug fitted with a 13 amp fuse. Should
the fuse require replacement, it must be replaced with a fuse rated at 13 amp and approved to BS1362.
The plug contains a removable fuse cover that must be refitted when the fuse is replaced. In the event
of the fuse cover being lost or damaged, the plug must not be used until a replacement cover has been
obtained.
If the moulded mains plug is unsuitable for the socket outlet in your home or is removed for any other
reason, then the fuse should be removed and the cut off plug disposed of safely to prevent the hazard
of electric shock.
There is a danger of electric shock if the cut off plug is inserted into any 13 amp socket outlet.
Important
The wires in the mains lead on this appliance are coloured in
accordance with the following code:
Green and Yellow - Earth
Blue – Neutral
Brown – Live
How to wire a 13 amp plug.
As the colours may not correspond with the markings
identifying the terminals in your plug proceed as follows.
The green and yellow wire must be connected to the terminal
in the plug which is marked with the letter E or with the earth
or coloured green and yellow.
symbol
The blue wire must be connected to the terminal marked N or coloured black.
The brown wire must be connected to the terminal marked L or coloured red.
2
SAFETY INSTRUCTIONS
IMPORTANT
t The unit is designed for indoor operation.
t Rating: This unit must be connected to a 220-240 V / 50 Hz earthed outlet.
t The installation must be in accordance with regulations of the country where the unit is
used.
If you are in any doubt about the electrical installation, have it checked and if necessary
modified by a qualified electrician.
t
t
t
t
t
t
The air conditioner is safe. However, as with other electrical appliances, use it with care.
Keep out of the reach of children.
Do not clean the air conditioner by spraying it or immersing it in water.
Do not insert any object into the opening of the air conditioner.
Disconnect it from the mains before cleaning the unit or any of its components.
Never connect the unit to an electrical outlet using an extension cord. If an outlet is not
available, one should be installed by a licensed electrician.
t Any service other than regular cleaning or filter replacement should be performed by an
authorized service representative. Failure to do so could result in a loss of warranty.
t A damaged supply cord should be replaced by the manufacturer, its service agent or a
qualified person in order to avoid a hazard.
WARNING
t Never operate this appliance if it has a damaged cord or plug. Do not lead the cord over
sharp edges.
t Don’t lift or move by pushing the air conditioner at the rear, but always at the front side.
t Keep a minimal 0.5 m safety distance between the appliance with the electrical heater
and any inflammable surface.
a
e
b
f
c
g
d
h
a.
b.
c.
d.
e.
f.
g.
h.
i.
j.
k.
l.
i
j
k
Do not use a damaged cable.
Keep out of reach of children.
Do not place unevenly.
Do not place near a heat source.
Do not repair.
Do not spill.
Do not place in front of an open
window.
Do not immerse in water.
Do not use an extension cord.
Do not clamp or bend the cable.
Do not bring in contact with
chemicals.
Do not insert anything.
l
3
2
1
3
4
1 Extendable window guide(inner/outer part)
3 Adapter (for exhaust hose)
5
2 Screw, washer, nut
4 Flexile exhaust hose
5 Remote Control
INSTALLATION
WARNING! Before using the air conditioner it should be left in an upright position for at least 2 hours.
This unit can easily be moved from one room to another. In doing so keep this in mind:
– Ensure that the unit is positioned upright, on a level surface and 50 cm away from obstacles.
– Do not operate the unit inside the bathroom, shower, or in any other very humid environment.
– Connect the hose to the unit by turning it clockwise (at least 5 turns).
– Similarly, connect the hose to the slide bar connector as far as possible.
– Place the telescopic slide bar in the open window or door and
adjust the length to as much open space as possible.
– Put the slide bar connector in the opening in the telescopic slide
bar.
– Close the window or door as much as possible to prevent outside
air entering the room.
– Ensure that the slide bar connector has a free ow outside.
Important
The
exhaust hose can be extended from 660 to 2000 mm for mounting. This length
has been designed especially according to the
of the air conditioner. Do not
erent hose as that may lead to malfunctioning. The
use an extension or exchange for a
exhaust air must ow freely, any blockage can lead to overheating of the air conditioner.
Take care to prevent any sharp bow or bend in the exhaust.
OPERATION
Cooling mode
- After machine turns on, default value is cooling mode with 22℃ and low fan speed.
- Press “ MODE” to select cooling mode, cooling mode indictor turns on .
- Press “ UP” or “ DOWN” to adjust temperature ( from 16℃ to 31℃).
- Press “SPEED” to select fan speed(Auto,high ,medium and low)
5
Fan mode
- Press “ MODE” to select fan mode, fan mode indicator turns on .
- Press “SPEED” to select fan speed(Auto,high ,medium and low)
- Temperature and sleeping function cannot be setup.
Dehumidifying mode
- Press “MODE” to select dehumidifying mode, dehumidifying mode indicator turns on .
- Under dehumidifying mode, sleeping function cannot be setup, and fan speed is low.
Timer mode
- Under standby mode, press “TIMER” to setup the power-on time. Timer indicator turns on.
- Under power-on mode, press “TIMER” to setup power-off timer. Timer indicator turns on.
- under power-on or standby mode, press this key to setup on/off time from 1~24.
Sleeping mode
- Press key “SLEEP” enter into sleeping mode, default value of fan speed is low.
- When sleeping mode turns on , under cooling mode, the first one hour later, setting
temperature will go up 1℃, the second one hour later, setting temperature will go up
another 1℃, and then keep the same .
- Sleeping mode is invalid under dehumidifying and fan mode. Under water full,
machine standby and mode conversion, sleeping mode will be cancelled .
Compressor protection
- Three minutes later after power on / restart, compressor starts to run.
6
AIR FILTER
This air conditioner is equipped with two filter sets:
1. A screen filter in the upper air inlet, to clean the circulated room air.
2. A screen filter in the lower air inlet, to remove dust particles.
Cleaning the air filters
- Clean the filters every two weeks, if filters are blocked by dust, machine efficiency will
be reduced .
- Clean the filters in warm water with neutral detergent, then dry the cleaned filters
on a shady place.
Note: Don’t run the machine without filters.
WATER DRAINAGE
This machine with auto-water-evaporating system. Condensed-water cycle to cool down
the condenser, which will not only improve cooling efficiency, but also save energy.
If inner water tank is full, water full indicator will flashed on the screen , machine enter
into standby mode, buzzer shouts , compressor stops and all keys is invalid till
machine recovers to be normal .
Pull out the plug to drain out water, power off the machine and restart it , the
machine will runs normally .
MAINTENANCE
Note: in order to avoid electric shocks, please power-off the machine and pull out plug
before maintenances or repairs.
Cleaning
- Please pull out plug before cleaning .
- Use soft semi-dry cloth to clean the machine. Don’t use chemical agents, such as
benzene, alcohol, gasoline and so on ; otherwise the machine surface will be damaged,
or even the machine itself.
- Don’t spatter water into the machine .
Season Cleaning
If the machine will be unused for a long time, please do as following :
- Pull out drainage plug upper / lower to flow out water.
- Let the machine runs under fan mode for 2 hours to dry out the machine internal
- Turn off machine and pull out plug .
- Clean and dry filters , then reinstall them .
- Pull out exhaust pipe for safekeeping .
- Put the machine into plastic bag , and place it on a dry place.
7
TROUBLE SHOOTING
Never try to repair or dismantle the air conditioner yourself. Incompetent repairs result in loss of
warranty and can endanger the user and the property.
Problem
Cause
The air
No power supply.
conditioner does Is the water-full indicator
. turns on
not function.
Timer function is active.
The air
In direct sunlight.
conditioner does Windows or doors open, many
not seem to
people or a heat source in the room.
perform.
Dirty filter.
Air inlet or air outlet blocked.
Room temperature lower than the
selected value.
The unit is noisy. Unit stands uneven.
The compressor The overheat protection is probably
does not work.
activated.
The remote
Distance too great.
control does not Remote control signal not detected
function.
by the control panel.
The batteries are drained.
Solution
Connect to a functioning outlet and switch on.
Empty the internal water container.
Deactivate TIMER function.
Close curtains.
Close doors and windows, place an extra air
conditioner.
Clean or replace the filter(s).
Remove the blockage.
Change temperature selection.
Place on an even, solid surface (less vibrations).
Wait 3 minutes until the temperature has
decreased, then turn on the unit again.
Make sure the remote control is correctly
aimed at the control panel.
Replace the batteries.
To correct problems that have not been described in the table and/or if the recommended solutions fail to solve the
problem, contact an authorized service centre.
Note: when abnormal situations are occurred, turn off machine and pull out plug, then contact with
professional electrician for help .
THE DISPOSAL OF ELECTRICAL AND ELECTRONIC EQUIPMENT WASTE PRODUCTS ON THE PART OF
FINAL USERS IN THE EUROPEAN UNION”
This symbol on the product or on the container indicates that this product cannot be eliminated
with the general waste. The user is responsible for eliminating this kind of waste by throwing
them away at a “recycling point” specifically for electrical and electronic waste. Selective
collection and electrical equipment recycling contribute to preserve natural resources and
warrant waste recycling to protect environment and health. In order to receive further information
about electrical and electronic waste collecting and recycling, contact your Local Council, the
service of household waste or the establishment where the product was acquired.
8