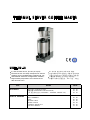
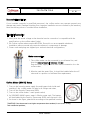
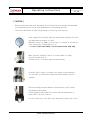
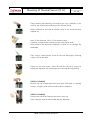
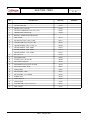
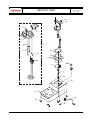
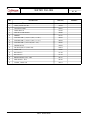
1
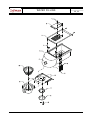
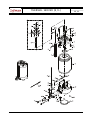
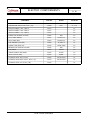
Welcome to the world of
코프맨(Cofman) 커피기계에 대한 신뢰에 깊이 감사 드립니다.
구입하신 코프맨(Coftman) 커피장비는 올바르게 사용하실 경우 매우 안전하고, 높은 신뢰도를 제공 하도록 설계되
었습니다. 커피장비를 사용하시기 전에 주의 깊게 메뉴얼을 읽는 것은 편리하고 안전한 운전을 보증하며, 좋은 품질
의 음료(커피)를 서비스하기 위하여 매우 중요합니다.
구입하신 커피장비는 엄격한 품질보증 시스템을 적용하여 제작되었으며, 장시간 사용하는 소비자를 위하여 편의
성과 높은 내구성을 갖도록 설계된 업무(소)용 제품 입니다.
이 매뉴얼에는 설치,사용,보수,청소등 코프맨(Cofman) 커피장비에 대하여 필요한 전반적인 기술 자료를 포함하고
있습니다. 따라서 오랫동안 좋은 성능을 유지하기 위해서는, 본 메뉴얼을 숙지 하시고 필요시 참고하실 수 있도록
보관 하십시오.
만약 메뉴얼의 내용에 대해서 궁금한 사항이 있으시면, 다원식품㈜ 기술팀에 연락을 주십시오.
We want to thank you for your trust in「Cofman」coffee equipments, manufactured by DAONE FOOD INC.
「Cofman」coffee equipments are designed to provide safe, durable and reliable operation if used correctly.
Therefore, it is very important to read this instruction manual carefully before using the coffee equipment for
the first time.
The coffee equipment which you have just bought is manufactured to strict quality control standards, and has
been designed applying ergonomical principles, so that you will have no problems whatsoever using it and so
that it will provide comfortable and safe operation.
In this manual you will find all the information necessary for installing, using, maintaining and cleaning your
coffee equipments. Follow all of these instructions carefully to ensure a long, trouble-free life for your coffee
equipment. Store this manual in a safe place for future reference.
If any problem arises or you have doubts as to the contents of this manual, please don't hesitate to consult
our Technical Service Team.
상표설명 (Trademark Information)
다원식품㈜의 등록상표입니다.
is the trademark of DAONE FOODS INC. in Korea.
다원식품㈜의 커피메이커는 [우수디자인상품]으로 선정되었습니다.
Cofmam Coffee Maker is to certifity that Good Design Selection by Korean
Government
THERMAL SERVER COFFEE MAKER
MODEL : DW - 80
8.1 liter thermal server. (4 Liter per Cycle)
Thermal servers are easily transported to remote
meeting rooms, breakfast bars, banquet hall, etc.
International electrical configurations available.
*Responsibility temperature for Thermal Server
78℃ above 6 hours
REV.
DOCUMENT
PARTS & DRAWING
8.1 리터의 보온서버 (1회 4리터 추출)
보온서버(Zojirushi-일본)는 추출 후 분리하여
이동이 용이합니다. (회의장, 휴게실, 호텔 등)
수출품에 대하여는 전기적인 조정가능
* 추출후 서버의 보증온도 : 78℃ 이상 - 6시간
NAME
CODE
설치시운전 (INSTALLATION)
추출방법 (OPERATING INSTRUCTIONS)
8.1L 보온서버 청소 (CLEANING - THERMAL SERVER 8.1L)
01 . 60
02 . 00
02 . 20
DIMENSIONS & TECHNICAL DATA
PART ASSEMBLY
BODY
HEATING TANK
WATER FILLING
THERMAL SERVER 8.1L
ELECTRIC WIRING
03
05
06
07
08
09
12
.
.
.
.
.
.
.
00
00
00
00
00
00
00
Installation
DW 80
01 . 60
Successful Installation
If not installed correctly by qualified personnel, the coffee maker may operate properly any
damage may result. Damages resulting from improper installation are not covered by the warranty.
Here are the key points to consider before installation.
Electrical Connection
1. Verify that the actual voltage at the electrical service connection is compatible with the
specifications on the coffee maker's label.
2. All Cofman coffee makers require NEUTRAL. Ground is not an acceptable substitute.
Installation without neutral may cause the electronic components to damage.
3. Power cords and plugs are shipped your national electrical configurations.
Water connection
1. The coffee maker can be connected to a cold water line, and
that the water pressure is between 1~5 bar.
Flush the water supply line and filter before connection it to the
coffee maker .
2. Must be used the water filter, it should be installed after the off
valve and in a position to facilitate filter replacement.
Coffee Maker (DW 80) Setup
1. Turn on the incoming water supply line and inspect both inside and
outside of the coffee maker for leaks in all fittings and tubes.
2. Turn off the Security Thermostat (EGO).
3. Turn on the coffee maker 's main power switch.
4. As SOLENOID VALVE opens, water is filled to water tank. The heaters
will be disabled by the Security Thermostat (EGO) until the tank is full.
5. As shown in the figure, please dial according to the specified location.
[CAUTION] If the thermostat is set higher temperature than standard, it can cause boiling
and mechanical problems.
DW 80 - Installation
DW 80
Installation
01 . 60
6. The coffee maker will be stand-by for operation as soon as the standby light comes on to signify that the water tank is up to temperature.
7. The coffee maker will be stand-by for operation as soon as the standby light comes on to signify that the water tank is up to temperature.
8. Brew one batch (water only) to confirm proper fill levels.
Quantity of brewing can control increase-decrease by Timer.
9. Re-attach the covers after one final inspection for leaks.
Look closely in the top of the brewer at the dispense fitting during
this inspection.
Troubleshooting
< BREWING PROBLEM >
DIVISION
Shot brew levels (Every Brew)
One or half batch are affected
and levels are consistent.
Shot brew levels (Some Brews)
One or half batch are affected
and levels are erratic.
High brew levels (Every Brew)
Overfills but does stop
High brew levels (Some Brews)
Maker basket or filter overflows
Maker won't stop brewing
POSSIBLE CAUSE
SOLUTION
Spray-cap clogged.
- Clean and replace the spray-cap.
Timers are set too low.
Water filter clogged.
Incoming Voltage is too low for timers
to function at proper time sequences.
Water pressure or flow rate is too low
or fluctuates too much to support a full
brew. (Problem is worse in simultaneous
brews.)
Water filter clogged. (Problem is worse
during simultaneous brews.)
- Advance timers to proper level.
- Change water filter.
Timer(s) are set too high.
- Adjust timers down to appropriate level.
Glass Decanter not empty.
-
- Call an electrician in the building.
- Make sure Maker has a dedicated water line.
- Increase the diameter of the water line to the Maker
or stable source.
- Change water filter.
Water pressure increase.
Bad or stuck fill Solenoid Valve.
Do not install Water-filter.
Empty the Glass Decanter and try again.
Adjust – Timer.
Pressure more than 5 Bar: Install Regulator.
Replace or rebuild the fill Solenoid valve.
Install the water-filter system and replace or rebuild the
fill solenoid valve.
< TEMPERATURE PROBLEM >
DIVISION
Brew water is cold /
not hot enough,
Stand-by light is OFF.
POSSIBLE CAUSE
No power to brewer
SOLUTION
-
Make sure power switch is on.
Check power connection. (plug or wire)
Check building circuit breaker
Check amperage draw on heater wires.
Brew water is cold /
not hot enough,
Stand-by light is ON.
Bad heater element
Bad Thermostat (the thermostat
- Change the new Thermostat
Belive that it is at set temperature)
Low brew temperature setting on EGO. - Adjust thermost (Set it to 'BEST' sign)
Slower to recover temperature.
One heater fail or water tank limed up
- Check amperage and inspect for lime.
Glass Decanter (Not hot )
Bad heater element
- Change the new warmer heater
Thermostat set too high for altitude
- Reduce temperature setting to 5℃ below
Defective thermostat (EGO)
- Replace the thermostat
Boiling
DW 80 - Installation
Operating Instructions
DW 80
02 . 00
[ CAUTION ]
Before starting the initial brew, preheating of the Thermal Server is strongly recommended
to avoid brewing into a cold or room temperature by accelerating heat loss.
This can be done either at night during cleanup or first thing in the morning.
Place a paper filter carefully inside the maker basket and then fill it with
the appropriate an amount of coffee.
Maximum extract is 4000cc at one time, it's possible to extract two
times continuosly. (Thermal Server 8.1 L)
- In case of input water 4000cc, we recommend coffee 200g ±30g
Make sure that "Stand-By" lamp is on, maker basket is in place,
and the Thermal Server is.
Thermal Server is in position under the maker basket.
Press the "Brew" switch. If you want, can change a coffee quantity.
You use timer in coffee maker inside and coffee quantity control is
available.
Before removing the maker basket or thermal server, verify visually
that dripping has stopped.
Coffee extraction was ended. This coffee warrants temperature of
about 78℃ for 6 hours in server.
Put your coffee cup. If you press valve downward, coffee drops to cup.
DW 80 - Operating Instructions
Cleaning of Thermal Server (8.1L)
DW 80
02 . 20
These cleaning and sanitizing instructions are only a guideline to be
used for the cleaning and sanitizing of the Thermal Server.
Before cleaning, be sure that all residual coffee in the server has been
emptied out.
Next, fill the dispenser 1/4 to 1/2 full with hot water.
If desired, an appropriate cleaning solution may also be used.
Never immerse the dispenser completely in water or run through any
dishwasher.
Then, using a cleaning brush, scrub out the liner thoroughly, loosening
coffee oils into the water.
Empty out the dirty water, either through the faucet or simply by
tipping the dispenser over and dumping out through the top opening.
[WEEKLY CLEANING]
Remove the cap of sight glass tube and clean with water or cleaning
solution, using the small brush included with the dispenser.
[WEEKLY CLEANING]
Unscrew the faucet and remove the silicone seat cup.
Clean using the small brush included with the dispenser.
DW 80 - Cleaning of Thermal Server(8.1L)
DW 80
DIMENSIONS & TECHNICAL DATA
95
03 . 00
HEAT
READY
90
175
780
510
POWER
194
228
427
TECHNICAL DETAILS (DW 80)
MODEL
WATER FILLING
DIMENSIONS (WxDxH)
ELECTRICAL CONNECTION
POWER CONSUMPTION
BREWING TIME PER 4 LITER
THERMAL SERVER
CAPACITY
STORAGE VOLUME
MAXIMUM BREWING QUANTITY
STANDARD EQUIPMENT
FILTER PAPER
:
:
:
:
:
:
DW 80
AUTO
228 x 427 x 760
110V / 220V
2500 W
±7 Min
:
:
:
:
:
:
:
30 Cup / Cycle
250 Cup / Hr
8.1L (65 Cup)
½ POT(4 Liter)
1 THERMAL SERVER
1 BASKET
13 inch (134ø x100h)
PARTS ASSEMBLY
DW 80
05 . 00
DW 80
BODY
NO
DISCRIPSION
06 . 00
PART NO.
1
HOSE NIPPLE (O.D10)
83315
2
SOLENOID VALVE ASS'Y
87300
3
NIPPLE (8A x 15A)
83318
4
SUS FLEXIBLE HOSE (15A x 600L)
83610
5
SECURITY THERMOSTAT (EGO 16A 110℃)
87200
6
KNOB, EGO
84400
7
PCB BOARD
86300
8
PCB BOARD BRACKET
85236
9
TK SUPPORT BRACKET
85231
10
TOP FRAME
85223
11
MIDDLE FRAME
85124
12
PILOT LAMP (RED)
87203
13
PILOT LAMP (GREEN)
87202
14
POWER S/W
87400
15
BREWING S/W
87432
16
BACK COVER
85122
17
SCREW M4 X 10
81301
18
FUSE BREAKER (15A 250V)
87600
DW 80 - BODY
REMARKS
BODY
DW 80
06 . 00
DW 80
HEATING TANK
NO
DISCRIPSION
07 . 00
PART NO.
1
TANK COVER ASS'Y
82190
2
NUT M12 (HEATER)
81318
3
WASHER (I.D15 x O.D19)
81320
4
SECURITY THERMOSTAT (EGO 16A 110℃)
87200
5
TEMPERATURE PROTECTOR
87208
6
BRACKET, TEMPERATURE PROTECTOR
7
TANK COVER
82110
8
SUS PIPE (I.D12.8 X O.D15 X L145)
83211
9
SILICONE TUBE (I.D13 X O.D17 L95)
84272
10
TEFLON PACKING (I.D14 x O.D21 2t)
84200
11
HEATER ELEMENT 220V 2000W
87510
HEATER ELEMENT 220V 2500W
87512
HEATER ELEMENT 110V 2500W
87516
12
BOLT M5 X 25
81150
13
ADJUSTMENT BAR
85235
14
O-RING (I.D125 x O.D139 8t)
84206
15
HOT WATER TANK (4L)
82105
16
ADJUSTMENT PLATE (145 X 145 R125)
85107
17
INSULATION COVER Φ120
84910
18
CORD GLAND
87901
19
DW 80 FRAME - BASE
85321
20
DW 80 FRAME - 8.1L SERVER
85322
21
RUBBER LEG,S
84281
22
SCREW M4 X 20
81302
23
POWER CORD
87700
24
SILICONE TUBE ( I.D7.5 x O.D11.5 )
84222
25
HOSE CLAMP
81351
DW 80 - HEATING TANK
REMARKS
HEATING TANK
DW 80
07 . 00
DW 80
WATER FILLING
NO
DISCRIPSION
08 . 00
PART NO.
1
SUS WIRE 1.2ψ x 200
83200
2
COVER, WATER FILLING
85204
3
TOP PLATE COVER
85221
4
SCREW M4 X 20
81302
5
HEAD & FILLING BASKET
84406
6
EMBLEM
82141
7
SILICONE TUBE ( I.D7.5 x O.D11.5 L 220 )
84222
8
SILICONE TUBE ( I.D7.5 x O.D11.5 L 110 )
84222
9
SILICONE TUBE ( I.D14 x O.D18 L 110 )
84225
10
SHOWER PLATE
85222
11
SUS PIPE (I.D6.2 X O.D8 X L60)
83212
12
SPRAY CAP
82500
13
BOLT M4 X 6
81102
14
BOLT M3 X 6
81107
15
BREWER BASKET, SUS - 2012
84121
16
WIRE BASKET - 2012
84120
17
O-RING , SPRAY CAP
84212
DW 80 - WATER FILLING
REMARKS
WATER FILLING
DW 80
08 . 00
DW 80
THERMAL SERVER (8.1L)
NO
PART NO.
REMARKS
COMPLETE LID ASSEMBLY
84465
56-7375
2~6
LID COVER
84466
7~9
1
DISCRIPSION
09 . 00
LID BODY
84467
10~11
PIPE (SUS 9Ø)
84468
12
UPPER BODY
84469
13
O-RING
84470
14
BOLT M4x8
84471
15
BOLT COVER
84472
16
GRIP
84473
17
WASHER
84474
18
NUT
84475
19
BODY, SUS
84476
56-7379
20
BASE BODY
84477
56-7381
21
LEG, RUBBER
84478
56-7631
23
BASE COVER
84479
24
BOLT M4x8
84480
25
INSULATION COVER
84481
26
L – SHAPED TUBE
84482
27
SPRING CLAMP
84483
29
CAP, SIGHT GLASS
84484
30
PLATE
84485
31
COVER, SIGHT GLASS
84486
35
SIGHT GLASS
84487
56-7635
36
NUT
84488
56-7636
37
O-RING
84489
56-7637
38
RING
84490
56-7638
39
PACKING
84491
56-7639
40
LEVER FOR SG-CB80
84492
56-7641
41
FAUCET FOR SG-CB80
84493
56-7642
42
GUARD
84494
56-7643
43
SCREW M4
84495
46
BRUSH
84496
DW 80 - THERMAL SERVER
56-7377
56-7378
56-7382
56-7633
56-7644
THERMAL SERVER (8.1L)
DW 80
09 . 00
DW 80
ELECTRIC COMPONMENTS
COMPONENT
12 . 00
PART NO.
MODEL
TESTED BY
SECURITY THERMOSTAT (EGO 16A 110℃)
87200
55.18
UL, VDE
TEMPERATURE PROTECTOR (7.5A 110℃)
87208
MS-1
UL, CSA
HEATER ELEMENT 220V 2000 W
87510
KS
HEATER ELEMENT 220V 2500 W
87512
KS
HEATER ELEMENT 110V 2000 W
87516
KS
POWER S/W (DAJEON 15A 250V)
87400
DWL
KS
PILOT LAMP (GREEN)
87202
DAJEON F-2
KS
PILOT LAMP (RED)
87203
DAJEON F-2
KS
FUSE BREAKER (15A 250V)
87600
ZE-700S-15
UL
POWER CORD (250V 15A)
87700
DONG YANG
KS
BREWING S/W (DAJEON 15A 250V)
87432
DWL
KS
PCB BOARD
86300
DWPCB
KS
*TIMER (SUNGHO 220V 3MIN)
87228
SH-MT1
KS
*RELAY (GSR 5A 250V)
87225
GPM2L
CE
SOLENOID VALVE ASSY (Parker)
87300
WV121S222JV
CE
SOLENOID VALVE BODY (Parker, Ø2.0 x 1/4")
87310
WV121S222JV
CE
SOLENOID VALVE COIL (Parker, 8W)
87320
DW 80 - ELECTRIC COMPONENTS
CE