1
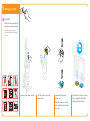
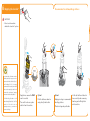
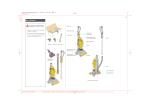
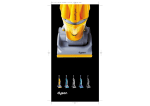
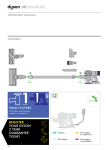
1 Assembling
IMPORTANT
• Ensure hose is straight when
inserting wand.
• Please see back of manual for
optional accessories.
• If you have any questions,
please call the Dyson Helpline,
or log onto www.dyson.com
Brush tool
Stair tool
Crevice tool
Slide wand down inside hose
until it clicks.
Slot wand into top of machine
and click into place.
Wind cable anti-clockwise and
secure with clip.
Click tools into place.
2 Using your Dyson
IMPORTANT
• Please note: this machine is
intended for domestic use only.
Fine dust such as plaster dust or
flour should only be vacuumed
in very small amounts.
• The brushbar will automatically
stop if it becomes obstructed.
• Do not press the cyclone release
button while carrying the
machine or it could fall and
cause injury.
• Ensure the cyclone is secured to
the machine.
• Do not shake the machine while
carrying or it could fall and
cause injury.
Carrying your Dyson
Using your Dyson
Ensure machine is upright
before carrying.
Plug in and press ON/OFF
switch.
Use the carry handle at the
top of the cyclone to lift.
Press pedal to release cleaner
head and pull handle towards you.
Use pedal only – do not stand
directly on cleaner head.
Ensure stabilising wheels are
fully retracted or brushbar will
not operate.
3 Using your Dyson
IMPORTANT
• The brushbar will be set to the
ON position every time you
start the vacuum.
• If the brushbar stops during
use, please refer to the
blockages section.
Brush control
Using DC15
Press button to turn brushbar
OFF for delicate rugs, looped
carpets and hard floors. Press
again to restart for carpets.
Small movements of the wrist will create a zigzag motion in the head,
for easier cleaning around furniture.
When finished, push machine
into an upright position to
drop stabilising wheels.
Ensure wheels are fully
locked in place before
letting go of the cleaner.
4 Using the tools
IMPORTANT
• Ensure machine is in upright
position before using tools.
B
• To protect your floors, the
brushbar will not rotate when
the machine is in an upright
position.
A
• Ensure hair and loose clothing
are kept clear of wand cap
when machine is switched on.
B
• Ensure wand cap is closed,
unless using with tools.
A
• Powerful suction can cause the
hose to ‘pull back’. Please take
care when cleaning stairs.
B
Wand mode
Hose mode
Stair cleaning
A Lift up wand cap and pull metal wand from inside handle until it clicks.
A First extend the wand, then
press side buttons to remove
wand handle from hose.
Always work with the machine
at the bottom of the stairs.
B Press button to release hose and wand handle from machine. To
push wand back inside hose, ensure hose is straight. Press wand
release button and push wand down into hose.
B Tools can be fitted directly to
the end of hose or wand.
5 Washing your filter
IMPORTANT
• Check your filter regularly and
wash at least every six months.
• The filter may require more
frequent washing if vacuuming
fine dust.
Remove cyclone from machine.
Lift filter release catch and
remove filter.
Separate blue filter and
yellow case.
Wash filter and case in cold
water only. Repeat until water
runs clear.
Dry for at least 12 hours. Ensure
filter is completely dry before
refitting onto the machine.
6 Emptying the clear bin
TM
Recommended for asthma/allergy sufferers
IMPORTANT
• Do not use the machine
without the clear bin in place.
TM
The British Allergy Foundation considers
that this product may in proper use reduce
exposure to both House Dust Mite (Der p 1)
and Cat Allergen (Fel d 1). It is strongly
recommended that a sensitive person should
take care when emptying the clear bin. We
recommend the manufacturer’s emptying
instructions should be strictly followed.
The British Allergy Foundation is a UK
national charity (Charity Re. No. 1003726)
founded in 1991 with the aim of
improving awareness, prevention and
treatment of allergies.
Empty bin as soon as the MAX
mark is reached.
Press catch to release cyclone
and bin from the machine.
Option 1
Option 2
Push the button as shown to
empty directly into dustbin.
Emptying in a bag is recommended
for allergy sufferers.
Place bin in bag and push button.
Let the dust settle and close bin
base securely before removing
from bag and refitting the bin
on the machine.
7 Cleaning the clear bin
TM
IMPORTANT
• Do not use detergents, polishes
or freshening products.
• Do not immerse the whole
cyclone in water.
• Ensure parts are completely dry
before replacing.
A
Cleaning the shroud
(optional)
Ensure bin is empty and bin
base is open.
TM
A Press catch to release the
clear bin from the cyclone.
Clean shroud with a cloth or
dry brush to remove fluff.
Cleaning the clear bin
TM
(optional)
Re-assembling the clear bin
TM
Ensure bin is empty and bin base
is open.
Holding carry handle, fit cyclone
inside the clear bin.
Rinse with cold water only.
Line up the front and rear guides
and push down to secure.
Ensure bin is dry before replacing.
TM
8 Clearing blockages
A
IMPORTANT
• If any part of the machine
becomes blocked, the machine
will automatically shut off.
Unplug machine and clear
blockage before restarting.
D
• Please ensure machine is
upright before attempting to
remove hose or airway
inspection ports.
B
E
• Refit all parts of the machine
securely before using it.
C
D
F
G
Maintaining Mini turbine head
C
A
B
Check tools, wand and hose are
clear of blockages.
A To remove the hose, rotate
base of hose downwards until
it clicks, then twist away from
the machine.
A Undo fasteners and remove
soleplate.
B Squeeze release catches to
remove the airway inspection
and check inside.
D Undo coloured soleplate
fasteners with a coin.
C Pull the top end of the tube
away from machine and
check inside.
F Pull out brushbar sections.
E Rotate endcaps to remove.
G Cut out debris avoiding bristles.
B Remove brushbars and
debris. When re-assembling,
ensure brushbar arrows
match those on central
support C and slider is set
as shown D.
Dyson customer care
Important safety information
DC15 accessories
These items can be used with your DC15. For further
information visit the Dyson website www.dyson.com
Every new Dyson domestic vacuum cleaner
has a 2 year guarantee.
Take care to ensure objects or
body parts are not inserted into
the cleaner head
If you have a query about your Dyson, call the
Dyson Helpline with your serial number and
details of when/where you bought the cleaner.
1. This appliance is not intended for use
by young children or infirm persons
without supervision. Young children should
be supervised to ensure they do not play
with the appliance or place body parts
near the cleaner head.
Your serial number can be found on the rating
plate, which is on the base of the machine
behind the bin.
2. The plug must be removed from the
socket outlet before cleaning or
maintaining the appliance.
Mini turbine head
Picks up pet hair and dirt
from stairs and upholstery.
Car turbine head
Cleans pet hair and fibres
from confined spaces.
Low reach floor tool
For easier cleaning under
low furniture.
Most queries can be solved over the phone by
one of our trained helpline staff.
3. Check to ensure your electricity supply
corresponds to that shown on the rating
plate, which can be found on the back of
the machine behind the hose. The
machine must only be used as rated.
DC15
230-240V 50Hz
1200 W
4. If the supply cable or the cleaner is
damaged, disconnect from the socket
immediately. The cable must be replaced
by Dyson Ltd. or our appointed agent to
avoid a hazard.
FOR PATENT INFORMATION SEE OPERATING MANUAL
02422-01-04
DYSON LIMITED MALMESBURY SN16 ORP ENGLAND UK
Note your serial number for future reference:
5. Do not use the cleaner if the cable or
plug are damaged or if the cleaner has
been damaged, dropped or has come in
to contact with water or any other liquid.
In these cases, contact the Helpline.
Mattress tool
Removes dirt and dust
mites from mattresses
and upholstery.
Stubborn dirt brush
With stiff bristles for dried-in
and stubborn dirt.
6. When vacuuming, certain carpets may
generate small static charges in the clear
bin. These are entirely harmless and not
associated with the power supply.
7. Do not use the cleaner if any parts
appear to be faulty, missing or damaged.
8. Do not carry out any maintenance work
other than that shown in this manual or
advised by the Helpline, and do not put
anything into the openings or moving
parts of the machine.
9. Only use parts recommended by
Dyson; failure to do so could invalidate
your guarantee.
Flexi crevice tool
Extends and flexes into
awkward gaps.
Do you need spares or accessories?
Contact the Dyson helpline or log on to www.dyson.com
10. If you have a query about your Dyson,
call the Dyson Helpline with your serial
number, which can be found at the back
of the machine behind the hose.
DC15 List of patent and patent applications
Major territories only =
WO 03/039317
GB0326102.1
PCT/GB04/004303
GB0416903.3
AU2002226556
CA2,439,250
EP1370172
JP2002-567120
US10/468,676
AU2002225209
CA2,438,073
EP1377197
JP2002-567130
US10/467,671
AU2002225232
CA2,438,079
EP1361815
JP2002-567134
US10/468,304
GB0318939.6
PCT/GB04/003414
AU2002225207
=
CA2,438,069
EP1361814
JP2002-567129
US10/468442
AU2001240894
EP1268076
JP2001-572220
US10/239,426
AU637 272
CA2,056,161
EP0636338
JP1948863
US5078761
PCT/GB03/03132
PCT/GB03/03135
PCT/GB03/03142
GB0416355.6
GB0416476.0
GB0416359.8
GB0410700.9
AU2002233553
CA2,439,247
rights may exist in other territories
EP1365676
JP2002-570878
US10/468,469
AU2003252873
CA2449304
EP1380247
JP2003-344965
US10/683390
helpline
UK O87O5 275 1O4
7 days a week 8am - 8pm
e-mail [email protected]
IRL (O1) 475 71O9
AU 18OO 239 766
NZ O8OO 397 667
JN10663 PN08898-01-01 12.11.04
Soft dusting brush
Soft bristles to gently dust
around the home.
The Ball User Guide
Please read this guide carefully before using your DC15