1
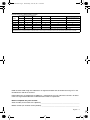
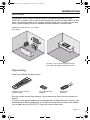
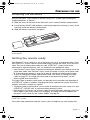
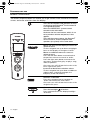
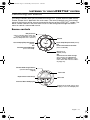
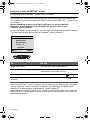
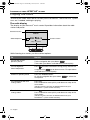
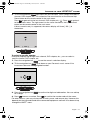
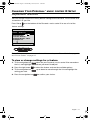
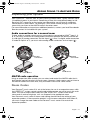
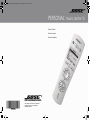
PMC III Covers_FRONT and BACK.fm Page 1 Wednesday, July 20, 2011 12:15 PM ® PERSONAL music center III Owner’s Guide Guía de usuario Notice d’utilisation ©2011 Bose Corporation, The Mountain, Framingham, MA 01701-9168 USA AM348740 Rev.00 PMC III.book Page 2 Wednesday, June 29, 2011 3:45 PM SAFETY INFORMATION Please read this guide Please take the time to follow the instructions in this guide carefully. They will help you set up and use your Personal® music center III properly so you can enjoy its advanced features. Please save this guide for future reference. WARNINGS: • Do not expose this apparatus to dripping or splashing, and do not place objects filled with liquids, such as vases, on or near the apparatus. As with any electronic products, use care not to spill liquids into any part of the system. Liquids can cause a failure and/or a fire hazard. • Do not place any naked flame sources, such as lighted candles, on or near the apparatus. • Keep the remote control batteries away from children. They may cause a fire or chemical burn if mishandled. Do not recharge, disassemble, heat above 100ºC (212ºF), or incinerate. Dispose of used batteries promptly. Replace only with batteries of the correct type and model number. Please dispose of used batteries properly, following any local regulations. Do not incinerate. For Personal® music center III remotes in the U.S. NOTE: This equipment has been tested and found to comply with the limits for a Class B digital device, pursuant to Part 15 of the FCC Rules. These limits are designed to provide reasonable protection against harmful interference in a residential installation. This equipment generates, uses, and can radiate radio frequency energy and, if not installed and used in accordance with the instructions, may cause harmful interference to radio communications. However, there is no guarantee that interference will not occur in a particular installation. If this equipment does cause harmful interference to radio or television reception, which can be determined by turning the equipment off and on, the user is encouraged to try to correct the interference by one or more of the following measures: • Reorient or relocate the receiving antenna. • Increase the separation between the equipment and receiver. • Connect the equipment into an outlet on a circuit different from that to which the receiver is connected. • Consult the dealer or an experienced radio/TV technician for help. Changes or modifications not expressly approved by Bose Corporation could void the user’s authority to operate this equipment. Operation is subject to the following two conditions: (1) This device may not cause harmful interference, and (2) this device must accept any interference received, including interference that may cause undesired operation. For Personal® music center III remotes in Canada only This device complies with Industry Canada licence-exempt RSS standard(s). Operation is subject to the following two conditions: (1) This device may not cause interference, and (2) this device must accept any interference, including interference that may cause undesired operation of the device. Output power: 88 dBµV/m @ 3m @ 27.145 MHz. For Personal® music center III remotes in Europe only This product conforms to all applicable EU Directive requirements.. The complete Declaration of Conformity can be found at www.Bose.com/compliance. 2 – English PMC III.book Page 3 Wednesday, June 29, 2011 3:45 PM Names and Contents of Toxic or Hazardous Substances or Elements Toxic or Hazardous Substances and Elements Lead (Pb) Mercury (Hg) Cadmium (Cd) Hexavalent (CR(VI)) Polybrominated Biphenyl (PBB) Polybrominated diphenylether (PBDE) PCBs X 0 0 0 0 0 Metal parts X 0 0 0 0 0 Plastic parts 0 0 0 0 0 0 Speakers 0 0 0 0 0 0 Cables 0 0 0 0 0 0 Part Name 0: Indicates that this toxic or hazardous substance contained in all of the homogeneous materials for this part is below the limit requirement in SJ/T 11363-2006. X: Indicates that this toxic or hazardous substance contained in at least one of the homogeneous materials used for this part is above the limit requirement in SJ/T 11363-2006. HDMI and the HDMI Logo are trademarks or registered trademarks of HDMI Licensing LLC in the United States and other countries. iPod and iPhone are trademarks of Apple Inc., registered in the U.S. and other countries. All other marks are registered trademarks and trademarks of Bose Corporation. Please complete for your records Serial number (on the back of the product) __________________________________________________ Model number (on the back of the product) _________________________________________________ English – 3 PMC III.book Page 4 Wednesday, June 29, 2011 3:45 PM 4 – English PMC III.book Page 5 Wednesday, June 29, 2011 3:45 PM CONTENTS INTRODUCTION 7 Welcome . . . . . . . . . . . . . . . . . . . . . . . . . . . . . . . . . . . . . . . . . . . . . . . . . . . . . Unpacking . . . . . . . . . . . . . . . . . . . . . . . . . . . . . . . . . . . . . . . . . . . . . . . . . . . . EXPANDING YOUR LIFESTYLE® SYSTEM 7 7 8 Connecting your homewide antenna . . . . . . . . . . . . . . . . . . . . . . . . . . . . . . . Connecting an expansion product to the control console . . . . . . . . . . . . . . . PREPARING FOR USE 8 8 9 Installing the batteries . . . . . . . . . . . . . . . . . . . . . . . . . . . . . . . . . . . . . . . . . . . Getting the remote ready . . . . . . . . . . . . . . . . . . . . . . . . . . . . . . . . . . . . . . . . Basic controls . . . . . . . . . . . . . . . . . . . . . . . . . . . . . . . . . . . . . . . . . . . . . . . . . Source display . . . . . . . . . . . . . . . . . . . . . . . . . . . . . . . . . . . . . . . . . . . . . . . LISTENING TO YOUR LIFESTYLE® SYSTEM 9 9 10 11 13 Controlling the source . . . . . . . . . . . . . . . . . . . . . . . . . . . . . . . . . . . . . . . . . . . Playing a docked iPod or iPhone . . . . . . . . . . . . . . . . . . . . . . . . . . . . . . . . . . Playing the radio . . . . . . . . . . . . . . . . . . . . . . . . . . . . . . . . . . . . . . . . . . . . . . . Using radio presets . . . . . . . . . . . . . . . . . . . . . . . . . . . . . . . . . . . . . . . . . . . Listening to other sources . . . . . . . . . . . . . . . . . . . . . . . . . . . . . . . . . . . . . . . . LISTENING TO AN EXPANSION PRODUCT 13 14 16 17 18 20 Selecting local sources on your expansion product . . . . . . . . . . . . . . . . . . . . 20 English – 5 PMC III.book Page 6 Wednesday, June 29, 2011 3:45 PM CHANGING YOUR PERSONAL® MUSIC CENTER III SETUP Adjustable features . . . . . . . . . . . . . . . . . . . . . . . . . . . . . . . . . . . . . . . . . . . . . To view or change settings for a feature . . . . . . . . . . . . . . . . . . . . . . . . . . . ADDING SOUND TO ANOTHER ROOM Expanding your system . . . . . . . . . . . . . . . . . . . . . . . . . . . . . . . . . . . . . . . . . . Audio connections for a second room . . . . . . . . . . . . . . . . . . . . . . . . . . . . . AM/FM radio operation . . . . . . . . . . . . . . . . . . . . . . . . . . . . . . . . . . . . . . . . Room Codes . . . . . . . . . . . . . . . . . . . . . . . . . . . . . . . . . . . . . . . . . . . . . . . . . . When to change the room code . . . . . . . . . . . . . . . . . . . . . . . . . . . . . . . . . House Codes . . . . . . . . . . . . . . . . . . . . . . . . . . . . . . . . . . . . . . . . . . . . . . . . . REFERENCE Troubleshooting . . . . . . . . . . . . . . . . . . . . . . . . . . . . . . . . . . . . . . . . . . . . . . . Contacting customer service . . . . . . . . . . . . . . . . . . . . . . . . . . . . . . . . . . . . . Limited warranty . . . . . . . . . . . . . . . . . . . . . . . . . . . . . . . . . . . . . . . . . . . . . . . Technical information . . . . . . . . . . . . . . . . . . . . . . . . . . . . . . . . . . . . . . . . . . . 6 – English 21 21 21 23 23 23 23 23 24 24 25 25 25 25 26 PMC III.book Page 7 Wednesday, June 29, 2011 3:45 PM INTRODUCTION Welcome ® The Personal® music center III remote control is designed to expand your Bose LIFESTYLE® V25/V35, 235, or 135 home entertainment system into other rooms of your home. Using the Personal® music center III remote control, you can listen to your main room system through a Bose link-enabled expansion product in another room. LIFESTYLE® V25/V35, 235, 135 system (main room) Personal® music center III remote control with expansion product (expansion room) Unpacking Check the carton for the parts shown. Personal® music center III remote control Four AA (IEC LR6) batteries Homewide antenna Save the carton and packing materials, which provide the safest way to transport this product. If any part of the product appears to be damaged, do not attempt to use it. Contact your authorized Bose dealer immediately or call Bose Customer Service. Refer to the address list included with your LIFESTYLE® system for contact information. English – 7 PMC III.book Page 8 Wednesday, June 29, 2011 3:45 PM EXPANDING YOUR LIFESTYLE® SYSTEM Connecting your homewide antenna Plug the antenna cable into the Homewide Antenna connector on your LIFESTYLE® system. Control console (main room) Antenna (bare wire) Antenna cable Note: Plugging the antenna cable into your LIFESTYLE® system is essential for proper operation of your Personal® music center III remote control. Do not bundle the antenna together with other cables and do not place it close to large metallic objects or surfaces. Connecting an expansion product to the control console 1. Plug one end of the Bose® link cable into the Bose link OUT connector on your LIFESTYLE® system control console. Control console (main room) Cable from expansion product 2. Connect the other end of the Bose link cable to your expansion product. Your expansion product might be a speaker system or an AL8 Homewide Wireless Audio Link if you are making a wireless connection. Refer to the owner’s guide that came with your expansion product for more information on making this connection. 8 – English PMC III.book Page 9 Wednesday, June 29, 2011 3:45 PM PREPARING FOR USE Installing the batteries ® ® Use your Personal music center III with the LIFESTYLE system after installing the supplied batteries, as follows: ® 1. Slide the cover off the back of the Personal music center III battery compartment. 2. Install the four AA (IEC LR6) batteries, matching the polarity markings (+ and –) to the markings inside the battery compartment. 3. Slide the battery cover back into place. + + + + Note: Change the batteries when you notice a marked decrease in the range or response of the remote. Getting the remote ready Your Personal® music center III is set at the factory for use in an expansion room, while the LIFESTYLE® system control console and primary remote are set for use in the main room. The use of unique room codes lets your LIFESTYLE® system know where commands it receives originate, so it can respond in the appropriate room. • Your Personal® music center III remote and expansion product must both be set to the same room code. Your Personal® music center III remote is initially set to room code B. If the expansion product is also set to room B, you do not need to do anything. • To view or change the remote control room code, see “When to change the room code” on page 24. To change the room code in the expansion product, see the owner’s guide that came with it. The signals from a remote in one house can possibly reach and affect the operation of a LIFESTYLE® system in another. Changing the house code for the system and all the remotes used with it avoids any conflict. ® • The house code in the Personal music center III remote must be the same as in your ® LIFESTYLE V25/V35, 235, or 135 home entertainment system. • Both products are initially set to house code 15 and should work together unless the house code in your main system was changed. To change the house code on the ® Personal music center III, see “House Codes” on page 24. Note: For more information on changing the house code, see the operating guide for your LIFESTYLE® system. If the room code and house code are correct, you can begin to use your remote now. English – 9 PMC III.book Page 10 Wednesday, June 29, 2011 3:45 PM PREPARING FOR USE Basic controls The buttons explained below will enable you to get started, move around on the display screen, and make selections from the display. Turns on the amplifier and speakers or local system that your Personal® music center III is assigned to control. Alerts the LIFESTYLE® system control console in the main room. Activates the last used source, which is set to its previous volume and preset, if that applies. Turns off the current source, the Personal® music center III, and the amplifier and speakers (or system) in the same room. Moves the focus on the display or causes an action to occur. Tilt the navigation bar up or down to highlight items on the display or change a channel. Moves to a different menu or causes an action to occur. Press the left arrow button to move back to the previous menu or to cancel an action. Press the right arrow button to move to the next menu, activate Party play, or play a song, video, or podcast. Onscreen cues will indicate the function of the left or right button press. Increases or decreases selection values. Tilt the navigation bar up or down to add to or subtract from a value (for example, the frequency of the FM stations). Confirms a selection. Press the navigation bar to complete an action and move to the next choice. Onscreen cues will indicate the function of the navigation bar press. Shows the available sources. off and on. Turns the backlight Press and hold to turn the display backlight off and on. 10 – English PMC III.book Page 11 Wednesday, June 29, 2011 3:45 PM PREPARING FOR USE Source display Press to see the list of the available sources. Your list may look different, depending on the devices you have connected to your LIFESTYLE® system, and what type of system it is. Room label Indicates more choices are available Bedroom Cable Blu-ray FM AM iPod Local Cancel [Ok] On Audio 2 Audio stream and source in use here and in other rooms On Audio 1 Audio stream and source in use in the main room Party Sets all expansion rooms that are on to play the same source as in the main room Audio 2, the audio stream selected to deliver sound to the expansion room speakers, appears briefly in place of the Room label whenever you enter the source select display. Note: To understand more about audio streams, refer to “Reference” on page 25. What you can do in the source display: • Tilt the navigation bar up or down to highlight a preferred source. • Press the navigation bar to confirm your new choice. • Press the left arrow button to cancel the current activity and return to a previous display. • Press the right arrow button to select Party and synchronize all expansion room speakers (that are on) to the main room audio. When you confirm a choice, the display shows information about the source that is currently playing. English – 11 PMC III.book Page 12 Wednesday, June 29, 2011 3:45 PM PREPARING FOR USE Symbols on the display You may notice if a symbol appears on the display. These symbols indicate special conditions, as described below: Battery indicator: Your Personal® music center III battery is depleted by 75% or more. Mute: The Mute button has been pressed and the speakers in the expansion room controlled by your Personal® music center III are silenced. Mute all: The Mute button has been pressed and held on a Personal® music center III in one of the expansion rooms, silencing the speakers in all expansion rooms. Pressing Mute again will unmute the speakers in your expansion room only. Setup button: use as needed Pressing this button presents a list of the adjustable features on your Personal® music center III. See “Adjustable features” on page 21. 12 – English PMC III.book Page 13 Wednesday, June 29, 2011 3:45 PM LISTENING TO YOUR LIFESTYLE® SYSTEM Controlling the source The source controls allow you to control the LIFESTYLE® system AM/FM radio and an iPod or iPhone that is docked in the main room. The source controls may also control some of the features of the source connected to the rear of the LIFESTYLE® system. The Bose® remote control in the main room must first be configured through the UNIFY® menu to control a connected source. Source controls FM preset list (when selecting from within any source except AM. In the AM source, AM preset list is shown.) Quick Replay/Skip Backward (Press) OR Seek Backward/Rewind (Press and hold) Volume Quick Skip/Skip Forward (Press) OR Seek Forward/Fast Forward (Press and hold) Play (Press), Pause (Press) OR Confirm house code change (Press when the appropriate UNIFY® display appears in the main room. See “House Codes” on page 24.) Shuffle iPod songs/albums (Use Encore button for repeat) Not used Repeat iPod selection(s) Not used Previous/Next iPod playlist Change to the iPod source and display a menu of iPod playlists English – 13 PMC III.book Page 14 Wednesday, June 29, 2011 3:45 PM LISTENING TO YOUR LIFESTYLE® SYSTEM Playing a docked iPod or iPhone Your LIFESTYLE® system has a connection jack for your Bose dock for iPod/iPhone. For connection instructions, select the UNIFY® menu on the LIFESTYLE® system in the main room. Before attempting to select your iPod, make sure it is securely docked. Otherwise, it will not appear in the SOURCE list on your TV or on your Personal® music center III. On your Personal® music center III, you can select your iPod from the Source display. The iPod home display appears on the Personal® music center III. iPod Track Name Artists Name Album Name Track _ of _ II Paused Back Menu To Do this Browse for a song From the main menu, choose Music. Browse for a video From the main menu, choose Videos (only the audio portion of the video will play). Play a song or video Select the song or video and press Play all the songs in a playlist or album Select the playlist or album and press or . . When the LIFESTYLE® system remote is actively browsing the iPod and you attempt to use the Personal® music center III to browse, the message, “Another room browsing” is displayed on the Personal® music center III. When you are using the Personal® music center III to browse the iPod, you cannot use the LIFESTYLE® system remote to browse until you exit the Personal® music center III iPod browsing display. 14 – English PMC III.book Page 15 Wednesday, June 29, 2011 3:45 PM LISTENING TO YOUR LIFESTYLE® SYSTEM The following controls operate your iPod as described. Button group Button Button function Display the iPod Menu from the iPod home display. Go back to the previous menu. Choose a menu item. Volume Change the volume. Skip or fast forward. • Press to skip to the next song or chapter in an audiobook or podcast. • Press and hold to fast-forward a song or video soundtrack. Restart or rewind. • Press to start a song or video over. • Press and hold to rewind a song or video soundtrack. Press twice to play the previous song or chapter in an audiobook or podcast. Press to play a song or video soundtrack. Press again to pause. Shuffle• Repeat Shuffle all songs or albums. The shuffle icon the display. • Press once to shuffle all songs. • Press again to shuffle all albums. • Press a third time to cancel shuffle mode. appears on (Use the Encore button to repeat a selection.) Playlist Change to the iPod source and display a menu of iPod playlists. (This is a shortcut to the iPod playlist menu from any source.) Encore Repeat a selected song or playlist. The repeat icon appears on the display. • Press once to repeat just one song. • Press again to repeat all songs in the playlist. • Press a third time to cancel repeat mode. Skip to the next playlist. Skip to the previous playlist. The uMusic and Whole CD buttons are not used. Note: While browsing iPod menus, activating Shuffle, or selecting a song while Shuffle is active, the Personal® music center III display may take a few seconds to update while it is communicating with the control console. English – 15 PMC III.book Page 16 Wednesday, June 29, 2011 3:45 PM LISTENING TO YOUR LIFESTYLE® SYSTEM Playing the radio To listen to the radio, select AM or FM from your list of sources. The LIFESTYLE® system turns on, if needed, and begins playing. The radio display The display on your Personal® music center III provides information about the radio station and preset. FM Radio Selected source Station Selected preset 2 FM 103.3 Current station Jump to preset Back Tune While listening to a station, you have several options. To Tune to the next or previous preset Do this Tilt the navigation bar up or down . Tilt the bar up or down and hold to tune more quickly. Tune to higher or lower frequencies Press Choose a specific preset Press the Presets button. Or, tilt the navigation bar up or down next preset. Tune forward to the next strong station for AM or FM station tuning (Tune), then tilt the navigation bar up or down to tune. Tilt up or down and hold to tune more quickly. to select the Press . Press and hold to tune quickly and release to stop at the next station. (For best results, connect an AM/FM antenna to your LIFESTYLE® system control console.) Tune backward to the next strong station Press . Press and hold to tune quickly and release to stop at the next station. (For best results, connect an AM/FM antenna to your LIFESTYLE® system control console.) 16 – English PMC III.book Page 17 Wednesday, June 29, 2011 3:45 PM LISTENING TO YOUR LIFESTYLE® SYSTEM Using radio presets Your LIFESTYLE® system can store up to 20 AM and 20 FM stations as radio presets. By assigning a preset number to stations, you can choose them quickly and easily. All of the presets can be used in any of the expansion rooms. You can either let the system assign the next available preset number to the station you have tuned in, or you can assign a specific preset number to a station. To let the system assign the next available preset, press and hold the Presets button until a preset number appears on the display next to the station identity. To assign a specific preset number to a station: 1. Press the Presets button to see the list of established presets for FM or AM. 2. Move up or down to highlight the preset you prefer. 3. Move right to select that preset number. 4. Tip up or down on the navigation bar to tune in the station you want assigned to the selected preset number. 5. Press the navigation bar to confirm the assignment. English – 17 PMC III.book Page 18 Wednesday, June 29, 2011 3:45 PM LISTENING TO YOUR LIFESTYLE® SYSTEM Listening to other sources Your Personal® music center III can select sources connected to the rear of your LIFESTYLE® system control console, such as a TV, CD, DVD, DVR, cable, or satellite box. Each connected source appears in the source list display on your Personal® music center III. Once a source in the list has been turned on, you can select and listen to it. You also may have the ability to control some of the features of the source connected to the LIFESTYLE® system if the Bose® remote control in the main room has been configured through UNIFY® to control that source. Note: The Personal® music center III will not control or display sources connected to the LIFESTYLE® system front panel, nor will it turn on or off any source connected to your LIFESTYLE® system rear panel. Listening to a video source 1. Turn on the source connected to your LIFESTYLE® system control console. 2. Press to see the list of the available sources. Bedroom Cable Blu-ray FM AM iPod Local Cancel On Audio 2 On Audio 1 [Ok] Party up or down on your Personal® music center III to select 3. Tilt the navigation bar the source, then press to confirm the source selection. The screen for the selected source displays: Cable CH Back Last Channel, DVD, Chapter, etc. 18 – English PMC III.book Page 19 Wednesday, June 29, 2011 3:45 PM LISTENING TO YOUR LIFESTYLE® SYSTEM 4. Tilt the navigation bar up or down on your Personal® music center III to select a channel, DVD chapter, etc. This action has the same function as the Channel Up/ Down button on the remote control in the main room. Press to go back to the last channel, DVD chapter, etc. ( ). Press to go back to the previous menu. The right arrow has the same function as the Last Channel button on the remote control in the main room. If direct numeric entry is supported, the source display will show [ 123...] at the bottom. Cable CH Back [ 123...] To select a specific number Instead of sequencing through each channel, DVD chapter, etc., you can select a specific channel, DVD chapter, etc. 1. Press the navigation bar to see the numeric selection display. 2. Tilt the navigation bar up or down on your Personal® music center III to increase or decrease the highlighted number. Enter number Track 1234 Erase [Add] Done 3. Press the navigation bar to six digits. 4. Press to confirm the digit and add another. You can add up to erase a number. Press to confirm the number and exit the menu. For other sources, you may also be able to seek, pause, and resume play. However, this depends on the type and brand of the connected equipment and how it has been set up through the UNIFY® menu. English – 19 PMC III.book Page 20 Wednesday, June 29, 2011 3:45 PM LISTENING TO AN EXPANSION PRODUCT Selecting local sources on your expansion product The Local selection in the source menu allows you to select and control the sources within your expansion product such as the AM/FM radio, CD, or DVD. For example, if your Bose® expansion product is a Wave® music system, you can control its AM/FM radio and CD using your Personal® music center III. 1. Press to see the list of sources. up or down to select Local (the expansion product) from 2. Tilt the navigation bar the source list. 3. Press the navigation bar to confirm the Local source selection. Bedroom Cable Blu-ray FM AM iPod Local Cancel On Audio 2 On Audio 1 [Ok] Party Controlling an expansion product The Personal® music center III display offers a generic display to indicate the actions you can take with your expansion product, but this display does not update to show the actions you take as you press buttons. Local — See Local Device — Station/Folder/Disc Back [123... ] Input If your expansion product has a display screen, refer to this display to see the results of actions you take using your Personal® music center III. • Press to change inputs. • Tilt the navigation bar up or down to change the station, folder, or disc. • Press the navigation bar to confirm your choice. You may also be able to use the Personal® music center III source controls with your expansion product. 20 – English PMC III.book Page 21 Wednesday, June 29, 2011 3:45 PM CHANGING YOUR PERSONAL® MUSIC CENTER III SETUP Adjustable features You can change some of the factory default settings of the Personal® music center III to customize it as you like. Press Setup near the bottom of the Personal® music center III to see a list of the feature settings. Setup Name: Bedroom Room Code: B Audio Stream: 2 Contrast: Default Backlight Bright: 100% Backlight: On Back Open Note: To learn more about room codes and house codes, see “Room Codes” on page 23 and “House Codes” on page 24. To view or change settings for a feature 1. Tilt the navigation bar down on your Personal® music center III to move down the list, and highlight the feature you want to adjust. 2. Press the right arrow 3. Tilt the navigation bar setting you want. 4. Press the navigation bar to select the feature and see the available options. up or down to move through the list and highlight the to confirm your choice. English – 21 PMC III.book Page 22 Wednesday, June 29, 2011 3:45 PM CHANGING YOUR PERSONAL® MUSIC CENTER III SETUP Factory settings are in bold type. Feature Setting Name Bedroom Designates where you use this Personal® music center III. Choose from a list of possible rooms to label your music center and distinguish it from any others. Room Code B Distinguishes each room (up to 14) connected to the system. For further information about room codes, refer to “Expanding your system” on page 23. House Code (Change ONLY under certain conditions.) 15 Audio Stream (not adjustable) 2 Contrast Default For further information about house codes, refer to “House Codes” on page 24. This is an informational field only. The audio stream cannot be changed. Visually distinguishes display text from background. Increase or reduce the display contrast as needed. Backlight Bright 100% Varies the brightness of the display backlight. Choose a lower setting to reduce the intensity. Backlight On Choose Off to turn off backlighting. LCD Delay 30 seconds Increase or decrease (in 10-second increments) the pause before the display turns off. Language (not adjustable) Version (not adjustable) 22 – English Update Shows the display language currently selected on the LIFESTYLE® system control console. English text is substituted on the Personal® music center III display when the LIFESTYLE® system is displaying a language different from one of the following: English, Danish, German, Spanish, French, Italian, Dutch, and Swedish. Indicates the software version currently installed on the Personal® music center III. PMC III.book Page 23 Wednesday, June 29, 2011 3:45 PM ADDING SOUND TO ANOTHER ROOM Expanding your system Your LIFESTYLE® V35/V25, 235, or 135 system can deliver Bose® quality sound in up to 14 additional rooms in your home. Connecting a Bose link-compatible product to the Bose link OUT connector on the control console enables you to listen to a different sound source in other rooms. For example, a DVD movie can be playing in the main room while you listen to the AM/FM radio in the other room. For more information or to purchase additional products, contact your local Bose dealer. See the contact list included with your system. Audio connections for a second room To hear audio in another room from any source device connected to HDMITM input 1, 2, or 3, you must also make an analog audio connection between the device and the left (L) and right (R) analog connectors for that input ( ). Also, if a digital audio connection is made for input 4 or 5, you must make analog audio connectors for that input ( ). Analog connection From source Analog connection From source AM/FM radio operation Using an expansion room remote, you can select and control the AM/FM radio that is built into the control console in the main room. However, if both rooms want to listen to the AM/FM radio at the same time, they must both listen to the same station. Room Codes Your Personal® music center III is set at the factory for use in an expansion room, while the LIFESTYLE® system control console and primary remote are set for use in the main room. The use of unique room codes lets your LIFESTYLE® system know where commands it receives originate, so it can respond in the appropriate room. Your Personal® music center III room code setting should match the setting of your expansion product. If the expansion product is set to some code other than Room B, you must change the room code on the Personal® music center III to match the expansion product. English – 23 PMC III.book Page 24 Wednesday, June 29, 2011 3:45 PM ADDING SOUND TO ANOTHER ROOM When to change the room code If you have multiple expansion rooms, you must change the room code on both the expansion product and the Personal® music center III so they match each other, but have a different room code than the main room and every other expansion room. • When you add an expansion product, the Personal® music center III room code must be identical to the switch settings on the expansion product. There are a total of 14 room codes: Room B plus codes for an additional 13 rooms (C, D, E, etc.). Bose® link-compatible products are set at the factory for Room B. If you change this setting because you have more than one expansion room set up, your Personal® music center III room code must change to match that of the product in that room. • If you have older (legacy) products, such as Bose Acoustimass® 5 powered speakers, a Wave® radio, or other amplifiers, choose room O. This will allow the Personal® music center III to work with limited functionality. House Codes Your Personal® music center III is set to house code 15 at the factory. If you have not changed the house code setting in your LIFESTYLE® system, there is no need to change that code in your Personal® music center III. When to change the house code A LIFESTYLE® system radio frequency (RF) remote has a long range and the ability to penetrate walls. Therefore, the signals from a remote in one home can possibly reach and affect the operation of a LIFESTYLE® system in another. Changing the house code for the system and all the remotes used with it avoids the conflict. To change the house code: 1. Press the setup button on the LIFESTYLE® system control console in the main room. 2. In the UNIFY® menu, select Homewide, then select House Code. On the control console screen, you will see the current house code. 3. On your Personal® music center III, press Setup. 4. Tilt the navigation bar 5. Press the right arrow 6. Tilt the navigation bar house code you want. down to move down the list, and highlight House Code. to see the available codes. up or down to move through the list and highlight the 7. Press the navigation bar 8. Press the Play/Pause button LIFESTYLE® system. to confirm your choice. to change the house code setting in your Note: For more details on the system house code, refer to the operating guide included with your system. 24 – English PMC III.book Page 25 Wednesday, June 29, 2011 3:45 PM REFERENCE Troubleshooting Problem What to do System not responding to controls • Make sure the Personal® music center III remote and the expansion system have the same room code. Refer to “When to change the room code” on page 24. • Make sure the Personal® music center III remote and the main room system have the same house code. Refer to “House Codes” on page 24. • Make sure the homewide antenna is connected. Refer to “Connecting your homewide antenna” on page 8. A device is not responding to remote control commands • Make sure the device is on. • Install an IR emitter in the main room. Intermittent operation using the Personal® music center III remote • Check the batteries to see if they need changing. • Make sure the homewide antenna is connected. Refer to “Connecting your homewide antenna” on page 8. • Move the remote to a different location to see if the problem is caused by “dead spots” in the room. System turns on or off, or changes sources unexpectedly when no buttons on the Personal® music center III remote have been pressed • Check to see if someone in the main room is using the primary remote control in that way. • You may be experiencing a control conflict with another LIFESTYLE® system near your home. Change the house code. Refer to “House Codes” on page 24. Contacting customer service For additional help in solving problems, contact Bose® Customer Service. See the address and phone number list included with your LIFESTYLE® system. Limited warranty Your Personal® music center III is covered by a limited warranty. See your product registration card for details. Please be sure to fill out the information section on the card and mail it to Bose. Failure to do so will not affect your limited warranty. English – 25 PMC III.book Page 26 Wednesday, June 29, 2011 3:45 PM REFERENCE Technical information Remote control range 80 ft. (24.4 m) Size 8¼ in. L x 1 in. H x 2½ in. W (21 cm x 3 cm x 6 cm) Weight with batteries installed 0.7 lb (.3 kg) Battery type 1.5V AA (IEC LR6) batteries (4) Frequency U.S./Canada: 27.145 MHz Euro: 40.685 MHz RF Field Strength Peak level: 88 dBV/m @ 3 meters @ 27.145 MHz 26 – English PMC III.book Page 27 Wednesday, June 29, 2011 3:45 PM English – 27 PMC III Covers_FRONT and BACK.fm Page 1 Wednesday, July 20, 2011 12:15 PM ® PERSONAL music center III Owner’s Guide Guía de usuario Notice d’utilisation ©2011 Bose Corporation, The Mountain, Framingham, MA 01701-9168 USA AM348740 Rev.00