1
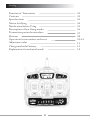
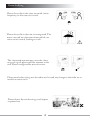
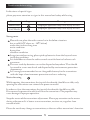
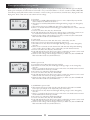
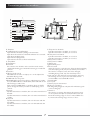
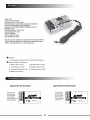
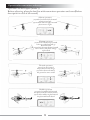
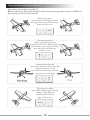
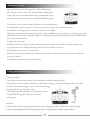
Operating Manual for
LCD DIGITAL PROPORTIONAL
RADIO CONTROL SYSTEM
WWW.DYNAM-RC.COM
Catalog
Function of Transmitter
Contents
Specifications
Notice for flying
Notification before Using
Description of four flying modes
Transmitter particular introduce
Receiver
Operation for transmitter and servo
Adjustmen order
Charge method of battery
Explaination for technical words
2
03
03
03
04
05
06
07
08
09~10
11
11
12
Thanks for purchasing RACON X6 radio control set. For safe use, please
read this manual before using carefully. Any damage or loss to radio control
set and model due to inproper use will not be shouldered by noreum Machi.
Function of Transmitter
RACON X6 is a newly developed 6 channel proportional transmitter
with four flying mode installed: A(aeroplane mode);V( V tail mode);
C(CCPM helicopter mode);H(helicopter mode) The switch between
each mode is very convenient. There is a reverse switch for Ch1,
CH2,CH4 and Ch6 separately. The LCD on the transmitter can show
voltage of transmitter, channel status, flying mode and flying time.
It has a function of auto-alarm for low voltage.
Specifications
Type: RACON X6
Channels: 6 channels
Modulation: FM-PPM
Signal Power: <750mW
Working Current: <250mA
Voltage Indicator: LCD
Flying Mode: A/V/H/C
Work Frequency: 72M
Working Voltage: 12V 5#AAA dry battery or 9.6V Ni-MH Battery Pack
3
Notice for flying
Please do not fly in the same area with simiar
f requency, or that can cause crash.
Please do not fly in the rain or strong wind. The
water can sink into the transmitter which can
cause out of control, leading to crash.
The shortened antenna may cause the short
range of signal, please pull the antenna to the
end. Please straighten the wire of receive.
FM
6 Channel
n
single conversio
6/B
5
4
3
2
1
FM
6 Channel
n
single conversio
Please note before using, test the radio set first and any change to the radio set or
model car cause crash.
Please do not fly near housing, road, airport
or power line.
4
6/B
5
4
3
2
1
Notification before using
Indications of special signs
please pay more attention to signs in this manual and safety while using
Show
Logo
Meanings
WARNING
I inproper operation may cause injury or hurt
CAUTION
I inproper operation may cause injury or hurt
Storage note
Please do not place the radio control se in the below situation:
hot or cold (60 C above or - 10 C below)
under the sunshine long time
moist condition
dusty place
vibration condition
Long time without using, please pick up batteries f rom the bay and store
in the dry condition.
It is forbidden to clean the radio control set with chemical solvent such
as acetone.
The over used dry batteries can not be dispatched anywhere. That should
be stored in a non-metal tool and dispatched by environment-protection
department.
It is strongly recommended to use chargeable battery for the transmitter
with the hope of environment-protection and cost-reducing.
Notice for using
While opening the transmitter, the joystick for throttle should be on idle; only
opening the transmitter can connect the power to model.
In order to close the transmitter, the joystick for throttle should be on idle.
Disconnect the power of model, and close the transmitter. The propeller may
cause damage if inproper operation.
Stop the motor while transmitter adjustment. Please pay attention to the motor
during adjustment. It is batter to use transmitter, receiver etc, together f rom
noreum machi.
Please do not do any change to transmitter, or that can affect transmitter’s function.
5
Description of four flying modes
RACON X6 with four flying mode installed: A(aeroplane mode);V( V tail mode);C(CCPM helicopter mode);H
(helicopter mode) the switch between each mode is very convenient. There is a reverse switch for CH1,CH2,CH4
and Ch6 separately. The LCD on the transmitter can show voltage of transmitter, channel status, flying mode and
flying time. It has a function of auto-alarm for low voltage.
05:08 CH
A
MODEL
08:57
9.2 V
CH
V
MODEL
V
CH
H
MODEL
V
CH
C
MODEL
V
A: Airplane
1.The ranges of CH1,CH2 and CH4 of servos can be adjusted by tiny mixl in
order to adjust for different aerobatics.
2.The function of CH1,CH2,CH4 small angel and large angle can changed by
switch 3.
3.The mixture function of CH1 and ch6 can be achieved by switch 2.
4.there is a isolated channel 1 for landing gear and that function can be achieved
by switch 1
5.reverse switch for ch1,ch2,ch3,ch4 and ch6
6.lock and unlock function. when every change data is settled, the situation can
be saved with lock function and every change will be no accepted.
7.alarm for low voltage: when voltage of battery is under 8.5v,the red led will
flash and when under 7.5v,LCD will close.
V:v tail mode
1.The mixture function of ch1 and ch6 can be achieved by switch 1.
2.the range of servo for ch4 can be changed by tiny mix 2.
3.The function of ch1,ch2,ch4 small angel and large angle can be changed by
switch 3.
4.there are two isolateds switch channel ch5 and ch6. and collapsable landing
gear as well as photo-taking can be achieved by switch channel 1 and 2.
5.reverse switch for ch1,ch2,ch3,ch4 and ch6.
6.lock and unlock function. when every data is settled, the situation can be saved
with lock function and every change will be not accepted.
7.alarm for low voltage: when voltage of battery is under 8.5v,the red LED will
flash and when under 7.5v,LCD will close.
H:helicopter mode
1.pit and plt can be adjusted by tiny mix 1 and 2.
2.the function of ch1,ch2,ch4 small angle and large angle can be changed by
switch 3.
3.there is a switch for the function of gyro and can be switched between normal
mode and head lock mode by switch 1.
4.the switch 2 is settled for 3D diverted flight.
5.reverse switch for ch1,ch2,ch3,ch4 and ch6.
6.lock and unlock function. when every data is setted, the situation can be saved
with lock function and every change will be not accepted.
7.alarm for low voltage: when voltage of battery is under 8.5v,the red LED will
flash and when under 7.5v,LCD will close.
C:CCPM helicopter model
1.The mixture function of ch1,ch2,ch3 and ch6 can be achieved for CCPM
helicopter. pit and plt can be adjusted by tiny mix 1 and 2.
2.The function of ch1,ch2,ch4 small angel and large angle can be changed by
switch 3.
3.there is a switch for the function of gyro and can be switched between normal
mode and head lock mode by switch 1.
4.the switch 2 is settled for 3D diverted flight.
5.reverse switch for ch1,ch2,ch3,ch4 and ch6.
6.lock and unlock function. when every data is settled, the situation can be saved
with lock function and every change will be not accepted.
7.alarm for low voltage: when voltage of battery is under 8.5v, the red LED will
flash and when under 7.5v, LCD will close.
6
Transmitter particular introduce
A
B
C
E
G
K
M
O
Q
I
H
F
Y
D
P
J
L
N
R
S
A: Antenna
B: LCD(Liquid Crystal Display)
1)To indicate the battery voltage of transmitter.
2)To show the situation of channels whether it is reversed.
3)To show the flying time.
4)To indicate flying mode.
5)To indicate the status of lock and unlock.
C: Tiny Mix 1
D:Tiny Mix 2
E:Switch 1
this switch is for ch5 that can be used for aerial camera,
collapsible landing gear and shift between gyro mode and
gain, etc.
F:Switch 2
G:Flying mode switch
when the lock switch is on adjust, it is can be adjusted to
A/V/H/C Flying mode.
H:LED indicator for power
I:Red LED indicator for low voltage: when battery is under
8.5v, the LED will have a flash alarm; the LCD will cut off
when voltage is under 7.6v.
Note: when red LED flashes or nothing shows on LCD,
please change the battery in order to avoid flying out of
control.
J:Joystick
1)if the transmitter is model 1, ch1 is for aileron and ch3 for
throttle.
2)if the transmitter is model 2, ch1 is for aileron and ch2 for
rudder.
K:Joystick
1)if the transmitter is model 1, ch2 is for elevator and ch4
for rudder.
2)if the transmitter is model 2, ch3 is for throttle and ch4
for rudder.
7
L:Tiny mix for channels
1) if the transmitter is model 1, it is for ch3.
2) if the transmitter is model 2, it is for ch1.
M:Tiny mix for channels
1)if the transmitter is model 1, it is for ch1.
2)if the transmitter is model 2, it is for ch3.
N:Tiny mix for aileron
O:Tiny mix for rudder
P:Flying ring
Q:Switch for power
R:Lock switch
when the switch is on lock status, all are locked, including
switch for flying mode, tiny mix 1, and tiny mix 2 when
the switch is on adjust status, all can be changed,
including flying mode, tiny mix 1 and tiny mix 2.
S:ch1,ch2,ch3,ch4,ch6 reversed switched for changing
the turning of servo, up for reversed and down for
normal. REV: reversed NOR: normal
T:steel handle
U:tx crystal
V:battery bay for transmitter
W:plug for simulator
X:rechargeable plug(note:only 9.6v Ni-mh battery pack
can be recharged)
Y:Switch 3
the switch is to change the turning the turning range
of servos(100%/70%)for ch1,ch2,ch4.when it is 0,it
means the turning range of servos is 100%. When it is
1, it means the turning range of servos is 70%.
Receiver
Function
FM
FM
6 Channel
single conversion
8
6 Channel
single conversion
Operation for transmitter and servo
Operation for helicopter (mode 1)
Before adjusting, please be familiar with transmitter operation and servo(Before
description in case of all neutral)
Aileron operation
joystick for aileron left forward
plane moves left
joystick for aileron right forward
plane moves right
Elevator operation
joystick for elevator up forward
tail is up, and plane will go
down forward
joystick for elevator down forward
tail is down, and plane will go
up forward
Throttle operation
joystick is up forward,
the power becomes large
joystick is down forward,
the power becomes small
Rudder operation
joystick for rudder left forward
the plane will turn anticlockwise
joystick for rudder right forward
the plane will turn deasil
9
Operation for transmitter and servo
Operation for airplane (mode 1)
Before adjusting, please be familiar with transmitter operation and servo(Before
description in case of all neutral)
Aileron operation
joystick for aileron right forward
the right aileron up and left aileron
down and vice versa
Elevator operation
climb up forward operation
joystick for elevator is down forward,
the elevator is up, and tail is down,
then the plane will climb up,
and vice versa
Operation for throttle
joystick for throttle is down forward,
the power becomes small
joystick for throttle is up forward,
the power becomes large
Operation for rudder
joystick for rudder right forward,
rudder is right forward
and the plane will turn
right and vice versa.
10
Adjustment order
Open the battery bay, and range the 8 cells AAA battery
into the battery bay, then close the bay. Before adjustment,
change the reverse switch to the lower position(nor). Open
the transmitter and the receiver, and do the following steps:
1.check every servo’s movement and make sure every movement
of control arms and servo arms is correct if not, please change the switch for reverse.
2.check the centering position of aileron, elevator and rudder
open the transmitter rand connect the power to motor. Make sure every servo is in centering position
and check servo arm has a 90 angel with servo. Adjust the length of control rod, and check all control
arm is in neutral position.
3.adjustment for range
check the movement range and the centering position of each servo. If the traveling range is not
accepted, that can be adjusted by the position of clevis on the servo arm.
4.check the connection of esc and motor.
Check the joystick for throttle movement is in accordance with motor. If not, it is can be adjusted
by reverse switch.
5.check the tiny mix for every control horn.
Charge method of battery
Charge method:
1.turn off the transmitter, connect the transmitter with the charger in kits
(note: please make sure the transmitter be off before charging, it will not charged unless it is off )
2.check it the input voltage is same as the main voltage,
the plug the charger into the socket.
3.the charging time should be no more than 5 hours,
it should be recharged if it has been unused
in long time.
Remark:
1.only the 9.6v Ni-he rechargeable battery can be charged, the dry cell should not be charged.
2.order to prolong the life of battery, please do not charge more than the required time.
11
Explainaction for technical words
12