1
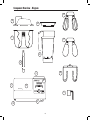
Manual and Recipe Book
TM
1
Table of Contents
Important Safeguards.....................................................................................................................................5
Component Overview......................................................................................................................................6
Component Overview – Diagram..............................................................................................................9
Operating Instructions................................................................................................................................. 10
Cleaning Instructions.................................................................................................................................... 11
Mixer Recipes................................................................................................................................................... 11
Blender Recipes.............................................................................................................................................. 16
Troubleshooting............................................................................................................................................... 18
Warranty.............................................................................................................................................................. 18
Notes..................................................................................................................................................................... 19
©2009 Blendtec® All Rights Reserved.
Important Information and Safeguards
way, return the unit to a Blendtec service agent
immediately for examination, repair, electrical or
mechanical adjustment, or possible replacement.
PLEASE READ ALL INSTRUCTIONS CAREFULLY
BEFORE USING YOUR Mix n Blend II™
6. NEVER PUT NON-FOOD ITEMS INTO BLENDER
JAR OR MIXING BOWL
Metal utensils, rocks, and glass are dangerous if
placed in jar or bowl. Damage caused by such
foreign objects will void the warranty. Keep hands
and utensils out of the blender jar or mixing bowl
while in use to reduce the risk of severe injury to
persons or damage to the machine. Utensils may
only be used when the machine is not running.
1. SAFETY CERTIFICATION
This machine is certified by ETL (Report No.
3018204-4, 3018204-2 & 3018204-3).
It also complies with UL standard 982 4th ed.
11-29-2001, and to CSA standard C22.2 No. 195-m
1987, Nov. 1990, R 1994.
2. CERTIFICATION
The Mix n Blend II™ and its accessories are
certified by NSF International (NSF) under
Blendtec® in the NSF Official Listing.
7. NEVER OPERATE THE BLENDER WITHOUT
THE LID IN PLACE
8. NEVER OPERATE THE BLENDER USING
ATTACHMENTS NOT SOLD BY BLENDTEC
The use of any unauthorized attachments may
cause fire, electric shock, and/or injury and will
void the warranty.
3. AVOID CONTACT WITH MOVING PARTS
•Keep fingers, hands, hair, and clothing away from
all moving parts.
•Keep all utensils away from the drive socket,
blender jar blades, and whisks during operation.
Metal utensils may cause damage.
•NEVER put hands into the blender jar or add
substances by hand when the blender jar is on the
motor base.
•NEVER touch the blade with your fingers whether
it is on or off the motor base.
•NEVER place jar into drive socket if blender motor
is operating.
•DO NOT rock the blender jar during operation.
9. CONTAINER MUST BE PROPERLY IN PLACE
WHILE APPLIANCE IS OPERATING
10. BLADES ARE SHARP! HANDLE CAREFULLY!
11. WHEN BLENDING HOT LIQUIDS, THE VENTED
LID WILL ALLOW PRESSURE RELIEF. BE
CAREFUL NOT TO COME IN CONTACT WITH
ANY STEAM COMING FROM THE CLEAR
CENTER LID.
4. KEEP THE MACHINE AWAY FROM AND OUT
OF ANY WATER OR LIQUID
To protect against the risk of electrical shock do
not put the Mix n Blend II™ power unit in water
or other liquid. Do not use the machine outdoors
where it is subject to precipitation.
12. POWER CORD PRECAUTIONS
•NEVER operate with a damaged cord or plug. If
the electrical cord is damaged it must be replaced
by the manufacturer or authorized service agent
to avoid a hazard.
•DO NOT permit the cord to hang over the edge of
the work surface.
•NEVER use an extension cord with the machine.
•UNPLUG the machine when not in use or while
5. NEVER OPERATE THE MACHINE IF IT
APPEARS DAMAGED
If the machine malfunctions call your service
agent first. If it is dropped or damaged in any
5
cleaning. Remove beaters from mixer before
washing.
SAVE THIS INSTRUCTION
MANUAL FOR FUTURE REFERENCE
13. NEVER ATTEMPT TO REPAIR THE POWER
UNIT. NEVER REMOVE THE MOTOR COVER. THE
MOTOR DOES NOT CONTAIN SELF-ADJUSTABLE
OR SERVICEABLE PARTS. A QUALIFIED
SERVICE AGENT MUST MAKE ALL SERVICE
ADJUSTMENTS. REMOVING THE COVER OR
ATTEMPTING TO SERVICE THE UNIT WILL VOID
THE WARRANTY.
Component Overview
1. POWER UNIT
This is the main part of the mixer that includes
the electrical controls, the motor assembly,
drive gears, and the control panel. Each unit has
been factory tested to ensure that all internal
components are in proper working order. The
cover must not be removed. There are no
adjustments that can be made and no serviceable
parts within the power unit. All service must be
performed by the Blendtec factory or authorized
service representatives. Removing the cover may
result in damage to the machine and will void the
warranty.
14. TURN THE POWER SWITCH OFF WHEN NOT
IN USE
The power switch (ON/OFF switch) is located at
the front right corner, at the bottom edge of the
machine.
15. AVOID TOUCHING THE BLENDER DRIVE
SOCKET AFTER EXTENSIVE USE
The blender drive socket may become hot after
numerous cycles.
2. POWER SWITCH
The power switch is located on the lower right
corner of the machine (below the control panel).
Power can be immediately turned off using this
switch.
16. CLOSE SUPERVISION IS NECESSARY WHEN
THIS APPLIANCE IS USED BY OR NEAR
CHILDREN OR PERSONS WITH REDUCED
CAPABILITIES. Further, children and persons
with reduced capabilities should not play with the
appliance at any time.
3. LOW SPEED DRIVE
Because of the great variety of options on the
Mix n Blend II™, two drives are required. The low
Speed drive is located on the lower left section of
the machine and operates the mixing attachments
inside the mixing bowl.
17. THE Mix n Blend II™ IS INTENDED FOR HOME
USE ONLY! ANY USE OF THE MACHINE
FOR COMMERCIAL PURPOSES VOIDS ALL
WARRANTIES.
4. HIGH SPEED DRIVE
The high speed drive is located on the upper right
side of the mixer and is used to drive the blender.
18. ALL REMOVABLE PARTS ARE DISHWASHER
SAFE ON TOP RACK ONLY. DISHWASHER
TEMPERATURE SHOULD NOT EXCEED 220°
FAHRENHEIT.
5. CONTROL PANEL
The control panel is used to control all functions
of the Mix n Blend II™. The chart below gives a
brief overview of the button functions:
These precautions are intended to help prevent
personal injury and/or damage to the machine.
6
BUTTON
FUNCTION
Jar
Accesses the Blender Menu
Bowl
Accesses the Mixer Menu
Auto-Knead
Starts Auto-Knead cycle
Speed
Manually adjust speed setting
Time
Manually adjust length of
cycle
Up/Down Arrows
Scrolls through cycle menus,
adjusts speed and time
settings
Pulse
Pulses at maximum speed
while button is pressed
Start/Stop
Starts and stops cycles and/or
manual operations
7. BOWL
The bowl is also used in all mixing operations.
Rinsing your bowl with a vinegar or baking soda
solution will remove oils from the surface. Avoid
using sharp metal utensils or scouring pads
as they could scratch or damage your bowl.
To attach the bowl to the power unit, turn it
counterclockwise. To release the bowl, turn it
clockwise.
8. BOWL LID
The bowl lid should be placed on the mixer
when kneading large batches of dough. The lid
helps keep the dough mass down so that proper
kneading will occur. The lid opening can be
used for adding ingredients or final amounts of
flour to a dough mixture. Using the lid whenever
operating the mixer will avoid spills or overflow
of ingredients. To attach the lid to the bowl, turn
it counterclockwise. To release the lid, turn it
clockwise.
More on the functionality of the control panel can
be found in the Operating Instructions.
6. DRIVE SHAFT
The drive shaft is used in all mixing operations.
The shaft fits into the low speed drive. To protect
the motor and gear assemblies, the drive shaft has
been designed to be the weakest link as power
is transferred from the motor to the dough hook
or whisk assembly. This built-in, fail-safe design
will prevent serious gear or motor damage from
occurring in the event that rotation of the dough
hook or whisks becomes excessively difficult.
Always adjust all non Mix n Blend II™ bread
recipes by using at least 15% less flour. Most
recipes call for “excess” flour to accommodate
kneading by hand.
9. KNEADING ARM
The kneading arm provides a stationary barrier
which pulls and folds the dough as the dough
hook turns past the kneading arm. The kneading
arm is only used in conjunction with the dough
hook.
10. DOUGH HOOK
The dough hook is made of surgical stainless steel
for long life without tarnishing. DO NOT PLACE
THE DOUGH HOOK ON THE DRIVE SHAFT
UNLESS THE BOWL IS IN PLACE.
The drive shaft is designed to break so as to
protect the motor and gear assembly if too much
flour is added. Foreign objects, such as spoons,
measuring cups, etc., placed or dropped into the
bowl can also break the drive shaft. The drive
shaft is not included in the warranty.
11. MEDIUM WHISK ASSEMBLY
Medium whisks are single wire whisks used for
thicker batters, heavier frosting, and cookie dough.
If the dough cannot be stirred with a spoon, or if
it contains ingredients such as nuts or chocolate
chips, then the dough hook and kneading arm
should be used.
7
french whisks are used for meringue, light frosting,
whipped cream, pourable batters, and mashed
potatoes (potatoes must be thoroughly cooked).
12. FRENCH WHISK ASSEMBLY
French whisks are used for meringues, whipping
cream, mashing potatoes, light frosting, and
pourable batters. DO NOT USE WITH STIFF
BATTERS OR COOKIE DOUGH.
NOTE: Using the french whisks for cookies
will cause the whisk gear to fail and will void
the warranty on that attachment.
13. ACCESSORY RELEASE BUTTON
Attachments can be released from the mixer by
depressing the release button found under the
front left corner.
Medium whisks are used for denser dough, such
as cookies. Medium whisks are designed with a
single loop that lets dough through more easily.
14. BLENDER JAR
The blender jar has a total capacity of nearly two
quarts and has markings for cups and ounces. The
blade is made from high quality stainless steel.
The dough hook is used for heavy doughs and is
always used in conjunction with the kneading arm.
To assemble, place kneading arm over center of
mixing bowl with the arm in the 9 o’clock position.
Place dough hook on top and turn in a clockwise
direction until it engages with drive shaft. Make
sure kneading arm is NOT directly under the lid
opening.
15. BLENDER JAR LID
The lid for the blender jar must be in place any
time the blender is in operation. The blender lid
can be easily removed by grasping one of the
corners and lifting up to release it from the jar.
When blending hot liquids, the vented lid will allow
pressure relief. Be careful not to come in contact
with any steam coming from the clear center lid.
4. Plug unit into outlet and turn on power switch.
Mixer Assembly
For smooth operation and successful food
preparation, please read and become familiar with
these instructions.
1. Insert the drive shaft into the mixer base.
2. Place the bowl over the drive shaft and turn the
bowl counterclockwise.
3. Add the appropriate accessory to the top of the
drive shaft following these precautions:
8
Component Overview - Diagram
12
8
15
7
11
14
6
10
4
5
1
3
9
13
2
9
Operating Instructions
As you begin to use your Mix n Blend II™, you will
quickly learn that its power and double whisk action
will make quick work out of any mixing job. Do not
over-mix your batter. Begin on Speed 3 to blend
ingredients in the order specified by your favorite
recipe. Increase speed as needed.
One of the unique features of Mix n Blend II™ is its
computer controlled “cycles” allowing food and drink
to be prepared automatically. The following blender
and mixer cycles are preprogrammed into Mix n Blend
II™:
MANUAL OPERATIONS
When you first turn on the machine, the default mode
is manual operation. CAUTION: Keep hands clear
of mixer and blender base. Pressing the UP key at
this time will start the machine at Speed 1 and will run
for 5 minutes. Manual mode can be accessed at any
time by pressing the SPEED or TIME buttons.
By pressing either the SPEED and/or TIME buttons
while the machine is in operation, the speed and time
can be adjusted by pressing the Up or Down arrows. If
the mixer is inactive, the speed and time can also be
adjusted in the same manner. (Press the START/STOP
button to start with these settings.)
NOTE: The speed can only be adjusted while the
arrows are flashing around “Speed X”. The time can
only be adjusted while the arrows are flashing around
the time.
MIXER OPERATION - AUTOMATIC
CYCLE NAME
CYCLE TIME
Bread
See “Auto Knead” function below
Whip
1 minute 30 seconds
Cake
2 minutes 30 seconds
CYCLE NAME
CYCLE TIME
Regular
Cookie
50 seconds
Double Cookie
1 minute 20 seconds
To access the Mixer cycles, press the Bowl button.
Again use the Up/Down buttons to scroll through the
cycles in the Mixer Menu. Press START/STOP to start
the cycle.
AUTO KNEAD FUNCTION
This feature is unique to Blendtec. First, press the
Bowl button. The first mixer cycle to appear is the
Bread cycle. After placing the first set of ingredients
into the mixing bowl, begin the Bread cycle by
pressing the START/STOP button. The Mix n Blend II™
begins the initial mixing of flour, yeast, water, etc.
Add the remaining flour until the dough clings to the
dough hooks and pulls away from the sides of the
bowl. This initial mixing period should take between 3
and 4 minutes.
IMPORTANT! Stop machine when dough pulls
away from sides of bowl. Do not knead past this
point. Due to the varying moisture content of the
flour, the exact amount of flour needed will vary with
every batch of bread made. For excellent, consistent
bread, keep the initial mixing period from 3 to 4
minutes. Answering the phone or becoming otherwise
distracted during this time can unduly lengthen the
total mixing time and potentially over-knead your
bread.
Next push the Auto Knead button to initiate the
Auto Knead function. Be sure to follow your recipe,
remembering that the Mix n Blend II™ uses at least
15% less flour than recommended in standard bread
recipes. DO NOT ADD TOO MUCH FLOUR!
The Mix n Blend II™ now takes over developing the
gluten. It will knead until the gluten is fully developed
10
and will stop automatically. This process takes
approximately two to three minutes.
BLENDER OPERATION - AUTOMATIC
CYCLE NAME
CYCLE TIME
Smoothie
25 Seconds
Multi-Use
50 Seconds
Juice
50 Seconds
Sauces
23 Seconds
Batters
23 Seconds
Ice Crush
34 Seconds
Milkshakes
35 Seconds
Ice Cream
45 Seconds
To access the blender cycles, press the Jar button.
Then use the Up/Down buttons to scroll through the
cycles in the Blender Menu. Once the desired cycle
has been selected, press Start/Stop to start the cycle.
Be aware that both drive sockets turn when the motor
is running. When running the blender, remove the
bowl and vice versa!
Cleaning Instructions
The Mix n Blend II™ is as easy to clean as it is to use.
Before cleaning make sure the main power switch is
turned off and the mixer is unplugged.
POWER UNIT
Always keep the power unit far away from water.
Wipe the power unit off with a soft cloth.
MIXER ACCESSORIES
Do not use harsh abrasives on any parts. Wash parts
by hand with warm, soapy water or place on the top
rack of a dishwasher. Dishwasher temperatures should
not exceed 220 degrees Fahrenheit.
BLENDER JAR
For best results, do not wash blender jar in
dishwasher. After use, blend one drop of dish soap
with 1 to 2 cups of water for a few seconds. Rinse
out and dry shaft and seals on bottom of jar. Allow
jar to air dry in upright position. Keep metal shaft on
blender jar dry after cleaning. Keep bottom of blender
jar as dry as possible.
Mixer Recipes
To help you get started with your Mix n Blend II™,
we’ve included some basic recipes on the following
pages. These recipes have been kitchen tested in the
Mix n Blend II™ mixer. Our suggestion would be to test
and try your favorite recipes.
NOTE ABOUT YEAST
The recipes in this instruction booklet use rapid or
instant yeast. We recommend Fermipan® Instant
Yeast available either from Blendtec or from a bakery
supply store in your area. If you are not able to use
the rapid or instant yeast you will need to let the
dough rise once before you form the loaves.
TIPS FOR MAKING BREAD
1. Use instant yeast.
2. Put dough into pan seam side down.
3. Use medium size pans or smaller. Bread tends to
fall with large size pans.
4. Form bread dough into loaves as quickly as
possible, as yeast starts acting quickly.
5. When making fancy breads, line the baking sheet
with parchment paper. This makes cleanup easier
and eliminates the need to grease the baking
sheet.
6. Allow dough to rise until ALMOST double in size.
11
The dough will continue to rise when it is baking.
7. If dough rises too much in the pans, punch it down
and re-shape loaves. Allow dough to rise again
before baking.
8. To give bread a softer crust, brush the top with
butter or shortening after cooling for five minutes.
To give bread a shiny look, brush top with egg
whites or whipped egg after baking. Return to the
oven for two or three minutes to cook the glaze.
9. A preheated oven provides a stable temperature
which will bake bread evenly and prevent bottom
from burning.
10. If bread crust is too hard, place bread in a plastic
bag while slightly warm to soften the crust.
11. Baking times will vary depending on size of the
loaf and temperature of the oven.
12. If using honey as a sweetener, measure vegetable
oil first and use same cup to measure honey. It
will slip right out.
13. Use temperature probe in microwave to heat water
to just the right temperature (about 110° F, very
warm but not too hot to kill the yeast).
14. If you have problems with the bread, check water
temperature. Next, check yeast to be sure it is
alive. (Put yeast in 1/2 cup of warm water with a
dash of sugar. After approximately 5 minutes it
should be foamy and bubbly.)
15. We recommend using at least 3 cups of liquid
when making bread.
16. Dough can always be frozen and used later.
17. Keep initial mixing of bread ingredients within a
period of 3 to 4 minutes. Long delays may cause
over-kneading.
18. If bread is still rising too much or too little, contact
your local county extension agency for information
on the amount of yeast needed in your area. This
would especially apply to bread making at high
altitudes.
19. If you wish to freeze bread, cool thoroughly then
put in a plastic bread sack and secure tightly.
Freeze loaf whole. If you slice the bread before
freezing, more surface area is open to frost. Thaw
at room temperature overnight.
WHOLE WHEAT BREAD
LARGE BATCH (7-12 LOAVES)
7 cups warm water
¾ cups sugar or honey
4 tsp salt
½ cup vegetable oil
16 to18 cups flour
4 Tbsp instant yeast
¾ cup vital wheat gluten
MEDIUM BATCH (5-8 LOAVES)
5 cups warm water
½ cup sugar or honey
1 Tbsp salt
⅓ cup vegetable oil
11 to 13 cups flour
3 Tbsp yeast
½ cup vital wheat gluten
SMALL BATCH (3-5 LOAVES)
3 cups warm water
⅓ cup sugar or honey
2 tsp salt
⅓ cup vegetable oil
6 to 8 cups flour
2 Tbsp yeast
¼ cup vital wheat gluten
Combine water, sweetener, salt, and oil in mixing bowl.
Select the Bread cycle under the mixer menu and
12
press START/STOP. While the mixer is operating add
a partial amount of flour according to recipe size: 7
cups for large batch, 5 for medium, and 3 for small.
Continue mixing for an additional 30 seconds. Add
the yeast and lock the lid on the bowl.
Gradually add the remaining amount of flour until the
dough clings to the dough hooks and stops sticking to
the sides of the mixing bowl. This indicates that there
is sufficient flour incorporated into the dough. This
initial mixing lasts approximately 3-4 minutes.
When dough pulls away from the sides of the bowl,
stop adding flour, and press the Auto Knead button.
The Mix n Blend II™ will now mix the dough until the
bread reaches its peak of gluten development. It will
then shut off automatically. The dough is now ready
to form into loaves.
When using instant yeast, there is no need to let the
dough rise before forming into loaves.
Put 2 to 3 tablespoons of oil on a clean counter. With
oiled hands, remove dough hook and kneading arm
and empty dough out onto counter.
Form dough into loaves. Roll each loaf in oil and place
in pans. Rolling the dough in the oil keeps it from
sticking to the pan and keeps the top of the bread
moist as it is rising.
Allow loaves to rise in a warm oven or on a warm
counter away from drafts.
For oven rising: Set oven to 150 degrees Fahrenheit
for a few minutes to take the chill off, turn off and put
the bread in to rise. If the oven is too hot, the bread
will rise too fast and cause a hollow area at the top of
the loaf.
Allow bread to rise until it is almost double in size. If
loaves are in the oven, remove them before preheating
the oven. (For a thicker crust, the loaves may stay in
the oven while it is preheating.)
Preheat the oven to 350 degrees Fahrenheit.
Bake for 15-20 minutes in 3” x 5” pans or 20-25
minutes in 5” x 9” pans.
Bread is done when the top crust is nicely browned.
Remove one of the loaves from the oven and take
it out of the pan to check the bottom crust. If it is
too light, return to the oven and bake for five more
minutes. Remove loaves from pans and cool on a wire
rack.
WHITE BREAD
3 cups warm water
12 oz canned evaporated milk
¼ cup sugar or honey
¼ cup vegetable oil
4 cups white flour
2 Tbsp instant yeast
5 to 7½ cups white flour
2 tsp salt
Follow the same directions given for Whole
Wheat Bread. Bake at 350 degrees Fahrenheit for
approximately 30 minutes.
OLD FASHIONED CINNAMON ROLLS
8 to 10 cups flour
1 cup non-fat powdered milk
1 cup instant mashed potato flakes
1 cup sugar
2 tsp salt
2 medium eggs
½ cup butter or margarine, melted
3½ cups warm water
2 Tbsp instant yeast
Cinnamon/Sugar Mixture (see the recipe below)
Frosting (see right column)
Combine 2¾ cups flour, powdered milk, potato flakes,
13
sugar and salt in mixer bowl. Mix on Speed 5 for 10
seconds. Add eggs, butter or margarine, and water
and mix 10 more seconds on Speed 5. Add the yeast
and continue mixing on Speed 5. Gradually add
remaining flour until dough clears the sides of the
bowl. Stop adding flour and press the Auto Knead
button.
Spread 2-3 tablespoons of vegetable oil on the
counter. Empty dough onto the oiled counter and let
rest for five minutes.
Divide dough into two pieces. Roll the first piece
into a rectangle 15” x 18”. The dough should be
about ⅜” - ½” thick. Brush dough with 2 tablespoons
softened butter or margarine and sprinkle with ½ cup
cinnamon/sugar mixture.
2 cups powdered sugar
3 Tbsp butter or margarine, softened
½ tsp vanilla or almond flavoring
3 to 4 Tbsp milk or cream
Mix with french whisks on Speed 3 for 30 seconds.
Adjust liquid or sugar to achieve desired
consistency.
MASHED POTATOES
10 lbs. potatoes
Cut 1¼” slices. Place on greased or parchment
covered pan. Repeat with the second portion of
dough.
Peel, cube and boil potatoes until soft. NOTE: If
they are not soft, they may cause damage to the
whisk assembly. Drain well. Place in mixing bowl.
With the french whisks, mix on Speed 3 for 30-60
seconds. Add 1 cup of milk, 2 teaspoons salt, and ¼
cup butter or margarine. Use the Whip cycle (under
the mixer menu), or select Speed 9 from the manual
controls and whip until fluffy (30-60 seconds). Blend
in one can of cream of mushroom or cream of chicken
soup for variety.
Allow to rise 30-45 minutes in a warm area.
MERINGUE
Bake at 350 degrees Fahrenheit for 15-20 minutes.
2 med egg whites (warm to room temperature)
¼ tsp cream of tartar
½ tsp vanilla
From the longer edge, roll the dough and pinch to seal
the edge.
Allow to cool for 5 minutes before frosting.
Makes 30-36 cinnamon rolls.
CINNAMON/SUGAR MIXTURE
½ cup brown sugar
½ cup white sugar
1 to 2 Tbsp cinnamon (to taste)
Place ingredients in blender and use the Pulse
button to blend thoroughly.
FROSTING
NOTE: It is important to thoroughly remove any
vegetable oil or grease which may be coating the bowl
from previous recipes. Wash the bowl, the whisk, and
the spatula you will be using with hot soapy water.
Rinse well with hot water. You may add 1 teaspoon
vinegar or lemon juice to the rinse water. The acid will
cut the grease.
Preheat oven to 350 degrees Fahrenheit.
Whip the egg whites and cream of tartar on Speed 9
until stiff – but not dry. The meringue should stand
14
in peaks. Add vanilla and mix on Speed 3 until vanilla
is blended into meringue mixture. Do not over-mix
at this stage. Spread meringue on pie, forming
small peaks with the back of a spoon. Bake at 350
degrees Fahrenheit for 10-15 minutes depending on
the thickness of the meringue. Meringue should be
golden brown when baked correctly.
CARROT CAKE
1¾ cup sugar
¼ cup vegetable oil
¼ cup cornstarch
½ cup water
1 cup applesauce
2 cups flour
1 tsp cinnamon
1 tsp salt
½ tsp allspice
1 tsp baking soda
3 cups shredded carrots
½ cup raisins
Icing recipe (below)
Preheat oven to 350 degrees Fahrenheit. Soak raisins
in warm water to soften. Combine all ingredients
except raisins in mixer bowl using the medium whisks
at Speed 5 for 2 minutes. Add raisins and mix 10
seconds on Speed 5.
or sugar for a smoother consistency.
OATMEAL RAISIN COOKIES
¾ cups butter or margarine, softened
1 tsp salt
1¼ cups packed brown sugar
1 tsp cinnamon
2 med eggs
½ tsp nutmeg
1 tsp vanilla
2 cups rolled oats
1½ cups flour
1 cup raisins
2 tsp baking soda
½ cup chopped nuts
Preheat oven to 350 degrees Fahrenheit. Soak
raisins in warm water to soften. Combine butter or
margarine, sugar, eggs, and vanilla in mixer bowl and
mix on Speed 5 with medium whisk until creamy. Add
the flour, baking soda, salt, cinnamon, and nutmeg.
Continue mixing until well blended. Replace medium
whisk with dough hook and kneading arm if dough
gets too thick. Add oats, raisins, and nuts. Beat on
Speed 3 until well combined. Drop by teaspoonfuls on
greased cookie sheet. Bake for about 8-12 minutes or
until lightly golden.
LEMON BARS
Pour cake batter in a lightly greased 9” x 13” pan.
Bake 30 minutes. Cover cake with icing when cool.
CARROT CAKE ICING
4 oz cream cheese
2 cup powdered sugar
2 Tbsp milk
1 dash salt
1 tsp vanilla
Combine ingredients in mixer bowl and mix on Speed
9 with french whisks for 2-3 minutes. Add more milk
Mixer Bowl:
2 cups all-purpose flour
½ cup sifted powdered sugar
1 cup butter, softened
Preheat the oven to 350°F. Add the above ingredients
to the mixer bowl and mix on Speed 5 with the
medium whisk until mixed. Spoon flour mixture into a
9x13 inch pan. Press into pan evenly and firmly, using
fingertips. Bake at 350°F for 20-25 minutes or until
golden brown.
15
Blender:
1/3 cup lemon juice
4 large eggs
2 cups sugar
½ tsp baking powder
¼ cup all-purpose flour
¼ cup powdered sugar
Add the lemon juice, eggs, sugar, baking powder and
flour to the blender jar and secure the blender lid.
Select the “Batters” cycle and press START/STOP.
Pour over baked crust and bake for 22-25 minutes or
until lightly browned and set. Cool and sprinkle with ¼
cup powdered sugar and cut into bars.
Select the Smoothie cycle from the Blender menu.
Press START/STOP.
STRAWBERRY BANANA SMOOTHIE
1¼ cups apple juice ½ cup fresh strawberries
½ cup vanilla frozen yogurt or ice cream
1 cup ice
1 medium banana
Select the Smoothie cycle from the Blender menu.
Press START/STOP.
CRUSHED ICE (SNOW CONES)
TIPS FOR COOKIE DOUGH
Here are some suggestions if the dough looks and
tastes fine but then spreads paper thin while cooking:
1. Some shortening has a higher percentage of water
and causes the cookies to spread too thin while
baking.
2. Placing cookie dough on a warm cookie sheet will
cause the uncooked cookie dough to spread while
baking.
3. Check the expiration date on your baking powder
to make sure it is current.
Blender Recipes
ORANGE JUICE SMOOTHIE
6 oz can frozen orange juice concentrate
1 cup milk
1 cup water
1 tsp vanilla
2 Tbsp sugar
1½ cups ice cubes
The Mix n Blend II™ will crush ice faster and finer
than you may need in a recipe. For the best results,
use smaller cubes if possible and place them in the
blender without water. Select the Ice Crush cycle
from the Blender menu. Press START/ STOP.
SOFT-SERVE CHOCOLATE ICE CREAM
1¼ cups whipping cream
½ cup chocolate milk powder
¼ cup sugar
4 cups frozen milk cubes
Select the Ice Cream cycle from the Blender menu.
Press START/STOP.
PEANUT BUTTER
2 Tbsp peanut oil
2 cups plain or honey roasted peanuts
Place peanut oil and peanuts into the blender jar.
Place lid on blender jar and select the Multi-Use cycle.
Press Pulse if needed for additional blending. Remove
cover and scrape sides so that peanuts contact blade.
Replace cover and repeat until mixture is at desired
16
consistency.
½ cup sour cream
½ tsp vanilla extract
WHOLE WHEAT BLENDER PANCAKES
1 cup wheat
2 Tbsp sugar
1½ tsp baking powder
½ tsp salt
1½ tsp vegetable oil
1 cup milk
Place wheat in blender and select the Batters cycle.
Add remaining ingredients in blender jar and continue
blending on Speed 4. Pour batter onto medium hot
griddle or frying pan coated with non-stick cooking
spray. Cook until the top of pancakes are bubbly; turn
and cook the other side until brown.
NOTE: For other grain pancakes substitute 1/4 cup of
rye, oats, millet, or barley for 1/4 cup of the wheat.
If the batter is not used immediately, it may need to
be blended again. Thin batter with a small amount of
milk.
BANANA BREAD
1-1/2 cup flour
1 tsp baking soda
1 tsp salt
½ chopped pecans or walnuts, optional
Add the above ingredients to the blender jar and
secure the lid. Select the “Batters” cycle and press
START/STOP. Pour wet ingredients into the mixing
bowl. Using a spoon or a spatula, stir the wet and dry
ingredients and nuts (optional) until blended. Pour
into a greased loaf pan and bake for 1 hour or until a
toothpick inserted near the center comes out clean.
Yields: 1 loaf.
GREEN PINEAPPLE PARADISE
2 cups fresh pineapple
½ medium ripe avocado
2 cups spinach
Add ingredients to the blender jar following the
above order and secure the blender lid. Select the
“Smoothie” cycle and press START/STOP. To serve
cold may add ½ cup of ice or add ½ cup water to thin.
TOMATO BASIL SOUP
2 cups tomato juice or chicken stock
2 cups diced tomatoes, fresh or canned
6-7 basil leaves
Add the above ingredients to the blender jar following
the above order and secure the blender lid. Select the
“Multi-use” cycle and press START/STOP.
Preheat oven to 350°F and grease a loaf pan.
Add the above ingredients to the blender jar and
secure the blender lid. Press the “Pulse” button 3
times for 2-3 seconds to sift the dry ingredients. Pour
dry ingredients into a mixing bowl.
2 large, very ripe bananas
2 eggs
1 cup sugar
½ cup butter, softened
2 Tbsp butter
½ cup cream
Salt and pepper to taste
Using a pot or pan, brown the butter over moderate
heat. Stir as the butter melts and turns to a light tan
color. Pour the blended soup into the pan and bring
to a boil. Simmer for 15-20 minutes. Before serving,
add cream and salt and pepper to taste.
17
BLENDER TIPS
Blended fruit drinks are as nutritious as they are
easy. Use your imagination to come up with your own
specialty drinks. Try any of your favorite fruits alone
or in combination. Using frozen fruit makes the drink
thicker and more like a shake.
Blend all ingredients with the Smoothie or Milkshake
cycles, or use the Pulse button until smooth and
frothy. Add more fruit juice or water if too thick.
Frozen bananas especially help make the shake
thicker and sweeter.
Another variation is to add milk or yogurt instead of
fruit juice.
Remove overripe bananas from their peel and freeze
until ready to use.
Milling Grains: The blender will grind all grains,
however, it is not a mill. It is designed to do 1 or 2
cups of grain. If you need a larger amount of grain
for flour we recommend that you use the Blendtec
Kitchen Mill™ which will mill one pound of flour per
minute. For more information visit blendtec.com
TROUBLESHOOTING
1. If you experience a problem with the blender,
remove jar from base and try to twist the jar shaft.
If the blade will not turn freely the blender jar is
“frozen up” and will need to be replaced.
2. If you feel your bread dough is under-kneaded,
continue at Speed 5 until you feel the dough is
adequately kneaded.
3. If the drive shaft breaks while in the Auto Knead
function, too much flour was added to the amount
of liquid before pressing Auto Knead. Remember
to adjust your recipe by using at least 15% less
flour. Less flour results in better bread. The drive shaft is not
covered by warranty.
WARRANTY
Blendtec warrants the Mix n Blend II™ components to be free of
defects in material and workmanship for a period of two years
from the date of original purchase with the following exceptions:
the blender jar and motor are warranted for three years.
These warranties only apply to product purchased through an
authorized Blendtec dealer. The following instructions apply
to any servicing required under these warranties. For service
outside the specified warranty, please call Blendtec Customer
Service at (800) 253-6383.
1. Return the appliance postage paid to:
Blendtec
Attn: Service Department
1206 South 1680 West Orem UT 84058
Telephone: (801) 222-0888 or (800) 253-6383
2.
Be sure to include your name, address, and phone number,
as well as a description of the problem.
3. Submit original proof of purchase, including date.
These warranties do not cover normal wear, nor do they cover
damage resulting from accident, misuse, dirt, water damage,
tampering, servicing performed or attempted by unauthorized
service agencies, or units that have been modified or used for
commercial purposes.
ALL IMPLIED WARRANTIES INCLUDING ANY IMPLIED
WARRANTY OF MERCHANTABILITY OR FITNESS FOR ANY
PARTICULAR PURPOSE, ARE LIMITED IN DURATION TO THE
SPECIFIED TIME FROM DATE OF ORIGINAL PURCHASE.
BLENDTEC IS NOT RESPONSIBLE FOR CONSEQUENTIAL
DAMAGES RESULTING FROM THE USE OF THIS PRODUCT.
Some states do not allow the exclusion or limitation of incidental
or consequential damages, so the above limitation may not
apply to you. This warranty gives you specific legal rights. Other
rights vary from state to state.
18
Notes
19
1206 South 1680 West Orem, UT 84058
801-222-0888
blendtechome.com
OWN-RE-022 Mix n Blend II™ Manual v4 Jan 10