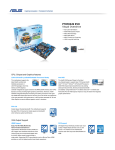
1
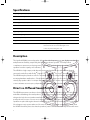
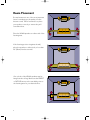
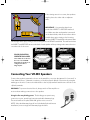
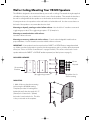
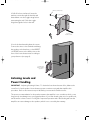
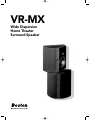
VRMX Manual
2/9/01
12:16 PM
Page 1
VR-MX
Wide Dispersion
Home Theater
Surround Speaker
VRMX Manual
2/9/01
12:16 PM
Page 2
Specifications
Frequency Response (±3dB)
80–20,000Hz
Recommended Amplifier Power
15–200 watts
Nominal Impedance
8 ohms
Sensitivity [1 watt (2.83v) at 1m]
90dB
Bass Unit
5 1⁄4" (135mm) copolymer
Passive Radiator
5 1⁄4" (135mm) copolymer
High-Frequency Driver
Dual 1" (25mm) VR aluminum dome with AMD
Crossover Frequency
2500Hz
Dimensions (HxWxD)
11 x 115⁄16 x 515⁄ 16" (279 x 286 x 151mm)
Weight /each
9 lbs (4.25kg)
Finish
Cherry wood veneer with gray grille cloth
or black ash wood veneer with black grille cloth
or white vinyl with white grille cloth
Description
The Lynnfield VR-MX surround speaker delivers the wide frequency response, high power-handling
and placement flexibility required by the finest home theater systems. Its unique driver
complement creates an enveloping sense of surround sound, simulating the multiple surround
speakers found in a quality movie theater.
The VR-MX is a high output, wide dispersion surround speaker. It provides the rear channel
surround sound effects with Dolby® Digital, DTS® and Dolby® Pro-Logic® decoding electronics.
The VR-MX may be placed on a shelf or mounted on a wall or ceiling using the supplied template,
mounting hardware and bracket. Gold-plated five-way binding posts allow the connection of
virtually any speaker cable. Its unique design allows for it to be used to create a seemingly larger
or more intimate acoustic space, depending upon how it is oriented relative to the listening space.
Direct vs. Diffused Sound Pattern
The VR-MX represents a product evolution based upon our considerable experience with direct
and diffused radiating surround speakers. The surround channels from a movie soundtrack are
designed to help the moviemaker transform the theater into the environment that is being
portrayed on the screen. Since a movie theater is a relatively large space, several surround
speakers are placed along the theater’s walls. If you would like your listening room to sound more
like a larger acoustic space and more like a movie theater or live music performance venue, then
the VR-MX should be placed so that the speakers’ passive radiators acoustically interact with most
2
VRMX Manual
2/9/01
12:16 PM
Page 3
of the room. This is accomplished by mounting the speaker so that the diffuse side of the arrow on
the back of the speaker is aimed toward the bulk of the listening area. If you prefer the surround
effects to be more discreet and localized, then you should mount the speakers so that the direct side
of the arrow on the back of the speaker is aimed toward the bulk of the listening area. In either case,
the best results will be obtained if the VR-MX is mounted above ear level and out at least 20 inches
from the corner. However, it has been our experience that satisfactory results can be obtained with a
e ct
se
Di r
Dif
Di r
Dif
fu
wide variety of placement choices.
ec
t
fuse
Direct Configuration
Diffuse Configuration
The VR-MX can be placed on the side or back walls, as well as hung from the ceiling. Recommended
placement is above ear level on the side walls opposite the primary listening position, ideally 20
inches or more out from the back wall. However, experimentation will yield the best possible results
for every room. If possible, permanent mounting of the VR-MX should only be done after the
optimum location is determined.
In general, surround speakers are either directional or diffuse. Directional surround speakers provide
a high degree of localization, and are considered best for music. Diffuse surround speakers are
difficult to localize, and are considered best for movies. The VR-MX can be used in either manner.
The VR-MX surround speaker is shipped in mirror-image pairs. Refer to the label on the back of the
VR-MX to assist you in placing the speakers for the desired result (see the label picture on page 5).
After mounting the wall brackets, experimentation between direct and diffused patterns can be
easily achieved simply by swapping the right and left speakers.
MOUNTING TIPS: Use the supplied template to aid in positioning the mounting bracket. At least 4
inches of clearance is required between the top of the template and the ceiling. Please take care
that the mounting brackets are attached securely to the chosen surface. Toggle bolts are supplied
for use on drywall or hollow plaster walls. Alternatively, you may wish to obtain wood screws for
wood or wall studs, molly bolts or screw anchors for drywall or plaster walls, or masonry anchors for
masonry walls. You can also just place the speakers to sit upright on a shelf or other flat surface. In
this case, be sure to use the supplied self-adhesive rubber feet to prevent any possible slippage.
3
VRMX Manual
2/9/01
12:16 PM
Page 4
Room Placement
Room placement is one of the most important
factors contributing to the quality of home
theater sound. Take a few minutes to place
your speakers correctly to ensure they will
sound their best.
Place the VR-MX speakers on either side of the
listening area.
If the listening position is against the wall,
place the speakers to either side, no less than
20" (50cm) from the rear wall.
One or both of the VR-MX speakers may be
hung from the ceiling. Make sure the DIRECT
or DIFFUSE arrows on the rear label points to
the listening area for your desired effect.
4
VRMX Manual
2/9/01
12:16 PM
Page 5
If the viewing area is in a corner, the speakers
may be placed to either side on adjacent
walls.
IMPORTANT: Your speakers have been
packed as a DIRECT or DIFFUSE matched
set. Make sure that each speaker is mounted
on the desired side, with the active bass driver
(smaller dust cap) pointing to the listening
area for a DIRECT sound field or the passive bass
driver (larger dust cap) pointing to the listening area for a DIFFUSE sound field. The end result is that
the DIRECT and DIFFUSE arrows on the back of each speaker will be pointing in the same direction
on either side of the room.
VR-MX
SOUND RADIATION
ORIENTATION LABELS
These labels are located on
the rear of each VR-MX.
Note that the speakers are
configured as mirror
imaged pairs.
VR-MX
Wide Dispersion Surround Speaker
Boston Acoustics, Inc. Peabody, MA 01960
8 ohms
Made in USA
Wide Dispersion Surround Speaker
Boston Acoustics, Inc. Peabody, MA 01960
8 ohms
Made in USA
SOUND RADIATION
SOUND RADIATION
DIRECT
DIFFUSE
DIFFUSE
For DIFFUSE Field
Surround Effects:
Position VR-MX
with DIFFUSE
arrow facing the
listening area.
For DIRECT Radiating
Surround Effects:
PZ 000101 A
Position VR-MX
with DIRECT
arrow facing the
listening area.
DIFFUSE
DIRECT
DIFFUSE
Consult manual for orientation best
suited to your listening
environment.
Consult manual for orientation best
suited to your listening
environment.
For DIRECT Radiating
Surround Effects:
Position VR-MX
with DIRECT
arrow facing the
listening area.
For DIFFUSE Field
Surround Effects:
PZ 000101 B
Position VR-MX
with DIFFUSE
arrow facing the
listening area.
Connecting Your VR-MX Speakers
Connect the speaker’s terminals to those on the amplifier or receiver designated for “surround” or
“rear channel effects.” Maintain consistency of the + (red) and – (black) connections by using the
markings on the wire. Connect the ribbed side to the + (red) terminals and the smooth side to the
– (black) terminals.
WARNING: To prevent electrical shock, always switch off the amplifier or
receiver when making connections to the speaker.
Using the five-way binding posts: The binding posts permit easy
connection to pins, spade lugs, bare wire and cable banana plugs.
The metal surfaces are plated with 24K gold to resist corrosion.
NOTE: Most dual banana plugs will not fit behind a flush wall mount
installation, however single wire banana plugs should fit.
5
VRMX Manual
2/9/01
12:16 PM
Page 6
Wall or Ceiling Mounting Your VR-MX Speakers
The VR-MX is designed to be mounted directly onto a wall or ceiling. First attach the eight supplied
self-adhesive felt pads, one on the back of each corner of both speakers. Then attach the bracket to
the wall or ceiling and slide the speaker on to the bracket as shown below and on the next page.
You may run wires to the speakers on the wall surface or behind the wall. Use the recessed area on
the back of the speaker to accommodate the wire slack.
Mounting on drywall, paneling or other hollow surfaces: Use the 6-32 x 2" machine screws and
toggle wings provided. The toggle wings require a 1⁄2" (12mm) hole.
Mounting on wood and other solid surfaces:
Use a #6 or #8 wood screw.
Mounting on masonry, adobe and similar surfaces: Consult a knowledgeable installer about
proper hardware. You will obtain best results with #6 or #8 wood screws.
IMPORTANT: Your speakers have been packed as a DIRECT or DIFFUSE mirror imaged matched
set. Make sure that each speaker is mounted on the appropriate side to yield the desired surround
effect (see “Direct vs. Diffuse Sound Pattern” on pages 2 and 3). The arrows on the back of each
speaker indicate the DIRECT or DIFFUSE radiation pattern (see label picture on page 5).
INCLUDED HARWARE
(8) rear
felt pads
(2) mounting
brackets
(4) toggle wing screws
(8) rubber feet for
shelf mounting
MOUNTING
1. Mark off the two bracket mounting
holes using the VR-MX Mounting
Template provided. If running wires
2"
(51mm)
behind the wall, then also mark off a 1⁄ 2"
(12mm) hole located at 21⁄2" (63mm)
below the lower bracket hole. This hole
is also positioned on the template.
6
21⁄ 2"
(63mm)
VRMX Manual
2/9/01
12:16 PM
Page 7
Drill 1⁄ 2" (12mm) holes
2. Drill all holes as indicated. Insert the
machine screws through the bracket and
toggle wings
thread them onto the toggle wings before
penetrating the wall. Push the toggle
wings through the holes in the wall.
6-32 x 2"
machine screws
3. Level the bracket and tighten the screws.
Connect the wires to the terminals and hang
the speaker on the brackets, so the DIRECT
or DIFFUSE arrow on the label points to the
front of the home theater area according to
your preference (see page 3).
Level bracket
before hanging
speaker
Listening Levels and
Power Handling
IMPORTANT: Adjusting Listening Volume. To obtain the best home theater effect, balance the
sound level of each speaker. Home theater systems contain a test signal that simplifies this
procedure. Refer to the instructions provided with your surround sound electronics.
The power recommendation for the speaker assumes the amplifier is not overdriven, which, over a
long period, can damage even our rugged speakers. If you hear a harsh, gritty noise on peak levels,
turn down the volume control. Prolonged or repeated operation with a distorted signal from the
amplifier can cause damage to the speakers, which is not covered by the warranty.
7
VRMX Manual
2/9/01
12:16 PM
Page 8
Limited Warranty
For five years from the date of purchase, Boston Acoustics will repair for the original owner any
defect in materials or workmanship that occurs in normal use of the speaker system, without
charge for parts and labor.
Your responsibilities are to use the system according to the instructions supplied, to provide safe
and secure transportation to an authorized Boston Acoustics service representative and to present
proof of purchase in the form of your sales slip when requesting service.
Excluded from this warranty is damage that results from abuse, misuse, accidents, shipping or repairs
or modifications by anyone other than an authorized Boston Acoustics service representative.
This warranty is void if the serial number has been removed or defaced.
This warranty gives you specific legal rights, and you may also have other rights which vary from
state to state.
If Service Seems Necessary
First, contact the retailer from whom you purchased the speaker. If that is not possible, write to:
Boston Acoustics, Inc., 300 Jubilee Drive, Peabody, MA 01960.
Send us:
1. Your name, address and daytime telephone number.
2. When and where you purchased the speaker system and a copy of your sales slip.
3. Makes/models of your signal sources and amplifier.
4. Description of the problem.
5. Whether you have the original carton and fillers or need new ones.
We will promptly advise you of what action to take. If it is necessary to return your speaker to the
factory, please ship it prepaid. After it has been repaired, we will return it freight prepaid in the U.S.
and Canada.
Boston and Boston Acoustics are registered trademarks and
Lynnfield VR is a trademark of Boston Acoustics, Inc. Dolby and
Dolby Pro Logic are registered trademarks of Dolby Laboratories
Licensing Corporation.
300 Jubilee Drive
Specifications subject to change without notice.
Peabody, MA 01960
© 2000 Boston Acoustics, Inc.
978-538-5000
042-001201-0