1
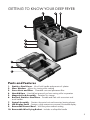
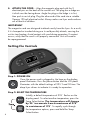
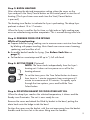
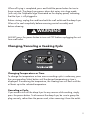
XL Digital Deep Fryer
USER GUIDE
Model HE380DF
Thank you for choosing the Calphalon XL Digital Deep Fryer.
The Calphalon Kitchen Electrics collection features our exclusive
Opti-Heat System. Designed to provide accurate temperature control
and even heat delivery, Opti-Heat ensures that foods cook evenly and
thoroughly, for reliable results you can count on – every time.
We know you are excited to begin using your deep fryer; this User Guide is
designed to help you make the most of your new appliance.
Be sure to carefully review this guide before using your deep fryer and keep
it handy for future reference should you have any questions about your
deep fryer’s operation.
TABLE OF CONTENTS
Safety Instructions...................................................................................................page 1
Getting to Know Your Deep Fryer.....................................................................page 5
Parts & Features.................................................................................................................. Preparing Your Deep Fryer..................................................................................page 6
Before the First Use
Operating Your Deep Fryer.................................................................................page 7
Before Each Use................................................................................................................. Setting the Controls............................................................................................................ Tips for Successful Operation............................................................................page 12
Cleaning and Care................................................................................................ page 14
Storage.......................................................................................................................page 15
Frequently Asked Questions.............................................................................page 15
Warranty...................................................................................................................page 16
Recipes....................................................................................................................... page 18
NOTE: If you have additional questions or concerns, or wish to return
product(s), please contact Calphalon Customer Service at
1-800-809-7267. Please do not return this product to the store.
SAFETY INSTRUCTIONS
The safety instructions appearing in this guide are not meant to cover
all possible situations that may occur. Caution must be exercised when
installing, maintaining or operating this appliance. Contact your dealer,
distributor, service agent or manufacturer with any issues you do not
understand.
Recognize Safety Messages
Always read and obey the safety messages included in this guide. Look for
the following safety symbols, which will alert you to potential hazards.
WARNING
WARNING – Hazards or unsafe practices which COULD result in severe
personal injury or death.
CAUTION
CAUTION – Hazards or unsafe practices which COULD result in minor
personal injury.
ATTENTION!
ATTENTION! The deep fryer may emit a light smoke or odor as it heats up
during the first few minutes of operation. This will dissipate quickly and is not
a reason for concern.
1
IMPORTANT SAFEGUARDS
When using electrical appliances, basic safety precautions should always
be observed, including the following:
1. READ ALL INSTRUCTIONS in this guide before attempting to operate
your appliance.
2. This product is designed for household use only. Do not use appliance
for other than intended purpose.
3. Do not touch hot surfaces. Appliance surfaces are hot during and after
use. To prevent burns or personal injury, use handles and knobs and
hot pads or oven mitts.
4. To protect against fire, electrical shock and injury to persons, DO NOT
immerse cord, plug, or the deep fryer’s electronic control assembly in
water or other liquid.
5. Be sure basket handles are properly attached to baskets and locked in
place. See Before Each Use on page 7.
6. Close supervision is necessary when any appliance is used by or
near children.
7. Do not let children handle or put electrical cords or plugs in
their mouths.
8. Always attach magnetic plug end to appliance first, then plug cord
into the wall outlet. To disconnect, remove plug from wall outlet and
then from appliance. When fryer is connected or disconnected to wall
outlet, it should always have its magnetic plug attached.
9. Unplug cord from outlet and appliance when not in use and before
cleaning. Allow to cool before putting on or taking off parts and before
cleaning the appliance.
10. Do not operate any appliance with a damaged cord or plug or after
the appliance malfunctions or has been dropped or damaged in
any manner. Contact Calphalon Customer Service at
1-800-809-7267 for examination, repair, or adjustment. A short
detachable power-supply cord is to be provided to reduce the risk
resulting from becoming entangled in or tripping over a longer cord.
2
11. The use of accessory attachments not recommended by the appliance
manufacturer may cause injuries.
12. Do not use a damaged fryer bowl or a basket having a loose or
weakened handle.
13. Always insert the control assembly with heating element down into the
fryer bowl before plugging the unit into the power outlet
14. Do not use outdoors.
15. Never let the cord hang over the edge of a table or counter or touch
hot surfaces.
16. Do not place the deep fryer on or near a hot gas, electric or induction
burner, or in a heated oven.
17. It is recommended that this fryer NOT be moved when it contains
hot oil or other hot liquid.
18. Carefully follow the Cleaning and Care instructions on page 14
when cleaning your deep fryer to avoid risk of injury or shock hazards.
19. Periodically check for looseness and retighten screws or nuts in
accordance with the manufacturer’s instructions.
CAUTION
Overtightening can result in stripping of screws or nuts or cracking
of handle or feet.
NOTE: If this deep fryer malfunctions during use, immediately press the
Start/Cancel button to cancel the cycle and press the Power button.
Unplug the power cord from the electrical outlet. Do not use or attempt to
repair the deep fryer. Contact Calphalon Customer Service at
1-800-809-7267 for examination, repair, or adjustment.
SAVE THESE INSTRUCTIONS
FOR FUTURE REFERENCE.
3
ELECTRICAL REQUIREMENTS
CAUTION
Avoid Electric Shock
This appliance has a magnetic plug (that connects to the deep fryer) and a
2-prong polarized plug (with one blade wider than the other) that inserts in
the electrical outlet. To reduce the risk of electric shock, this plug is intended
to fit into a polarized outlet only one way. If the plug does not fit into the
outlet completely, reverse the plug. If it still does not fit, contact a qualified
electrician. Do not attempt to modify the plug in any way.
Short Cord Instructions
Your Calphalon deep fryer has a short power supply cord as a safety
precaution to prevent personal injury or property damage resulting from
becoming entangled with a longer cord. Do not allow children to be
near this appliance without adult supervision. DO NOT USE WITH AN
EXTENSION CORD.
SAVE THESE INSTRUCTIONS
FOR FUTURE REFERENCE.
4
GETTING TO KNOW YOUR DEEP FRYER
8
9
10
7
6
5
4
3
2
1
Parts and Features
1.
2.
3.
4.
5.
6.
Stainless Steel Cover – Lifts off with handle and prevents oil splatter
Glass Window – Allows for viewing while cooking
Cover Vents and Filter – Cleanable vents and permanent filter
Nonskid Base – Nonskid feet prevent fryer from moving while in operation
Magnetic Cord Assembly – Detaches for storage
Brushed, Stainless Steel Base – Durable and sleek with convenient cool
touch handles
7. Control Assembly – Contains the control unit and immersion heating element
8. LCD Display Panel – Features a high contrast easy-to-read, illuminated display
9. Removable Enamel Bowl – With easy-clean enamel coating
10. Removable Wire Frying Basket – Includes a collapsible handle
5
PREPARING YOUR DEEP FRYER
CAUTION
A short power supply cord is provided to reduce the risk resulting from
becoming entangled in or tripping over a longer cord. DO NOT USE WITH
AN EXTENSION CORD.
CAUTION
Appliance surfaces are hot during and after use. Always wear protective,
insulated oven mitts when touching hot deep fryer.
Before the First Use
1. Place deep fryer on a dry, level, stable, heat-resistant surface such as a
countertop or table. Keep away from countertop edge.
IMPORTANT: The magnetic cord was designed to detach easily from
the fryer. As a result, if it is bumped or touched during use it could possibly
detach, causing the unit to stop heating. Avoid contact with cord during
operation. If contact occurs, verify that the cord is still properly connected.
NOTE: Do not allow the cord to run underneath or around the unit. The
magnetic cord may not detach easily if the cord is positioned in this way.
2. Close supervision is necessary when fryer is used around children. Hot
oil can cause serious and painful burns.
3. Remove all packing material and disassemble unit for cleaning. Take
the frying basket out of the unit. Remove the cord assembly from the
basket and set aside. Lift the control assembly out of the unit. Wipe the
control assembly (control unit with heating element) with a damp cloth.
Never immerse the control assembly, cord or plug in water.
4. Lift out the removable bowl from the base and wash the bowl, frying
basket, and fryer cover in warm, sudsy water. Rinse and dry thoroughly.
5. Continue with steps for Operating Your Deep Fryer.
6
OPERATING YOUR DEEP FRYER
Before Each Use
CAUTION
To avoid the risk of electrocution or severe disfiguring electrical burns, do
not let children handle or put electrical cords or plugs in their mouths.
1. INSERT REMOVABLE BOWL – Place removable bowl into deep
fryer base, making sure that the basket hook is aligned to the front of
the deep fryer (same side as Calphalon logo).
2. ATTACH CONTROL ASSEMBLY TO BASE – Align the two tabs
on control assembly with outer two slots on fryer base. Slide control
assembly down as far as it will go, making sure that both tabs are in the
slots, and heating element is in bottom of bowl. (NOTE: The fryer will
only operate when both tabs are fully in place in the slots.)
3. FILL BOWL WITH OIL – The amount of oil used must be between the
minimum and maximum levels on the inside of the bowl. The fryer will
hold up to one gallon of oil. NEVER exceed the maximum level of oil.
4. ASSEMBLE BASKET HANDLE – The fry basket has a collapsible
handle. Make sure the collapsible handle is properly positioned.
The basket handle should be unfolded by rotating the handle and
engaging with the handle bracket attached to the basket. An audible
“click” will be heard when properly engaged. Ensure both the left and
right support arms of the handle are fully engaged with the notched
recesses in the handle bracket. The process should be reversed to
disengage the handle.
To aid in the engagement or disengagement of the handle, the user
may squeeze the left and right support arms of the handle to help
release the handle from the notched recesses of the handle bracket.
CAUTION
To avoid accidental burning or other injury, insure that the handle is firmly
attached to the basket. Make sure the handle bar’s pegs are in the basket
loops and the handle is secured around the metal plate.
7
5. ATTACH THE CORD – Align the magnetic plug end with the 3
electrical pins on the back of the control unit. The plug has a ledge on
it which must be facing down. Angle the plug so the ledge is in first,
then push in rest of plug. Plug the other end of the cord into a suitable
2-prong 120-volt electrical outlet. Always make sure fryer and cord are
out of reach of children.
IMPORTANT
The magnetic cord was designed to detach easily from the fryer. As a result,
if it is bumped or touched during use it could possibly detach, causing the
unit to stop heating. Avoid contact with cord during operation. If contact
occurs, verify that the cord is still properly connected. Unit will need to
be reprogrammed.
Setting the Controls
Step 1: POWER ON
Once the power cord is plugged in, the logo on the display
panel illuminates. Press the power button and the LCD panel
illuminates with the default settings of 325˚F and 00 time. The
deep fryer chimes to indicate it is ready for operation.
Step 2: SELECT THE TEMPERATURE
Initially, a default temperature of 325˚ flashes on the
display panel. To select another temperature, press the
Temp Select button. The temperature will change
by 25˚ increments from a maximum of 375˚
to a minimum of 175˚. To rapidly cycle through
the temperature options, press and hold the Temp
Select button.
8
Step 3: BEGIN HEATING
After selecting the desired temperature setting, place the cover on the
fryer and press the Start/Cancel button on the control panel to start the oil
heating. (The fryer chimes once each time the Start/Cancel button
is pressed.)
The heating icon flashes to indicate the fryer is preheating. The deep fryer
preheats in about 15 to 17 minutes.
When the fryer is used for the first time, a slight odor or light smoking may
occur as manufacturing residue evaporates. This is normal during initial use.
Step 4: PREPARE FOOD FOR FRYING
While oil is preheating:
a.Prepare food for frying, making sure to remove excess moisture from food
by blotting with paper toweling. Moist foods can cause excess foaming,
spattering, and overflow of oil.
b.Assemble basket handle for frying. (See Before Each Use on
page 7).
c. Set basket on countertop and fill up to 2/3 full with food.
Step 5: SET THE TIMER (Optional)
NOTE: The timer works independently from the fryer’s
heating unit. It does not turn power on or off to the
heating element.
To set the timer, press the Time Select button to choose
from times in 1 minute increments from a minimum of 1
minute to a maximum of 30 minutes. To rapidly cycle
through the time options, press and hold the Time
Select button.
Step 6: POSITION BASKET OF FOOD OVER HOT OIL
When the deep fryer reaches the selected temperature, it chimes and the
Ready icon illuminates. The unit is now ready for use.
Remove the cover and attach the filled fry basket to the bowl, putting the
drain hook onto the ledge inside the bowl.
Position the cover over the basket, with the vent area away from the basket
handles and the two slots in the cover fitting over the handles.
9
Step 7: START THE TIMER (Optional)
If desired, start the timer by pressing the Start/Cancel button. The display
will begin to count down the amount of cook time remaining. When cooking
is complete and the timer expires, the deep fryer will chime three times.
CAUTION
The chimes that sound at the end of the cooking time DO NOT indicate that
the deep fryer has powered off. To avoid accidental burning or other injury,
use caution, since the deep fryer and its contents remain hot.
Step 8: LOWER BASKET OF FOOD INTO HOT OIL
Keeping cover over basket, lift up slightly on basket handle to disengage
basket drain hook from bowl and slowly lower basket down into oil until the
basket rests on its supports over the heating element. The cover ensures that
hot oil does not splatter up out of fryer.
Food should be golden brown. If cover is on, look through the viewing
window in the cover. If additional cooking time is needed, set the timer for
additional time.
WARNING
To prevent the risk of severe personal injury or property damage, use
caution when cooking with hot oil.
CAUTION
It is normal for steam to escape from cover vents during frying. To prevent
steam burns, keep hands and face away from the vents.
Step 9: REMOVE COOKED FOOD
When food is done, lift basket handle along with fryer cover and hook
basket onto the fryer rim to allow excess oil to drain from food.
Remove cover.
Empty food onto absorbent paper. Season to taste.
If frying additional food, return to Step 4.
10
When all frying is completed, press and hold the power button for two to
three seconds. The deep fryer powers down but enters into sleep mode
(with only the Calphalon logo illuminated on the display panel) indicating
that the fryer is still plugged in.
Before storing, unplug the cord from both the wall outlet and the deep fryer.
Allow oil to cool completely before removing control assembly and
before cleaning.
WARNING
ALWAYS press the power button to turn unit OFF before unplugging the unit
from wall outlet.
Changing/Canceling a Cooking Cycle
Changing Temperature or Time
To change the temperature or time once a cooking cycle is underway, press
the corresponding Select button until the desired temperature or time is
displayed. If increasing the temperature, the Heating icon will flash until the
oil heats up to the selected temperature.
Canceling a Cycle
If you need to turn off the deep fryer for any reason while cooking, simply
press the power button. To disconnect the deep fryer, be sure to grasp the
plug securely, rather than the power cord, when removing it from the outlet.
11
WARNING
If this deep fryer malfunctions during use, immediately press the Start/
Cancel button and the Power button to cancel the cycle. Unplug the power
cord from the electrical outlet. Do not use or attempt to repair the deep
fryer. Contact Calphalon Customer Service at 1-800-809-7267 for
examination, repair, or adjustment.
TIPS FOR SUCCESSFUL OPERATION
As you become familiar with your deep fryer, we want to share a few
suggestions.
Safety First
•When the fryer is used for the first time, a slight odor or light smoking
may occur as manufacturing residue evaporates. This is normal during
initial use.
•Never use the deep fryer without the removable enameled bowl inserted
into the base.
•Always fry foods with basket and lid.
•Before deep frying, remove ice crystals and excess moisture from food by
blotting with paper towel. Do not add wet food to cooking oil. Even small
amounts of moisture on foods causes excess foaming and/or spattering
and could cause the oil to overflow.
•Use only metal cooking utensils in the fryer. Plastic or rubber will become
damaged from the hot oil. Do not leave metal utensils in the fryer as they
will become hot.
•Always use the handles on the base when lifting or moving the appliance.
Move the deep fryer when it is empty, never when it is filled with oil.
NEVER lift or move the appliance by using the control assembly.
Choosing Cooking Oils
•Never use the deep fryer without sufficient oil. Also, never exceed the
maximum fill level. The minimum and maximum fill levels are embossed
inside the removable bowl.
12
•Use only good quality cooking oil in the deep fryer. Using olive oil is not
recommended because it has a lower smoking temperature.
•Do not use solid fat (shortening, butter, margarine or lard). Solid fat will
not melt uniformly and will cause severe smoking. In addition, solid fat will
re-solidify once it has cooled, making it very difficult to remove or insert
the control assembly.
Storing and Reusing Oil
•After each use, strain oil through a filter or a double thickness of
cheesecloth to remove the accumulated food residue.
•The number of times the cooking oil can be reused will depend on the
type of food being fried. For example, the oil will need to be replaced
more often if fish or food coated with bread or cracker crumbs is
fried frequently.
•The longer the oil is heated, the more rapidly it deteriorates. Avoid
preheating longer than necessary and turn off the fryer once the last
batch of food has been removed.
•To prolong the useful life of oil, store it in an airtight container in a cool,
dark area or in the refrigerator.
•It is time to replace the oil if:
– The oil is dark in color.
– The oil has an unpleasant odor.
– The oil smokes when it is heated.
– The oil foams excessively during frying.
Tips for Crispy, Evenly Cooked Foods
•Fry foods of equal size and thickness, as they will fry more evenly and be
cooked in the same amount of time.
•Do not fill the basket more than 2/3 full. If too much food is put in the fryer
at once, the food will not get crisp.
•For breading or coating foods, use commercial breading, finely ground
bread or cracker crumbs, corn meal, a mixture of corn meal and flour,
pancake mix or prepared bread mixes.
13
CLEANING AND CARE
WARNING
Unplug deep fryer before cleaning. Failure to do so may result in risk of
serious injury and electric shock.
Before Cleaning
1. UNPLUG – Carefully unplug the deep fryer’s power cord from the
electrical outlet by firmly grasping the plug. Then, unplug the magnetic
plug from the base of the deep fryer and set aside.
2. COOL – Let the deep fryer and oil cool completely before cleaning.
Cleaning the Deep Fryer
1. Completely cool fryer and oil.
2. Carefully lift control assembly out of fryer and wipe with a damp cloth
to clean. NEVER immerse the control assembly in water or wash in a
dishwasher.
3. Carefully lift bowl of cooled oil out of base. If you plan to reuse the
cooking oil, it is recommended that you strain the oil to remove any
food particles. Store the oil in a tightly sealed container and keep
where it will not be exposed to air or direct light.
4. Wash the removable bowl and fryer cover in dishwasher or in warm,
sudsy water. Do not use steel wool scouring pads or abrasive kitchen
cleansers on the removable bowl, cover or base and do not use
bleaching agents to clean the fryer basket. NOTE: Your fryer has a
permanent grease filter in the cover. The filter does not need replacing
and is not removable.
5. Wash frying basket by hand in warm, sudsy water. If desired, the
basket handle may be removed for cleaning. Squeeze the left and right
support arms of the handle to help release the handle from the notched
recesses of the handle bracket. The basket handle may be folded by
rotating the handle.
6. Before assembling unit, make sure all parts are completely dry
7. Always check magnetic plug before use to assure no metal items have
become attached to the magnet.
14
STORAGE
Store the deep fryer upright on a clean, dry level surface. The basket
handle may be collapsed and stored inside the basket. The power cord may
also be removed and stored inside the basket.
Do not store any materials, other than manufacturers recommended
accessories, in the deep fryer when not in use.
FREQUENTLY ASKED QUESTIONS
I set the temperature to 325˚, but the deep fryer is not heating
up. What is the problem? After selecting the temperature, press the
Start/Cancel button and the fryer will chime once. The deep fryer will begin
to heat the oil, and the heating icon will illuminate on the display panel.
After preheating the oil in my deep fryer for five minutes,
I added some French fries. They didn’t cook all the way
through. What did I do wrong? The oil takes approximately 15 to
17 minutes to preheat. During this time a heating icon will appear on the
display panel. When preheating is complete, the Ready icon will illuminate.
Simply wait for this signal indicating that the oil is the correct temperature to
begin frying.
Immediately after food is first added to the fryer, the Ready icon may
disappear and the Heating icon will reappear. This is normal, indicating
that the fryer is maintaining temperature. Even though the Ready icon is not
illuminated it doesn’t mean the fryer is not ready for use.
15
WARRANTY
Register your Deep Fryer - It’s Easy!
Please register your product to ensure that we have the correct information
in our system for any warranty inquiries. Retain the original sales
receipt. Without registering your product or having the
original sales receipt, we will consider the warranty start date
to be the date of manufacture.
Taking a few moments to register your product greatly expedites warranty
inquiries and helps us continue to develop new products and services that
make your culinary experience even better. Please visit
www.calphalon.com for complete details.
Limited One Year Warranty
Calphalon will repair or replace any deep fryer found defective in
material or workmanship within one year of the original purchase with
the original sales receipt. This warranty applies when the deep fryer is
put to normal household use and is operated and cared for according
to the instructions. This excludes damage from misuse or abuse, such as
improper cleaning, neglect, accident, alteration, fire, theft, or use in a
commercial establishment. Minor imperfections, surface markings as a
result of shipping, and slight color variation are normal. This warranty
excludes all incidental and consequential damages, except in those
states that do not allow the exclusion or limitation of these damages.
Without an original sales receipt or having registered your product
with Calphalon, the warranty start date will be considered the date of
manufacture. This warranty gives you specific legal rights, and you may
have other rights that vary from state to state.
16
Customer Service
We at Calphalon want to hear from you. If you have a question, comment,
or a recommendation that will help us help you, please contact us via our
web site, phone, fax or mailing address.
Please do not return the product to the store. Please contact
us directly with questions or comments about your deep fryer.
Thank you!
Web site
www.calphalon.com
Write Us
Calphalon Customer Service
PO Box 583 Toledo, Ohio 43697-0583
(Please, DO NOT send returns to this address)
Toll Free Phone
1-800-809-7267
(Monday-Friday 8:00am – 5:00pm EST)
Fax
419-666-2859
17
RECIPES
Crunchy Fried Shrimp
Serves 4
Ingredients:
Canola or Peanut Oil
1 lb. large fresh shrimp (16 to 20 per pound)
2 large eggs
1 c. all-purpose flour
Salt and pepper, to taste
Dash cayenne pepper, or to taste
1½ c. panko (Japanese breadcrumbs)
Lemon wedges
Method:
Using a Calphalon Deep Fryer, add oil to maximum fill line in bowl. Select
350 degrees F. and preheat oil. While oil is preheating, rinse, peel and
devein shrimp, leaving the tails on. Drain.
Place eggs in a shallow dish and beat well. Combine flour, salt, pepper and
cayenne pepper and place in a shallow dish. Place panko in a third dish.
Dredge each shrimp in flour, then egg and then panko, coating each piece
thoroughly. Transfer shrimp to a large plate.
Place 6 pieces of shrimp in the Calphalon Deep Fryer basket, and carefully
lower it into the preheated oil. Cook about 2½ to 3 minutes, until golden
brown. Carefully lift basket out of oil and lock it onto resting hooks. Allow
shrimp to drain and then remove and transfer to a wire rack with a pan
underneath. Repeat the process with remaining shrimp.
Serve shrimp with lemon wedges.
18
Fried Onion Rings
Serves 4 to 6
Ingredients:
2 large Spanish or sweet onions
2 c. buttermilk
2 Tbsp. hot sauce
1½ c. all-purpose flour
½ c. cornstarch
1 tsp. salt, plus extra for cooked rings
¼ tsp. black pepper
½ tsp. baking powder
Canola or peanut oil
Method:
Peel and cut onions into slices, about ¼ to ½ inch thick. Separate the slices
into rings. In a mixing bowl, whisk together the buttermilk and hot sauce. In
another bowl, whisk together the flour, cornstarch, salt, pepper and baking
powder. Combine the wet and dry ingredients together. (If batter is too thick
add a little water to thin.)
Using a Calphalon Deep Fryer, add oil to maximum fill line in bowl. Preheat
the oil to 375 degrees F.
Dip each ring into batter and then shake off extra batter. Place several
onion rings into the Calphalon Deep Fryer basket and carefully lower it into
the preheated oil. Cook onions about 1½ to 2 minutes, or until the rings
are golden brown. Use metal tongs to turn the rings during the cooking
process. Carefully lift the basket out of oil and lock it onto resting hooks.
Allow onions to drain and then transfer them to a wire rack with a pan
underneath. Repeat the process with the remaining onions.
Sprinkle the rings with salt and serve.
19
NOTES
20
NOTES
21
© 2011