1
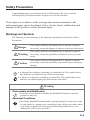
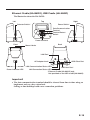
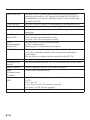
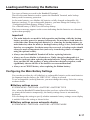
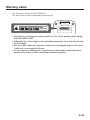
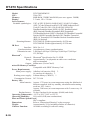
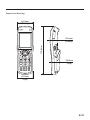
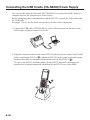
E Handheld Terminal DT-970 User’s Guide Be sure to read “Safety Precautions” inside this guide before trying to use your Handheld Terminal. Series BLUETOOTH is a registered trademark owned by Bluetooth SIG, Inc. and licensed to CASIO COMPUTER CO., LTD. eneloop is a registered trademark of Panasonic Group. Information in this document is subject to change without advance notice. CASIO Computer Co., Ltd. makes no representations or warranties with respect to the contents or use of this manual and specif ically disclaims any express or implied warranties of merchantability or f itness for any particular purpose. BLUETOOTH是注冊商標Lj為Bluetooth SIGLjInc.所擁有Lj並授權卡西歐計算機 株式會社使用該商標ă eneloop是Panasonic Group的注册商标。 未经事先通知Lj可更改本文信息ă卡西欧计算机有限公司对本手册内容或本手册的使用不做 任何声明或保证Lj并且对用于任何特定目的的适销性或适用性的明示或默示的保证不予承诺ă BLUETOOTH, Bluetooth SIG, Inc. şirketinin sahip olduğu ve lisansı CASIO COMPUTER CO., LTD'ye verilen tescilli bir ticari markadır. eneloop, Panasonic Grubunun tescilli ticari markasıdır. Bu belgedeki bilgiler önceden bildirilmeksizin değiştirilebilir. CASIO Computer Co., Ltd. bu kılavuzun içeriği veya kullanımıyla ilgili hiçbir sorumluluk kabul etmez ya da garanti vermez ve ticari değer veya belirli bir amaca uygunluk konusundaki açık ya da zımni her türlü garantiyi reddeder. BLUETOOTH ist ein eingetragenes Warenzeichen der Bluetooth SIG, Inc., lizenziert für CASIO COMPUTER CO., LTD. eneloop ist eine eingetragene Handelsmarke der Panasonic Group. Die Angaben in diesem Dokument können ohne vorherige Bekanntgabe geändert werden. CASIO Computer Co., Ltd. gibt keine Zusicherungen und Garantien in Bezug auf den Inhalt dieses Handbuchs ab, und lehnt insbesondere jegliche ausdrückliche oder stillschweigende Garantie über Marktfähigkeit oder Eignung für einen bestimmten Zweck ab. BLUETOOTH является зарегистрированным товарным знаком, принадлежащим компании Bluetooth SIG, Inc и лицензированным для компани CASIO COMPUTER CO., LTD. eneloop является зарегистрированным товарным знаком компании Panasonic Group. Информация, содержащаяся в данном документе, может быть изменена без предупреждения. Компания CASIO Computer Co., Ltd. не делает никаких заявлений и не дает никаких гарантий относительно содержания или использования настоящего руководства, и при этом не дает никаких обязательств в отношении каких-либо явно выраженных или подразумеваемых гарантий товарного качества или пригодности для использования по назначению. Contents Safety Precautions .........................................................................................E-3 Operating Precautions ...................................................................................E-8 About the Waterproofing/Dustproofing........................................................E-9 Regulatory Information ................................................................................E-10 Important ......................................................................................................E-10 Accessories and Options .............................................................................E-11 General Guide ...............................................................................................E-12 Loading and Removing the Batteries .........................................................E-17 Configuring the Main Battery Settings .............................................................. E-17 Loading the Main Batteries ................................................................................E-18 Loading the Backup Battery ..............................................................................E-19 Removing the Backup Battery ...........................................................................E-19 Handling microSD Cards .............................................................................E-20 Installing............................................................................................................. E-20 Removing ........................................................................................................... E-21 Performing Communications .....................................................................E-22 IR Communication ............................................................................................. E-22 Bluetooth® Communication ...............................................................................E-23 Resetting the Handheld Terminal ................................................................E-24 Warning Label ...............................................................................................E-25 DT-970 Specifications .................................................................................E-26 Connecting the USB Cradle (HA-N60IO) Power Supply............................E-28 Specifications .....................................................................................................E-30 E-1 Connecting the USB Cradle (HA-E60IO) Power Supply ............................E-31 Connecting the Ethernet Cradle (HA-N62IO) Power Supply ....................E-33 Specifications .....................................................................................................E-35 Adjusting the Laser Beam Width ................................................................E-36 E-2 Safety Precautions Congratulations upon your selection of this CASIO product. Be sure to read the following Safety Precautions before trying to use it for the first time. Your neglect or avoidance of the warning and caution statements in the subsequent pages causes the danger of fire, electric shock, malfunction and damage on the goods as well as personal injury. Markings and Symbols The following are the meanings of the markings and symbols used in these Safety Precautions. Danger This symbol indicates information that, if ignored or applied incorrectly, creates the danger of death or serious personal injury. Warning This symbol indicates information that, if ignored or applied incorrectly, creates the possibility of death or serious personal injury. Caution This symbol indicates information that, if ignored or applied incorrectly, creates the possibility of personal injury or property damage. • A diagonal line indicates something you should not do. The symbol shown here indicates you should not try to take the unit apart. • A black circle indicates something you should do. The symbol shown here indicates you should unplug the unit from the wall outlet. Warning Disassembly and Modification • Never try to disassemble or modify the Handheld Terminal or optional products in any way. Abnormal Conditions • Should the Handheld Terminal and/or optional products become hot or start to emit smoke or a strange odor, immediately turn off the power and contact your dealer or distributor whom you purchased the product from, or an authorized CASIO service provider. E-3 Warning Dust and Moisture • Though the Handheld Terminal is dust and water splash resistant, its options including the cradle are not. Keep loose metal objects and containers filled with liquid away from your Handheld Terminal and the options. Also, never handle the Handheld Terminal and the options while your hands are wet. Laser Light • The Handheld Terminal scans bar codes using laser light. Never look directly into the laser light or shine the laser light into the eyes. Warning Interference with the Operation of Other Equipment (Using Wireless Data Communication) 11 • Keep your Handheld Terminal at least 22 centimeters (8 /16") away from anyone wearing a pacemaker. Radio waves emitted by the Handheld Terminal can affect the operation of a pacemaker. • Before the use in aircraft, be sure to consult with cabin crew for interference the Handheld Terminal emits. • Before the use in medical facility, be sure to consult with the facility management or the manufacture of a specific medical equipment that the Handheld Terminal may interfere with. • Do not use the Handheld Terminal nearby gas pump or chemical tank or any other places flammable or explosive. Caution Foreign Objects • Take care to ensure that metals or combustible objects are not inserted into the openings of the Handheld Terminal or its options, and not to allow moisture to get inside of them. Location • Install the cradle properly on a flat and stable surface so that it cannot fall down onto floor. LCD Screen • Never apply strong pressure to the screen or subject it to strong impact. Doing so can crack the LCD Screen. E-4 Rechargeable Batteries Caution • Use Panasonic “eneloop” rechargeable AA batteries. Do not use other types of rechargeable battery. • Always charge the rechargeable batteries using the dedicated charger. • Rechargeable batteries cannot be charged while installed in the DT-970. • When using eneloop batteries with the charger, read the instructions for the eneloop batteries and charger to ensure that you use them correctly. Alkaline Batteries Danger • If fluid from one of the batteries gets into your eye, immediately take the following steps: — Rinse with clean water without rubbing the eye. — Seek immediate medical treatment from a physician. Failure to take remedial action could result in loss of eyesight. Warning • Incorrect use of the batteries could result in staining of the surroundings due to fluid leakage, or could cause the batteries to burst, resulting in fire or injury. Ensure that you observe the following: — Never disassemble, modify, damage or short-circuit the batteries. — Do not heat the batteries or throw them into a fire. — Do not use new and old batteries together. — Do no use different types of batteries together. — Do not attempt to charge alkaline batteries. — Do not drop batteries or subject them to strong impacts. — When storing or disposing of batteries, insulate the battery terminals with tape, etc., and do not short-circuit the batteries. • Load the batteries, ensuring that the polarity (+ and - ends of the battery) is correct. • Using the incorrect battery type could result in an explosion. E-5 Caution • Incorrect use of the batteries could result in staining of the surroundings due to fluid leakage, or could cause the batteries to burst, resulting in fire or injury. Ensure that you observe the following: — Do not store the batteries in locations exposed direct sunlight, high temperatures or high humidity. — If the batteries will not be used for a long period, take them out of the Handheld Terminal. — Do not allow water or other fluids to come into contact with the batteries. Coin-type Lithium Battery Warning • Using the coin-type lithium battery incorrectly could cause the battery to burst, resulting in a fire or injury. Ensure that you observe the following: — Never disassemble, modify, damage or short-circuit the battery. — Do not attempt to charge the coin-type lithium battery. — Do not heat the battery or throw it into a fire. — Load the batteries, ensuring that the polarity (+ and - ends of the battery) is correct. — When storing or disposing of batteries, insulate the battery terminals with tape, etc., and do not short-circuit the batteries. — Do not drop battery or subject it to strong impacts. Caution • Using the coin-type lithium battery incorrectly could cause the battery to burst, resulting in a fire or injury. Ensure that you observe the following: — Do not store the battery in locations exposed direct sunlight, high temperatures or high humidity. — Do not allow water or other fluids to come into contact with the battery. • Dispose of used battery according to the local regulation. E-6 Power Supply / AC Adaptor Warning • Do not use the Handheld Terminal at a voltage other than the specified voltage. • Never modify, sharply bend, twist, or pull on the power cord. • Never use a detergent to clean AC adaptor and its power cable, especially on the plug and the jack. • When using the cradles, be sure to use the respective AC adaptors. Caution • Never pull on the power cord when unplugging it. Always hold the plug when unplugging it from the wall outlet. • Never touch the plug while your hands are wet. • Be sure to unplug the power cord from the wall outlet before cleaning the cradles. • Unplug the power cord from the wall outlet whenever leaving the cradles unattended for a long period. • The housing of the AC adaptor can become warm during normal use. • At least once a year, unplug the AC adaptor from the wall outlet and clean any dust that builds up between the prongs of the plug. Dust built up between the prongs can lead to the danger of fire. Backup of All Important Data Caution • Note that CASIO Computer Co., Ltd. shall not be held liable to you or any third party for any damages or loss caused by deletion or corruption of data due to use of the Handheld Terminal, malfunction or repair of the Handheld Terminal or its peripherals, or due to the batteries going dead. • The Handheld Terminal employs electronic memory to store data, which means that memory contents can be corrupted or deleted if power is interrupted due to the batteries going dead or incorrect battery replacement procedures. Data cannot be recovered once it is lost or corrupted. Be sure to make backup of all important data. One way to do this is to use the separately sold cradles to transfer data to a computer. E-7 Operating Precautions Your Handheld Terminal and its options are precision. Improper operation or rough handling can cause problems with data storage and other problems. Note and observe the following precautions to ensure proper operation. • Do not continue using the battery once it is exhausted. Doing so could result in data loss or corruption. When the battery is exhausted, replace it immediately. • Stop or avoid using the Handheld Terminal and its options in areas and conditions subject to the following. — Large amounts of static electricity — Extreme heat or cold or humidity — Sudden temperature change — Large amount of dust — After large amount of rain or water falls on the Handheld Terminal — Pressing the screen or keys with excessive force when using in the rain • Do not use volatile chemical substances such as thinners, benzene or toiletries to clean the Handheld Terminal. When the Handheld Terminal is dirty, wipe it clean with a soft, dry cloth. Rubbing with excessive force could scratch the display. • The power-supply terminals and Data Communication terminals should be cleaned from time to time using an implement such as a dry cotton bud. Soiling on the terminals may cause connection defects. • Take care when using chemicals. Applying thinners, gasoline, kerosene, solvents or oils, or substances such as cleaners, adhesives, paints, medications or toiletries that contain those materials, to the plastic case or cover may cause discoloration or other damage. E-8 About the Waterproofing/Dustproofing The DT-970 Series models are waterproof and dustproof. • Waterproofing: Performance complies with the IPX7 level set out in the IEC standards (waterproof for 30 minutes at a depth of 1 meter in still tap water at normal temperature). • Dustproofing: Performance complies with the IP6X level set out in the IEC standards. IP (Ingress Protection) is the standard for splash- and dust-proofing for electrical products set out in the International Electrotechnical Commission (IEC) standard 60529. The IEC is a global organization for standardization that includes all the IEC National Committees. Important! The water- and dust-proofing performance of this product is based on CASIO testing procedures. Note also that this performance applies to the product at the time of shipment (delivery to the customer) and is not guaranteed inclusive of the environment in which the product is used. The warranty does not apply to any situation where the product is immersed during use, and as with any other electrical product, great care should be taken when using this product in the rain or similar situation. • Precautions When Using this Product — Check that there is no dust, sand or other foreign matter on the battery covers, USB Port cover or on the respective contact surfaces. If any soiling is found, wipe it off with a clean, soft, dry cloth. Even very small amounts of soiling trapped on the contact surfaces (a single hair or grain of sand, etc.) can cause water to leak into the device. — Check that the waterproof seals on the battery covers and USB Port cover are free from cracks and other damage. — Close the battery cover lock switches firmly until you hear them click into place. — Avoid opening and closing the battery covers or USB Port cover in locations near water or exposed to sea breezes, and do not open or close them with wet hands. — Do not drop this product or leave it in locations exposed to temperatures outside the specified range. Doing so could impair its water- or dust-proofing. • Other Precautions — The accessories for this product and optional products are not water- or dust-proof. — Subjecting this product to a severe impact could render it no longer water- or dust-proof. — If any water leaks into the product as a result of carelessness or inattention during product handling, CASIO cannot be held liable for compensation for any damage to internal components (recording media, etc.) or for the costs of recorded content or the recording thereof. — CASIO COMPUTER CO., LTD. accepts no other liability whatsoever for any accident that occurs due to water leakage. E-9 Regulatory Information Europe Products are for distribution within all member states of the EU. 0984 Optional models HA-N60IO, HA-N62IO, HA-E60IO are in conformity with the Council Directive 2004/108/EC. Manufacturer: CASIO COMPUTER CO., LTD. 6-2, Hon-machi 1-chome, Shibuya-ku, Tokyo 151-8543, Japan Representative within the European Union: CASIO EUROPE GmbH Casio-Platz 1, 22848 Norderstedt, Germany The modification of the software for controlling RF radiation of Bluetooth is prohibited. Important • This guide does not include any information about programming and download procedures. See the applicable separate documentation for information about the procedures. After Service • Should this product ever malfunction, contact your original retailer providing information about the product name, the date you purchased it, and details about the problem. E-10 Accessories and Options Handheld Terminal DT-970M50E DT-970M51E Accessories Please check the items in the box before using the Handheld Terminal for the first time. • Alkaline AA batteries 2 • Coin-type lithium battery • Hand Strap 1 • User’s Guide 1 Options • USB Cradle HA-N60IO • Ethernet Cradle HA-N62IO • Laser Redirection Attachment HA-N50BN5 • USB Cable (Handheld terminal-computer connection) HA-N81USBC • USB Cable (Cradle-computer connection) DT-380USB-A • AC Adaptor for Ethernet Cradle AD-S42120C-N5 • USB Cradle HA-E60IO • AC Adaptor for HA-E60IO AD-S15050B-N5 • Attachment kit for HA-E60IO HA-N64AT • Power Cord for Europe AC-CORD-EU • Power Cord for Taiwan AC-CORD-TW • Power Cord for Korea AC-CORD-KR • Power Cord for Australia AC-CORD-AU For the latest options list, refer to the ON-LINE manual available at http://support.casio.com/en/manual/manual.php?cid=010 E-11 General Guide Handheld Terminal (DT-970M50E/M51E) The illustration shows the DT-970M51E. Indicator Screen USB Port R Trigger Key Reset Switch IR Port Power Contacts microSD Card Slot (Battery Compartment) Keys Power Key BS Key CLR Key S Key microSD Card Slot Center Trigger Key Cursor Keys (Up/Down/ Left/Right) Multi-function (R) Key Numeric Keys Multi-function (L) Key Enter Key Function Keys Barcode Reader Port Buzzer Battery Cover Lock Switches Battery Cover (Backup Battery) L Trigger Key Battery Cover (Main Batteries) Strap Holes E-12 Data Communication Terminal Barcode Reader Port Indicator Screen L Trigger Key R Trigger Key Cursor Key Keys Reset Switch Laser light is emitted from this window that reads bar codes. Three-color LED (red, green, blue). Shows the operating status and confirms barcode scanning. Lit green: Barcode scan successful. The indicator light specifications vary depending on the application used. Displays various data when a program is being run. Used to perform bar code reading. Used to perform bar code reading. Perform the same functions as the up and down arrow keys on a PC keyboard. CLR key: Cancels input. Power Key: Turns the power on and off. BS key: Backspaces and deletes one character. S key: Switches between the character input mode and the number input mode. “S” appears on the LCD screen to indicate character input mode. If “S” is not displayed (when “S” display is set to ON), the Handheld Terminal is in number input mode. The “S” display can be enabled or disabled in the application settings. Multi-function (L/R) keys: Keys that can be assigned any function. 10-key pad: The function of these keys depends on whether the Handheld Terminal is in the character input mode or the number input mode. Character input mode: Input alphanumeric and symbols. Number input mode: Inputs the numbers 0 to 9 and the decimal point. Enter key: Registers input. Function keys: Keys that can be assigned any function except for the trigger key function. The following are the initial functions assigned to these keys. F1 (–): Inputs the minus (–) sign. F2 (←): Moves the cursor left. F3 (→): Moves the cursor right. F4 (DEL): Deletes a character. F5 (SP): Inputs a space. F6 (▲): Increases display contrast. F7 (▼): Decreases display contrast. F8 (BL): Turns the display backlight and the key lights ON and OFF. Used to reset the Handheld Terminal. E-13 Center Trigger Key USB Port Buzzer Battery Cover (Backup Battery) Battery Cover Lock Switches Battery Cover (Main Batteries) Strap Holes Data Communication Terminal Power Contacts IR Port E-14 Used to perform bar code reading. Connects the optional USB cable (HA-N81USBC). Outputs operation confirmation tones. Opens the cover to allow the memory backup lithium battery to be installed. Used to lock the battery cover and to release. Opens the cover to allow the main batteries to be installed. Used to attach the hand strap. Used for communication with the cradle. Used to receive power provided by the USB Cradle. This port is for IR communication with another DT-970 unit or with one of the optional cradles (HA-E60IO). Ethernet Cradle (HA-N62IO), USB Cradle (HA-N60IO) The illustration shows the HA-N62IO. Left Top Right Power Switch* Selector Switch* Data Communication Terminal Terminal Detect Switch Power Contacts Front Back Mount Hooks LAN Port* AC Adaptor-Jack* Power Indicator LED* LAN Communication Status LED* LAN Connection Status LED* USB Client Port USB Host Port* * Ethernet Cradle (HA-N62IO) only. Not provided on the USB cradle (HA-N60IO). Important! • The data communication terminal should be cleaned from time to time using an implement such as a dry cotton bud. Soiling or dust buildup could cause connection problems. E-15 USB Client Port USB Host Port Power Switch Selector Switch LAN Connection Status LED LAN Communication Status LED LAN Port AC Adaptor Jack Terminal Detect Switch Power Contacts Data Communication Terminal Power Indicator LED Mount Hooks E-16 This port is used to transmit data and files (download, upload) by connecting the cradle to a PC using a USB cable (DT-380USB-A). The dedicated driver must be installed in the PC before connecting the cradle to the PC. This port is used to connect a corresponding USB peripheral device. Turns the power on and off. This switch is used to switch between a USB connection and a LAN connection. This LED shows the status of the LAN connection. Off: LAN cable not connected correctly. Lit green: LAN cable connected correctly. This LED shows the LAN operation status. Off: No communication. Blinking green: Communication in progress. This port is used for connecting the cradle to a PC or hub via a LAN cable so that data and files can be transmitted (uploaded or downloaded). The special driver software must be installed in the DT-970. Connect the AC adaptor here. This switch detects when the DT-970 is seated correctly on the cradle. Power is supplied to the DT-970 via these contacts. Used for data communications. This LED indicates the power status and the mounting status of the DT-970. Off: Power off Green: Power on, DT-970 mounted correctly Red: Power on, DT-970 not mounted Use these hooks to lock the DT-970 into the cradle. Loading and Removing the Batteries Two types of battery are used in the Handheld Terminal. There are the main batteries used to operate the Handheld Terminal, and a backup battery used for memory protection. As the main batteries, use alkaline AA batteries or fully charged rechargeable AA batteries (eneloop). To use rechargeable batteries, you must change the setting. (See “Configuring the Main Battery Settings” below.) Use a lithium battery (CR2032) as the backup battery. If an icon or message appears on the screen indicating that the batteries are exhausted, replace them promptly. Important! • The main batteries are used for both operation and backup, while the backup battery provides power for memory backup only. Do not remove both batteries at the same time. Removing both batteries, or removing the backup battery (or main batteries) when the main (or backup) battery charge is low, could result in data loss or corruption. Lost data cannot be recovered, so backup copies should always be made of important data (such as by transferring data to a computer using the optional cradle). • Always turn the Handheld Terminal off before replacing batteries. • Always use 2 new alkaline AA batteries or 2 fully charged rechargeable AA batteries (eneloop) when replacing the main batteries. Using batteries other than those specified for this product, or using old and new batteries together, could significantly shorten the life of the batteries or cause malfunctions. • Always use a CR2032 battery when replacing the lithium battery. Configuring the Main Battery Settings You can choose either dry cell (alkaline) or rechargeable batteries as the main batteries. At shipment from the factory, the “DRY CELL” setting is selected. To use rechargeable (eneloop) batteries, you must change the setting. Select the setting as shown below. ■ Battery settings screen SYSTEM MENU→SETTINGS→BATTERY→BATTERY TYPE Also, when the Handheld Terminal detects that you have replaced the batteries (or removed the batteries temporarily), the battery settings screen is automatically displayed. You can change the setting to specify whether automatic battery settings screen display is enabled. Select the setting as shown below. ■ Battery settings screen automatic display SYSTEM MENU→SETTINGS→BATTERY→SETTING MODE E-17 Loading the Main Batteries 1. Turn the battery cover lock switches to the “FREE” position and remove the battery cover. Locked Free 2. Load the batteries, ensuring that the polarity (+ and -) is correct. 3. Re-install the battery cover and return the battery cover lock switches to the “LOCK” position. E-18 Loading the Backup Battery 1. Loosen the 2 screws and remove the battery cover by opening the notch with your fingernail. Screws (2) Notch 2. Load the battery from the direction of the arrow, ensuring that the polarity (+ and -) is correct. 3. Re-install the battery cover and tighten the 2 screws. Removing the Backup Battery 1. As shown in the illustration, use a pointed implement such as a ballpoint pen to remove the battery. E-19 Handling microSD Cards The Handheld Terminal supports microSD card. Since the microSD card slot is located inside the battery compartment, first remove the batteries when installing or removing a microSD card. Refer to pages 17 to 18 for information on “Loading and Removing the Main Batteries”. Install (or remove) a microSD card according to the procedure described below. Installing 1. Make sure that the power on the terminal has been switched off. If the power is still on, press the power key to switch off. 2. Remove the batteries. 3. Open the microSD card cover. 4. Lay the card flat with the front (the side with the text) upwards so that it will slide into the slot at the rear and then push the card into the slot. • Push the card firmly into the slot until it locks into place. • Do not try to insert the card on an angle. 5. Close the microSD card cover and install the batteries. E-20 Removing 1. Make sure that the power on the terminal has been switched off. If the power is still on, press the power key to switch off. 2. Remove the batteries and open the microSD card cover. 3. Catch the projecting lip with your fingertip as shown in the illustration and pull the card out. 4. Close the microSD card cover and install the batteries. Important! • A microSD card must be inserted with the top and bottom properly aligned and in the proper direction. Attempt in inserting it with an excessive force in incorrect orientation can risk damage to the connectors and slot. • Never turn off the power or remove a microSD card from the slot while the card is being accessed. Doing so can damage the microSD card or data in the card. • Do not drop the card or lose it. E-21 Performing Communications IR Communication IR communication can be used to transmit data between two Handheld Terminals. When performing IR communication, orient the IR ports of both Handheld Terminals so they are pointing directly at each other. The ports can be in direct contact with each other, or they can be separated by up to 30cm (1113⁄16") (up to 20cm (7 7⁄8") for communication between units). Important! • A high-sensitivity communication element is used during IR communication. • In order to ensure successful communication, avoid using cellular phones or other devices that emit radio wave in the area where you are performing IR communication. • If you need to use such a device, move away from the communicating Handheld Terminals. In case of a cellular phone, keep it at least 30cm (1113⁄16") away. E-22 Bluetooth® Communication Bluetooth® interface can also be used to transmit data between two Handheld Terminals. With Bluetooth® the two Handheld Terminals should be located within about 5 meters from each other, as long as there is nothing blocking the path between them. Important! Observe the following precautions to help ensure that Bluetooth communication is successful. • Make sure there is at least two meters between the Handheld Terminal and other equipment (electrical appliances, audio-visual equipment, OA equipment, and digital cordless telephones, facsimile machines, etc.). (Take special care with microwave ovens. Allow at least three meters between the Handheld Terminals in wireless operation and a microwave oven.) When approaching such a device when its power is turned on, proper communication may prove impossible while this may also cause interference with TV and radio reception (images produced by certain UHF and broadcast satellite channels may become blurry). • Normal communication may not be possible in an area near a broadcast transmitter or wireless transmitter. If this happens, move the Handheld Terminal to a different location. Normal communication may not be possible in areas exposed to strong radio waves. • RF Wireless LAN Interference Because Bluetooth® and RF wireless LAN use the same frequency band (2.4GHz), radio interference can occur if there is a wireless LAN device nearby. This can result in lower communication speeds, or even make it impossible to establish a connection. If this happens, try the following countermeasures. • Move at least 10 meters away from the wireless LAN device. • If you cannot keep the distance at least 10 meters or more between the Handheld Terminal and a wireless LAN device, turn off the power of either the Handheld Terminal or the wireless LAN device. E-23 Resetting the Handheld Terminal Resetting the Handheld Terminal is the same as restarting a PC. Performing a reset causes all unsaved inputs and edits to be lost, but data that is already stored in the memory as well as all settings should be unaffected. Use reset to restore normal operation whenever the Handheld Terminal operates abnormally due to misoperation or some other reason. Use a stylus to press the reset switch on the front of the DT-970. This starts the reset operation. * Do not use a toothpick or pencil or other object whose tip may break off when pressing the reset switch. Otherwise there is a risk of damage. E-24 Warning Label The illustration shows the DT-970M51E. The label location differs depending on the model. • This label is a warning and caution label for Class 2 laser products that comply with IEC60825-1:2007. • Although Class 2 laser light is only emitted momentarily, never look directly into the beam light. • The laser light emitted by this laser scanner has a maximum output of less than 1 mW and a wavelength of 650 nm. • Use of controls or adjustments or performance of procedures other than those specified herein may result in hazardous radiation exposure. E-25 DT-970 Specifications Model: CPU: Memory: Display: Laser Scanner: Readable symbologies: Scanning distance: DT-970M50E/M51E 32bit CPU 8MB RAM, 32MB Flash ROM (user area: approx. 28MB) 2.3-inch, 128 × 128-dot UPC-A/UPC-E/EAN8 (JAN8)/EAN13 (JAN13)/Codabar (NW-7)/Code39/Interleaved2of5 (ITF)/MSI/Industrial2of5/ Code93/Code128 (GS1-128 (EAN128))/IATA/GS1 DataBarOmnidirectional (RSS-14)/GS1 DataBarLimited (RSS Limited)/DataBar Expanded (RSS Expanded)/ GS1DataBarStacked (RSS-14 Stacked)/GS1DataBar Expanded Stacked (RSS Expanded Stacked)/GS1 DataBar Truncated (RSS-14 Truncated)/GS1 DataBar Stacked Omnidirectional (RSS-14 Stacked) DT-970M51E: Within approximately 40-550 mm DT-970M50E: Within approximately 45-550 mm IR Port: Interface: IrDA Ver. 1.0 Synchronization: Asynchronous, frame synchronization Transmission rate: 2,400 bps/9,600 bps/19,200 bps/38,400 bps/57,600 bps/ 115,200 bps/ Bluetooth®: Protocol: Bluetooth® Specification Ver.2.1+EDR Range: Approximately 5 m (depends on radio wave conditions and environment) Output: 4dBm max. (PowerClass2) microSD Memory Card Slot: Compatible with SDHC Memory Card Power Requirements: Main power supply: Alkaline AA batteries (LR6) 2 Or, eneloop AA batteries 2 Backup power supply: Lithium battery (CR2032) 1 Consumption Current: DC 3V/0.4A Battery Life: Main batteries: Approx. 175 hours (at room temperature using the alkaline AA batteries supplied, with key standby, calculation and scanning used in a 20:1:1 ratio) Approx. 200 hours (at room temperature with 2 scans every 10 seconds) Backup battery: 20 days (backup for the memory (RAM) and clock) Operating Temperature: –10°C to 50°C (14°F to 122°F) Operating Humidity: 10% to 80% RH (non-condensation) Dust and Water Splash Proof: IP67-compliant Dimensions: Refer to “Dimensional Drawing” on the next page. Weight: Approximately 215g (including alkaline AA batteries) Vibrator Function: Available according to software setting. E-26 Dimensional Drawings 54.0mm (Display) 25.0mm 173.5mm (Display) 26.9mm (Grip) 52.0mm (Grip) E-27 Connecting the USB Cradle (HA-N60IO) Power Supply You can use the optional USB cable (DT-380USB-A) to connect the USB Cradle to a computer and use the computer as a power source. Before attempting data communication with the DT-970, connect the USB Cradle and the USB cable. See pages 15 to 16 for the name and operation of each of the components. 1. Connect the USB cable (DT-380USB-A) to the USB client port on the back of the USB Cradle, and then connect it to the PC. PC 2. Align the contacts on the bottom of the DT-970 with the power contacts in the cradle before inserting the DT-970 ( 1 ). Mount the DT-970 in the cradle so that the mount hooks in the cradle are aligned with the mount holes in the DT-970 ( 2 ). To remove the DT-970 from the cradle, tilt the DT-970 forward to disengage the mount hooks from the mount holes and then lift the DT-970 out of the cradle. E-28 Important! • Water or other liquids on the data communication or power supply terminals can lead to an electric shock or fire. Note also that soiling on the terminals will impair the connection, leading to reduced power supply and communication functionality. As a safety precaution, disconnect the USB cable before wiping the data communication and power supply terminals clean with a dry cloth or cotton bud. • When loading the DT-970 into the cradle, ensure that it is securely slotted into place. The DT-970 must be inserted correctly to draw power and communicate successfully. • Never short out the power contacts of the USB Cradle. This can damage the USB Cradle. • Do not pick up the DT-970 while it is mounted in the USB Cradle. Doing so may result in the USB Cradle being accidentally dropped, causing injury or damage. • Do not subject the DT-970 and USB Cradle to vibration or impact during communication. This can cause communication to be interrupted. • Always cap ports that are not being used. Using the USB Cradle while the ports are uncapped can cause damage. E-29 Specifications 1. USB Protocol: Transfer Rate: 2. Power Supply Output to Handheld Terminal: 3. Dimensions and Weight Dimensions: Weight: 4. Operating Environment Temperature: Humidity: E-30 USB Ver2.0 Full speed 12Mbps (max.) 5V DC 0.5A (max.) Approximately 94(W) × 84(D) × 107(H) mm Approximately 250g 0°C to 40°C (32°F to 104°F) 30% to 80% RH (non-condensation) Connecting the USB Cradle (HA-E60IO) Power Supply Before using the cradle, fit the optional attachment kit (HA-N64AT). 1. Make sure that the USB Cradle’s power switch is turned off and then plug the optional AC adaptor (AD-S15050B-N5) into the AC adaptor jack on the back of the USB Cradle. 2. Connect the power cord to the AC adaptor before connecting the power cord to the electrical outlet. E-31 3. Connect the USB cable (DT-380USB-A) to the USB port on the back of the USB Cradle and then connect it to the personal computer. 4. Line up the infrared interface on the bottom of the DT-970 and the infrared interface on the USB Cradle to mount the DT-970. 5. Turn on the power switch. The power indicator LED on the front of the USB Cradle lights green if the DT-970 is correctly mounted. Important! • This does not supply power to the DT-970. • The DT-970 cannot be loaded directly into the cradle (HA-E60IO) itself. You must fit the optional attachment kit (HA-N64AT) first. • Be careful not to pinch the hand strap when it is attached to the DT-970. Draw the hand strap to the side of the cradle. E-32 Connecting the Ethernet Cradle (HA-N62IO) Power Supply Use the separately sold AC adaptor (AD-S42120C) for the power supply of the Ethernet Cradle. Always make sure to connect the AC adaptor to the Ethernet Cradle before performing communication with the Handheld Terminal. Power to the Handheld Terminal is supplied from the Ethernet Cradle. 1. Plug the AC adaptor into the AC adaptor jack on the back of the Ethernet Cradle. 2. After connecting the power cable to the AC adaptor, plug the other end of it into an electrical outlet. 3. Use the selector switch on the left side of the Ethernet Cradle to select the port to be used. Set the switch to the “LAN” position when using the LAN port on the cradle. Set the switch to the “B” position when using the unit as a USB client, or set it to the “A” position when using the unit as a USB host. E-33 4. Before using the cradle ports, remove the caps from the ports. When using a LAN, connect one end of the LAN cable to the LAN port and the other end to the PC or hub. When using a USB connection, connect one end of the USB cable (DT-380USB-A) to the USB port and the other end to the PC. The USB host port is used for connecting the cradle with other USB peripheral device. PC PC or hub 5. Turn on the power switch on the right side of the Ethernet Cradle. The power LED on the front of the Ethernet Cradle lights red. 6. Align the contacts on the bottom of the DT-970 with the power contacts of the Ethernet Cradle when inserting the unit. The power LED on the front of the Ethernet Cradle will light green if the Handheld Terminal has been properly mounted. E-34 Important! • Always make sure to first remove the 970 from the Ethernet Cradle when switching the selector switch. • Water or other liquids on the data communication or power supply terminals can lead to an electric shock or fire. Note also that soiling on the terminals will impair the connection, leading to reduced power supply and communication functionality. As a safety precaution, disconnect the AC adapter before wiping the data communication and power supply terminals clean with a dry cloth or cotton bud. • Never short out the power contacts of the Ethernet Cradle. This can damage the Ethernet Cradle. • Do not subject the Handheld Terminal and Ethernet Cradle to vibration or impact during communication. This can cause communication to be interrupted. • When loading the DT-970, fit it securely in place and check that the green power indicator LED on the front of the Ethernet Cradle is lit. The DT-970 must be inserted correctly to draw power and communicate successfully. • Always cap ports that are not being used. Using the Ethernet Cradle while the ports are uncapped can cause damage. • Do not pick up the DT-970 while it is mounted in the Ethernet Cradle. Doing so may result in the Ethernet Cradle being accidentally dropped, causing injury or damage. • If the Ethernet Cradle will not be used for an extended period, set the power switch to OFF. Specifications 1. LAN Specifications Communications protocol: Media type: 2. USB Protocol: Transmission rate: 3. Power Supply Power Source: Consumption Current: Output to Handheld Terminal: USB Host Output: 4. AC Adaptor Model: Input: Output: 5. Dimensions and Weight Dimensions: Weight: 6. Operating Environment Temperature: Humidity: IEEE 802.3 10base-T/100base-TX auto-switched USB Ver2.0 Full speed 12Mbps (max.) AC adaptor (AD-S42120C-N5) 12V DC approximately 0.3A 5V DC 0.5A (max.) 5V DC 0.5A (max.) AD-S42120C-N5 100V to 240V AC 50/60Hz 1.2A 12V DC 3.5A Approximately 94(W) × 84(D) × 107(H) mm Approximately 280g 0°C to 40°C (32°F to 104°F) 30% to 80% RH (non-condensation) E-35 Adjusting the Laser Beam Width You can select the laser beam width used by the DT-970. Note that using this function may result in a laser beam width error. In this event, use the procedure below to adjust the laser beam width. 1. Turn the Handheld Terminal ON with the system menu. 2. Press the following keys in order to start up laser beam adjustment: and keys held down to start up the Startup Screen 4: ENVIRONMENT 4: BARCODE 4: CALIBRATION OBR CALIBRATION PLEASE PUSH TRG KEY TRG :START CLR :EXIT 3. Press the trigger key to emit the laser beam, and align the laser beam with the beam width adjustment bar code. Adjustment Screen OBR CALIBRATION EXECUTING..... * Align the laser beam with the fine bars on both sides of the adjustment bar code. TRG :STOP (Example) When the buzzer sounds and the laser beam turns off, beam width adjustment is completed. Calibration Completed Screen OBR CALIBRATION FINISHED COMPLETE TRG :RETRY CLR :EXIT E-36 Print this page at its actual size (not reduced) to adjust the laser beam width. Laser Beam Width Adjustment Bar Code E-37 CASIO COMPUTER CO., LTD. 6-2, Hon-machi 1-chome Shibuya-ku, Tokyo 151-8543, Japan 2013 CASIO COMPUTER CO., LTD.