1
Optional Speed Sensor Installation
All the units in this series can display speed and distance traveled, but
only the X126DF and X136DF come packed with a speed sensor. If you
wish to purchase an optional additional sensor for your unit, refer to
the accessory ordering information inside the back cover of this manual. The following instructions describe how to install the speed sensor.
Recommended tools for this job include: drill, 7/8" drill bit, 1/8" drill bit for
pilot holes, screwdriver. Required supplies for this job include: four #8
stainless steel wood screws (3/4" long), high quality, marine grade aboveor below-waterline caulking compound.
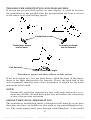
First find a location on the boat's transom where the water flow is smoothest. Don't mount the sensor behind strakes or ribs. These will disturb the
water flow to the speed sensor. Make sure the sensor will remain in the
water when the boat is on plane. Also make sure the location doesn't interfere with the boat's trailer. Typically, the sensor is mounted about one foot
to the side of the transom's centerline.
Once you've determined the proper location for the unit, place the sensor on the transom. The bottom of the bracket should be flush with the
hull's bottom. Using the sensor as a template, mark the hull for the
screws' pilot holes. Drill four 1/8" holes, one in each end of the slots.
Mount the sensor to the hull using #8 stainless steel wood screws (not
included). Use a high quality, marine grade above- or below-waterline
caulking compound to seal the screws. Make sure the sensor is flush
with the bottom of the hull and tighten the screws.
Good location
Stern view showing good location for mounting sensor on transom.
Transom
Bottom of hull
Bottom of hull
Speed sensor mounting configuration:
side view (left) and rear view (right.)
22
offered by www.Busse-Yachtshop.de
email: [email protected] Tel: +49 (0)4347 908234