1
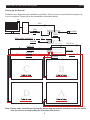
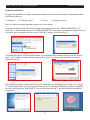
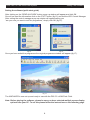
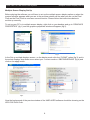
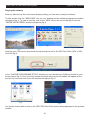
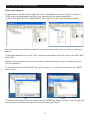
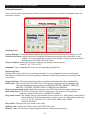
LEDJ P85 5.5 x 4M Pixel Cloth System
Order code: STAR40
USER MANUAL
LEDJ P85 5.5 x 4M Pixel Cloth System
WARNING
FOR YOUR OWN SAFETY, PLEASE READ THIS USER MANUAL CAREFULLY
BEFORE YOUR INITIAL START-UP!
CAUTION!
Keep this equipment away from rain,
moisture and liquids.
SAFETY INSTRUCTIONS
Every person involved with the installation, operation & maintenance of this
equipment should:
Be competent
Follow the instructions of this manual
CAUTION! TAKE CARE USING THIS EQUIPMENT!
HIGH VOLTAGE-RISK OF ELECTRIC SHOCK!!
Before your initial start-up, please make sure that there is no damage caused during
transportation. Should there be any, consult your dealer and do not use the equipment.
To maintain the equipment in good working condition and to ensure safe operation, it is
necessary for the user to follow the safety instructions and warning notes written in this
manual.
Please note that damages caused by user modifications to
this
equipment
are
not
and
damage
to the
wiring
subject
to
warranty.
loom inside the cloth are not subject to warranty.
1.
Safety
LEDJ P85 5.5 x 4M Pixel Cloth System
Safety
IMPORTANT:
The manufacturer will not accept liability for any resulting damages caused
by the non-observance of this manual or any unauthorised modification to the
equipment.
•
Never let the power-cable come into contact with other cables. Handle the
power-cable and all mains voltage connections with particular caution!
•
Never remove warning or informative labels from the equipment.
•
Do not open the equipment and do not modify the equipment.
•
Do not connect this equipment to a dimmer-pack.
•
Do not switch the equipment on and off in short intervals, as this will reduce the
system’s life.
•
Only use the equipment indoors.
•
Do not expose to flammable sources, liquids or gases.
•
Always disconnect the power from the mains when equipment is not in use or before cleaning! Only handle the power-cable by the plug. Never pull out the plug by pulling the power-cable.
•
Make sure that the available voltage is between 110v/240v.
•
Make sure that the power-cable is never crimped or damaged. Check the equipment and the power-cable periodically.
•
If the equipment is dropped or damaged, disconnect the mains power supply
immediately. Have a qualified engineer inspect the equipment before
operating again.
•
If the equipment has been exposed to drastic temperature fluctuation (e.g. after transportation), do not switch it on immediately. The arising condensation might dam
age the equipment. Leave the equipment switched off until it has reached room temperature.
•
If your product fails to function correctly, discontinue use immediately. Pack the unit securely (preferably in the original packing material), and return it to your Prolight dealer for service.
•
Only use fuses of same type and rating.
•
Repairs, servicing and power connection must only be carried out by a qualified technician. THIS UNIT CONTAINS NO USER SERVICEABLE PARTS.
•
WARRANTY; One year from date of purchase.
OPERATING DETERMINATIONS
If this equipment is operated in any other way, than those described in this manual, the
product may suffer damage and the warranty becomes void.
Incorrect operation may lead to danger e.g.: short-circuit, burns, electric shocks,
lamp failure etc.
Do not endanger your own safety and the safety of others!
Incorrect installation or use can cause serious damage to people and property!
2.
LEDJ P85 5.5 x 4M Pixel Cloth System
Technical Specifications
You should find inside the carton the following items:
1,4 x 2.75 x 2M Pixel Cloths
5, Connection cables
2, Instruction manual
6, Power cable
3, DVI Box
7, Software disc
4, Sub Controller
Technical Specifications:
Cloth:
768 x 5mm tri-colour LEDs (per cloth)
Pixels: 23 x 32 (H x W) (per cloth)
3’072 x 5mm tri-colour LEDs (in total)
Heavy duty fire retardant wool serge
Metal eyelets on all four sides
Power consumption: 260W
Power supply: 110-240V~50-60Hz
Dimensions: 2.75 x 2M (each)
5.5 x 4M (zipped togethger)
Weight: 8.2Kgs (each)
32.76Kgs (zipped together)
DVI Box:
IEC power in socket
DVI in socket
2 x RJ-45 out sockets
1 x USB in socket
Robust metal housing
Power consumption: 5W
Power supply: 110-240V~50-60Hz
Dimensions (L x W x H):
168 x 185 x 55mm
Weight: 1Kgs
Overview:
Sub controller:
DVI Box:
Identification:
1, Power switch
2, Audio socket
3, USB socket
4, RJ-45 Out sockets
5, DVI in socket
6, IEC power in socket
7, Powercon in socket
8, Powercon out socket
9, Fuse
10, RJ-45 in sockets
11, RJ-45 (data) out sockets (for cloths)
12, Power out sockets (for cloths)
13, Voltage selector
3.
Sub controller:
Powercon in/out sockets
2 x RJ-45 in sockets
4 x RJ-45 out sockets
Robust metal housing
Mounting holes
Voltage convertor
Power consumption: Up to 260W
Power supply: 110-240V~50-60Hz
Dimensions (L x W x H)
327 x 228 x 63mm
Weight: 3Kgs
LEDJ P85 5.5 x 4M Pixel Cloth System
Operating System
Operating System
For the software to run correctly you must have the following operating system
and hardware;
Operating system:
Windows98/me/2000/NT or XP
Hardware configuration:
CPU: Pentium ablove 300MHz
Memory: 64Meg
Video card: Standard above VGA 256 display
Related software:
Windows media player
Office 2000
Real player
4.
LEDJ P85 5.5 x 4M Pixel Cloth System
Set up
Setting Up the System
Please be sure that before the installation procedure that you have connected the full system up
to your computer. Please follow the connection instructions below.
PC
DVI
USB
POWER
(COMMUNICATION
CABLE)
DATA
INTO NEXT SUB BOX
POWER
DATA (A)
DATA (C)
DATA (D)
DATA (B)
POWER
POWER
POWER
POWER
Note: Please make sure that you follow the above diagram exactly and that you put the cloths
into the correct corresponding RJ-45 socket (see above)
5.
LEDJ P85 5.5 x 4M Pixel Cloth System
Software Installation
Software Installation
To begin the installation process, first please make sure you have received the software disc with
the following files on.
1, Xmplayer,
2, 64-48(pm).rsps
3, Set up
4, Xmplayer set up.
If any of these are missing please contact your local dealer.
Inserted the software CD into the PC/laptop and double click on the “XMPLAYERCODE 2.2.7”
folder (fig 1). Now double click on the “XMPLAYERSETUP” and a pop up window will appear for you
to choose your language and click on the “INSTALL” button to continue.(fig 2)
Fig 1.
Fig 2.
A window will appear “the soft need wincap, if you already have installed wincap click on cancel”
(fig 3). If you need to install wincap please click on “OK” to continue and follow the on screen
instructions (fig 4).
Fig 4.
Fig 3.
After wincap has been installed you will ned to install the “K-Light Mega Codec Pack 3.6.5” (fig 5).
To install simply follow the on screen instructions (fig 6). One the installation has been completed
you will now find a new “XMPLAYER” icon on your desk top (fig 7) and the Software installation
is complete.
Fig 5.
Fig 6.
6.
Fig 7.
LEDJ P85 5.5 x 4M Pixel Cloth System
Setting The Software
Setting the software (quick start guide)
Once the XMPLAYER software has been installed you now need to set it up.
To start the set up, double click on the “XMPLAYER” icon on your desk top and the programme
window will appear (fig 8). On the top bar click on the “CONTROL” drop down and click on
“LED CONTROLLER CONFIGURATION” (fig 9).
Fig 8.
Fig 9.
Now click on the “PARA SETTING” (fig 10) icon in the window and enter the password
“DBSTARLED” and click “OK” (fig 11).
Fig 10.
Fig 11.
A new window will now appear “LED CONTROL SETTING” (fig 12).
In the LED CONTROL SETTING window, click on the “IMPORT” button and select the
“64-48(pm).rsps” file that is supplied on the software disc and click “OPEN” (fig 13).
Now back into the LED CONTROL SETTING WINDOW click on the “SEND ALL PARA” button on
the bottom right hand side of the window (fig 14).
Fig 12.
Fig 13.
7.
Fig 14.
LEDJ P85 5.5 x 4M Pixel Cloth System
Setting The Software
Setting the software (quick start guide)
After clicking on the “SEND ALL PARA” button a pop up window will appear and click OK.
Once it has sent the information click on the “EXIT” button (fig 15) and exit the LED Control Manager
After exiting the control manager a pop up window will appear asking you
“are you sure you want to exit the programme”, simply click OK (fig 16).
Fig 8.
Fig 15.
Fig 16.
Once you have exited the programme the original programme window will appear (fig 17).
Fig 17.
The XMPLAYER is now set up and ready to use with the P85 5.5 x 40M Pixel Cloth.
Note: Before playing the software, please be sure you have selected multiple screen display
options from your PC. To set this please follow the instructions on the following page.
8.
LEDJ P85 5.5 x 4M Pixel Cloth System
Multiple Screen Display Set Up
Multiple Screen Display Set Up
Before playing the software you will have to set up the multiple screen display option so when the
preview window appears what you see in the preview window will be what you see on the Pixel
Cloth as the Pixel Cloth is used as a second monitor. Please follow the instructions below to
set this up correctly.
To set up your PC in to multiple screen display, right click on your desktop and go to “GRAPHICS
PROPERTIES” (fig 1) and the graphics properties window will appear (fig 2).
Fig 1.
Fig 2.
In the Set up multiple displays screen, on the display mode click the “CLONE” option (fig 3) and in
the select displays drop down menu select your “current monitor + DBSTARLEDX008” (fig 4) and
click on the apply button.
Fig 4.
Fig 3.
Now the background of the preview window of the XMPLAYER software should be showing on the
LEDJ P85 Pixel Cloth.
9.
LEDJ P85 5.5 x 4M Pixel Cloth System
Playing The Software
Playing the software
Now you have set up the multi screen display setting, you can start to play the software.
To start double click the “XMPLAYER” icon on your desktop and the software programme window
will appear (fig 1). To crate a new file, click on the “NEW” tab on the top tab bar (fig 2) and the
“DEFINE LED SCREEN” window will appear (fig 3).
Fig 2.
Fig 3.
Fig 1.
Now Set your LED screen size which should already be set for the P85 Pixel Cloth (W64 x H46),
click OK (fig 4).
Fig 4.
In the “CHOOSE PROGRAMME STYLE” window you can choose from 8 different styles for your
screen layout (fig 5). Once you have chosen the style the preview will window will appear at the
top left of your screen and a new file window will appear (fig 6).
Fig 5.
Fig 6.
You should now be able to see on the LEDJ P85 Pixel Cloth what is being displayed in the preview
window.
10.
LEDJ P85 5.5 x 4M Pixel Cloth System
Playing The Software
Playing the software
To add media to the file window, right click on the “1(programme window)” tab (fig 7) and go to
“ADD” and in the drop down menu (fig 8) and choose from the various media files:
i.e SWF, JPG, BMP, GIF, PCX, MPG, MPEG, MPV, MPA, AVI, VCD, RM, RA, RMJ and ASF.
Fig 7.
Fig 8.
Once have chosen the relevant media file, to preview it just double click on the file you have just
placed.
To play the media file click on the “PLAY” button the top tab bar and it will output to the LEDJ P85
Pixel Cloth.
Always be sure to save your file to your desktop or dedicated folder so you can simply go back
into any saved file.
To save your file click on the “SAVE” tab, give it a name i.e “my file.xml” and click on the “SAVE”
button (fig 9)
Fig 9.
Fig 10.
To reopen a saved file at anytime, simply click the “OPEN” tab, find your saved “.xmp” file and click
open and your saved file will reopen from its last saved point (fig 10).
11.
LEDJ P85 5.5 x 4M Pixel Cloth System
Intelligent Set Up
Setting Parameters:
If you need to set the parameters further from the quick start set up guide then please follow the
instructions below.
Sending Card:
Screen display: The screen display adjust the brightness of the screen and the scope is 1-256.
Position of picture: Adjust the mode of display and selects according to the resolution of the
display. The area where the content on the display (viewing window) shall be
displayed on the LEDJ P85 Pixel Cloth.
Screen rotation: Using one of the four options, the display can be rotated
either 0˚, 90˚, 180˚ or 270˚.
Schedule: Time is appointed to carry out corresponding operations.
Receiving Card:
Before entering the area of the receiving card data, it is very important that you understand
the different controls of the receiving setting interface to make the operation more simple and
convenient.
Screen Options: The basic parameter of the monolithic receiving card will be established.
LED Driver: The driving chip of the LED Pixel Cloth that the receiving card is equipped with.
The main supporting driving chips are MBI5026/TB62726, MBI5027, MBI5030,
MBI5039, 74HC595, LPD6803, DM413, MBI5042 and MBI5020.
Frame synchronized mode: Makes the computer and LED Cloth have the same refresh rate.
Data clock freq: CLK of the driving chip of the driving screen, the scope is 4-225 and the
frequency scope of the clock is 490KHZ-31.25Mhz.
Grey scale levels: The display screen of the double colour selects 25.= 4096 grade is selected for
indoor use and 16,384 is selected for outdoor uses. The selectable grades are
4, 8, 16, 32, 64, 128, 256, 512, 1024, 2048, 4096, 8192, 16384,
32768 and 65536.
Grey effect: Changes the grey scale of the effect.
Refresh rate: Adjusts the refresh rate for the LED Pixel cloth.
Wizard: Takes you through a step by step process of setting the parameters.
12.
13.
14.