1
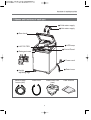
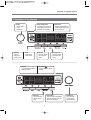
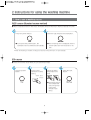
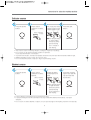
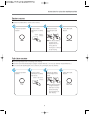
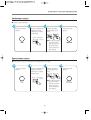
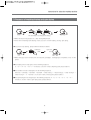
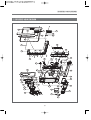
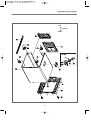
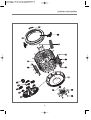
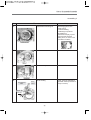
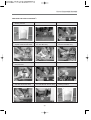
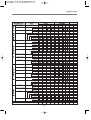
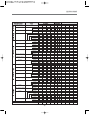
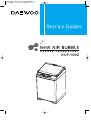
Service Guides
KUF-150Q
Contents
1. Overview of washing machine
1. Product features.....................................................................................................................2
2. Comparison of product specifications.........................................................................3
3. Names and functions of each part................................................................................4
4. Functions of the buttons.....................................................................................................5
2. Instructions for using the washing machine
1. Method for using the full automatic course...............................................................6
2. Air bubble up washing..........................................................................................................9
3. Manual setting (Wash, Rinse, Spin) ...........................................................................11
3. Disassembly and Reassembly
1. Wiring diagram .....................................................................................................................12
2. Exploded view diagram ....................................................................................................13
3. Parts list....................................................................................................................................17
4. Disassembly procedure ....................................................................................................21
5. directions for disassemBly and adjustment ............................................................24
6. the repair method of gear mechanism for clutch spring problem..............27
4. Electric Circuit
1. Sequence chart....................................................................................................................34
2. Convenient service function..........................................................................................39
3. PCB error displays .............................................................................................................41
4. Troubleshooting...................................................................................................................42
1. Overview of washing machine
1. Product features
1. World’
s first air bubble washing method to improve washing power significantly.
2. Use of nano silver maximizes sterilization and odor removal and is antibiotic.
3. Strong and luxurious washing plate used.
4. Fine air bubbles to maximize washing power in this impeller-type washing plate.
5. Use of new digital design for the new era.
6. Use of two residue filter nets to remove fine dust completely.
7. Washing eccentricity correction water flow to remove tangling of laundry automatically.
8. Diversified range and type of washing depending on a model. Ten fully automatic courses
standard, saving, wool, blanket, hand cloth, container washing, shoes, book bag, lingerie,
functional garment.
9. Waterproof structure for a rear panel to protect the electrical parts.
10. Use of automatic power shut off.
11. Use of stainless washing tank with washing plates.
12. Use of front control for the power button.
13. Smart door for convenient controls.
14. Use of reinforced glass for better safety.
2
Overview of washing machine
2. Comparison of product specifications
No
Items
KUF-150Q
1
Rated power consumption
600 W
2
Wash and Spin weight
15 kg
3
Weight
51 kg
4
Exterior dimension (WxHxD)
630(W)x1055(H)x720(D)mms
High
95ℓ
Mid
81ℓ
low
65ℓ
small
50ℓ
6
Standard water level
225ℓ
7
Nano Silver
O
8
Control Panel
Front Panel ( Option button + Function button)
9
Exterior
Painting
10
Rated voltage /Frequency
Single Phase AC127V/60Hz
11
Washing type
Air bubbles + Waterfall flow + nano silver
12
Control type
Electrical front control
13
Display method
88LED + LAMP
14
Buzzer messge method
Single melody
15
Wash Course
Normal, Saving, Wool, Blanket, rag, Tub Clean,
Sports shoes, Book Bags, Lingerie, Sports wear
16
Water pressure
0.3~8kgf/cm2
17
Water Level
Electronic Sensing
18
Level meter
X
19
Softener auto injection
O
20
Cleaning agent auto injection
O
21
Reserved washing function
O
22
Auto power off
O
23
Alarm functions
O
24
Remaining time displays
O
25
Auto water refill
O
26
Laundry eccentricity correction
O
27
Residue bags
2
28
Height adjustment device
2 screw fixing units
5
Water level
3
Overview of washing machine
3. Names and functions of each part
● Cold water supply
● Hot water supply
● Door knob
● LED lamp
● LINT FILTER
● Contol Panel
● Detergent case
● Power cord
● Drain hose
● Height
adjusting legs
Water supply
hoses (two)
Drain hose
Water hose fixer
(two)
4
User manual
Overview of washing machine
4. Functions of the buttons
• Power
Use it to switch
on the
equipment.
• Washing
Use it to
change the
washing time.
• Water temperature
Depending on the laundry
type, select one from hot,
lukewarm or cold water.
• Soak
Use it for the
soak function.
• Rinsing
Use it to change
the number of
rinses.
• Course
Use it to select the desired
washing course.
• Water level
Select the desired amount
of water depending on the
amount of laundry.
• Spin dry level
Use it to change
the level of spin
drying.
• Air bubble
Use it to select functional
washing.
• Wind dry
Use it to change
the spin drying
time.
• Reservation
Use it to make a reservation.
You can reserve it from 2 to
48 hours in advance.
5
• Start/Pause
Use it to switch
on/off. Use it to
add the laundry.
2. Instructions for using the washing machine
1. How to use a washing course
FUZZY course (Standard course method)
" What is a standard course? In this course, the washer selects the best way to wash your laundry on its own.
1
2
Press the power button.
Close the cap and press the start button.
● If you press the power button, the
standard course is selected automatically.
● The remaining time is displayed and the
sensor takes care of the laundry on its
own.
✽When the washing is finished, the buzzer is heard and the power turns off automatically.
ECO course
" This is an economic course where you can save time and water.
1
2
Press the power
button.
3
Press course
selection to select
saving.
4
Select the water
temperature and
level.
Select‘ECO’
Course
● The default setting is
mid for water level
and 2 time general
rinsing and 3
minutes of spin
drying.
6
Press the start
button.
Instructions for using the washing machine
Delicate course
1
2
Press the power
button.
3
Press course
selection to select
wool.
4
You must pour neutral
cleaning agent in the
cleaning agent case.
Press the start
button.
Select‘Delicate’
Course
● The default setting
is mid for water
level and 2 times
general rinsing
and 1 minute of
spin drying.
✽ This course is used for washing sweaters, cardigans, lingerie and stockings.
✽ Do not use it for dry cleaning clothes, leathers or cashmere.
It can cause deformation or contraction.
✽ To prevent deformation, the water temperature should be cold, the water level should be middle or high.
✽ Additional washing, rinsing or spin dry can’
t be done.
✽ Do not exceed the amount of laundry- 3kg for each washing session.
Blanket course
1
2
Press the power
button.
3
Press course
selection to select
blanket.
4
Select the water
temperature and
level.
Select‘blanket’
Course
Close the cleaning
agent case and the
cap and start the
start button.
● The default setting
is high for water
level and 2 times
general rinsing
and 5 minutes of
spin drying.
✽ Used for blanket or bedding that can be washed in water.
✽ If you pour detergent into the cold water it may stay undissolved between the blankets. Use liquid
detergent.
✽ Do not use it for electric blanket or carpets. (It can cause damage to the washing machine or the laundry.)
7
Instructions for using the washing machine
Duster course
■ Used for handkerchiefs, towels or floor cloths.
1
2
Press the power
button.
3
Press course
selection to select
rag.
4
Select the water
temperature and
level.
Press the start
button.
Select‘Duster’
Course
● The default setting
is Extra low for
water level and 1
times general
rinsing and 1 minute
of spin drying.
Tub clean course
■ Use the high water level for washing tank cleaning.
■ Use the recommended detergent (oxygen-based whitener). (Do not use chloride-based whiteners.)
■ If you clean the washing tank once a month, you can keep it clean at all times.
1
2
Press the power
button.
3
Press course
selection to select
tub clean.
4
Select the water
temperature and
level.
Select‘tub clane’
Course
● The default setting
is high for water
level and 1 times
general rinsing
and 3 minutes of
spin drying.
8
Press the start
button.
Instructions for using the washing machine
2. Air bubble up washing
Gym Shoes course
" Used to wash Gym Shoes.
1
2
Press the power
button.
3
Press air bubble up
washing course
selection to select
sports shoes.
4
You must pour neutral
cleaning agent in the
cleaning agent case.
Press the start
button.
Select‘Gym Shoes’
Course
● The default setting
is low for water
level and 2 times
general rinsing
and 3 minutes of
spin drying.
Shcool Bag course
" Used to wash Shcool Bag.
1
2
Press the power
button.
3
Press air bubble up
washing course
selection to select
book bags.
4
Select the water
temperature and
level.
Select‘Shcool Bag’
Course
● The default setting
is low for water
level and 2 times
general rinsing
and 3 minutes of
spin drying.
9
Press the start
button.
Instructions for using the washing machine
Underwear course
" Used to wash underwear.
1
2
Press the power
button.
3
Press air bubble up
washing course
selection to select
underwear.
4
Select the water
temperature and
level.
Press the start
button.
Select‘underwear’
Course
● The default setting
is low for water
level and 2 times
general rinsing
and 3 minutes of
spin drying.
Sports wear course
" This course is used for mountain wear, fishing wear or gym wear.
1
2
Press the power
button.
3
Press air bubble up
washing course
selection to select
sports wear.
4
Select the water
temperature and
level.
Select‘sports wear’
Course
● The default setting
is low for water
level and 2 times
general rinsing
and 5 minutes of
spin drying.
10
Press the start
button.
Instructions for using the washing machine
3. Progress of washing/rinsing and spin drying
" If you only want washing, rinsing and spin drying, then do as follows.
Use each button to change the setting.
※ When the clean rinsing lamp is on, clean rinsing will proceed.
※ In the wool or washing tank cleaning course, you can’
t control washing, rinsing, spin drying.
" If you want only draining, please follow the directions below.
Select the
SPIN
Open the
door
※ When the buzzer sound is heard, the control panel LE displays . Discharging is completed, so turn off the
power.
" The washing time is changed as in the following sequence.
6 → 10 → 14 → 15 → 18 → 0 → 6 minutes. If you don’
t want a washing cycle, please select 0.
■ The number of rinses is changed as in the following sequence.
General1 → General2 → General3 → General4 → Clean rinsing 1 → Clean rinsing 2 → Clean rinsing 3 →
Clean rinsing 4 → 0 → General 1. If you don’
t want a rinsing cycle, please select 0.
■ The spin drying time is changed as in the following sequence. 4 → 5 → 7 → 9 → 0 → 1 → 3 → 4 →
minutes. If you don’
t want a spin drying cycle, please select 0.
11
3. Disassembly and Reassembly
1. WIRING DIAGRAM
12
DISASSEMBLY AND REASSEMBLY
2. EXPLODED VIEW DIAGRAM
A38
A39
A48
A49
A47
A46
A45
A40
A20
A41
A19
A44
A42
A18
A43
A14
A15
A16
A17
A12
A25
A13
A04
A22
A21
A23
A24
A05
A26
A27
A28
A02
A29
A30
A31
A03
A33
A32
A34
A01
A35
A36
A08
A06
A09
A07
A37
A11
A10
13
DISASSEMBLY AND REASSEMBLY
TOP
RIGHT
FRONT
14
DISASSEMBLY AND REASSEMBLY
15
DISASSEMBLY AND REASSEMBLY
16
PARTS LIST
3. Parts list
1. PARTS LIST
No.
Item Code
Items
A01
3614542000
PLATE T AS
ABS, UV-BASE
1
A02
3618105800
NOZZLE TOP
PP
1
A03
3618105810
NOZZLE UNDER
PP
1
A04
3613270830
HOSE INLET HOT
EPDM 60 ID9.5 OD14.5 L467.5±2.5
1
3613270840
HOSE INLET COLD
EPDM 60 ID9.5 OD14.5 L512.5±2.5
1
3613270850
HOSE INLET RINSE EPDM 60 ID9.5 OD14.5 L522.5±2.5
1
A05
3611205800
CLAMP HOSE
100H, ID=13.8 W=10.0 0.9T
1
A06
3610528700
INLET BOX AS
PP
1
A07 36111T2C50
CASE DETERGENT PP
1
A08
3610907800
CAP SOFTENER
1
A09
3612613600
HANDLE DETERGENT
ABS
1
A10
3612613610
HANDLE COVER
ABS
1
A11
3615115100
SPRING HANDLE
SUS304, D0.6
1
A12
3614801720
SENSOR PRESSURE 0。3PIN L=740MM
1
A13
4507D08150
SENSOR PRESSURE CLAMP MFZN HOSE ID-7PI
1
A14
3619047040
SWITCH SAFETY
SF-030A23,CH09T.NO-ARM,STRAIGHT-LEVER
1
A15
3618911300
CONDENSER
125UF 400VAZ, CAN TYPE
1
A16
3618919020
UNIT BUBBLE GENERATOR
CDK-230V, KET D/L CON. BLUE L=200
1
A17
3615416300
VALVE INLET
DR-23AS,C-R-H,220-240V,50/60HZ
1
A18
3611339040
CORD POWER
CP-2PIN 100H IEC 53 (VCTF, H05W-F) 3 x 0.75 1.9M GY
1
A19 36142T2F10
PANEL B
ABS
1
A20
3612904500
HINGE AS
ASS’Y
1
A21
3613625600
LAMP AS
320'S LED LAMP
1
A22
3613625650
PROTECTOR LAMP G-PP
1
A23 36111T1X00
CASE LAMP
ABS
1
A24
WINDOW LAMP
TR-ABS
1
3615509900
Materials and Sizes
PP
Q'TY
A25 36142T2F00
PANEL F
ABS
1
A26
3619048020
SWITCH DOOR AS
320'S REED SW
1
A27
3615510200
WINDOW DISPLAY
TR-ABS
1
A28
3611697610
DECO BUTTON L
ABS
1
A29
3611697620
DECO BUTTON R
ABS
1
A30
3616605300
BUTTON POWER
ABS
1
A31
3616605400
BUTTON START
ASB
1
A32
3615510210
WINDOW FUNCTION
TR-ABS
1
17
Remarks
PARTS LIST
No.
Item Code
Items
Materials and Sizes
Q'TY
A33
3616605100
BUTTON COURSE L ABS
1
A34
3616605200
BUTTON COURSE R ASB
1
A35
3611697600
DECO WINDOW
ABS
1
A36
3616605500
BUTTON FUNCTION ABS
1
A37 PRPSSW150Q PCB AS
DWF-150Q STANBY POWER IW
1
A38 36117AD500
DOOR OUTER
ABS
1
A39
3611697000
DOOR DECO A
ABS
1
A40
3611697500
DOOR DECO B
ABS
1
A41 36117AD600
GLASS DOOR
GLASS
1
A42 36117AD550
DOOR INNER
ABS
1
A43
3611575000
CUSHION DOOR
CR
4
A44
3619048300
SWITCH MAGNET
BAFE(1200GAUSS),15X25X6T,140F
1
A45
3612904400
HINGE BRACKET F L
SPG 2.0T
1
A46
3612904410
HINGE BRACKET F R
SPG 2.0T
1
A47
3612904420
HINGE BRACKET REAR SPG 2.0T
2
A48
3611432200
COVER HINGE L
ABS
1
A49
3611432300
COVER HINGE R
ABS
1
A50 361279A100
HINGE AS
1
A51
3618947910
UNIT FILTER
104K+THERMAL TUBE
1
B01
3613226700
HOSE DRAIN O
L=1250mm, HANGER
1
B02
3614538Y00
PLATE UPPER
PP
1
B03
7122501211
SCREW TAPPING
T2S TRS 5x12 MFZN
8
B04
3615302220
SUPPORTER TUB(BL) SPG 1.6T
1
B05
3615302320
SUPPORTER TUB(BR) SPG 1.6T
1
B06
3615302420
SUPPORTER TUB(FL) SPG 1.6T
1
B07
3615302520
SUPPORTER TUB(FR) SPG 1.6T
1
B08
3611413605
COVER BACK
0.35T
1
CABINET
PCM,WHITE,FLORA
1
B09 361081W600
361081W610
PCM,DARK RED,FLORA
3612100330
LEG FIX
BUTYL VE
2
B11
3610312200
BASE U
PP (DWF-1398)
1
B12
3617702122
LEG ADJUST
VE
2
B13
3612603300
HANDLE CABINET
PP
2
B14
3611405320
COVER PUMP
PP(B360F)
1
B15
7112501611
SCREW TAPPING
B16
3618957380
UNIT DRAIN PUMP 110-127/60, L=1310VSF
3618957290
230-240/50, L=1310VSF
B17
3611906700
140FG
159FP
B10
3611405301
Remarks
UL/CSZ(466FWU, HFH-400)
FILTER AS
T1 TRS 5*16 MFZN
DMI PUMP
2
1
1
18
127/60, 110/60
220/50
PARTS LIST
No.
Item Code
Items
Materials and Sizes
Q'TY
C01
3616105400
BALANCER AS
100'S, HIDDEN
1
C02
3611904700
FILTER AS
100'S LINT FILTER AS
2
C03
3612202900
FRAME FALL
PP
1
C04
3618815300
TUB
SUS
1
Remarks
C05
3612507210
GUIDE FILTER AS
HIDDEN FILTER(SUS 0.6T)
3
C06
3616008600
SPECIAL BOLT
SUS
6
FOR GUIDE FILTER
C07
3616003700
SPECIAL SCREW
SUS 5.5*16
12
FOR BALANCER AS
C08
3616008700
SPECIAL NUT
SUS
6
FOR GUIDE FILTER
C09
3616003700
SPECIAL SCREW
SUS 5.5*16
12
FOR TUB U
C10
3618815503
TUB U
13kg, M/B
1
C11
4507D83080
SPECIAL NUT
SUS 304
1
C12
3617200200
FLANGE TUB
ADC12, 6FOOT
1
C13
3616007000
SPECIAL SCREW
SCM 24H, 6.5*24
12
C14
3610920100
CAP AGITATOR
ABS
1
C15
3616003740
SPECIAL SCREW
SUS430,6X27,WASHER,P-LOCK
1
C16
3610920000
CAP IMPELLER
TR-ABS
3
C17
3611885600
FAN IMPELLER
PP
3
C18
3619708600
PULSATOR AGITATOR
PP
1
C19
3611906300
NANO FILTER AS
NANO FILTER, ABS, 150Q
1
140FG, 159FP
NANO FILTER, ABS, 150QS
2
140FG, 159FP
D01
3611413900
COVER TUB O
PP
1
D02
3618807100
TUB O
1098
1
D03
3613265901
HOSE BUBBLE
L=1250MM,ID=4
1
D04
3619803900
SUSPENSION AS(B) 1398,ROD=612, SPRING=96
1
D05
3619803800
SUSPENSION AS(F) 1398,ROD=612, SPRING=104
1
D06
3613208901
HOSE OVERFLOW
PELD, L=280MM
1
NON PUMP
D07
3615408400
VALVE DRAIN AS
1098'S, VE TYPE
1
NON PUMP
D08
3613218500
HOSE DRAIN I AS
LDPE+EVA, L=219.5
1
NON PUMP
3613212120
HOSE DRAIN I
EVA,L=184
1
PUMP
D09
3610387400
BASE
SECEN 2.0T
1
D10
3616006900
SPECIAL SCREW
SCM 24H, 6.5*18
4
D11
3616007000
SPECIAL SCREW
SCM 24H, 6.5*24
14
D12
3612712200
INNER EARTH WIRE GN VSF(30/0.18)
1
3612713150
HARNESS EARTH WIRE VSF YW/GN L1=620 L2=200
36189L1R50
MOTOR SYNCHRONOUS 100~130V/50~60HZ,KD-DW11LJ,#1806,L1150,RD
1
127/60,110/60
3618957610
MOTOR SYNCHRONOUS 100-130V KD-DW11LD L=1150
1
127/60
D13
3619617620
D14
3617310200
220/50-60,SV-MX7T06D,#1806-L1150-RED
GEAR MECHANISM GM-1300-KS6P2(SPUR)
19
NON PUMP
220/50
1
PARTS LIST
No.
Item Code
Items
D15
7341801511
BOLT HEX
D16
3618301300
PROTECTOR GEAR SBHG 1.6T
1
D17
3616590220
BELT V
1
3616590230
Materials and Sizes
6B-1 8*15 MFZN
M20.5, AGING
Q'TY
4
M21, AGING
3614800710
SENSOR HALL AS
DWF-100MV, 5.4
1
D19
3611502700
CUSHION DOWN
POM(8MM)
2
D20
WM244XA011 120V L=1450
3618432000
MOTOR CONDENSER M-TYPE DS=10 DP=48.5 60HZ
3618403510
M-TYPE DS=12 DP=52.5 60HZ
D21
7650802528
BOLT HEX
D22
3618403510
PULLY MOTOR AS
3618431300
60HZ
50HZ
D18
3964821120
Remarks
127/60
1
4
ADC-12, DS=12, DP=52.5, 60Hz
1
20
140FG
159FP
6B-1 8*25 PW(3*28) MFZN
ADC-12, DP=60.5, 50Hz
INVERTER
60Hz
50Hz
Disassembly procedure
4. Disassembly procedure
1. How to disassemble the upper plate
1) Release the four screws in the rear of the door
and separate the cover.
2) Separate the bracket (two units in L/R)
Caution. Separate it while holding the front of the
door with one hand.
3) Separate it while pulling the door toward you.
4) Remove the four hinge fixing screws.
5) Remove the door hinge by pulling it upwards.
6) Using the necessary tools, separate the rubber
cap and separate the screw. (2 units in L/R)
21
Disassembly procedure
7) Remove the two rear fixing screws.
8) Remove the rear panel by pulling it upwards.
9) Separate the cleaning agent injection box by
pulling it towards you.
10) Remove the Front panel fixing screw.
11) Push the front panel to the right and lift it up.
12) Remove the fixing screws for the PCB assemblu
and separate the PCB assembly.
22
Disassembly procedure
2. How to disassemble the door ass’
y
1) Place the door on top of a soft cloth or towel.
2) Remove the screws(7 EA)
3) Push the bottom glass with one hand and pull the
door with the other hand to separate it.
4) Remove the door glass.
5) Push the hook slightly to separate deco A.
6) As you did in 5), separate deco B.
23
How to Disassemble/Assemble
5. directions for disassemBly and adjustment
Warning
BEFORE ATTEMPTING TO SERVICE OR ADJUST ANY PART OF THE WASHING MACHINE,
DISCONNECT THE POWER CORD FROM THE ELECTRIC OUTLET.
Gear Mechanism Ass’y Replacement
GEAR MECHANISM ASS’Y REPLACEMENT
1 Raise the top plate on the outer cabinet.
2 Loosen four screws mounting outer tub cover
3 Remove the cap pulsator from the pulsator
assy by using screw driver
and remove outer tub cover from the tub
ass’y.
4 Loosen the pulsator mounting screw and
5 Remove the special nut by using “T” type box
remove the pulsator.
wrentch.
6 Remove the special washer.
24
How to Disassemble/Assemble
7 Remove the tub i assy.
8 Lay the front of the washer on the floor.
9 Remove four special bolts of gear protect by
using a box wrentch and remove gear protect.
0 Remove the V-belt.
q Remove four special bolt of gear mechanism
w Pull out the gear mechanism assy.
assy by using a box wrentch.
NOTES
To assemble the gear mechanism ass’y, reverse the disassembly procedure.
25
How to Disassemble/Assemble
MOTOR SYNCHRONOUS AND VALVE REPLACEMENT (NON PUMP MODEL)
1 Lay the front of the washer on the floor.
2 Loosen two special screw of motor
3 Take out the wire of motor synchronous from
the braket.
4 Separate the motor synchronous from the
synchronous.
base.
5 Turn the valve by using screw driver as
6 Remove the valve lid from the valve drain
shown in picture.
assy.
26
How to Disassemble/Assemble
6. the repair method of gear mechanism for clutch spring problem
the structure of gear mechanism
●TOOL FOR REPLACING THE CLUTCH BOSS ASSEMBLY●
Tool name
Specification
Fixing jig
Ratchet handle
Socket and extension bar
Cotton yarn
Q’ty
1
socket : 10mm, 17mm
27
1
per each
some
How to Disassemble/Assemble
how to check the clutch spring
CHECKING METHOD
IN THIS CASE, YOU MUST EMPTY THE SPIN TUB FIRST.
1) TO CHECK THE REVOLUTION OF SPIN TUB.
IF THE SPIN TUB DOES NOT REVOLVE AND ONLY THE PULSATOR IS TURNING,
THAT IS CLUTCH SPRING DEFECT.
2) TO CHECK THE SPIN SPEED(RPM) BETWEEN SPIN TUB AND PULSATOR.
IF YOU FIND THE DIFFERENT SPIN SPEED BETWEEN SPIN TUB AND
PULSATOR, THIS IS ALSO CLUTCH SPRING DEFECT.
IN THIS CASE, WE ARE GOING TO SUPPLY THE CLUTCH BOSS ASSEMBLY INSTEAD
OF GEAR MECHANISM ASSEMBLY. PLEASE REFER TO FOLLOWING FIG.
THE CLUTCH BOSS ASSEMBLY
NO.
PARTS NAME
SPECIFICATION
CODE
Q’TY
1
CLUTCH SPRING
1.5*1.5
3615110000
1
2
CLUTCH BOSS
PP
3619301300
1
3
GREASE
beacon#325 3g
PACKING PACKING THE CLUTCH BOSS ASS’Y
METHOD BY USING VINYL PACK
CLUTCH BOSS ASS’Y PART CORD : 3619301400
28
1
How to Disassemble/Assemble
The Process Of Disassembling
No.
Disassembling 1
Process
1
Notice
Remove the protector
Use wrench or driver
- ratchet handle
- extension bar
- socket : 10mm
Release screws marked 4-point
2
Remove the v-belt
3
Loosen the fastening nut
Use fixing jig for pulley as to
see fig 1.
and 17mm-socket for nut
4
Disassemble the spring washer
Take out plain washer if it has
29
How to Disassemble/Assemble
Disassembling 2
No.
Process
Notice
5
Disassemble the pulley
6
Disassemble the clutch boss Catch the boss and pull upward
with spiral rotate in the
assembly
clockwise direction
7
Separate coupling from clutch
boss ass’y
8
Cleaning
Clean the drum plate, coupling
surface and contact face
between drum plate and
coupling
It is necessary to keep cotton
piece goods being dry and
clean
30
How to Disassemble/Assemble
The Process Of Assembling
No.
Assembling 1
Process
Notice
1
Assemble the coupling
Check the uneven face of
coupling is assembled upward
2
Assemble the new clutch boss
ass’y
- Push in the clutch boss ass’y
with rotating on the clockwise
direction.
- After assembling, rotate on the
clockwise more 2~3 teeth and
pull out the pulley shaft upward
3
Assemble the pulley
4
Assemble the spring washer
31
If there was plain washer, you
have to assemble plain washer
the first and then assemble
spring washer
How to Disassemble/Assemble
Assembling 2
No.
Process
Notice
5
Assemble the fastening nut
6
Assemble the belt
7
Assemble the protector
8
Final checking
Synchronous
Motor
Drain
Valve
Clutch Tip
3.5~4.5
32
- Use fixing jig and 17mm
socket wrench
as if disassembling,
as fastening torque about
100~200kgf-cm.
- Check the end-play, up and
downward and check the
binding force, too much or not
on bi-direct of rotation.
Finally, check the interference
depth both clutch tip and clutch
boss(3.5~4.5mm)
How to Disassemble/Assemble
REPLACE THE CASE FILTER ASS’Y
1 separate the back cover from
washing machine
2 remove two screws
3 remove three screws
4 turn the case filter ass’y and
separate it from the drain motor
5 separate the drain hose i from
the case filter ass’y
6 separate the cavitation hose
from the case filter ass’y
7 assemble the case filter ass’y
that purchased
8 tie up three screws
9 tie up two screws
0 assemble the hose drain I to the
case filter with bond & clamp
q assemble the cavitation hose to
the case filter with bond & clamp
w assemble the back cover to the
washing machine
33
4. Electric Circuit
1. SEQUENCE CHART
Classification
P
r
e
W
a
s
h
Sensing
Water Inlet
PRE-WASH
WASH
Drain
BALANCE SPIN
R
i
n
s
e
1
Mid Spin
Natural Stop
Rinse Shower
Water Inlet
Rinse
Drain
BALANCE SPIN
R
i
n
s
e
Mid Spin
Natural Stop
Water Inlet
2
Rinse
Drain
BALANCE SPIN
S
p
i
n
Spin
Natural Stop
Buzzer
Over Time Indication
Time
8Sec
4Min
2Min
60Min
30Min
18Min
15Min
10Min
6Min
BC 35Sec
3Min
1Min
60Sec
30Sec
90Sec
20Sec
120Sec
60Sec
40Sec
60Sec
Sec
4Min
2Min
3Min
2Min
BC 35Sec
3Min
1Min
60Sec
30Sec
90Sec
60Sec
120Sec
60Sec
40Sec
4Min
2Min
3Min
2Min
BC 35Sec
3Min
1Min
60Sec
30Sec
9Min
7Min
5Min
3Min
1Min
120Sec
60Sec
10Sec
Fuzzy
E.low low mid
■
■
■
■
ECO
high E.low low mid
■
■
high
■
■
■
■
■
■
■
■
■
■
■
■
■
■
■
■
■
■
■
■
■
■
■
■
■
■
■
■
■
■
■
■
■
■
■
■
■
■
■
■
■
■
■
■
■
■
23
■
■
23
■
■
27
■
■
27
14Min
■
■
■
■
■
■
■
■
■
■
■
■
■
■
■
43
■
43
34
■
■
■
■
■
■
56
■
■
■
■
■
■
53
ELECTRIC CIRCUIT
Classification
P
r
e
W
a
s
h
Sensing
Water Inlet
PRE-WASH
WASH
Drain
BALANCE SPIN
R
i
n
s
e
1
Mid Spin
Natural Stop
Rinse Shower
Water Inlet
Rinse
Drain
R
i
n
s
e
2
BALANCE SPIN
Mid Spin
Natural Stop
Water Inlet
Rinse
Drain
BALANCE SPIN
S
p
i
n
Spin
Natural Stop
Buzzer
Over Time Indication
Time
8Sec
4Min
2Min
60Min
30Min
18Min
15Min
10Min
6Min
BC 35Sec
3Min
1Min
60Sec
30Sec
90Sec
20Sec
120Sec
60Sec
40Sec
60Sec
Sec
4Min
2Min
3Min
2Min
BC 35Sec
3Min
1Min
60Sec
30Sec
90Sec
60Sec
120Sec
60Sec
40Sec
4Min
2Min
3Min
2Min
BC 35Sec
3Min
1Min
60Sec
30Sec
9Min
7Min
5Min
3Min
1Min
120Sec
60Sec
10Sec
Duster
E.low low mid
■
■
■
■
■
■
■
■
■
■
■
■
■
28
■
28
35
■
■
■
■
■
32
Tub clean
high E.low low mid
■
■
■
■
■
32
■
■
■
■
■
■
■
■
■
■
■
■
high
■
■
■
■
■
■
■
■
■
■
■
■
■
■
■
■
■
32
■
32
■
36
■
36
ELECTRIC CIRCUIT
Classification
P
r
e
W
a
s
h
Sensing
Water Inlet
PRE-WASH
WASH
Drain
BALANCE SPIN
R
i
n
s
e
1
Mid Spin
Natural Stop
Rinse Shower
Water Inlet
Rinse
Drain
R
i
n
s
e
2
BALANCE SPIN
Mid Spin
Natural Stop
Water Inlet
Rinse
Drain
BALANCE SPIN
S
p
i
n
Spin
Natural Stop
Buzzer
Over Time Indication
Time
8Sec
4Min
2Min
60Min
30Min
18Min
15Min
10Min
6Min
BC 35Sec
3Min
1Min
60Sec
30Sec
90Sec
20Sec
120Sec
60Sec
40Sec
60Sec
Sec
4Min
2Min
3Min
2Min
BC 35Sec
3Min
1Min
60Sec
30Sec
90Sec
60Sec
120Sec
60Sec
40Sec
4Min
2Min
3Min
2Min
BC 35Sec
3Min
1Min
60Sec
30Sec
9Min
7Min
5Min
3Min
1Min
120Sec
60Sec
10Sec
Blanket
E.low low mid
■
high
Delicate
mid high
■
■
■
■
■
■
■
■
■
■
■
■
■
53
■
53
36
■
■
■
■
59
■
■
■
■
■
■
■
■
■
■
■
■
■
■
■
■
■
■
■
■
■
■
■
■
■
■
■
■
■
■
■
■
■
36
■
■
36
■
■
■
59
ELECTRIC CIRCUIT
Classification
P
r
e
W
a
s
h
Sensing
Water Inlet
PRE-WASH
WASH
Drain
BALANCE SPIN
R
i
n
s
e
1
Mid Spin
Natural Stop
Rinse Shower
Water Inlet
Rinse
Drain
R
i
n
s
e
2
BALANCE SPIN
Mid Spin
Natural Stop
Water Inlet
Rinse
Drain
BALANCE SPIN
S
p
i
n
Spin
Natural Stop
Buzzer
Over Time Indication
Time
8Sec
4Min
2Min
60Min
30Min
18Min
15Min
10Min
6Min
BC 35Sec
3Min
1Min
60Sec
30Sec
90Sec
20Sec
120Sec
60Sec
40Sec
60Sec
Sec
4Min
2Min
3Min
2Min
BC 35Sec
3Min
1Min
60Sec
30Sec
90Sec
60Sec
120Sec
60Sec
40Sec
4Min
2Min
3Min
2Min
BC 35Sec
3Min
1Min
60Sec
30Sec
9Min
7Min
5Min
3Min
1Min
120Sec
60Sec
10Sec
Gym Shoes
School Bag
E.low low mid high E.low low mid high
■
■
■
■
■
■
■
■
■
■
■
■
■
■
■
■
■
■
■
51
■
51
■
57
37
■
■
■
■
■
■
■
■
■
■
■
■
■
■
■
■
■
■
■
■
57
■
48
■
■
■
■
■
■
■
■
■
■
■
■
■
■
■
■
48
■
54
■
54
ELECTRIC CIRCUIT
Classification
P
r
e
W
a
s
h
Sensing
Water Inlet
PRE-WASH
WASH
Drain
BALANCE SPIN
R
i
n
s
e
1
Mid Spin
Natural Stop
Rinse Shower
Water Inlet
Rinse
Drain
R
i
n
s
e
2
BALANCE SPIN
Mid Spin
Natural Stop
Water Inlet
Rinse
Drain
BALANCE SPIN
S
p
i
n
Spin
Natural Stop
Buzzer
Over Time Indication
Time
8Sec
4Min
2Min
60Min
30Min
18Min
15Min
10Min
6Min
BC 35Sec
3Min
1Min
60Sec
30Sec
90Sec
20Sec
120Sec
60Sec
40Sec
60Sec
Sec
4Min
2Min
3Min
2Min
BC 35Sec
3Min
1Min
60Sec
30Sec
90Sec
60Sec
120Sec
60Sec
40Sec
4Min
2Min
3Min
2Min
BC 35Sec
3Min
1Min
60Sec
30Sec
9Min
7Min
5Min
3Min
1Min
120Sec
60Sec
10Sec
Under wear
Sports wear
E.low low mid high E.low low mid high
■
■
■
■
■
■
■
■
■
■
■
■
■
■
■
■
■
■
■
■
45
■
■
45
■
■
51
38
■
■
■
■
■
■
■
■
■
■
■
■
■
■
■
■
■
■
■
■
■
51
■
50
■
■
■
■
■
■
■
■
■
■
■
■
■
■
■
■
50
■
56
■
56
ELECTRIC CIRCUIT
2. Convenient functions
1. Option and LED/buzzer check (initial test mode)
1) How to enter the initial test mode
1> While the washing and spin dry buttons are pressed, turn on the power to enter into option,
LED and Buzzer check mode.
2) The option, LED and buzzer test mode will proceed as follows.
Order
1
2
3
4
Check
Time
Washer capacity check 1 sec
L/S data check
Other LED: off
1 sec
Functional option no. check 2 sec
Other LED: off
LED, buzzer check
8 sec
LED
Buzzer
88 display: 15
Remark
15kg
88 display: L1 to 8
88 display: option no.
88 display and other LED
0.5 sec on/off
Refer to the
attached option table.
LED on for
buzzers sounds
3) Option no.: Depending on the insertion of option diode D20 to D23, Bit 7 to Bit 0 are set and a
binary number is converted into a hexadecimal. The option no. for each model is managed to
prevent wrong insertion of option diodes.
4) After the above check is finished, the power is off with the power off sounds.
5) Press the water level button to check the saved L/S value. The three data will be displayed in
turns.
39
ELECTRIC CIRCUIT
2. Washing aging function (D1)
1) How to enter the D1 test mode
1> During washing, press the spin dry button to enter into D1 test mode where you can perform
washing aging.
2) Operation of the aging test mode
1> Regardless of the current water level, the standard course’s low water level flow time will
keep operating the washing motor. If you open the door, no error is generated. The bubbles
keep operating.
3) All the other LEDs are off and the 88 display will show“d1”.
3. Service check function (D2)
1) How to enter the D2 test mode
1> While in the D1 (washing aging) test mode, press the spin dry button to enter the D2 test
mode where you can check the function of the washer.
2) The D2 test mode will proceed as in the following sequence to check the operational status of
each load.
Order
Check
Time
1
Check water supply.
4 Sec
Waster discharge sync motor on.
2
Check water discharging.
3 Sec
Water discharge sync motor + spin dry motor on.
3
Check water discharging.
1 Sec
Hot water supply valve on.
1 Sec
Cold water supply valve on.
1 Sec
Softener injection water supply valve on.
Check the washing
1 Sec
Washing right motor on.
motor and the bubbles.
1 Sec
Bubble on
1 Sec
Washing left motor on.
1 Sec
Pump on.
4
5
Check operation of the pump.
Load operation
3) After the above checks are finished, the power is off with the power off sounds.
40
LED display
88 display: d2
Other LED: off
ELECTRIC CIRCUIT
3. PCB error displays
ERROR
displayed
Contents
Drain error. Check the location of the drain hose, drain synchronous motor, and
bellows.
Open/close the door and press“Start/Pause”to run the washer again.
Drain error. Check if the tap is left open, water temperature is correctly
selected, the hose is properly connected, or impurities are collected in the
water-supply valve.
Or the water-level sensor error.
Open/close the door and press“Start/Pause”to run the washer again.
The laundry tangled during spin-drying or 수평량 and safety switch error.
Adjust the levelness or correct the safety switch contact.
Open/close the door and press“Start/Pause”to run the washer again.
The door opened during washing/spinning/or timing.
Replace the door switch and safety switch in case the error exists after the door
is closed.
Open/close the door and press“Start/Pause”to run the washer again.
Load sensing error.
Replace PCB ASS’Y in case the error is indicated for 0.5 sec after load sensing
operates for 7 sec and the level is always set to“High”.
Water level sensing error.
Check the water-level sensor and the connector of the water level sensor Ass’
y in the back.
41
ELECTRIC CIRCUIT
4. Troubleshooting
Problems
Matters to Check
• Check the voltage used
• Check blackout and a circuit
breaker
Check the voltage
Replace the fuse
and check the
operation in the
test mode to see if
the same error
occurs.
• If the fuse is disconnected during
water supply, replace the watersupply valve after measuring the
resistance of the valve and a short
is confirmed
• If the fuse is disconnected during
washing, replace the motor after
measuring the resistance of the
motor and a short is confirmed
Check the connector and corrosion of
the wiring.
• Replace the connector and harness
Check the voltage of the regulator I.C.
of PCB (Input: 12V, Output: 6V)
• Replace the PCB or parts if the
error exists after checking the
regulator.
After
draining
→
the wing rotates
only in the one
direction or makes
excessive noises
when it rotates in
the reverse
direction.
• TRIAC error on the PCB. Replace
the PCB.
Check
electrical
noise of
the motor
→
• Check the
connector
• Check
disconnection of
wires of the
motor
• Replace the connector and harness
• Replace the motor if a motor wire
is disconnected
• Replace the PCB if a motor wire is
normal.
Check the
fuse
→
No power
No washing
Troubleshooting
Check the capacitor terminal
• Correct the contact of the capacitor
terminal.
Check abrasion of the belt
• Replace the belt
42
ELECTRIC CIRCUIT
Problems
Matters to Check
Check
the fuse
No spindrying
→
Check the voltage
at both ends of the
drain synchronous
motor
Troubleshooting
• Replace the synchronous motor
• Replace the PCB if the synchronous
motor is normal
Check the abrasion of the V belt
Replace the V belt
Check the voltage of both ends of the
motor (White-red~purple)
Replace the motor if the voltage is not
normal
Check the contact of motor start
condenser
Correct the contact of the condenser
terminal
Check if the tap is left open
Open the tap
Check if impurities are collected in the Clean the filter with a brush
water-supply valve.
No water
supply
Check the connection of hose and
water-supply valve
• Connect the hose with the valve
properly
• Check that the hose is properly
connected with the nozzle
Check electrical noise of the watersupply valve
Replace the valve if the same error
persists
Check the contact of the connector
and terminal
• Take measures to prevent the
same error
• Replace the PCB if the error
persists after correcting the contact
43
ELECTRIC CIRCUIT
Problems
Water supply
not stopping
Matters to Check
Check if water is supplied when the
power is off
• Replace the water-supply valve
Check if water is supplied
continuously when the power button
is pressed
• Replace TRIAC of the PCB
Check if
water is
supplied
continuously
when the
level
reaches
“High”
→
• Check if the
level-sensing
hose is bent
• Check if the
level-sensing
hose is filled
with water
• Check if water
is not supplied
when the level is
set to“Middle”
Check if the drain hose is on the floor
Check the
drain
synchronous
motor
→
No drain
Troubleshooting
Check voltage at
both ends of the
synchronous motor
• Unfold the bent hose
• Air leakage in the hose
• Replace the sensor
Place the hose on the floor.
• Replace the synchronous motor if
the voltage is not normal
• Replace the PCB if the voltage is
normal
Check if impurities are collected in the Clean the impurities
drain bellows
44
Office: 1-2 Jeodong-1 ga Jung-gu Seoul
Customer Service: (Rep.) 360-8282
http://www.dwe.daewoo.co.kr
ABOUT THIS MANUAL
VISION CREATIVE, INC.
서울 종로구 통의동
6번지 이룸빌딩 4층
담
당
민가영 님
MODEL
KUF-150Q (멕시코향 영문 S,G)
접
2010.09.27
수
1차
2차
일
정
3차
4차
5차
제
판
규
격
인
한
쇄
MEMO 총 40p
10.09.27-표지 (파생 DWF-150Q -> KUF-150Q), 1p, 3p, 4p, 5p,
11p, 13p, 14p, 15p, 16p, 18p, 19p, 20p 수정_ 신규 13p
10.09.28-19p, 20p, 24p, 25p, 26p, 27p, 28p, 29p, 30p, 31p, 32p,
33p(페이지 추가 5페이지) 수정_ 신규 12p
연락처
VISION 담 당
방 문 수
TEL: 730-0660 FAX: 730-3788