1
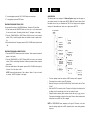
MICRO HIFI SYSTEM WITH COMPACT DISC PLAYER, MP3/WMA DISC/USB/CARD SLOT PLAYBACK, DIGITAL PLL MW/FM RADIO AND REMOTE CONTROL HIF-5510UCMPT Instruction manual Bedienungsanleitung Manuel d’instructions Manuale d’istruzioni Manual de instrucciones Manual de instruções is a registered Trademark of Roadstar S.A. - Switzerland All rights reserved RCR-5510UCMPT INDEX English Deutsch Français Italiano Español Português Page 1 Seite 21 Page 41 Pagina 61 Página 81 Pagina 101 • Your new unit was manufactured and assembled • under strict ROADSTAR quality control. Thank-you for purchasing our product for your music enjoyment. Before operating the unit, please read this instruction manual carefully. Keep it also handy for further future references. Ihr neues Gerät wurde unter Beachtung der strengen ROADSTAR-Qualitätsvorschriften gefertigt. Wir danken Ihnen für den Kauf unseres Produktes und wünschen Ihnen optimalen Hörgenuss. Bitte lesen Sie diese Bedienungsanleitung durch, und heben Sie sie auf, um jederzeit darin nachschlagen zu können. • Votre nouvel appareil a été fabriqué et monté en • étant soumis aux nombreaux tests ROADSTAR. Nous espérons que cet appareil vous donnera entière satisfaction. Avant de vous adonner à ces activités, veuillez lire attentivement ce manuel d’instructions. Conservezle à portée de main à fin de référence ultérieure. • Vuestro nuevo sistema ha sido construido según las normas estrictas de control de calidad ROADSTAR. Le felicitamos y le damos las gracias por su elección • de este aparado. Por favor leer el manual antes de poner en funcionamiento el equipo y guardar esta documentación en case de que se necesite nuevamente. Il vostro nuovo apparecchio è stato prodotto ed assemblato sotto lo stretto controllo di qualitá ROADSTAR. Vi ringraziamo di aver acquistato un nostro prodotto per il vostro piacere d’ascolto. Prima di procedere all'utilizzo dell'apparecchio, leggete attentamente il manuale d’istruzioni e tenetelo sempre a portata di mano per futuri riferimenti. Seu novo aparelho foi construido e montado sob o estrito controle de qualidade da ROADSTAR. Agradecemos por ter comprado nosso produto para a sua diversão. Antes de usar esta unidade é necessário ler com atençâo este manual de instruções pare que possa ser usada apropriadamente; mantenha o manual ao seu alcance para outras informações. Deutsch SICHERHEITSHINWEISE Das Ausrufszeichen im Dreieck weist den Benutzer auf wichtige Bedienungs- und Wartungsanweisungen (Service) in diesem Handbuch hin, die unbedingt zu befolgen sind. 21 22 Deutsch HIF-5510UCMPT MICRO-HIFI-SYSTEM MIT CD/MP3/WMA/USB/SD/MMC CARD WIEDERGABE, DIGITAL-PLL-UKW/MW RADIO UND FERNBEDIENUNG. BEDIENUNGSANLEITUNG Das Blitzsymbol im Dreieck weist den Benutzer auf “gefährliche Spannungen” an einigen freiliegenden Bauteilen im Innem des Gerätes hin. Bitte lesen Sie diese Bedienungsanleitung aufmerksam durch, um sich mit Ihrem neuen HiFi-System vertraut zu machen, bevor Sie es zum ersten Mal in Betrieb nehmen. Bitte bewahren Sie diese Anleitung auf, um später jederzeit nachschlagen zu können. Um die Gefahr elektrischer Schläge auszuschliessen, Gehäuse auf keinen Fall abnehmen. Im Innem befinden sich keine vom Benutzer selbst instandsetzbaren Teile. Reparaturen dürfen nur von einer autorisierten Fachwerkstatt durchgeführt werden. INHALTSVERZEICHNIS Dieses Gerät arbeitet mit einem Laserstrahl. Da die Gefahr von Augenschäden besteht, darf nur qualifiziertes Personal den Deckel des Gerätes aufheben, entfernen oder reparieren. Dunkelstrahlung bei geöffneten Geräten und defektem Verschluss. Bedienung oder Regulierung der technischen Eigenschaften oder sonstige nicht spezifierte Prozeduren auf dieser manuellen Betriebsart können zur Ausetzung gefährlicher Laserstrahlen führen. Dieses Gerät ist für 230V ~ 50Hz Netzspannung ausgelegt. Bei längerer Nichtbenutzung des Geräts ziehen Sie den Stecker aus der Steckdose. Setzen Sie das Gerät weder Feuchtigkeit noch Regen aus. Der EIN-Schalter dieses Geräts ist an den Sekundärschaltkreis angeschlossen. Seine Abschaltung unterbricht die Hauptstromzufuhr des Geräts nicht. Schalten Sie das System erst dann ein, wenn Sie alle Verbindungen genau geprüft haben. Stellen Sie das Gerät so auf, dass immer eine ungestörte Frischluftzufuhr sichergestellt ist. Stellen Sie das Gerät keinesfalls auf Teppiche und in die Nähe von Gardinenund bauen Sie es nicht in Bücherregale ein. Setzen Sie das Gerät weder direkter Sonneneinstrahlung noch Wärmequellen aus. • • Lage der Bedienungselemente Fernbedienung • • • Stromanschluß Stromversorgung Kopfhörer • • • Wiedergabe der Compact Disc Titelsprung Manueller Suchlauf • • Disc Programmieren Wiederhol-Funktion • • • Random-Abspiel Remain-Funktion Intro-Funktion • MP3-Funktion • • USB/SD/MMC CARD -Funktion Besondere Funktionen • • Wichtiges Technische Daten Deutsch 23 24 Deutsch LAGEDERBEDIENUNGSELEMENTE FERNBEDIENUNG 1. 2. 3. CD-Stop-Taste CD-Wiedergabe-/Pause-Taste Wiederhol-Taste 1. 2. 3. Power-Taste CD-Wiedergabe-/Pause-Taste CD-Stop-Taste 4. 5. 6. Mono/Stereo/ESP-Taste LCD Anzeige Mute -Taste 4. 5. 6. MUTE-Taste ESP/ST./MO.-Taste Numerik-Tasten 7. 8. Random-Taste Lautstärker - Taste 7. 8. INTRO-Taste RANDOM-Taste 9. Lautstärker + Taste 10. CD Fach 11. EQ-Taste (Vorwahl-Equalizer) 9. MEMORY-Taste 10. BBSTaste 11. EQ-Taste 12. Band-Taste 13. Kopfhörerbuchse 14. CD-Fach-Taste (Öffnen/Schliessen) 12. REPEAT-Taste 13. Funktion-Taste 14. BAND-Taste 15. Aux in-Buchse 16. Abstimmen ab /CD-Sprung/Suchen rückwärts 15. Vorwahl auf Taste 16. Lautstärke-Taste + 17. Sensor für Fernbedienung 18. Vorwahl ab Taste 19. SD/MMC Card Reader 17. Abstimmung/Sprung-Taste rückwärts 18. Abstimmung/Sprung-Taste vorwärts 19. Vorwahl ab Taste 20. Abstimmen auf/CD-Sprung/Suchen vorwärts 21. Vorwahl auf Taste 22. Power-Taste 20. Lautstärke-Taste - 23. USB Port 24. Funktionstaste (TUNER/CD/AUX/CARD-USB) VORBEREITUNG Ziehen Sie die Plastikscheibe von der Fernbedienung heraus. 25. Memory-Taste 26. Spannungsschalter (nicht vorhanden in dieser Version) 27. Netzkabel Wenn die Batterie zu schwach wIrd, wird die Reichweite der Fernbedienung bedeutend verringert und Sie müssen die Batterie (CR-2025) ersetzen. Hinweise: Um die Genauigkeit und eine lange Betriebsdauer der Fernbedienung 28. Links-Lautsprecherbuchse 29. Rechts-Lautsprecherbuchse 30. FM-Antenne beizubehalten, drücken Sie niemals zwei oder mehr Tasten gleichzeitig. Wenn Sie die Fernbedienung längere Zeit nicht benutzen, entfernen Sie die Batterie, da sonst Säureauslaufen könnte. RICHTIGE VERWENDUNG DER FERNBEDIENUNG Richten Sie die Fernbedienung auf den Sensor am Gerät. Die Funktionstasten auf der Fernbedienung sind dieselben wie auf dem Hauptgerät. Eine starke Lichtquelle im Raum kann die Leistung des Infrarot-Sensor beeinträchtigen und eine unzuverlässige Funktion hervorrufen. Deutsch 25 26 Deutsch Die maximale effektive Reichweite der Fernbedienung beträgt ca. 5 Meter. NETZANSCHLUSS MW/UKW-TUNER Bevor Sie das Gerät einschalten, vergewissern Sie sich, daß Ihre örtliche Netzspannung mit der auf dem Typenschild angegebenen Spannung übereinstimmt. BETRIEB • Drücken Sie die POWER-Taste (22) auf dem Gerät oder auf der Fernbedienung Zu Ihrer eigenen Sicherheit lesen Sie sorgfältig die folgende Bedienungsanleitung, bevor Sie das Gerät ans Netz anschließen. • (1), um das Gerät einzuschalten. Drücken Sie die Funktion-Taste (24) auf dem Gerät oder auf der Fernbedienung (13), um TUNER zu wählen. NETZBETRIEB(AC) Dieses Gerät funktioniert nur mit einer Spannung von AC 230V 50Hz. Wird das Gerät an • Wählen Sie mit der Band-Taste (12) auf dem Gerät oder auf der Fernbedienung (14), das Frequenzband, das Sie hören möchten. andere Stromquellen angeschlossen könnte es Schaden nehmen. • Vorsicht • Stimmen Sie die gewünschte Sendestation mittels den Abstimm-Tasten (16/20) auf dem Gerät oder auf der Fernbedienung (17/18) ab. Um das Radio auszuschalten, drücken Sie die POWER-Taste (AUS). Um elektrischen Schlägen vorzubeugen, trennen Sie das Gerät vom Netz, bevor Sie den Deckel entfernen. Für die Wartung wenden Sie sich an qualifiziertes Kundendienstpersonal. Sicherheitsmaßnahmen Setzen Sie das Gerät weder Regen noch Feuchtigkeit aus. MANUELLES / AUTOMATISCHES EINSTELLEN • Zum Einstellen eines Senders die Abstimm-Tasten (16/20) auf dem Gerät oder auf der • Stromversorgung: AC 230Volt / 50Hz - nur Wechselstrom (AC) Dieses Zeichen bedeutet, daß dieses Gerät doppelt isoliert ist. Eine Erdung ist nicht notwendig. STROMVERSORGUNG Nehmen Sie das Gerät vorsichtig aus der Verpackung und heben Sie diese für eine spätere Verwendung auf. gedrückt halten. Dann beginnt die Einheit automatisch mit dem Suchen. Der erste Radiosender mit ausreichend guter Signalübertragung wird nun eingestellt. ABSPEICHERN VON EINGESTELLTEN SENDERN Es können bis zu 40 Radiosender gespeichert werden (30xUKW, 10xMW). Zum Speichern der eingestellten Sender: • Drücken Sie die POWER-Taste auf dem Gerät oder auf der Fernbedienung, um das Gerät einzuschalten. • Drücken Sie die Funktion-Taste (24) auf dem Gerät oder auf der Fernbedienung (13), um TUNER zu wählen. Wählen Sie UKW (FM) oder MW mit der Band-Taste (12) auf dem Gerät oder auf derFernbedienung (14). Das gewünschte Frequenzband wird auf WECHSELSTROM-BETRIEB(AC) Schließen Sie das Netzkabel (27) an eine AC-Steckdose an. Überprüfen Sie, daß Ihre Stromversorgung 230V, 50Hz beträgt. • KOPFHÖRER dem Display angezeigt. Stimmen Sie die gewünschte Sendestation mittels den Abstimm-Tasten auf dem Gerät oder auf der Fernbedienung ab. • Die Taste MEMORY (25) drücken. Nun blinkt die Anzeige "MEMORY" auf dem Display und eine Einstellnummer wird angezeigt. • • Die PRE UP oder PRE DNTasten (21/18 ) auf dem Gerät oder auf der Fernbedienung (15/19) drücken, um die gewünschte Vorwahl-Nummer auszuwählen. Die Taste MEMOR erneut drücken, um den Sender unter der gewählten Nummer • abzuspeichern. Für alle weiteren Sender, die programmiert werden sollen, die oben beschriebenen An dieses Gerät können Stereo-Kopfhörer (nicht mitgeliefert) mit einem 3.5mm-Stecker und einer Impedanz von 8 Ohm oder höher angeschlossen werden. Die Lautsprecher werden automatisch abgeschaltet, wenn ein Kopfhörer an der KOPFHÖRERBUCHSE (13) angeschlossen ist. Fernbedienung (17/18) kurz drücken. Für das automatische Einstellen die Abstimm-Tasten mindestens zwei Sekunden lang Deutsch 27 28 Deutsch Schritte wiederholen. ABHÖREN EINES PROGRAMMIERTEN SENDERS • Drücken Sie die POWER-Taste, um das Gerät einzuschalten. ZUM UMGANG MIT DEN COMPACT DISCS • Um eine Disc aus ihrer Schutzhülle zu nehmen, drücken Sie auf die mittlere Halterung und • Drücken Sie die Funktion-Taste auf dem Gerät oder auf der Fernbedienung, um TUNER zu wählen. Mit der BAND-Taste wählen Sie UKW oder MW. • Die PRE UP oder PRE DNTasten drücken, um den gewünschten Sender zu wählen. ANTENNE • Für den UKW-Empfang befindet sich auf der Rückseite des Gerätes ein eingebauter UKW-Antennendraht. Bewegen Sie den Draht hin und her, bis der beste Empfang • erreicht wird. Für den MW-Empfang werden die Signale über die eingebaute Ferrit-Antenne empfangen. Sie brauchen das Gerät nur auszurichten, bis Sie den besten Empfang erreichen. UKW UND UKW-STEREO-EMPFANG • Stereo Ton ist möglich wenn die eingestellte UKW-Station in Stereo sendet. • Wählen Sie FM mit der BAND-Taste (12) auf dem Gerät oder auf der • Fernbedienung (14). Wenn ein UKW-Signal abgestimmt wird, können Sie das Programm in Stereo empfangen. “ST” erscheint auf dem Display. Bei schwachen Stereo-Signalen und einem geräuschvollen Empfang ist es oft vorzuziehen, das Programm in Mono zu empfangen. Drücken Sie den Taste MONO/ST/ ESP auf dem Gerät oder auf der Fernbedienung. Der Empfang erfolgt mit weniger Störgeräuschen. heben Sie die Disc hoch, wobei Sie vorsichtig an den Rändern halten sollten. Fingerabdrücke und Staub sollten von der bespielten Oberfläche der Disc vorsichtig mit einem weichen Tuch entfernt werden. Im Unterschied zu den herkömmlichen Platten, haben Compact Discs keine Rillen, in denen sich Staub und feinste Schmutzteilchen ansammeln können. Somit werden durch das Abwischen mit einem weichen Tuch die meisten Teilchen entfernt. Wischen Sie in geraden Bewegungen von der Mitte der Disc zum Außenrand. Kleine Staubteilchen oder leichte Streifen beeinflussen keinesfalls die Wiedergabequalität. Verwenden sie niemals chemische Produkte, wie Plattensprays, Antistatik-Sprays, Benzin oder Verdünner, um Compact Discs zu reinigen. Diese Produkte könnten die Oberfläche der CD ernsthaft beschädigen. Nach der Verwendung sollten die CDs wieder in ihre Schutzhülle zurückgelegt werden, um grössere Kratzer vermieden, die das Springen des Laser-Tonabnehmers hervorrufen könnten . Setzen Sie die Discs nicht längere Zeit dem direkten Sonnenlicht, hoher Feuchtigkeit oder hohen Temperaturen aus. Werden die CDs längere Zeit hohen Temperaturen ausgesetzt, könnten sie sich verformen. Vermeiden Sie es, auf die beschriftete Seite der CD Aufkleber anzubringen oder mit einem Kugelschreiber darauf zu schreiben. WIEDERGABE DER COMPACT DISCS/MP3/WMA EINLEGENUNDHERAUSNEHMENDERCOMPACT DISCS • • • Drücken Sie die POWER-Taste (22) auf dem Gerät oder auf der Fernbedienung (1), um das Gerät einzuschalten. Drücken Sie die Funktion-Taste (24) auf dem Gerät oder auf der Fernbedienung (13), um CD/MP3-Betrieb zu wählen. Drücken Sie die CD-Fach-Taste (14), um den CD-Fach zu öffnen. Nach dem Öffnen des CD-Fachs, nehmen Sie eine Disc aus ihrer Schutzhülle und legen Sie sie vorsichtig, mit der beschrifteten Seite nach oben, ins Fach ein. Wenn die Disc Deutsch • 29 kleiner als 3 Zoll ist, legen Sie diese auf die mittlere Spindel im Fach. Schließen Sie den Deckel. Ist das CD-Fach richtig geschlossen, beginnt sich die Disc automatisch zu drehen. Die Gesamttitelanzahl der CD erscheint auf dem LCD. VORSICHT • Legen Sie nichts anderes, als eine CD ins CD-Fach. Fremdkörper könnten den Mechanismus beschädigen. • Wenn Sie das Gerät nicht benutzen, lassen Sie das CD-Fach geschlossen, damit weder Schmutz noch Staub in den Mechanismus eindringen können. • Legen Sie niemals mehrere CDs gleichzeitig ins CD-Fach. • Wenn die Disc richtig eingelegt worden ist, erscheinen die folgenden Informationen auf dem Display: Gesamtanzahl der Titel auf der Disc Gesamtspielzeit Hinweise: Wenn trotz vollständig geschlossenem Deckel keine CD-Informationen auf dem Display erscheinen, bedeutet das, daß die Disc nicht richtig eingelegt worden ist (meist falsch herum). Überprüfen Sie, indem Sie erneut das CD-Fach öffnen und die Disc richtig einlegen. “ESP”ANTISPRUNG-FUNKTION(ANTI-SCHOCK) • Während des Betriebes könnte der CD-Spieler Stößen oder Schwingungen ausgesetzt werden. Die ANTI-SHOCK-Funktion wird eine ununterbrochene Wiedergabe garantieren. • Die ESP (ANTI-SHOCK) Funktion wird automatisch beim CD oder MP3 Abspielen • aktiviert. Während CD-Betrieb drücken Sie die Taste “ESP” (4) auf dem Gerät oder auf der Fernbedienung (5), um die Funktion zu löschen. • Die Anti-Schock-Funktion ist immer aktiv im CD/MP3-Betrieb. 30 Deutsch 4. Es unterstützt "Version 1.1" im "ID3"-Modus. COMPACT DISC (CD) CD-Wiedergabe 1. Drücken Sie die Funktion-Taste (24) auf dem Gerät oder auf der Fernbedienung (13), um CD-Betrieb zu wählen, erscheinen die CD-Anzeige, die Gesamtanzahl der Titel auf der Disc und Gesamtspielzeit. Hinweis: Die ESP-Anzeige wird erscheinen und meint auch, daß die automatische Elektronische-Schockschutz-Funktion aktiviert wird. 2. Drücken Sie PLAY/PAUSE einmal, um die CD-Wiedergabe zu beginnen, erscheint die Titelnummer und die abgelaufene Abspielzeit. ESP-Anzeige blinkt. 3. Um zeitweilig die CD-Wiedergabe zu stoppen (Pause-Modus), drücken Sie PLAY/PAUSE 4. 5. nochmals, die abgelaufene Abspielzeit blinkt. Um die Wiedergabe der Disc fortzusetzen, drücken Sie erneut die PLAY/PAUSE-Taste. Drücken Sie die Stop-Taste. Die CD-Wiedergabe wird gestoppt, und das Display zeigt die Gesamttitelanzahl der CD an. CD-TITELSPRUNG 1. 2. Drücken Sie eine der Titelsprungtasten vorwärts oder rückwärts mittels den SprungTasten (16/20) auf dem Gerät oder auf der Fernbedienung (17/18) ab. Die Nummer des gewünschten Titels erscheint auf dem CD-Display. Drücken Sie PLAY/PAUSE, um die Wiedergabe zu starten. MP3-ABSPIELEN (CD) Wiedergabe von MP3 1. Drücken Sie die Funktion-Taste (24) auf dem Gerät oder auf der Fernbedienung (13), um (CD)MP3-Betrieb zu wählen. Im Display erscheinen die Gesamtanzahl der Titel auf der Disc, die Anzahl der Alben und die Gesamtspielzeit. COMPACT DISC UND MP3 DISK WIEDERGABE (CD) Drücken Sie die Funktion-Taste (24) auf dem Gerät oder auf der Fernbedienung (13), um CD/MP3-Betrieb zu wählen. A) In CD Dieses Gerät kann CD, CD-R, CD-RW ablesen. B) In MP3 Dieses Gerät kann auch folgenden ablesen: 1. " 8 cm " und " Multi Section " einer MP3-DISK. 2. Es ist mit Playback Transfer Rate 56-256 kbps gestattet. 3. Es kann bis 640 Files und 255 Folders ablesen. 2. Drücken Sie PLAY/PAUSE einmal, um die MP3-Wiedergabe zu beginnen, erscheint die aktuelle Albumnummer, die Titelnummer und die abgelaufene Abspielzeit. Die ESP- Anzeige blinkt. Drücken Sie die “/ESP” Taste auf dem Gerät für ca. 2 Sekunden. Nun werden die ggf abgespeicherten ID3 Tag Informationen im Display angezeigt. Deutsch 31 3. Um zeitweilig die MP3-Wiedergabe zu stoppen (Pause-Modus), drücken Sie PLAY/PAUSE nochmals, die abgelaufene Abspielzeit blinkt. 4. Um die Wiedergabe der Disc fortzusetzen, drücken Sie erneut die PLAY/PAUSE-Taste. 5. Drücken Sie die Stop-Taste. Die Wiedergabe wird gestoppt. 32 Deutsch EINZELSESSION Das folgende Diagramm ist ein Beispiel einer Windows Explorer Bildschirmseite, die auf Ihrem Monitor Ihres Computers erscheint, wenn Sie eine MP3 CD in Single Session Verfahren brennen. Die nachfolgenden Hinweise erklären die Zusammenstellung einer MP3 CD. SUCHEN INNERHALB DER ALBEN NACH TITELN/KÜNSTLERN 1. Im Stop-Modus, drücken Sie die MO/ST/ESP-Taste auf dem Gerät (4) oder auf der Fernbedienung (5) einmal und die Titel/Künstler, die mit dem Buchstaben “A” beginnen, werden im Display angezeigt. 2. Drücken Sie die Tasten TUNING (BACK) oder (NEXT) (16/20) auf dem Gerät oder (17/18) auf der Fernbedienung, um durch die Buchstaben und Nummern zu scrollen, um einen bestimmten Titel/Künstler zu finden. 3. Wenn der gewünschte Titel/Künstler erscheint, drücken Sie die Taste PLAY/PAUSE, um den Titel/Künstler abzuspielen. ALBUM / VERZEICHNISS INNERHALB DER CD SUCHEN 1. Drücken Sie die MO/ST/ESP-Taste auf dem Gerät (4) oder auf der Fernbedienung (5) zweimal und die erste Album-Name und -Nummer erscheinen im Display. 2. Drücken Sie die Tasten TUNING (BACK) oder (NEXT) (16/20) auf dem Gerät oder (17/18) auf der Fernbedienung, um durch die Alben/Verzeichnisse und Nummern zu scrollen, um ein bestimmtes Album zu finden. 3. Wenn das gewünschte Album erscheint, drücken Sie die Taste PLAY/PAUSE, um den erste Titel/Künstler des Albums abzuspielen HINWEIS: Wenn während des scrollens durch Titel/Künstler oder Alben/Verzeichnisse, • Die Fließrichtung mit den Pfeilen zeigt die Reihenfolge bei der Wiedergabe der MP3 • Alben und der Spuren/Lieder an. Bei diesem Beispiel gibt es insgesamt 7 MP3 Verzeichnisse/Alben. keine Namen oder Inhalte vorhanden sind, erscheint im Display “NONE”. • • • Auf der Grundlage dieser Einstellung wird die erste Spur “Blur01.mp3” und die letzte Spur“Twain15.mp3” sein. Wenn Sie die MP3 CD in den CD Spieler einlegen, wird im Display die Anzahl der Verzeichnisse und die Gesamtanzahl der Titel angezeigt. “Skipped” weist auf ein Verzeichnis hin, das keine Ton- bzw. Audiodateien enthält, wie z.B. jpg, wav, etc. Diese Formate können mit diesem Gerät nicht angewählt oder abgespielt werden. Befinden sich auf der MP3 Disc Nicht-Tondateien, werden diese einfach übersprungen. HINWEIS: Abhängig von der Art des CD Brenners, der Brenngeschwindigkeit, der Qualität der CD Rohlinge und der Bit-Rate, kann es bei der Wiedergabe zu Problemen kommen. Dies ist keine Fehlfunktion des Gerätes. Deutsch 33 SPRUNG-/SUCH-FUNKTION Im CD / MP3-Abspielmodus: 1. Drücken und halten Sie einige Sekunden lang TUNING (BACK) oder (NEXT) (16/20) auf dem Gerät oder (17/18) auf der Fernbedienung, die abgelaufene Zeit wird vorwärts oder rückwärts einige Sekunden laufen. 2. Um diese Funktion zu löschen, drücken Sie PLAY / PAUSE. 3. Drücken und halten Sie länger als drei Sekunden TUNING (BACK) oder (NEXT), die Zeitanzeige wird schneller rückwärts oder vorwärts gehen. WIEDERHOLTE WIEDERGABE IN CD 1. In der CD / MP3-Wiedergabe, wenn Sie den gleichen Titel wiederholen wollen, drücken Sie REPEAT (3) auf dem Gerät oder auf der Fernbedienung (12) einmal, wird die "REPEAT” Anzeige erscheinen. 2. Wenn Sie die ganze Disc wiederholen wollen, drücken Sie REPEATzweimal, wird die Anzeige "REPEAT ALL" leuchten. 3. Um die Wiederhol-Funktion zu löschen, drücken Sie STOP oder die REPEAT Taste bis die REPEAT-Anzeige verschwindet. Hinweis : Der "REPEAT ALL"-Modus wirkt auf normalen und programmierten Wiedergaben. WIEDERHOLTE WIEDERGABE IN MP3 1. In der MP3-Wiedergabe, wenn Sie den gleichen Titel wiederholen wollen, drücken Sie REPEAT (3) auf dem Gerät oder auf der Fernbedienung (12) einmal, wird die "REPEAT”" Anzeige erscheinen. 2. Wenn Sie die ganze Disc wiederholen wollen, drücken Sie REPEAT zweimal, wird die Anzeige "REPEAT ALL" leuchten. 3. Wenn Sie das aktuelle Album wiederholen wollen, drücken Sie REPEATdreimal, wird die Anzeige "REPEAT ALBUM" leuchten. 4. Um die Wiederhol-Funktion zu löschen, drücken Sie STOP oder die REPEAT Taste bis die REPEAT-Anzeige verschwindet. RANDOM-TASTE im STOP-Modus, drücken Sie die RANDOM-Taste (7) auf dem Gerät oder auf der Fernbedienung (8). Daraufhin erscheint die RANDOM-Anzeige auf dem Display. Um die Wiederbabe in willkürrlichen Reihenfolge zu starten, drücken Sie PLAY / PAUSE. Um diese Funktion zu löschen, drücken Sie STOP oder RANDOM bis die Anzeige RANDOM verschwindet. WIEDERGABESTOPPEN 1. Drücken Sie die Stop-Taste. Die CD-Wiedergabe wird gestoppt, und das Display zeigt die Gesamttitelanzahl der CD an. 2. Drücken Sie die CD-Fach-Öffnungstaste, um die Disc herauszunehmen. 34 Deutsch INTRO SCAN WIEDERGABE • Drücken Sie die INTRO-Taste (7) auf der Fernbedienung: die ersten 10 Sekunden jeder Spur auf der CD werden gespielt. “INTRO” wird auf dem Display angezeigt. Drücken Sie diesen Knopf wieder, wenn eine gewünschte Spur spielt, um zur normalen Wiedergabe zurückzukehren. “INTRO” wird von dem Display verschwinden. PROGRAMMIERTEDISC-WIEDERGABE Es ist nicht möglich, die CD während der Wiedergabe zu programmieren. Drücken Sie zuerst die Stop-Taste und befolgen Sie dann die untenstehenden Anweisungen. Drücken Sie die Taste MEMORY (25) auf dem Gerät oder auf der Fernbedienung (9). Die folgende Information wird auf dem CD-Display angezeigt. 00 P-01 Drücken Sie die Titelsprungtasten vorwärts und rückwärts auf dem Gerät oder auf der Fernbedienung , um den Titel zu wählen, der auf Speicherplatz 1 gespeichert werden soll (zB Titel 03). 03 P-01 Drücken Sie die MEMORY. Die erste Programmwahl befindet sich nun im Programmspeicher. 00 P-02 Wählen Sie mit den Titelsprungtasten vorwärts und rückwärts den nächsten Titel, der programmiert werden soll (zB Titel 05). 05 P-02 Drücken Sie die MEMORY, um diesen Titel zu speichern. Auf diese Weise können Sie alle gewünschten Titel (bis zu 64) speichern. Wenn Sie die MEMORY drücken, um den 64.Titel zu speichern, kehrt das Display zum ersten Speicherplatz zurück. Drücken Sie die MEMORY, um die Speicherplätze einzusehen. Wenn Sie einen Titel zum Programm hinzufügen möchten, drücken Sie die MEMORY, bis der zuletzt programmierte Titel auf dem Display angezeigt wird. Drücken Sie erneut die MEMORY. Drücken Sie die Titelsprungtaste vorwärts oder rückwärts, bis der gewünschte Titel auf dem Display angezeigt wird, dann drücken Sie die MEMORY. Der hinzugefügte Titel wird als letzter Titel in den Programmspeicher eingegeben. Hinweise: Wenn Sie die Wiedergabe/Pause-Taste drücken, um einen Titel zu speichern, bevor die MEMORY gedrückt wurde, wird dieser Titel nicht programmiert. Die Disc- Deutsch 35 Wiedergabe startet vom ersten gewählten Titel. Sie können jeden Titel so programmieren, daß er mehrmals wiedergegeben werden kann. WIEDERGABEDERPROGRAMMIERTENTITEL Drücken Sie die Pause-Taste. Die Disc-Wiedergabe startet vom ersten programmierten Titel. LÖSCHENDESPROGRAMMSPEICHERS Wenn die Disc gerade wiedergegeben wird, drücken Sie die Stop-Taste, um die Wiedergabe zu stoppen. Wählen Sie mit dem Funktionsschalter (eine andere Funktion, um das Programm zu löschen. PROGRAMMIERTE MP3WMA-WIEDERGABE Es ist nicht möglich, die CD/MP3 während der Wiedergabe zu programmieren. Drücken Sie zuerst die Stop-Taste und befolgen Sie dann die untenstehenden Anweisungen. Drücken Sie die Taste MEMORY auf dem Gerät oder auf der Fernbedienung . Die folgende Information wird auf dem Display angezeigt. 36 Deutsch 00 000 P-02 Wählen Sie mit den Titelsprungtasten vorwärts und rückwärts das nächste Album, der programmiert werden soll (zB Album 05). 05 000 P-02 Drücken Sie die MEMORY, um dies Albumnummer zu speichern. Wählen Sie mit den Titelsprungtasten vorwärts und rückwärts den nächsten Titel, der programmiert werden soll (zB Titel 07). 05 007 P-02 Drücken Sie die MEMORY, um diesen Titel zu speichern. Auf diese Weise können Sie alle gewünschten Titel (bis zu 64) speichern. Wenn Sie die MEMORY drücken, um den 64.Titel zu speichern, kehrt das Display zum ersten Speicherplatz zurück. Drücken Sie die MEMORY, um die Speicherplätze einzusehen. Drücken Sie die Titelsprungtasten vorwärts und rückwärts (16/12) auf dem Gerät oder auf der Fernbedienung (17/18) , um das gewünschte Album zu wählen (z.B. 02). 02 000 P-01 Drücken Sie die MEMORY, um das Album zu bestätigen. Drücken Sie die Titelsprungtasten vorwärts und rückwärts auf dem Gerät oder auf der Fernbedienung, um den Titel zu wählen, der auf Speicherplatz 1 gespeichert werden soll (zB Titel 03). 02 003 P-01 Drücken Sie die MEMORY. Die erste Programmwahl befindet sich nun im Programmspeicher. Erscheint auf dem Display: Wenn Sie einen Titel zum Programm hinzufügen möchten, drücken Sie die MEMORY, bis der zuletzt programmierte Titel auf dem Display angezeigt wird. Drücken Sie erneut die MEMORY. Drücken Sie die Titelsprungtaste vorwärts oder rückwärts, bis der gewünschte Titel auf dem Display angezeigt wird, dann drücken Sie die MEMORY. Der hinzugefügte Titel wird als letzter Titel in den Programmspeicher eingegeben. Hinweise: Wenn Sie die Wiedergabe/Pause-Taste (6) drücken, um einen Titel zu speichern, bevor die MEMORY gedrückt wurde, wird dieser Titel nicht programmiert. Die DiscWiedergabe startet vom ersten gewählten Titel. Sie können jeden Titel so programmieren, daß er mehrmals wiedergegeben werden kann. WIEDERGABEDERPROGRAMMIERTENTITEL Drücken Sie die Pause-Taste. Die Disc-Wiedergabe startet vom ersten programmierten Titel. LÖSCHENDESPROGRAMMSPEICHERS Wenn die Disc gerade wiedergegeben wird, drücken Sie die Stop-Taste, um die Wiedergabe zu stoppen. Wählen Sie mit dem Funktionsschalter (eine andere Funktion, um das Programm zu löschen. Deutsch 37 USB MEMORY STICK WIEDERGEBEN STARTEN • • Drücken Sie die Funktion-Taste (24) auf dem Gerät oder auf der Fernbedienung (13), um “CARD-USB” Betrieb zu wählen. Stecken Sie den USB-Memory Stick auf den USB-Port. • Die Gesamtanzahl der Titel und Alben erscheinen im Display der Anlage. BETRIEB • Folgen Sie den Anweisungen für CD-Wiedergabe. HINWEIS • • Den USB-Port nur für USB MP3-Spieler oder USB-Memory Sticks benutzen. Wenn Sie die Musik von dem USB Memory Stick abspielen, ziehen Sie diesen nicht vom USB-Port herunter. Ansonnsten wird die Wiedergabe 38 Deutsch BESONDEREFUNKTIONEN MUTE -FUNKTION (Ton weg) • Zum Tonabschalten drücken SIE die MUTE-Taste (6) auf dem Gerät oder auf der Fernbedienung (4). Die Lautstärke-Niveau-Anzeigeblinkt auf dem Display. • Wird die Taste erneut gedrückt, oder eine der Lautstärke-Tasten,spielt die Anlage mit der bisherigen Lautstärke weiter. AUX-ANSCHLÜSSE Dieses Gerät kann analoge Signale durch diese Anschlüsse wiedergeben. • Wählen Sie die AUX-Funktion mit der Funktion-Taste. • Benutzen Sie ein RCA-Kabel (Chinch), um externen Tongeräte zu verbinden (Plattenspieler, VCD Spieler, Videorekorder, und so weiter). unterbrochen und es kann zu Funktionsstörungen kommen. BASS BOOST MMC/SD-CARD WIEDERGEBEN Wenn die BBS -Taste (10) auf der Fernbedienung gedrückt wird, werden die tiefen Frequenzen des Systems verstärkt. STARTEN Dieses CD-Player kann MMC (MULTMEDIA MEMORY CARD) und SD (SECURE DIGITAL CARD) wiedergeben. • Drücken Sie die Funktion-Taste (24) auf dem Gerät oder auf der Fernbedienung • (13), um “CARD-USB” Betrieb zu wählen. Schieben Sie die MEMORY CARD wie abgebildet in den Schlitz hinein. BETRIEB • Folgen Sie den Anweisungen für CD-Wiedergabe. HINWEIS: • Stoppen Sie die Wiedergabe bevor Sie die MEMORY CARD entfernen. • Führen Sie die MEMORY CARD ausschliesslich gemäss der unteren Abbildung in den Schlitz ein. Wenden Sie keine starke Druck an, wenn Sie die MEMORY CARD hineinstecken. • Sollten die MEMORY CARD und den USB-Memory Stick gleichzeitig in Betrieb genommen werden, wird zuerst der Inhalt der MEMORY CARD wiedergegeben. MEMORY CARD ENTFERNEN Durch leichten Druck auf die MEMORY CARD können Sie diese aus dem Schlitzt entfernen. EQUALIZER-FUNKTION (PRESET EQ) Die Qualität des Klanges kann durch den Equalizer eingestellt werden (PASS- normal, CLASSIC, ROCK, POP, JAZZ). Drücken Sie die EQ-Taste (11) auf dem Gerät oder auf der Fernbedienung (11), um die gewünschte Art von Musik zu wählen. Deutsch 39 WICHTIG Deutsch Abspielbarkeit selbsterstellter CDs auf CD-Laufwerken von Roadstar. Die Bewegung des CD-Mechanismus und der empfindliche Stromkreis können Störungen bei einem nahestehenden Radio oder Tuner hervorrufen. Schalten Sie daher das Gerät aus, wenn Sie andere Radios eingeschaltet haben. Dieses Gerät arbeitet mit einem Laserstrahl Gefahr - 40 CD-R/CD-RW im CD-DA- und im MP3-Format können abgespielt werden. Es ist jedoch möglich, dass einzelne selbsterstellte CDs aufgrund einer unterschiedlichen Medienqualität und Aufnahmeart nicht gelesen werden können. Dies bedeutet nicht, dass das Wiedergabegerät in diesen Fällen nicht ordnungsgemäß funktioniert. Unsichtbare Laserstrahlung beim Öffnen und wenn das Schließsystem versagt oder beschädigt ist. Vermeiden Sie es, sich der direkten Strahlung auszusetzen. Vorsicht - Die Benutzung von Bedienelementen, das Vornehmen von Regulierungen oder Einstellungen, die nicht in dieser Bedienungsanleitung aufgeführt sind, könnten Sie einer gefährlichen Strahlung aussetzen. BEZÜGLICH DER COMPACT DISCs Nur Compact Discs mit der Marke CD können mit diesem CD-Spieler wiedergegeben werden. TECHNISCHEDATEN Stromversorgung AC: 230V – 50Hz Radio-Frequenzbereich UKW: MW: 87.5 – 108 MHz 522 – 1620 kHz CD-Spieler Tonabnehmer: Encoding: 3-Beam, Halbleiter-Laser 16-Bit, linear, 2 x Oversampling Hinweis: Auf Grund ständiger Verbesserungen bleibt die Änderung der technischen Daten und des Designs ohne Vorankündigung vorbehalten. Korrekte Entsorgung dieses Produkts (Elektromüll) Die Kennzeichnung auf dem Produkt bzw. auf der dazugehörigen Literatur gibt an, dass es nach seiner Lebensdauer nicht zusammen mit dem normalen HaushaltsmüIl entsorgt werden darf. Entsorgen Sie dieses Gerat bitte getrennt von anderen Abfallen, um der Umwelt bzw. der menschlichen Gesundheit nicht durch unkontrollierte Müllbeseitigung zu schaden. Recyceln Sie das Gerät, um die nachhaltige Wiederverwertung von stofflichen Ressourcen zu fördern. Private Nutzer sollten den Händler, bei dem das Produkt gekauft wurde, oder die zuständigen Behörden kontaktieren, um in Erfahrung zu bringen, wie sie das Gerät auf umweltfreundliche Weise recyceln können. Gewerbliche Nutzer sollten sich an Ihren Lieferanten wenden und die Bedingungen des Verkaufsvertrags konsultieren. Dieses Produkt darf nicht zusammen mit anderem Gewerbemüll entsorgt werden. English WARNINGS The exclamation point within the triangle is a warning sign alerting the user of important instructions accompanying the product. The lightening flash with arrowhead symbol within the triangle is a warning sign alerting the user of “dangerous voltage” inside the unit. To reduce the risk of electric shock, do not remove the cover. No user serviceable parts inside the unit. Refer all servicing to qualified personnel. This unit employs a laser. Only a qualified service person should remove the cover or attempt to service this device, due to possible eye injury. 1 2 English HIF-5510UCMPT Micro Hifi System with Compact Disc/MP3/WMA/USB/MEMORY CARD Player, Digital PLL MW/FM-stereo radio and Remote Control. INSTRUCTION MANUAL Please read this instruction manual carefully and familiarize yourself with your new HiFi System before using it for the first time. Please retain this manual for future reference. TABLE OF CONTENTS Invisible laser radiation when the unit is opened or interlocks defeated. Avoid exposure to laser beam. Use of controls, adjustments or procedures other than those specified herein may result in hazardous radiation exposure. • Location and Controls • Remote Control • Connecting to Power This unit operates on 230V ~ 50Hz. If the unit is not used for a long period of time, remove the plug from the AC mains. • Power Supply • Headphones This unit must not be exposed to moisture or rain. • Tuner Operation • Compact Disc Operation The power switch in this unit is mounted on the secondary circuit and does not disconnect the whole unit from the mains in OFF position. • Track Skip • Manual Search Ensure all connections are properly made before operating the unit. • Disc Programming • Repeat Functions This unit should be positioned so that it is properly ventilated. Avoid placing it, for example, close to curtains, on the carpet or in a built-in installation such as a bookcase. • Random Play • Intro Play • MP3 playback • USB/Card playback • Special Functions • Important • Specifications Do not expose this unit to direct sunlight or heat radiating sources. English 3 4 English LOCATION OF CONTROLS REMOTE CONTROL 1. 2. 3. CD Stop button CD Play / Pause button Repeat button 1. POWER Button 4. 5. 6. Mono / stereo/ ESP button LCD Display Mute button 2. 3. 4. CD PLAY / PAUSE Button CD STOP Button MUTE button 7. 8. Random button Volume + button 5. 6. 7. Mono / stereo / ESP button Numeric Buttons INTRO Button 8. 9. RANDOM Button MEMORY Button 9. Volume - button 10. CD door 11. EQ button 12. Band button 13. Headphone Socket 14. CD door open / close button 15. Aux in jack 16. CD Skip / Search Back (Tuner down) 17. Remote sensor 18. Preset Down button 19. Memory card slot (MMC / SD) 20. CD Skip / Search Next (Tuner up ) 21. Preset Up button 22. Power button 23. USB port 24. Function button (CD/AUX/CARD-USB/TUNER) 25. Memory button 26. Voltage selector (not available in this version) 27. AC Power Cord 28. Left Speaker jack 29. Right Speaker jack 30. Speakers 31. FM antenna 10. BBS Button 11. EQ Button 12. REPEAT Button 13. FUNCTION Button 14. BAND Button 15. PRESET UpButton 16. VOLUME + Button 17. TUNING/SKIP Back Button 18. TUNING/SKIP Next Button 19. PRESET Down Button 20. VOLUME - Button PREPARATION BEFORE USE Please pull out the plastic paper from the battery compartment before using the remote control. BATTERY REPLACEMENT When the remote control operation becomes unstable or the distance from which remote control is possible becomes shorter, replace the batteries with new one (CR-2025) USINGTHEREMOTECONTROLUNIT • To use remote control unit, point it at the remote sensor (17) and press the button gently and frimly. Remote control is possible within about 5m (approx. 16FT). However, since the remote control range is less when the unit is used at an angle, use directly in front of the remote sensor, as far as possible. • Do not expose the remote sensor to strong light (direct sunlight or artificial lighting) and make sure that there are no obstacles between the remote sensor and the remote control unit. English 5 6 English CONNECTING TO POWER MW/FM TUNER Before switching on make sure that the voltage of your electricity supply is the same as that indicated on the rating plate. For your own safety read the following instructions carefully before attempting to connect OPERATION • Press the POWER Button (22) on the unit or on the remote control (1) to power the unit. • Press the FUNCTION Button (24) on the unit or on the remote control (13) to choose the this unit to the mains. • MAINS (AC) OPERATION This unit is designed to operate on AC 230V 50Hz current only. Connecting it to other power sources may damage the unit. TUNER mode. Select the desired frequency band by pressing the BAND Button (12) on the unit or on the remote control (14) . • Tune to the desired radio station by pressing the TUNING (BACK) or (NEXT) Buttons (16/20) on the unit or on the remote control (17/18). • To turn off the unit, press the POWER Button (22) on the unit or on the remote control (1). CAUTION To prevent electric shock disconnect from the mains before removing cover. No user MANUAL /AUTOMATIC TUNING serviceable parts inside. Refer servicing to qualified service personnel. • SAFETY PRECAUTION • Do not allow this unit to be exposed to rain or moisture. Mains Supply: 230V 50Hz - AC only This symbol means that this unit is double insulated. An earth connection is not required. To tune a station, press and release the TUNING (BACK) or (NEXT) Buttons (16/20) on the unit or on the remote control (17/18). To activate the automatic tuning, press and hold the TUNING (BACK) or (NEXT) Buttons for more than two seconds. The unit will automatically search for the first available broadcast of sufficient strength it can receive, and stop there. MEMORIZING PRESET STATIONS You can store up to 40 radio stations into the memory: 30 for FM and 10 for MW . POWER SUPPLY Remove the stereo carefully from the box, retaining the packaging for future use. • • To memorize preset stations: Press the POWER Button (22) on the unit or on the remote control (1) . Press the FUNCTION Button (24) on the unit or on the remote control (13) to choose the AC POWER OPERATION • Tuner mode. Select the desired frequency band by pressing the BAND Button (12) on the unit or on Connect the plug (27) to a mains power inlet 230V AC ~ 50 Hz. • HEADPHONE • the remote control (14) . Tune to the desired radio station by pressing the TUNING (BACK) or (NEXT) Buttons (16/20) on the unit or on the remote control (17/18). This unit will accept stereo headphones (not included) with a 3.5mm plug and an impedance of 8 ohms or greater. • Press the MEMORY Button (25) on the unit or on the remote control (9). “MEMORY” will be displayed and a preset number will flash on the display. Press the PRE(SET) UP Button or PRE(SET) DNButton (21/18) on the unit or on the The speakers are automatically disconnected when headphones are connected to the PHONES JACKS (13). • remote control (15/19) to select the desired preset station number. Press the MEMORY Button again to memorize the station into the chosen preset number. • Repeat the above mentioned steps until all desired presets are programmed. English 7 8 English LISTENING TO APRESET STATION • Press the POWER Button (22) on the unit or on the remote control (1) to power the unit. HANDLING COMPACT DISC • • • • Press the FUNCTION Button (24) on the unit or on the remote control (13) to choose the Tuner mode. Select the desired frequency band by pressing the BAND Button (12) on the unit or on To remove a disc from its storage case, press down on the centre of the case and lift the disc out, holding it carefully by the edges. the remote control (14) . Press the PRE(SET) UP Button or PRE(SET) DN Button (21/18) on the unit or on the remote control (15/19) to select the desired preset station number. ANTENNA • • For FM reception there is a built-in FM antenna wire (31) at the rear side of the unit. Move the wire around to obtain the best reception. For MW reception the signals are picked up through a built-in ferrite antenna. Your may • have to orient the unit to obtain the best reception. Fingerprints and dust should be carefully wiped off the disc’s recorded surface with a soft cloth. Unlike conventional records, compact discs have no grooves to collect dust and microscopic debris so gently wiping with a soft cloth should remove most particles. Wipe in a straight line from the inside to the outside of the disc. Small dust particles and FM & FM-STEREO RECEPTION • • Select the FM band with BAND Button (12) on the unit or on the remote control (14). When in FM mode and the station is broadscasting in Stereo, “ST” appears on the LCD • display. When FM stations are weak and are disturbed, listening can be improved by selecting FM Mono (MONO) with the MONO/ST/ESP selector (4) on the unit or (5) on the remote • control. Reception will then be in MONO. • Discs should be returned to their cases after use. This avoids serious scratches that could cause the Laser pickup to skip. Do not expose discs to direct sunlight, high humidity, or high temperatures for extended • periods. Long exposure to high temperatures can warp the disc. Do not stick paper or write anything with a ballpoint pen on the label side of the disc. • light stains will have absolutely no effect on reproduction quality. Never use chemicals such as record sprays, antistatic sprays, benzine, or thinners to clean compact discs. These chemicals can irreparably damage the disc’s surface. COMPACT DISC/MP3/WMA OPERATION LOADING AND UNLOADING COMPACT DISCS • Press the POWER Button (22) on the unit or on the remote control (1) to power the unit. • Press the FUNCTION Button (24) on the unit or on the remote control (13) to choose the • CD / MP3 operation. Open the disc compartment by pressing the CD OPEN/CLOSE Button (14). • When the disc compartment has opened, remove a disc from its case and place it carefully in the compartment with the label side facing up. Locate smaller, 3” discs, in the centre depression of the compartment. • Close the disc compartment. When the compartment is fully closed, the disc will start turning automatically. The total number of tracks of the CD will appear on the LCD display. English 9 CAUTION • Do not put anything except a compact disc into the compartment. Foreign objects can • • • damage the mechanism. Keep the disc compartment closed when not in use to prevent dirt and dust from entering the mechanism. Never place more than one disc into the disc compartment at any time. If the disc is correctly loaded , the following information will be displayed: Total number of tracks on the disc 10 LISTENING TO COMPACT DISC (CD) Playing the CD 1. 2. Total playing time Notes: After the disc compartment is fully closed, the disc information may not appear on the display, This means that the disc is improperly loaded (most likely it is upside down). To check, open the disc compartment again and reload the disc. • • • • ANTI SHOCK FUNCTION (ESP) If in use, the player is likely to receive shocks or vibrations, press the “ESP” button to provide uninterrupted playback. Press “ESP” (4) on the unit or on the remote control (5) to disable the ESP function during normal CD playback. The ESP (ANTI-SHOCK) function will be activated automatically during the playback of CD or MP3/WMA playback. With MP3 disc the ESP function is always on and cannot be disabled. LISTENING TO COMPACT DISC AND MP3/WMADISC (CD) • Press the FUNCTION Button (24) on the unit or on the remote control (13) to choose the CD / MP3 operation. English 3. Press the FUNCTION Button (24) on the unit or on the remote control (13) to choose the CD operation, the CD indicator, the total number of tracks and total playing time will appear on the display. Note: The ESP indicator will also appear meaning that the automatic Electronic Shock Protection function is activated. Press the PLAY / PAUSE button on the unit (or remote) once to start playing the CD from the first track. The actual number of track and elapsed playing time will appear on the display. ESP indicator will start flashing. Press the PLAY / PAUSE button again to pause playing the CD, the elapsed playing time will start flashing. 4. To resume playback, press the PLAY / PAUSE button again. 5. To stop playback, press the STOP button. Selecting a different Track during CD Playback 1. Press TUNING (BACK) or (NEXT) Buttons (16/20) on the unit or (17/18) on the remote 2. control, the required track number appears on the display. Press the PLAY / PAUSE button on the unit. Starting again with the track that is currently selected. LISTENING TO MP3/WMA DISC (CD) Playing the MP3/WMA 1. Press the FUNCTION Button (24) on the unit or on the remote control (13) to select the (CD) MP3 mode, the total tracks will appear and also the total albums / folders will appear at the top middle also. Note: The ESP indicator will also appear meaning that the automatic Electronic Shock Protection function is activated. A) In the CD mode This unit can read CD, CD-R, CD-RW. Do not try to play CDI, CDV, DVD, or computer CDs. B) In the MP3 mode This unit can also read as below : 1. It can be reading as " 8 cm " and " Multi Section " of MP3 DISC. 2. 3. 4. It can be "Playback Transfer Rate in 56-256 kbps". It can be "Max Readable to 640 Files and 255 Folders ". It can be "Support Version 1.1" in "ID3" mode. 2. Press the PLAY / PAUSE button on the unit (or remote) once to start playing the MP3 from the first track of the first album. The actual number of album and track and elapsed playing time will appear on the display. ESP will start flashing. 3. Press the PLAY / PAUSE button again to pause playing the MP3 , and the elapsed playing time will start flashing. English 11 12 English 4. To resume playback, press the PLAY / PAUSE button once more again. 5. To stop playback, press the STOP button. SINGLE SESSION The following chart is an example of a Windows Explorer display that will appear on SEARCHING THROUGH MP3 TRACKS / FILES your computer monitor for a single session MP3 CD ROM with Folders / Albums. Check the added notes to help you understand the MP3 CD unit display and the playback sequence of folders/albums and tracks on a single session MP3 CD. You can search the contents of the MP3/WMA albums ( If burned on CD) as follows: 1. In Stop mode press the MO/ST/ESP button on the unit (4) or on the remote control (5) once and the track / file starting with the letter “A” will appear in the display. 2. Press the TUNING (BACK) or (NEXT) Buttons (16/20) on the unit or on the remote control (17/18) to scroll through the letters and numbers to locate a specific track / file. 3. When the desired track / file appears, press the PLAY / PAUSE button to play the track / file. SEARCHING THROUGH MP3 ALBUMS / FOLDERS 1. Press the MO/ST/ESP button twice and the first album / folder name and number will appear in the display. 2. Press the TUNING (BACK) or (NEXT) Buttons (16/20) on the unit or on the remote control (17/18) to scroll through the albums / folders and numbers to locate a specific album folder. 3. When the desired album / folder appears, press the PLAY / PAUSE button to play the first track / file of the album / folder. NOTE: When scrolling through track / files or albums / folders, if there is no name or contents, “NONE” will appear in the display. • • The arrow pathway shows the sequence of MP3 directory and file playback. This example has a total of seven MP3 directories. • Based on this layout, the first file will be”Blur01.mp3” and the last file will be “Twain 15.mp3”. • When the MP3 CD is inserted into the CD player, the first digit in the display will be the folders, and the second digit will be the total number of tracks. “Skipped” denotes a directory which contains non-audio files only, e.g. jpg, wav, etc. • These cannot be detected nor played on this player. When an album contains mixed format files, the non-MP3 files will be skipped. NOTE: For CDR/CDRW/MP3 users, depending on the type of CD burmer, on the disc brand, the burning speed and the MP3 compression level, some reading problems may occur. English 13 14 English SKIP / SEARCH FUNCTION In the playing of CD / MP3 mode: 1. If press and hold the TUNING (BACK) or (NEXT) Buttons (16/20) on the unit or on the remote control (17/18) on the remote control, for a few seconds, the current time of the track will skip backward or forward to the beginning of next elapsed time for more than 2 seconds continuously. 2. To cancel this function, press the PLAY / PAUSE button. 3. Repeat to press and hold the TUNING / SKIP / SEARCH buttons more than 3 seconds, the current time of the track will be to skip backward or forward to the beginning of next elapsed time for more than 5, 10 or 20 seconds continuously. INTROPLAY In STOP mode press the INTRO Button (7) on the remote control once, the REPEAT PLAY IN CD 1. When playing the CD, if you desire to repeat the same track only, press the REPEAT button (3) on the unit or on the remote control (12) once and the "REPEAT" display will light up. 2. To repeat all the Disc, press the REPEAT button twice and the "REPEAT ALL" display will light up. 3. To cancel repeat play, press the STOP button or press the REPEAT button until the REPEAT indicator disappears. Note : If in "REPEAT ALL" mode, the normal & program playing will also effect in this function. Press the MEMORY Button (25) on the unit or on the remote control (9). The following information will be displayed on the CD Display. REPEAT PLAY IN MP3 1. When playing the CD / MP3, if you desire to repeat the same track only, press the REPEAT button (3) on the unit or on the remote control (12) once and the "REPEAT" display will light up. 2. To repeat all the Disc, press the REPEAT button twice and the "REPEAT ALL" display will light up. 3. To repeat the Album, press the REPEAT button three times and the "REPEAT ALBUM" display will light up. 4. To cancel repeat play, press the STOP button or press the REPEAT button until the REPEAT indicator disappears. Press the MEMORY Button. The first program selection is now stored in the program memory. "INTRO" indicator will light up. Each track will be read for 10 seconds sequentially. PROGRAMMED CD-DISC PLAY It is not possible to enter programs during disc play. Press the Stop button (2) on the unit or on the remote control (3) first, then follow the instructions below. 00 P-01 Press the TUNING (BACK) or (NEXT) Buttons (16/20) on the unit or on the remote control (17/18) to select the track to be stored in location “01”( i.e. track 03). 03 P-01 00 P-02 Select the next track to be programmed using the TUNING (BACK) or (NEXT) Buttons (16/20) on the unit or on the remote control (17/18) ( i.e. track 05). 05 P-02 Press the MEMORY Button to store this track. RANDOM PLAY 1. In STOP mode press the RANDOM (7) on the unit or on the remote control (8) once, the "RANDOM" indicator will light up. 2. Press the PLAY / PAUSE button to start playing. The tracks will be played randomly. 3. To cancel random play, press the STOP button or press the RANDOM button until the random indicator disappears. STOPPINGPLAY 1. Press the STOP button if you wish to stop play. The disc and total numbers of tracks will now appear on the display. 2. Open the CD door on the unit to remove the CD. Continue entering tracks in this way until all the desired tracks are stored (up to a limit of 64). When the MEMORY Button is pressed to store the 64th track, the display will return to the 1st program location. Press the MEMORY Button to step through the program locations. If you wish to add a track to the program, press the MEMORY Button until the last programmed track is displayed. Press the MEMORY Button again. Press the TUNING Button is pressed to store a track, that track will not be programmed, and the disc will start playing from the first selected track. Any track can be programmed to play more than once. Listening to Programmed Tracks Press the Play Pause button . Disc play will start at the beginning of the first programmed track English 15 16 English 05 To Clear The Program Memory If the disc is playing, press the Stop button to stop the disc. Press FUNCTION Button to other source to clear the Program. PROGRAMMED MP3/WMA-DISC PLAY 000 P-02 Press the MEMORY Button to store this Album. Select the next track to be programmed using the TUNING (BACK) or (NEXT) Buttons ( i.e. track 07). 05 It is not possible to enter programs during disc play. Press the Stop button (2) on the unit or 007 P-02 on the remote control (3) first, then follow the instructions below. Press the MEMORY Button (25) on the unit or on the remote control (9). The following information will be displayed on the CD Display. Press the MEMORY Button to store this track. Continue entering tracks in this way until all the desired tracks are stored (up to a limit of 64). When the MEMORY Button is pressed to store the 64th track, the display will return to the 1st program location. Press the MEMORY Button to step through the program locations. If you wish to add a track to the program, press the MEMORY Button until the last programmed Press the TUNING (BACK) or (NEXT) Buttons (16/20) on the unit or on the remote control (17/18) to select the Album to be stored in location “01”( i.e. Album 02). 02 000 P-01 Press the MEMORY Button to confirm the Album number. Press the TUNING (BACK) or (NEXT) Buttons (16/20) on the unit or on the remote control (17/18) to select the track to be stored in location “01”( i.e. track 03). 02 003 P-01 Press the MEMORY Button. The first program selection is now stored in the program memory.On the displéay appears 00 000 P-02 Press the TUNING (BACK) or (NEXT) Buttons to select the Album to be stored in location “02” ( i.e. Album 05). track is displayed. Press the MEMORY Button again. Press the SKIP UP / DOWN BUTTONS (14) on the unit or on the remote control (13/4) until the desired track is displayed, then press theMEMORY Button. The added track will be entered as the last track in the program memory. Notes: If the Play/Pause button (6) is pressed before the MEMORY Button is pressed to store a track, that track will not be programmed, and the disc will start playing from the first selected track. Any track can be programmed to play more than once. Listening to Programmed Tracks Press the Play Pause button (2). Disc play will start at the beginning of the first programmed track . To Clear The Program Memory If the disc is playing, press the Stop button to stop the disc. Press FUNCTION Button to other source to clear the Program. English 17 18 English READING USB PORT SPECIAL FUNCTIONS GETTINGSTART MUTE Function • Press the Mute button (6) on the unit or on the remote control(4) to switch off the sound. The Volume level indicator will flash. • Press Mute again or a Volume button to restore the sound. • • • Press the FUNCTION Button (24) on the unit or on the remote control (13) to select the “CARD-USB” mode. Plug in the USB harddrive into the USB port. The total tracks will appear in display. ( If an MP3 CD is saved into hardrive, the total albums / folders will appear at the top middle also. ) OPERATION • Follow the normal procedures for CD playback. AUX INPUT 1. Press the FUNCTION Button (24) on the unit or on the remote control (13) to choose 2. NOTES: • • USB socket for USB MP3 player or USB harddrive only. When playing back music through the USB port, do not disconnect the USB driver from the system. This may cause the system to malfunction. READING CARD MODE GETTING START This CD player is capable of playing in the MMC (MULTMEDIA MEMORY CARD) and SD (SECURE DIGITAL CARD) types memory media. • Press the FUNCTION Button (24) on the unit or on the remote control (13) to select “CARD-USB” mode. • Push the memory card firmly all the way into slot. OPERATION • Follow the normal procedures for CD playback. NOTE: • • Make sure stop to play before push out the memory card. If the memory card is oriented incorrectly, it will not go all the way into slot. Do not apply force when inserting the memory card. • Memory card will be played first when memory card and USB driver plug-in at the same time. HOW TO REPLACE THE MEMORY CARD Push the memory card into slot and then slowly remove your finger. The lock is released and the memory card is pushed out. the AUX mode. This unit can input analog sound signals through this jack (15). Use a cable with RCA jack to connect external audio equipment (Turntable, VCD players, VCRs, etc.). BASS BOOST • Press the Bass Boost button (10) on the remote control to enjoy a more powerful Bass sound. PRESET EQUALIZER • • The Quality of the sound can be adjusted to suit the type of music playing (PASSnormal, CLASSIC, ROCK, POP, JAZZ). Simply Press the Preset EQ button (11) on the unit or on the remote control (11) which matches the type of music playing. English 19 20 English IMPORTANT Since movement of the CD mechanism and the sensitive circuitry may cause interference to a radio tuner nearby switch this unit off while operating other radio devices. This product utilizes a laser Danger - Invisible laser radiation when opened and interlock failed or defeated. Avoid direct exposure to the beam. Caution - Use of controls, adjustments, or procedures not listed in this manual may result in hazardous radiation exposure. Concerning Compact Discs Only compact discs identified with this mark can be used with this player. SPECIFICATIONS Power Supply AC: 230V ~ 50Hz Radio Frequency Coverage FM: 87.5 - 108 MHz AM: 522 - 1620 kHz Correct Disposal of This Product (Waste Electrical & Electronic Equipment) CD Player Pick Up: 3-Beam. Semiconductor Laser Encoding: 16-Bit Linear, 2 x oversampling Design and specifications are subject to change without notice. Playability of self-made CDs on Roadstar CD drive mechanisms. CD-R/CD-RW can be played back. However it can occur, due to differences in the quality of the media as well as the characteristics of the recording, that individual self-made CDs cannot be read. This does not indicate an incorrect function of the playback unit in these cases. This marking shown on the product or its literature, indicates that it should not be disposed with other household wastes at the end of its working life. To prevent possible harm to the environment or human health from uncontrolled waste disposal, please separate this from other types of wastes and recycle it responsibly to promote the sustainable reuse of material resources. Household users should contact either the retailer where they purchased this product, or their local government office, for details of where and how they can take this item for environmentally safe recycling. Business users should contact their supplier and check the terms and conditions of the purchase contract. This product should not be mixed with other commercial wastes for disposal.