1
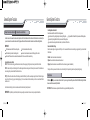
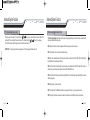
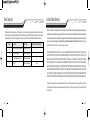
@ @@@ @@ N cautionZ c @@@@ @ @@ @@ @@ @@@ www.compustar.com www.alarmascompustar.com t@ @ @@p@QU@@ @fcc@ N@@o @@ @@ @@[ HQI@t@ @@@ @@ N HRI@t@ @@ @@ @ L@@ @@@ @ @ N Remote 2WG5R - 900SH 1WG5R - 900SH FCC ID Number (US Only) VA5JR961A915 VA5JR961AM IC ID Number (International Only) 7087A-R961A915 7087A-R961AM Aplicable al remoto (s siguiente) 2WG5R-900SH - 2 Vias, Remotos de 4 Botones LED Applicable to the following remote(s) 2WG5R-900SH www.firstechllc.com www.compustar.com VA5JR961AM 1WG5R - 900SH Número ID FCC (Solamente EE.UU.) VA5JR961A915 2WG5R - 900SH Remoto Número ID FCC (Solamente Internacional) 7087A-R961A915 7087A-R961AM Este dispositivo está sujeto a la seccion 15 de las reglas de FCC. El funcionamiento está sujeto a las siguientes condiciones; (1)este dispositivo no puede causar interferencia dañosa. (2)este dispositivo puede aceptar cualquier interferencia recibida, incluso interferencia que pueda causar mal funcionamiento al equipo. CUATELA: Cambios ó modificaciones no expresamente aprobadas por la parte responsable del cumplimiento de la norma, pueden anular la autorizacion del usuario para operar este dispositivo. t @o@c t @o@c i T w@c T q@r U v @m r @m @M@b @r Rw@r @b@f Qw@r @b@f r @led@f@@d By Firstech, LLC 2 U V W Y QQ g @s @f a @l@O@a@@u@O@d p @l@O@a a@t@r @s@f m@t@r @s@f@Hr @m I t@r aux@o@O@w@rMd@O@s@d s @a@O@d QR QR QS QS QT QU QV QV a @s @f d @l@O@@c @d@l t@t @m R c@m @Hm @v @cI rps@Hr @p@s I@u@O@d s @v @s t @s@m c@O@h@s@m a@j@m m @o@s QW r @s@e@d RS QW QW QX QY RP RQ RQ RQ RQ a@d RT l @l @w RU m RW r @c@O@p@r HI RR p@Rw@Tb@r RR 3 By Firstech, LLC Introduction Thank you for purchasing a Firstech system for your vehicle. In order to truly enjoy the benefits of this system, we recommend that you thoroughly review the following manual. Please note that this manual applies to the 2WG5R-900SH 2 Way - 4 Button LED Remote, regardless of whether you purchased the alarm only, starter only or alarm/starter combination. This manual also supports the 1WG5R-900SH 1 Way remotes that may be included with your system. There are certain features listed in this manual that may not be available for your system. There may also be features listed in this manual that require additional installation or programming before they are active. Please note that this remote system has a 6 pin antenna plug and are not compatible with previous systems. If you have any questions, please contact the original place of purchase. For further information you may also contact our customer support center by calling 888-820-3690. Warranty Coverage ! Quick Reference v @m When servicing or loaning your vehicle to others, the system should be placed in Valet Mode. Valet Mode prevents the system from remote starting and disables all alarm functions. IMPORTANT: While in Valet mode the remote will still control power lock and unlock systems. The parking lights will not flash. The system can be put into valet one of three ways: 1. Turn the vehicle’s key to the ignition “on” position and tap buttons simultaneously for 0.5 second. The parking lights will flash once and/or siren chirp once to confirm the system is in valet mode. Repeat this process to take the system out of valet mode. The parking lights will flash twice and/or siren chirp once to confirm the system is out of valet mode. Caution: The Manufacturer’s warranty will be voided if this product is installed by anyone other than an authorized Firstech dealer. For complete warranty details visit www.compustar.com or the last page of this manual. Firstech remotes carry a 1 year warranty from original date of purchase. 2. If you do not have your remote control, you can put the system into valet by turning the ignition key “on” and then “off” five times within 7 seconds. The parking lights will flash once to confirm the system is in valet mode. Shortly after the first flash, the parking lights will flash twice. A remote control is required to take the system out of valet mode. IMPORTANT: If your system is set up for a secure valet option, you will not be able to put the system into valet until the proper code has been entered to the secure valet switch. Warranty registration can be completed online by visiting www.compustar.com. Please complete the registration form within 10 days of purchase. We do not include a mail in warranty registration card with each unit - registration must be done online. To verify that an authorized dealer installed your system, we highly recommend that you keep a copy of the original proof of purchase, such as the dealer invoice in a safe place. 3. If your system is set up for the secure valet option (optional), you will not be able to put the system into valet until the proper code has been entered to the secure valet switch. The secure valet switch is the small button with bright blue LED on the front and if installed is the only way to override the alarm and/or remote start. Until programmed, the default code is (3, 3). By Firstech, LLC 4 5 By Firstech, LLC Quick Reference r @m Mb @r The only regular maintenance this system requires is remote control battery replacement. No programming is required when replacing the battery. Two Way Remotes: First, remove the small Phillips screw located on the back of the remote. Once the screw has been removed, gently pull the remote apart taking care to not damage the circuit board. Your battery size should be listed on the battery. (Battery size: CR2450) IMPORTANT: Be sure to observe correct polarity when installing the battery. One Way Remotes: First, remove the small Phillips screw located on the back of the remote. Once the screw has been removed, gently pull the remote apart taking care to not damage the circuit board. Your battery size should be listed on the battery. Replacements can be purchased from your local Firstech dealer or an electronics store. Quick Reference R@w@r @b@f Button(s) Duration Function LED LED 0.5 second 3.5 seconds Locks doors and/or arms alarm. Panic/vehicle locater (flashes vehicle’s parking lights and sounds siren and horn). Amber Green and Red Red Green and Red Unlocks doors and/or disarms alarm. Amber Red Twice 0.5 second Aux 1. Triggers the auxiliary 1 output (most commonly used for rear defrost or window roll-down). Trunk release. Triggers the trunk release output and opens the vehicle’s trunk. Aux 2. Triggers the auxiliary 2 output (most commonly used for rear defrost or window roll-down). Activates the remote start. Repeat and remote start will shut off. Will activate Stop and Go Mode if held when vehicle is running with the key. Turns siren chirps on/off (Note: With the siren chirps off, it will still sound in the event the alarm is triggered). Option programming menu 1 - Installers Only. Amber Red Once 2.5 seconds 2.5 seconds 0.5 second 2.5 seconds 6 Once N/A 0.5 second 0.5 second By Firstech, LLC 2nd Car Mode Chirp(s) Solid Amber then Solid Red then Flash Red Flash Amber Amber Red Twice Solid Amber then Solid Red then Flash Red Flash Amber Once On / Twice Off Amber Once On / Twice Off Once Red Solid Amber then Solid Red then Flash Red Flash Amber 7 Once By Firstech, LLC Quick Reference Quick Reference R@w@r @b@f Button(s) Duration Function LED LED 2nd Car Mode Chirp(s) 0.5 second Valet mode (see Valet Mode Section for details) Amber Red Once On / Twice Off 0.5 second Drive lock. Activates ignition controlled door locks. 2.5 seconds Option programming menu 2 - Installers Only. Amber Red Once On / Twice Off Solid Amber then Solid Red then Flash Red Once Flash Amber Amber Red Once On / Twice Off Duration AdditionalProgramming Function / Description Required 0.5 second no Locks doors and / or arms alarm. Panic/vehicle locater (flashes vehicle’s parking lights and sounds siren and horn) Activates passive arming (vehicle will arm/lock 30 seconds after the vehicle is disarmed) 2.5 seconds Activates the 2nd Car function. Your remote has the Solid Amber then Solid Red then Flash Red Once On / Twice Off ability to control two systems with the same remote. Flash Amber You must have the same RF Kit in both of your vehicles. 0.5 second no Unlocks doors and / or disarms alarm. 0.5 second no Aux 1. Triggers the auxiliary 1 output (most commonly used for rear defrost or window roll-down) 2.5 seconds no Trunk pop. Triggers the trunk release output and opens the vehicle’s trunk. 0.5 second 0.5 second no Aux 2. Triggers the auxiliary 2 output (most commonly used for rear defrost or window roll-down) Activates timer start mode. Timer start mode has multiple programmable settings: duration settings, temperature settings and self start settings. 0.5 second Activates the built in Turbo Timer function. Additional installation is required when using this feature on automatic transmission vehicle’s. 2.5 seconds Car Check (updates vehicle status on remote pager) / Secure Auxiliary 8 Button 3.5 seconds no 0.5 second By Firstech, LLC Q@w@r @b@f Amber Amber Red Red Once On / Twice Off Once On / Twice Off Solid Amber then Solid Red then Flash Red Twice Flash Amber 2.5 seconds no Activates the remote start. Repeat and remote start will shut off 0.5 second Turns siren on/off (Note: With the siren off, it will still sound in the event the alarm is triggered) no 2.5 seconds no Option programming menu 1 - Installers Only 0.5 second no Valet mode (see Valet Mode section for details) 2.5 seconds no Turns the shock sensor on/off. (Alarm or alarm / Starter systems only) 9 By Firstech, LLC Quick Reference Remote LED Functions and Descriptions Your remote will communicate to and from your vehicle while in range. The unique LED design will display LEDs indicating lock/unlock status, remote start confirmation and remaining run time and much more. Q@w@r @b@f Button Duration Additional Programming Function / Description Required Event LED LED Duration Chirp(s) Six times Runtime Remaining: 100 Percent Flash Green Once every 5 seconds 0.5 second yes Drive lock. Activates ignition controlled door locks. Runtime Remaining: 50 Percent Flash Amber Once every 5 seconds N/A 2.5 seconds no Option programming menu 2 - Installers Only Runtime Remaining: 25 Percent Flash Red Once every 5 seconds N/A 0.5 second no Activates passive arming (vehicle will arm/lock 30 seconds after the vehicle is disarmed) Runtime Remaining: 60 Seconds Flash Red Once every 2 seconds N/A 2.5 seconds no Activates 2nd Car Mode on the All command confirmations Flash Green Once or Twice depending on function Once or Twice depending on function 0.5 second yes Activates timer start mode. Timer start mode has multiple programmable settings: All error confirmations Flash Red Three times duration settings, temperature settings and self start settings 0.5 second yes Activates the built-in Turbo timer function. Additional installation is required when using this 2.5 seconds no Car Check (updates vehicle status on remote pager) / Secure Auxiliary Three chirps Alarm is triggered while remote started Flash Green and Red Until disarmed by remote Arming/Locking while trigger is open Flash Red Three times Three chirps feature on automatic transmission in vehicle’s If you would like additional information on the functionality of your 1way companion remote, please visit the support page at www.compustar.com to download the full user manual. By Firstech, LLC 10 11 By Firstech, LLC General System Functions General System Functions The remote transmitter functions have been predetermined and programmed from the factory. The four button configuration allows for many functions to be performed through a series of tapping, holding and / or multiple presses of buttons. Sending Commands When in range and a command has been sent, the remote will receive a page back and LED command. For example, to send a remote start command from the 2 Way remote, hold down the button for 2.5 seconds. The remote will beep once to confirm the command has been sent and that the remote is in range. Once the vehicle has successfully remote started, the remote will receive a command indicating the vehicle is running. Receiving Commands The remote pager will receive commands indicating the status of the vehicle, confirmation of sending commands and alarm notifications. For example, after sending the lock command, the pager will receive LED and chirp signals confirming that the vehicle has been successfully locked/armed. To see if your pager is in range, hold the buttons for 2.5 seconds - if the remote receives an audible and visual confirmation then it is in range. IMPORTANT: the 2WG5R-900SH does not receive page back alerts if an alarm is triggered only while your vehicle is remote started. Tap button for 0.5 second to lock/arm and unlock/disarm. The LED will flash on your remote. If your vehicle is locked, tap button vehicle is unlocked, tap button to lock. to unlock; if your IMPORTANT: If the alarm has been triggered (Siren is going off), you must wait up to 5 seconds before disarming the alarm - the first shut off the alarm and the second will unlock/disarm the system. button tap will 12 The system can be configured to passively lock and arm the vehicle. Put the system in passive by tapping buttons The remote will beep once and the LEDs will illuminate to indicate the system is in passive lock and arming mode. simultaneously for 0.5 second. While in passive mode, the system will lock and arm the alarm 30 seconds after the last door is closed. As an indicator that the vehicle is going to passively lock and arm, the remote and siren will chirp once and the parking lights will flash once at both 10 and 20 seconds prior to passively locking and arming. If you want the system to passively arm and not passively lock, ask your local Firstech dealer to turn Option 1-8 to setting II. a@t@r @@f Hold the button for 2.5 seconds to remote start an automatic transmission vehicle. If you are in range and if the vehicle is ready to remote start, the parking lights will flash once and/or siren chirp once to indicate that the remote start command has been successfully transmitted. If you are in range and the remote beeps three times, there is a remote start error. Refer to the “remote start error diagnostic” on the last page of this manual for details. a @l@O@a@@u@O@d By Firstech, LLC p @l@O@a Upon receiving confirmation that your vehicle is running, the remote LEDs will flash the and remote beep to show the run time. The remote start run time can be programmed for 3, 15, 25, or 45 minutes - ask your local Firstech dealer to adjust Option 2-7 if you would like a run time other than 15 minutes (default). IMPORTANT: Your vehicle’s key must be inserted into the ignition and turned to the “on” position prior to driving your vehicle. If the foot brake is depressed prior to the key being in the “on” position, the vehicle will shut off. 13 By Firstech, LLC General System Functions m@t@r @s@f@Hr @m I In order to remote start a manual transmission vehicle, the system must first be set in Reservation Mode. Reservation Mode must be set each and every time you want to remote start a manual transmission vehicle. The purpose of Reservation Mode is to leave the transmission in neutral before exiting the vehicle. IMPORANT The transmission must be left in the neutral position. The vehicles windows must be rolled up. The vehicles door pins must be in working order. Do not set reservation mode or remote start with people in the vehicle. Do not install this remote start on a manual transmission vehicle that has a convertible or removable top. Activating Reservation Mode STEP1 : While the vehicle is running, place the transmission in neutral, set the emergency / parking brake, and remove pressure from the foot brake. STEP2 : Remove the key from the vehicle’s ignition. The vehicle’s engine should remain running even after the key has been removed. If the vehicle does not remain running visit your local authorized Firstech dealer for service. General System Functions Cancelling Reservation Mode Reservation mode will be cancelled for the following reasons; You did not activate the parking brake prior to turning off the ignition. You pressed the foot brake after the key was removed from the ignition. You released the parking brake after the key was removed from the ignition. You entered valet mode, opened the vehicles door, hood, trunk or set off the alarm. Reservation Mode Settings Reservation mode settings can be programmed with Option 1-6. It is recommended that reservation mode settings are programmed by your local authorized Firstech dealer. Default1 : Locks doors when reservation mode is set. Option2 : Does not lock doors when reservation mode is set. Option3 : Reservation mode sets 10 seconds after the last door is closed, as opposed to immediately. This option will allow you to access the vehicle’s rear doors, trunk or hatch prior to the system setting reservation and passively locking/arming. t@r STEP3 : Exit the vehicle and close the door. The vehicle’s engine should shut off instantly or within 10 seconds upon closing the last door. If the vehicle’s engine does not shut off, your door trigger may be functioning improperly. Do not use the remote start feature and take your vehicle to a local authorized Firstech dealer for service. Hold button for 2.5 seconds to release the trunk or hatch. If you are in range, the remote will beep twice and the LEDs will flash indicating that the trunk release command has been successfully transmitted. Once the vehicle shuts off your system is in reservation mode and the vehicle is ready to safely remote start. IMPORTANT: Trunk release is an optional vehicle feature that may require additional parts and labor. IMPORTANT : By default, the system will lock/arm the vehicle upon setting reservation mode. Take care to not lock your keys inside the vehicle. By Firstech, LLC 14 15 By Firstech, LLC General System Functions a@o@O@w@rMd@O@s@d Your system is equipped with two additional outputs that can be configured to control windows, open power sliding doors, open a power sliding moon roof, or even turn on a rear defroster. These outputs can be configured for pulsed, timed or latched settings. Your authorized Firstech dealer can set these outputs up accordingly. Using auxiliary outputs to control additional vehicle functions will require additional parts and can be rather labor extensive. Tap button for 0.5 second to trigger auxiliary output 1. Tap button for 0.5 second to trigger auxiliary output 2. The vehicle’s parking lights will flash once and/or siren chirp once indicating that the auxiliary outputs have been triggered. By default, the system is in secure auxiliary mode, which requires you to hold button for 2.5 second prior to triggering auxiliary 1 or 2. To turn off secure auxiliary, ask your authorized Firstech dealer to turn on Option 4-5 to setting II. s @a@O@d Upon lock/arm and unlock/disarm, you can eliminate vehicle’s audible confirmation by muting the siren. Normally, the siren will chirp once to indicate the system is locked/armed and twice to indicate the system is unlocked/disarmed. To mute the siren tap buttons simultaneously for 0.5 second. When the siren is muted, the siren icon will no longer be displayed on the LCD. IMPORTANT: Even when the siren is muted, it will still go off in the event the alarm is triggered. By Firstech, LLC 16 Advanced System Functions The following section reviews advanced system functions. Many of these functions require multiple steps or additional programming by your local authorized Firstech dealer to be active. d @l@O@@c @d@l Tap buttons simultaneously for 0.5 second to turn drive lock on and off (also known as ignition controlled door locks). The vehicle’s parking lights will flash once and/or siren chirp once to confirm drive lock is off. The vehicle’s parking lights will flash twice and/or siren chirp twice to confirm drive lock is on. IMPORTANT: Drive lock mode requires that the dealer turn on Option 1-9. Drive lock has two settings; Default 1: Off Option 2: Locks the doors when the ignition is on and after the brake is depressed. Option 3: locks the doors when the RPM’s have reached two times that of idle speed (this setting requires that a tachometer wire is connected). With both settings, the doors will unlock when the ignition is turned off. If using this feature on a manual transmission vehicle, the doors will unlock upon setting the emergency / parking brake. t@t @m This feature can not be turned on with the 2 Way remote. The built in turbo timer keeps the vehicle’s engine running for either 1, 2, or 4 minutes (programmable from dealer) after the vehicle key has been removed from the ignition. This feature will keep oil running through the turbo system to allow for appropriate cooling time. Tap buttons simultaneously for 0.5 second to turn on or off turbo mode. The remote will beep once and green LEDs will flash to confirn that turbo mode is activated. The remote will beep twice and LEDs will flash twice to confirn that turbo mode is off IMPORTANT: To utilize this feature, the emergency / parking brake wire must be connected to the Firstech system. Consult your local authorized dealer for installation. 17 By Firstech, LLC Advanced System Functions Advanced System Functions R c@m @Hm @v @cI rps@Hr @p@s I@u@O@d This remote has the ability to operate a 2nd vehicle. Hold buttons for 2.5 seconds to activate this feature. The remote’s LEDs will flash confirming that 2nd car mode is activated. The remote will remain in 2nd Car Mode until you hold the buttons for 2.5 seconds again. The remote will beep twice and the LEDs change from red to amber to confirm 2nd car mode is off. The RPS is an optional feature. Basic RPS and car call functions do not require programming, however in order for the sensor to unlock/disarm the vehicle you must perform the following procedures; IMPORTANT: 2nd car mode requires the remote to be programmed to a 2nd vehicle that is equipped with the same remote kit. STEP 1: Disarm/unlock the alarm (remote must be programmed first) and choose a 4 digit code. You can not have zeros. STEP 2: Turn ignition key to the “on” position and leave the driver’s door open. STEP 3: Knock on the windshield in front of the RPS a total of 5 times (each time you knock the LED on the RPS will flash RED). The LED will begin to flash rapidly in BLUE with successful completion of this step. STEP 4: Enter the first digit of the desired four digit pass code by knocking on the windshield in front of the RPS the desired number of times. For example, to enter 3, knock on the sensor 3 times (each time you knock the LED will flash RED) then wait. STEP 5: The LED on the RPS will confirm your first number by flashing BLUE slowly. Once the LED begins to flash rapidly in BLUE, enter your second number by repeating step 4. STEP 6: Repeat steps 4 & 5 to enter all four numbers. STEP 7: Turn the ignition OFF - the RPS disarm/unlock feature is now programmed. Follow steps 3 - 5 to enter your disarm/unlock code. STEP 8: (Optional) If you would like to rearm/relock your vehicle then close all doors, knock on the RPS 5 times and your vehicle will lock/arm. By Firstech, LLC 18 19 By Firstech, LLC Advanced System Functions Advanced System Functions s @v @s t @s@m The optional Secure Valet Switch prevents the alarm from being put into valet mode through cycling the ignition on/off five times. The Secure Valet Switch is more secure than traditional toggle / valet switches because it requires a two digit code. IMPORTANT: The first two digits of the RPS unlock/disarm pass code will be the default pass code for the secure valet - you do not need to program them independently. If you are not using the RPS unlock, following the below procedures to program your secure valet pass code; Timer start mode is used to cool or warm the vehicle automatically without use of the key or the remote. While engaged, timer start will activate even while the remote is out of range. Tap buttons simultaneously for 0.5 second to activate timer start mode. The remote will beep once and LEDs flash twice. Repeat the same step to turn off timer start mode. Timer start mode will be cancelled any time the vehicle is started manually or remotely. To change from the default setting to optional settings, see your place of purchase. STEP 1: Turn on Option 3-10-III. (Dealer programmed option) c@O@h@s@m STEP 2: Turn ignition key to the “on” position. Cold/hot start mode works in conjunction with timer start mode (see above) and the temperature sensor. It allows you to configure your timer start feature to check the vehicle’s temperature prior to starting. All of these options require programming from your local dealer. STEP 3: Hold down the valet switch for 1.5 seconds. The LED on the valet switch will begin to flash rapidly with successful completion of this step. STEP 4: Enter the first digit of the desired two digit pass code by depressing the switch the number of times that coordinates with the desired first number. For example, to enter 3, depress the switch 3 times, then wait. STEP 5: The LED will confirm the first number by flashing BLUE slowly. Once the LED begins to flash rapidly, enter your second number by repeating step 4. a@j@m Your system has a mode that requires you to keep your remote separate from your key chain. This feature also requires additional labor. Please consult your installer for more details. The Anti Jacking mode allows you to safely disable your vehicle once a thief has driven off with your property. If you are car jacked and still have your remote, you can panic the system by holding button down for 3.5 seconds. The siren will sound for 30 seconds and the vehicle will shut down. STEP 6: Turn the ignition off - the Secure Valet Switch is now programmed. Follow steps 3 - 5 to enter your Secure Valet code. m @o@s If you purchased an Alarm or Alarm and Remote Start system you have the ability to add optional sensors from Firstech, LLC. You have the ability to protect your investment by adding a battery back up system to protect main power to your alarm or a tilt sensor to protect expensive rims and tires. By Firstech, LLC 20 21 By Firstech, LLC Remote Coding / Programming Routine (S) IMPORTANT: Every Firstech remote must be coded to the system prior to performing any operations. All remotes must be coded at the same time. p@Z@R@w@T@b@r Z STEP 1: Activate Valet/Programming mode by manually turning the ignition key on and off (between the Acc & On positions) five times within 7 seconds. The vehicle’s parking lights will flash once with the successful completion of this step. STEP 2: Within 2 seconds after cycling the ignition for the 5th time, press button (I) or Lock on 2 way remotes or the (lock) button on 1 way remotes for 0.5 second. The parking lights will flash once to confirm the transmitter has been coded. Exiting Programming: Programming is a timed sequence. The parking lights will flash twice signaling the end of programming mode. Programming Multiple Remotes: After the confirmation flash given in step 2, code additional remotes by pressing button (I) or Lock on 2 way remotes or the (lock) button on 1 way remotes. The parking lights will flash once confirming each additional remote. All systems (except the 2WSSR-PRO), can recognize up to three remotes. By Firstech, LLC 22 Remote Start Error Diagnostic If the remote start fails to start the vehicle, the parking lights will flash three times immediately. Following those three flashes the parking lights will flash again corresponding to the error table. Number of Parking Light Flashes 1 2 3 4 5 6 7 8 Remote Start Error Motor running Key in ignition on position Door open (manual transmission only) Trunk open Foot brake on Hood open Reservation off (manual transmission only) Tach or voltage sensing failure We recommend that you do not attempt any repairs on your remote starter. Contact your dealer or call us directly. 23 By Firstech, LLC Alarm Diagnostic Limited Lifetime Warranty 2WG5R-900SH is not intended to operate as a full 2 Way alarm system. It will only receive alarm trigger page back while your vehicle is remote started. While the alarm is armed, the LED (if installed) will blink slowly. While the siren is going off, the LED will indicate the specific zone that was triggered. Upon disarming the alarm after it has been triggered, the amount of siren chirps and LED on the vehicle (if installed) will indicate the specific zone. Priority Situation LED On Duty 1 Door/Hood/Trunk/Key Triggered 2 flash, rest, then repeat Number of Siren Chirps (If Installed) 6 2 2nd Shock Triggered 3 flash, rest, then repeat 5 3 Optional Sensor Triggered 4 flash, rest, then repeat 4 4 PANIC 5 flash , rest, then repeat N/A Firstech, LLC Warrants to the original purchaser that this product shall be free of defects in material and workmanship under normal use and circumstances for the period of time that the original owner of this product owns the vehicle in which it is installed; except that the remote controller unit for the period of one year from the date of installation to the original owner of this product. When the original purchaser returns the product to the retail store where it was purchased or prepaid postal to Firstech, LLC., 21911 68th Avenue South, Kent, WA 98032, USA within the warranty period, and if the product is defective, Firstech, LLC, will at its option repair or replace such. TO THE MAXIMUM EXTENT ALLOWED BY LAW, ANY AND ALL WARRANTIES ARE EXCLUDED BY THE MANUFACTURER AND EACH ENTITY PARTICIPATING IN THE STREAM OF COMMERCE THEREWITH. THIS EXCLUSION INCLUDES BUT IS NOT LIMITED TO, THE EXCLUSION OF ANY AND ALL WARRANTY OF MERCHANTAPILITY AND/OR ANY AND ALL WARRANTY OF FITNESS FOR A PARTICULAR PURPOSE AND/OR ANY AND ALL WARRANTY OF NON-INFRINGEMENT OR PATENTS, IN THE UNITED STATES OF AMERICA AND/OR ABROAD. NEITHER THE MANUFACTURER OF ANY ENTITIES CONNECTED THEREWITH SHALL BE RESPONSIBLE OR LIABLE FOR ANY DAMAGES WHATSOEVER, INCLUDING BUT NOT LIMITED TO, ANY CONSEQUENTIAL DAMAGES, INCIDENTAL DAMAGES, DAMAGES FOR LOSS OF TIME, LOSS OF EARNINGS, COMMERCIAL LOSS, LOSS OF ECONOMIC OPPORTUNITY AND THE LIKE. NOTWITHSTANDING THE ABOVE, MANUFACTURER DOES OFFER A LIMITED WARRANTY TO REPLACE OR REPAIR THE CONTROL MODULE AS DESCRIBED ABOVE. Some states do not allow limitations on how long an implied warranty will last or the exclusion or limitation on how long an implied warranty will last or the exclusion or limitation of incidental or consequential damages. This warranty gives you specific legal rights, and you may also have other rights, which vary State to State. By Firstech, LLC 24 25 By Firstech, LLC Limited Lifetime Warranty Memo Firstech, LLC. is not RESPONSIBLE OR LIABLE FOR ANY DAMAGES WHATSOEVER, INCLUDING BUT NOT LIMITED TO, ANY CONSEQUENTIAL DAMAGES, INCIDENTAL DAMAGES, DAMAGES FOR LOSS OF TIME, LOSS OF EARNINGS, COMMERCIAL LOSS, LOSS OF ECONOMIC OPPORTUNITY AND THE LIKE that may or may not resulted from the operation of Compustar, Compustar Pro, Arctic Start, Vizion, or NuStart. NOT WITH STANDING THE ABOVE, MANUFACTURER DOES OFFER A LIMITED WARRANTY TO REPLACE OR REPAIR THE CONTROL MODULE AS DESCRIBED ABOVE. Your Warranty The product’s warranty is automatically void if the date code or serial number is defaced, missing or altered. This warranty will not be valid unless you have completed the registration card at www.compustar.com within 10 days of purchase. By Firstech, LLC 26 27 By Firstech, LLC 8102REUSC000602 By Firstech LLC Version 1.0 www.firstechllc.com 21911 68th Ave S Kent, WA 98032 Toll Free : 888-820-3690 Toll Free : 888-820-3690 21911 68th Ave S Kent, WA 98032 By Firstech LLC Version 1.0 8102REUSC000602 t @o@c U c@rá T c@r T gí Modo Valet Mantenimiento al Remoto – Reemplazo de Batería Remoto de 2 Vías Remoto de 1 Vía Programando el Reloj Funciones Control Remoto 2 Vías Funciones Control Remoto 1 Vía d ó@@ @ @led@ @@ By Firstech, LLC 5 6 6 6 6 7 9 f @g @ @s Enviando Comandos Recibiendo Comandos Cerrar/Armar y Abrir/Desarmar Activo Cerrar/Armar pasivo Transmisión Automática Función Arranque de Motor Transmisión Manual Función Arranque de Motor (Modo de Reservación) Liberador de Cajuela Condición de Batería y Temperatura del Automóvil Armado/Desarmado Silencioso Salidas Auxiliares/Bajar Ventana Electrica/Puertas Corredizas Modo Silencioso/Vibrador Vía Remoto Sensor de Golpes Encender/Apagar QQ QR QR QR QS QS QT QU QU QU QV QV QV QQ f @ @s @a Conducir Cerrar/Controlar Cierre de Seguros Eléctricos con Ignición Modo Temporizador Turbo Modo 2do automóvil (Control Múltiple de Vehículos) Llamada de Auto/RPS (Sensor de Voceo Remoto) RPS (Sensor de Voceo Remoto) Abrir/Desarmar Interruptor Seguro Valet Modo Temporizador de Arranque Modo Arranque Frió/Caliente Modo Automático c@r @O@ rHI@ @pó Programando Control Remoto 2 Vías de 4 Botones QW QW QX QX QY QY RP RQ RQ RQ t @o@c RT dó@ @a RS dó@ @e L@a @r gí@l@ @@v RU RR RR 3 2 By Firstech, LLC Introducción Le agradecemos por haber comprado un sistema Firstech para su vehículo. Para disfrutar completamente de todos los beneficios de su sistema le recomendamos que lea cuidadosamente el siguiente manual. Por favor, note que este manual se aplica al control remoto bidireccional a LED a 4 botones 2WG5R-900SH , aunque haya comprado solamente la alarma, solamente el arranque o la combinación alarma/arranque. Este manual también explica el control unidireccional 1WG5R-900SH que puede estar incluído en su sistema. Hay ciertas funciones explicadas en este manual que posiblemente no estén disponibles para su sistema. También puede haber funciones explicadas en este manual que requieran una instalación suplementaria o programación antes de estar activas. Por favor, note que este sistema de control remoto tiene un enchufe de antena de 6 patas y que no es compatible con sistemas anteriores. Si usted tiene cualquier pregunta, por favor acuda al lugar original de compra. Para más información, usted puede contactar nuestro centro de apoyo al cliente llamando 888-820-3690. Garantia ! Cautela: La garantía del Fabricante será nula, si este producto es instalado por cualquier persona que no sea un distribuidor autorizado de Firstech. Para detalles de la garantía visite www.compustar.com o la última página de este manual. Los remotos de Firstech llevan un 1 año de garantía , a partir de la fecha original de compra. El registro de la garantía puede completarse en línea visitando www.compustar.com. Por favor complete la forma del registro dentro de los primeros 10 días de la compra. Nosotros no incluimos una tarjeta de registro de garantía con cada unidad - el registro debe hacerse en línea. Para verificar que un distribuidor autorizado instaló su sistema, nosotros recomendamos que usted guarde una copia de la prueba original de compra, como la factura del distribuidor en un lugar seguro. By Firstech, LLC Referencia Rápida m@v @@ Al llevar su auto al taller o prestar su vehículo a otros, usted debe poner el sistema en Modo Valet. El Modo Valet previene el sistema del arranque remoto y desactiva todas las funciones de la alarma. IMPORTANTE: Mientras en Modo Valet, el remoto todavía controlará seguros eléctricos abrir/cerrar. Las luces de aparcamiento (cuartos) no encenderán. El sistema puede ponerse en Modo Valet en una de tres maneras: 1. En el cilindro de la ignición, gire la llave del vehículo a la posición “ON” y presione los botones del remoto simultáneamente durante 0.5 segundos. Las luces de aparcamiento (cuartos) encenderán una vez confirmando que el sistema está en modo valet. Repita este proceso para sacar el sistema de modo valet. Las luces de aparcamiento (cuartos) encenderán dos veces y/o sirena emite un chirrido para confirmar que el sistema está fuera de modo valet. 2. Si usted no tiene su control remoto, usted puede poner el sistema en valet, girando la llave de ignición a la posición “ON” y después “OFF”, cinco veces dentro de 7 segundos. Las luces de aparcamiento (cuartos) encenderán una vez para confirmar que está en modo valet. Brevemente, después del primer destello, las luces del aparcamiento (cuartos) encenderán dos veces. Un control remoto se necesita para sacar el sistema de modo valet. IMPORTANTE: Si su sistema está programado para una opción de valet seguro, usted no podrá poner el sistema en valet hasta que el código apropiado sea ingresado al interruptor del valet seguro. 3. Si su sistema está programado para la opción de modo valet seguro (opcional), usted no podrá poner el sistema en modo valet, hasta que el código apropiado se ha ingresado al interruptor del modo valet seguro. El interruptor de modo valet seguro, es el botón pequeño con LED luminoso azul en el frente y si es instalado, es la única manera de anular la alarma y/o la salida de arranque remota. Hasta ser programado, el código predefinido es (3, 3). 4 5 By Firstech, LLC Referencia Rápida m @@r @M@@r @ @@b í@@ Referencia Rápida f @ @b @ @c@r @R@ví 0.5 segundo Traba las puertas y/o activa la alarma.. Pánico/localizador de vehículo (hace titilar las luces de 3.5 segundos estacionamiento del vehículo y sonar la sirena y la bocina). Remoto de 2 Vías: Primero, abra la cerradura de la tapa de la batería localizada en la parte trasera del remoto. Una vez abierta, suavemente deslice la tapa de la batería para exponer la batería. 2WG5R-900SH requieren de una batería CR2450. IMPORTANTE: Esté seguro observar la polaridad correcta al instalar la batería. Duración El único mantenimiento regular que este sistema requiere, es reemplazo de la batería del control remoto. Ninguna programación se requiere al reemplazar la batería. Boton 0.5 segundo Remoto 1 Vía: Primero, quite el pequeño tornillo tipo Phillips localizado en la parte trasera del remoto. Una vez retirado el tornillo, suavemente separe las tapas del remoto, cuidando no tocar el circuito impreso. Las baterías del remoto de 1 vía, difieren entre otros modelos. El tamaño de su batería debe estar impreso sobre la batería. Reemplazos pueden ser adquiridos a su distribuidor de Firstech o a una tienda de electrónica. 0.5 segundo 2.5 segundos 0.5 segundo 2.5 segundos 0.5 segundo Function Destraba las puertas y/o desactiva la alarma). Aux 1. Activa la salida auxiliar 1 (utilizada más comúnmente para la luneta térmica trasera o para abrir las ventanas). Activación de la cajuela. Activa la salida de activación de la cajuela del vehículo y la abre. Aux 2. Activa la salida auxiliar 2 (utilizada más comúnmente para la luneta térmica trasera o para abriri las ventanillas) Activa el arranque a distancia. Si lo repite el arranque a distancia sera anulado. Activará el modo Pare y Arranque (stop and go) si lo sostiene cuando el vehículo está funcionando con la llave. Enciende y apaga los bips de la sirena (Nota: Si Ud. apaga los bips de la sirena, ésta sonará de todas maneras si la alarma es activada). 2.5 segundos Menú 1 de programación de opciones - Sólo para instaladores. By Firstech, LLC LED LED - Modo 2o vehículo Bip(s) Rojo y verde Verde y rojo Rojo Ámbar Ámbar Rojo Rojo Una vez N/A Dos veces Dos veces Ámbar fijo y Rojo fijo y después titila ámbar después titila rojo Una vez Ámbar Una vez Ámbar fijo y Rojo fijo y después titila ámbar después titila rojo Una vez Ámbar Ámbar Rojo Rojo Ámbar fijo y Rojo fijo y después titila ámbar después titila rojo 6 7 activa/dos veces, desactiva Una vez, activa/ dos veces, desactiva Una vez By Firstech, LLC Referencia Rápida f @ @b @ @c@r @R@ví Boton Duración 0.5 segundo 0.5 segundo By Firstech, LLC Function Modo Valet (refiérase a la sección Modo Valet para obtener más detalles) Trabado automático. Activa el trabado de las puertas controlado por el encendido del motor. LED Ámbar Ámbar LED Bip(s) Modo 2o vehículo Rojo Rojo Referencia Rápida f @c@r @Q@ví Boton Una vez, activa/ dos veces, desactiva Duración 0.5 Segundo 3.5 Segundos Una vez, activa/ dos veces, desactiva Programación Adicional No No No 2.5 Segundos No 0.5 Segundos Ámbar fijo y Rojo fijo y Una vez, activa/ después titila ámbar después titila rojo dos veces, desactiva No 2.5 Segundos Una vez, activa/ dos veces, desactiva No 0.5 Segundo No 0.5 Segundo Ámbar Activa la activación pasiva (el vehículo se activará/ 0.5 segundo trabará 30 segundos después de ser desactivado) 2.5 segundos Activa la función 2o vehículo. Su control remoto puede controlar dos sistemas. Debe tener el mismo Kit RF en los dos vehículos. Activa el modo de arranque. El modo de arranque con minutero 0.5 segundo tiene múltiples ajustes programables: ajustes de duración, de temperatura y de auto arranque. Activa la función integrada de Turbo con minutero (Turbo Timer) 0.5 segundo Se necesita una instalación suplementaria cuando esta función se utiliza en vehículos de transmisión automática. Supervisión del vehículo (pone al día el estado del vehículo 2.5 segundos en el control remoto)/Auxiliar seguro Ámbar fijo y Rojo fijo y Una vez después titila ámbar después titila rojo 2.5 segundos Menú 2 de programación de opciones. Sólo para instaladores. Rojo Rojo Ámbar Rojo Ámbar Una vez, activa/ dos veces, desactiva Una vez activa/dos veces, desactiva Ámbar fijo y Rojo fijo y después titila ámbar después titila rojo Dos veces No 2.5 Segundos No 0.5 Segundos No 2.5 Segundos No 0.5 Segundos Función / Descripción Cierra puertas y/o arma alarma. Pánico/localizador de vehiculo (destella las luces de aparcamiento (cuartos) activa sirena y claxon). Abre puertas y/o desarma alarma. Aux. 1. Acciona la salida auxiliar 1 (comúnmente utilizada para defroster (desempañante) o bajar ventana eléctrica. Abrir cajuela. Acciona la salida liberadora de cajuela y abre la cajuela del vehículo. Aux. 2. Acciona la salida auxiliar 2 (comúnmente utilizada para defroster trasero (desempañante) o bajar ventana eléctrica. Activa la salida arranque remoto. Repita y la salida arranque remoto cesará. Activa/Desactiva chirrido sirena (Nota: Con los chirridos desactivados, de todos modos sonará la alarma al activarse algún sensor). Opciones programables menú 1 – Sólo instaladores. Modo valet (vea Sección del Modo Valet para detalles) Activa/Desactiva sensor de golpes. (Sistemas de Alarma ó sistemas de Alarma/Arrancador solamente) 8 9 By Firstech, LLC Referencia Rápida f @c@r @Q@ví Boton By Firstech, LLC Duración Programación Adicional No 2.5 Segundos Si 0.5 Segundos Si 0.5 Segundos No 0.5 Segundos No 2.5 Segundos Si 0.5 Segundos Función / Descripción Conducir cerrar. Activación de controlador de seguros eléctricos con ignición. Opciones programables menú 2 – Solo Instaladores. Activa armado pasivo (vehículo arma/cierra 30 seg. después de que el vehículo sea desarmado) Descripción y funciones del LED del control remoto Su control remoto se comunicará a partir del vehículo y con el vehículo mientras esté en la zona de alcance. El diseño único del LED mostrará LEDs para indicar el estado de trabado/destrabado, confirmar el arranque a distancia y tiempo restante de encendio y mucho más. Evento LED Titila rojo Encendido restante: 60 segundos Titila rojo Encendido restante: 25% Titila ámbar Encendido restante: 50% Titila verde Encendido restante: 100% Activación/trabado cuando el activador está abierto Revisión de Automóvil (actualiza el estado del vehículo en remoto de pantalla) / Auxiliar Seguro La alarme se enciende mientras se arranca a distancia Activa el Temporizador Turbo integrado. nstalación adicional se requiere al utilizar este rasgo en vehículos de la transmisión automático. Titila rojo Confirmación de todos los errores Titila verde Confirmación de todas lar órdenes Activa modo temporizador de la salida de arranque remoto. El modo temporizado de arranque tiene opciones programables: duración, temperatura y arranque automático. Titila verde y rojo Titila rojo Duración del LED Una vez cada 5 segundos Una vez cada 5 segundos Una vez cada 5 segundos Una vez cada 2 segundos Una vez o dos dependiendo de la función Tres veces Bip(s) Seis veces N/A N/A N/A Una vez o dos dependiendo de la función Tres bips Hasta ser desarmado por el control remoto Tres veces Tres bips 10 11 By Firstech, LLC Funciones Generales del Sistema Las funciones del transmisor fueron predeterminadas y se han programado en la fábrica. La configuración de 4 botones permite la realización de varias funciones a ser realizadas a través de una serie de toques, presiones y/o múltiples presiones en los botones. Enviando Comandos Cuando en rango, y una orden sea enviada, la pantalla del remoto iluminará, el remoto emitirá una señal sonora y el icono apropiado se desplegará. Por ejemplo, para enviar un orden de arranque remoto del control remoto, sujete botón durante 2.5 segundos. LED del remoto iluminará y el remoto emitirá una señal sonora para confirmar que la orden fue enviada y que el remoto está en rango. Una vez que el vehículo haya arrancado exitosamente a control remoto, el remoto recibirá un orden que indica que el vehículo está encendido. Recibiendo Comandos El remoto recibirá órdenes que indican el estado del vehículo, confirmación de envío de órdenes y notificaciones de alarma. Por ejemplo, después de enviar la orden de cerrar, el remoto de pantalla se actualizará con el icono de la cerradura para confirmar que el vehículo ha sido cerrado/armado con éxito. Para confirmar que su remoto de pantalla está en rango, presione el botón durante 2.5 segundos - si la pantalla del remoto se ilumina y emite una señal sonora, el remoto está en rango. Funciones Generales del Sistema c Oa@p@@ El sistema puede configurarse para cerrar con llave pasivamente y armar el vehículo. Ponga el sistema en pasivo presionando botones simultáneamente durante 0.5 segundo. El remoto emitirá una señal sonora una vez y el LED iluminará para indicar que el sistema está en cierre pasivo y modo armado. Mientras en modo pasivo, el sistema cerrará con llave y armará la alarma 30 segundos después del cierre de la última puerta. Como un indicador que el vehículo va cerrar con llave pasivamente y armar, el remoto y la sirena chirriará una vez y las luces de aparcamiento (cuartos) encenderán una vez a los 10 y 20 segundos, antes de cerrar con llave pasivamente y armar. Si usted quiere que el sistema arme pasivamente y no cierre pasivamente, pida a su distribuidor de Firstech que modifique Opción 1-8, a posición II. fó@ @a @r @ @tó@aá@@ IMPORTANTE: La llave de su vehículo debe insertarse en la ignición y debe girarse a la posición de “ON” antes de manejar su veh ículo. Si el pedal del freno de pie es presionado antes de girar la llave, en la ignición, en la posición de “ON”, el vehículo se apagará. IMPORTANTE: Si la alarma se ha activado (la sirena sonando), usted debe esperar hasta que el remoto de pantalla sea compaginado antes de desarmar la alarma - la primera palmadita al botón silenciará la alarma y el segundo abrir/desarmar el sistema. En el momento de recibir la confirmación de que el vehículo está funcionando, el LED titilará y el control remoto emitirá un bip para mostrar el tiempo de encendido. El tiempo de duración de encendido puede programarse para 3, 15, 25, o 45 minutos - pida a su distribuidor de Firstech que ajuste Opción 2-7, si usted necesita un tiempo de encendido diferente a 15 minutos (valor programado de fábrica). Presione el botón durante 0.5 segundo para cerrar/armar y abrir/desarmar. Si su vehículo está cerrado con llave, presione el botón para abrir; si su vehículo está abierto, presione el botón para cerrar con llave. Si está equipado, esto también activará su corta-marcha y la función anti-desgarre de engranaje. Usted no podrá encender su vehículo con la llave hasta abrir/desarmar. Si usted está en rango y el remoto pita tres veces, hay un error de arranque de motor. Refiérase a la sección “diagnóstico de error, arranque de motor” situada en la última página de este manual para detalles. c Oa@a@@aOd @@ Presione el botón durante 2.5 segundos para encender a control remoto un vehículo de transmisión automática. Si usted está en rango y si el vehículo está listo para arranque de motor, el remoto emitirá una señal sonora una vez y LED se iluminará para indicar que la orden de arranque remoto fue transmitida con éxito. IMPORTANTE: el 2WG5R-900SH no recibe alertas del localizador si una alarma suena mientras el vehículo se arranca a distancia. By Firstech, LLC 12 13 By Firstech, LLC Funciones Generales del Sistema fó@ @a @r @ @tó@m@Hm@r óI@@ Para encender un vehículo de transmisión manual a control remoto, el sistema debe ponerse primero en Modo Reservación. El Modo Reservación debe ponerse cada vez que usted quiera encender su vehículo de transmisión manual a control remoto. El propósito de Modo Reservación, es dejar la transmisión en neutral, antes de salir del vehículo. IMPORTANTE: La transmisión debe quedar en la posición neutral. Los interruptores de las puertas del vehículo deben estar funcionando. Las ventanas del vehículo deben estar arriba (cerradas). No active modo de reservación ó arranque remoto con personas dentro del vehículo. No instale este arrancador remoto en un vehículo de transmisión manual que tenga un toldo convertible o trasladable. Funciones Generales del Sistema Cancelando Modo Reservación Modo reservación será cancelado por las siguientes razones; Usted no activó el freno de emergencia antes de apagar la ignición. Usted soltó el freno de emergencia, después de que la llave fue alejada de la ignición. Usted presionó el pedal del freno de pie, después de que la llave fue alejada de la ignición. Usted entró a modo valet, abrió la puerta del vehículo, cofre, cajuela o accionó la alarma. Opciones para Modo Reservación Las opciones pueden programarse con Opción 1-6. Se recomienda que las opciones de modo reservación sean programadas por su distribuidor autorizado Firstech. Predefinido 1: Cierra puertas con llave cuando modo reservación está fijo. Opción 2: No cierra puertas con llave cuando modo reservación está fijo. Opción 3: Modo reservación se activa 10 segundos después del cierre de la última puerta, opuesto a inmediatamente. Esta opción le permitirá acceder a las puertas traseras del vehículo, cajuela o cofre antes de que el sistema active reservación y pasivamente cierre/arme. En cuanto cierre/arme y abra/desarme, usted puede eliminar la confirmación audible del vehículo, silenciando la sirena. Normalmente, la sirena chirriará una vez para indicar que el sistema está cerrado/armado y dos veces para indicar que el sistema está abierto/desarmado. Para silenciar a la sirena, presione botones simultáneamente durante 0.5 segundo. Cuando la sirena es silenciosa, el icono de la sirena ya no se desplegará en el LCD. IMPORTANTE: Por estándar, el sistema cierra/arma el vehiculo al activar modo reservación. Tenga cuidado no dejar sus llaves dentro del vehículo. aOd @s @ IMPORTANTE: Abrir cajuela es una opción del vehículo que puede requerir partes adicionales y mano de obra. PASO 3: Salga del vehículo y cierre la puerta. El motor del vehículo debe apagarse 10 segundos después de cerrar la última puerta. Si el motor del vehículo no se apaga, el interruptor de la puerta puede estar funcionando inadecuadamente. No utilice el arrancador de motor y lleve su vehículo a un distribuidor Firstech autorizado para el servicio. Presione el botón durante 2.5 segundos para liberar la cajuela. Si usted está en rango, el remoto emitirá una señal sonora dos veces y el icono de la cajuela iluminará, indicando que la orden de abrir cajuela se ha transmitido con éxito. PASO 2: Retire la llave del cilindro de ignición del vehículo. El motor del vehículo debe permanecer encendido, aun después de retirar la llave. Si el vehículo no sigue encendido, acuda con su distribuidor Firstech autorizado para el servicio. a@c Activando Modo Reservación PASO 1: Mientras el vehículo está encendido, ponga la transmisión en neutral, ponga el freno/palanca de emergencia, y quite presión sobre el pedal del freno de pie. Una vez que el vehículo se apague, el sistema está en modo reservación, entonces es seguro encender el vehículo a control remoto. IMPORTANTE: Incluso cuando la sirena es silenciosa, se disparará en el momento que la alarma se active. By Firstech, LLC 14 15 By Firstech, LLC Funciones Generales del Sistema s@a L@b@v Op @c @ Su sistema está provisto con dos salidas auxiliares adicionales que pueden configurarse para controlar ventanas eléctricas, puertas corredizas eléctricas, abrir quema cocos o incluso enciende un defroster (desempañante) trasero. Estas salidas pueden configurarse para pulso momentáneo, temporizado ó fijo. Su distribuidor autorizado Firstech puede preparar estas salidas de acuerdo a sus necesidades. Utilizar salidas auxiliares para controlar funciones adicionales del vehículo, requiere de partes adicionales y puede ser bastante laborioso. Presione botón durante 0.5 segundo para activar salida auxiliar 1. Presione el botón durante 0.5 segundo para activar salida auxiliar 2. El remoto emitirá una señal sonora una vez y las luces de aparcamiento (cuartos) destellarán, indicando que la salida auxiliar(s) se ah activado. Por estándar, el sistema está en modo auxiliar seguro, le requiere presionar el botón auxiliar seguro, pida a su distribuidor autorizado Firstech que encienda Opción 4-5, a opción II. por 2.5 segundos antes de activar auxiliar 1 o 2. Para apagar Funciones Avanzadas del Sistema La siguiente sección explica las funciones avanzadas del sistema. Muchas de estas funciones requieren pasos múltiples o programación adicional, hecha por su distribuidor autorizado Firstech, para ser activas. c @c Os @eé@c@@ió@ Presione botones simultáneamente durante 0.5 segundo para encender y apagar, conduce cierra (también conocido como seguros eléctricos controlados por ignición). El remoto emitirá una señal sonora una vez y el icono de “Drive Lock” (conduce cierra) se iluminará para confirmar la activación de ese modo. El remoto emitirá una señal sonora dos veces y el icono de “Drive Lock” (conduce cierra) desaparecerá para confirmar que el modo está apagado. IMPORTANTE: Drive Lock (conduce cierra) requiere que el distribuidor encienda Opción 1-9. Drive Lock (conduce cierra) tiene dos opciones; Estándar 1: Fuera de servicio Opción 2: Cierra los seguros eléctricos cuando la ignición está encendida y después de presionar el pedal del freno. Opción 3: Cierra los seguros eléctricos cuando las RPM han alcanzado dos veces las revoluciones mínimas (este modo requiere que el cable del tacómetro sea conectado). s @ @g @e Oa@@ Presione los botones simultáneamente durante 2.5 segundos para encender y apagar el sensor de golpes. El remoto emitirá una señal sonora dos veces y el icono del sensor de golpes iluminará para confirmar que el sensor de golpes está apagado. El remoto emitirá una señal sonora una vez y el icono de sensor de golpes desaparecerá para confirmar que el sensor de golpes está encendido. Con ambas opciones, los seguros eléctricos abrirán cuando la ignición sea apagada. Si utiliza esta función en un vehículo de transmisión manual, los seguros eléctricos abrirán al poner el freno/palanca de emergencia. IMPORTANTE: Apagando el sensor de golpes, lo mismo sucede con el sensor opcional. Ajustar la sensibilidad del sensor de golpes se hace físicamente en el sensor, que por lo general está montado en alguna parte, bajo el tablero del vehículo. Conforme el número mas alto en el disco, significa mayor sensibilidad en el impacto. El ajuste recomendado en el disco para la mayoría de los vehículos está entre 2 y 4. Si usted está probando su sensor, por favor note que el sensor de golpes no reconoce ningún impacto hasta el término de 30 segundos, después de armado el sistema. By Firstech, LLC 16 17 By Firstech, LLC Funciones Avanzadas del Sistema Funciones Avanzadas del Sistema El RPS es una función opcional. Funciones RPS básicas y funciones de llamada del automóvil no requieren programación, sin embargo para que el sensor abra/desarme el vehículo, usted debe realizar los siguientes procedimientos; Esta opción no puede activarse con el remoto de 2 Vías. La función de temporizador turbo mantiene el motor del vehículo encendido por 1, 2, ó 4 minutos (distribuidor lo debe programar) después de que la llave haya sido retirada de la ignición del vehículo. Esta función mantendrá el aceite en movimiento a través del sistema del turbo, para permitir tiempo suficiente de enfriamiento. Presione botones simultáneamente durante 0.5 segundos para encender/apagar modo turbo. El remoto emitirá una señal sonora una vez y el icono del turbo iluminará para confirmar que el modo turbo está activado. El remoto emitirá una señal sonora dos veces y el icono desaparecerá para confirmar que el modo turbo está apagado. rps@Hs @ @pó@r I@aOd @@ m@t@@ IMPORTANTE: Para utilizar esta opción, el cable del freno/palanca de emergencia debe estar conectado al sistema Firstech. Consulte a su distribuidor autorizado para la instalación. m@R@aó@Hc@mú @ @v íI@@ Este control remoto puede operar un 2o vehículo. Sostenga presionado el botón durante 2,5 segundos para activar esta función. El LED del control remoto titilará para confirmar que el modo 2o vehículo fue activado. El control remoto quedará en modo 2o. vehículo hasta que Ud. sostenga los botones durante 2,5 segundos nuevamente. El control remoto emitirá dos bips y el LED cambiará de rojo a ámbar para confirmar que el modo 2o. vehículo ha sido anulado. IMPORTANTE: Modo del 2do automóvil requiere que el remoto sea programado a un 2do vehículo que está provisto con el mismo sistema. PASO 1: Desarma/abre la alarma (remoto debe programarse primero) y escoja un código de 4 dígitos. No puede contener ceros. PASO 2: Gire la llave en el cilindro de la ignición a la posición “ON” y abra la puerta del chofer. PASO 3: Aplique un total de 5 toquidos al parabrisas frente al RPS (cada vez que usted toque, el LED en el RPS encenderá ROJO). El LED empezará a destellar rápidamente en AZUL con la realización exitosa de este paso. PASO 4: Ingrese el primer digito del código de 4 dígitos deseado, por medio de golpeteos en el parabrisas frente al RPS, el número deseado de veces. Por ejemplo, para ingresar el 3, golpeé en el sensor 3 veces (cada vez que usted golpea, el LED encenderá ROJO) y espere. PASO 5: El LED en el RPS confirmará su primer número encendiendo AZUL lentamente. Una vez que el LED empiece a destellar rápidamente en AZUL, entre el segundo número repitiendo paso 4. PASO 6: Repita pasos 4 & 5 para ingresar los cuatro números. PASO 7: Apague la ignición – la función RPS desarmar/abrir quedó programada. Siga pasos 3 - 5 para ingresar su código desarmar/abrir. By Firstech, LLC 18 19 By Firstech, LLC Funciones Avanzadas del Sistema Funciones Avanzadas del Sistema m@a @fóOc PASO 1: Encienda Opción 3-10-III. (Opción programada por el distribuidor) El modo de arranque con minutero se utiliza para enfriar o calentar automáticamente el vehículo sin utilizar la llave o el control remoto. Cuando está activado, el arranque con minutero se activará incluso cuando el control remoto está fuera de la zona de alcance. Presione los botones simultáneamente durante 0,5 segundo para activar el modo de arranque con minutero. El control remoto emitirá un bip y el LED titilará dos veces. Repita el mismo procedimeinto para anular el modo de arranque con minutero. El modo de arranque con minutero será anulado en el momento de arrancar el vehículo manualmente o a distancia. Para cambiar de los ajustes de fábrica a los ajustes opcionales, contacte a su vendedor. IMPORTANTE: Los primeros dos dígitos del código de abrir/desarmar del RPS, serán el código predefinido para el valet seguro - usted no necesita programarlos independientemente. Si usted no está utilizando el RPS para abrir, siga los procedimientos para programar su código de valet seguro; a @t @@ i @v @s @@ El Interruptor opcional de Valet Seguro, previene la alarma de ponerse en modo de valet, a través de los ciclos prender/apagar en la ignición cinco veces. El Interruptor de Valet Seguro es más confiable que los interruptores de palanca/interruptores valet tradicionales, porque requiere un código de dos dígitos. PASO 2: Gire la llave en la ignición a la posición de “ON”. PASO 3: Presione el interruptor de valet durante 1.5 segundos. El LED en el interruptor de valet empezará a encender rápidamente al realizar con éxito este paso. PASO 4: Entre el primér dígito del código de 2 dígitos deseado, presionando el interruptor el número de veces que coincida con el primer número deseado. Por ejemplo, para ingresar el 3, deprima el interruptor 3 veces, entonces espere. PASO 5: El LED confirmará el primer número encendiendo AZUL lentamente. Una vez que el LED empiece a encender rápidamente, ingrese el segundo número, repitiendo paso 4. PASO 6: Apague la ignición - el Interruptor Seguro de Valet está programado. Siga pasos 3 - 5 para ingresar su código de Valet Seguro. Modo frío/caliente, funciona en conjunto con el modo arranque temporizado (vea arriba) y el sensor de temperatura. Le permite configurar su función de arranque temporizado para que verifique la temperatura antes de encender el vehículo. Todas estas opciones requieren de programación de su distribuidor. Las siguientes temperaturas están sujetas a cambio. m@aMa@@ Su sistema tiene un modo que le permite guardar su remoto separado de las llaves del vehículo. Esta configuración requiere mano de obra adicional. Para mas detalles, por favor consulte a su instalador. El modo Anti-Asalto le permite desactivar su vehículo después de que un ladrón se haya marchado con su propiedad. Si usted es asaltado y todavía tiene su remoto, usted puede presionar el botón de pánico durante 3.5 segundos. La sirena sonará por 30 segundos y el vehículo se apagará. dé @ Si usted adquirió una Alarma o Alarma con Sistema de Arranque Remoto, usted tiene la posibilidad de agregar sensores adicionales de Firstech, LLC. Usted tiene la posibilidad de proteger su inversión agregando un sistema de batería de respaldo para la fuente principal de su alarma o un sensor de inclinación para proteger rines costosos y neumáticos. By Firstech, LLC 20 21 By Firstech, LLC Codificando Control Remoto / Rutina de Programación IMPORTANTE: Cada Control Remoto Firstech debe codificarse al sistema antes de realizar cualquier operación. Todos los control remoto, deben codificarse al mismo tiempo p@r @ @R@ví@@T@b Z@@@ PASO 1: Active modo Valet/Programación girando la llave del cilindro de ignición “ON” y “OFF” (entre Acc y posición ON, “Apagar y Prender”) cinco veces antes del término de 7 segundos. Las luces del aparcamiento (cuartos) encenderán una sola vez indicando paso exitoso. PASO 2: Dentro de un periodo de 2 segundos, después del transcurso del ciclo de la ignición, en el 5to intento, presione el botón o el botón (cerrar) en remoto de 2 Vías, o el botón (cerrar) en remoto de 1 Vía una vez durante 0.5 segundos. Las luces de aparcamiento (cuartos) encenderán una vez para confirmar que el transmisor ha sido codificado. Para Salir de Programación: Programación es un suceso cronometrado. Las luces de aparcamiento (cuartos) encenderán dos veces al término de modo programación. Programando Varios Remotos: Después del destello de confirmación en el paso 2, codifique remotos adicionales presionando el botón en remoto de 2 Vías o el botón (cerrar) en remoto de 1 Vía. Las luces de aparcamiento (cuartos) encenderán una vez confirmando cada remoto adicional. Todos los sistemas (excepto P2WSSR), pueden reconocer hasta tres remotos. By Firstech, LLC Diagnostico de Errores, Arranque Motor Remoto Si el arrancador de motor no enciende el vehículo, las luces de aparcamiento (cuartos) encenderán tres veces inmediatamente. Siguiendo estos tres destellos, las luces de aparcamiento (cuartos) encenderán varias veces correspondiendo al número de error, descrito en la tabla inferior. Número Destellos de la Luz de Aparcamiento 1 2 3 4 5 6 7 8 Error de Arranque de Motor Motor encendido Llave en posicion de “ON” Puerta abierta (solo transmission manual) Cajuela Abierta Pedal del freno presionado Cofre Abierto Modo reservación apagado (solo transmisión manual) Tach o sensor de voltaje con falla Nosotros recomendamos que usted no intente ninguna reparación en su arrancador de motor remoto. Avise a su distribuidor o llámenos directamente. 22 23 By Firstech, LLC Diagnostico de Alarma El 2WG5R-900SH no está preparado para funcionar como un sistema de alarma bidireccional completo, recibirá mensajes de accionamiento de la alarma únicamente cuando el vehículo se arranca a distancia. Cuando se activa la alarma el LED (si instalado) titilará lentamente. Mientras suena la sirena el LED indicará la zona específica que ha sido accionada. Una vez desactivada la alarma después de haber sido accionada, la cantidad de bips de la sirena y el LED del vehículo (si instalado) indicarán la zona específica. Prioridad Situación PANICO 4 Sensor Opcional Accionado 3 2nda Guardia Accionada 2 Puerta/Cofre/Cajuela/Llave Accionada 1 LED en Servicio 2 destellos, descansa, repite 3 destellos, descansa, repite 4 destellos, descansa, repite 5 destellos , descansa, repite # Chirridos (si está instalado) 6 5 4 N/A Garantía de por Vida Limitada Firstech, LLC Garantiza al comprador original, que este producto estará libre de defectos en material y fabricación, bajo uso normal y circunstancias normales por el periodo de tiempo que el dueño original de este producto posee el vehículo en el que se instala; El control remoto tiene garantía por un periodo de un año a partir de la fecha de instalación, al dueño original de este producto. Cuando el comprador original devuelva el producto a la auto-boutique (minorista) donde fue comprado o enviado con flete pre-pagado a Firstech, LLC., 21911 68th South, Kent, WA 98032, EE.UU. dentro del periodo de la garantía, y si el producto es defectuoso, Firstech, LLC, a su criterio reparará o reemplazará el equipo. A LA EXTENSIÓN MÁXIMA PERMITIDA POR LEY, CUALQUIERA Y TODAS LAS GARANTÍAS SON EXCLUIDAS POR EL FABRICANTE Y CADA ENTIDAD QUE PARTICIPA EN EL PROCESO DEL COMERCIO. ESTA EXCLUSIÓN INCLUYE PERO NO SE LIMITA A, LA EXCLUSIÓN DE CUALQUIERA Y TODAS LAS GARANTÍAS MERCANTILES Y/O CUALQUIERA Y TODAS LAS GARANTÍAS DE APTITUD PARA UN PROPÓSITO PARTICULAR Y/O CUALQUIERA Y TODAS LAS GARANTÍAS DE NO-INFRINGIR LAS PATENTES O, EN LOS ESTADOS UNIDOS DE AMÉRICA Y/O EN EL EXTRANJERO. EL FABRICANTE, NI CUALQUIER OTRA ENTIDAD SERÁ RESPONSABLE , U OBLIGADO POR CUALQUIER DAÑO O PERJUICIOS , INCLUYENDO PERO NO LIMITANDO A, CUALQUIER DAÑO Y PERJUICIOS CONSIGUIENTES, DAÑOS Y PERJUICIOS INCIDENTALES, DAÑOS Y PERJUICIOS POR LA PÉRDIDA DE TIEMPO, LA PÉRDIDA DE GANANCIAS, PÉRDIDA COMERCIAL, LA PÉRDIDA DE OPORTUNIDAD ECONÓMICA Y SIMILARES. A PESAR DE LO ANTERIOR, EL FABRICANTE OFRECE UNA GARANTÍA LIMITADA PARA EL REEMPLAZO O REPARACIÓN DEL MÓDULO DE CONTROL (CEREBRO) COMO DESCRITO ANTERIORMENTE. Algunos estados no permiten limitaciones en la duración de una garantía implícita o la exclusión o limitación, en cuánto tiempo una garantía implícita durará o la exclusión o limitación de daños y perjuicios incidentales o consiguientes. Esta garantía le da derechos legales específicos, y usted también puede tener otros derechos que varían de Estado en Estado. By Firstech, LLC 24 25 By Firstech, LLC Garantía de por Vida Limitada Memo Firstech, LLC. No es OBLIGADO o RESPONSABLE POR CUALQUIER DAÑO Y PERJUICIO , INCLUYENDO PERO NO LIMITADO A, CUALQUIER DAÑO Y PERJUICIO CONSIGUIENTE, DAÑOS Y PERJUICIOS INCIDENTALES, DAÑOS Y PERJUICIOS POR LA PÉRDIDA DE TIEMPO, LA PÉRDIDA DE GANANCIAS, PÉRDIDA COMERCIAL, LA PÉRDIDA DE OPORTUNIDAD ECONÓMICA Y SIMILARES que puedan ser resultado ó no, del funcionamiento de Compustar, Compustar Pro, Arctic Start, Vizion, o NuStart. Sin embargo, el FABRICANTE OFRECE UNA GARANTÍA LIMITADA PARA REEMPLAZAR ó REPARAR EL MÓDULO DE CONTROL (CEREBRO) COMO DESCRITO ANTERIORMENTE. Su Garantía La garantía del producto es automáticamente nula, si el código de la fecha o el número de serie es borrado, perdido o alterado. Esta garantía no es válida, a menos que usted complete la tarjeta de registro y la envié a www.compustar.com dentro de los primeros 10 días de la compra. By Firstech, LLC 26 27 By Firstech, LLC