1
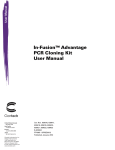
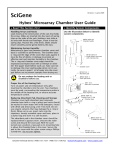
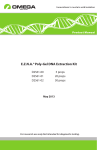
20 LITRE DEHUMIDIFIER
MODEL NO: DH20
PART NO: 6470652
OPERATION & MAINTENANCE
INSTRUCTIONS
LS0510
INTRODUCTION
Thank you for purchasing this CLARKE product.
Before attempting to use this product, please read this manual thoroughly and
follow the instructions carefully. In doing so you will ensure the safety of yourself
and that of others around you, and you can look forward to your purchase
giving you long and satisfactory service.
GUARANTEE
This product is guaranteed against faulty manufacture for a period of 12
months from the date of purchase. Please keep your receipt which will be
required as proof of purchase.
This guarantee is invalid if the product is found to have been abused or
tampered with in any way, or not used for the purpose for which it was
intended.
Faulty goods should be returned to their place of purchase, no product can
be returned to us without prior permission.
This guarantee does not effect your statutory rights.
ENVIRONMENTAL PROTECTION
Recycle unwanted materials instead of disposing of them as
waste. All tools, accessories and packaging should be sorted,
taken to a recycling centre and disposed of in a manner which is
compatible with the environment.
R134a is a refrigerant that complies with EEC environmental
standards; nonetheless, the refrigerant circuit on the machine
should not be punctured. At the end of its working life, consign the
air conditioning unit to a special collection centre.
2
Parts & Service: 020 8988 7400 / E-mail: [email protected] or [email protected]
SAFETY WARNINGS
WARNING: IF THE SUPPLY CABLE IS DAMAGED, IT MUST BE REPLACED BY
THE MANUFACTURER, ITS SERVICE AGENT OR SIMILARLY QUALIFIED
PERSONS IN ORDER TO AVOID A HAZARD.
1. Please read these instructions carefully and retain for future reference.
2. Position the mains cable so that it cannot be inadvertently pulled or
pinched and where it does not cause a trip hazard
3. This appliance is designed to dehumidify residential environments and must
not be used for other purposes.
4. If the appliance requires repair, always contact your CLARKE dealer.
Always insist on original spare parts. Repairs carried out by unauthorized
persons may be dangerous and invalidate the guarantee.
5. This appliance must only be used by adults. Children should not be allowed
to play with this appliance.
6. Do not use extension power cables.
7. Before cleaning or maintenance operations, always unplug the appliance
from the power supply.
8. Do not move the appliance by pulling the power cable.
9. Do not install the appliance in rooms containing gas, oil or sulphur. Do not
install near sources of heat.
10. Do not use the appliance on inclined surfaces.
11. Keep the appliance at least 50 cm away from inflammable substances
(alcohol etc) or pressurised containers (e.g. aerosol cans).
12. Do not rest heavy or hot objects on top of the appliance.
13. Always transport the appliance upright or resting on one side. Remember
to drain the tank before moving the appliance. Wait at least 1 hour after
transporting the appliance before using it to allow the refrigerent gasses to
settle.
14. Do not use the appliance outdoors.
15. Do not obstruct the air inlet or outlet.
3
Parts & Service: 020 8988 7400 / E-mail: [email protected] or [email protected]
ELECTRICAL CONNECTIONS
WARNING! Read these electrical safety instructions thoroughly
before connecting the product to the mains supply.
Before switching the product on, make sure that the voltage of your electricity supply is
the same as that indicated on the rating plate. This product is designed to operate on
230VAC 50Hz. Connecting it to any other power source may cause damage.
This product may be fitted with a non-rewireable plug. If it is necessary to change the
fuse in the plug, the fuse cover must be refitted. If the fuse cover becomes lost or
damaged, the plug must not be used until a suitable replacement is obtained.
If the plug has to be changed because it is not suitable for your socket, or due to
damage, it should be cut off and a replacement fitted, following the wiring instructions
shown below. The old plug must be disposed of safely, as insertion into a mains socket
could cause an electrical hazard.
WARNING! The wires in the power cable of this product are
coloured in accordance with the following code:
Blue = Neutral
Brown = Live Yellow and Green = Earth
If the colours of the wires in the power cable of this product do not correspond with the
markings on the terminals of your plug, proceed as follows.
• The wire which is coloured Blue must be connected to the terminal which is
marked N or coloured Black.
• The wire which is coloured Brown must be connected to the terminal which is
marked L or coloured Red.
• The wire which is coloured Yellow and Green must be connected to the terminal
which is marked E or
or coloured Green.
Plug must be BS1363/A approved.
Always fit a 3 Amp fuse.
Earth
(Green and Yellow)
Live
Neutral
(Brown)
(Blue)
Ensure that the outer sheath of the cable is firmly held by the clamp
We strongly recommend that this machine is connected to the mains supply via a Residual
Current Device (RCD)
If in any doubt, consult a qualified electrician. DO NOT attempt any repairs yourself
4
Parts & Service: 020 8988 7400 / E-mail: [email protected] or [email protected]
OVERVIEW
2
NO
DESCRIPTION
1
Control panel
2
Handle
3
Air vent
4
Filter cover / Air inlet
5
Water tank
1
3
4
5
POSITIONING THE DEHUMIDIFIER
• Position the dehumidifier close to a mains supply socket
• A free space
indicated must be
left around the
dehumidifier, so as
not to block the air
flow.
• Make sure that the
power cable is not
placed where it can
be inadvertently
pulled or pinched
and where it does
not cause a trip
hazard.
5
Parts & Service: 020 8988 7400 / E-mail: [email protected] or [email protected]
OPERATION
SWITCHING ON
Plug into the mains supply socket and
switch on. The Automatic indicator
will flash.
Press the
button.
• The Automatic indicator will
illuminate.
SELECT MODE
Press the
button to cycle
through the available modes.
• The indicator light will
illuminate above your
selection.
AUTOMATIC
Used to dehumidify a room or
prevent a room from getting mouldy
through excessive condensation.
• The dehumidifying functions stops when the humidity falls below 60%,
The air cleaning function continues as long as the unit is switched on.
CONTINUOUS
Used to dehumidify a wardrobe:
• Position the dehumidifier with the air inlet facing the open doors.
DRY CLOTHES
Used to dry a carpet or small space or to dry wet clothes faster
• Position the dehumidifier with the air inlet facing wet clothes/carpet.
AIR CLEAN
Used to filter the air
• The filter must be fitted for the air cleaning function to work.
6
Parts & Service: 020 8988 7400 / E-mail: [email protected] or [email protected]
TIMER OPERATION
Press the
button to cycle
through the timer options: 2 hours, 4
hours or 8 hours.
After the time selected has elapsed
the dehumidifier will switch off.
NOTE: The timer function works in
ALL modes.
SWITCHING OFF
Press the
button. to turn the
dehumidifier off.
EMPTYING THE WATER TANK
1. When the FULL indicator on the panel illuminates, switch off and
disconnect from the mains supply.
2. Carefully remove the water tank
by placing your fingers in the
channel on either side of the tank
and pulling forwards, as shown
opposite.
3. Discard the water and refit the
water tank.
NOTE: The unit will not operate
unless the water tank is fitted
correctly.
7
Parts & Service: 020 8988 7400 / E-mail: [email protected] or [email protected]
CONTINUOUS DRAINING
This function enables continuous dehumidifying without having to empty the
water tank.
PREPARATION FOR CONTINUOUS DRAINING:
1. Remove the water tank.
2. Make the hose opening.
• To make the opening, prise the
cover for the drain hose away
using a screwdriver.
3. Fit the drainage pipe adapter
supplied into position shown on
the right.
4. Put the drain hose (not supplied)
through the hose opening and
securely fit the hose to the
drainage pipe adapter.
• The hose should have an
internal diameter of 15mm and
an outer diameter of less than
20mm.
• Make sure that the drain hose always runs downhill away from the
dehumidifier.
5. Replace the water tank.
• The unit will not operate without the tank in position.
8
Parts & Service: 020 8988 7400 / E-mail: [email protected] or [email protected]
MAINTENANCE
WARNING: ALWAYS UNPLUG THE DEHUMIDIFIER BEFORE PERFORMING
ANY CLEANING OR MAINTENANCE OPERATIONS.
CLEANING THE CABINET
• Use a soft damp cloth to clean the exterior.
• Never use harsh chemicals or abrasive cleaning agents as these may
damage the casing finish.
CLEANING THE AIR FILTER
1. Remove the water tank.
2. Pull the grill forwards, from the
bottom.
3. Remove the filter holder.
4. Unclip the cage at the rear of the
filter holder.
5. Wash the filter under running
water to remove any dust.
6. Allow the filter to dry naturally.
7. Refitting is the reverse process.
The frequency depends on the
duration and the level of dust in the enviroment.
STORAGE
• Unplug from the mains socket and empty the tank.
• Clean and reinstall the filter.
• Cover the dehumidifier to prevent dust getting into the workings.
9
Parts & Service: 020 8988 7400 / E-mail: [email protected] or [email protected]
TROUBLESHOOTING
Cause
No operation
Solution
Power cable disconnected Insert the plug into a power
socket.
Water tank is full
Empty the water tank.
Water tank is not seated
properly.
Replace the tank correctly in
position.
Air vent closed.
Open the air vent.
Dehumidified
Is the filter dirty?
volume is small
Check to see if the air inlet
is blocked.
Clean the filter as specified.
Remove dirt from the air inlet.
The dehumidifier is in ‘air
clean’ mode.
Change the operation mode
to the dehumidifying mode.
Operation
stops during
spot
dehumidifying
The room temperature is
higher than the usable
operating temperature.
Dehumidifying operation will
restart automatically when the
temperature falls
Washed
clothes are not
dried
Clothes are not exposed to
the air from the unit.
Try to expose the clothes to the
air flow.
Washed clothes are hard to
dry when the temperature
is low.
Check to see if the room
temperature is too low
TECHNICAL SPECIFICATION
Power source
220 to 240 Volts AC 50Hz
Input Power
400W
Water tank capacity
5 Litres
Weight
13.6 kg
Operation temperature
5 - 35 degrees Celsius
Dimensions (LxWxH)
290 mm x 386 mm x 575 mm
Refrigerant
R134a
10
Parts & Service: 020 8988 7400 / E-mail: [email protected] or [email protected]
DECLARATION OF CONFORMITY
11
Parts & Service: 020 8988 7400 / E-mail: [email protected] or [email protected]