1
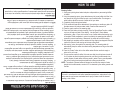
Model ACM-640D
Instruction Manual
10 tasas
Cafetera Digital
10-Cup Digital
Coffee Maker
Manual de Instrucciones
Modelo: ACM-640D
© 2005 Aroma Housewares Company All rights reserved.
Aroma Housewares Co.
6469 Flanders Drive
San Diego, CA 92121
U.S.A.
1-800-276-6286
www.aromaco.com
¡Felicidades!
Su cafetera digital de seguro se convertirá en uno de los aparatos más
prácticos en su hogar. ¡Disfrute un café filtrado fresco en cualquier
momento!
Sírvase leer las siguientes instrucciones cuidadosamente antes de usar la
cafetera por primera vez.
Published By:
Publicado por:
Please read the following instructions carefully before your first use.
Your
Digital Coffee Maker will surely become one of the most
practical appliances in your home. Enjoy fresh brewed coffee anytime!
Aroma Housewares Co.
6469 Flanders Drive
San Diego, CA 92121
EE.UU.A.
www.aromaco.com
© 2005 Aroma Housewares Company
Congratulations!
IMPORTANTES INSTRUCCIONES DE SEGURIDAD
Siga siempre las precauciones básicas de seguridad al usar cualquier aparato
eléctrico, incluyendo las siguientes:
1. Lea todas las instrucciones antes de usar el aparato.
2. No toque superficies calientes.
3. To protect against fire, electrical shock and injury to persons, do not immerse cord,
plug or the product in water or any liquid.
4. Cuando la cafetera esté siendo usada o está cerca de niños, es necesario vigilarla
constantemente.
5. Desenchúfelo del tomacorriente cuando no esté en uso y antes de limpiarlo. Espere
a que se enfríe por completo antes de retirar o colocar piezas, y antes de limpiarlo.
6. No lo use si el cable o el enchufe están dañados, si no ha funcionado bien o ha
tenido alguna avería. Devuélvalo al agente de servicio técnico autorizado más
cercano para que lo examinen, reparen o ajusten.
7. El uso de accesorios no recomendados por el fabricante del equipo puede provocar
lesiones.
8. Do not use outdoors.
9. Do not let cord hang over edge of table or counter, or touch hot surfaces.
10. Do not place on or near a hot burner or in a heated oven.
11. Para desconectar, presione el botón de encendido (Power), después retire la clavija
de la toma de corriente eléctrica de la pared.
12. No use el aparato para otro uso que no sea el indicado.
13. Se puede quemar si se retira la tapa durante el proceso de filtrado.
14. La garrafa está diseñada para usarse con esta cafetera y nunca se deberá utilizar
sobre una hornilla, en un horno o en el microondas.
15. No coloque la garrafa caliente sobre superficies húmedas o frías.
16. No use una garrafa estrellada o con una agarradera suelta o debilitada.
17. Si el café se ha consumido en la garrafa, asegúrese de limpiarla muy bien y
verifique que no se haya estrellado. No deje que el café se consuma, ya que podría
dañarse la garrafa.
18. Maneje la garrafa con cuidado.
GUARDE ESTAS INSTRUCCIONES
El producto para la casa utiliza solo
1
1
Product for Household Use Only.
SAVE THESE INSTRUCTIONS
1. Read all instructions before use.
2. Do not touch hot surfaces. Use handles or knobs.
3. To protect against electrical shock, do not immerse cord, plug or coffee maker in
water or any other liquid.
4. Close supervision is necessary when this appliance is used by or near children.
This appliance is not intented to be used by children.
5. Unplug from outlet when not in use and before cleaning. Allow to completely cool
before putting on or taking off any parts and before cleaning.
6. Do not operate this appliance with a damaged cord, plug or after the appliance
malfunctions or has been damaged in any manner. Return appliance to the
nearest authorized service facility for examination, repair or adjustment.
7. The use of accessory attachments not recommended by the appliance
manufacturer may cause injuries.
8. Do not use outdoors.
9. Do not let cord hang over edge of table or counter, or touch hot surfaces.
10. Do not place on or near a hot gas or electrical burner or in a heated oven.
11. To disconnect, press the Power button, then remove plug from wall outlet.
12. Do not use appliance for other than intended use.
13. Scalding may occur if the lid is removed during the brewing process.
14. The carafe is designed for use with this coffee maker and must never be used on
a rangetop, oven or microwave.
15. Do not set hot carafe on wet or cold surfaces.
16. Do not use a cracked carafe or a carafe with a loose or weakened handle.
17. If coffee has boiled dry in the carafe, be sure to clean the carafe properly and
check for cracks. Do not let coffee boil dry, as it could damage the carafe.
18. Handle carafe with care.
Basic safety precautions should always be followed when using electrical appliances,
including the following:
IMPORTANT SAFEGUARDS
2
This appliance is for household use only.
KEEP AWAY
FROM CHILDREN !
INSTRUCCIONES PARA USAR EL CABLE CORTO
1. Se proporciona un cable eléctrico corto con el propósito de reducir el riesgo
de tropezarse o enredarse con un cable más largo.
2. Hay cables de extensión más largos disponibles y deben ser usados co
sumo cuidado.
3. Si se usa un cable de extensión más largo:
a. La clasificación eléctrica marcada en el cable de extensión debe ser
por lo menos igual que la clasificación eléctrica del aparato.
b. El cable más largo debe ser colocado de manera que no cuelgu
por el borde del mostrador o mesa en donde pudiera ser jalado por
un niño o alguien pudiera tropezarse con el cable sin querer.
CLAVIJA POLARIZADA
Este aparato cuenta con una clavija polarizada (una espiga es más ancha que la
otra); siga las siguientes instrucciones:
Para reducir el riesgo de choque eléctrico, esta clavija debe ser conectada a una salida
o enchufe eléctrico polarizado solamente de una manera. Si la clavija no entra
completamente en el enchufe, voltee la clavija.
Si aún no queda bien en el enchufe, póngase en contacto con un electricista
especializado. No trate de modificar la clavija.
This appliance has a polarized plug (one blade is wider than the other); follow the
instructions below:
To reduce the risk of electric shock, this plug is intended to fit into a polarized outlet
only one way. If plug does not fit fully into the outlet, reverse the plug. If it still does
not fit, contact a qualified electrician. Do not attempt to modify the plug in any way.
¡NO DEJE QUE EL CABLE CUELGUE!
POLARIZED PLUG
1. A short power-supply cord is provided to reduce risk resulting from becoming
entangled in or tripping over a longer cord.
2. Longer extension cords are available and may be used if care is exercised.
3. If a longer extension cord is used:
a. The marked electrical rating of the extension cord should be at least as great as
the electrical rating of the appliance.
b. The longer cord should be arranged so that it will not drape over counter or
tabletop where it can be pulled by children or tripped over unintentionally.
SHORT CORD INSTRUCTIONS
¡MANTÉNGASE
LEJOS DE LOS
NIÑOS!
Este aparato fue diseñado
Solamente para Uso Doméstico.
2
IDENTIFICACIÓN DE LAS PARTES
1
2
12
h
3
min
auto
power
4
5
6
Water Reservoir Lid
Water Reservoir
“Hour” Button
“Minute” Button
“Auto” Button
“Power” Button
Digital Clock
Warming Plate
Carafe
Carafe Lid
Pivoting Brew Basket
Water Level Indicator
Measuring Spoon
11
3
1.
2.
3.
4.
5.
6.
7.
8.
9.
10.
11.
12.
13.
13
7
10
9
8
8
9
10
7
4
3
13
6
auto
h
1. Tapa del recipiente de agua
2. Recipiente de agua
3. Botón de la hora (Hour).
4. Botón de minutos (Minute)
5. Botón de automático (Auto)
6. Botón de encendido (Power).
7. Reloj digital
8. Plato calentador
9. Garrafa
10. Tapa de la garrafa
11. Canasta de filtrado giratoria
12. Indicador del nivel de agua
13. Cuchara medidora
11
5
power
min
12
2
1
PARTS IDENTIFICATION
3
4
CAUTION:
The carafe must be returned to position under the pivoting brew basket within 45
seconds to prevent overflowing.
CÓMO USAR SU CAFETERA
Antes del primer uso:
1. Lea todas las instrucciones e indicaciones importantes de seguridad.
2. Retire todos los materiales de empaque y asegúrese de que las partes están en
buenas condiciones.
3. Levante la tapa del recipiente de agua y retire la cuchara medidora del recipiente de
agua.3. Lave todos los accesorios con agua tibia jabonosa utilizando una esponja o
un paño para platos.
4. Enjuague perfectamente bien para quitar por completo el residuo de jabón.
5. Agregue agua al recipiente de agua y deje que funcione un ciclo sin café. Vacíe el
agua y permita que se enfríe antes de volver a utilizarla.
6. Limpie la base con un paño húmedo.
.Filtros de café:
Hay filtros desechables con forma de cono disponibles en las tiendas locales y donde se
venden cafeteras. Use filtros #4 estándar con esta cafetera. No se recomienda el uso de
filtros desechables estilo canasta. Estos filtros no se adaptan adecuadamente a la forma
de la canasta de filtrado giratoria y pueden causar que el café se asiente y se derrame
durante el filtrado. Los filtros dorados permanentes también se pueden adquirir,
eliminando la necesidad de los filtros desechables.
Coffee Filters:
Cone shaped disposable filters are available locally at grocery stores and where coffee
makers are sold. Use standard #4 filters in this coffee maker. The use of basket-style
disposable filters is not recommended. These filters do not properly conform to the
shape of the pivoting brew basket and may cause coffee to back up and spill over during
brewing. Permanent gold filters can also be purchased, eliminating the need for
disposable filters.
¾ No use limpiadores abrasivos o fibras para tallar.
¾ No sumerja la cafetera, el cable o la clavija en agua en ningún momento
Pause n’ Serve Feature:
If the brewing cycle has begun and you wish to serve a cup of coffee before the
brewing cycle is complete. The Stop-Drip feature allows you to simply remove the
carafe from the warming plate and the coffee will automatically stop dripping. Return
the carafe to the warming plate within 45 seconds and the coffee will continue brewing.
¾ Do not use abrasive cleaners or scouring pads.
¾ Do not immerse the coffee maker, cord or plug in water at any time.
Before First Use:
1. Read all the instructions and important safeguards.
2. Remove all packaging materials; make sure all your items are received in good
condition.
3. Lift water reservoir lid and remove the measuring spoon from the water reservoir.
3. Wash all the accessories with warm soapy water using a sponge or dishcloth.
4. Rinse thoroughly to remove soapy residue.
5. Add water to water reservoir and run one cycle without coffee. Empty water and allow
to cool before using again.
6. Wipe body clean with a damp cloth.
Característica de pausa para servir:
Si el ciclo de filtrado ha comenzado y usted desea servir una taza de café antes de que
el ciclo esté completo. La característica de pausa del filtrado le permite simplemente
retirar la garrafa del plato de calentamiento y el café dejará de caer en forma
automática. Regrese la garrafa al plato de calentamiento en 45 segundos y el café
seguirá filtrándose.
PRECAUCIÓN:
La garrafa se debe regresar a la posición debajo de la canasta de filtrado giratoria en
45 segundos para evitar que se derrame.
HOW TO USE
4
CÓMO USAR SU CAFETERA
5
Función de filtrado fuerte de Aroma:
Su nueva cafetera está equipada con una función de filtrado fuerte que le permite hacer
una taza de café más fuerte para esos días cuando se necesita un empujoncito extra.
Cuando la función de filtrado fuerte se activa, la cafetera tendrá un tiempo de filtrado
más largo que hará un café de sabor más rico y más fuerte. Para activar la función de
filtrado fuerte, presione el botón de encendido dos veces y el icono de la taza de café de
la esquina derecha inferior en la pantalla comenzará a parpadear. Este parpadeo indica
que la función de filtrado fuerte se ha activado. Después de que la función de filtrado
fuerte se ha activado, sólo siga las instrucciones de filtrado normales de la página
siguiente y disfrute de una taza de café más fuerte.
Cuando use la función de programación automática, para activar la función de filtrado
fuerte, presione el botón de automático dos veces y establezca su tiempo de
programación. La palabra "AUTO" parpadeará en la pantalla. Después sólo siga la
instrucción de programación automática normal. (La función de programación
automática se explica en la página 7)
Nota:
Durante el proceso de filtrado fuerte, la cafetera operará durante cerca de 20 segundos
y después reposará durante cerca de 10 segundos. Esta es una función normal para
el proceso de filtrado fuerte. Durante este tiempo, la pantalla LED también entrará y
saldrá de operación; sin embargo, después de 15 minutos la pantalla LED se
encenderá y el icono del café permanecerá en la pantalla.
Note:
During the Strong-Brew process, the coffee maker will operate for approximately 20
seconds and then rest for approximately 10 seconds. This is a normal function for the
Strong-Brew process. During this time, the LED display will also go in and out of
operation, however, after 15 mintues the LED display will light up and the coffee icon
will remain in the display.
When using the Auto Preset function, to activate the Strong-Brew setting, press the Auto
button twice and set your preset time. The word “AUTO” will flash in the display. Then
simply follow the normal Auto Preset instruction. (Auto Preset function is explained on
page 7)
Your new coffee maker is equipped with a Strong-Brew function that allows you to brew
a stronger cup of coffee for those days when a little extra kick is needed. When the
Strong-Brew function is activated, the coffee maker will have an extended brew time
resulting in richer tasting, stronger coffee. To activate the Strong-Brew function, press
the Power button twice and the coffee cup icon in the lower right corner of the display
will begin to flash. This flashing indicates that the Strong-Brew function has been
activated. After the Strong-Brew function has been activated, simply follow the normal
brewing instructions on the next page and enjoy a stronger cup of coffee.
Aroma Strong-Brew Function:
5
HOW TO USE
6
CAUTION:
If the unit is not allowed to cool before immediate repeated use, water placed in the
water reservoir may become overheated and a spray of steam could be released
creating a risk of burns.
Brewing Coffee:
1. Swing open pivoting brew basket and place a disposable or permanent gold filter
in basket.
2. Using the measuring spoon, place desired amount of ground coffee into filter. Use
one spoonful of drip grind coffee for each cup of brewed coffee. For stronger or
milder coffee, adjust the amount of coffee to suit your taste.
3. Completely close pivoting brew basket.
4. Fill the carafe with water to the desired level. Use markings on carafe as a guide. Lift
the water reservoir lid and pour water inside. Close the water reservoir lid.
5. Place the empty carafe on the warming plate.
6. Press the Power button to begin brewing (Twice for Strong-Brew Function--coffee
cup icon will begine to flash in the display). Use the Pase n’ Serve feature
explained on page 4 if you wish to serve a cup of coffee before the brewing cycle
is complete. Please remember to return the carafe to the warming plate within 45
seconds to prevent overflowing. Afterwards, the coffee will continue brewing.
7. After brewing is complete, wait one minute until the dripping has stopped. Keep the
carafe lid in place for safe serving and to keep coffee warm.
8. After serving, return the carafe to the warming plate. The warming plate will
automatically keep the coffee at an ideal serving temperature as long as the coffee
maker is on.
9. Press the “Power” button to turn the coffee maker off when carafe is empty or
when unit is not in use.
10. To brew another carafe of coffee, first make sure that the unit has been turned off
for 10 minutes to allow the heating element to cool. After the coffee maker has
cooled, dispose of used coffee and rinse carafe in water. Place a new disposable
filter in the pivoting brew basket and add fresh coffee grounds to filter.
NOTE: The amount of brewed coffee will always be less than the amount of water
placed into the coffee maker, as about 10% is absorbed by the coffee grounds and
the filter.
HOW TO USE
CÓMO USAR SU CAFETERA
Filtrado de café:
1. Gire la canasta de filtrado giratoria para abrirla y colocarle el filtro desechable o
permanente.
2. Use la cuchara medidora, coloque la cantidad deseada de café molido en el filtro.
Use una cucharada llena de café para filtrar por cada taza de café. Para hacer café
más fuerte o ligero, ajuste la cantidad de café que se adecue a su gusto.
3. Cierre por completo la canasta de filtrado giratoria.
4. Llene la garrafa con agua hasta el nivel deseado. Use las marcas en la garrafa
como guía. Levante la tapa del recipiente de agua y coloque el agua adentro. Cierre
la tapa del recipiente de agua.
5. Coloque la garrafa vacía sobre el plato de calentamiento.
6. Presione el botón de encendido (Power) para comenzar el filtrado. Use la
característica se pausa para servir que se explica en la página anterior si desea
servir una taza de café antes de que el ciclo de filtrado esté completo. Por favor
recuerde regresar la garrafa al plato de calentamiento en 45 segundos para prevenir
que se derrame. Después, el café seguirá filtrándose.
7. Después de que el filtrado esté completo, espera un minuto hasta que el goteo se
haya detenido. Mantenga la tapa de la garrafa en su lugar para tener seguridad al
servir y conservar el café caliente.
8. Después de servir, regrese la garrafa al plato de calentamiento. El plato de
calentamiento mantendrá el café caliente en forma automática a una temperatura
ideal siempre que la cafetera esté encendida.
9. Presione el botón de encendido (Power) para apagar la cafetera cuando la garrafa
esté vacía o cuando la unidad no esté en uso.
10. Para filtrar otra garrafa de café, primero asegúrese de que la unidad se haya
apagado durante 10 minutos para permitir que el elemento de calentamiento se
enfríe. Después de que la cafetera se haya enfriado, tire el café utilizado y enjuague
la garrafa con agua. Coloque un filtro desechable nuevo en la canasta de filtrado
giratoria y agregue café fresco al filtro.
NOTA: La cantidad de café filtrado siempre será menor que la cantidad de agua
colocada en la cafetera, ya que cerca del 10% se absorbe en el café y el filtro.
PRECAUCIÓN:
Si la unidad no se deja enfriar antes de volverla a usar, el agua que se coloca en el
recipiente de agua se puede sobrecalentar y se puede generar vapor, lo que puede
provocar un riesgo de quemaduras.
6
CÓMO USAR SU CAFETERA
7
Programación del reloj:
Nota:
Su cafetera no filtrará café hasta que el reloj esté programado y el botón de
encendido esté prendido; aparecerá un símbolo de taza de café en la pantalla. Esta
es una característica de seguridad para prevenir que la cafetera se encienda en
forma automática.
1. Coloque la cafetera sobre una superficie limpia y seca, donde se pueda conectar
con facilidad a la toma de corriente eléctrica.
2. Conecte la cafetera a la toma de corriente eléctrica. Los números en la pantalla LCD
comenzarán a parpadear.
3. Programe el reloj para que muestre la hora correcta. Presione el botón "H" (horas)
hasta que aparezca la hora correcta. Presione el botón "M" (minutos) hasta que
aparezcan los minutos correctos. El reloj está programado ahora. Las palabras
a.m./p.m. aparecen en la esquina izquierda superior de la pantalla LCD.
To Set the Automatic Brew:
1. Press the Auto button and “AUTO” will appear in the upper right corner of the LCD
display (press twice for Strong-Brew function--The word “AUTO” will begin to flash in
the display)
2. The coffee maker will turn on at the programmed time.
3. The timer will automatically shut the coffee maker off 2 hours after the programmed
time.
4. To have the coffee maker brew at the same time the next day, simply refill the water
reservoir and push the Auto button again (press twice for Strong-Brew function--The
word “AUTO” will begin to flash in the display). To change to a different time, repeat
the steps above.
To Set the Program Time:
1. Press and hold the Auto button and press the “H” button at the same time to
advance to the desired hour. Make sure the a.m./p.m. times are correct.
2. Press and hold the Auto button and press the “M” button at the same time to
advance to the desired minute.
Using the Auto Preset Function:
Uso de la función de programación automática:
Para programar el tiempo del programa:
1. Presione y sostenga el botón de automático y presione el botón "H" al mismo tiempo para
avanzar a la hora deseada. Asegúrese de que las horas a.m./p.m. estén correctas.
2. Presione y sostenga el botón de automático y presione el botón "M" al mismo tiempo
para avanzar al minuto deseado.
Para programar el filtrado automático:
1. Presione el botón de automático y aparecerá "AUTO" en la esquina derecha superior
de la pantalla LCD (presione dos veces para activar la función de filtrado fuerte, la
palabra "AUTO" comenzará a parpadear en la pantalla)
2. TLa cafetera se encenderá en la hora programada.
3. El reloj apagará en forma automática la cafetera 2 horas después del tiempo programado.
4. Para que la cafetera funcione en la misma hora al día siguiente, sólo rellene el
compartimiento del agua y presione el botón de automático de nuevo (presione dos
veces para activar la función de filtrado fuerte, la palabra "AUTO" comenzará a
parpadear en la pantalla). Para cambiar a una hora diferente, repita los pasos de
arriba.
7
3. Set the timer to display the current time. Press the “H” (hours) button until the
current hour is displayed. Press the “M” minutes button until the correct minutes are
displayed. The clock is now set. The a.m./p.m is displayed in the top left corner of
the LCD display.
2. Plug the coffee maker into the outlet. The numbers on the LCD display will begin to flash.
1. Place the coffee maker on a clean, dry countertop where it can easily be plugged
into an electrical outlet.
Note:
Your coffee maker will not brew coffee until the clock is set and the Power button is
turned on--a coffee cup symbol will appear in the display. This is a safety feature to
prevent the coffee maker from automatically turning on.
Setting the Clock:
HOW TO USE
8
WARNING:
• To reduce the risk of fire or electrical shock, do not remove bottom cover.
There are no user serviceable parts inside. Repairs should only be done by
authorized service personnel. Please call Aroma Customer Service department
at 1-800-276-6286.
• Do not immerse the appliance in water or any liquid.
• Do not clean coffee carafe or accessories in dishwasher.
• Do not use abrasive cleaners or scouring pads.
To Descale:
1. Pour white vinegar in the carafe up to the “6-cup” level, then pour the vinegar into
the water reservoir.
2. Place the disposable filter into the pivoting brew basket and turn the unit on by
pressing the “Power” button.
3. Let half the solution brew into the carafe, then turn the coffee maker off and let cool
for 15 minutes to soften the mineral deposits.
4. Pour the liquid that brewed into the carafe back into the water reservoir. Turn on the
coffee maker and let all the solution brew into the carafe.
5. Turn off the coffee maker and discard the solution. Then follow the “Before First
Use” directions to flush out the remaining solution.
Mineral Deposits and Descaling:
Mineral deposits left by water can clog your coffee maker. Descale your coffee maker
every 1 to 3 months. If you live in an area with hard water, you may have to descale
the coffee maker more frequently. Excessive steaming or a prolonged brewing cycle
are signs that descaling is needed.
Caring For Your Carafe:
• Do not allow all liquid to evaporate from carafe while on the warming plate. Do not
heat carafe when empty. If this happens, discard carafe.
• Discard carafe if damaged in any manner. A chip or crack could result in breakage
that could contaminate liquid contents with glass particles.
• Never use abrasive scouring pads or cleaners as they will scratch and weaken the glass.
• Do not place the carafe on or near a hot gas or electric burner, in a heated oven or
in a microwave oven.
• Handle carafe with care. Carafe is not dishwahser safe.
Always unplug and allow unit to cool completely before cleaning.
1. To clean the coffee maker after brewing coffee, be sure the coffee maker is turned
off and has cooled.
2. Wipe the coffee maker with a soft, damp cloth and dry thoroughly. Do not use
abrasive soaps or scouring pads.
3. Hand wash the carafe and lid in hot, soapy water. Rinse and dry thoroughly.
HOW TO CLEAN
CÓMO LIMPIAR LA CAFETERA
Siempre desconecte la unidad y permita que se enfríe antes de limpiarla.
1. Para limpiar la cafetera después de filtrar café, asegúrese de que esté apagada y que se ha
enfriado.
2. Limpie la cafetera con un paño suave y húmedo y después séquela a conciencia. No utilice
limpiadores abrasivos o fibras que rayen.
3. Lave a mano la garrafa y su tapa con agua jabonosa caliente. Enjuague y seque por completo.
Cuidado de su garrafa:
• No permita que todo el líquido se evapore de la garrafa mientras esté en el plato de
calentamiento. No caliente la garrafa cuando esté vacía. Si esto ocurre, deseche la
garrafa.
• Deseche la garrafa si está dañada de cualquier forma. Una despostilladura o grieta podría
provocar que se rompa y contaminar el contenido líquido con partículas de vidrio.
• Nunca use fibras o limpiadores para tallar porque pueden rayar o debilitar el vidrio.
• No coloque la garrafa sobre o cerca de un quemador de gas o eléctrico caliente ni en un
horno o en el microondas.
• Maneje la garrafa con cuidado. La garrafa no se puede meter a la lavaplatos.
Depósitos Minerales y Desescamado:
Los depósitos minerales que deja el agua pueden obstruir la cafetera. Desescame su cafetera
cada 1 a 3 meses. Si vive en un área con agua dura, quizá tenga que desescamar su
cafetera con más frecuencia. El vapor excesivo y un ciclo de filtrado prolongado son señales
de que se necesita desescamar.
Para desescamar:
1. Ponga vinagre blanco en la garrafa hasta el nivel de la taza seis (6-cup), después coloque
el vinagre en el recipiente de agua.
2. Coloque el filtro desechable en la canasta de filtrado giratoria y encienda la unidad
presionando el botón de encendido (Power).
3. Deje que la mitad de la solución se filtre hacia la garrafa, después apague la cafetera y
déjela enfriar durante 15 minutos para suavizar los depósitos minerales.
4. Coloque de nuevo el líquido que se filtró hacia la garrafa en el recipiente de agua.
Encienda la cafetera y deje que toda la solución se filtre hacia la garrafa.
5. Apague la cafetera y deseche la solución. Después siga las instrucciones de "Antes del
Primer Uso" para remover el resto de la solución.
ADVERTENCIA:
• Para reducir el riesgo de incendio o descarga eléctrica, no retire la tapa de la parte
inferior. No hay ninguna parte que necesite servicio en su interior. Las
reparaciones sólo se deben hacer a través del personal de servicio autorizado. Por
favor llame al departamento de servicio al cliente de Aroma al 1-800-276-6286.
• No sumerja el aparato en agua o cualquier líquido.
• No lave la garrafa o los accesorios de la cafetera en la lavaplatos.
• No utilice limpiadores abrasivos o fibras que rayen.
8
GARANTÍA LIMITADA
9
Aroma Housewares Company garantiza que este producto esté libre de
defectos de fabricación y en los materiales durante un período de un año de la
fecha comprobable de compra dendro de Los Estados Unidos.
Dentro de este período de garantía, Aroma Housewares Company, a su
opción, reparará o reemplazará gratuitamente cualquier parte que resulte
defectuosa, siempre y cuando el producto sea devuelto a Aroma Housewares
Company, con porte pagado y comprobante de compra y U.S. $8.00 para
gastos de envío y manejo. Sírvase llamar al número telefónico gratuito
que se menciona abajo para obtener un número de autorización de
devolución. Espere entre 2-4 semanas para recibir el aparato
nuevamente.
Esta garantía no cubre la instalación incorrecta, uso indebido, maltrato o
negligencia por parte del usuario. La garantía también es inválida en caso de
que el aparato sea desarmado o se le dé mantenimiento por un centro de
servicio no autorizado.
Esta garantía le ofrece derechos legales específicos, los cuales podrán variar
de un estado a otro y no cubre fuera de Los Estados Unidos.
AROMA HOUSEWARES COMPANY
6469 Flanders Drive
San Diego, California 92121
1-800-276-6286
M-F, 8:30 AM - 5:00 PM, Pacific Time
Website: www.aromaco.com
This warranty gives you specific legal rights which may vary from state to state and
does not cover areas outside the United States.
This warranty does not cover improper installation, misuse, abuse or neglect on the
part of the owner. Warranty is also invalid in any case that the product is taken
apart or serviced by an unauthorized service station.
AROMA HOUSEWARES COMPANY
6469 Flanders Drive
San Diego, California 92121
1-800-276-6286
L-V, 8:30 AM - 5:00 PM, Tiempo del Pacífico
Sitio Web: www.aromaco.com
Within this warranty period, Aroma Housewares Company will repair or replace, at
its option, defective parts at no charge, provided the product is returned, freight
prepaid with proof of purchase and U.S. $8.00 for shipping and handling charges
payable to Aroma Housewares Company. Before returning an item, please call the
toll free number below for return authorization number. Allow 2-4 weeks for return
shipping.
Aroma Housewares Company warrants this product free from defects in material
and workmanship for one year from provable date of purchase in the continental
United States.
9
LIMITED WARRANTY