1
ASSEMBLY
Make sure you have the following
Make Assembly
Easier for Yourself
• Two adjustable wrenches
Everything in this manual is designed to
ensure that the weight sys[em can be assembled successfully by anyone. Before beginning assembly, make sure to read the
information on this page. This brief introduction will save you much more time than
it takes to read it.
Assembly
Requires
tools:
• One standard screwdriver
• One phillips screwdriver
• One rubber mallet
• You will also need grease or petroleum jelly, a
small amount of soapy water, and clear tape or
masking tape.
Two Persons
For your convenience and safety, assemble the
weight system with the help of another person.
Note: Assembly will be more convenient if you have
a socket set, a set of open-end or closed-end
wrenches, or a set of ratchet wrenches.
Set Aside Enough
How to Identify
Time
Due to the many features of the weight system, the
assembly process will require several hours. By
setting aside plenty of time and by deciding to
make the task enjoyable, assembly will go smoothly.
You may want to assemble the weight system over
a couple of evenings.
Select a Location
for the Weight
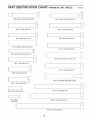
To help you identify the small parts used in assembly,
we have included a PART iDENTiFiCATiON CHART
in the center of this manual. Place the chart on the
floor and use it to easily identify parts during each
assembly step. Note: Some small parts may have
been pre=attached, if a part is not in the parts
bag, check to see if it has been pre=attached.
System
How
Because of its weight and size, the weight system
should be assembled in the location where it will be
to Orient
Tightening
Parts
the Box
Tighten all parts as you assemble them, unless
instructed to do otherwise.
To make assembly as easy as possible, we have
divided the assembly process into four stages. The
parts needed for each stage are found in individual
bags. Important: Wait until you begin each stage
to open the parts bag for that stage. Place all
parts of the weight system in a cleared area and
remove the packing materials. Do not dispose of
the packing materials until assembly is completed.
The Four Stages
Parts
As you assemble the weight system, make sure all
parts are oriented exactly as shown in the drawings.
used. Make sure that there is enough room to walk
around the weight system as you assemble it.
How to Unpack
Parts
of the Assembly
Questions?
If you have questions after reading these assembly
instructions, please call 1=800=4=MY=HOME®
(1-800-469-4663).
Process
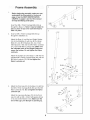
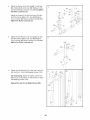
Frame Assembly--You will begin by assembling
the base and the uprights that form the skeleton of
the weight system.
Cable Assembly--During this stage you will
attach the cables and pulleys that connect the
arms to the weights.
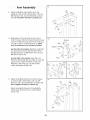
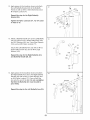
Arm Assembly--During this stage you will
assemble the arms and the leg lever.
Seat Assembly--During the final stage you will
assemble the seats and the backrests.
8