1
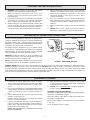
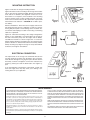
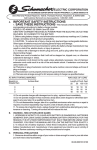
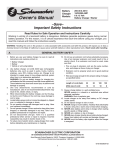
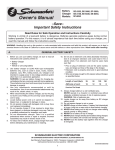
Battery
Charger
Model:
Owner's Manual
SE-1-12S
1½ AMP
Battery Charger & Maintainer
For 12 Volt Batteries
Read Rules for Safe Operation and Instructions Carefully
Working in vicinity of a lead-acid battery is dangerous. Batteries generate explosive gases during normal
battery operation. For this reason, it is of utmost importance that each time before using your charger, you
read this manual and follow the instructions exactly.
WARNING: Handling the cord on this product or cords associated with accessories sold with this product, will expose you to lead, a
chemical known to the State of California to cause cancer and birth defects or other reproductive harm. Wash hands after handling.
GENERAL BATTERY SAFETY
1.
2.
3.
4.
5.
6.
7.
8.
9.
Before you use your battery charger, be sure to read all
instructions and cautions printed on:
• Battery Charger
• Battery
• Vehicle or unit using battery
Use battery charger on LEAD ACID type rechargeable
batteries only, such as used in autos, trucks, tractors,
airplanes, vans, RV's trolling motors, etc. Charger is not
intended to supply power to low-voltage electrical system
other than in an automotive application.
WARNING: Do not use battery charger for charging drycell batteries that are commonly used with home appliances.
These batteries may burst and cause injury to persons and
damage to property.
Use only attachments recommended or sold by
manufacturer. Use of non-recommended attachments may
result in fire, electric shock, or injury.
When disconnecting the battery charger, pull by the plug
not by the cord. Pulling on the cord may cause damage to
cord or plug.
Locate battery power cord so it cannot be stepped on, tripped
over, or subjected to damage or stress.
Do not operate charger with damaged cord or plug. Have
cord replaced immediately.
Do not operate charger if it has received a sharp blow, been
dropped, or otherwise damaged in any way. Take it to a
qualified professional for inspection and repair.
Do not disassemble charger. Take it to a qualified
professional when service or repair is required. Incorrect
reassembly may result in electric shock or fire.
To reduce risk of electric shock, unplug charger from outlet
before attempting any maintenance or cleaning.
10. Do not use an extension cord unless absolutely necessary.
Use of an improper extension cord could result in fire or
electric shock. If an extension cord must be used, make
sure that:
• Pins on plug of extension cord are the same number,
size, and shape as those of plug on charger.
• Extension cord is properly wired and in good electrical
condition.
• Wire size is large enough for AC ampere rating of charger,
as specified below:
Length of cord (feet):
25
50
100
150
AWG size of cord:
18
18
18
16
11. Always charge battery in a well ventilated area.
NEVER operate in a closed-in or restricted area without
adequate ventilation.
WARNING: Risk of explosive gas.
12. Locate charger as far away from battery as DC charger
cables permit.
13. Do not expose charger to rain or snow.
14. NEVER charge a frozen battery. If battery fluid (electrolyte)
is frozen, bring into a warm area to thaw before charging.
15. NEVER allow battery acid to drip on charger when reading
specific gravity or filling battery.
16. NEVER set a battery on top of charger.
17. NEVER place charger directly above battery being charged.
Gases from battery will corrode and damage charger.
18. NEVER touch the battery clips together when the charger
is energized.
19. NEVER crank engine with charger attached to battery, and
120 volt line.
• IMPORTANT SAFETY INSTRUCTIONS •
• SAVE THESE INSTRUCTIONS •
SCHUMACHER ELECTRIC CORPORATION
801 BUSINESS CENTER DRIVE • MOUNT PROSPECT, ILLINOIS 60056-2179
Send Warranty Product Repairs to: 1025 E. Thompson, Hoopeston, IL 60942-0280
Call Customer Service if you have questions: 1-800-621-5485
00-00-000457/0603
1
PERSONAL PRECAUTIONS AND SAFETY
1.
2.
3.
4.
WARNING: Wear complete eye protection and clothing
protection, when working with lead-acid batteries.
Make sure someone is within range of your voice or close
enough to come to your aid when you work with or near a
lead-acid battery.
Have plenty of fresh water and soap nearby for use if battery
acid contacts skin, clothing, or eyes. If battery acid contacts
skin or clothing, wash immediately with soap and water.
Avoid touching your eyes while working with a battery. Acid
particles (corrosion) may get into your eyes! If acid enters
your eye, immediately flood eye with running cold water for
at least 10 minutes. Get medical attention immediately.
5.
6.
7.
8.
Remove all personal metal items such as rings, bracelets,
necklaces, and watches when working with a lead-acid
battery. A lead-acid battery can produce a short-circuit
current high enough to weld a ring (or the like) to metal,
causing a severe burn.
Take care not to drop a metal tool or other metal onto the
battery. Metal may cause sparking or short circuit the battery
or another electrical devise. Sparking may cause an
explosion.
Always operate battery charger in an open well ventilated
area.
NEVER smoke or allow a spark or flame in the vicinity of
the battery or engine. Batteries generate explosive gases!
GROUND AND AC POWER CORD CONNECTIONS
Charger should be grounded to reduce risk of electric shock.
Charger is equipped with an electric cord having an equipmentgrounding conductor and a grounding plug. The plug must be
plugged into an outlet that is properly installed and grounded in
accordance with all local codes and ordinances.
ADAPTER
GROUNDED OUTLET
GROUNDING SCREW
This battery charger is designed for use on a nominal 120-volt
circuit and has a grounded plug that looks like the plug illustrated FIGURE 1 (A). This plug should be used in a grounded
outlet. The plug pins must fit the receptacle (outlet).
COVER OF GROUNDED
OUTLET BOX
GROUNDING PIN
ADAPTER: A temporary adaptor, as shown in FIGURE 1 (B)
and (C), may be used to connect the charger plug to a two-pole
receptacle (outlet) as shown FIGURE 1 (B).
ADAPTER
GROUNDING
MEANS
NOTE: The temporary adapter should be used only until a properly grounded outlet can be installed by a qualified electrician.
FIGURE 1 GROUNDING METHODS
DANGER: NEVER alter the AC cord or plug provided. If it will not fit outlet, have proper outlet installed by a qualified electrician.
Improper connection can result in a risk of an electric shock. DANGER: Before using an adaptor as illustrated, be certain that center
screw of outlet plate is grounded. The green-colored rigid ear or lug extending from adaptor must be connected to a properly grounded
outlet. Make certain it is grounded. If necessary, replace original outlet cover plate screw with a longer screw that will secure adapter ear
or lug to outlet cover plate and make ground connection to grounded outlet.
PREPARING TO CHARGE
1.
2.
3.
4.
If necessary to remove battery from vehicle to charge,
always remove grounded terminal from battery first. Make
sure all accessories in the vehicle are off, so as not to cause
an arc.
Be sure area around battery is well ventilated while battery
is being charged. Gas can be forcefully blown away by using
a piece of cardboard or other non-metallic material as a
fan.
Clean battery terminals. Be careful to keep corrosion from
coming in contact with eyes.
Keep the battery terminals clean and tight. Use terminal
protectors to prevent corrosion.
If battery has removable filler vents, check periodically to
make sure battery electrolyte (liquid) covers the plates. If
liquid is down, add water to bring level up. This also helps
purge excessive gas from the cells.
NOTE: DO NOT OVERFILL (OVERFILLING COULD
RESULT IN DAMAGE).
5.
6.
Study all battery manufacturer's specific precautions such
as removing or not removing cell caps while charging, and
recommended rates of charge.
DO NOT use for parallel charging. Charger is designed to
charge / maintain one 12 volt battery.
CHARGER LOCATION PRECAUTION
Never place charger directly above battery being charged; gases
from battery could damage charger.
Never allow battery acid to drip on charger when reading specific gravity or filling battery.
Do not operate charger in a closed-in area or restrict ventilation
in any way.
Do not set battery on top of charger.
2
MOUNTING INSTRUCTION
FENDER WELL
Figure 1 illustrates the charger mounting brackets.
Figure 2 illustrates surface mounting of the charger to the fender
well. If using the nut and bolt provided, drill two holes between
3/16" and 1/4" in diameter. (For alignment of holes use one of
the brackets as a template.) If the backside of the mounting
surface is hard to reach, you may consider using two 1/2" sheetmetal screws instead of nut bolt, drill a pilot hole if required, drill
holes between 1/8" and 5/32". CAUTION: Do not drill or puncture battery.
12 VOLT
BATTERY
Figure 1
Electrical installations - Route and secure supply cord and output wiring away from gas line, carburetor or other hot, sharp or
moving and pinch parts to avoid damage to the insulation. Secure the AC cord and plug to a cable or from using a self locking
cable tie or equivalent.
Figure 2
Figure No. 3 illustrates mounting of the charger alongside the
battery of your automobile. If convenient place the charger to
the side of the battery away from the engine and fan blades,
assemble the brackets as shown in figure No. 4. Loosen the
battery retaining hardware enough that you can insert the longer
portion of bracket "C" between the bottom of the battery and the
battery mounting tray. Align the charger to freely stand without
restrictions, then tighten all hardware.
ELECTRICAL CONNECTION
The output leads of the charger are terminated with 3/8 inch
ring lugs. Remove the bolts from the battery post connector,
insert the bolt through the ring lug then place the bolt back in
the battery connector and tighten. Connect the red lead to the
positive (+) battery post and the black lead to the negative (-)
post.
If you have difficulty connecting the output leads, consult your
local auto supply store, they may assist you in finding a connecting device for your application.
Figure 4
Figure 3
Figure 5
LIMITED WARRANTY
THIS IS THE ONLY EXPRESS LIMITED WARRANTY AND THE MANUFACTURER NEITHER ASSUMES NOR AUTHORIZES ANYONE TO ASSUME OR
MAKE ANY OTHER OBLIGATION TOWARDS THE PRODUCT OTHER THAN
THIS EXPRESS LIMITED WARRANTY. THE MANUFACTURER MAKES NO
WARRANTY OF MERCHANTABILITY OR FITNESS FOR PURPOSE OF THIS
PRODUCT AND EXPRESSLY EXCLUDES SUCH FROM THIS LIMITED WARRANTY.
SCHUMACHER ELECTRIC CORPORATION, 801 BUSINESS CENTER DRIVE,
MOUNT PROSPECT, ILLINOIS 60056-2179 MAKES THIS LIMITED WARRANTY
TO THE ORIGINAL PURCHASER AT RETAIL OF THIS PRODUCT. THIS LIMITED WARRANTY IS NOT TRANSFERABLE.
Schumacher Electric Corporation warrants this battery charger for two years
from date of purchase at retail against defective material or workmanship. If
such should occur, the unit will be repaired or replaced at the option of the manufacturer. It is the obligation of the purchaser to forward the unit together with
proof of purchase, transportation and/or mailing charges prepaid to the manufacturer or its authorized representative.
SOME STATES DO NOT ALLOW THE EXCLUSION OR LIMITATION OF INCIDENTAL OR CONSEQUENTIAL DAMAGES OR LENGTH OF IMPLIED WARRANTY SO THE ABOVE LIMITATIONS OR EXCLUSIONS MAY NOT APPLY TO
YOU.
This limited warranty is void if the product is misused, subjected to careless
handling, or repaired by anyone other than the manufacturer or its authorized
representative.
THIS WARRANTY GIVES YOU SPECIFIC LEGAL RIGHTS AND YOU MAY ALSO
HAVE OTHER RIGHTS WHICH VARY FROM STATE TO STATE.
The manufacturer makes no warranty other than this limited warranty and expressly excludes any implied warranty including any warranty for consequential
damages.
3
OPERATING INSTRUCTIONS
Model SE-1-12S is intended for use with 12 volt battery systems only. The charger contains an electronic control circuit which
safeguards against overcharging the battery.
5.
After reading and following the directions "Charging battery in
vehicle" or "Charging battery out of vehicle," you may observe
the following conditions:
Light Color
Green
On/Off
Off
Condition
Check wall receptacle for
120 volts or check lead
connections, may be
reversed.
Green
On
AC Power is present.
Red
On
Battery charger voltage is
approximately 14 volts and
charging has stopped.
Red
Off
Battery voltage has
dropped one volt and the
charging has resumed.
6.
7.
PROPER DISCONNECT PROCEDURE
1.
2.
The on/off cycle of the red light will continue, the red light will
stay on for longer periods of time as the battery becomes more
fully charged. Your charger has been designed NOT to spark if
the ring lugs on the leads accidentally touch one another, or if
the leads are connected in reverse.
3.
The battery must measure at least 2 volts to start the charging
of the battery. The green light will be on even if the charging is
not taking place. You can verify charging by measuring the battery voltage and noting an increase in volts.
For some applications you may need to purchase a terminal
similar to that shown in figure 5 to make connections.
1. Storage of a battery during non-seasonal use.
2. For vehicles seldom used or placed in storage.
3. For improved battery performance during cold weather.
Figure 5
Smaller batteries such as those used on motorcycles and garden tractors can be charged overnight.
Check polarity of battery posts. POS (+) usually is the larger
diameter than NEG (-) post. Connect POS (+) red lead ring terminal to positive post of the battery. Position yourself away from
the battery as far as possible, then connect NEG (-) blk lead
ring terminal to the negative (-) post of the battery. DO NOT
face battery when making final connection.
For large automotive or marine battery which are deeply discharged, it is recommended to recharge first with a larger charger
(such as a 10 amp) then use the SE-1-12S to maintain the charge
level of the battery.
If the battery is used in automobile or other application which
has its own means of charging a battery, the above time maybe
greatly reduced by partially charging the battery before applying the charger.
A marine (boat) battery must be removed and charged on
shore. To charge it on board requires equipment specially
designed for marine use.
CHARGER OVERLOAD PROTECTION
CHARGING BATTERY IN VEHICLE
Your battery charger is protected from power overload by an
automatic heat sensing switch. The protector will open with a
clicking sound and reclose after a brief cooling period.
FOLLOW THESE STEPS WHEN BATTERY IS INSTALLED IN
VEHICLE A SPARK NEAR BATTERY MAY CAUSE BATTERY
EXPLOSION. TO REDUCE RISK OF SPARK NEAR BATTERY:
2.
3.
4.
Always unplug extension cord before doing anything else.
Disconnect the grounded clamp from the engine block,
framework or battery.
Finally disconnect the remaining clamp from battery terminal
post.
NOTE: When connected to an electrical source, the charger
may hum or buzz. This is normal. Also, the charger is
designed to get quite warm. Do not set on flammable
material.
CHARGING BATTERY OUT OF VEHICLE
This charger is ideally suited for maintaining the battery charge
level for the following applications.
1.
most vehicles, see item 5. If positive post is grounded to
chassis, see item 6.
For common negative grounded vehicle, connect positive
(red) terminal from battery charger to positive (+)
ungrounded post of the battery. Connect negative (-) ring
terminal to the vehicle chassis or engine block away from
battery as far as the leads will permit. Do not connect ring
terminal to the carburetor, fuel lines, or sheet metal body
parts. Connect to a heavy gauge metal part of the frame or
engine block or the negative post.
For positive grounded vehicle, connect negative (blk) ring
terminal from the battery charger to the NEG (-) ungrounded
battery post. Connect POS (+) red ring terminal to the vehicle
chassis or engine block or the POS battery post. DO NOT
connect the ring terminal to the carburetor, fuel lines, or
sheet metal body parts. Connect to a heavy gauge metal
part of the frame or engine block.
Only after completing steps 1 through 6, plug the extension
cord into grounded 120 volt 60 hertz outlet.
Position AC and DC cords to reduce risk of damage by
hood, door or moving parts.
Stay clear of fan blades, belts, pulleys and other parts that
can cause injury.
Check polarity of battery posts. POSITIVE (+) battery post
usually has a larger diameter than the NEGATIVE (-) post.
Determine which post of battery is grounded (connected to
the chassis). If negative post is grounded to chassis, as in
MAINTENANCE AND CLEANING
Very little maintenance is required. As with any appliance or
tool, a few common sense rules will prolong the life of your
battery charger.
Store in a clean, dry place.
Clean case and cords with a dry or slightly damp cloth.
4