1
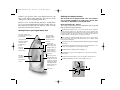
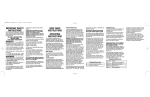
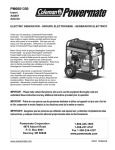
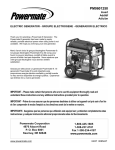
05CN1258 DPP3000C IB
11/17/05
11:52 AM
Page 1
™
P
R
O
F
E
S
S
I
O
N
A
L
Digital Steam Iron
User Guide
DPP3000 / DPP4000 Series
7 Setting LCD
For your safety & continued enjoyment of this product, always read
the instruction booklet carefully before using.
05CN1258 DPP3000C IB
11/17/05
11:52 AM
Page 2
IMPORTANT SAFEGUARDS
When using your iron, basic precautions should always be followed, including the following:
READ ALL INSTRUCTIONS
BEFORE USING
Use iron only for its intended use. To protect against a risk of electric
shock, do not immerse the iron in water or other liquid. The iron
should always be turned Off before unplugging from an outlet.
Never yank cord to disconnect from outlet; instead, grasp plug and
pull to disconnect. Do not allow cord to touch hot surfaces. Let iron
cool completely before putting away. Loop cord loosely around
cord wrap when storing. Always disconnect iron from electrical outlet when filling with or emptying water and when not in use. Be
careful to avoid spilling water over iron when filling.
Do not operate any appliance with a damaged cord or plug or
after the appliance malfunctions or is dropped or damaged in any
manner. If the product requires attention within the warranty period,
call the toll-free number listed in the warranty section of this manual
for information on examination, repair, or electrical or mechanical
adjustment.
To avoid the risk of electric shock, do not disassemble the iron;
instead, take it to an authorized service centre for examination and
repair. Incorrect reassembly can cause risk of electric shock when
the iron is used.
Close supervision is necessary for any appliance being used near
children. Not for use by children. Do not leave iron unattended
while connected or on an ironing board. Always position iron carefully to prevent it from falling if ironing board is accidentally moved
or cord is pulled. Always use heel rest.
If you need to clean the iron, unplug and allow to cool. Use a slightly
damp cloth and wipe down the outside of the iron. Do not use
cleaning agents or place the iron in water or cleaning fluids.
Burns can occur from touching hot metal parts, hot water, or steam.
Use caution when you turn a steam iron upside down or use vertical
Burst of Steam – there may be hot water in the water tank. Avoid
rapid movement of iron to minimize water spillage.
When using Burst of Steam, always direct the steam vents away
from your body and others.
Do not operate in the presence of explosive and/or flammable
fumes.
Do not use iron outdoors.
This product is for household use only, not for commercial or
industrial use.
SPECIAL INSTRUCTIONS
To avoid circuit overload, do not operate another high wattage
appliance on the same circuit. If an extension cord is absolutely
necessary, a 15-ampere rated cord with a polarized plug and CUL,
CSA or NOM approval should be used. Cords rated for less
amperage may overheat. Care should be taken to arrange the cord
so that it cannot be pulled on or tripped over.
SAVE THESE INSTRUCTIONS
Polarized Plug
This appliance has a polarized plug (one blade is wider than the
other). As a safety feature, this plug will fit into a polarized outlet
only one way. If the plug does not fit fully into the outlet, reverse the
plug. If it still does not fit, contact a qualified electrician. Do not
attempt to defeat this safety feature.
05CN1258 DPP3000C IB
11/17/05
11:52 AM
Page 4
Thanks for your purchase of the Conair Digital Steam Iron. We
have used the highest quality materials in the production of this
clothing iron to ensure long-lasting performance.
Please be sure to read the following instructions carefully before
you use your Conair Digital Steam Iron for the first time. Once you
have familiarized yourself with this appliance, please save this
instruction manual for future reference.
Getting To know your Digital Steam Iron
Oversized soleplate covers
more fabric. Curved nose gets
between buttons
1500 watt heater
Anti-Calcium additives
soften water and
extend the life of
the iron
Dual spray
nozzles for
wider coverage
Extra large
12 oz/375 ml
water tank
Burst of Steam
control
Front work light
illuminates wrinkles
(included on some
Conair steam irons)
Water fill
Variable Steam
adjusts steam output
to your ironing needs.
Self Clean setting uses
powerful steam burst
to clean out steam
chamber and improve
performance.
Water spray control
Electronic OneTouch™
control panel on top of
handle puts settings at
your fingertips. Easy to
read display indicates
the fabric setting and
status of the iron.
Power Cord
Clothing Iron Unique Features
This iron has been designed with some new features
not previously available on steam irons. Please take
some time to familiarize yourself with them:
Electronic OneTouch™ Control
This control system provides precision temperature control to greatly
improve fabric-pressing performance.
1 Ready Indicator: Displays one, two, or three dots when the iron has reached the
selected temperature. If there are no dots in this area, the iron is not ready. These dots
correspond to international recommendations for safe pressing temperatures and may
be found on the fabric care label of your garment. For example, one dot matches the
setting for synthetics, 2 dots for silk to wool, 3 dots for wool to linen.
2 Auto Off Indicator: Will blink steadily when iron has not been moved and the
heater has shut down. This indicator will also blink when iron is in Crafter’s Setting
(heel rest/auto shutoff bypass).
3 Message Area: This area of the display will indicate the fabric setting, and will display
alert messages.
4 Steam Indicator: Will appear when the heater is at the right temperature to produce steam (recommended for wool, cotton, and linen settings).
5 Headlamp Indicator: Will appear when headlamp is on.
6 On/Off Button: Use this to turn the appliance on or off. Also used to activate
Crafter’s Setting.
7 Up/Down Arrow Selector Buttons: Use to select the fabric setting for the iron.
8 Headlight On/Off Button: Use this to turn the headlamp on or off.
1
7
3
5
6
8
2
4
05CN1258 DPP3000C IB
11/17/05
11:52 AM
Page 6
setting without shutting off and cooling down. In this setting the
iron will still shut down if left motionless face down or on its side,
or if dropped.
Soleplate
The soleplate on this iron has a curved design at
the tip which makes it much easier to press
between shirt buttons, and around collars and
other details on your garments.
*NOTE: WHEN THIS FEATURE IS ACTIVATED, THE IRON WILL
NOT SHUT OFF IF LEFT MOTIONLESS WHEN RESTING ON ITS
HEEL (SEE IMAGE)
4-way Automatic Shutoff
This iron will shut down if left motionless on its heel, on its side,
facedown or if dropped.
The auto shutoff icon will appear.
If dropped, the iron display will flash. Unplug, and inspect for damage.
Discontinue use if damage is detected.
To activate the Crafters’ Setting:
1. When the iron is turned off, press and hold the power on/off
button for over three seconds.
2. The Auto Off Indicator will blink on and off which indicates that
the heel rest auto shutoff has been disabled.
3. The iron will remain heated at the selected fabric setting until you
power off or unplug the iron.
To disable the Crafters’ Setting
1. Push the on/off button to shut off the iron, and then unplug
the iron.
10 minutes
30 seconds
30 seconds
Instant
Preparing for first use
CordKeeper™
This iron may have been equipped with a
CordKeeper™ for convenient storage of the
power cord. Grasp the cord and slowly pull
out to the length that you need for pressing –
do not pull past the red mark. When you need
to store the iron, grasp the plug with one hand
and push the button on the top of the
CordKeeper™ to retract the cord. Be careful not
to let the cord snap back towards your body.
Crafters’ Setting*
If you are involved in a lengthy craft project
that requires pressing such items as seams,
you can bypass the heel rest/auto shutoff. This
enables the iron to stay heated to the fabric
OPERATING INSTRUCTIONS
Before first use, remove all labels from the soleplate and housing.
Before you use the iron to press fabrics for the first time, heat it to
the highest temperature setting without adding any water (see
“selecting fabric settings”), then turn the iron off, allow to cool, and
unplug iron.
1. Fill the water tank with unsoftened tap water or spring water
a. Open the fill door.
b. Using a clean measuring cup, slowly fill the tank until
the water reaches the “Max” indicator. DO NOT OVERFILL.
c. Close the fill door and wipe off any water that may have
spilled on the outside of the iron with a soft clean cloth.
2. Set the iron on a stable, flat surface when selecting the settings.
We recommend using a quality ironing board as the pressing
surface. Be sure to give yourself enough room to maneuver the iron
when pressing.
Heel Rest
05CN1258 DPP3000C IB
11/17/05
11:52 AM
Page 8
3. Plug the iron into a 120V electrical receptacle. Make sure that
no other high wattage appliances are plugged into the same circuit.
4. Press the power on/off button. You will see the following
message on the display: “Hello, please select fabric setting by
pressing up or down button”.
Selecting Your Fabric/Temperature Setting
5. Press the up or down button to scroll through the fabric settings.
There are seven settings to choose from. Each setting corresponds
to the safest temperature for that fabric:
(lowest to highest) Acrylic, Silk, Rayon, Polyester, Wool, Cotton,
and Linen.
6. When you stop on a particular fabric, i.e. “Cotton”, the iron will
heat to the appropriate temperature to achieve the best pressing
results with that fabric. Once the temperature has been reached, a
set of “dots” will appear in the display. These dots correspond to
fabric care symbols that may be found on the fabric care tag of
your garment. They are:
“One dot” (low); “two dots” (medium); and “three dots” (high)
Adjusting Variable Steam
This iron is capable of both dry pressing and steam pressing. Dry pressing is best for delicate fabrics like silk, that may be damaged by steam.
FABRIC CARE TIP Dry pressing is also a good second step
after steam pressing cotton pants, to achieve a crisp crease.
7. To dry press, set the variable steam lever to the image of steam
with an “x” through it.
8. If steam is desired, you can choose the level of steam that best
suits your fabric and pressing needs. Simply adjust the steam lever
until you get the right amount of continuous steam (Steam pressing
is only recommended for wool, cotton, and linen).
FABRIC CARE TIP For heavy wrinkles or thick fabrics, set the
variable steam lever to maximum steam.
9. The Burst of Steam is used to eliminate tough wrinkles. While
pressing, push the Burst of Steam control to get a maximum steam
shot through the fabric. Too many bursts in a row will cool the soleplate and take the iron out of the appropriate temperature setting.
After a few bursts, check the “dots” display. If the dots are not in the
display, the iron is not at the correct temperature. Please wait until
the dots reappear and then continue pressing.
10. The Cool Spray feature helps eliminate wrinkles. Press the Cool
Spray button to moisten fabric before pressing. When the hot iron
passes over the moist fabric, the water will turn into steam and help
eliminate wrinkles.
Vertical Steam
This iron will help remove wrinkles and freshen garments on hangers,
or draperies, with vertical bursts of steam.
11. Hang the item that you want to treat, such as a suit jacket.
12. Set the iron to the highest setting: linen.
13. Hold the iron with the soleplate facing the fabric, but not
touching it.
14. Press the Burst of Steam button. Make sure the burst of steam is
penetrating the fabric. Repeat until the wrinkles have been removed
or the fabric has been freshened to your taste.
When you have finished pressing or vertical steaming, press the
on/off button and unplug the iron. Be sure to allow the iron to cool
completely before storing in a cabinet or drawer.
Self-Clean System
WARNING
Operating the Self Clean feature will cause hot
water and steam to come out of the soleplate. Hold over sink and
away from the body, as instructed below.
1. Fill the iron to the max fill level with tap water.
2. Place iron on the heel rest.
3. Plug the iron into a 120V outlet.
4. Set temperature to maximum (three dots or linen).
5. When iron indicates that the temperature is ready, unplug the
iron and hold over the sink with the soleplate facing down.
6. Move the variable steam control to the Self Clean position and
hold for 30 seconds.
7. Gently tilt the iron back and forth. USE CAUTION IN THE NEXT
STEP as the soleplate and flushed water and deposits will be very hot.
05CN1258 DPP3000C IB
11/17/05
11:52 AM
Page 10
8. After 30 seconds of Self Clean activation, release the Self Clean
control and place iron on its heel rest.
9. Unplug iron.
10. With a clean soft cloth, wipe soleplate clean of water and
flushed deposits.
Before reusing iron after Self Clean Procedure:
1. Refill water tank
2. Set iron to maximum. When it is ready, operate Burst of Steam
to flush any remaining deposits out of the soleplate.
Automatic Shutoff
This iron is equipped with an automatic shutoff circuit that will shut
down the heater if the iron is left motionless in the following positions for the following time: Heel rest: 10 minutes; face down: 30
seconds; on its side: 30 seconds.
When the automatic shutoff has been triggered, the Auto Shutoff
Indicator will appear in the display. To restart the iron, move it back
and forth. The iron will heat up to the last setting.
If the iron has been knocked off the pressing surface to the floor, the
impact sensor will shut the iron off immediately. If there is no damage, plug in iron and it will function normally.
WARNING
If the iron has been dropped, unplug the iron
and inspect it for damage. If there is obvious damage or if you hear
any loose parts or suspect the iron has been damaged, contact
Conair Customer Service at 1-800-472-7606 to arrange for service. Be extremely cautious if you have dropped the iron. Until
unplugged exposed electrical components could cause an electric
shock, serious injury or death.
TROUBLESHOOTING
Iron does not heat
• Make sure that the iron is plugged in and turned on. Make sure
to select a fabric.
• The automatic shutoff may have activated: Move the iron to reset
and begin heating.
Iron does not steam
• The iron will only produce steam at the highest settings (Wool,
Cotton, Linen). Make sure the iron is set to one of those.
• The variable steam control must not be set to the “no steam“ setting.
Move the variable steam control to one of the steam settings.
• Make sure the water tank is full.
• After many months of use in a very hard water environment, the
steam chamber can become clogged with hard mineral deposits,
which may block steam production. Follow the self-clean procedure
to eliminate some of the deposits from the steam chamber.
Water leaks from the soleplate
• Make sure that you are using the Burst of Steam in the higher
settings, If not, the iron will not be hot enough to produce steam.
• When storing the iron turn the variable steam knob to “no steam”
setting. Try to store the iron sitting on the heel rest.
Iron is flashing and beeping
• Unplug and inspect for damage
• If there is no damage, plug iron in and iron will operate normally.
05CN1258 DPP3000C IB
11/17/05
11:52 AM
Page 12
LIMITED ONE YEAR WARRANTY
MD
Conair will repair or replace (at our option) your unit free of charge for
12 months from the date of purchase if the appliance is defective in
workmanship or materials.
To obtain service under this warranty, return the defective product to the
service centre listed below, together with your purchase receipt and $7.50
for postage and handling. In the absence of a purchase receipt, the
warranty period shall be 12 months from the date of manufacture.
ANY IMPLIED WARRANTIES, OBLIGATIONS, OR LIABILITIES,
INCLUDING BUT NOT LIMITED TO THE IMPLIED WARRANTY
OF MERCHANTABILITY AND FITNESS FOR A PARTICULAR
PURPOSE, SHALL BE LIMITED IN DURATION TO THE 12
MONTH DURATION OF THIS WRITTEN, LIMITED WARRANTY.
FER À VAPEUR NUMÉRIQUE
P
R
O
F
E
S
S
I
O
N
n
e
Guide d’utilisation
IN NO EVENT SHALL CONAIR BE LIABLE FOR ANY SPECIAL,
INCIDENTAL, OR CONSEQUENTIAL DAMAGES FOR BREACH
OF THIS OR ANY OTHER WARRANTY, EXPRESS OR IMPLIED,
WHATSOEVER.
This warranty gives you specific legal rights, and you may also have other
rights, which vary from province to province.
SERVICE CENTRE:
CONAIR CONSUMER PRODUCTS INC.
156 Parkshore Drive,
Brampton, Ont. L6T 5M1
1-800-472-7606
Visit our Web site at: www.conaircanada.ca
©2005 CONAIR CONSUMER PRODUCTS INC.
05CN1258
Séries DPP3000 / DPP4000
7 options de température LCD
IB-5865
Afin que votre appareil vous procure en toute sécurité
des années de satisfaction, lisez toujours soigneusement
le guide d’utilisation avant de l’utiliser.
l