1
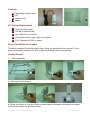
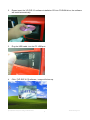
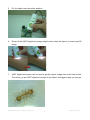
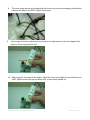
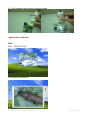
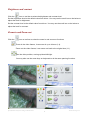
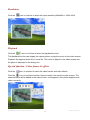
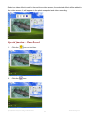
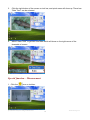
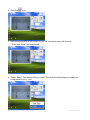
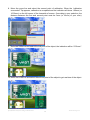
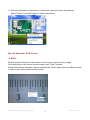
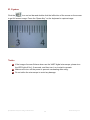
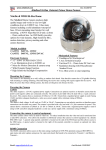
Digital Microscope
DMC-1113
User Manual
Features
VAST digital microscope provides 10~200X adjustable magnification range. The build-in
high-performance white LED can illuminate the object without using any auxiliary light. Adjust
focus knob on the flank, the magnified image can be seen, captured and recorded from
computer screen with VGA (640x480) & SXGA (1280X1024) resolution directly.
Specifications
Image Sensor:
1/4” Color CMOS image sensor
Effective Pixels:
1280 (H) x 1024 (V) pixels
Signal Output:
Serial data for USB standard compliant 2.0
Light Control:
Automatic Gain Control (AGC)
Magnification:
10X~200X
Snap Shot Mode:
Software controllable
Power Source:
5VDC, 110mA (AVG.) through USB port
O/S:
Windows XP SP2 and VISTA
CE, FCC and RoHS Compliant
Applications
Skin Check
Scalp Check
Industrial Inspection e.g. Printing Circuit Board(PCB)inspection,
Electronics device inspection
Visual Assistance
Printing Inspection
Textile Inspection
Paper money Inspection
Jewelry Inspection
Science Learning
Specifications subject to change without notice.
VAST Technologies Inc.
1
Contents
Digital Microscope Device
CD
User manual
Stand
PC System Requirement
Pentium 4 Class CPU
128 MB of system RAM
One USB 2.0 port or above
VGA system with at least 16bit color support
UVC: Windows XP SP2 or above
Driver Installation Procedure
This device supports “Universal Video Class” driver, no additional driver required. Plug in
device and system (Windows XP SP2 or above) will install driver automatically.
Getting Started
1.
Stand assembly:
a.) Push and Lock the stand.
b.) Press the holder, pull up and down to adjust distance between microscope and object.
c.) Place microscope on the stand holder.
Specifications subject to change without notice.
VAST Technologies Inc.
2
2.
Please insert the VP-EYE 6.0 software installation CD into CD-ROM drive, the software
will install automatically.
3.
Plug the USB cable into the PC USB port.
4.
Click 【VP-EYE 6.0】software, image will show up.
Specifications subject to change without notice.
VAST Technologies Inc.
3
5.
Put the object near the center position.
6.
Please tilt the VAST digital microscope slightly when close the object, in order to get 3D
image.
7.
VAST digital microscope can be used to get the proper image size as the user’s wish.
The closer you put VAST digital microscope to the object, the bigger image you can get.
Specifications subject to change without notice.
VAST Technologies Inc.
4
8.
9.
The clear image can be got by adjusting the focus knob as well as changing the distance
between the object and VAST digital microscope .
If the image is blurred, adjust the focus knob to the right end and view the image of the
object in lower magnification first.
10. When magnify the image of the object, adjust the focus knob slightly to the left and move
VAST digital microscope up and down until a clear image shows up.
Specifications subject to change without notice.
VAST Technologies Inc.
5
11. If the object is lumpy or a higher magnification (bigger image) is unnecessary, lift VAST
digital microscope a little bit and adjust the focus knob to the right slightly until a clear
image shows up.
12. If the object is too dark or bright, adjust the light knob to get the light you need. Turn right
to get brighter light and left to get darker light.
13. When use high magnification or observe the specific area of the object, we suggest user
placing the VAST digital microscope on the stand holder to get clear image.
Specifications subject to change without notice.
VAST Technologies Inc.
6
14. Use hardware snap button to capture image.
Application Software
Start
Click 【VP-EYE 6.0】
Then image will show up.
Specifications subject to change without notice.
VAST Technologies Inc.
7
Function Key lists:
Enter the tools window
Enter this users guide
Close this program
Select the snapshot and recording functions
Select the brightness and contrast level
Select the zoom-in and zoom-out functions
Select the input resolution for the video camera
Select the playback function
Select the video frames and video effects
Snapshot and recording
Click the
icon on tool bar to snapshot and recording
Specifications subject to change without notice.
VAST Technologies Inc.
8
Brightness and contrast
Click the
icon on tool bar to select the brightness and contrast level.
Set the brightness level to the default value from driver. You may use the scroll bar on the below to
adjust the level for brightness.
Set the contrast level to the default value from driver. You may use the scroll bar on the below to
adjust the level for contrast.
Zoom-in and Zoom-out
Click the
icon on tool bar to select the zoom-in and zoom-out functions
Zoom-in the video frames, it can zoom-in up to 4 times (1:4).
Zoom-out the video frames, it can zoom-out back to the original size (1:1).
Pan the video position, moving up/down/left/right.
You may also use the arrow keys on keyboard to do the same panning functions.
Specifications subject to change without notice.
VAST Technologies Inc.
9
Resolution
Click the
icon on tool bar to select the input resolution(640x480 or 1280x1024).
Playback
Click the
icon on tool bar to select the playback function.
The playback function can display the capture photo or play the movie on the video screen.
Playback the capture photo file or movie file. The movie is played in the video screen and
the photo is displayed in the dialog box.
Special function -Video frames & effects
Click the
icon on tool bar to select the video frames and video effects
Click the
icon on tool bar to select a frame to add in the real-time video screen. The
selected frame will be added in the video screen. It will appear in the photo snapshot and
video recording.
Specifications subject to change without notice.
VAST Technologies Inc.
10
Select an video effect to add in the real-time video screen, the selected effect will be added in
the video screen. It will appear in the photo snapshot and video recording.
Special function - Time Record
1.
Click the
icon on tool bar.
2.
Click the
icon.
Specifications subject to change without notice.
VAST Technologies Inc.
11
3.
Click the right button of the mouse on tool bar, and quick menu will show up. There has
“Date Time” can be selected.
4.
Select “Data Time” to get time and date which will show on the right corner of the
downside of screen.
Special function - Measurement
1. Click the
icon on tool bar.
Specifications subject to change without notice.
VAST Technologies Inc.
12
2. Click the
icon.
3. Click the right button of the mouse on tool bar, and quick menu will show up.
There has “Ruler” can be selected.
4. Select “Ruler”. The default setting is “pixel”. Please follow below steps to change the
measurement unit to “mm”.
Specifications subject to change without notice.
VAST Technologies Inc.
13
5. Please put a ruler near the center position of VAST digital microscope.
6. Click the right button of the mouse on the screen and quick menu will show up. Select
“Calibrate 1mm” (or “Calibrate 10mm”.)
7. When the “Tip” appears, move the cross line and select the first point of calibration.
Specifications subject to change without notice.
VAST Technologies Inc.
14
8. Move the cross line and select the second point of calibration. When the “calibration
succeeded” Tip appears, calibration is completed and the indication will show 1.00mm (or
10.00mm) on the left corner of the downside of screen. (According to your selection, the
distance between the first and second point must be 1mm (or 10mm) of your ruler).
9. Move the cross line and select the first point of the object, the indication will be “0.00 mm”.
10. Move the cross line and select the second point of the object to get real size of the object.
Specifications subject to change without notice.
VAST Technologies Inc.
15
11. Click the right button of the mouse on the screen, and quick menu will show up.
Select”Freeze” to get still image for further observation.
Special function--Full Screen
A. Ruler
Double click the left button of the mouse on the screen to get full screen image.
Click right button of the mouse on the screen to get “Ruler” function.
Please follow above calibration steps to calibrate the “Ruler” again when exit different mode,
in order to get correct measurement function.
Specifications subject to change without notice.
VAST Technologies Inc.
16
B. Capture
Click the
icon on tool bar and double click the left button of the mouse on the screen
to get full screen image. Press the “Space Key” on the keyboard to capture image.
Notice
If the image of screen flickers when use the VAST digital microscope, please turn
the LED light off for 1-2 seconds, and then turn it on to start to operate.
Make sure to turn off the power to prevent overheating after using.
Do not strike the microscope to avoid any damage.
Specifications subject to change without notice.
VAST Technologies Inc.
17