1
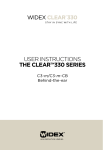
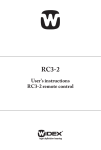
USER INSTRUCTIONS SCOLA™ FM SYSTEM SCOLA BUDDY 2 CONTENTS INTRODUCTION . . . . . . . . . . . . . . . . . . . . . . . . . . . . . . . . . . . . . . . . PACKAGE CONTENTS. . . . . . . . . . . . . . . . . . . . . . . . . . . . . . . . . . . THE SCOLA SYSTEM . . . . . . . . . . . . . . . . . . . . . . . . . . . . . . . . . . . . SCOLA BUDDY RECEIVER. . . . . . . . . . . . . . . . . . . . . . . . . . . . . OVERVIEW OF BUTTONS, LEDS AND JACKS. . . . . . . . . . . . GETTING SCOLA BUDDY READY TO USE: . . . . . . . . . . . . . . CHARGING THE DEVICE FOR THE FIRST TIME. . . . . . . . . . . . . BATTERY LED AND ACOUSTIC INDICATORS. . . . . . . . . . . . OPERATION. . . . . . . . . . . . . . . . . . . . . . . . . . . . . . . . . . . . . . . . . . . . RECEIVING ON THE TRANSMITTER CHANNEL . . . . . . . . . . CONNECTING TO THE FM TRANSMITTER. . . . . . . . . . . . . . . ACOUSTIC INDICATORS. . . . . . . . . . . . . . . . . . . . . . . . . . . . . . . . . RANGE OF THE FM SIGNAL. . . . . . . . . . . . . . . . . . . . . . . . . . . . . . CUSTOMISING YOUR SCOLA BUDDY. . . . . . . . . . . . . . . . . . . . . CHANGING THE COLOUR. . . . . . . . . . . . . . . . . . . . . . . . . . . . . APPLYING STICKERS. . . . . . . . . . . . . . . . . . . . . . . . . . . . . . . . . SPECIAL CONFIGURATIONS. . . . . . . . . . . . . . . . . . . . . . . . . . . EXTENDED USE / ADDITIONAL INFORMATION . . . . . . . . . . . RECHARGEABLE BATTERY. . . . . . . . . . . . . . . . . . . . . . . . . . . . CONNECTING DEVICES TO THE AUDIO INPUT. . . . . . . . . . CHANNEL SYNCHRONISATION. . . . . . . . . . . . . . . . . . . . . . . . CONNECTING HEADPHONES TO THE AUDIO OUTPUT (SPECIAL SETTING). . . . . . . . . . . . . . . . . . . . . . . . . . . . . . . . . . TIPS FOR USING THE SCOLA FM SYSTEM . . . . . . . . . . . . . . . . GETTING STARTED . . . . . . . . . . . . . . . . . . . . . . . . . . . . . . . . . . CARE AND MAINTENANCE . . . . . . . . . . . . . . . . . . . . . . . . . . . . . . WARNINGS. . . . . . . . . . . . . . . . . . . . . . . . . . . . . . . . . . . . . . . . . . . . . IF THE SCOLA FM SYSTEM DOES NOT WORK . . . . . . . . . . . . . WARRANTY. . . . . . . . . . . . . . . . . . . . . . . . . . . . . . . . . . . . . . . . . . . . REGULATORY INFORMATION. . . . . . . . . . . . . . . . . . . . . . . . . . . . SYMBOLS. . . . . . . . . . . . . . . . . . . . . . . . . . . . . . . . . . . . . . . . . . . . . . SETTINGS . . . . . . . . . . . . . . . . . . . . . . . . . . . . . . . . . . . . . . . . . . . 3 4 5 7 7 8 9 12 13 14 14 14 16 17 18 18 20 20 21 21 22 23 25 26 26 29 30 31 34 36 41 44 INTRODUCTION Our mission at Widex is to give people with hearing loss the same opportunities for communication as people with normal hearing. A Widex hearing aid combined with the SCOLA™ FM system helps optimise listening comfort and speech comprehension. SCOLA provides hearing aid users with additional opportunities in difficult listening situations. This FM system has been specifically developed for children and educational environments, and these instructions therefore primarily address parents and teachers. WARNING This booklet contains important information and instructions. Please read this booklet carefully before you start using the FM system. NOTE The FM system and accessories shown in these user instructions may differ from the ones you have. We also reserve the right to make any changes considered necessary. 4 PACKAGE CONTENTS The SCOLA BUDDY incl. a set of covers Box 1 Charger Box 2 1. Audio cable 2. USB cable 1. 2. 5 Box 3 2 sets of extra covers User instructions 6 THE SCOLA SYSTEM Using this FM system requires a SCOLA BUDDY receiver and a SCOLA transmitter, which can either be a SCOLA TALK or a SCOLA TEACH. The SCOLA BUDDY receiver and the transmitter must be set to the same channel to work correctly. SCOLA BUDDY RECEIVER In SCOLA BUDDY’s standard mode, hearing aids with telecoils are required, such as BTE or ITE models, bone-anchored hearing aids or cochlear products. The hearing aid programme must be set to either the MT or the T programme. NOTE Hearing aids without a telecoil will NOT work with SCOLA BUDDY. SCOLA BUDDY can also receive FM signals from other FM transmitters, as long as the same channel/ frequency is used for transmitting and receiving. SCOLA BUDDY may be connected to devices such as MP3 players using the audio cable. If SCOLA BUDDY is configured to the headphone mode, headphones should be used rather than hearing aids. 7 OVERVIEW OF BUTTONS, LEDS AND JACKS Inductive neck loop Removable colour covers, front and rear Battery LED FM LED Loop connector Volume down Charging jack, mini USB Volume up Audio jack 3.5 mm 8 On/off and scan button GETTING SCOLA BUDDY READY TO USE: Set your hearing aid(s) to MT or T (according to the user’s instructions for your hearing aid). The SCOLA BUDDY device must be worn around the neck. Pull it over your head or open the neck loop at the connector. The plug opens easily to prevent any kind of injury. 9 Switch on (and off): Press and hold (1 sec.) the power ON/OFF button. The battery LED will glow green if the battery has been sufficiently charged. To switch OFF, press and hold the power ON/OFF button (1 sec.). The battery LED will turn off. 10 Check the loop connection Increase or decrease the volume using the volume buttons, and listen as the beeps in the hearing aid grow louder or quieter. 11 CHARGING THE DEVICE FOR THE FIRST TIME Connect the charger to the mains supply. Plug the charger’s plug into the charging jack. The battery LED glows constant red. Alternatively, the USB cable may be used to connect the device to a PC. Wait until the battery LED begins to flash green. Remove the charger from the mains supply, and take out the charger plug. After charging, SCOLA BUDDY is switched off. Charging for the first time takes about 10 hours. Rechargings take about 4 hours. 12 BATTERY LED AND ACOUSTIC INDICATORS Battery OK Constant green Battery almost empty needs recharging Red flashing. Warning beeps (high-low) every 2 minutes Charging Constant red Charging completed Green flashing 13 OPERATION RECEIVING ON THE TRANSMITTER CHANNEL SCOLA BUDDY should be placed around the neck and the hearing instruments set to the MT or the T programme. CONNECTING TO THE FM TRANSMITTER Switch on SCOLA BUDDY. Both LEDs flash briefly, indicating that its self-test result is OK. A green light in the LED indicates the power is on. 14 Switch on the FM transmitter (SCOLA TALK or SCOLA TEACH). If the FM LED is off, press the SCAN button (same as the ON/ OFF button) and the device will find the transmitting channel. When SCOLA BUDDY is receiving the FM signal, the FM LED will be green. When speaking into the FM transmitter’s microphone, the speech must be audible in the hearing aid. Press the ▼ or ▲ button to adjust the volume up or down to an appropriate reception volume. Alternatively, hold the button down for rapid adjustment. The device will remember the setting after switch-off. 15 ACOUSTIC INDICATORS After switching on, a start-up jingle will indicate connection to the hearing aid. Adjusting the volume up or down: • High or low-pitched beeps are heard during volume adjustment. • At maximum or minimum volume setting, the beep tone will be constant. Channel scanning: During channel scanning, brief “scanning beeps” indicate that the channel scan is in progress. • A double beep indicates that a transmitting channel has been found. • A long beep indicates that no transmitting channel can be detected. 16 RANGE OF THE FM SIGNAL The distance between the transmitter and the SCOLA BUDDY receiver can be up to 15 metres, depending on various factors, such as whether the device is being used indoors or outdoors. If the signal gets too weak or noisy, the FM LED will switch off. NB: Due to the nature of the FM signal, drop-outs may occur in the FM signal at certain spots within its range. Try to avoid being located in these “dead” spots. 17 CUSTOMISING YOUR SCOLA BUDDY CHANGING THE COLOUR SCOLA BUDDY is supplied with covers in black, white and blue. There is a front and a rear cover in each colour. You can change these covers individually, but remember to choose the cover with the LED symbols for the side of the SCOLA BUDDY unit where the LEDs are placed. To remove a cover: Lift off the cover from the top, using the nail grip in the middle. 18 Lift out the cover from the two holes in the bottom. To attach a cover: First, attach the cover at the bottom, locating the two locks in the holes in the unit. Next, click and fasten the cover at the top. 19 APPLYING STICKERS You can also personalise your SCOLA BUDDY by placing small stickers on the covers. This is very popular among children, in particular, but remember not to place the stickers over the LEDs. When removing the stickers, first remove the c overs from the SCOLA BUDDY unit, then clean the covers with warm water. (Alcohol must NOT be used). SPECIAL CONFIGURATIONS The SCOLA BUDDY device is very flexible and can be configured in many different ways. Channels can be installed/removed, various frequencies for beep tones are available, and the LEDs can be permanently switched off. All of the special settings can be configured by your SCOLA provider. 20 EXTENDED USE / ADDITIONAL INFORMATION RECHARGEABLE BATTERY Fully charged, the battery will last for about ten hours. To charge the battery, use the charger included or connect the USB cable to a PC to use the PC as the charging supply. When the battery is fully charged (the battery LED flashes green), it will NOT harm the battery if the charger remains connected. When the FM transmitter is switched off or out of range (the FM LED turns off), SCOLA BUDDY will switch to its “sleep mode” to save battery power. As soon as the FM signal is received again, it will “wake up”. NOTE The built-in battery is not replaceable. In case of battery malfunction, contact your SCOLA provider. 21 CONNECTING DEVICES TO THE AUDIO INPUT You can listen to mobile audio devices such as MP3 players, mobile phones, etc., by connecting these to the audio input. Connect the audio cable to the 3.5 mm jack socket in the SCOLA BUDDY unit. The FM reception will be interrupted. Connect the other jack of the audio cable to the audio unit. Adjust the volume on the SCOLA BUDDY to an appropriate level. The setting will be remembered SCOLA BUDDY device after switch-off. by the The volume setting is specific for the audio input, and will not affect the volume setting of the FM signal. 22 CHANNEL SYNCHRONISATION Using SCOLA TEACH With the SCOLA TEACH transmitter, it is possible to manually, but remotely, synchronise the SCOLA BUDDY’s receiving channel with the transmitting channel. Synchronise the channels as described in the user’s instructions for SCOLA TEACH. Even if the receiving channel is not within the standard channel range for the SCOLA BUDDY unit, it will still be possible to set it to any channel used by the SCOLA TEACH device. SCOLA BUDDY can be configured either to start up on the channel last used, or on a specific channel. The default setting is the “last used” channel. 23 Using SCOLA CLASSMATE Using SCOLA CLASSMATE, the classroom synchroniser, it is possible to remotely and automatically synchronise the SCOLA BUDDY’s receiving channel to the channel used in the classroom. For further information, please see the user’s instructions for SCOLA CLASSMATE. A beep indicates successful channel synchronisation. 24 CONNECTING HEADPHONES TO THE AUDIO OUTPUT (SPECIAL SETTING) NB: The following setting is only possible when SCOLA BUDDY is configured using a SCOLA PROGRAMMER at your SCOLA provider. SCOLA BUDDY can be supplied with the 3.5 mm jack socket configured as an output, for use with standard headphones. In this case, when the headphones are connected, the FM signal will be routed to the audio output instead of to the telecoil. Without headphones connected, the tele-loop function will be active. Connect the headphones to the 3.5 mm jack socket in the SCOLA BUDDY unit. With the FM transmitter switched on and receiving on the correct channel, listen to the FM signal in the headphones. Adjust the volume on the SCOLA BUDDY to an appropriate level. The setting will be remembered by the SCOLA BUDDY device after switch-off. The volume setting is specific for the headphone output, and will not affect other settings. 25 TIPS FOR USING THE SCOLA FM SYSTEM GETTING STARTED SCOLA BUDDY is primarily intended for use in educational institutions, but can naturally also be used in other locations where noise, poor acoustics or other factors restrict speech comprehension. To get the best out of the SCOLA system, it is important to do the following: 1. Practise using FM, and try out various listening situations in secure surroundings. This obviously also applies to the parents and teachers of a hearing impaired child. 2. Inform others that you are using an FM system for your hearing aids, so that they understand why they may have to speak into a microphone. Talk to the teacher or lecturer in advance; tell him or her that you are a hearing aid user and explain the way that SCOLA works. Check that the settings and the use of accessories with both SCOLA BUDDY and SCOLA TEACH/SCOLA TALK are correct. In the following, we have compiled a list of various listening situations and recommended settings for the FM system and hearing aids: 26 Listening Use of SCOLA situation BUDDY and transmitters Possible settings for the hearing aid’s telecoil programmes Kinder garten Ask the teacher to use the SCOLA transmitter and to place the micro phone as described in the instructions. Teaching In group work situations, or where there are several teachers, we recommend the use of SCOLA TEACH with the Team Teach function. For younger children, we mainly recommend that the hearing aid is set to microphone and telecoil (MT), so that the child can hear both his or her own speech and that of others. Lectures 1. Check that there is no interference from any other FM systems on the channel to which the system is set. Find and set both transmitter and receiver to a noisefree channel. 2. Explain to the speaker how the SCOLA transmitter works. Ask the speaker to place the microphone as close as possible to his or her mouth. 27 If there is a lot of noise in the room, and you only want to hear the teacher or speaker, it can be beneficial to set the telecoil programme to telecoil alone (T). If there is less noise, and you also want to hear what is being said around you, select the MT programme. Listening Use of SCOLA situation BUDDY and transmitters Possible settings for the hearing aid’s telecoil programmes At home The SCOLA transmitter can be connected to the TV, PC, etc. using the audio cable. You can also speak into the microphone at the same time; the speech is transmitted together with the music. If you have the Team Teach version of SCOLA TEACH and an additional FM microphone, such as a SCOLA TALK, both parents can communicate with the child via FM. In the car The SCOLA system is particularly effective in the car. However, some cars’ electrical systems can interfere with the hearing aid’s telecoil reception. If, as a passenger, you wish to listen to some music from, for example, an MP3 player, it can be used in the same manner as described above (under “At home”) 28 If it is only necessary for the child to hear the parent, select the hearing aid’s T programme. CARE AND MAINTENANCE In relation to maintenance, the same advice applies to the SCOLA FM system as to hearing aids. It is a good idea to clean the system every day and remove dirt and dust from the whole FM system. In addition, there are some special precautions: • Remove any dirt from the SCOLA BUDDY using a soft, dry cloth. • Do not take apart the SCOLA BUDDY or the hearing aid, as this will invalidate the warranty. • Never clean the FM system with water, alcohol or the like (with the exception of the SCOLA BUDDY front and rear covers). • Avoid knots in leads and cables. • Avoid exposing the SCOLA system to cosmetics, hairsprays, water, detergents or other chemicals. 29 WARNINGS WARNING •Always ensure that the batteries for the hearing aids and SCOLA TEACH or SCOLA TALK are out of reach of small children, who might put them in their mouths. Do not change the batteries in front of children, and do not let them see where you store your batteries. •All batteries must be disposed of in accordance with the relevant environmental rules. •If the SCOLA FM system is used in conjunction with any equipment which is connected to an electrical outlet, the safety regulations for this equipment, as set out in the IEC 60065 standard, must be followed. •Do not switch on the SCOLA transmitter in hospitals, aircraft, etc., where it may interfere with other electronic equipment. NOTE Avoid setting several FM transmitters to the same channel/frequency in the same area. Note that there is a risk of interference from other radio services, especially if the system is used abroad. When travelling abroad, be aware that the use of certain channels may be illegal in some countries. CAUTION Be aware that what is transmitted from SCOLA transmitters may be picked up by other FM equipment. 30 IF THE SCOLA FM SYSTEM DOES NOT WORK On the following pages are some tips on what to do if the SCOLA system fails to work as it should. Check the following before contacting your SCOLA system provider: If there is no sound from SCOLA BUDDY or the audio equipment, or if the sound is distorted, it may be because: The hearing aid, SCOLA BUDDY or SCOLA transmitter is not receiving enough electrical power. Check that both the transmitter and receiver are turned on, with power from all batteries. Recharge, if necessary, the batteries for the SCOLA transmitter or SCOLA BUDDY, and replace the hearing aid batteries. SCOLA TEACH and SCOLA BUDDY are not set to the same channel. Check that the SCOLA BUDDY’s FM LED is on, and that there is an FM signal to it from the correct transmitter (e.g. turn off the transmitter and check that the LED goes off). If not, select another channel. The plug on the SCOLA BUDDY neck loop is not properly connected. Clean the plug with a soft cloth, and check that the beep tones sound correctly when the volume control is adjusted up or down. The earmould or the tube is blocked. Check that the tube and earmould are securely connected, and see whether wax, moisture or other debris is blocking the earmould or tube. 31 If there is noise in the hearing aid, it may be because: You are outside the range of the transmitter, or at its periphery. Reduce the distance between the transmitter and the SCOLA BUDDY. The hearing aid is set to the telecoil programme (T position), and the FM microphone signal or the signal from the audio equipment is weak or interrupted. Set the hearing aid to the MT programme. Check that the SCOLA transmitter is switched on, place it closer to the person speaking, or turn up the audio signal. Reception is impaired or blocked by noise or whistling, possibly because two or more FM transmitters are transmitting on the same channel on which you are receiving (interference). Try turning off the SCOLA transmitter. If you can then hear a second FM signal, this is what is causing the noise. There are three possible ways to prevent interference: 1. Only have one FM transmitter turned on. 2. Switch to a vacant channel and set/synchronise both the SCOLA transmitter and the SCOLA BUDDY to this channel. 3. Increase the distance to the interfering FM transmitter, so that the range becomes so great that the transmitted signals do not interfere with one another. 32 If the SCOLA BUDDY is connected to audio equipment, but no sound can be heard from it: Check that the plug of the audio cable is properly connected to the audio input of the SCOLA BUDDY or audio equipment. Ensure that both connectors are secure. The signal from the audio equipment is too weak. Turn up the volume of the audio signal using the volume control of the audio equipment, if possible. If the batteries have been charged, but the battery LED does not show that the batteries have been recharged, this may be because: There is no power in the power outlet. Check that the outlet works. The charger, cable or plug may be defective. Contact your SCOLA FM system supplier. 33 WARRANTY The product is supplied with a two-year international warranty. The warranty covers all defects in materials and workmanship. Faults which arise due to mishandling or repair by unauthorised persons are not covered by the warranty. SERIAL NUMBER We recommend that you write down the apparatus serial number at the end of this guide. 34 SAFETY WARNING: This device can be powered by an external power supply. • Only connect a power supply that is compatible with the SCOLA BUDDY. • The power supply must have an output rating of 5VDC, 200mA and mini USB connector. • The power supply input rating voltage must match the mains power voltage in your region and the power supply must have a mains male plug that is compatible with the AC wall outlet in your region. • The power supply must be certified for ITE use and must have the certification marks from an agency acceptable in your region. Widex strongly recommends that you always use a power supply that is delivered by your Widex Distributor to ensure safe and efficient use of your SCOLA BUDDY. 35 REGULATORY INFORMATION Directive 1999/5/EC Hereby, Widex A/S declares that this SCOLA BUDDY is in compliance with the essential requirements and other relevant provisions of Directive 1999/5/EC. A copy of the Declaration of Conformity according to 1999/5/EC can be found at: http://www.widex.com/doc 36 FCC ID: U28NAU01 IC: 5676B-SBU Federal Communications Commission Statement This device complies with part 15 of the FCC Rules. Operation is subject to the following two conditions: (1) This device may not cause harmful interference, and (2) this device must accept any interference received, including interference that may cause undesired operation. NOTE: This equipment has been tested and found to comply with the limits for a Class B digital device, pursuant to part 15 of the FCC Rules. These limits are designed to provide reasonable protection against harmful interference in a residential installation. This equipment generates, uses and can radiate radio frequency energy and, if not installed and used in accordance with the instructions, may cause harmful interference to radio communications. However, there is no guarantee that interference will not occur in a particular installation. If this equipment does cause harmful interference to radio or television reception, which can be determined by turning the equipment off and on, the user is encouraged to try to correct the interference by one or more of the following measures: — Reorient or relocate the receiving antenna. — Increase the separation between the equipment and receiver. 37 —C onnect the equipment into an outlet on a circuit different from that to which the receiver is connected. — Consult the dealer or an experienced radio/TV technician for help. NOTE: This equipment complies with FCC radiation exposure limits set forth for an uncontrolled environment. This transmitter must not be co-located or operating in conjunction with any other antenna or transmitter. Changes or modifications to the equipment not expressly approved by Widex could void the user’s authority to operate the equipment. Industry Canada Statement / Déclaration d’industrie Canada Under Industry Canada regulations, this radio transmitter may only operate using an antenna of a type and maximum (or lesser) gain approved for the transmitter by Industry Canada. To reduce potential radio interference to other users, the antenna type and its gain should be so chosen that the equivalent isotropically radiated power (e.i.r.p.) is not more than that necessary for successful communication. This device complies with Industry Canada licenceexempt RSS standard(s). Operation is subject to the following two conditions: 38 (1) this device may not cause interference, and (2) this device must accept any interference, including interference that may cause undesired operation of the device. Conformément à la réglementation d’Industrie Canada, le présent émetteur radio peut fonctionner avec une antenne d’un type et d’un gain maximal (ou inférieur) approuvé pour l’émetteur par Industrie Canada. Dans le but de réduire les risques de brouillage radioélectrique à l’intention des autres utilisateurs, il faut choisir le type d’antenne et son gain de sorte que la puissance isotrope rayonnée équivalente (p.i.r.e.) ne dépasse pas l’intensité nécessaire à l’établissement d’une communication satisfaisante. Le présent appareil est conforme aux CNR d’Industrie Canada applicables aux appareils radio exempts de licence. L’exploitation est autorisée aux deux conditions suivantes : (1) l’appareil ne doit pas produire de brouillage, et (2) l’utilisateur de l’appareil doit accepter tout brouillage radioélectrique subi, même si le brouillage est susceptible d’en compromettre le fonctionnement. 39 lectrical and electronic equipment (EEE) E contains materials, components and substances that can be hazardous and present a risk to human health and the environment when waste electrical and electronic equipment (WEEE) is not handled correctly. Do not dispose of hearing aids, hearing aid accessories and batteries with ordinary household waste. Hearing aids, batteries and hearing aid accessories should be disposed of at sites intended for waste electrical and electronic equipment, or given to your hearing care professional for safe disposal. Proper disposal helps to protect human health and the environment. 40 SYMBOLS Symbols commonly used by Widex A/S in medical device labelling (labels/IFU/etc .) Symbol Title/Description Manufacturer The product is produced by the manufacturer whose name and address are stated next to the symbol . If appropriate, the date of manufacture may also be stated . Date of manufacture The date when the product was manufactured . Use-by date The date after which the product is not to be used . Batch code The product’s batch code (lot or batch identification) . Catalogue number The product’s catalogue (item) number . Serial number The product’s serial number .* Keep away from sunlight The product must be protected from light sources and/or The product must be kept away from heat 2 41 Symbol Title/Description Keep dry The product must be protected from moisture and/or The product must be kept away from rain Lower limit of temperature The lowest temperature to which the product can be safely exposed . Upper limit of temperature The highest temperature to which the product can be safely exposed . Temperature limits The highest and lowest temperatures to which the product can be safely exposed . Consult instructions for use The user instructions contain important cautionary information (warnings/precautions) and must be read before using the product . Caution/Warning Text marked with a caution/warning symbol must be read before using the product . WEEE mark “Not for general waste” When the product is to be discarded, it must be sent to a designated collection point for recycling and recovery . 3 42 Symbol Title/Description CE mark The product is in conformity with the requirements set out in European CE marking directives . Alert The product is identified by R&TTE Directive 1999/5/EC as an equipment Class 2 product with some restrictions on use in some CE member states . C-Tick mark The product complies with EMC and radio spectrum regulatory requirements for products supplied to the Australian or New Zealand market . Interference Electromagnetic interference may occur in the vicinity of the product . *The six- or seven-digit number on the product is the serial number . Serial numbers may not always be preceded by 4 43 SETTINGS Serial number:________________________ Gain adjustment:______________________ Starting channel:______________________ Channel scan possible: yes [ ] 44 no [ ] 45 46 47 WIDEX A/S Nymoellevej 6, DK-3540 Lynge, Denmark www.widex.com Manual no.: 9 514 0151 001 #03 Issue: 2014-09 É[5qr0q5|a;;a;a]