1
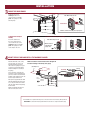
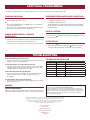
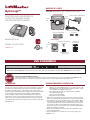
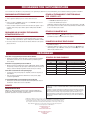
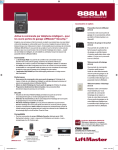
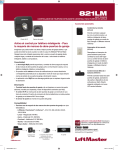
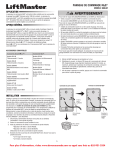
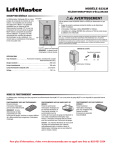
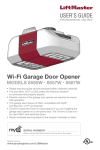
CARTON INVENTORY
MyQ Garage™
NOT SHOWN: Installation Guide and Wi-Fi Setup Card for the customer
Wi-Fi Hub
UNIVERSAL SMARTPHONE
GARAGE DOOR CONTROLLER
Power Cord for W-Fi Hub
Light
LEDs
Bracket for Wi-Fi Hub
Hardware for Wi-Fi Hub
(long screws)
Door Sensor
Model 821LM
LED
Hardware for Door Sensor
(short screws)
Test
Button
INSTALLATION GUIDE
myLiftMaster.com
Fastening Strips for
Door Sensor
Warning Placard
OVERVIEW
To reduce the risk of SEVERE INJURY to persons:
• DO NOT enable the MyQ Garage™ if operating either one-piece or swinging doors. To be enabled ONLY on a sectional door.
STOP
Read instructions thoroughly BEFORE beginning.
If using this product with residential door openers, this product must be used only with door openers manufactured after 1993 that utilize photoelectric
sensors. The photoelectric sensors are always located on or near the bottom of the door track.
INTRODUCTION
PRE-INSTALLATION REQUIREMENTS
Thank you for your purchase of the 821LM MyQ Garage™. This product is designed to
connect to your current garage door opener through your existing Wi-Fi® connection and
allow you to remotely monitor and control the status of your door using a smartphone,
tablet or PC. In addition to remotely controlling your garage door, this product will also
allow you to control interior lighting when programmed to any MyQ® enabled Lighting
products as well. The following installation guide will walk you through the necessary
steps to quickly install the hardware and program to your garage door opener. Please
ensure that you have the serial number (located on the bottom of the Wi-Fi Hub or with
the Wi-Fi Setup card) prior to installing this product. For a full manual, please visit www.
liftmaster.com.
• Compatible Garage Door Openers:
- LiftMaster® with purple, yellow, green, or orange LEARN button
(310, 315, and 390 MHz) (Chamberlain, Do-It, Master Mechanic, Raynor,
True Value and Sears Craftsman are compatible with LiftMaster technology.)
- Genie®/Overhead Door® Intellicode I and II (315 and 390 MHz)
- Linear® Mega Code (318 MHz)
- Stanley® Secure Code (310 MHz)
- Wayne Dalton® Keeloq (372.5 MHz)
• Verify there is a Wi-Fi router and broadband Internet connection at the site. Wi-Fi range
will vary depending on the thickness and number of walls, doors, or other barriers. The
average Wi-Fi range is about 300 feet.
• To test the strength of the Wi-Fi signal, take your device into the garage and turn on
its Wi-Fi. Connect your device to ensure you are receiving a good signal. If you don’t
have a strong enough signal in the garage, a Wi-Fi range extender will be necessary
(available at most consumer electronics stores).
• Wi-Fi Hub Serial Number (located on the bottom of the Wi-Fi hub or with the Wi-Fi
Setup card)
For more information about compatible garage door openers, visit
myLiftMaster.com.
PROGRAMMING
1
PROGRAM THE DOOR SENSOR TO THE WI-FI HUB
1
2
Plug in the Wi-Fi Hub. The blue LED will
blink.
3
Press and release BUTTON 1 on the Wi-Fi
hub. The yellow LED will turn on solid.
Press and release the Test button on the door
sensor until the Wi-Fi hub beeps and the light
flashes. The yellow LED on the
Wi-Fi hub will turn off.
“BEEP”
Yellow LED (ON)
Blue LED (blink)
2
press and release
press and release until....
PROGRAM THE WI-FI HUB TO THE GARAGE DOOR OPENER
1
Press and release the
solid.
BUTTON (Settings), the Blue LED will turn on
Blue LED (ON)
2
Press and hold the
BUTTON again until the green and yellow LEDs
alternate blinking. Press and release the
BUTTON again, the yellow LED
will turn on solid.
BUTTON
Green and yellow
LEDs
3
Press and release BUTTON 1 the number of times indicated in
the chart (the yellow LED will turn on solid):
NUMBER OF PRESSES
RF (IN MHZ)
BRAND
1
310, 315, et 390
LiftMaster® with Yellow LEARN button
2
315
LiftMaster® with Purple LEARN button
3
390
LiftMaster® with Orange LEARN button
4
390
LiftMaster® with Green LEARN button
5
315
Genie®/Overhead Door® Intellicode
6
390
Genie®/Overhead Door® Intellicode
7
318
Linear® Mega Code
8
310
Stanley® Secure Code
9
372.5
Wayne Dalton® Keeloq
press and release...
BUTTON 1
4
Press and release the
BUTTON. The yellow and green LEDs will blink.
5
BUTTON
6
Press and release BUTTON 1 until the garage door opener clicks. Press
and release BUTTON 1 again to activate the garage door opener.
If the garage door opener does not activate, press and release the
BUTTON, then repeat steps 3-6.
BUTTON
Press and release the LEARN button on the garage door opener. Your
garage door opener may look different.
LEARN
button
7
To exit programming mode, press and hold the
LED blinks.
BUTTON until the blue
If programming an additional door sensor and garage door opener for a second door, repeat the programming steps using BUTTON 2 instead of BUTTON 1.
INSTALLATION
3
MOUNT THE DOOR SENSOR
Position the door sensor
vertically and attach to a
clean, dry location on the top
panel of the garage door with
fastening strips.
“TOP” MUST always face UP
Door Sensor
Fastening Strips
MUST be mounted on the TOP panel of garage door.
ALTERNATIVE OPTION (WITH
SCREWS)
ALTERNATIVE OPTION (WITH SCREWS)
“TOP” MUST always face UP
Press in the bottom of the
door sensor and remove the
cover. Position the door sensor
vertically and attach to the top
panel of the garage door with
screws. Replace the cover.
MUST be mounted
on the TOP panel
of garage door.
Press
4
MOUNT THE WI-FI HUB AND INSTALL THE WARNING PLACARD
Mount the Wi-Fi hub on the ceiling
near the garage door opener. The
Wi-Fi hub should be mounted on
either side of the garage door opener
(as shown) so the Wi-Fi hub light is
visible if standing in the doorway of
the garage.
Use the bracket as a template and
mark holes for the bracket. Drill 5/32"
pilot holes. Install the bracket with the
hardware. Slide the Wi-Fi hub onto the
bracket. Plug in the Wi-Fi hub.
After power is applied the blue LED
will blink indicating the Wi-Fi needs
to be setup. The LEDs on the Wi-Fi
Hub are visible when directly facing
the Wi-Fi Hub.
MUST be mounted in a location where the Wi-Fi Hub light will
be visible if standing in the doorway of the garage.
(mounting area)
(ceiling)
Wi-Fi Hub
Door
Control
Warning
Placard
Attach the warning placard to the
wall next to the door control.
The installation is complete and ready to be connected to the home’s wireless (Wi-Fi) network.
IMPORTANT: Leave the Wi-Fi Setup card with the homeowner to complete the Wi-Fi setup.
ADDITIONAL PROGRAMMING
If the LED(s) on the Wi-FI hub are not on or flashing, unplug the power cord, then plug back in before programming the Wi-Fi hub.
PROGRAM A DOOR SENSOR
ERASE REMOTE CONTROL & KEYLESS ENTRY- SECURITY✚ 2.0™
To program a new sensor.
1. Press and hold:
1. Use the MyQ App to add a new door sensor.
•
BUTTON 1 on the Wi-Fi hub for door 1
OR
•
BUTTON 2 on the Wi-Fi hub for door 2
1. Press and release BUTTON 1 for door 1 or BUTTON 2 for door 2 on the Wi-Fi hub.
The yellow LED will turn on solid.
The yellow LED will turn on, continue holding the button until the yellow LED turns
off (approximately 6 seconds). All the remote controls and the keyless entry will be
erased for that button.
2. Press and release the Test button on the door sensor until the Wi-Fi hub beeps and
the light flashes. The yellow LED on the Wi-Fi hub will turn off.
ERASE WI-FI SETTINGS
PROGRAM REMOTE CONTROL(S) - LIFTMASTER
SECURITY✚ 2.0™
The Green LED MUST be on or blinking to erase Wi-Fi settings.
1.
1. Press and release BUTTON 1 on the Wi-Fi hub. The yellow LED will turn on solid.
2. Press and release the desired button on the remote control until the Wi-Fi hub beeps
and the light flashes. The yellow LED on the Wi-Fi hub will turn off.
3. To test, press the remote control button again. The garage door opener will activate.
Press and hold the
is ready to be setup.
BUTTON on the Wi-Fi hub until the blue LED blinks. The Wi-Fi
FACTORY DEFAULT
1.
Press and hold the
BUTTON on the Wi-Fi hub until the blue LED blinks.
2.
While the blue LED is blinking, press and hold the
BUTTON on the Wi-Fi hub
until the blue LED pauses then blinks. The Wi-Fi hub is set to factory default.
TROUBLESHOOTING
The Wi-Fi hub will not program to the home router.
• Verify you are using the correct router name and password, reset back to the factory
default if necessary, see Factory Default above.
The door sensor will not or is not programmed to the Wi-Fi hub.
• Press the Test button on the door sensor (the LED on the door sensor should blink).
If the LED does not blink, replace the battery, then replace the door sensor. After
replacing the battery, see Program a Door Sensor above.
The Wi-Fi hub will not operate the garage door opener.
• Ensure the garage door opener is compatible, see Pre-Installation Requirements.
• Follow the steps to program the Wi-Fi hub to the garage door opener, see
Programming.
LED INDICATORS FOR THE WI-FI HUB
LED COLOR
LED STATE
WI-FI HUB STATUS
Blue
Blinking
Wi-Fi needs to be setup
Green and Blue
Blinking
NO router communication
Blue
ON
Wi-Fi setup active
Green
Blinking
Communicating with router
Yellow and Green
Blinking
Programming mode
Green
ON
Wi-Fi Connected
The remote control(s) will not program to the Wi-Fi hub.
• Verify the remote control is compatible. Visit www.myliftmaster.com for a complete
list of compatible accessories.
WARRANTY
ONE YEAR LIMITED WARRANTY
LiftMaster, Inc. warrants to the first consumer purchaser of this product that is free from
defect in materials and/or workmanship for a period of 1 year from the date of purchase.
NOTICE: To comply with FCC and/or Industry Canada (IC) rules, adjustment or modifications of this
transceiver are prohibited. THERE ARE NO USER SERVICEABLE PARTS.
This device complies with Part 15 of the FCC rules and IC RSS-210. Operation is subject to the
following two conditions: (1) this device may not cause harmful interference, and (2) this device
must accept any interference received, including interference that may cause undesired operation.
This device must be installed in a way where a minimum 8" (20 cm) distance is maintained
between users/bystanders and device.
Chamberlain and LiftMaster are Trademarks of Chamberlain Group. Sears Craftsman is a Trademark
of KCD IP, LLC. Genie and Overhead Door are Trademarks of Overhead Door Corporation. Linear is a
Trademark of Linear Corporation. Stanley is a Trademark of The Stanley Works. Wayne Dalton is a
trademark of Wayne Dalton Corporation. Do It is a trademark of Do It Best Corporation.
Wi-Fi® is a registered trademark of Wi-Fi Alliance.
The Chamberlain Group, Inc.
845 Larch Avenue
Elmhurst, Illinois 60126-1196
©2013 The Chamberlain Group, Inc.
All Rights Reserved
114A4634C
INVENTAIRE DE LA BOÎTE
MyQ Garage™
NON ILLUSTRÉ : Guide d’installation et carte de configuration Wi-Fi à l’intention du client
Comptrolleur Wi-Fi
CONTRÔLEUR UNIVERSEL DE
PORTE DE GARAGE POUR
TÉLÉPHONE INTELLIGENT
Voyant
lumineux
Voyants
DEL
Support du comptrolleur Wi-Fi
Modéle 821LM
Cordon électrique du comptrolleur Wi-Fi
Quincaillerie du comptrolleur Wi-Fi
(vis longues)
Capteur de porte
DEL
MANUEL D’INSTALLATION
Quincaillerie du capteur de porte
(vis courtes)
Plaque-étiquette
d’avertissement
Bouton de
test
myLiftMaster.com
Bandes de fixation du
capteur de porte
VUE D’ENSEMBLE
Pour réduire les risques de BLESSURES corporelles GRAVES :
• NE PAS activer le dispositif MyQ Garage™ pour actionner une porte de garage rigide ou des portes pivotantes. Il doit être utilisé UNIQUEMENT sur des portes articulées.
ARRÊT
Lisez bien les instructions AVANT de commencer.
Si vous prévoyez d’utiliser ce produit pour une application domestique, il ne doit être utilisé qu’avec des ouvre-portes fabriqués après 1993 utilisant des
capteurs photoélectriques. Les capteurs photoélectriques sont toujours situés sur ou près de la partie inférieure du guide de la porte.
INTRODUCTION
EXIGENCES PRÉALABLES À L’INSTALLATION
Merci de votre achat d’un contrôleur 821LM MyQ Garage™. Ce produit est conçu pour
être fi xé à votre ouvre-porte de garage et relié à votre connexion Wi-Fi®. Il vous permet
de surveiller et de contrôler à distance l’état de votre porte à l’aide d’un smartphone,
d’une tablette ou d’un PC. En plus de contrôler à distance votre porte de garage, ce
produit vous permet également de contrôler l’éclairage intérieur lorsqu’il est programmé
sur des produits d’éclairage également activés par MyQ®. Le guide d’installation
suivant vous indique les étapes à suivre pour installer rapidement le matériel et la
programmation sur votre ouvre-porte de garage. Vérifi ez bien que vous disposez du
numéro de série (situé sur la partie inférieure du hub Wi-Fi, ou fourni avec la carte de
confi guration Wi-Fi) avant d’installer ce produit. Pour obtenir le manuel complet, visitez
www.liftmaster.com.
• Ouvre-porte de garage compatible :
LiftMaster® avec bouton LEARN violet, jaune, vert ou orange (310, 315, et 390
MHz) (Chamberlain, Do-It, Master Mechanic, Raynor, True Value, et Sears
sont compatibles avec LiftMaster technologie.)
- Genie® /Overhead Door® Intellicode I et Intellicode II (315 et 390 MHz)
- Linear® Mega Code (318 MHz)
- Stanley® Secure Code (310 MHz)
- Wayne Dalton® Keeloq (372.5 MHz)
• Vérifier que le lieu est équipé d’un routeur sans fil et d’une connexion Internet haut
débit. La portée Wi-Fi dépendra de l’épaisseur des murs, portes ou autres barrières et
de leur épaisseur respective. La portée Wi-Fi moyenne est d’environ 90 m (300 pi).
• Tester la puissance du signal Wi-Fi, apporter le dispositif avec vous dans le garage
et activer sa fonction Wi-Fi. Connecter votre appareil pour vous assurer de recevoir
un bon signal. Si le signal n’est pas suffisamment puissant dans le garage, il sera
nécessaire de vous procurer un extenseur de signal de portée Wi-Fi (disponible dans
la plupart des magasins d’électronique).
• Numéro de série du hub Wi-Fi (situé sur la partie inférieure du hub Wi-Fi ou sur la
carte de confi guration Wi-Fi)
Pour plus d’informations sur compatible avec ouvre-portes du garage, visite
myLiftMaster.com.
ATTENTION
AVERTISSEMENT
AVERTISSEMENT
AVERTISSEMENT
PROGRAMMATION
1
PROGRAMMER LE DÉTECTEUR DE LA PORTE AU HUB WI-FI.
1
2
Brancher dans le hub Wi-Fi. La DEL
bleue clignotera.
3
Enfoncer et relâcher le BOUTON 1 du hub
Wi-Fi. La DEL jaune s’allumera.
Enfoncer et relâcher le bouton d’essai sur le
détecteur de la porte jusqu’à ce que le hub
Wi-Fi clignote et que la lumière clignote. La
DEL jaune du hub Wi-Fi s’allumera.
a
a
«“BEEP”
BIP »
DEL jaune
(allumée)
DEL bleue (clignote)
2
enfoncer et relâcher
enfoncer et relâcher jusqu’à ce que…
PROGRAMMER LE HUB WI-FI SUR L’OUVRE-PORTE DE GARAGE.
1
Enfoncer et relâcher le
restera allumée.
BOUTON (d’engrenage) (Réglages), la DEL bleue
DEL bleue (allumée)
2
Enfoncer et tenir enfoncé le
BOUTON (d’engrenage) une fois de plus
jusqu’à que ce les DEL verte et jaune clignotent en alternance. Enfoncer et
tenir enfoncé le
BOUTON (d’engrenage) une fois de plus jusqu’à que ce la
DEL jaune reste allumée.
BOUTON
DEL verte et jaune
3
Enfoncer et relâcher le BOUTON 1 le nombre de fois indiqué dans le
tableau (la DEL jaune restera allumée) :
NOMBRE DE PRESSIONS
RF (EN MHZ)
MARQUE D’OUVRE-PORTE DE GARAGE
1
310, 315, et 390
LiftMaster® avec bouton LEARN jaune
2
315
LiftMaster® avec bouton LEARN violet
3
390
LiftMaster® avec bouton LEARN orange
4
390
LiftMaster® avec bouton LEARN vert
5
315
Genie®/Overhead Door® Intellicode
6
390
Genie®/Overhead Door® Intellicode
7
318
Linear® Mega Code
enfoncer et relâcher…
BOUTON 1
4
Enfoncer et relâcher le
clignoteront.
BOUTON (d’engrenage). Les DEL jaune et verte
5
Enfoncer et relâcher le BOUTON 1 jusqu’à ce que l’ouvre-porte de garage
émette un clic. Enfoncer et relâcher le BOUTON 1 de nouveau pour activer
l’ouvre-porte de garage. Si l’ouvre-porte de garage ne s’active pas, enfoncer
et relâcher le
BOUTON (d’engrenage), puis répéter les étapes 3 à 6.
8
310
Stanley® Secure Code
9
372.5
Wayne Dalton® Keeloq
Enfoncer et relâcher le bouton d’apprentissage (LEARN) de l’ouvre-porte de
garage. L’aspect de votre ouvre-porte peut être différent.
Bouton
d’apprentissage
(LEARN)
BOUTON
6
BOUTON
7
Pour quitter le mode de programmation, enfoncer et tenir enfoncé le
BOUTON (d’engrenage) jusqu’à ce que la DEL bleue clignote.
Pour programmer un détecteur ou un ouvre-porte de garage supplémentaire pour une deuxième porte, répéter les étapes de
programmation en utilisant le BOUTON 2 au lieu du BOUTON 1.
INSTALLATION
3
MONTER LE DÉTECTEUR DE PORTE
Positionner le détecteur de
porte à la verticale et le fixer
à un endroit sec et propre sur
le panneau supérieur de
la porte de garage avec des
bandes de fixation.
L’indication « TOP » doit être en HAUT
Capteur de porte
Bandes de fixation
DOIT être installé sur le panneau du HAUT de
la porte de garage.
AUTRE OPTION (AVEC VIS)
AUTRE OPTION (AVEC VIS)
Appuyez sur la partie inférieure
du détecteur et retirez le capot.
Positionnez le détecteur de la
porte à la verticale et fixez-le
au panneau supérieur de la
porte de garage à l’aide de
bandes de fixation ou de vis.
Remettre en place le couvercle.
4
L’indication « TOP » doit être
en HAUT
DOIT être installé
sur le panneau du
HAUT de la porte
de garage.
Appuyer
MONTER LE HUB WI-FI
Monter le support du hub Wi-Fi au
plafond, près de l’ouvre-porte de
garage. Le hub Wi-Fi doit être monté
d’un côté ou de l’autre de l’ouvreporte de garage (comme illustré) de
manière à ce que la lumière du hub
Wi-Fi soit visible en vous tenant dans
l’ouverture de la porte de garage.
Utiliser le support pour le repérage et
marquer l’emplacement des trous du
support. Percer des trous de guidage
de 4 mm (5/32 po). Installer le support
avec la visserie. Faire coulisser le hub
Wi-Fi sur le support. Brancher le hub
Wi-Fi.
DOIT être monté à un endroit où la lumière du hub Wi-Fi sera
visible de l’entrée du garage.
(zone de montage)
(plafond)
Comptrolleur Wi-Fi
Commande
de porte
Plaque-étiquette
d’avertissement
Une fois le hub allumé, la DEL bleue
clignote indiquant que le Wi-Fi doit
être configuré. Les DEL sur le hub
Wi-Fi sont visibles en vous tenant
directement en face du hub.
Fixer la plaque-étiquette
d’avertissement au mur, à côté de la
commande de porte.
L’installation est terminé et prêt à être connecté à sans fi l (Wi-Fi) réseau la maison.
IMPORTANTE : Laissez la confi guration de carte Wi-Fi avec le propriétaire d’une maison pour terminer la
confi guration d’une connexion Wi-Fi.
PROGRAMMATION SUPPLÉMENTAIRE
Si la ou les DEL sur le hub Wi-Fi ne sont pas allumées ou ne clignotent pas, débrancher le cordon d’alimentation, puis le rebrancher avant de programmer le hub Wi-Fi.
PROGRAMMER UN DÉTECTEUR DE PORTE
Pour programmer un nouveau détecteur.
EFFACER LA TÉLÉCOMMANDE ET L’ÉMETTEUR MURAL À
CODE - SECURITY✚ 2.0™
1. Utiliser l’application MyQ pour ajouter un nouveau détecteur de porte.
1. Enfoncer et maintenir enfoncé :
OU
•
le BOUTON 1 du hub Wi-Fi pour la porte 1.
1. Enfoncer et relâcher le BOUTON 1 pour la porte 1 ou le BOUTON 2 pour la porte 2
sur le hub Wi-Fi. La DEL jaune s’allumera.
•
le bouton 2 du hub Wi-Fi pour la porte 2
2. Enfoncer et relâcher le bouton d’essai sur le détecteur de la porte jusqu’à ce que le
hub Wi-Fi émette un bip et que la lumière clignote. La DEL jaune du hub Wi-Fi
s’allumera.
La DEL jaune s’allumera. Continuer de tenir enfoncé le bouton jusqu’à ce que la DEL
jaune s’éteigne (environ 6 secondes). Toutes les télécommandes et l’émetteur mural
à code seront effacés pour ce bouton.
EFFACER LES PARAMÈTRES WI-FI
PROGRAMMER UNE OU PLUSIEURS TÉLÉCOMMANDES LIFTMASTER SECURITY✚ 2.0™
La DEL verte DOIT être allumée ou clignoter pour pouvoir effacer les paramètres Wi-Fi.
1. Enfoncer et tenir enfoncé le
BOUTON (d’engrenage) sur le hub Wi-Fi jusqu’à ce
que la DEL bleue clignote. Le Wi-Fi est prêt à être configuré.
1. Enfoncer et relâcher le BOUTON 1 du hub Wi-Fi. La DEL jaune s’allumera.
2. Enfoncer et relâcher le bouton désiré sur la télécommande jusqu’à ce que le hub
Wi-Fi émette un bip et que la lumière clignote. La DEL jaune du hub Wi-Fi s’éteindra.
3. Pour tester, enfoncer une fois de plus le bouton de télécommande. L’ouvre-porte de
garage s’actionnera.
PARAMÈTRES PAR DÉFAUT RÉGLÉS EN USINE
1. Enfoncer et tenir enfoncé le
que la DEL bleue clignote.
BOUTON (d’engrenage) sur le hub Wi-Fi jusqu’à ce
2. Pendant que la DEL bleue clignote, enfoncer et tenir enfoncé le
BOUTON sur le
hub Wi-Fi jusqu’à ce que la DEL bleue s’arrête puis se remette à clignoter. Le hub
Wi-Fi est réglé par défaut en usine.
DÉPANNAGE
Le hub Wi-Fi se ne programmera pas au routeur de votre domicile.
• Vérifier que vous utilisez le bon nom du routeur et le bon mot de passe, réinitialiser
aux paramètres d’usine au besoin, consulter Paramètres par défaut réglés en
usine ci-dessus.
Le détecteur ne se programmera pas avec le hub Wi-Fi.
• Appuyer sur le bouton Test du détecteur de porte (sa DEL devrait clignoter). Si la DEL
ne clignote pas, remplacer la pile, puis replacer le détecteur de porte. Une fois la pile
changée, consulter la rubrique Programmer un détecteur de porte ci-dessus.
Le hub Wi-Fi n’a aucun effet sur l’ouvre-porte de garage.
• S’assurer que l’ouvre-porte de garage est compatible, consulter les exigences de
préinstallation.
• Suivre les étapes pour programmer le hub Wi-Fi avec l’ouvre-porte de garage,
consulter Programmation.
VOYANTS À DEL POUR LE HUB WI-FI
COULEUR DE LA DEL
ÉTAT DE LA DEL
ÉTAT DU HUB WI-FI
Bleu
Clignotante
Le comptrolleur Wi-Fi doit être initialisé
Vert et bleu
Clignotante
Pas de communication avec le routeur
Bleu
ALLUMÉE
Réglage Wi-Fi actif
Vert
Clignotante
Communication avec le routeur
Jaune et vert
Clignotante
Mode de programmation
Vert
ALLUMÉE
Wi-Fi connecté
La ou les télécommandes ne se programment pas avec le hub Wi-Fi.
• Vérifiez que la télécommande est compatible. Visitez www.myliftmaster.com pour
obtenir la liste complète des accessoires compatibles.
GARANTIE
GARANTIE LIMITÉE D’UN AN
LiftMaster, Inc. Offre la garantie au premier acheteur en magasin s’appliquant à ce
produit, certifi é exempt de tout défaut concernant les matériaux et/ou sa fabrication,
pendant une période d’un an à compter de la date d’achat.
AVIS. - Les règles de la FCC et/ou d’Industrie Canada (IC) interdisent tout ajustement ou toute
modification de ce récepteur. IL N’EXISTE AUCUNE PIÈCE SUSCEPTIBLE D’ÊTRE ENTRETENUE PAR
L’UTILISATEUR.
Cet appareil est conforme aux dispositions de la partie 15 du règlement de la FCC et de la norme
IC RSS-210. Son utilisation est assujettie aux deux conditions suivantes : (1) ce dispositif ne peut
causer des interférences nuisibles, et (2) ce dispositif doit accepter toute interférence reçue, y
compris une interférence pouvant causer un fonctionnement non souhaité. Cet appareil doit être
installé de manière à laisser une distance d’au moins 20 cm (8 po) entre celui-ci et l’utilisateur ou
toute personne.
Chamberlain et LiftMaster sont des marques commerciales du groupe Chamberlain. Sears Craftsman
est une marque commerciale de KCD IP, LLC. Genie et Overhead Door sont des marques commerciales
d’Overhead Door Corporation. Linear est une marque commerciale de Linear Corporation. Stanley
est une marque commerciale de The Stanley Works. Wayne Dalton est une marque commerciale de
Wayne Dalton Corporation. Do It est une marque commerciale de Do It Best Corporation.
Wi-Fi® est une marque déposée de Wi-Fi Alliance.
The Chamberlain Group, Inc.
845 Larch Avenue
Elmhurst, Illinois 60126-1196
©2013 The Chamberlain Group, Inc.
Tous droits réservés
114A4634C