1
OPERATING INSTRUCTIONS
c5
E
Item no. : Cafina - 2954076
Item no. : Melitta SystemService - 2954082
OI c5 eng V9 / 18.08.2006
© Cafina / Melitta
OPERATING INSTRUCTIONS
E
RETAIN FOR FUTURE USE !
The copyright of these Operating Instructions, which are entrusted to the recipient personally, remains with the Cafina / Melitta company.
The content may not be disclosed or made available to any third party without the express
consent of the Cafina / Melitta company.
These Operating Instructions must be read and applied by anyone performing work with or
on the equipment described.
In particular, it is imperative that all such persons familiarise themselves with the safety instructions.
© Cafina / Melitta
OI c5 eng V9 / 18.08.2006
TABLE OF CONTENTS
1
Description
1.1
Design . . . . . . . . . . . . . . . . . . . . . . . . . . . . . . . . . . . . . . . . . . . . . . . . . . . . . 1 - 1
1.1.1
External parts . . . . . . . . . . . . . . . . . . . . . . . . . . . . . . . . . . . . . . . . . . . 1 - 1
1.1.2
Internal parts . . . . . . . . . . . . . . . . . . . . . . . . . . . . . . . . . . . . . . . . . . . 1 - 2
1.2
Mode of operation . . . . . . . . . . . . . . . . . . . . . . . . . . . . . . . . . . . . . . . . . . . .
1.2.1
c5 coffee maker . . . . . . . . . . . . . . . . . . . . . . . . . . . . . . . . . . . . . . . . .
1.2.2
"Installed EF milk cooler" option . . . . . . . . . . . . . . . . . . . . . . . . . . . .
1.2.3
"External FC milk cooler" option . . . . . . . . . . . . . . . . . . . . . . . . . . . .
1.2.4
"Draw hot water" option . . . . . . . . . . . . . . . . . . . . . . . . . . . . . . . . . . .
1.2.5
"Draw steam" option . . . . . . . . . . . . . . . . . . . . . . . . . . . . . . . . . . . . .
1.2.6
"cw cup warmer" option . . . . . . . . . . . . . . . . . . . . . . . . . . . . . . . . . . .
1.2.7
"Second coffee bean grinder" option . . . . . . . . . . . . . . . . . . . . . . . . .
1.2.8
"Raised bean hopper" option . . . . . . . . . . . . . . . . . . . . . . . . . . . . . . .
1.2.9
"Bean hopper lockable" option . . . . . . . . . . . . . . . . . . . . . . . . . . . . . .
1.2.10 "Milk level monitoring" option . . . . . . . . . . . . . . . . . . . . . . . . . . . . . . .
1.2.11 "Raised feet" option . . . . . . . . . . . . . . . . . . . . . . . . . . . . . . . . . . . . . .
1.2.12 "Waste water container level monitoring" option . . . . . . . . . . . . . . . .
1.2.13 Shift function . . . . . . . . . . . . . . . . . . . . . . . . . . . . . . . . . . . . . . . . . . .
1.2.14 TWIN function . . . . . . . . . . . . . . . . . . . . . . . . . . . . . . . . . . . . . . . . . .
1.2.15 Key cards . . . . . . . . . . . . . . . . . . . . . . . . . . . . . . . . . . . . . . . . . . . . . .
1.2.15.1
"user" key card . . . . . . . . . . . . . . . . . . . . . . . . . . . . . . . . . . . .
1.2.15.2
"manager" key card . . . . . . . . . . . . . . . . . . . . . . . . . . . . . . . . .
1.2.15.3
"memory" key card . . . . . . . . . . . . . . . . . . . . . . . . . . . . . . . . .
1.2.15.4
"free vend" key card . . . . . . . . . . . . . . . . . . . . . . . . . . . . . . . .
1.2.15.5
"vip" key card . . . . . . . . . . . . . . . . . . . . . . . . . . . . . . . . . . . . .
1.2.15.6
"external" key card . . . . . . . . . . . . . . . . . . . . . . . . . . . . . . . . .
1.2.15.7
"key lock" key card . . . . . . . . . . . . . . . . . . . . . . . . . . . . . . . . .
1.2.15.8
"engineer" key card . . . . . . . . . . . . . . . . . . . . . . . . . . . . . . . . .
1-3
1-3
1-3
1-3
1-3
1-3
1-4
1-4
1-4
1-4
1-4
1-4
1-4
1-4
1-4
1-5
1-5
1-5
1-5
1-5
1-5
1-5
1-5
1-5
1.3
Technical data . . . . . . . . . . . . . . . . . . . . . . . . . . . . . . . . . . . . . . . . . . . . . . .
1.3.1
Coffee maker types . . . . . . . . . . . . . . . . . . . . . . . . . . . . . . . . . . . . . .
1.3.2
Machine identification . . . . . . . . . . . . . . . . . . . . . . . . . . . . . . . . . . . .
1.3.2.1
Switzerland . . . . . . . . . . . . . . . . . . . . . . . . . . . . . . . . . . . . . . .
1.3.2.2
Export . . . . . . . . . . . . . . . . . . . . . . . . . . . . . . . . . . . . . . . . . . .
1.3.3
Dimensions and weights . . . . . . . . . . . . . . . . . . . . . . . . . . . . . . . . . .
1.3.4
Filling data . . . . . . . . . . . . . . . . . . . . . . . . . . . . . . . . . . . . . . . . . . . . .
1.3.5
Operating performance data . . . . . . . . . . . . . . . . . . . . . . . . . . . . . . .
1.3.6
Environmental conditions . . . . . . . . . . . . . . . . . . . . . . . . . . . . . . . . . .
1.3.6.1
Temperature and humidity . . . . . . . . . . . . . . . . . . . . . . . . . . .
1.3.6.2
Space requirements . . . . . . . . . . . . . . . . . . . . . . . . . . . . . . . .
1-6
1-6
1-7
1-7
1-7
1-8
1-8
1-9
1-9
1-9
1-9
OI c5 eng V9 / 18.08.2006
i
© Cafina / Melitta
E
TABLE OF CONTENTS
2
Safety instructions
2.1
Warnings . . . . . . . . . . . . . . . . . . . . . . . . . . . . . . . . . . . . . . . . . . . . . . . . . . .
2.1.1
Warnings symbols used (depending on nationality) . . . . . . . . . . . . .
2.1.2
Places where warning symbols
are affixed (depending on nationality) . . . . . . . . . . . . . . . . . . . . . . . .
2.1.3
Safety information in these Operating Instructions . . . . . . . . . . . . . .
2-1
2-1
2.2
Basic safety instructions . . . . . . . . . . . . . . . . . . . . . . . . . . . . . . . . . . . . . . . .
2.2.1
Proper use . . . . . . . . . . . . . . . . . . . . . . . . . . . . . . . . . . . . . . . . . . . . .
2.2.1.1
General . . . . . . . . . . . . . . . . . . . . . . . . . . . . . . . . . . . . . . . . . .
2.2.1.2
c5 coffee maker . . . . . . . . . . . . . . . . . . . . . . . . . . . . . . . . . . . .
2.2.1.3
Installed EF milk cooler . . . . . . . . . . . . . . . . . . . . . . . . . . . . . .
2.2.1.4
cw cup warmer . . . . . . . . . . . . . . . . . . . . . . . . . . . . . . . . . . . .
2.2.2
Specific hazards and instructions . . . . . . . . . . . . . . . . . . . . . . . . . . .
2.2.2.1
c5 coffee maker . . . . . . . . . . . . . . . . . . . . . . . . . . . . . . . . . . . .
2.2.2.2
Installed EF milk cooler . . . . . . . . . . . . . . . . . . . . . . . . . . . . . .
2.2.2.3
cw cup warmer . . . . . . . . . . . . . . . . . . . . . . . . . . . . . . . . . . . .
2.2.2.4
Key cards . . . . . . . . . . . . . . . . . . . . . . . . . . . . . . . . . . . . . . . .
2.2.3
Personal safety . . . . . . . . . . . . . . . . . . . . . . . . . . . . . . . . . . . . . . . . .
2-2
2-2
2-2
2-2
2-2
2-2
2-3
2-3
2-5
2-5
2-6
2-6
2.3
Safety mechanisms . . . . . . . . . . . . . . . . . . . . . . . . . . . . . . . . . . . . . . . . . . . 2 - 7
2.3.1
Power switch . . . . . . . . . . . . . . . . . . . . . . . . . . . . . . . . . . . . . . . . . . . 2 - 7
2.3.2
Pressure relief valve . . . . . . . . . . . . . . . . . . . . . . . . . . . . . . . . . . . . . 2 - 7
2.4
Authorised persons . . . . . . . . . . . . . . . . . . . . . . . . . . . . . . . . . . . . . . . . . . . .
2.4.1
General . . . . . . . . . . . . . . . . . . . . . . . . . . . . . . . . . . . . . . . . . . . . . . .
2.4.2
Areas of responsibility of personnel . . . . . . . . . . . . . . . . . . . . . . . . . .
2.4.2.1
Operator . . . . . . . . . . . . . . . . . . . . . . . . . . . . . . . . . . . . . . . . .
2.4.2.2
User . . . . . . . . . . . . . . . . . . . . . . . . . . . . . . . . . . . . . . . . . . . . .
2.4.2.3
Maintenance personnel (service technician) . . . . . . . . . . . . . .
2.4.3
Minimum training and qualifications of authorised personnel . . . . . .
2.4.3.1
Operator . . . . . . . . . . . . . . . . . . . . . . . . . . . . . . . . . . . . . . . . .
2.4.3.2
User . . . . . . . . . . . . . . . . . . . . . . . . . . . . . . . . . . . . . . . . . . . . .
2.4.3.3
Maintenance personnel (service technician) . . . . . . . . . . . . . .
E
2-1
2-1
2-7
2-7
2-7
2-7
2-8
2-8
2-8
2-8
2-8
2-8
2.5
Maintenance duty . . . . . . . . . . . . . . . . . . . . . . . . . . . . . . . . . . . . . . . . . . . . . 2 - 8
2.6
Availability of these Operating Instructions . . . . . . . . . . . . . . . . . . . . . . . . . . 2 - 8
© Cafina / Melitta
ii
OI c5 eng V9 / 18.08.2006
TABLE OF CONTENTS
3
4
Controls and indicators
3.1
Overview . . . . . . . . . . . . . . . . . . . . . . . . . . . . . . . . . . . . . . . . . . . . . . . . . . . . 3 - 1
3.2
Operating modes . . . . . . . . . . . . . . . . . . . . . . . . . . . . . . . . . . . . . . . . . . . . . 3 - 3
Initial start-up
4.1
Normal initial start-up . . . . . . . . .
4.1.1
c5 coffee maker . . . . . . . .
4.1.2
Installed EF milk cooler . .
4.1.3
cw cup warmer . . . . . . . . .
...
...
...
...
...
...
...
...
...
...
...
...
...
...
...
...
...
...
...
...
...
...
...
...
...
...
...
...
...
...
...
...
...
...
...
...
...
...
...
...
4-1
4-1
4-1
4-1
4.2
Return to service after the machine
has been out of service for a limited time
4.2.1
c5 coffee maker . . . . . . . . . . . . . .
4.2.2
Installed EF milk cooler . . . . . . . .
4.2.3
cw cup warmer . . . . . . . . . . . . . . .
...
...
...
...
...
...
...
...
...
...
...
...
...
...
...
...
...
...
...
...
...
...
...
...
...
...
...
...
...
...
...
...
...
...
...
...
4-1
4-1
4-1
4-1
Return to service after a fault . . .
4.3.1
c5 coffee maker . . . . . . . .
4.3.2
Installed EF milk cooler . .
4.3.3
cw cup warmer . . . . . . . . .
...
...
...
...
...
...
...
...
...
...
...
...
...
...
...
...
...
...
...
...
...
...
...
...
...
...
...
...
...
...
...
...
...
...
...
...
4-2
4-2
4-2
4-2
5.1
Power supply connection . . . . . . . . . . . . . . . . . . . . . . . . . . . . . . . . . . . . . . .
5.1.1
c5 coffee maker . . . . . . . . . . . . . . . . . . . . . . . . . . . . . . . . . . . . . . . . .
5.1.2
Installed EF milk cooler . . . . . . . . . . . . . . . . . . . . . . . . . . . . . . . . . . .
5.1.3
cw cup warmer . . . . . . . . . . . . . . . . . . . . . . . . . . . . . . . . . . . . . . . . . .
5.1.4
Temperature regulator unit . . . . . . . . . . . . . . . . . . . . . . . . . . . . . . . .
5.1.4.1
Control panel . . . . . . . . . . . . . . . . . . . . . . . . . . . . . . . . . . . . . .
5.1.4.2
Brief description . . . . . . . . . . . . . . . . . . . . . . . . . . . . . . . . . . .
5.1.4.3
Cooling operation . . . . . . . . . . . . . . . . . . . . . . . . . . . . . . . . . .
5.1.4.4
Checking the desired milk temperature . . . . . . . . . . . . . . . . . .
5.1.4.5
Programming the desired milk temperature . . . . . . . . . . . . . .
5-1
5-1
5-1
5-1
5-2
5-2
5-2
5-2
5-3
5-3
5.2
Water connection . . . . . . . . . . . . . . . . . . . . . . . . . . . . . . . . . . . . . . . . . . . . . 5 - 4
5.2.1
Water intake . . . . . . . . . . . . . . . . . . . . . . . . . . . . . . . . . . . . . . . . . . . . 5 - 4
5.2.2
Water drainage . . . . . . . . . . . . . . . . . . . . . . . . . . . . . . . . . . . . . . . . . 5 - 4
5.3
Switching on and off . . . . . . . . . . . . . . . . . . . . . . . . . . . . . . . . . . . . . . . . . . .
5.3.1
Switching on the c5 coffee maker . . . . . . . . . . . . . . . . . . . . . . . . . . .
5.3.2
Switching off the c5 coffee maker . . . . . . . . . . . . . . . . . . . . . . . . . . .
5.3.3
Switching the cw cup warmer on and off . . . . . . . . . . . . . . . . . . . . . .
4.3
5
...
...
...
...
...
...
...
...
...
...
...
...
Operation
OI c5 eng V9 / 18.08.2006
iii
5-5
5-5
5-6
5-8
© Cafina / Melitta
E
TABLE OF CONTENTS
5.4
Dispensing of beverages . . . . . . . . . . . . . . . . . . . . . . . . . . . . . . . . . . . . . . . 5 - 9
5.4.1
Dispensing normal coffee . . . . . . . . . . . . . . . . . . . . . . . . . . . . . . . . . 5 - 9
5.4.1.1
General sequence . . . . . . . . . . . . . . . . . . . . . . . . . . . . . . . . . . 5 - 9
5.4.1.2
Dispensing a level 1 beverage . . . . . . . . . . . . . . . . . . . . . . . 5 - 10
5.4.1.3
Dispensing a level 2 beverage . . . . . . . . . . . . . . . . . . . . . . . 5 - 12
5.4.2
Dispensing decaffeinated coffee . . . . . . . . . . . . . . . . . . . . . . . . . . . 5 - 14
5.4.3
Dispensing milk . . . . . . . . . . . . . . . . . . . . . . . . . . . . . . . . . . . . . . . . 5 - 15
5.4.4
Dispensing of hot water . . . . . . . . . . . . . . . . . . . . . . . . . . . . . . . . . . 5 - 16
5.4.5
Drawing steam . . . . . . . . . . . . . . . . . . . . . . . . . . . . . . . . . . . . . . . . . 5 - 17
5.4.6
Frothing milk manually . . . . . . . . . . . . . . . . . . . . . . . . . . . . . . . . . . . 5 - 18
5.5
Routine work . . . . . . . . . . . . . . . . . . . . . . . . . . . . . . . . . . . . . . . . . . . . . . . .
5.5.1
Refilling fresh water canister . . . . . . . . . . . . . . . . . . . . . . . . . . . . . .
5.5.2
Emptying the waste water canister . . . . . . . . . . . . . . . . . . . . . . . . .
5.5.3
Refill coffee beans . . . . . . . . . . . . . . . . . . . . . . . . . . . . . . . . . . . . . .
5.5.4
Refill milk . . . . . . . . . . . . . . . . . . . . . . . . . . . . . . . . . . . . . . . . . . . . .
5.5.5
Emptying the coffee dregs drawer . . . . . . . . . . . . . . . . . . . . . . . . . .
5.5.6
Cleaning the drip tray . . . . . . . . . . . . . . . . . . . . . . . . . . . . . . . . . . . .
5 - 19
5 - 19
5 - 19
5 - 20
5 - 22
5 - 23
5 - 24
5.6
System work . . . . . . . . . . . . . . . . . . . . . . . . . . . . . . . . . . . . . . . . . . . . . . . .
5.6.1
Control panel and button layout . . . . . . . . . . . . . . . . . . . . . . . . . . . .
5.6.2
Structure of the functions . . . . . . . . . . . . . . . . . . . . . . . . . . . . . . . . .
5.6.2.1
Overview and adjustment values . . . . . . . . . . . . . . . . . . . . .
5.6.3
Brief description of functions . . . . . . . . . . . . . . . . . . . . . . . . . . . . . .
5.6.3.1
Cleaning . . . . . . . . . . . . . . . . . . . . . . . . . . . . . . . . . . . . . . . .
5.6.3.2
Daily counter . . . . . . . . . . . . . . . . . . . . . . . . . . . . . . . . . . . . .
5.6.3.3
Total counter . . . . . . . . . . . . . . . . . . . . . . . . . . . . . . . . . . . . .
5.6.3.4
Functions . . . . . . . . . . . . . . . . . . . . . . . . . . . . . . . . . . . . . . . .
5.6.3.5
Water quantity . . . . . . . . . . . . . . . . . . . . . . . . . . . . . . . . . . . .
5.6.3.6
Coffee quantity ±1g . . . . . . . . . . . . . . . . . . . . . . . . . . . . . . . .
5.6.3.7
Flow period hot water . . . . . . . . . . . . . . . . . . . . . . . . . . . . . .
5.6.3.8
Pre-infusion 1 milk . . . . . . . . . . . . . . . . . . . . . . . . . . . . . . . . .
5.6.3.9
Pre-infusion 2 milk . . . . . . . . . . . . . . . . . . . . . . . . . . . . . . . . .
5.6.3.10
Post-infusion milk . . . . . . . . . . . . . . . . . . . . . . . . . . . . . . . . .
5.6.3.11
Flow period milk . . . . . . . . . . . . . . . . . . . . . . . . . . . . . . . . . .
5.6.3.12
Flow period steam . . . . . . . . . . . . . . . . . . . . . . . . . . . . . . . . .
5.6.3.13
Price . . . . . . . . . . . . . . . . . . . . . . . . . . . . . . . . . . . . . . . . . . .
5.6.3.14
No charge . . . . . . . . . . . . . . . . . . . . . . . . . . . . . . . . . . . . . . .
5.6.3.15
Time / date . . . . . . . . . . . . . . . . . . . . . . . . . . . . . . . . . . . . . .
5 - 25
5 - 25
5 - 26
5 - 26
5 - 27
5 - 27
5 - 27
5 - 27
5 - 27
5 - 27
5 - 28
5 - 28
5 - 28
5 - 28
5 - 28
5 - 28
5 - 28
5 - 28
5 - 28
5 - 28
E
© Cafina / Melitta
iv
OI c5 eng V9 / 18.08.2006
TABLE OF CONTENTS
5.6.4
Use of the functions . . . . . . . . . . . . . . . . . . . . . . . . . . . . . . . . . . . . .
5.6.4.1
Cleaning . . . . . . . . . . . . . . . . . . . . . . . . . . . . . . . . . . . . . . . .
5.6.4.2
Daily counter . . . . . . . . . . . . . . . . . . . . . . . . . . . . . . . . . . . . .
5.6.4.3
Total counter . . . . . . . . . . . . . . . . . . . . . . . . . . . . . . . . . . . . .
5.6.4.4
Functions . . . . . . . . . . . . . . . . . . . . . . . . . . . . . . . . . . . . . . . .
5.6.4.5
Water quantity . . . . . . . . . . . . . . . . . . . . . . . . . . . . . . . . . . . .
5.6.4.6
Coffee quantity ±1g . . . . . . . . . . . . . . . . . . . . . . . . . . . . . . . .
5.6.4.7
Flow period water . . . . . . . . . . . . . . . . . . . . . . . . . . . . . . . . .
5.6.4.8
Pre-infusion 1 milk . . . . . . . . . . . . . . . . . . . . . . . . . . . . . . . . .
5.6.4.9
Pre-infusion 2 milk . . . . . . . . . . . . . . . . . . . . . . . . . . . . . . . . .
5.6.4.10
Post-infusion milk . . . . . . . . . . . . . . . . . . . . . . . . . . . . . . . . .
5.6.4.11
Flow period milk . . . . . . . . . . . . . . . . . . . . . . . . . . . . . . . . . .
5.6.4.12
Flow period steam . . . . . . . . . . . . . . . . . . . . . . . . . . . . . . . . .
5.6.4.13
Price . . . . . . . . . . . . . . . . . . . . . . . . . . . . . . . . . . . . . . . . . . .
5.6.4.14
No charge . . . . . . . . . . . . . . . . . . . . . . . . . . . . . . . . . . . . . . .
5.6.4.15
Time / date . . . . . . . . . . . . . . . . . . . . . . . . . . . . . . . . . . . . . .
5.6.5
Resetting to initial installation default settings . . . . . . . . . . . . . . . . .
5.6.5.1
Coffee maker reset . . . . . . . . . . . . . . . . . . . . . . . . . . . . . . . .
6
Maintenance
6.1
Maintenance schedule . . . . . . . . . . . . . . . . . . . . . . . . . . . . . . . . . . . . . . . . .
6.1.1
Intervals . . . . . . . . . . . . . . . . . . . . . . . . . . . . . . . . . . . . . . . . . . . . . . .
6.1.1.1
Cleaning intervals . . . . . . . . . . . . . . . . . . . . . . . . . . . . . . . . . .
6.1.1.2
Intervals between services . . . . . . . . . . . . . . . . . . . . . . . . . . .
6-1
6-1
6-1
6-2
6.2
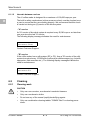
Cleaning . . . . . . . . . . . . . . . . . . . . . . . . . . . . . . . . . . . . . . . . . . . . . . . . . . . .
6.2.1
Cleaning work . . . . . . . . . . . . . . . . . . . . . . . . . . . . . . . . . . . . . . . . . .
6.2.2
Cleaning procedure . . . . . . . . . . . . . . . . . . . . . . . . . . . . . . . . . . . . . .
6.2.2.1
c5 coffee maker . . . . . . . . . . . . . . . . . . . . . . . . . . . . . . . . . . . .
6.2.2.2
Installed EF milk cooler / external FC milk cooler . . . . . . . . . .
6-2
6-2
6-4
6-5
6-7
6.3
7
5 - 29
5 - 29
5 - 29
5 - 30
5 - 31
5 - 32
5 - 32
5 - 33
5 - 33
5 - 34
5 - 34
5 - 35
5 - 35
5 - 36
5 - 36
5 - 37
5 - 38
5 - 38
Maintenance log . . . . . . . . . . . . . . . . . . . . . . . . . . . . . . . . . . . . . . . . . . . . . . 6 - 8
Troubleshooting
7.1
Fault display, troubleshooting and fault acknowledgement . . . . . . . . . . . . . 7 - 1
7.2
Checklist for fault diagnosis and troubleshooting . . . . . . . . . . . . . . . . . . . . . 7 - 2
7.2.1
Textual error messages . . . . . . . . . . . . . . . . . . . . . . . . . . . . . . . . . . . 7 - 2
7.2.2
Error messages displayed via diagnosis points (DP) . . . . . . . . . . . . . 7 - 6
OI c5 eng V9 / 18.08.2006
v
© Cafina / Melitta
E
TABLE OF CONTENTS
8
E
9
Taking out of service and storage
8.1
Taking out of service for a
limited time / taking out of service for good . . . . . . . . . . . . . . . . . . . . . . . . . 8 - 1
8.2
Storage for a limited period / permanent storage . . . . . . . . . . . . . . . . . . . . . 8 - 1
Packing and transportation
10 Disposal
11 Guarantee, consumables, spare parts, ordering procedure
12 "Service Technician" maintenance log
© Cafina / Melitta
vi
OI c5 eng V9 / 18.08.2006
DESCRIPTION
1
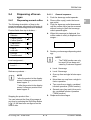
Description
1.1
Design
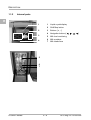
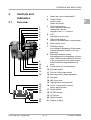
1.1.1
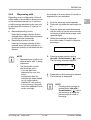
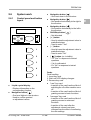
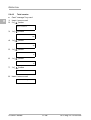
External parts
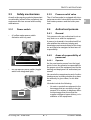
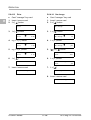
E
1
2
3
4
5
6
7
8
1
Installed EF milk cooler
2
Bean hoppers 1 and 2
3
Temperature regulator unit
4
Filling chute with lid
5
Liquid crystal display
9
10
11
6
Control panel cover
7
Shift/Stop button
8
Beverage selection buttons
12
9
Hot water button
13
14
10 Steam tap
11 Beverage outlet, height-adjustable
12 Drip tray with drip grille
15
13 Steam outlet
14 Milk cooler door
15 c5 coffee maker
16
17
16 cw cup warmer
17 "Key card" slot
18 Coffee dregs drawer
18
19 Hot water outlet
19
20 Power switch for cw cup warmer
21 Cleaning container
22 COMBI-Tabs container
20
23 AMC powder bag
21
22
23
OI c5 eng V9 / 18.08.2006
1-1
© Cafina / Melitta
DESCRIPTION
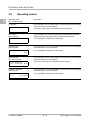
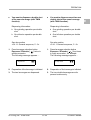
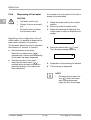
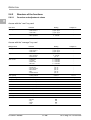
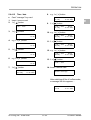
1.1.2
Internal parts
E
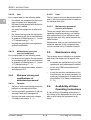
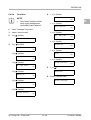
1
2
3
4
1
Liquid crystal display
2
Shift/Stop button
3
Buttons [ + , - ]
4
Navigation buttons [ ! , " , # , $ ]
5
Milk level monitoring
6
Milk container
7
Milk intake lines
5
6
7
© Cafina / Melitta
1-2
OI c5 eng V9 / 18.08.2006
DESCRIPTION
1.2
Mode of operation
1.2.1
c5 coffee maker
1.2.2
"Installed EF milk cooler"
option
The installed EF milk cooler consists of a
compressor cooling unit, a separate pump
system, a temperature regulator unit and a
6 litre capacity milk container.
The c5 coffee maker is a fully automatic
coffee making machine which, in the basic
version, can dispense pre-programmed
coffee products through a height-adjustable product outlet into the container. The
beverage required is selected via five beverage selection buttons.
The milk is automatically added to the relevant coffee products. The milk cooler door
can be lockable.
The beverage selection buttons employ a
click pushbutton design that provides both
tactile and visual feedback. Large, illuminated product fields indicate the beverage
currently selected.
1.2.3
"External FC milk cooler"
option
The external FC milk cooler consists of an
industry-standard refrigerator.
A filling chute enables pre-ground, decaffeinated varieties of coffee to be processed.
If the c5 coffee maker is fitted with an additional external FC milk cooler, the c5 coffee
maker will contain an extra pump system
for the automatic addition of milk into the
relevant coffee products.
The c5 coffee maker exhibits the latest
marks of conformity, indicating that it satisfies the necessary certification standards.
1.2.4
"Draw hot water" option
It is possible to draw hot water in user-defined quantities by pressing a button.
For hot milk processing with integrated, fully automatic cleaning, the c5 coffee maker
satisfies the HACCP hygiene requirements.
1.2.5
"Draw steam" option
Steam can be drawn from the steam tap,
and is continuously adjustable.
The patented, Automatic Coffeequality
System (ACS) quality monitoring system
continually monitors relevant parameters
such as fineness of grind, coffee powder
weighed-in quantity, infusion time and water temperature.
The piston system is optimally controlled
via a Variable Pressure System (VPS).
The water supply can be directly connected
to the water mains or to a water can.
OI c5 eng V9 / 18.08.2006
1-3
© Cafina / Melitta
E
DESCRIPTION
1.2.6
E
"cw cup warmer" option
1.2.11
The autonomous cw cup warmer has three
levels with built-in heating elements.
1.2.7
To clean the area underneath the machines, all the machines can be fitted with
raised feet.
"Second coffee bean
grinder" option
1.2.12
The second coffee bean grinder option allows a second variety of coffee to be used.
Without this option, the second bean hopper is locked.
1.2.8
"Raised bean hopper"
option
1.2.13
Shift function
The five beverage selection buttons are allocated as standard at two levels with one
pre-programmed beverage per level in
each case.
"Bean hopper lockable"
option
Lockable versions of both the standard and
raised bean hoppers are available.
1.2.10
"Waste water container
level monitoring" option
If the c5 coffee maker is connected to fresh
water and waste water cans, it is possible to monitor the level of the waste water
can (see also section «5.2 Water connection, 5 - 4»). The level monitoring is coupled
to the control system. The control system
outputs level-specific information to the
LCD.
A higher been hopper (a unit) can be placed on top of the bean hopper(s) to increase the coffee bean capacitiy.
1.2.9
"Raised feet" option
The Shift function switches the beverage
selection buttons to the second level and
back again.
"Milk level monitoring"
option
1.2.14
Milk level monitoring is used in conjunction
with the installed EF milk cooler. It is coupled to the c5 coffee maker control system.
TWIN function
Normally, one pass of coffee grinding with
subsequent infusion operation produces a
single quantity of the selected coffee (coffee + milk) product.
Warnings on the LCD enable the user to
keep an eye on the level of milk while the
machine is in operation.
With the TWIN function, one pass of coffee
grinding with one subsequent infusion operation produces a double quantity of the
selected coffee (coffee + milk) product.
The TWIN function has to be activated by
the Technical Customer Service.
© Cafina / Melitta
1-4
OI c5 eng V9 / 18.08.2006
DESCRIPTION
1.2.15
Key cards
1.2.15.4
The "free vend" key card enables beverages to be dispensed at no charge, using external billing modules.
Key cards are needed to access the functions of the c5 coffee maker.
Functions such as switch on/switch off,
counter readout or programming can only
be used if one has the relevant authorised
key card.
1.2.15.1
1.2.15.5
"user" key card
1.2.15.6
"manager" key card
1.2.15.7
"key lock" key card
The "key lock" key card enables the control
buttons to be locked or released without
having to delve into the programming of the
c5 coffee maker.
"memory" key card
The "memory" key card contains all the
system data for the c5 coffee maker, as it
was configured at the time of (first) installation by the service technician.
1.2.15.8
"engineer" key card
The "engineer" key card is reserved for the
service technician. It allows the technician
to access every area of the system software, read the statistical data and directly
control hardware components for test purposes.
The "memory" key card enables the coffee
maker to be reset following an emergency.
OI c5 eng V9 / 18.08.2006
"external" key card
The "external" key card enables external
modules, such as coin-operation units or
coin-checking devices, to be enabled or
disabled without having to delve into the
programming of the c5 coffee maker.
The "manager" key card is the card of the
person (manager), who uses this card to
gain access to the higher-level functions.
This card can be configured as a multi-user
card for up to six c5 coffee makers.
1.2.15.3
"vip" key card
The "vip" key card enables the self-service
mode to be enabled or disabled without
having to delve into the programming of the
c5 coffee maker.
The "user" key card is the card of the person who operates the c5 coffee maker.
This card can be configured as a multi-user
card for up to six c5 coffee makers.
1.2.15.2
"free vend" key card
1-5
© Cafina / Melitta
E
DESCRIPTION
E
1.3
Technical data
1.3.1
Coffee maker types
Description
Standard
model
Shift
function
TWIN
function
c5-1
X
X
X
X
X
X
X
Optional
X
c5 Office
Hot water
outlet
Steam
outlet
Separate hot
water outlet
Installed EF
milk cooler
External FC
milk cooler
Milk level
monitoring
(1)
c5-1 W
X
X
X
X
c5-1 C
X
X
X
X
X
X
X
X
X
X
X
X
X
X
X
X
X
X
X
X
X
X
X
X
X
X
X
X
X
X
X
X
X
X
X
X
X
X
X
c5-12 W
X
X
X
(2)
c5-1 C EF
c5-12 C
X
Optional
X
Optional
(3)
c5-12 C EF
X
(3)
c5-1 C FC
c5-12 C FC
(3)
( 1 ) Hot water drawn through the coffee outlet
( 2 ) Coffee and hot water dispensed simultaneously
( 3 ) Coffee, hot water and steam dispensed simultaneously
Standard options
The following options can be used with every machine configuration:
- "cw cup warmer"
- "Bean hopper" (optionally lockable)
- "Second coffee bean grinder"
- "Raised bean hopper" (optionally lockable)
- "Raised feet"
The milk cooler door of the installed EF milk cooler is available in a lockable version.
© Cafina / Melitta
1-6
OI c5 eng V9 / 18.08.2006
DESCRIPTION
1.3.2
Machine identification
1.3.2.1
Switzerland
Position of identification plate
•
E
c5 coffee maker
CH-5502 HUNZENSCHWIL
Switzerland and EU:
Behind the coffee dregs drawer in the
slide-in tray, at the top of the inside
wall.
USA:
On the front left-hand side.
•
Hz
Type
Serial-No.
Instr. sheet
Model year
1.3.2.2
W
Export
Installed EF milk cooler
Switzerland, EU:
In the chill compartment at the top lefthand side of the inside wall.
•
V
CH-5502 HUNZENSCHWIL
V
Type
cw cup warmer
W
Serial-No.
Model year
Through
heater
Switzerland, EU and USA:
In the lower cup compartment at the top
of the back wall.
Boiler
Water lowest level
liters
Max. temperature
°C
Max. overpressure
bar
Heater power
kW
Serial-No.
Test overpressure and design comply with
the Ordinance on Steam Boilers
OI c5 eng V9 / 18.08.2006
1-7
© Cafina / Melitta
DESCRIPTION
1.3.3
Dimensions and weights
Description
Width [ mm ]
c5-1
450
49
c5 Office
450
49
c5-1 W
450
50
c5-1 C
450
50
c5-12 W
450
58
c5-1 C EF
700
90
c5-12 C
450
c5-12 C EF
700
94
c5-1 C FC
450
53
c5-12 C FC
450
61
cw
250
12
EF
250
26
E
Height [ mm ]
680
Weight [ kg ]
58
600
Raised bean hopper
140
Raised feet
25.4 ( 1" )
50.8 ( 2" )
76.2 ( 3" )
101.6 ( 4" )
1.3.4
Depth [ mm ]
Filling data
Description
Coffee
beans:
first
bean
hopper
Coffee
beans:
second
bean
hopper
[ kg ]
1.4
Number
of cups which
can be
accommodated
Number
of cups which
can be
accommodated
[ kg ]
Standard
size
Espresso
size
1.4
8
20
Refilling the
milk container
Refilling the
canisters
[ litres ]
[ litres ]
c5-1
c5 Office
c5-1 W
c5-1 C
c5-12 W
c5-1 C EF
6
c5-12 C
c5-12 C EF
6
c5-1 C FC
c5-12 C FC
Water intake
(fresh water container)
20
Water outlet
(waste water container)
10
cw
Approx. 100 (mixed)
EF
Raised
bean hopper
© Cafina / Melitta
6
+ 1.6
+ 1.6
1-8
OI c5 eng V9 / 18.08.2006
DESCRIPTION
1.3.5
Operating performance data
Description
White coffee:
c5 output [ kW ] =
standard cups / h
Espresso:
c5 output [ kW ] =
Espressos / h
c5-1
2.3 kW = 170
2.3 kW = 250
3.4 kW = 200
3.4 kW = 250
c5 Office
c5-1 W
2.3 kW = 170
2.3 kW = 250
3.4 kW = 200
3.4 kW = 250
2.3 kW = 170
2.3 kW = 250
3.4 kW = 250
6.0 kW = 200
6.0 kW = 250
6.0 kW = 30
3.6 kW = 170
3.6 kW = 250
3.6 kW = 20
c5-12 W
7.4 kW = 200
7.4 kW = 250
7.4 kW = 40
c5-1 C EF
6.1 kW = 200
6.1 kW = 250
c5-12 C
7.4 kW = 200
7.4 kW = 250
c5-12 C EF
6.1 kW = 200
6.1 kW = 250
6.1 kW = 200
6.1 kW = 30
7.5 kW = 200
7.5 kW = 250
7.5 kW = 200
7.5 kW = 40
c5-1 C FC
6.0 kW = 200
6.0 kW = 250
6.0 kW = 200
6.0 kW = 30
c5-12 C FC
7.4 kW = 200
7.4 kW = 250
7.4 kW = 200
7.4 kW = 40
1.3.6
Environmental conditions
1.3.6.1
Temperature and humidity
!
Operating and storage temperatures:
min. + 5 °C
max. + 30 °C
!
Operating and storage humidity:
max. 80 %
!
Hot water:
c5 output [ kW ] =
litres / h
3.4 kW = 200
c5-1 C
1.3.6.2
Cappuccino:
c5 output [ kW ] =
Cappuccinos / h
6.1 kW = 200
6.1 kW = 30
7.4 kW = 40
Space requirements
Minimum space required for operation:
180 mm from the top edge of the bean hopper must be kept clear to allow for replenishment of beans.
OI c5 eng V9 / 18.08.2006
1-9
© Cafina / Melitta
E
DESCRIPTION
E
© Cafina / Melitta
1 - 10
OI c5 eng V9 / 18.08.2006
SAFETY INSTRUCTIONS
2
Safety instructions
2.1
Warnings
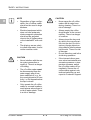
2.1.1
Warnings symbols used
(depending on nationality)
2.1.2
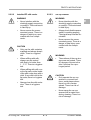
NOTE
The following warnings symbols may be affixed to the equipment.
Low voltage
•
Warning of dangerous electrical voltage.
•
Electric shocks can lead to
serious injury or death.
•
Only authorised technical
personnel may perform
work on electrical installations.
•
The technical safety instructions must be followed.
•
Unplug equipment before
carrying out any work on
electrical installations.
2.1.3
Hot surface / hot internal
components
Warning of heat which could
lead to injury.
•
Allow hot surfaces and components to cool before carrying out any work on these
component parts.
•
If necessary, wear heat-resistant gloves.
OI c5 eng V9 / 18.08.2006
•
The equipment comes supplied with warning symbols
(stickers) affixed wherever
appropriate.
•
If any of the warning symbols should fall off during
operation or following cleaning work, the operator must
stick these warning symbols
back again immediately.
Safety information in
these Operating
Instructions
In these Operating Instructions, you will
find the following three levels of safety information:
!
•
Places where warning
symbols are affixed
(depending on nationality)
Level 1
WARNING
•
2-1
A warning refers to significant hazards. Failure to follow the relevant safety
instruction could lead to injury or death.
© Cafina / Melitta
E
SAFETY INSTRUCTIONS
2.2
Basic safety
instructions
2.2.1
Proper use
WARNING
2.2.1.1
General
•
Proper use includes, in addition to the specific provisions set out below, observing
these Operating Instructions and complying with the supplier’s obligatory maintenance and repair instructions.
Depending on the type of danger, instead of
STOP, one of the following symbols could
be combined with the word WARNING.
E
Warning of electric shock.
WARNING
•
!
Warning of heat.
2.2.1.2
The c5 coffee maker is used solely to dispense coffee products, coffee and milk
combined products, hot water, steam and
to heat and froth milk.
Level 2
No other use of the c5 coffee maker will be
deemed to be proper.
CAUTION
•
!
The CAUTION symbol
stresses important instructions. Failure to observe
these instructions could
lead to damage to the equipment or to other material assets.
2.2.1.3
No other use of the installed EF milk cooler
will be deemed to be proper.
2.2.1.4
cw cup warmer
The cw cup warmer is intended solely to
keep cups warm.
NOTE
Notes contain additional information aimed at raising
the general level of safety
and at lightening the user’s
workload.
© Cafina / Melitta
Installed EF milk cooler
The installed milk cooler is used exclusively
to keep milk cold.
Level 3
•
c5 coffee maker
No other use of the cw cup warmer will be
deemed to be proper.
2-2
OI c5 eng V9 / 18.08.2006
SAFETY INSTRUCTIONS
2.2.2
Specific hazards and
instructions
2.2.2.1
c5 coffee maker
WARNING
•
Hot air comes out from the
bottom of the steam outlet.
There is a danger of scalding.
•
The bottom of the steam
pipe is hot after it has been
giving off steam. There is a
danger of burns.
•
Hot liquid comes out from
the bottom of the beverage
outlet. There is a danger of
scalding.
•
Hot liquid comes out from
the bottom of the hot water
outlet. There is a danger of
scalding.
•
The bottom of the hot water
outlet is hot after it has been
dispensing liquid. There is a
danger of burns.
WARNING
•
Never insert either the
hands or any rod-shaped
object into a bean hopper or
into the filling chute while
the c5 coffee maker is connected to the mains power
supply.
•
Only coffee beans may be
introduced to the bean hopper.
•
Only ground coffee may be
introduced to the filling
chute.
WARNING
•
When handling the combination cleaning tablets
"COMBI-Tabs", the manufacturer’s warnings and instructions that are printed on
the cleaning tablet container
must be observed and complied with.
WARNING
WARNING
•
When handling the AMC
powder, the manufacturer’s
warnings and instructions
that are printed on the bag
must be observed and complied with.
OI c5 eng V9 / 18.08.2006
2-3
•
Never interfere with the
electricity supply connection
or modify it. This could result
in fatal injury.
•
Never remove the screwmounted covers. There is a
danger of fatal injury upon
contact with live components.
© Cafina / Melitta
E
SAFETY INSTRUCTIONS
E
NOTE
CAUTION
•
Regardless of type configuration, the c5 coffee maker
should not be used in large
kitchens.
•
Never spray the c5 coffee
maker with a water hose
during cleaning. There is a
risk of damage.
•
Electrical equipment which
does not have adequate
electro-magnetic protection
should not be operated
close to the c5 coffee maker
or the installed EF milk cooler.
•
Always empty the coffee
dregs drawer in the correct
manner. There is a danger
of overflow.
•
Always insert the key card
dry and in the correct position into the slot. Do not insert any foreign objects or
chip cards for other systems
into the slot. There is a risk
of damage.
•
Do not leave key card in the
slot during operation.
•
If the internal relieve pressure valve is actuated due to
excessive pressure or temperature increase, switch
the c5 coffee maker off immediately. Secure the c5
coffee maker against unintentional switching on and
report to Customer Support.
•
The drip tray serves solely
to collect drip water. It must
not be used as a sink.
CAUTION
•
Never interfere with the water mains connection or
modify it. There is a danger
of flooding.
•
The c5 coffee maker must
be disconnected from the
water supply after it has
been switched off, e.g. for
the overnight period of inactivity, i.e. it is imperative that
the tap is closed.
•
Only operate the c5 coffee
maker in covered locations,
avoid places where there is
a risk of water splash. There
is a risk of damage.
© Cafina / Melitta
2-4
OI c5 eng V9 / 18.08.2006
SAFETY INSTRUCTIONS
2.2.2.2
Installed EF milk cooler
2.2.2.3
cw cup warmer
WARNING
WARNING
•
Never interfere with the
electricity supply connection
or modify it. This could result
in fatal injury.
•
Never interfere with the
electricity supply connection
or modify it. This could result
in fatal injury.
•
Never remove the screwmounted covers. There is a
danger of fatal injury upon
contact with live components.
•
Always check that the power
switch is working properly.
The signal lamp must be illuminated.
•
Never remove the screwmounted covers. There is a
danger of fatal injury upon
contact with live components.
CAUTION
•
Only use the milk container
supplied and always keep it
clean. There is a hygiene
risk.
•
When refilling with milk,
always use pre-cooled
milk that is no hotter than
1 - 5 °C. There is a hygiene
risk.
•
When refilling with milk, cover the lip seals on the inside
of the milk cooler door with a
cloth. If any milk is left in the
lip seals, there is a hygiene
risk.
•
WARNING
•
CAUTION
•
Only operate the cw cup
warmer in covered locations, avoid places where
there is a risk of water
splash. There is a risk of
damage.
•
Never spray the cw cup
warmer with a water hose
during cleaning. There is a
risk of damage.
Always close the milk cooler
door. There is a hygiene
risk.
OI c5 eng V9 / 18.08.2006
The surfaces of the cup storage area are heated. There
is a danger of burns to the
skin if touched for a prolonged period.
2-5
© Cafina / Melitta
E
SAFETY INSTRUCTIONS
2.2.2.4
E
2.2.3
Key cards
Personal safety
CAUTION
WARNING
•
Keep key cards dry, cool
and in the plastic pockets
provided for this purpose.
There is a risk of damage.
If handled improperly, the equipment could cause serious or fatal injury.
•
Never put a key card on a
hot surface or expose to direct sunlight. There is a risk
of damage.
•
Never put a key card down
in an environment where
there is a risk of water
splash. There is a risk of
damage.
•
Always clean key cards including chip contacts with a
clean, slightly moist cloth
without using any household cleaner. There is a risk
of damage.
•
•
Anyone using and maintaining
the equipment must be trained
in the correct handling of the
equipment and must have read
and understood the safety instructions in these Operating Instructions before starting to use
or maintain the equipment.
WARNING
Never modify or remove any
safety mechanisms.
Do not disable any safety mechanisms by modifying the equipment.
Never bend or fold a key
card or use it as a tool.
There is a risk of damage.
If there are any warning symbols
affixed to the equipment (dependent on nationality), never remove these. Replace any lost or
defective warnings symbols immediately.
In an environment that is
likely to be electrostatic, always ensure that you have
earthed yourself (e.g. by
touching a radiator) before
handling a key card. There
is a risk of damage.
WARNING
Never operate the equipment in
a damaged condition.
Report any irregularities to your
superior immediately, especially
if they affect safety.
© Cafina / Melitta
2-6
OI c5 eng V9 / 18.08.2006
SAFETY INSTRUCTIONS
2.3
2.3.2
Safety mechanisms
Pressure relief valve
As well as the warning symbols (dependent
on nationality) affixed to the equipment, the
equipment also has several active safety
mechanisms.
The c5 coffee maker is equipped with internal pressure relief valves which monitor the
flow heater pressure and the boiler pressure.
2.3.1
2.4
Authorised persons
2.4.1
General
-
Power switch
c5 coffee maker power switch.
Activation with key card.
Only persons who are authorised to do so
may work on or with the equipment.
A person is deemed to be authorised if he/
she satisfies the minimum training and
knowledge requirements listed in this chapter and has been assigned a fixed area of
responsibility.
-
2.4.2
Areas of responsibility of
personnel
2.4.2.1
Operator
As the most senior person from the legal
point of view, the operator is responsible for
the proper use of the equipment and for the
training and deployment of authorised personnel.
cw cup warmer power switch (toggle
switch with integrated light)
He records the competencies and of authorised persons, including whether they have
the authority to give orders, for his business.
His tasks include the following:
-
OI c5 eng V9 / 18.08.2006
2-7
He sets or resets the equipment to the
beverages that are currently to be dispensed, if he wishes to dispense different beverages than those that the
supplier configured upon delivery or installation of the equipment.
© Cafina / Melitta
E
SAFETY INSTRUCTIONS
2.4.2.2
User
2.4.3.2
He is responsible for the following tasks:
E
User
-
He adjusts the equipment to the beverages currently to be dispensed.
This is a person who has been instructed in
how to use the equipment and is aware of
the hazards that exist.
-
He loads the equipment with the beverages to be handled.
2.4.3.3
-
He starts the equipment up and monitors it.
-
He cleans and services the equipment
in accordance with the work described
in chapters «6 Maintenance, 6 - 1» and
«7 Troubleshooting, 7 - 1».
-
He pinpoints problems and organises
problem rectification.
2.4.2.3
These are people who have completed
specialist vocational training, are familiar
with maintenance of the equipment and
through their work they have acquired the
skills needed.
Maintenance work on the mechanical and
electrical aspects of the equipment may
only be carried out by Customer Support.
Maintenance personnel
(service technician)
2.5
He is responsible for the following tasks:
-
-
He takes the equipment apart, stores it
and disposes of it.
Minimum training and
qualifications of
authorised personnel
2.4.3.1
Operator
-
He has a commercial background and
performs a managerial function.
-
He has specialist experience in risk assessment and staff management.
-
He has read and understood chapter
«2 Safety instructions, 2 - 1».
© Cafina / Melitta
Maintenance duty
The operator has an obligation to maintain
and clean the equipment at regular intervals.
He services and repairs the equipment
in accordance with the work described
in chapters «6 Maintenance, 6 - 1» and
«7 Troubleshooting, 7 - 1».
2.4.3
Maintenance personnel
(service technician)
-
to operate the equipment only in a fully
operational and undamaged condition;
-
to use only OEM consumables and
spare parts;
-
to test the security mechanisms to ensure that they are working properly following any maintenance or repair work
(see section «2.3 Safety mechanisms,
2 - 7»).
2.6
Availability of these
Operating Instructions
A copy of these Operating Instructions in
the vicinity of the equipment must be available to staff using the equipment at all
times.
2-8
OI c5 eng V9 / 18.08.2006
CONTROLS AND INDICATORS
3
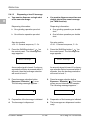
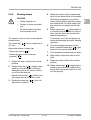
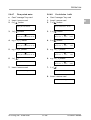
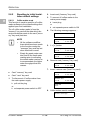
3.1
Controls and
indicators
1
Steam tap, can be swivelled 90°
2
Product fields,
top line level 1,
bottom line level 2
3
3
4
5
Control panel cover,
can be swivelled upwards,
underneath it are the
navigation and "+ / -" buttons.
4
LCD,
text display on two lines
6
5
Filling chute with lid,
chute for "decaffeinated" coffee powder
6
Bean hopper cover
7
Shift/Stop button,
level change in dispensing of beverages,
acknowledgement function in the programming
8
9
10
11
12
13
Beverage selection buttons,
dual assignment for dispensing of beverages, selection and modification function
in the programming (only topmost and
bottom-most beverage selection buttons)
9
Power switch for cw cup warmer
14
12 Beverage outlet, height-adjustable
Overview
1
2
7
8
E
10 Hot water button
11 Pull-out coffee dregs drawer
13 Drip grille
14 Milk cooler door
15 Digit light spot "setting mode"
15
16
17
18
19
16 Above: "Compressor" symbol,
below: digit light spot
17 Rocker switch
18 ENTER function
19 UP function
20 DOWN function
20
21
OI c5 eng V9 / 18.08.2006
21 Display (3 digits)
3-1
© Cafina / Melitta
CONTROLS AND INDICATORS
3.2
E
Operating modes
Operating mode
(incl. sample display)
Description
In operation
In this condition, the c5 coffee maker is connected to the power supply
and water mains or to the canisters.
Select beverage
There are no restrictions on the dispensing of beverages.
Out of order
(de-energised)
In this condition the c5 coffee maker is disconnected from the power
supply and water mains but is still connected to the canisters.
It is not possible to dispense any beverages.
Operation with
critical problem
In this condition, the c5 coffee maker is connected to the power supply
and water mains or to the canisters.
It is not possible to dispense any beverages.
DPxx
Operation with
non-critical problem
Select beverage
Error coffee part DP16
"Stand by" operation
(switched off)
c5
12:10
In this condition, the c5 coffee maker is connected to the power supply
and water mains or to the canisters.
There are restrictions on the dispensing of beverages.
In this condition, the c5 coffee maker is connected to the power supply
and water mains or to the canisters.
It is not possible to dispense any beverages.
14.06.2004
© Cafina / Melitta
3-2
OI c5 eng V9 / 18.08.2006
INITIAL START-UP
4
Initial start-up
4.1
Normal initial start-up
4.1.1
c5 coffee maker
After the machine has been connected to
the mains and the coffee bean level and
water connection have been checked, the
c5 coffee maker can be switched on. It is
recommended carrying out the cleaning
procedure described in section «6.2.2.1 c5
coffee maker, 6 - 5» immediately after
switching on.
Normal initial start-up assumes that the c5
coffee maker is connected to the mains
power supply.
Once the coffee bean level and the water
connection have been checked, the c5
coffee maker can be switched on.
4.1.2
4.2.2
Initial start-up after the machine has been
out of service for a limited time assumes
that the installed EF milk cooler (together
with the c5 coffee maker) will normally have
been disconnected from the mains. Once
the machine has been connected to the
mains power supply and the full milk
container has been inserted, the installed
EF milk cooler is switched on. It is
recommended carrying out the cleaning
procedure described in section «6.2.2.2
Installed EF milk cooler / external FC milk
cooler, 6 - 7» immediately after switching
on.
Installed EF milk cooler
Normal initial start-up assumes that the
installed EF milk cooler (together with the
c5 coffee maker) are connected to the
mains.
Once the full milk container has been
inserted, the installed EF milk container is
ready for operation.
4.1.3
cw cup warmer
The machine is started up normally by
pressing the power switch.
4.2.3
The cw cup warmer is ready for operation
once it has been filled with cups.
4.2
Return to service after
the machine has been
out of service for a
limited time
4.2.1
c5 coffee maker
Installed EF milk cooler
cw cup warmer
If the plug for the cw cup warmer has been
pulled out of the socket, it must be plugged
into the socket first. To start the machine for
the first time after it has been out of service
for a limited time, press the power switch.
The cup warmer is ready for operation once
it has been filled with cups.
Initial start-up after the machine has been
out of service for a limited time assumes
that the c5 coffee maker will normally have
been disconnected from the mains.
OI c5 eng V9 / 18.08.2006
4-1
© Cafina / Melitta
E
INITIAL START-UP
E
4.3
Return to service after
a fault
4.3.1
c5 coffee maker
Normal initial start-up after a failure
assumes that the c5 coffee maker has not
been disconnected from the mains.
Before the c5 coffee maker can be
operational again, the fault must have been
cleared in accordance with chapter
«7 Troubleshooting, 7 - 1».
4.3.2
Installed EF milk cooler
Normal initial start-up after a failure
assumes that the installed EF milk cooler
(together with the c5 coffee maker) have
not been disconnected from the mains.
Before the installed EF milk cooler can be
operational again, the fault must have been
cleared in accordance with chapter
«7 Troubleshooting, 7 - 1».
4.3.3
cw cup warmer
The cw cup warmer does not have any
fault-monitoring software.
After a fault, the plug for the cw cup warmer
must be re-inserted into the socket and the
power switch activated.
© Cafina / Melitta
4-2
OI c5 eng V9 / 18.08.2006
OPERATION
5
Operation
5.1.2
5.1
Power supply connection
The installed EF milk cooler is connected to
the mains power supply via the c5 coffee
maker.
Connection to the power supply is a matter
for the installation company and is taken for
granted below.
If the coffee maker, having been connected
to the mains, is then disconnected from the
mains, the installed EF milk cooler will be
deactivated accordingly.
5.1.1
c5 coffee maker
NOTE
•
The c5 coffee maker is permanently connected to the power supply during normal
operation.
Depending on the form of the power connection, the c5 coffee maker is disconnected from the power supply via power plug
and socket or, in the case of a permanent
connection, via a switch on the mains.
5.1.3
The EF installed milk cooler
does not have a power
switch of its own.
cw cup warmer
The cw cup warmer is connected to the
power supply independently of the "c5 coffee maker / installed EF milk cooler" unit.
NOTE
•
Installed EF milk cooler
The cw cup warmer is connected to the
power supply via the toggle switch and is
switched off by this means.
The c5 coffee maker does
not have a power switch of
its own.
NOTE
•
OI c5 eng V9 / 18.08.2006
5-1
The cw cup warmer has a
separate power switch.
© Cafina / Melitta
E
OPERATION
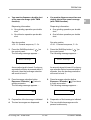
5.1.4
E
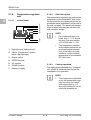
5.1.4.1
Temperature regulator
unit
5.1.4.2
Brief description
The temperature regulator unit controls the
compressor for the installed EF milk cooler.
During operation, the display shows the approximate actual temperature of the milk in
the milk container. The actual milk temperature is taken from the plate on which the
milk container stands.
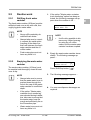
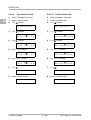
Control panel
1
2
3
4
5
NOTE
•
Pre-cooled milk that is no
hotter than 1 - 5 °C should
be used. See also section
«5.5.4 Refill milk, 5 - 22».
•
The temperature indicator
on the display shows the approximate actual temperature of the milk in the milk
container, not the internal
temperature of the installed
EF milk cooler.
6
7
1
Digit light spot "setting mode"
2
Above: "Compressor" symbol,
below: digit light spot
3
Rocker switch
4
ENTER function
5
UP function
6
DOWN function
7
Display (3 digits)
5.1.4.3
Cooling operation
The digit light spot beneath the "Compressor" symbol is illuminated as long as the
compressor is in operation.
NOTE
•
© Cafina / Melitta
5-2
The compressor is switched
on by the temperature regulator unit when the actual
milk temperature is 2 °C
above the setting for the desired milk temperature.
OI c5 eng V9 / 18.08.2006
OPERATION
5.1.4.4
Checking the desired milk
temperature
5.1.4.5
1. Press ENTER for approx. 2 seconds ...
Programming the desired
milk temperature
E
NOTE
- On the display, the word "SET" will
appear.
•
2. Press ENTER a second time, but this
time only briefly ...
- The digit light spot "Setting mode"
will flash for approx. 12 seconds.
Alternative settings for the
desired milk temperature
will be found in the separate
specification for the temperature regulator unit.
1. Press ENTER for approx. 2 seconds ...
- On the display, the desired milk temperature will appear.
- On the display, the word "SET" will
appear.
3. Press ENTER for approx. 2 seconds or
wait until the digit light spot "Setting
mode" stops flashing.
2. Press ENTER a second time, but this
time only briefly ...
- The digit light spot "Setting mode"
will flash for approx. 12 seconds.
- On the display, the current desired
milk temperature will appear.
- To set the desired milk temperature,
press the UP / DOWN buttons as required.
NOTE
•
Factory setting: 5 °C
•
Adjustment range:
between 3 °C and 6 °C
3. Press ENTER for approx. 2 seconds or
wait until the digit light spot "Setting
mode" stops flashing.
- The desired milk temperature is now
set, and the approximate actual milk
temperature is indicated on the display.
OI c5 eng V9 / 18.08.2006
5-3
© Cafina / Melitta
OPERATION
5.2
E
5.2.1
Water connection
The c5 coffee maker is supplied with water
from ...
Connection to the water mains is a matter
for the installation company and is taken for
granted below.
!
CAUTION
•
It is not permissible to combine a permanent connection to the mains water
supply with the use of a
waste water canister.
•
Ideally, either "permanent
connection to permanent
connection" or "canister to
canister" should be used as
the connection type.
•
Water intake
... the mains water supply, with permanent connection to the pipe system.
or
!
... from a fresh water canister with detachable hose coupling.
5.2.2
Water drainage
Water is drained from the c5 coffee
maker ...
!
The "Waste water container
level monitoring" option can
reduce the risk of overflows.
... into the waste water system, with
permanent connection to the pipe system.
or
!
... into a waste water canister fitted with
a cap with a hole in it.
or
!
© Cafina / Melitta
5-4
... into a wastewater canister in combination with the "Waste water container
level monitoring" option (hose is placed
above the connection pipe).
OI c5 eng V9 / 18.08.2006
OPERATION
5.3
Switching on and off
5.3.1
Switching on the c5
coffee maker
NOTE
•
Move steam and hot water
outlets to the vertical position.
•
Close steam tap tightly.
•
Pull beverage outlet right
down. Hot water and steam
will come out.
NOTE
•
The c5 coffee maker has a
"standby" operating mode.
•
The installed EF milk cooler
is set to "standby" or operating mode at the same time
as the c5 coffee maker.
3. This c5 coffee maker heats up. The
second line flashes.
When the c5 coffee maker is switched on, it
moves from "standby" to operating mode.
TURN ON
prog. 86 °C
None of the product fields are lit up.
act.
1. Turn on the tap.
2. Insert "user" / "manager" key card and
then remove.
c5
10:25
TURN ON
Steam temp. too low
14.06.2004
4. After the c5 coffee maker has heated
up, the "Refill milk" prompt will appear.
You should now fill it up with milk, i.e.
replenish with milk if the milk level is too
low, or else insert the milk container.
Select beverage
Refill milk
"
#
OI c5 eng V9 / 18.08.2006
5. All five product fields are illuminated.
The c5 coffee maker is now ready to
dispense beverages.
Select beverage
5-5
© Cafina / Melitta
E
OPERATION
5.3.2
E
Switching off the
c5 coffee maker
When the c5 coffee maker is switched off, it
moves from operating mode to "standby"
mode.
NOTE
•
The c5 coffee maker has a
"standby" operating mode.
•
The installed EF milk cooler
is set to "standby" or operating mode at the same time
as the c5 coffee maker.
It can be switched off in the following ways,
provided that "yes" is selected.
OFF after cleaning?
[1]yes
[5]no
!
NOTE
•
The c5 coffee maker goes straight to
"standby" mode without the cleaning
procedure.
Details on the cleaning
procedure can be found in
sections «6.2.2.1 c5 coffee
maker, 6 - 5» and «6.2.2.2
Installed EF milk cooler / external FC milk cooler, 6 - 7».
!
•
•
Only coffee or only milk beverages
have been dispensed since the last
switch-on:
The c5 coffee maker runs through the
relevant cleaning procedure and then
goes to "standby" mode.
CAUTION
•
No beverages have been dispensed
since the last switch-on:
Waste water canister almost
or completely full?
!
Depending on the cleaning
procedure, the throughput
of water may be high. If the
waste water canister has little remaining capacity, it
could overflow.
Both coffee and milk beverages have
been dispensed since the last switchon:
The c5 coffee maker runs through the
full cleaning procedure and then goes
to "standby" mode.
Check waste water canister
prior to switching off the machine!
© Cafina / Melitta
5-6
OI c5 eng V9 / 18.08.2006
OPERATION
We now describe as an example how the
machine is switched off after both coffee and milk beverages have been dispensed in the operating mode.
2. Before switching off, the cleaning
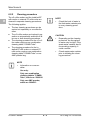
process starts up. (For details, see also section «6.2.2 Cleaning procedure,
6 - 4»).
Tell the c5 coffee maker to switch off after the cleaning process.
NOTE
• Coffee system: Only use combi-
OFF after cleaning?
[1]yes
[5]no
nation cleaning tablets "COMBITabs".
•
•
Get out two combination cleaning
tablets "COMBI-Tabs" or one
combination cleaning tablet
"COMBI-Tabs" and a AMC powder bag.
For "yes", press the topmost beverage
selection button [
].
Get the cleaning container.
3. You will now be prompted to empty the
coffee dregs drawer.
1. Insert "user" / "manager" key card and
then remove.
Empty drawer!
Select beverage
Pull out the coffee dregs drawer so that
you can empty it. The following message appears ...
Drawer missing!
"
#
Push the empty coffee dregs drawer
back in. The following message appears ...
Drawer emptied
Please confirm
(SH)
4. Now press the Shift/Stop button [
on the control panel.
OI c5 eng V9 / 18.08.2006
5-7
]
© Cafina / Melitta
E
OPERATION
E
8. When the cleaning process has
finished, the following message
appears ...
Now empty the milk, i.e. replace the
milk container with the empty cleaning
container (into which you have placed
one combination cleaning tablet "COMBI-Tabs" or the content of a AMC powder bag). Leave the milk cooler door
open.
c5
12:10
Insert the cleaning
container
14.06.2004
Take the cleaning container out of the
installed EF milk cooler.
The c5 coffee maker is switched off.
Please confirm
(SH)
5. Now press the Shift/Stop button [
on the control panel.
9. Turn off the tap.
5.3.3
]
The following message appears during
the rinse operation ...
Switching the cw cup
warmer on and off
The cw cup warmer is switched on and off
via the illuminated toggle switch.
NOTE
Rinsing
•
The cover of the filling chute folds
open. Now insert the other combination
cleaning tablet "COMBI-Tabs" in the
filling chute.
The cw cup warmer does
not have a "standby" mode.
It is always switched to full
heat output.
Put cleaning agent in
Please confirm
(SH)
6. Now press the Shift/Stop button [
on the control panel.
]
7. The following message appears ...
Cleaning
Cleaning milk
© Cafina / Melitta
5-8
OI c5 eng V9 / 18.08.2006
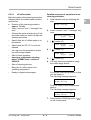
OPERATION
5.4
5.4.1
Dispensing of beverages
5.4.1.1
Dispensing normal coffee
2. Place coffee cup(s) under the beverage outlet.
1. Push the beverage outlet upwards.
The following description of how to dispense beverages assumes the following allocation to the beverage selection buttons:
3. Push the beverage outlet downwards
until the coffee cup(s) can be removed
without having to push the beverage
outlet upwards again.
Product fields from top to bottom ...
Espresso
Ristretto
[
]
Coffee Cream
Coffee Special
[
]
Cappuccino
Macchiatto
[
]
Cup of
cold milk
[
]
Hot milk
Decaffeinated
[
]
General sequence
4. When this message is displayed, the
coffee maker is ready to dispense beverages ...
Select beverage
5. Decide your beverage dispensing strategy.
NOTE
•
Level assignment ...
Level 1 .......
Level 2 .......
[
]
The TWIN function can only
be used if it has been activated by Customer Support!
! Level 1 beverage
! Level 2 beverage
! One cup from a single infusion oper-
Reference products ...
NOTE
ation
* after the product in the display
means "reference product from
bean hopper 1".
! More than one cup from a single infusion operation
! Two cups from a single, combined
** after the product in the display
means "reference product from
bean hopper 2".
infusion operation (TWIN function)
! Several cups (two each) from a single, combined infusion operation
(TWIN function)
6. Dispense the beverages.
Stopping the product flow ...
You can interrupt the flow of beverage at
any time by pressing the Shift/Stop button
[
], if this has been configured on the
control side.
OI c5 eng V9 / 18.08.2006
5-9
© Cafina / Melitta
E
OPERATION
5.4.1.2
!
E
Dispensing a level 1 beverage
You want to dispense a single shot
of the same beverage.
!
Dispensing information:
You want to dispense multiple shots
of the same beverage (no TWIN
function).
Dispensing information:
! One grinding operation per shot.
! One infusion operation per shot.
! One grinding operation per shot.
! One infusion operation per shot.
See also section
«5.4.1.1 General sequence, 5 - 9»
See also section
«5.4.1.1 General sequence, 5 - 9»
1. Press beverage selection button
Espresso / Ristretto [
] once.
1. Press beverage selection button
Espresso / Ristretto [
] five times
at two-second intervals, for example.
The following message appears ...
The following message appears ...
1 Espresso**
5 Espresso**
2. Preparation of the beverage is initiated.
2. Preparation of the beverage is initiated.
3. The beverage is dispensed.
3. The beverages are dispensed continuously.
© Cafina / Melitta
5 - 10
OI c5 eng V9 / 18.08.2006
OPERATION
!
You want to dispense a double shot
of the same beverage (with TWIN
function).
!
Dispensing information:
You want to dispense more than one
double shot of the same beverage
(with TWIN function).
Dispensing information:
! One grinding operation per double
! One grinding operation per double
shot
shot
! One infusion operation per double
! One infusion operation per double
shot.
shot.
See also section
«5.4.1.1 General sequence, 5 - 9»
See also section
«5.4.1.1 General sequence, 5 - 9»
1. Press beverage selection button
Espresso / Ristretto [
] twice in
quick succession.
The following message appears ...
1. Press beverage selection button
Espresso / Ristretto [
] four times
in quick succession, for example.
The following message appears ...
2 Espresso
4 Espresso
2. Preparation of the beverage is initiated.
2. Preparation of the beverage is initiated.
3. The two beverages are dispensed.
3. The two double beverages are dispensed continuously.
OI c5 eng V9 / 18.08.2006
5 - 11
© Cafina / Melitta
E
OPERATION
5.4.1.3
!
E
Dispensing a level 2 beverage
You want to dispense a single shot
of the same beverage.
!
Dispensing information:
You want to dispense more than one
double shot of the same beverage
(no TWIN function).
Dispensing information:
! One grinding operation per shot.
! One grinding operation per double
shot
! One infusion operation per shot.
! One infusion operation per double
shot.
See also section
«5.4.1.1 General sequence, 5 - 9»
See also section
«5.4.1.1 General sequence, 5 - 9»
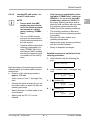
1. Press the Shift/Stop button [
] on
the control panel. The following message appears ...
SH
1. Press the Shift/Stop button [
] on
the control panel. The following message appears ...
SH
Select beverage
An acoustic signal is heard. If no beverage selection button is pressed within 5
seconds, then the beverage selection
will revert to level 1.
2. Press beverage selection button
Espresso / Ristretto [
] once.
The following message appears ...
Select beverage
An acoustic signal is heard. If no beverage selection button is pressed within 5
seconds, then the beverage selection
will revert to level 1.
2. Press beverage selection button
Espresso / Ristretto [
] five times
at two-second intervals, for example.
The following message appears ...
1 Ristretto
5 Ristretto
3. Preparation of the beverage is initiated.
3. Preparation of the beverage is initiated.
4. The beverage is dispensed.
4. The beverages are dispensed continuously.
© Cafina / Melitta
5 - 12
OI c5 eng V9 / 18.08.2006
OPERATION
!
You want to dispense a double shot
of the same beverage (with TWIN
function).
!
Dispensing information:
Dispensing information:
! One grinding operation per double
! One grinding operation per double
shot
shot
! One infusion operation per double
! One infusion operation per double
shot.
shot.
See also section
«5.4.1.1 General sequence, 5 - 9»
See also section
«5.4.1.1 General sequence, 5 - 9»
1. Press the Shift/Stop button [
] on
the control panel.
The following message appears ...
SH
You want to dispense more than one
double shot of the same beverage
(with TWIN function).
1. Press the Shift/Stop button [
] on
the control panel.
The following message appears ...
SH
Select beverage
An acoustic signal is heard. If no beverage selection button is pressed within 5
seconds, then the beverage selection
will revert to level 1.
2. Press beverage selection button
Espresso / Ristretto [
] twice in
quick succession.
The following message appears ...
Select beverage
An acoustic signal is heard. If no beverage selection button is pressed within 5
seconds, then the beverage selection
will revert to level 1.
2. Press beverage selection button
Espresso / Ristretto [
] four times
in quick succession.
The following message appears ...
2 Ristretto
4 Ristretto
3. Preparation of the beverage is initiated.
3. Preparation of the beverage is initiated.
4. The two beverages are dispensed.
4. The two double beverages are dispensed continuously.
OI c5 eng V9 / 18.08.2006
5 - 13
© Cafina / Melitta
E
OPERATION
5.4.2
E
Dispensing decaffeinated
coffee
3. Press beverage selection button
Hot milk / Decaffeinated [
] once.
The following message appears ...
As well as the nine pre-programmed beverages, which can be dispensed using the beverage
selection buttons, it is also possible to dispense
a tenth beverage.
Please wait
This tenth product is assigned for the purposes
of beverage dispensing to one overriding product from the range of beverage selection buttons.
4. Shortly afterwards the following message appears ...
This tenth product has to be in powder form and
is inserted into the filling chute using the measuring spoon.
Put coffee in
CAUTION
•
The lid of the filling chute opens.
"Powder form" is understood to
mean coffee ground from coffee beans. Different forms of
coffee or other powder products than coffee must not be
used.
5. Shortly afterwards the following message appears ...
Select beverage
(For an overview see also section
«5.4.1.1 General sequence, 5 - 9».)
The lid of the filling chute remains open
for approx. 20 seconds.
1. When this message is displayed, the
coffee maker is ready to dispense beverages ...
6. Put pre-prepared powder from the
measuring beaker filled up to the
line into the filling chute.
Select beverage
7. For example, press beverage selection
button Espresso / Ristretto [
]
once.
The following message appears ...
2. Press the Shift/Stop button [
] on
the control panel.
The following message appears ...
SH
Select beverage
1 Espresso**
An acoustic signal is heard. If no beverage selection button is pressed within 5
seconds, then the beverage selection
will revert to level 1.
© Cafina / Melitta
8. Preparation of the beverage is initiated.
9. The beverage is dispensed.
5 - 14
OI c5 eng V9 / 18.08.2006
OPERATION
5.4.3
Dispensing milk
An example of how a portion of hot milk is
dispensed is now described.
Depending on the configuration of the c5
coffee maker, it is possible to dispense cold
or hot milk either manually or in portions.
1. Push the beverage outlet upwards.
A milk beverage selection button can only
be allocated the functions of "manual" or
"portion".
!
2. Place milk jug under the beverage outlet.
3. Push the beverage outlet downwards
until the milk jug can be removed without having to push the beverage outlet
upwards again.
Manual dispensing of milk
Keep the beverage selection button
pressed down until the desired quantity
of milk has been dispensed.
!
Dispensing a portion of milk
Keep the beverage selection button
pressed down and wait until the programmed quantity of milk has been dispensed.
NOTE
•
Replenishment of milk is not
allowed while "milk" is being
dispensed.
•
The first portion of milk
should not be used ...
- if no milk has been
dispensed for over four
hours.
- immediately after the
machine has been started
up (c5 coffee maker /
installed EF milk cooler).
- in the morning, if the milk
was in the installed EF milk
cooler overnight.
OI c5 eng V9 / 18.08.2006
4. When this message is displayed,
the coffee maker is ready to dispense
beverages ...
Select beverage
5. Press beverage selection button
Hot milk / Decaffeinated [
] once.
The following message appears ...
1 Port. hot milk
6. Preparation of the beverage is initiated.
7. The beverage is dispensed.
NOTE
•
5 - 15
Pressing the beverage selection button Hot milk /
Decaffeinated [
] while
the beverage is being dispensed stops the flow of
beverage.
© Cafina / Melitta
E
OPERATION
5.4.4
Dispensing of hot water
An example of how a portion of hot milk is
drawn is now described.
CAUTION
E
•
Hot water outlet is hot.
•
Danger of burns and scalding.
•
Be careful when touching
the hot water outlet.
1. Rotate hot water outlet to the vertical
position.
2. Place cup under hot water outlet.
3. When this message is displayed, the
coffee maker is ready to dispense beverages ...
Depending on the configuration of the c5
coffee maker, it is possible to dispense hot
water either manually or in portions.
The hot water button can only be allocated
the functions of "manual" or "portion".
!
Manual drawing of hot water
Select beverage
4. Press hot water button [
] once.
The following message appears ...
Keep the hot water button [
]
pressed down until the desired quantity
of hot water has been dispensed.
!
1 Hot water
Drawing a portion of hot water
Keep the hot water button [
]
pressed down and wait until the programmed quantity of hot water has
been dispensed.
5. Preparation of the beverage is initiated.
6. The beverage is dispensed.
NOTE
•
© Cafina / Melitta
5 - 16
Pressing the hot water button [
] while the beverage is being dispensed
stops the flow of beverage.
OI c5 eng V9 / 18.08.2006
OPERATION
5.4.5
Drawing steam
4. Rotate the steam outlet forwards and
dip it into the drink that is to be heated.
CAUTION
•
Steam outlet is hot.
•
Danger of burns and scalding.
•
Be careful when touching
the hot steam outlet.
With larger receptacles, moved the
steam outlet together with the receptacles towards the c5 coffee maker and
then place the receptacle on the drip
grille.
5. Rotate steam tap [
] downwards in
a controlled way and keep it in this position until the drink has reached the
desired temperature.
The steam is used to heat up cold and preheated drinks.
The steam tap [
90° max.
] can be rotated up to
6. Once the heating operation has finished, rotate the steam tap [
] right
back into its normal position.
Operational status of steam tap:
- Steam tap closed [
If necessary, move the receptacle upwards and sideways during the heating
operation.
]
7. Pull receptacle forwards and put aside.
- Steam tap open to the maximum
possible [
]
8. Wipe steam outlet clean with a moist
cloth.
9. Rotate hot water outlet to the vertical
position.
1. Rotate hot water outlet to the vertical
position.
2. Rotate steam tap [
] slightly downwards so as to allow the condensed
water that is still in the steam outlet to
run off into the drip tray.
10. Rotate steam tap [
] slightly downwards so as to allow the residual fluid
that is still in the steam outlet to run off
into the drip tray.
Keep the steam tap [
] rotated until
only steam comes out of the nozzle.
3. Rotate the steam tap [
right back in position.
OI c5 eng V9 / 18.08.2006
] until it is
5 - 17
© Cafina / Melitta
E
OPERATION
5.4.6
E
Frothing milk manually
CAUTION
•
Beware hot steam outlet
and/or splash from hot milk.
•
Danger of burns and scalding.
•
Be careful when touching
the hot steam outlet. Observe distance between end
of steam nozzle and surface
of liquid.
1. Align steam outlet vertically.
2. Rotate steam tap [
] slightly downwards so as to allow the condensed
water that is still in the steam outlet to
run off into the drip tray.
3. Rotate steam outlet forwards and dip
the end of the steam nozzle into the
drink to be frothed right down to the
bottom of the receptacle.
4. Rotate the steam tap [
] downwards in a controlled way.
At the same time lower the receptacle
so that the end of the steam nozzle is
just above the surface of the liquid.
During the frothing operation, watch
the formation of froth and continually
adjust the distance between the "end of
the steam nozzle and the surface of the
liquid" (this will differ according to the
physical properties of the steam nozzle).
NOTE
•
The milk used should be
cool so as to comply with the
hygiene regulations.
Steam can be used to froth milk.
The steam tap [
90°.
] can be rotated up to
6. Pull receptacle forwards and put aside.
Operational status of steam tap:
- Steam tap closed [
]
- Steam tap open to the maximum
possible [
]
© Cafina / Melitta
5. When the desired degree of froth has
been achieved, rotate the steam tap
[
] back into its normal position
(closed) to terminate the operation.
7. Wipe steam outlet clean with a moist
cloth.
8. Align steam outlet vertically.
9. Rotate steam tap [
] slightly downwards so as to allow the residual fluid
that is still in the steam outlet to run off
into the drip tray.
5 - 18
OI c5 eng V9 / 18.08.2006
OPERATION
5.5
Routine work
5.5.1
Refilling fresh water
canister
1. If the option "Waste water container
level monitoring" option has been selected, the following message will appear when the canister is full ...
The fresh water canister (20 litres) must be
refilled at least once a day with cold, thoroughly hygienic mains water.
Select beverage
Waste water full
NOTE
5.5.2
•
Never refill completely decalcified fresh water.
•
Always take care to correctly connect the rapid action
coupling of the water line
that runs between the fresh
water canister and the c5
coffee maker.
•
Fresh water pipe must not
have any kinks in it.
NOTE
•
It will not be possible to dispense any further beverages using the c5 coffee
maker until the waste water
canister has been emptied.
2. Empty the waste water canister immediately. The following message appears ...
Emptying the waste water
canister
Waste water emptied
Please confirm
(SH)
The waste water canister (10 litres) must
be emptied and thoroughly rinsed at least
once a day.
Press Shift/Stop button [
].
3. The following message appears ...
NOTE
•
Always take care to ensure
that the waste water hose is
pushed down through the
hole in the cap of the waste
water canister to a sufficient
depth.
Select beverage
•
If the option "Waste water
container level monitoring"
was selected during installation, take care to ensure that
the waste water hose fits
snugly and sufficiently far on
the connection pipe.
•
Waste water hose must not
have any kinks in it.
OI c5 eng V9 / 18.08.2006
4. You can now dispense beverages as
required.
5 - 19
© Cafina / Melitta
E
OPERATION
5.5.3
E
Refill coffee beans
3. Press beverage selection button Coffee cream / Coffee Special [
]
again.
The bean hoppers are monitored as regards coffee bean content. If a bean hopper becomes empty, this is displayed for
the relevant bean hopper during the dispensing of a beverage.
NOTE
•
NOTE
•
The description which follows applies by analogy to
the bean hopper 2.
Do not press the Shift/Stop
button or insert any key
card.
4. If bean hopper 2 is also empty, the following message will appear briefly ...
1 Coffee cream*
Bean hopper 2 empty
In the example below, bean hopper 1 is
empty. The associated reference product is "Coffee cream*".
5. Preparation of the beverage is initiated.
1. Beverage selection key Coffee cream
/ Coffee Special [
] has been
pressed once.
The following message appears ...
6. The beverage is dispensed.
1 Coffee cream*
Bean hopper 1 empty
2. Pour coffee beans into bean hopper 1
up to about 2 cm below the bean hopper rim.
The position of bean hopper 1 is visible
on the inside of the bean hopper cover.
© Cafina / Melitta
5 - 20
OI c5 eng V9 / 18.08.2006
OPERATION
In the example below, bean hopper 1
is empty. The associated reference
product is "Coffee cream*".
4. Pour coffee beans into bean hopper 1
up to about 2 cm below the bean hopper rim.
The Shift/Stop button was pressed by
mistake.
The position of bean hopper 1 is visible
on the inside of the bean hopper cover.
1. Beverage selection key Coffee cream
/ Coffee Special [
] has been
pressed once.
The following message appears ...
5. Insert "user" / "manager" key card. The
following message appears ...
Fault confirmed
1 Coffee cream*
Bean hopper 1 empty
6. Remove "user" / "manager" key card.
The following message appears ...
2. The Shift/Stop button [
pressed by mistake.
] was
Select beverage
3. The following message appears ...
Select beverage
Bean hopper 1 empty
According to the illuminated product
fields, only the beverages served by
bean hopper 2 and also pure milk beverages are available for selection using
the relevant beverage selection buttons.
According to the illuminated product
fields, all the products are now available for selection via the associated
beverage selection buttons.
7. Select beverage.
8. Preparation of the beverage is initiated.
9. The beverage is dispensed.
As before, there are no restrictions on
the drawing of hot water and steam.
OI c5 eng V9 / 18.08.2006
5 - 21
© Cafina / Melitta
E
OPERATION
5.5.4
E
Refill milk
The description of the procedure below applies to both the installed EF milk cooler
and the external FC milk cooler.
!
CAUTION
•
The installed EF milk cooler can optionally be fitted with a milk level monitoring
system.
If the milk container is empty:
the addition of steam instead of milk to beverages
can result in splashing of hot
liquid, causing scalds.
•
NOTE
• The milk container for the in-
Replenish the milk supply
immediately.
stalled EF milk cooler holds approx. six litres of milk.
•
•
•
•
If the installed EF milk cooler is
fitted with milk level monitoring, then this will be activated
when the milk supply in the
milk container has dropped to
about 1 litre or when the milk
container is not in the installed
EF milk cooler.
When replenishing the milk
supply, always cover the lip
seals of the milk cooler door of
the installed EF milk cooler.
The milk used to replenish
the milk container must be
pre-cooled, i.e. it must not be
any hotter than 1 - 5 °C. If
hotter milk is used, the milk
will overheat when "milky
coffee" beverages are dispensed, insufficient froth
will be created and it will not
be possible to comply with
the hygiene regulations.
1. The following message indicates that
there is either no milk or insufficient
milk or else that the milk container itself
is not inside the installed EF milk
cooler ...
Select beverage
Refill milk
2. Replenish milk supply. This will result
in the following message ...
Select beverage
3. Pull beverage outlet right down.
4. Open control panel cover and press the
[ $ ] button.
If the milk container is empty
when the machine comes to
dispense beverages that include milk, the c5 coffee maker
will dispense steam instead of
milk.
Please wait
A little milk will be released to fill the
lines.
5. You can now dispense beverages as
required.
© Cafina / Melitta
5 - 22
OI c5 eng V9 / 18.08.2006
OPERATION
5.5.5
Emptying the coffee
dregs drawer
1. The following displays indicate how full
the coffee dregs drawer is ...
... Coffee dregs drawer 80 % full.
Once an infusion operation is complete,
empty the resulting block of coffee dregs
into the coffee dregs drawer.
1 Coffee cream*
Drawer nearly full!
Monitoring of how full the coffee dregs
drawer is is based on adding up the weight
of the individual blocks of coffee dregs discarded.
... Coffee dregs drawer 100 % full.
NOTE
•
Select beverage
Empty drawer!
The coffee dregs drawer is
full to capacity when it contains a weight of 0.7 kg.
When this occurs, the message "Empty drawer!" is displayed.
•
The coffee dregs drawer is
80 % full when it contains a
weight of 0.56 kg.
2. Push the beverage outlet all the way
up.
3. Pull out coffee dregs drawer. The following message appears ...
Select beverage
Drawer missing!
When this occurs, the message "Drawer nearly full!" is
displayed.
4. Empty coffee dregs drawer, clean with
warm water (not with hot water from
the c5 coffee maker) and dry.
CAUTION
•
•
If the coffee dregs drawer
overflows, this will cause serious dirt accumulation inside the c5 coffee maker.
5. Push coffee dregs drawer in. The following message appears ...
Drawer emptied
Please confirm
Always empty coffee dregs
drawer correctly when the
c5 coffee maker is switched
on.
(SH)
Press Shift/Stop button [
].
6. The following message appears ...
Select beverage
7. You can now dispense beverages as
required.
OI c5 eng V9 / 18.08.2006
5 - 23
© Cafina / Melitta
E
OPERATION
5.5.6
E
Cleaning the drip tray
The drip grille and drip tray must be
cleaned at regular intervals.
1. Press the drip grille at the back right or
back left corner downwards a little.
2. Remove drip grille and clean.
3. Clean drip tray and clean out the drain
holes if they are blocked.
4. Place the drip grille in the correct position on the drip tray, i.e. with the transverse rods underneath.
© Cafina / Melitta
5 - 24
OI c5 eng V9 / 18.08.2006
OPERATION
5.6
System work
!
5.6.1
Control panel and button
layout
!
!
!
!
!
1
2
!
3
4
5
!
!
Liquid crystal display
- Displays information on the
corresponding function.
Navigation button [ # ]
- One level higher in the structure
- Used to confirm queries /
or adjustment values
OI c5 eng V9 / 18.08.2006
Navigation button [ $ ]
- One level down in the structure
Navigation button [ " ]
- One position horizontally to the right in
the structure
Navigation button [ ! ]
- One position horizontally to the left in
the structure
Shift/Stop button [
]
- Not allocated
[ + ] button
- Used to raise the adjustment value in
predefined steps
- Used to enter "Yes"
[ – ] button
- Used to lower the adjustment value in
predefined steps
- Used to enter "No"
[
] button (no. invisible)
- 1 = "Yes" in response to textual
questions
- 2 to 4 unallocated
- 5 = "No" in response to textual
questions
Cards
Card handling:
1. Insert key card.
2. Wait until LCD display changes.
3. Remove key card.
!
"user" key card
- Insertion of the card has the effect of
switching the c5 coffee machine on or
off
- Insertion of the card has the effect of
granting access to basic functions
!
"manager" key card
- Insertion of the card has the effect of
granting access to advanced
functions
- Insertion of the card after the
adjustment values have been
changed has the effect of confirming
the new settings
5 - 25
© Cafina / Melitta
E
OPERATION
5.6.2
Structure of the functions
5.6.2.1
Overview and adjustment values
E
Access with the "user" key card
User menu
Function
Cleaning
- OFF after cleaning ?
- Clean coffee ?
- Clean milk ?
Daily counter
- Coffee total
- Other products
Setting
In steps of ...
(1)yes / (5)no
(1)yes / (5)no
(1)yes / (5)no
-
0 - 100.000
0 - 100.000
-
Setting
In steps of ...
(1)yes / (5)no
(1)yes / (5)no
(1)yes / (5)no
-
0 - 100.000
0 - 100.000
yes / no
-
0 - 1.000.000
0 - 1.000.000
0 - 1.000.000
0 - 1.000.000
-
Access with the "manager" key card
Manager menu
Function
Cleaning
- OFF after cleaning ?
- Clean coffee ?
- Clean milk ?
Daily counter
- Coffee total
- Other products
- Reset counter
Total counter
- Coffee total
- Tea total
- Steam total
- Milk total
Functions
- EXTERNAL
- Self-service
- ON / OFF timer
- Memoswitch
- Milk
- Disable buttons
yes / no
yes / no
yes / no
yes / no
yes / no
yes / no
-
Water quantity
- Coffee products
0-995 ml
± 0.5 ml
Coff. quant. ±1g
- Coffee products
±1g
± 0.1 g
Flow period water
- Hot water products
0.4 - 120 s
± 0.2 s
Pre-infusion 1 milk
- Milk / coffee products
0.0 - 50 s
± 0.5 s
Pre-infusion 2 milk
- Milk / coffee products
0.0 - 50 s
± 0.5 s
Post-infusion milk
- Milk / coffee products
0.0 - 50 s
± 0.5 s
Flow period milk
- Milk products
0.4 - 120 s
± 0.2 s
Flow period steam
- Steam products
0.4 - 120 s
± 0.2 s
Price
- For all products
0.00 - 25.00
± 0.10
No charge
- For all products
Yes / No
-
Time / date
- Hours
- Minutes
- Day
- Month
- Year
HH:
MM
DD.
MM.
YY
-
© Cafina / Melitta
5 - 26
OI c5 eng V9 / 18.08.2006
OPERATION
5.6.3
5.6.3.1
!
Brief description
of functions
5.6.3.4
!
Cleaning
!
!
Clean coffee?
The products intended can be dispensed directly.
Clean milk?
!
Specifies whether the cleaning procedure will apply to the milk system.
5.6.3.2
The switch-on/switch-off times must
have been previously specified.
Daily counter
With "user" key card
!
!
!
Disable buttons
Locking and release of the control buttons on the c5 coffee maker (analogous to "key lock" key card).
Queries the current counter status for
all products. Deletion of counters is
generally possible.
5.6.3.5
Total counter
[ i ] The total counters must not be used for
billing purposes as different counting methods are used. Billing will only be correct
with a registration system.
!
Milk
Addition and removal of the installed
EF milk cooler.
With "manager" key card
5.6.3.3
Memoswitch
The c5 coffee maker can take note of
the usage behaviour of the user up to a
point and simplify operation.
Queries the current counter status for
all products. Deletion of counters is not
possible.
!
ON / OFF timer
Sets c5 coffee maker to automatic
switching on and off.
[ i ] The daily counters must not be used for
billing purposes as different counting methods are used. Billing will only be correct
with a registration system.
!
Self-service
Switches c5 coffee maker to self-service operation (analogous to "vip" key
card).
Specifies whether the cleaning procedure will apply to the coffee system.
!
EXTERNAL
Addition and removal of external modules such as coin-operation units or
coin-checking devices (analogous to
"external" key card) etc.
OFF after cleaning?
Specifies whether the c5 coffee maker
will switch off after the individual cleaning procedures are complete or remain
in operation.
Functions
!
Water quantity
Every individual coffee product
The water quantity can be altered in
predefined steps.
Coffee / Tea / Steam / Milk
Queries the current counter status for
specified products.
Deletion of counters is not possible.
OI c5 eng V9 / 18.08.2006
5 - 27
© Cafina / Melitta
E
OPERATION
5.6.3.6
!
Coffee quantity ±1g
Every individual coffee product
5.6.3.11
!
The powder quantity can be altered in
predefined steps.
E
!
Flow period hot water
5.6.3.12
!
5.6.3.8
!
Pre-infusion 1 milk
"Steam button" option
The milk flow time can be altered in
predefined steps.
5.6.3.13
Coffee is then added.
!
Price
Every beverage
Allows a price to be stored for every
beverage, e.g. for a connected, external billing system.
Pre-infusion 2 milk
Every "coffee-milk" beverage
The milk flow time can be altered in
predefined steps.
Coffee is then added.
5.6.3.10
!
Flow period steam
The flow time can be altered in predefined steps.
Every "coffee-milk" beverage
5.6.3.9
!
Hot milk
The flow time can be altered in predefined steps.
Hot water beverages
The flow time can be altered in predefined steps.
Cold milk
The flow time can be altered in predefined steps.
!
5.6.3.7
Flow period milk
5.6.3.14
!
No charge
Every beverage
Allows a price to be stored for every
beverage, e.g. for a connected, external billing system.
Post-infusion milk
Every "coffee-milk" beverage
The milk flow time can be altered in
predefined steps.
5.6.3.15
!
Coffee is output first.
Time / date
Time
Used to set the time in the format
"12:34".
!
Date
Used to set the date in the format
"Wednesday 16.06.2004".
© Cafina / Melitta
5 - 28
OI c5 eng V9 / 18.08.2006
OPERATION
5.6.4
5.6.4.1
!
Use of the
functions
!
Cleaning
2. 1 x [ " ] button
Card: "manager" key card
1. Insert / remove card
Card: "user" key card
E
Daily counter
1. Insert / remove card
OFF after cleaning?
(1)yes
(5)no
2. [
Coffee total
25
] button (5)
Clean coffee?
(1)yes
3. [
3. 1 x [ $ ] button
4. [ " ] or [ ! ] button
(5)no
Other beverages
yy
] button (1)
Clean milk?
(1)yes
5. [ " ] or [ ! ] button
(5)no
Reset counter
4. [
no
] button (1)
5. Start of cleaning procedure
6. 1 x [ + ] button
Reset counter
5.6.4.2
!
yes
Daily counter
Card: "user" key card
7. 1 x [ # ]
1. Insert / remove card
Daily counter
2. 1 x [ " ] button
Daily counter
8. Insert / remove card
Select beverage
3. 1 x [ $ ] button
Coffee total
25
4. [ " ] or [ ! ] button
Other beverages
yy
5. Insert / remove card
Select beverage
OI c5 eng V9 / 18.08.2006
5 - 29
© Cafina / Melitta
OPERATION
5.6.4.3
!
E
Total counter
Card: "manager" key card
1. Insert / remove card
2. 2 x [ " ] button
Total counter
3. 1 x [ $ ] button
Coffee total
130
4. 1 x [ " ] button
Tea total
25
5. 1 x [ " ] button
Steam total
15
6. 1 x [ " ] button
Milk total
10
7. 1 x [ # ] button
Total counter
8. Insert / remove card
Select beverage
© Cafina / Melitta
5 - 30
OI c5 eng V9 / 18.08.2006
OPERATION
5.6.4.4
Functions
4. 1 x [ + ] button
EXTERNAL
NOTE
•
yes
Only those functions which
have a grey background
(activated) can be altered.
1 x [ + ] button
Self-service
yes
!
Card: "manager" key card
1 x [ + ] button
1. Insert / remove card
2. 3 x [ " ] button
ON / OFF timer
yes
Functions
1 x [ + ] button
3. 1 x [ $ ] button
Memoswitch
yes
EXTERNAL
no
1 x [ + ] button
1 x [ " ] button
Milk
yes
Self-service
no
1 x [ + ] button
1 x [ " ] button
Disable buttons
yes
ON / OFF timer
no
5. 1 x [ # ]
1 x [ " ] button
Functions
Memoswitch
no
6. Insert / remove card
1 x [ " ] button
Select beverage
Milk
no
1 x [ " ] button
Disable buttons
no
OI c5 eng V9 / 18.08.2006
5 - 31
© Cafina / Melitta
E
OPERATION
5.6.4.5
!
E
5.6.4.6
Water quantity
Card: "manager" key card
!
Coffee quantity ±1g
Card: "manager" key card
1. Insert / remove card
1. Insert / remove card
2. 4 x [ " ] button
2. 5 x [ " ] button
Water quantity
Coff. quant. ±1g
3. 1 x [ $ ] button
Espresso**
Water quantity
3. 1 x [ $ ] button
11
40 ml
4. e.g. 1 x [ – ] button
Espresso**
Water quantity
4. e.g. 1 x [ – ] button
11
35 ml
5. e.g. 2 x [ + ] button
Espresso**
Water quantity
Espresso**
11
Coffee quantity 8.5 g
Espresso**
11
Coffee quantity 8.4 g
5. e.g. 2 x [ + ] button
11
45 ml
6. 1 x [ # ]
Espresso**
11
Coffee quantity 8.6 g
6. 1 x [ # ]
Water quantity
Coff. quant. ±1g
7. 1 x [ $ ] button
Espresso**
Water quantity
7. 1 x [ $ ] button
11
45 ml
8. [ " ] or [ ! ] button
Espresso**
11
Coffee quantity 8.6 g
8. [ " ] or [ ! ] button
Other beverages
xx
Text
yyy ml
9. 1 x [ # ]
Other beverages
Text
9. 1 x [ # ]
Water quantity
10. Insert / remove card
Coff. quant. ±1g
10. Insert / remove card
Select beverage
© Cafina / Melitta
xx
y.y g
Select beverage
5 - 32
OI c5 eng V9 / 18.08.2006
OPERATION
5.6.4.7
!
Flow period water
Card: "manager" key card
5.6.4.8
!
Pre-infusion 1 milk
Card: "manager" key card
1. Insert / remove card
1. Insert / remove card
2. 6 x [ " ] button
2. 7 x [ " ] button
Flow period water
3. 1 x [ $ ] button
Pre-infusion 1 milk
3. 1 x [ $ ] button
Hot water
01
Flow period water\6.0s
4. e.g. 1 x [ – ] button
Espresso**
Pre-inf. 1 milk
Cappuccino
Pre-inf. 1 milk
Cappuccino
Pre-inf. 1 milk
13
1.0s
6. e.g. 2 x [ + ] button
Flow period water
7. Insert / remove card
13
1.5s
5. e.g. 1 x [ – ] button
Hot water
01
Flow period water\6.2s
6. 1 x [ # ]
11
0.0s
4. 2 x [ " ] button
Hot water
01
Flow period water\5.8s
5. e.g. 2 x [ + ] button
E
Cappuccino
Pre-inf. 1 milk
13
2.0s
7. 1 x [ # ]
Select beverage
Pre-infusion 1 milk
8. Insert / remove card
Select beverage
OI c5 eng V9 / 18.08.2006
5 - 33
© Cafina / Melitta
OPERATION
5.6.4.9
!
E
Pre-infusion 2 milk
Card: "manager" key card
5.6.4.10
!
Post-infusion milk
Card: "manager" key card
1. Insert / remove card
1. Insert / remove card
2. 7 x [ ! ] button
2. 6 x [ ! ] button
Pre-infusion 2 milk
3. 1 x [ $ ] button
Espresso**
Pre-inf. 2 milk
3. 1 x [ $ ] button
11
0.0s
4. 2 x [ " ] button
Cappuccino
Pre-inf. 2 milk
13
10.0s
Cappuccino
13
Post-infusion milk1.0s
5. e.g. 1 x [ – ] button
13
9.5s
6. e.g. 2 x [ + ] button
Cappuccino
Pre-inf. 2 milk
Espresso**
11
Post-infusion milk0.0s
4. 2 x [ " ] button
5. e.g. 1 x [ – ] button
Cappuccino
Pre-inf. 2 milk
Post-infusion milk
Cappuccino
13
Post-infusion milk0.5s
6. e.g. 2 x [ + ] button
13
10.5s
7. 1 x [ # ]
Cappuccino
13
Post-infusion milk1.5s
7. 1 x [ # ]
Pre-infusion 2 milk
8. Insert / remove card
Post-infusion milk
8. Insert / remove card
Select beverage
© Cafina / Melitta
Select beverage
5 - 34
OI c5 eng V9 / 18.08.2006
OPERATION
5.6.4.11
!
Flow period milk
Card: "manager" key card
5.6.4.12
!
Flow period steam
Card: "manager" key card
1. Insert / remove card
1. Insert / remove card
2. 5 x [ ! ] button
2. 4 x [ ! ] button
Flow period milk
3. 1 x [ $ ] button
Flow period steam
3. 1 x [ $ ] button
Port. hot milk
15
Flow period milk 25.0s
1 x [ " ] button
****
02
Flow period steam15.0s
4. e.g. 1 x [ – ] button
Port. cold milk
24
Flow period milk 25.0s
4. e.g. 1 x [ – ] button ]
****
02
Flow period steam14.8s
5. e.g. 2 x [ + ] button
Port. hot milk
15
Flow period milk 24.5s
Cold milk port.
24
Flow period milk 24.5s
E
****
02
Flow period steam15.2s
6. 1 x [ # ]
Flow period steam
5. e.g. 2 x [ + ] button
Port. hot milk
15
Flow period milk 25.5s
7. Insert / remove card
Select beverage
Cold milk port.
24
Flow period milk 25.5s
6. 1 x [ # ]
Flow period milk
7. Insert / remove card
Select beverage
OI c5 eng V9 / 18.08.2006
5 - 35
© Cafina / Melitta
OPERATION
5.6.4.13
!
E
Price
5.6.4.14
Card: "manager" key card
!
No charge
Card: "manager" key card
1. Insert / remove card
1. Insert / remove card
2. 3 x [ ! ] button
2. 2 x [ ! ] button
Price
No charge
3. 1 x [ $ ] button
Hot water
Price
3. 1 x [ $ ] button
01
2.00
4. e.g. 1 x [ – ] button
Hot water
Price
6. 1 x [ # ]
01
1.90
Hot water
No charge
01
yes
5. [ " ] or [ ! ] button
01
2.10
Other beverages
Text
xx
Text
6. 1 x [ + ] button
Price
7. Insert / remove card
01
no
4. 1 x [ + ] button
5. e.g. 2 x [ + ] button
Hot water
Price
Hot water
No charge
Other beverages
Text
xx
yes
7. 1 x [ # ]
Select beverage
No charge
8. Insert / remove card
Select beverage
© Cafina / Melitta
5 - 36
OI c5 eng V9 / 18.08.2006
OPERATION
5.6.4.15
!
Time / date
8. e.g. 1 x [ + ] button
Card: "manager" key card
Time / date
Day
Friday
18.06.2004
1. Insert / remove card
2. 1 x [ ! ] button
9. 1 x [ " ] button
Time / date
Time / date
Month
Friday
18.06.2004
3. 1 x [ $ ] button
Time / date
10. e.g. 1 x [ + ] button
Hours
14:20
4. e.g. 1 x [ + ] button
Time / date
11. 1 x [ " ] button
Hours
15:20
5. 1 x [ " ] button
Time / date
Time / date
Month
Sunday
18.07.2004
12. e.g. 1 x [ + ] button
Minutes
15:20
6. e.g. 5 x [ + ] button
Time / date
Time / date
Month
Sunday
18.07.2004
Time / date
Month
Monday
18.07.2005
13. 1 x [ # ] button
Minutes
15:25
7. 1 x [ " ] button
Time / date
14. Insert / remove card
Time / date
Day
Thursday
17.06.2004
Select beverage
After switching off the c5 coffee maker,
a message like this appears ...
c5
15:35
OI c5 eng V9 / 18.08.2006
5 - 37
18.07.2005
© Cafina / Melitta
E
OPERATION
5.6.5
E
5.6.5.1
Resetting to initial installation default settings
2. Insert card ("memory" key card)
3. To connect c5 coffee maker to the
mains power supply:
Coffee maker reset
! insert plug
This function is used to reset the c5 coffee
maker software to the default settings that
applied upon first installation.
or
! set separate power switch to ON
The c5 coffee maker reads in from the
"memory" key card all the data which the
service technician wrote to the card ("memory" key card) last time.
4. The following message appears ...
c5
Read memory card (+)
14:45
17.06.2004
NOTE
•
•
All the software modifications which have been made
to the functions using the
"manager" key card are lost
when machine is reset!
5. 1 x [ + ] button
Reading memory card
14:45
17.06.2004
Empty the waste water canister and fill the fresh water
canister prior to activating
the coffee maker reset so as
to accommodate the higher
water throughput that this
causes.
Remove card
14:45
17.06.2004
6. Remove card ("memory" key card)
c5
15:45
17.06.2004
7. Insert / remove card ("user" key card)
!
Card: "memory" key card
!
Card: "user" key card
Calibration
14:45
17.06.2004
1. To disconnect c5 coffee maker from
the mains power supply.
Please wait
14:45
17.06.2004
! pull out the plug
TURN ON
Text
or
! set separate power switch to OFF
8. Coffee maker reset is complete
Select beverage
© Cafina / Melitta
5 - 38
OI c5 eng V9 / 18.08.2006
MAINTENANCE
6
Maintenance
This chapter deals exclusively with preventive maintenance of the equipment. In
case of problems, please consult chapter «7 Troubleshooting, 7 - 1».
6.1
Maintenance schedule
6.1.1
Intervals
6.1.1.1
Cleaning intervals
Cleaning area
Daily
Cover of beverage outlet
!
Waste water canister
!
Weekly
External / internal "EF / FC"
!
External / internal cup warmer
!
Outside of c5 coffee maker
!
Control buttons and steam tap
!
Monthly
!
Steam outlet
Filling chute with lid
!
Bean hopper
!
Fresh water canister
!
Hot water outlet
!
Coffee dregs drawer
!
!
Liquid crystal display
Milk container “EF / FC”
!
Milk hoses "EF / FC"
!
Recess for coffee dregs drawer
!
Beverage outlet
!
Cleaning procedure "EF / FC"
!
(2 x)
Cleaning procedure c5 coffee maker
!
(1 x)
Area underneath the equipment (c5 / EF / cw)
!
Drip grille
!
Drip tray
!
OI c5 eng V9 / 18.08.2006
6-1
© Cafina / Melitta
E
MAINTENANCE
6.1.1.2
Intervals between services
The c5 coffee maker is designed for a maximum of 100,000 cups per year.
The built-in safety mechanisms (relieve pressure valves) must be checked once
a year to ensure that they are working properly. We recommend that this check
is carried out during an (A) service of the whole system.
E
- "A" service
An "A" service of the whole system is required every 50,000 cups or no later than
one year since the last "A" service.
The following display message indicates the need for maintenance:
Select beverage
Maintenance Coffee
Contact Customer Support.
- "B" service
If the coffee maker has a milk system (EF or FC), than a "B" service of the milk
system is required every 15.000 milk or coffee-plus-milk beverages (e.g. hot milk,
cappuccino, latte macciato etc.). The following display messages indicate the
need for maintenance:
Select beverage
Maintenance Milk
Contact Customer Support.
6.2
Cleaning
6.2.1
Cleaning work
CAUTION
•
Only use non-corrosive, non-abrasive household cleaners.
•
Only use non-abrasive cloths.
•
Do not use any of the normal (rapid) decalcifying agents.
•
Only use combination cleaning tablets "COMBI-Tabs" for cleaning procedures.
© Cafina / Melitta
6-2
OI c5 eng V9 / 18.08.2006
MAINTENANCE
Cleaning area
Cleaning work
Cover of beverage outlet
-
Clean using damp cloth.
Waste water canister
-
Clean using household cleaner and
bottle brush.
External / internal "EF / FC"
-
Clean using damp cloth.
External / internal cup warmer
-
Clean using damp cloth.
Outside of c5 coffee maker
-
Clean using damp cloth.
Control buttons and steam tap
-
Clean using damp cloth.
Steam outlet
-
Clean using damp cloth.
-
Be sure to blow out sufficiently after
every frothing operation (especially
with milk).
Filling chute with lid
-
Clean using dry cloth.
Bean hopper
-
Clean using dry cloth.
Fresh water canister
-
Clean using bottle brush.
-
Do not use any cleaning agent.
Hot water outlet
-
Clean using damp cloth.
Coffee dregs drawer
-
Rinse out with warm (not hot) water
every time that it is emptied.
-
Rub dry with cloth.
Liquid crystal display
-
Clean using dry cloth.
Milk container "EF / FC"
-
Clean using household cleaner and
(bottle) brush.
Milk hoses "EF / FC"
-
Following the cleaning procedure,
clean only the outside of the milk
hose, using a dry cloth.
Recess for coffee dregs drawer
-
Clean using damp cloth.
Beverage outlet
-
Clean using damp cloth.
Cleaning procedure "EF / FC"
-
For further details, see section
«6.2.2.2 Installed EF milk cooler /
external FC milk cooler, 6 - 7»
Cleaning procedure c5 coffee maker
-
For further details, see section
«6.2.2.1 c5 coffee maker, 6 - 5»
Drip grille
-
Clean using damp cloth.
Drip tray
-
Clean using damp cloth.
OI c5 eng V9 / 18.08.2006
6-3
© Cafina / Melitta
E
MAINTENANCE
6.2.2
E
Cleaning procedure
The c5 coffee maker and the installed EF
milk cooler or external FC milk cooler are
cleaned in separate cleaning procedures.
NOTE
•
The following applies:
!
The two cleaning procedures can be
carried out separately or one after the
other.
!
The c5 coffee maker can be kept in operation or automatically switched off after one or both cleaning procedures.
!
The cleaning procedure for the c5 coffee maker requires one combination
cleaning tablet "COMBI-Tabs".
!
The cleaning procedure for the installed EF milk cooler or external FC
milk cooler requires one combination
cleaning tablet "COMBI-Tabs" or one
AMC powder bag.
Check the level of water in
the fresh water canister prior
to every cleaning procedure.
CAUTION
•
Depending on the cleaning
procedure, the throughput
of water may be high. If the
waste water canister has little remaining capacity, it
could overflow.
•
Check waste water canister
prior to initiating the cleaning procedure!
NOTE
•
Information on consumables
Use only:
Only use combination
cleaning tablets "COMBITabs", article no. 2900018
Only use AMC powder,
article no. 2904013
© Cafina / Melitta
6-4
OI c5 eng V9 / 18.08.2006
MAINTENANCE
6.2.2.1
c5 coffee maker
Detailed sequence of operations in the
cleaning procedure:
Brief description of the cleaning procedure,
following which the coffee maker remains
switched on:
!
Duration of the cleaning procedure:
approx. 7.5 min.
-
Insert / remove "user" / "manager" key
card.
-
Choose the option whereby the c5 coffee maker does not switch off after the
cleaning procedure.
-
Specify that the c5 coffee maker is to
be cleaned.
-
Specify that the EF / FC is not to be
cleaned.
-
You may now be prompted to empty
the coffee dregs drawer.
-
Start of rinse operation.
-
Insert one combination cleaning
tablet "COMBI-Tabs", article no.
2900018.
-
Start of cleaning process.
-
Bring the c5 coffee maker up to
operating temperature.
-
Ready to dispense beverages.
1. Initial situation with the following display ...
E
Select beverage
2. Insert / remove "user" / "manager" key
card.
OFF after cleaning?
[1]yes
[5]no
3. [
] button (5)
Clean coffee?
[1]yes
4. [
] button (1)
Clean milk?
[1]yes
5. [
[5]no
[5]no
] button (5)
6. You may now be prompted to empty
the coffee dregs drawer.
Empty drawer!
Pull out the coffee dregs drawer so that
you can empty it.
The following message appears ...
Drawer missing!
Push the empty coffee dregs drawer
back in.
The following message appears ...
Drawer emptied
Please confirm
(SH)
7. Now press the Shift/Stop button [
on the control panel.
OI c5 eng V9 / 18.08.2006
6-5
]
© Cafina / Melitta
MAINTENANCE
8. The following message now appears ...
11. Shift/Stop button [
Rinsing
]
Cleaning
E
9. This message now appears ...
CAUTION
Put cleaning agent in
Please confirm
(SH)
•
10. Lid of filling chute opens. Insert one
combination cleaning tablet "COMBITabs" in the filling chute and confirm.
Hot suds will come out of the
beverage outlet.
12. Once the cleaning operation is over,
the following message will appear ...
If the lid has closed before the tablet is
inserted (timeout) the following message appears ...
TURN ON
prog. 86°C
act. 25°C
13. If the operating temperature appears to
have been achieved ...
Start cleaning
Select beverage
Press Shift/Stop button [
© Cafina / Melitta
] again.
6-6
OI c5 eng V9 / 18.08.2006
MAINTENANCE
6.2.2.2
Installed EF milk cooler / external FC milk cooler
-
NOTE
•
•
•
Once a week, the AMC
powder bag must be placed in the cleaning container instead of a combination cleaning "COMBITabs".
The use of AMC powder
prevents the accumulation
of milk scale and residues in
the milk system.
Together with the daily alkali
cleaning (combination cleaning "COMBI-Tabs") the
acid cleaner (AMC powder)
ensures the optimum hygienic condition of the milk system.
Only insert one combination cleaning tablet "COMBI-Tabs", article no.
2900018 or the content of one AMC
powder bag, article no. 2904013 in
the empty cleaning container and replace the milk container with the cleaning container (place both the milk
intake lines in the cleaning container).
-
The cleaning container is filled and
then rinsed six times (cleaning container emptied).
-
Bring the c5 coffee maker up to
operating temperature.
-
Replace the empty cleaning container
with the full milk container.
-
Ready to dispense beverages.
Detailed sequence of operations in the
cleaning procedure:
1. Initial situation with the following display ...
Select beverage
Brief description of the cleaning procedure,
following which the coffee maker remains
switched on:
!
Duration of the cleaning procedure:
approx. 17.5 min.
-
Insert / remove "user" / "manager" key
card.
-
Choose the option whereby the c5 coffee maker does not switch off after the
cleaning procedure.
-
2. Insert / remove "user" / "manager" key
card.
OFF after cleaning?
[1]yes
[5]no
3. [
Clean coffee?
[1]yes
4. [
Specify that the c5 coffee maker is not
to be cleaned.
6-7
[5]no
] button (5)
Clean milk?
[1]yes
Specify that the EF / FC is to be
cleaned.
OI c5 eng V9 / 18.08.2006
] button (5)
[5]no
© Cafina / Melitta
E
MAINTENANCE
5. [
E
6.3
] button (1)
Insert the cleaning
container
The service technician from Customer Support maintains the maintenance log for the
installation and subsequent maintenance
work.
Place one combination cleaning tablet
"COMBI-Tabs" or the content of one
AMC powder bag in the empty cleaning receptacle. Replace milk container
with cleaning receptacle (place both
milk intake lines in the cleaning container). Leave the milk cooler door
open.
For this purpose he enters the necessary
data into the table cells in chapter «12 "Service Technician" maintenance log, 12 - 1».
(SH)
Please confirm
6. Shift/Stop button [
Maintenance log
]
Cleaning milk
The cleaning container is filled and
then rinsed six times (cleaning container emptied).
7. Once the cleaning operation is over,
the following message will appear...
TURN ON
prog. 86°C
act. 80°C
Refill milk
Please confirm
(SH)
8. Replace cleaning container with full
milk container. Close milk cooler door.
9. Shift/Stop button [
]
Select beverage
© Cafina / Melitta
6-8
OI c5 eng V9 / 18.08.2006
TROUBLESHOOTING
7
Troubleshooting
Detailed sequence of stages involved in
troubleshooting - example initial situation:
7.1
Fault display, troubleshooting and fault acknowledgement
Too much coffee powder was placed in
the filling chute following selection of
"Decaffeinated".
During operation, the control system monitors the operating status continually. Faults
are displayed on the liquid crystal display.
In case of malfunction s, the user / operator
can intervene in accordance with the procedures described in this chapter and attempt to troubleshoot the problem.
1. The normal beverage selection "Decaffeinated" was made in the "Coffee
cream" quantity.
2. Three heaped measuring spoons of
coffee powder were put in the filling
chute.
Brief description of troubleshooting process:
-
The following message appears ...
Select beverage
Error coffee partDP 16
Analyse message on the liquid crystal
display. The possibilities are as follows:
3. Insert "user" / "manager" key card.
The following message appears ...
! text message
! text message plus diagnosis point
Fault confirmed
(DP) display
-
-
-
First of all insert / remove the "user" /
"manager" key card. If this clears the
malfunction, then the c5 coffee maker
will be once more ready to dispense
beverages. Otherwise, see below.
4. Remove "user" / "manager" key card.
The following message appears ...
c5
13:00
To troubleshoot the problem, proceed
as described in sections «7.2.1 Textual
error messages, 7 - 2» and «7.2.2 Error
messages displayed via diagnosis
points (DP), 7 - 6».
5. Insert "user" key card.
The following message appears ...
TURN ON
Text
Insert / remove "user" / "manager" key
card a second time.
6. This message now appears ...
If this clears the malfunction, then the
c5 coffee maker will be once more
ready to dispense beverages. If not,
the malfunction will not clear itself, and
"disconnect from the power supply /
connect to the power supply" is not
possible. If the malfunction is still unresolved, then Customer Support must
be contacted.
OI c5 eng V9 / 18.08.2006
22.06.2004
Select beverage
7. The fault has been cleared and the
c5 coffee maker is ready to dispense
beverages.
7-1
© Cafina / Melitta
E
TROUBLESHOOTING
7.2
Checklist for fault diagnosis and troubleshooting
7.2.1
Textual error messages
E
LCD textual error messages Cause of fault
Troubleshooting measure(s)
Temp. too high
Temp. too low
Unknown hardware or software error
Disconnect / connect to mains
power supply.
Boiler temp. too high
Static charge
Boiler temp. too low
Effect of storm (overvoltage
due to storm)
1. Disconnect c5 coffee maker from the mains power
supply.
2. Wait at least 30 seconds.
3. Connect c5 coffee maker
to the mains power supply.
4. Switch on c5 coffee maker.
5. Decision:
If the textual error message is no longer shown,
there is no need for any
action.
If the textual error message is still on view, notify
Customer Support.
Refill milk
Milk level too low.
If milk level monitoring is installed:
-
check milk level.
-
replenish milk supply.
See also section «5.5.4 Refill
milk, 5 - 22».
© Cafina / Melitta
7-2
OI c5 eng V9 / 18.08.2006
TROUBLESHOOTING
LCD textual error messages Cause of fault
Troubleshooting measure(s)
Refill milk
If no milk level monitoring installed:
Milk level too low.
-
check milk level.
-
replenish milk supply.
-
disconnect / connect to
mains power supply.
1. Disconnect c5 coffee maker from the mains power
supply.
2. Wait at least 30 seconds.
3. Connect c5 coffee maker
to the mains power supply.
4. Switch on c5 coffee maker.
5. Decision:
If the textual error message is no longer shown,
there is no need for any
action.
If the textual error message is still on view, notify
Customer Support.
See also section «5.5.4 Refill
milk, 5 - 22».
OI c5 eng V9 / 18.08.2006
7-3
© Cafina / Melitta
E
TROUBLESHOOTING
LCD textual error messages Cause of fault
Troubleshooting measure(s)
Drawer missing!
Coffee dregs drawer not inserted or not pushed in far
enough.
Use coffee dregs drawer correctly.
Check water connection.
Open stopcock in the external
fresh water feeder pipe.
E
No water
See also section
«5.5.5 Emptying the coffee
dregs drawer, 5 - 23».
Check pressure on external
fresh water feeder pipe
(should be 3 to 5 bar).
Refill fresh water canister.
Straighten out kink in water
line to the fresh water canister.
If one of the c5 coffee maker’s
feet is standing on the water
line, release water line.
Clean or replace external water filter.
Check external water pump.
See also section
«5.5.1 Refilling fresh water
canister, 5 - 19».
Waste water full
Bean hoppers (1 or 2)
© Cafina / Melitta
The "waste water
container level monitoring" option is installed
and is reporting that
the waste water canister
is full.
Empty waste water canister
immediately.
Bean hopper 1 or 2
is empty.
Replenish coffee beans.
7-4
See also section
«5.5.2 Emptying the waste
water canister, 5 - 19».
See also section «5.5.3 Refill
coffee beans, 5 - 20».
OI c5 eng V9 / 18.08.2006
TROUBLESHOOTING
LCD textual error messages Cause of fault
Troubleshooting measure(s)
Boiler level
There may be a water leak or
the water feed may be insufficient.
Water level too low.
Too much time elapses
during the filling operation.
The c5 coffee maker is still in
operation; however it is necessary to keep an eye on it.
Contact Customer Support.
Filter
Water filter is worn and
must be replaced.
The c5 coffee maker is still in
operation; however it is necessary to keep an eye on it.
Contact Customer Support.
Grinding correction
Maintenance Coffee
The automatic coffee bean
grinding calibration is not
working. This results in
reduced quality of the
beverages dispensed.
The c5 coffee maker is still in
operation; however it is necessary to keep an eye on it.
The whole system needs
servicing.
The c5 coffee maker is still in
operation; however it is necessary to keep an eye on it.
Contact Customer Support.
Contact Customer Support.
OI c5 eng V9 / 18.08.2006
7-5
© Cafina / Melitta
E
TROUBLESHOOTING
Specifically for the temperature regulator unit
NOTE
E
•
The error messages for the temperature regulator unit are shown in the temperature regulator unit display!
Displayed error message
Cause of fault
Troubleshooting measure(s)
PrF
Temperature sensor fault
Contact Customer Support.
EEE
EEPROM error
(loss of program data)
Contact Customer Support.
7.2.2
Error messages displayed via diagnosis points (DP)
Diagnosis point (DP)
Cause of fault
Troubleshooting measure(s)
0/1/2/4/5
System fault
Contact Customer Support.
7
Coffee dregs block
too high
Check coffee dregs drawer:
- empty coffee dregs drawer
correctly.
See also section
«5.5.5 Emptying the coffee
dregs drawer, 5 - 23».
If the fault persists, contact
Customer Support.
8 / 9 / 10 / 16 /
17 / 18 / 22 / 23
© Cafina / Melitta
System fault
Contact Customer Support.
7-6
OI c5 eng V9 / 18.08.2006
TAKING OUT OF SERVICE AND STORAGE
8
Taking out of
service and storage
8.1
Taking out of service
for a limited time /
taking out of service
for good
8.2
Storage for a limited
period / permanent
storage
If the "c5 coffee maker / installed EF milk
cooler / external FC milk cooler" and the cw
cup warmer are to be stored either for a limited period or permanently, it is essential
that they are taken out of service correctly see section 8.1.
Both when the coffee maker is taken out of
service for a limited (but prolonged) period
and also when it is taken out of service for
good, the "c5 coffee maker / installed EF
milk cooler / external FC milk cooler" and
the cw cup warmer must be disconnected
from the mains power supply.
When storing the equipment, the requirements specified in section «1.3.6 Environmental conditions, 1 - 9» must be
observed.
All raw materials which are used to prepare
beverages must be removed from the c5
coffee maker, the installed EF milk cooler
and the external FC milk cooler.
All the components must be cleaned thoroughly (see also sections «5.3.2 Switching
off the c5 coffee maker, 5 - 6» and «6.2.2
Cleaning procedure, 6 - 4»).
If the equipment is to be out of service for
an extended period, to avoid (frost) damage, it should be expertly drained by Customer Support.
OI c5 eng V9 / 18.08.2006
8-1
© Cafina / Melitta
E
TAKING
OUT OF SERVICE AND STORAGE
E
© Cafina / Melitta
8-2
OI c5 eng V9 / 18.08.2006
PACKING AND TRANSPORTATION
9
Packing and
transportation
When packing and transporting the equipment, the following requirements must be
observed:
E
WARNING
•
•
1. Disconnect equipment from power and
water mains.
Only persons with experience of haulage and transportation are authorised to
pack and transport the
equipment.
2. Remove any product raw materials,
such as coffee beans and milk, from
the equipment.
3. Empty coffee dregs drawer.
The requirements set out in
chapter «2 Safety instructions, 2 - 1» must be strictly
observed!
4. Empty hoses and drain. This is a matter
for Customer Support.
5. Clean equipment.
6. If possible, pack equipment in the original packaging.
7. Place the equipment (... in the original
packaging) on a suitable transport
base in an upright position and attach
to the transport base.
CAUTION
•
When securing the equipment (... in the original packaging) on the transport
base, take care not to cause
any chafe marks.
OI c5 eng V9 / 18.08.2006
9-1
© Cafina / Melitta
PACKING AND TRANSPORTATION
E
© Cafina / Melitta
9-2
OI c5 eng V9 / 18.08.2006
DISPOSAL
10
Disposal
The following requirements must be
observed in the case of disposal:
WARNING
1. Disconnect equipment from power and
water mains.
•
•
Disassembly and disposal
of the equipment may only
be carried out by persons
who satisfy the necessary
qualification and training
requirements.
The requirements set
out in chapter «2 Safety
instructions, 2 - 1» must
be strictly observed!
2. Remove any product raw materials,
such as coffee beans and milk, from
the equipment.
3. Empty coffee dregs drawer.
4. Take the equipment apart.
5. Recycle individual parts according to
material type.
6. Dispose of non-recyclable materials
according to type.
NOTE
•
Information on disposal
organisations and collection
points can be obtained from
your local administrative
authority.
•
During disposal, it is
necessary in any case to
comply with the pertinent
national and regional laws
and directives.
•
The machines do not
contain any materials whose
disposal requires special
approval.
OI c5 eng V9 / 18.08.2006
10 - 1
© Cafina / Melitta
E
DISPOSAL
E
© Cafina / Melitta
10 - 2
OI c5 eng V9 / 18.08.2006
GUARANTEE, CONSUMABLES, SPARE PARTS, ORDERING PROCEDURE
11
Guarantee, consumables, spare
parts, ordering procedure
This includes:
- Seals
- Filters
- Complete piston spray
- Complete piston plunger
- Paint coatings
- Grinding discs
- Hoses for the peristaltic pump
To validate the guarantee claim the defective part
must be returned to the manufacturer. After inspecting the returned part the manufacturer reserves the
right to reject a guarantee claim if one of the conditions referred to above exists.
Guarantee
We guarantee the trouble-free function of this machine for 12 months or a maximum 100'000 beverage dispensions. The start of the guarantee period
is the day of installation.
The acceptance of a guarantee claim for damage
due to a fault is only possible following the written
report of the manufacturer.
During the guarantee period any defects, which can
be traced back to material faults, defective workmanship or faulty construction, will be rectified free
by us or by a company authorized by us. The precondition here is the proper use and correct handling of the machine according to the relevant
descriptions in this operating manual.
Quality settings, which were not carried out on the
basis of the fault, are excluded from the guarantee.
Any work carried out during the guarantee period
will not extend its term.
Accordingly we will not accept any liability for the following cases:
-
Faults caused by contamination as a result
of improper cleaning (e.g. blocked valves or
mixer)
-
Faults due to limescale build-up or other deposits when operated with water softening
equipment (e.g. boiler or water pumps)
-
Faults due to excess electrical voltages
(e.g. burned PCBs)
This normally affects service technicians, third-party
customers or resellers:
To avoid misunderstandings when ordering consumable materials or spare parts, we request that
you always provide the following data with your order:
We will accept no liability for damage to all devices
arising from poor maintenance and care by the customer.
We will accept no liability for defects and faults in
our equipment, which can be traced back to inexpert
repairs or the installation of spare parts which do not
correspond with the original versions.
Normal wear of all parts, which are subject to natural
wear, is excluded from the guarantee.
Consumables, spare parts, ordering
procedure
!
Device identification according to the type
plate.
!
Description and article number of the consumable material or spare part.
!
Quantity of the required consumable materials
or spare parts.
Device-specific consumable materials or spare
parts must only be procured from the customer service location in the respective country.
Only device-specific spare parts made by the manufacturer are to be used.
The manufacturer rejects any liability for the situation in which it is found that non device-specific
spare parts have been installed in the respective
machine.
OI c5 eng V9 / 18.08.2006
11 - 1
© Cafina / Melitta
E
GUARANTEE, CONSUMABLES, SPARE PARTS, ORDERING PROCEDURE
A
Adresses of service
E
AUS
Adresses of service
B
Serviceadressen
CH
Adresses of service
D
Adresses of service
Servico Tecnicos
F
Services Techniques
J
Adresses of service
DK
Serviceadresser
FIN
Huoltopisteiden osoitteita
GB
Adresses of service
Serviceadresser
NL
Serviceadressen
RC
Adresses of service
S
Serviceadresser
TH
Adresses of service
Adresses of service
TW
Adresses of service
N
RUS
Service
USA
Adresses of service
E
KR
A
AUS
B
MELITTA System Service
International GmbH
Rottfeld 9A
5020 Salzburg
Fon 0043-662 / 88 28 88-33
Fax 0043-662 / 88 28 88-99
Global Coffee
Solutions Pty Ltd
5/77 Jardine St.
Fairy Meadow NSW 2519
Fon 0061 1300 552 883
Fax 0061 02 4284 6099
MELITTA System Service Benelux
Bijkantoor MELITTA Syst. Service
Brandstraat, 8
9160 Lokeren
Fon 0032-9 / 331 52 30
Fax 0032-9 / 331 52 35
CH
D
DK
CAFINA AG
Römerstrasse 2
5502 Hunzenschwil
Fon 0041-62 / 889 42 42
Fax 0041-62 / 889 42 89
Instruktionsnummer: 17098
MELITTA System Service
GmbH & Co. KG
Zechenstrasse 60
32429 Minden-Dützen
Fon 0049-571 / 50 49-0
Fax 0049-571 / 50 49-233
aromateknik a/s
Industrivej 44
4000 Roskilde
Fon 0045-46 / 75 33 66
Fax 0045-46 / 75 38 10
Tecnimel Hosteleria, S.L.
Avda. Esparteros, 15
Pol. S. J. de Valderas Sanahuja
28918 Leganés (Madrid)
Fon 0034-91 / 644 81 30
Fax 0034-91 / 644 81 31
F
FIN
GB
J
MELITTA System Service
France SA
16 Rue P.H. Spaak
Saint Thibault des Vignes
77462 LAGNY sur Marne Cedex
Fon 0033-1 / 6430 32 95
Fax 0031-1 / 6430 33 40
Hackman
Metos Oy AB
Ahjonkaarre
04220 Kerava
MELITTA Japan Ltd.
9F abc Kaikan
2-6-3, Shiba-koen, Minato-ku
Tokyo 105-0011 Japan
Fon 00358-204 / 39 13
Fax 00358-204 / 39 44 33
M.S.S. (UK) Limited
21 Grove Park
White Waltham
Maidenhead Berkshire
SL6 3LW
Fon 0044-1628 / 82 98 88
Fax 0044-1628 / 82 51 11
KR
NL
RC
RUS
Edward Keller (Korea) Ltd.
3F. Nasan Bldg. 1024
Daechi-dong
Kangnam-gu
Seoul 135-173
Fon 0082-2 / 2192-9541
Fax 0082-2 / 2192-9590
MELLITA
System Service Benelux BV
Industriestraat 6
3371 XD HARDINXVELD
GIESSENDAM
Fon 0031-18 467 / 16 60
Fax 0031-18 461 / 04 14
Edward Keller
21/F Southmark
11 Yip Hing St.
Wong Chuk Hang
Hongkong / China
Fon 00852 / 28 95-96 20
Fax 00852 / 28 95-00 39
MELITTA Russland
Sofiskaya 14 of. 805
192236 St. Petersburg
S
TH
USA
TW
aromateknik A/S
Radiovägen 2
Box 662
13526 Tyresö
Great Earth International Co., Ltd.
5th Floor, M Thai Tower,
All Seasons Place
87 Wireless Road, Patumwan
Bangkok 10330
Fon 0066-2 / 654-1118
Fax 0066-2 / 654-1119
Michaelo Espresso, Inc.
3801 Stone Way N.
Seattle, WA 98 103
JAS Corporation
B1, No. 17, Lane 28
Sec. 1, Huan Shan Rd.,
Nei Hu Area
Taipei
Fon 00886-2 / 2727-0630
Fax 00886-2 / 2727-0640
Fon 0046-8 / 7 98 77 88
Fax 0046-8 / 7 98 90 18
© Cafina / Melitta
N
Fon 001-206 / 548-9000
Fax 001-206 / 695-4951
11 - 2
E
Fon 0081-3 / 5470-2770
Fax 0081-3 / 5470-2774
Fon 007-812 / 3 26 65 56
Fax 007-812 / 3 26 65 57
OI c5 eng V9 / 18.08.2006
"SERVICE TECHNICIAN" MAINTENANCE LOG
12
Installation
"Service Technician" maintenance log
E
Key:
Serial-No.:
Date:
Installed water filter type:
Service Technician No.:
Bypass %:
[ A ] = Service of whole system
[ B ] = Service of milk system
[ S ] = Annual check of safety mechanisms
Water measured values on ...
... IN1)
Signature:
[ F ] = Water filter replaced
... OUT2)
*
= Check applicable fields
GH°:
1)
= Untreated water before the filter
kH°:
2)
= Water at the beverage outlet
pH:
Date:
Service *
[A]
[B]
Water values
[S]
[ F ] Bypass %:
Counter reading
Service Technician No.:
Water measured values
on ...
Coffee:
... IN1)
Milk:
Next service
Signature:
Date:
kH°:
Milk:
pH:
Service *
Water values
[B]
[S]
[F]
... OUT2)
GH°:
Coffee:
[A]
Notes:
Bypass %:
Counter reading
Service Technician No.:
Water measured values
on ...
Coffee:
... IN1)
Milk:
Next service
Signature:
Date:
Notes:
GH°:
Coffee:
kH°:
Milk:
pH:
Service *
Water values
[A]
[B]
[S]
[F]
... OUT2)
Notes:
Bypass %:
Counter reading
Service Technician No.:
Water measured values
on ...
Coffee:
... IN1)
Milk:
Next service
Signature:
GH°:
Coffee:
kH°:
Milk:
pH:
OI c5 eng V9 / 18.08.2006
... OUT2)
12 - 1
© Cafina / Melitta
"SERVICE TECHNICIAN" MAINTENANCE LOG
E
Date:
Service *
[A]
[B]
Water values
[S]
[F]
Bypass %:
Counter reading
Service Technician No.:
Water measured values
on ...
Coffee:
... IN1)
Milk:
Next service
Signature:
Date:
kH°:
Milk:
pH:
Service *
Water values
[B]
[S]
[F]
Bypass %:
Water measured values
on ...
Coffee:
... IN1)
Milk:
Next service
Signature:
kH°:
Milk:
pH:
Service *
Water values
[B]
[S]
[F]
... OUT2)
GH°:
Coffee:
[A]
Notes:
Bypass %:
Counter reading
Service Technician No.:
Water measured values
on ...
Coffee:
... IN1)
Milk:
Next service
Signature:
kH°:
Milk:
pH:
Service *
Water values
[B]
[S]
[F]
... OUT2)
GH°:
Coffee:
[A]
Notes:
Bypass %:
Counter reading
Service Technician No.:
Water measured values
on ...
Coffee:
... IN1)
Milk:
Next service
Signature:
© Cafina / Melitta
Notes:
Counter reading
Service Technician No.:
Date:
... OUT2)
GH°:
Coffee:
[A]
Date:
Notes:
... OUT2)
GH°:
Coffee:
kH°:
Milk:
pH:
12 - 2
OI c5 eng V9 / 18.08.2006
"SERVICE TECHNICIAN" MAINTENANCE LOG
E
Date:
Service *
[A]
[B]
Water values
[S]
[F]
Bypass %:
Counter reading
Service Technician No.:
Water measured values
on ...
Coffee:
... IN1)
Milk:
Next service
Signature:
Date:
kH°:
Milk:
pH:
Service *
Water values
[B]
[S]
[F]
Notes:
Bypass %:
Counter reading
Service Technician No.:
Water measured values
on ...
Coffee:
... IN1)
Milk:
Next service
Signature:
kH°:
Milk:
pH:
Service *
Water values
[B]
[S]
[F]
... OUT2)
GH°:
Coffee:
[A]
Notes:
Bypass %:
Counter reading
Service Technician No.:
Water measured values
on ...
Coffee:
... IN1)
Milk:
Next service
Signature:
Date:
... OUT2)
GH°:
Coffee:
[A]
Date:
Notes:
GH°:
Coffee:
kH°:
Milk:
pH:
Service *
Water values
[A]
[B]
[S]
[F]
... OUT2)
Notes:
Bypass %:
Counter reading
Service Technician No.:
Water measured values
on ...
Coffee:
... IN1)
Milk:
Next service
Signature:
GH°:
Coffee:
kH°:
Milk:
pH:
OI c5 eng V9 / 18.08.2006
... OUT2)
12 - 3
© Cafina / Melitta
"SERVICE TECHNICIAN" MAINTENANCE LOG
E
Date:
Service *
[A]
[B]
Water values
[S]
[F]
Bypass %:
Counter reading
Service Technician No.:
Water measured values
on ...
Coffee:
... IN1)
Milk:
Next service
Signature:
Date:
kH°:
Milk:
pH:
Service *
Water values
[B]
[S]
[F]
Bypass %:
Water measured values
on ...
Coffee:
... IN1)
Milk:
Next service
Signature:
kH°:
Milk:
pH:
Service *
Water values
[B]
[S]
[F]
... OUT2)
GH°:
Coffee:
[A]
Notes:
Bypass %:
Counter reading
Service Technician No.:
Water measured values
on ...
Coffee:
... IN1)
Milk:
Next service
Signature:
kH°:
Milk:
pH:
Service *
Water values
[B]
[S]
[F]
... OUT2)
GH°:
Coffee:
[A]
Notes:
Bypass %:
Counter reading
Service Technician No.:
Water measured values
on ...
Coffee:
... IN1)
Milk:
Next service
Signature:
© Cafina / Melitta
Notes:
Counter reading
Service Technician No.:
Date:
... OUT2)
GH°:
Coffee:
[A]
Date:
Notes:
... OUT2)
GH°:
Coffee:
kH°:
Milk:
pH:
12 - 4
OI c5 eng V9 / 18.08.2006
INDEX
Page
Page
A
F
Adresses of service
. . . . . . . . . . . 11 - 2
fault
acknowledgement
checklist . . . . . . . .
displays . . . . . . . .
rectification . . . . . .
authorised persons . . . . . . . . . . . . . 2 - 7
B
basic safety instructions . . . . . . . . . 2 - 2
...
...
...
...
...
...
...
...
...
...
...
...
...
...
...
...
7-1
7-2
7-1
7-1
foam quality . . . . . . . . . . . 5 - 18, 5 - 22
button layout
on the control panel . . . . . . . . . . . 5 - 25
frothing milk manually
. . . . . . . . . . 5 - 18
functions
brief description . . . . . . . . . . . . . 5 - 27
structure, overview, adjustment values . . . . . . . 5 - 26
use . . . . . . . . . . . . . . . . . . . . . . . 5 - 29
C
cleaning
procedure . . . . . . . . . . . . . . . . . . 6 - 4
work . . . . . . . . . . . . . . . . . . . . . . 6 - 2
coffee maker reset . . . . . . . . . . . . 5 - 38
G
Consumables . . . . . . . . . . . . . . . . 11 - 1
Guarantee . . . . . . . . . . . . . . . . . . . 11 - 1
control panel . . . . . . . . . . . . . . . . . 5 - 25
I
controls . . . . . . . . . . . . . . . . . . . . . . 3 - 1
indicators . . . . . . . . . . . . . . . . . . . . . 3 - 1
D
initial start-up . . . . . . . . . . . . . . . . . . 4 - 1
decaffeinated
coffee dispensing . . . . . . . . . . . . . 5 - 14
K
description . . . . . . . . . . . . . . . . . . . 1 - 1
key cards . . . . . . . . . . . . . . . . . . . . . 1 - 5
design . . . . . . . . . . . . . . . . . . . . . . . 1 - 1
M
dimensions . . . . . . . . . . . . . . . . . . . 1 - 8
maintenance
dispensing of beverages . . . . . . . . . 5 - 9
disposal
.................. 6-1
minimum training
and qualifications of
authorised personnel . . . . . . . . . . . . 2 - 8
. . . . . . . . . . . . . . . . . . . . 10 - 1
E
mode of operation . . . . . . . . . . . . . . 1 - 3
emptying the
coffee dregs drawer . . . . . . . . . . . 5 - 23
environmental conditions . . . . . . . . 1 - 9
OI c5 eng V9 / 18.08.2006
I
© Cafina / Melitta
E
INDEX
Page
E
Page
O
S
operating modes . . . . . . . . . . . . . . . 3 - 3
safety instructions
.............. 2-1
operating performance data . . . . . . 1 - 9
safety mechanisms
............. 2-7
operation . . . . . . . . . . . . . . . . . . . . . 5 - 1
Service Technician maintenance log . . . . . . . . . . . 12 - 1
Operator maintenance log . . . . . . . 6 - 8
Shift function
options . . . . . . . . . . . . . . . . . 1 - 3, 1 - 4
Ordering procedure
.................. 1-4
space requirements . . . . . . . . . . . . . 1 - 9
. . . . . . . . . . . 11 - 1
Spare part
P
. . . . . . . . . . . . . . . . . . . 11 - 1
packing . . . . . . . . . . . . . . . . . . . . . . 9 - 1
specific hazards and instructions . . . . . . . . . . . . 2 - 3
personal safety . . . . . . . . . . . . . . . . 2 - 6
storage . . . . . . . . . . . . . . . . . . . . . . . 8 - 1
power supply connection . . . . . . . . 5 - 1
switching off . . . . . . . . . . . . . . . . . . . 5 - 5
power switch . . . . . . . . . . . . . . . . . . 2 - 7
switching on . . . . . . . . . . . . . . . . . . . 5 - 5
preventive maintenance plan
Intervals . . . . . . . . . . . . . . . . . . . 6 - 1
system work . . . . . . . . . . . . . . . . . . 5 - 25
T
R
taking out of service . . . . . . . . . . . . . 8 - 1
refill coffee beans . . . . . . . . . . . . . 5 - 20
technical data . . . . . . . . . . . . . . . . . . 1 - 6
Refill milk
transportation . . . . . . . . . . . . . . . . . . 9 - 1
. . . . . . . . . . . . . . . . . . . 5 - 22
relief pressure valve . . . . . . . . . . . . 2 - 7
troubleshooting
................ 7-1
reset of coffee maker . . . . . . . . . . 5 - 38
TWIN function
................. 1-4
routine work . . . . . . . . . . . . . . . . . 5 - 19
W
warnings . . . . . . . . . . . . . . . . . . . . . . 2 - 1
water connection . . . . . . . . . . . . . . . 5 - 4
weights . . . . . . . . . . . . . . . . . . . . . . . 1 - 8
© Cafina / Melitta
II
OI c5 eng V9 / 18.08.2006