1
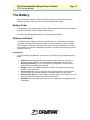
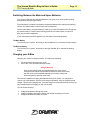
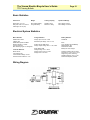
The Vienna E-Bike
By Daymak
Electric Bicycle
User’s Guide
For Use in Canada Only
Updated July, 2008
The Vienna Electric Bicycle User’s Guide
Page 2
TPS Training Bulletin
About Daymak
DAYMAK INC., a developer, importer and distributor
of alternative energy and fuel efficient vehicles. It has
a distribution network of 10 retail stores, two of which
are coporate owned, and 50 dealers primarily in Ontario. Daymak possesses the expertise and knowledge to go from “Concept” to “Commercialization” in
all the aspects including designing, testing, manufacturing and selling its products. The company is currently in the process of developing and launching its
proprietary Daymak Drive™ Technology. For more
information on the company, please visit
http://www.daymak.com.
www.daymak.com
Copyright 2008, Daymak Inc.
All materials in this guide are the copyright property of Daymak, Inc.
Reproduction of these materials requires written permission from Daymak.
The Vienna Electric Bicycle User’s Guide
Page 3
TPS Training Bulletin
Table of Contents
About Daymak ........................................................................................................................2
Table of Contents ...................................................................................................................3
Introduction.............................................................................................................................4
Bicycle Part Diagrams ............................................................................................................5
Riding Instructions..................................................................................................................6
Operating Instructions ......................................................................................................... 10
The Battery .......................................................................................................................... 12
Technical Data .................................................................................................................... 19
Maintenance and Troubleshooting...................................................................................... 22
E-Bikes and Canadian Law ................................................................................................. 27
TPS Training Bulletin........................................................................................................... 29
The Vienna Electric Bicycle User’s Guide
Page 4
TPS Training Bulletin
Introduction
E-Bikes
Riding an electric bicycle is a great way to hop around town conveniently and cheaply. EBikes represent a natural progression in the development of urban transportation.
Using only small amounts of electricity, e-bikes have the potential to radically reduce the
amount of pollution in our cities. As well, they are very quiet, so they do not add to the high
levels of noise pollution which we often take for granted. They are easy, and usually free,
to park. They are unobtrusive and highly practical additions to the urban landscape.
E-bikes are also inexpensive. They (currently) require no registration, no insurance, no
licence and do not incur parking charges. As well, compared to internal combustion
engines, the engines in electric vehicles have fewer moving parts and require far less
maintenance.
Your Daymak e-bike is the result of Daymak’s years of experience, the highly trained
technical skills of our staff and careful, ongoing design work by our engineers. We hope
you enjoy using this product and welcome any feedback that you may have.
New Laws
Most provinces in Canada, most states in the U.S.A, the United Kingdom and many
European countries have new laws that permit cyclists to use electric motors to assist the
regular operation of bicycles. Please check with your provincial or state government to
learn about your local laws. At the back of this manual you will find the some of the
common Canadian provincial regulations that govern e-bikes.
This Guide
The information in this guide may be subject to change without notice. For the latest
information available, please contact your local Daymak dealer or visit our website.
We have taken all possible measures to ensure the accuracy and completeness of the
information in this guide. However, if you do find anything missing, incomplete or wrong, do
not hesitate to contact us.
Liability
Daymak does not assume any liability for damages, loss of profits, or claims from third
parties due to improper use of this product. Daymak does not assume any liability for
damages due to problems with the product resulting from service by a third party that is not
certified by Daymak.
Page 5
The Vienna Electric Bicycle User’s Guide
TPS Training Bulletin
Bicycle Part Diagrams
Diagram 1: The Vienna E-Bike
This diagram illustrates the various parts of your bicycle. Please note that many of these
parts are not user-serviceable and should be repaired only by trained professionals. This is
especially true of the electrical systems and the mechanical components.
1.
2.
3.
4.
5.
6.
7.
Seat
Rear Compartment
Taillight
Rear Mudguard/Fairing
Rear Wheel
Rear Shock Absorber
Hub Motor
8.
9.
10.
11.
12.
13.
14.
Controller (inside)
Kickstand
Battery (inside)
Battery Carrier (with lock)
Battery charger slot
Front Shock Absorber
Wheel Rims
15.
16.
17.
18.
19.
20.
21.
Tire
Front Mud Guard
Headlight
On / Off key switch
Handlebars
Pedals
Seat Compartment
Diagram 2: The Handlebars and Controls
This diagram illustrates the various parts of the control mechanism and display. The
diagram may not exactly show the features on the Vienna e-bike, but will parallel them.
1. Accelerator
2. Front brake controller
3. Rear brake controller
4. Speedometer
5. Horn
6. Blinker lights
7. Headlight Switch
8. Battery
9. Power
The Vienna Electric Bicycle User’s Guide
Page 6
TPS Training Bulletin
Riding Instructions
This guide assumes that you already know how to ride a standard bicycle. Before you try to
ride an electric bicycle, you should be very familiar with controlling and balancing a normal
bicycle.
Caution
If you do not have cycling experience, an e-bike is too dangerous to
ride. Do not begin learning to ride a bicycle using an e-bike.
Important Notes
•
E-Bikes are Fast! E-bikes are capable of traveling at higher speeds than many
bicycle riders are accustomed to. Use caution at all times, especially when traveling
in mixed traffic. Always take into account driving and traveling conditions.
•
Obey the Law. Be sure to follow all provincial and city traffic laws. This includes
obeying stop signs, checking carefully when turning, and riding defensively. An e-bike
is a motorized vehicle, even though it is classed as a bicycle. You must follow the law.
•
Stay Sober. Never ride your bicycle while intoxicated. An e-bike is capable of
traveling faster than a normal bicycle, and you should always be in control of it.
•
Share the Road. Be careful in mixed traffic. When on bicycle paths, traveling near
pedestrians, or on recreational trails, try to be polite and courteous to those using the
paths with you. E-bikes are new in most cities, so other users of the roads and
recreational paths may not know how to deal with e-bike riders. Bear in mind that, in
a sense, e-bike riders are “ambassadors” for this new method of transportation.
Items to Carry with the E-Bike
It is a good idea to carry the following items with you at all times when you ride your e-bike.
•
•
•
•
The charger, to charge the bike in case the battery power runs out
30 Amp Fuse, spares for the batteries, in case the fuses blow
A lock, to secure your e-bike when you park it
A helmet, as required by safety laws
Inspecting your E-Bike
Always inspect your e-bike before you ride it, to make sure its safety features are operating
properly. Many accidents can be avoided with routine inspections.
Once you are comfortable with your e-bike, you will be able to detect small changes in the
way it feels. If anything changes between uses, make sure to have it properly examined.
Also, be sure to listen for changes in the sounds your e-bike makes over time. Any
mechanical or power issues may have effects on the sounds the bicycle makes.
The Vienna Electric Bicycle User’s Guide
Page 7
TPS Training Bulletin
Holding the Handlebars
As with a normal bicycle or gas scooter, place your fingers over the brake levers, using the
palms of your hand and your thumbs to wrap around and under the handlegrips. Doing this
allows you to activate the brakes easily, by squeezing your hand, in case you have to stop
quickly. This is the safe way to control your electric bicycle.
Turning your E-Bike On and Off
To turn on your e-bike, insert the key into the “ignition”, located just below the dash board,
and turn the key to the right. When your e-bike is activated, the power indicator will light
and the battery charge indicator will jump, showing you how much power your e-bike has.
To turn off the e-bike, simply turn the key to the left, and remove the key.
Warning
When you activate the e-bike, the electrical system becomes live. Do
not try to affect changes to the E-Bike (such as removing the battery
or repairing electrical components) while the E-Bike is activated. Turn
the E-Bike off and remove the key before you attempt to access any of
the electrical components. Also, the battery carries a significant
electric charge and can injure people if not treated properly and with
respect.
Accelerating and Decelerating
The throttle is found on the right-side hand grip on the handlebars. Turn the grip forward
(away from you) to accelerate. To decelerate, release the grip (turn it towards you). Don’t
over-rotate the accelerator, as this could damage the battery and electrical components.
Warning
Do not activate the accelerator until you are seated on the bicycle and
are ready to accelerate. The e-bike can easily escape from your
control, possibly injuring you or others, and the e-bike may be
damaged by being dropped.
The Vienna Electric Bicycle User’s Guide
Page 8
TPS Training Bulletin
Stopping
Your e-bike has two sets of brakes, at the front and at the rear. The levers attached to the
handlebars, on the left and right, activate the brakes. Pull the levers toward you to activate
the brakes.
You can use both brakes to come to a stop more quickly, or you can use one of the brakes
to come to a gentle stop, depending on your riding needs at the moment.
Note
When the brakes are activated, the power to the engine is automatically turned off,
until you release the brakes. This allows you to stop safely.
Safety Tips
•
When you are traveling in wet weather, water may cause your brakes to function less
efficiently because it reduces friction between the brake pads and the wheels. Take
care to slow down and give yourself more room to stop or slow if necessary.
•
It is a good idea to have your brakes and brake pads checked regularly. The brake
pads will eventually wear down through friction, and after significant use will have to
be replaced.
Signalling
You can signal and warn other users of the road by both sound and light signal.
The Horn
The e-bike has a horn. The horn button is on the left handlebar. Simply press it to activate
the horn.
Turning Signal Lights
Your e-bike has turn signal lights. The turn signal activator is on the left handlebar. Push it
left or right to activate it to indicate that you are turning in the appropriate direction, and
press the middle of the button to turn it off.
Note
The turn signals also emit a noise, to ensure that everyone knows you are turning.
This turn signal cannot be disabled without also disabling the visual signal.
Lights
The headlight and taillight are useful features when you are riding at night or in dark areas.
They radically improve your safety in mixed traffic. The switch is located on the left
handlebar.
Note
The lights on your e-bike consume some electricity. Keeping them on may reduce the
maximum distance you can travel on one charge by about 5 %.
The Vienna Electric Bicycle User’s Guide
Page 9
TPS Training Bulletin
Pedaling
This e-bike is designed to be a motor-assisted bicycle. You can use the motor by itself, but
ideally, you can work with the motor by pedaling. This increases the distance you can
travel on your e-bike, because it assists the motor and reduces the amount of electricity
you draw from the battery.
Riding in Wet Weather
Your e-bike is designed to function in wet conditions, such as when it is raining.
However, because the motor is on the rear wheel, it is easy to slip when moving at high
speeds. If it is very wet, be sure to avoid high speeds.
When you are traveling in wet weather, water may cause your brakes to function less
efficiently because it reduces friction between the brake pads and the wheels. Take care to
slow down and give yourself more room to stop or slow if necessary.
The Motor and Water
Your e-bike is not designed to be immersed in water. Always ensure that the water level
does not go above the middle of the tire, to prevent water from getting inside the motor.
Water in the motor can cause short-circuits and may damage the electrical systems in your
e-bike.
Riding in Cold Weather
Your e-bike is designed to operate year-round. However, in very cold conditions or when
there is a lot of snow or slush on the ground, it is possible for the motor in the e-bike to get
wet or for the brakes to function less efficiently, just as can happen in wet weather. Below
10 degrees Celsius, the battery will not work as well as it would in warmer temperatures.
While Lithium-Ion batteries perform better than Lead-Acid batteries in temperature
extremes, both will experience reduced performance in cold temperatures.
Also, riding the e-bike in cold temperatures may require you to replace the battery sooner
rather than later.
The Vienna Electric Bicycle User’s Guide
Page 10
TPS Training Bulletin
Operating Instructions
Using the Rear Storage Compartment
The rear storage compartment is opened using the key provided to you when you
purchased your e-bike. Insert the key and turn it to the right to open the compartment.
Close the case and turn the key in the opposite direction to lock the compartment again.
You can use this compartment to store the charger and associated cables, so you can
recharge your e-bike if it runs out of power. It can also hold a locking mechanism, such a ulock, for added security when parking your e-bike.
The space provided is perfectly suited for these purposes.
Opening the Seat Trunk
Note
Because your Vienna e-bike has a double battery, the seat trunk is actually used to
contain the second, or spare, battery. There may be some small storage space
available inside, but it is best not to use it, as the battery should be left free from
obstruction.
To open the seat trunk, insert the key into the lock on the left side of the e-bike just below
the seat. Turn it all the way to the right. The seat will snap open and pop up.
To close the seat trunk, make sure that there is nothing blocking the locking mechanism,
such as items you have placed in the storage compartment, and push the seat down with
force. You will hear a “click” sound when it is properly closed.
Note
The seat trunk will not open if you are sitting on it.
Parking and Locking your E-Bike
When you want to park your e-bike for a short time, either when you have reached your
destination or are at home, follow these steps:
1.
2.
3.
4.
Stop the e-bike and position it as you want it.
Get off the e-bike, making sure to keep it balanced.
Stand to the side and slightly to the rear of the e-bike.
Hold the kickstand with one foot, and hold on to the e-bike by the rear basket bracket.
This bracket is made of metal and will hold the e-bike’s weight.
5. Pull the back of the seat up and towards you. The e-bike will move backwards. The
kickstand will hold the e-bike in place and anchor the bike.
6. Lock your e-bike to a bicycle locking post or other secure object through the rear
wheel frame or one of the metal frame components.
Warning
Do not let your e-bike drop or fall. The exterior may be damaged. The
fall may damage other components inside the e-bike, as well.
The Vienna Electric Bicycle User’s Guide
Page 11
TPS Training Bulletin
Maximum Load
Do not exceed the maximum load capabilities of your e-bike. You can find the exact
loading capacity listed in the technical specifications in this guide.
If you exceed the maximum load, the performance of the bike will suffer.
Exceeding the maximum load of your e-bike could cause damage to the shocks, to the
mechanism and, ultimately, even to the frame. It could also cause your motor to work too
aggressively, and it may burn out.
Disconnecting the Circuit Breaker
When the circuit breaker is disconnected, all power from the battery to the e-bike is blocked.
This is useful if you are going to store your e-bike or if it is damaged and you wish to bring
it to be serviced.
Disable the circuit breaker using the following very simple procedure.
1. Open the seat compartment.
2. Find the circuit breaker switch (it should be very obvious).
3. Activate the switch. The power to the e-bike will be disabled.
Long-Term Storage of your E-Bike
If you are storing your bike for a long period, disconnect the circuit breaker. This is a safer
way to store the electric bicycle, as it prevents accidental activation of the e-bike and
makes it impossible to activate it even with the key. The circuit breaker is found by opening
up the battery case. It sits between the battery and the controller.
Note
Please see the section titled “Your Battery” for instructions on battery maintenance
while your e-bike is being stored.
The Vienna Electric Bicycle User’s Guide
Page 12
TPS Training Bulletin
The Battery
This section details what you need to know about the battery that powers your e-bike.
Always remember to treat your e-bike’s electrical systems with respect.
Battery Power
The dashboard has a battery charge indicator. When the e-bike is activated, the needle will
jump and indicate the currently available battery power.
If the power has dropped significantly, you should charge your e-bike.
Distance and Power
Your battery has the capacity to carry you anywhere from 35 to 50 km before it must be
recharged. The ability of your battery to power your bicycle depends on many variables.
These variables include the weight of the rider, the prevailing wind resistance, the rider’s
driving habits, the presence of steep hills and inclines, and other issues such as proper air
pressure in the tires.
Saving Power
If you are traveling long distances, you can save a lot of electricity by using better driving
habits.
•
•
•
•
•
•
Coasting: When going downhill or over long, flat road surfaces, try using your ebike’s momentum and allow it to coast, without drawing power from the motor.
Stopping and Starting: Try to avoid stop and go movements. The motor draws
more power when starting from a full stop.
Weight: Remove unnecessary weight from the bike. This reduces the amount of
power the motor must draw.
Air Pressure: Make sure your tires have the proper air pressure. Proper pressure
reduces drag on the tires and radically increases the efficiency of any vehicle.
Head and Tail Lights: Turn off the lights to conserve power, if it is safe to do so. The
lights will reduce the distance you can travel by about 5%.
Pedaling: When accelerating from a full stop, you might want to try pedaling to help
acceleration
The Vienna Electric Bicycle User’s Guide
Page 13
TPS Training Bulletin
Switching Between the Main and Spare Batteries
Your Vienna e-bike has two lead-acid batteries. This gives you a much greater traveling
distance than having a single battery.
The main battery is located in the battery compartment between the seat and the steering
column. The spare battery is stored in the seat compartment.
Like the main battery, the spare battery is made up of 4 lead acid battery cells, though they
are stored loosely in a sack instead of being placed in an enclosed pack, in order to fit
them into the seat compartment.
If your main battery has been depleted, you can switch to the backup battery.
The Main Battery
Turn the key in the “ignition” all the way to the left (labelled “A”) to activate the main battery.
The Backup Battery
Turn the key in the “ignition” all the way to the right (labelled “B”) to activate the backup
battery.
Charging your E-Bike
Charging your e-bike is a simple process. You require the following:
•
•
The charger that came with your e-bike
One or two 110V household electrical outlets
Charger Warning
Only use the chargers that were supplied with your e-bike. Using
chargers that do not have specifications identical to those which came
with the e-bike could irreparably damage your e-bike’s battery and
electrical systems, and may cause injury.
The Vienna is capable of charging both batteries through the e-bike. You may want to
remove one of the batteries, however, and charge it separately, using an optional second
charger. This will save charging time. A second charger is not included with the Vienna, but
your Daymak dealer can supply you with one of these.
You can do the following:
•
•
•
Charge both batteries through the e-bike.
Charge one battery through the e-bike, and charge one battery on its own.
Charge both batteries without the e-bike.
The Vienna Electric Bicycle User’s Guide
Page 14
TPS Training Bulletin
Charging through the E-Bike
To charge the batteries through the e-bike, follow this procedure.
1. Turn off the e-bike and remove the key from the “ignition”.
2. Plug the female end of the charger cable into the charging slot on the e-bike. This is
found on the outside casing of the e-bike, in front of and just underneath the seat.
3. Plug the male end of the charger power cable into your wall socket. This should be a
110v household electricity supply. You can also use a portable generator, if
necessary, but make sure it provides 110V current.
4. Allow the e-bike’s battery to charge for the appropriate amount of time (6-12 hours).
5. Disconnect the charger when the LED light on the charger is green. The batteries
have been fully charged.
Note
If your charger’s LED status light does not change from red to green over an extended
period of time, for perhaps more than 14 hours, and the battery is very hot, the battery
or charger may need replacing. Stop charging and bring both to your Daymak dealer
immediately. Do not charge the battery.
Charging a Battery on its Own
If you have removed one of both of the batteries to charge away from the e-bike, follow this
procedure.
1. Follow the instructions to remove the battery from its compartment
2. Plug the female end of the charger cable into the charging slot on the battery.
3. Plug the male end of the charger power cable into your wall socket. This should be a
110v household electricity supply. You can also use a portable generator, if
necessary, but make sure it provides 110V current.
4. Allow the e-bike’s battery to charge for the appropriate amount of time (3-8 hours).
Disconnect the charger when the LED light on the charger is green. The battery has
been fully charged.
Battery Care Caution
Be sure to follow all instructions concerning handling the battery found
under “Battery Care”.
Note
If your charger’s LED status light does not change from red to green over an extended
period of time, for perhaps more than 14 hours, and the battery is very hot, the battery
or charger may need replacing. Stop charging and bring both to your Daymak dealer
immediately. Do not charge the battery.
Heat Warning
A charging battery produces heat. Do not cover the battery with
anything when it is being charged, to allow the heat to escape.
Allowing the battery to overheat may cause serious damage to your
battery. If the battery is very hot to the touch, do not touch it until it has
cooled sufficiently.
The Vienna Electric Bicycle User’s Guide
Page 15
TPS Training Bulletin
The Battery Fuse
A fuse prevents over-use and power surges from affecting the e-bike’s electrical systems. It
is located on the main battery, where the power cable attaches to the battery itself. It is a
standard 30 amp fuse.
If the fuse is blown, all electrical input to the e-bike will cease. The battery will also not
recharge.
See “Maintenance and Troubleshooting” to learn how to replace the fuse.
Note
It is a good idea to always carry a spare 30 A fuse, to replace the fuse in case it blows.
If you are far from a possible supply source, you may not be able to ride your e-bike.
The Vienna Electric Bicycle User’s Guide
Page 16
TPS Training Bulletin
Removing the Main Battery for Charging or Storage
Your batteries can be removed for charging if you need to bring them inside while you are
stopped or waiting at a destination. This is useful if you are arriving at work and need to
allow the battery to charge before you commute home, or if you want to remove the
discharged battery and replace it with a spare battery that has been charged.
To do this, follow these steps:
1. Lift up the flexible footguard sitting on the battery compartment between the seat and
the steering shaft.
2. Unlock the battery compartment.
3. Lift the battery out part-way, turn the battery slightly and rest it against the battery
case frame.
4. Unplug the battery from the e-bike.
5. Lift the battery carefully with both hands and carefully place it somewhere convenient
and safe.
6. Carefully follow the instructions found under “Battery Care”.
When you want to place the battery back into the e-bike, reverse these steps.
Removing the Backup Battery for Charging or Storage
Because your Vienna e-bike has a double battery, the seat trunk is actually used to contain
the second, or spare, battery.
To open the seat trunk and remove the spare battery, follow this procedure:
1. Insert the key into the lock on the left side of the e-bike, just below the seat. Turn it all
the way to the right. The seat will snap open and pop up.
2. Unplug the battery from the e-bike.
3. Lift the battery out carefully, using both hands, by the straps provided, and place it
where it is to be charged.
4. Follow the instructions found under “Battery Care” and “Handling the Battery.”
When you want to place the battery back into the e-bike, reverse these steps.
To close the seat trunk, make sure that there is nothing blocking the locking mechanism,
such as items you have placed in the storage compartment, and push the seat down with
force. You will hear a “click” sound when it is properly closed.
Caution
Be careful not to disconnect the power leads that run between the
batteries when removing the spare battery from the compartment.
These wires keep the batteries in series, and allow the e-bike to draw
on the complete set as a single unit. Disconnecting the wires will
break the connection and will alter the power output of the battery unit
as a whole. If the wires become disconnected, call your Daymak
dealer immediately, before you try to service the battery.
The Vienna Electric Bicycle User’s Guide
Page 17
TPS Training Bulletin
Battery Care
Follow these suggestions to maintain your battery’s optimal performance. If you do not
follow these suggestions, your battery may lose its ability to maintain a charge and might
have to be replaced sooner than would otherwise be necessary.
•
•
•
•
Charge it: Charge your battery immediately after riding it.
Full Charge: Do not allow the battery to run down completely and lie in storage
without a charge. This significantly reduces the battery’s lifespan and may cause
damage.
Keep it Charged: When being stored, charge the battery occasionally to make sure
its power supply does not run down. Charging it once every 21 days should be
sufficient.
Storage Conditions: Store the battery on a flat, cool, dry surface. Do not allow the
battery temperature to drop below 10 degrees Celsius for extended periods of time.
Warning
DO NOT place your Lead-Acid battery on concrete. Concrete
drains the battery’s power and will neutralize the lead-acid. Placing the
battery on concrete for any length of time will likely result in the battery
being drained of power and possibly losing its ability to store electricity.
Handling the Battery
The battery contains large amounts of electrical power. You must use caution and respect
when handling it. Not following these instructions can result in serious injury.
WARNING!
Follow these instructions closely. Use care when handling your battery.
•
Always lift the battery with both hands, and carry it with care. Never drop the battery.
If the case is damaged, the contents may leak out.
•
Never puncture or open the battery case. The contents are dangerous and may
cause injury. Do not touch the contents of a leaking battery. Seek help immediately.
•
Do not touch the two metal poles on the battery box at the same time. This can cause
a short-circuit. It could injure you or others and cause serious damage to the
electrical systems in the e-bike. Your battery contains significant amounts of electrical
power.
•
Do not handle your battery if either you or the battery are wet. Water is an excellent
conductor of electricity. You may experience an electrical shock, and you may be
injured.
The Vienna Electric Bicycle User’s Guide
Page 18
TPS Training Bulletin
Cold Weather and your Battery
Below 10 degrees Celsius, the battery will not work as well as it would in warmer
temperatures. While Lithium-Ion batteries perform better than Lead-Acid batteries in
temperature extremes, both will experience reduced performance in cold temperatures.
Also, repeatedly riding the e-bike in cold temperatures may cause your battery to have to
be replaced sooner.
Replacement and Disposal
After approximately 300 charges, a lead-acid battery will need to be replaced. A lithium-ion
battery will last approximately 1500 charges. When the battery has to be replaced, you will
notice that your battery cannot carry as much of a charge as it could initially.
Contact your local Daymak dealer to purchase a new battery.
When replacing your battery, dispose of it at a proper municipal battery recycling facility. If
none is available, please contact your local Daymak dealer.
Warning
Be absolutely sure that you replace the battery with an identical or
very similar battery. While it is possible to change the battery format or
power levels, this requires advanced knowledge of electrical systems.
If improperly done, this can result in immediate and irreparable
damage to the electronic controller and electrical systems. Be
absolutely certain of what you are doing before you replace the
battery with a different type of battery.
Using the wrong type of battery will also void your warranty.
The Vienna Electric Bicycle User’s Guide
Page 19
TPS Training Bulletin
Technical Data
This section provides you with the technical specifications for your e-bike.
The Motor and Wheel Assembly
The Vienna e-bike has a 500 Watt magnetic DC brushless motor on the rear wheel hub.
This type of motor has excellent low-end torque and high efficiency when working within its
range. Note that while the motor is very quiet, it does produce some noise. Also attached to
the rear hub are speed reduction gear and the speed free clutch.
The Freewheel
The wheels have freewheels, so the e-bike’s drive train is not fixedly geared. This means
that when coasting or traveling downhill, you can turn off the engine and your e-bike will
continue to move without slowing. This feature will allow you to achieve faster speeds
when coasting, moving downhill or moving with the wind. It will also allow you to conserve
electrical power, because you will be able to let to the motor rest while moving.
The Controller
Daymak pioneered the development of intelligent component control in e-bikes. The “DDrive” technology developed by Daymak is the brain of your e-bike. It allows your e-bike to
achieve faster acceleration, to climb steeper hills, and to save energy. In future, it will allow
for other ways of recharging your e-bike’s batteries, such as by using solar or wind power.
The electronic controller is located under the seat assembly. This controller efficiently
regulates the speed and electronic functions of the bicycle. It allows for stepless speed
adjustment, shuts off the motor when the brakes are activated, has low voltage protection
and has fuses to prevent excess current from damaging the e-bike’s systems.
The Governor
A key component of the controller is the Governor. The Governor regulates the speed of
the e-bike. It prevents the motor from assisting riders when the e-bike’s speed surpasses
32 km per hour.
Note
The governor’s primary function is to make sure that the motor functions efficiently. If
the governor is not functioning, the mileage of the e-bike will be dramatically reduced,
and its performance will suffer.
Disabling the governor voids the warranty, and may damage your controller.
This speed limitation to 32 km per hour is required by government regulations. Traveling
faster than 32 km per hour through motor power alone is illegal in Canada and could result
in serious fines or penalties, unless your vehicle is insured for liability, is registered and you
are licensed to drive.
The Vienna Electric Bicycle User’s Guide
Page 20
TPS Training Bulletin
The Brakes
Rear Brakes
The rear brakes on your e-bike are EABS Brakes (Electric Absorption Braking System).
These provide a good friction-grip when they are activated. They significantly less than
standard drum brakes. Using these brakes helps to reduce the weight of the e-bike and
improve its performance.
Front Brakes
The brakes on your e-bike are drum-brakes, like those found on gas scooters and
motorcycles. They generally provide for very fine stopping and control. This is a very tested
and well-designed technology, but even so, the brakes will require servicing from time to
time, and may have to be adjusted for tension.
Unlike normal friction-grip bicycle brakes, which clamp down from the outside, the drum
brakes clamp from the inside. When the brakes are activated, tension increases and the
clamps engage. This is a very effective and reliable way to stop a vehicle.
The brakes are contained within a sealed unit, and are very finely adjusted and fitted.
The Chain and Pedals
The pedals are connected to the rear wheel. Along with the chain, they provide a humanpowered “drive train”. This is an important part of your e-bike. The pedals are not
removable and should not be removed.
Shock Absorbers
Your Vienna e-bike is equipped with Reverse Shock System shock absorbers. These
effective but simple devices absorb the energy from bumps and dips, and allow you to
have a much more comfortable ride. The Reverse Shock System is superior to normal
Monoshock shock absorbers usually found on e-bikes, and provides for a much more
comfortable ride.
While they are very resilient, please note that very sharp or large shocks, such as drops
from a height of 15 cm or more, can cause serious damage to your shock absorbers.
Replacing them is a complex and time-consuming task, so do be careful when dropping
from larger heights.
Page 21
The Vienna Electric Bicycle User’s Guide
TPS Training Bulletin
Basic Statistics
Dimensions
Weight
Loading Capacity
Speed and Mileage
Wheel Size: 3.0" x 16
Body Size: 169 x 39 x 109 cm
Seat Height: 75 cm (29")
36 kg without battery
72 kg with battery
Standard: 75 kg
Maximum: 150 kg
Max. Speed: 32 km/h
Max. Mileage: 70-90 km
Electrical System Statistics
Motor Statistics
Charger Statistics
Battery Statistics
Rated Power: 350W
Voltage: 48V
Rated rolled speed: 200 RPM
Working efficiency: 70-80%
Torque: 32-55 Nm
Max. Climbing Angle: 12-15 Degrees
Charger Input: AC 100 – 240V
Standard Input voltage: 110V +/- 10%
2 Batteries
Controller Statistics
Model: D-125
Input voltage: 48V
Low Protective Voltage: >43.5V
Excess Current Protection: <17A
Wiring Diagram
Output: DC 48V, BM-online
Charger output voltage: 43.8 +/- 10%, 50Hz
Power Rated: 80W
Voltage Charge: 43.2 – 44.2V
Charge Current: 2.5A +/- 0.02A
Charge Time: 6-12 hours
Each:
Type: Sealed Lead Acid Battery
Rated Voltage: 48V
Rated Power: 20AH
Battery Life: 300 charges
Number: 4 battery units in series
Dimensions: 17cm x 9.8cm x 11cm
Weight: 6 kg each, total 24 kg
Standard Capacity: 12V x 17 AH
Rated Total Capacity: 500Wh
The Vienna Electric Bicycle User’s Guide
Page 22
TPS Training Bulletin
Maintenance and Troubleshooting
This section outlines problems you may have and solutions you may be able to use.
Note
Many of the parts in this product are not user-serviceable and should be repaired by
trained professionals. This is especially true of the electrical systems and the
mechanical components. Alteration of these components voids the warranty.
Tire Pressure
Maintain the air pressure in your tires at the appropriate level. If the air pressure is too low,
your e-bike’s performance will suffer and it will become damaged more easily.
Cold weather and lower temperatures will cause the air pressure in your tires to drop, and
warmer weather will cause it to increase, even if there are no leaks in the tire tube.
To replace the air in your tires, follow this procedure:
1. Identify the required pressure by examining the text along the side of the tire rim. This
text should indicate the recommended pressure for your tire.
2. Locate the air valve on the inner surface of the tire rim.
3. Remove the valve cap and place in a secure location.
4. Place the nozzle end of an air pump (hand-power or mechanical) over the valve.
5. Pump up the air in the tire, being careful not to let the pressure go above the level
prescribed on the side of the tire wall.
6. Remove the pump nozzle from the air valve without allowing much air to escape from
the tire.
7. Replace the valve cap on the air valve.
Note
Maintaining the proper air pressure will allow you to travel much further on a single
charge, because the motor will not have to work as hard to move the e-bike.
Replacing Flat Tires
Replacing flat tire tubes is a more complicated and labour-intensive process with e-bikes
than it is with regular bicycles. It requires proper tools, more skill and more patience.
The front wheel is easier to service when changing a flat tire than the rear wheel, as the
rear wheel is connected to the hub motor and other mechanical parts.
Unless you are very familiar with the mechanical components of the rear motor, attempting
to change a flat rear tire may cause serious problems.
Please contact your Daymak dealer for specific instructions on how to remove your wheel
and tires safely, and how to replace the tubes.
It may be easier – and safer - to have the tubes replaced by your Daymak dealer.
The Vienna Electric Bicycle User’s Guide
Page 23
TPS Training Bulletin
The Brakes
The drum brakes on your Vienna e-bike allow you to stop and are a critical safety feature.
Make sure you test them regularly. Take the e-bike to your Daymak dealer if the brakes
appear to be losing their stopping power or feel looser than they were previously.
The brakes on your e-bike may require servicing from time to time. The brake pads will
need to be replaced as they wear down, usually after about a year to a year and a half or
so, depending on how the e-bike is ridden. Also, the brake cables may have to be adjusted
for tension.
You can only service the brakes yourself if you have extensive experience servicing drum
brakes. Please do not attempt to service the drum brakes if you are not absolutely sure
how to do it.
Adjusting the Drum Brake Cable Tension
From time to time, you may need to adjust the brake cable tension, to loosen or tighten the
drum brakes.
On your drum brakes, a small wing nut rides up and down a threaded bolt, moving the
brake cable and tightening or loosening the brake pads.
Just outside the casing, near the drum brake, the brake cable joins the drum brake. A small
wing nut allows you to adjust the tension.
1.
2.
3.
4.
Locate the wing nut on the drum brake.
To tighten the brakes, turn the wing nut clockwise.
To loosen the brakes, turn the wing nut counter-clockwise.
Adjust the tension until the drum brakes are tight enough to provide for proper safety
but are loose enough to allow the wheel to move freely when the brake is not
engaged.
Warning
Your brakes are a critical safety feature. Do not excessively loosen the
drum brakes. If you do not keep them sufficiently tight, your drum
brakes will fail and your e-bike will not be able to stop properly.
The Vienna Electric Bicycle User’s Guide
Page 24
TPS Training Bulletin
Adjusting the EABS Brake Cable Tension
From time to time, you may need to adjust the brake cable tension, to loosen or tighten the
EABS brakes.
On your EABS brakes, a small cable attaches to a nut. Depending on how tightly the cable
is threaded through the nut, the brakes will be tighter or looser.
Just outside the casing, near the drum brake, the brake cable joins the drum brake through
a small wing nut.
This is what the bolt and attached cable look like:
To adjust the brake tension, follow this procedure.
1. Locate the brake lever attached to the wheel.
2. Adjust the 10 MM bolt on the lever of the brake system to the tightness desired.
Warning
Your brakes are a critical safety feature. Do not excessively loosen the
drum brakes. If you do not keep them sufficiently tight, your drum
brakes will fail and your e-bike will not be able to stop properly.
Servicing the Battery
Please consult the special section “The Battery” in this manual for information about
servicing or handling your battery.
The Vienna Electric Bicycle User’s Guide
Page 25
TPS Training Bulletin
The Battery Fuse
A fuse prevents over-use and power surges from affecting the e-bike’s electrical systems. It
is located on the main battery, where the power cable attaches to the battery itself.
Total Loss of Power
If the fuse is blown, all electrical input to the e-bike will cease. The battery will also not
recharge, though the light on the charger will show “green” and indicate that the battery is
fully charged.
Follow this procedure to replace the fuse.
1.
2.
3.
4.
Turn off the e-bike.
Remove the battery.
Remove the fuse case, located near the battery plug, by turning it clockwise.
Remove the old fuse, and replace it with a new one. The fuse should be a 30 A
cylindrical fuse. The specific measure will also be on the old fuse.
5. Replace the battery.
6. Re-start the e-bike.
Note
It is a good idea to always carry a spare 30 A fuse, to replace the fuse in case it blows.
The Motor
Do not service the motor yourself. Bring the e-bike to your Daymak dealer for service. The
motor in your e-bike is a highly complex and fine-tuned mechanism. Repairing it requires
significant expertise.
We suggest maintenance every 100 running hours or so.
The Chain
Ensure that the chain on your e-bike is well-oiled and lubricated. It is an important part of
your e-bike. As with any bicycle, it needs to be maintained if it is to function.
Shock Absorbers and Comfort
If your riding experience feels bumpier than usual, and you suspect that your shock
absorbers are experiencing difficulties, check the air pressure in your tires. If the air
pressure is too low, this may be the reason you feel less comfortable. It may have nothing
to do with your shock absorbers.
If the problem persists, take your e-bike to your Daymak dealer for servicing.
The Vienna Electric Bicycle User’s Guide
Page 26
TPS Training Bulletin
Bringing in your E-Bike for Service
Do not attempt to service the electronic or mechanical parts of your e-bike unless you are
absolutely sure of what you are doing and have a solid understanding of electrical and
mechanical equipment.
If your e-bike is not performing properly, disconnect the circuit breaker and bring the e-bike
to your local Daymak dealer.
Do not store the e-bike without disconnecting the circuit breaker.
Liability
Daymak will not be held responsible for damage or injuries resulting
from errors resulting from improperly serviced parts.
The Vienna Electric Bicycle User’s Guide
Page 27
TPS Training Bulletin
E-Bikes and Canadian Law
British Columbia, Alberta, Saskatchewan, Manitoba, Quebec,
Nova Scotia, Newfoundland and Labrador, Yukon
Currently, eight Canadian jurisdictions (British Columbia, Alberta, Saskatchewan, Manitoba,
Quebec, Nova Scotia, Newfoundland and Labrador and Yukon Territory) have legalized
power-assisted bicycles for public road use and are treating these vehicles as conventional
bicycles and not as motor vehicles. As such, they do not require insurance, registration or
licences. E-bike technical specifications must fall within certain parameters, however,
The rules are similar in every province, with minor variations, and are not considered
controversial. Consult your local ministry or department of transportation for guidelines.
New Ontario Regulations
Ontario is currently running a pilot program to determine whether or not e-bikes should be
allowed on Ontario roads and under what conditions. The pilot program ends in 2009, at
which point decisions will be made as to the future of e-bikes on Ontario roads. Because
the program in Ontario is new, and the rules are often unfamiliar even to law enforcement
officials, we have included a synopsis of the regulations here.
These rules are very similar to the rules currently in place in other Canadian provinces.
Print the “TPS Training Bulletin” at the end of this manual and keep it with you when you
are traveling. If you are stopped by traffic authorities who are unfamiliar with e-bikes or the
regulations concerning them, show them this bulletin. They should allow you to continue.
Definition of an E-Bike
An e-bike is a bicycle with an added battery powered electric motor that does not exceed
500 watts and can assist the cyclist up to a speed of 32 km/h. It can also be driven like a
bicycle without any power assist. The addition of the power assist enables the rider to
pedal with less effort, to achieve a greater distance, to climb hills and ride against the wind
more easily. In its size, weight, speed and the driving skills required, the e-bike is similar to
the conventional bicycle.
A power-assisted bicycle is the same as an e-bike. An e-bike is considered a powerassisted bicycle as long as it meets all the requirements of the Motor Vehicle Safety Act.
Traveling by E-Bike
Power-assisted bicycles will be able to travel anywhere a bicycle travels. They will be
permitted on trails and paths where municipal by-laws permit bicycles. Power-assisted
bicycles, like bicycles, are not allowed on controlled-access highways such as the 400
series highways, the Queen Elizabeth Way, the Queensway in Ottawa or the KitchenerWaterloo Expressway, or on municipal roads, including sidewalks where bicycles are
banned under municipal by-laws.
Who Can Ride an E-Bike
Anyone who is 16 years of age or older and wears an approved bicycle helmet at all times
while operating an e-bike can ride one.
The Vienna Electric Bicycle User’s Guide
Page 28
TPS Training Bulletin
Specific Riding Requirements
Power-assisted bicycles are treated as bicycles. This means:
• No driver's licence is required
• No written test is required
• No vehicle registration or license plate is required
• No motor vehicle liability insurance is required
• Operators must be 16 years of age and older
• All persons are required to wear an approved bicycle helmet
• Only electric bicycles that conform to the federal Motor Vehicle Safety Act regulations
and are labelled as a "power-assisted bicycle" are eligible for the pilot. program
Equipment
A power-assisted bicycle (e-bike):
•
•
•
•
Has steering handlebars and is equipped with pedals
Is designed to be propelled primarily by muscular power and to travel on not more
than three wheels
Has a motor that has a power output rating of 500W or less. The motor is electric,
and is incapable of propelling the cycle at speed of 32km/h or greater on level ground,
without pedaling.
It must bear label indicating that it is a "Power-Assisted Bicycle".
Safety Equipment
Power-assisted bicycles will require the same safety equipment as bicycles under the
Highway Traffic Act:
• Proper lights
• Proper brakes
• Proper bell
Bicycle Helmets
Anyone operating an e-bike will be required to wear an approved bicycle helmet. There will
be no age exemptions.
Fines and Penalties
All the set fines established for violating rules of the road and equipment standards that
apply to bicyclists would apply to drivers of e-bikes. However, offences directly related to
the pilot program (i.e.; riding an e-bike under the age of 16 or anyone riding an e-bike
without a helmet) would be subject to the higher fines set for pilot projects, ranging from
$250 to $2,500.
Drinking and Driving
Drinking and driving a motor vehicle is a Criminal Code offence and charges are laid under
the Criminal Code of Canada. Under the Criminal Code, the definition of a "motor vehicle"
would include an e-bike and anyone operating an e-bike intoxicated could be charged for
impaired driving. If convicted, the offender would be subject to the Criminal Code penalties,
including a fine or jail time, and a driving prohibition. However, under this pilot regulation,
an e-bike would not be a motor vehicle under the Highway Traffic Act, so penalties for
impaired driving under the Act would not apply.
The Vienna Electric Bicycle User’s Guide
Page 29
TPS Training Bulletin
TPS Training Bulletin
TPS Training Bulletin
Attention Traffic and Training Sergeants:
Recently we have had some enquiries from officers in the field and members of the public
regarding e-bikes and have found that there is some confusion over the definition of a
Power Assisted Bicycle (e-bike).
According to Ontario Regulation 473/06, an e-bike that meets the definition is deemed not
to be a motor vehicle, under the Highway Traffic Act, and is essentially treated as a bicycle.
Any person 16 years and over who wears a bicycle helmet as required by subsection 104
(2.1) of the HTA may ride a power assisted bicycle on the highway. There is no
requirement for a drivers license, a permit or insurance.
The main requirements for a bicycle to be designated a "power assisted bicycle" is that it
"is capable of being propelled by muscular power" and a "bears a label that is permanently
affixed by the manufacturer stating that the vehicle is a power assisted bicycle". Obviously
while the e-bike is being operated on the road, the pedals must be attached and functional.
O. Reg 473 refers to federal Motor Vehicle Safety Regulations for a definition.
Rick Line, TC 4365,
TPS Training & Education Unit,
Traffic & Provincial Statutes Section,
C.O. Bick College,
4620 Finch Ave. E.,
Scarborough, On, M1S-4G2
Ph: 416-808-4877
"Committed to Lifelong Learning"