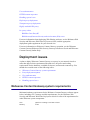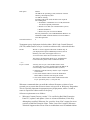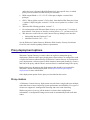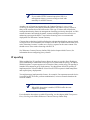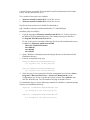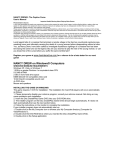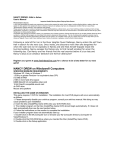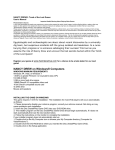
1
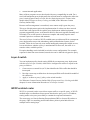
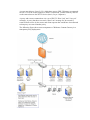
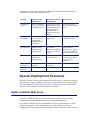
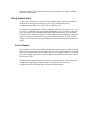
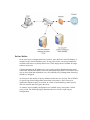
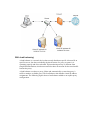
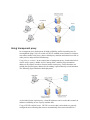
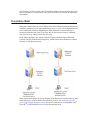
Deploying with Websense
Content Gateway
Websense® Content Gateway is a high-performance Web proxy that provides realtime content scanning and Web site classification to protect network computers from
malicious Web content while controlling employee access to dynamic, user-generated
Web 2.0 content. Web content has evolved from a static information source to a
sophisticated platform for 2-way communications, which can be a valuable
productivity tool when adequately secured.
The dilemma for administrators is how much access to allow. Web 2.0 sites rely
primarily on HTTP/HTTPS protocols, which cannot be blocked without halting all
Internet traffic. Malicious content can use this means of entry into a company
network.
The Websense Content Gateway module offers:
Automatic categorization of dynamic Web 2.0 sites
Automatic categorization of new, unclassified sites
HTTPS content inspection
Enterprise proxy caching capabilities
Websense Content Gateway is deployed as an add-on module with Websense Web
Security or Websense Web Filter. Websense Content Gateway can also be an
important piece of the following Websense deployments:
Web Security Gateway for on premises deployments. On premises deployments
may be implemented on Websense V-Series appliances or as software running on
general purpose servers.
Hosted Web Security Gateway for software as a service (SaaS) deployments
Web Security Gateway Anywhere for distributed enterprises with one or more
branch offices and multiple remote users
Deploying Websense Content Gateway can improve network efficiency and
performance by caching frequently accessed information at the edge of the network.
However, the increasing availability of Web dynamic content that cannot be cached
can limit the effectiveness of this feature.
This paper includes the following topics:
Websense Content Gateway system requirements
Proxy deployment options
User authentication
HTTPS content inspection
Handling special cases
Explicit proxy deployment
Transparent proxy deployment
Highly available Web proxy
In a proxy chain
With Blue Coat ProxySG
With Microsoft Internet Security and Acceleration (ISA) server
For more information about deploying Web filtering software, see the Websense Web
Security and Websense Web Filter Deployment Guide, and the appropriate
deployment guide supplement for your network size.
For more information on Websense Content Gateway operation, see the Websense
Content Gateway/Websense Web Security Gateway Installation Guide and Websense
Content Gateway Online Help.
Deployment issues
A plan to deploy Websense Content Gateway as a proxy in your network involves
more than physical site requirements like plant size, the power and cooling
requirements for the hardware, available rack space, and network connectivity. You
should also consider some of the following issues:
Websense Content Gateway system requirements
Proxy deployment options
User authentication
HTTPS content inspection
Handling special cases
Websense Content Gateway system requirements
Minimum hardware requirements for the Websense Content Gateway software appear
below, including CPU, memory and disk requirements. See the Websense Web
Security and Websense Web Filter Deployment Guide for a list of the requirements for
other Websense system components.
CPU
Quad-core running at 2.8 GHz or faster
Memory
4 GB
Disk space
2 disks:
100 GB for the operating system, Websense Content
Gateway, and temporary data.
147 GB for caching
If caching will not be used, the disk is not required.
The caching disk:
• Should have a minimum size of 2 GB, maximum
147 GB for optimal performance
• Must be a raw disk (not a mounted file system)
• Must be dedicated
• Must not be part of a software RAID
For best performance, use a 10K RPM SAS disk drive on
a hardware RAID controller that has at least 64 MB of
write-through cache.
Network interfaces
2
Transparent proxy deployment includes either a Web Cache Control Protocol
(WCCP)-enabled router or Layer 4 switch to redirect traffic, as described below:
Router
WCCP v1 routers support redirection of HTTP only. If
your deployment requires additional protocols, such as
HTTPS, your router must support WCCP v2.
®
®
A Cisco router must run Cisco IOS 12.2 or later.
The clients, the destination Web server, and Websense
Content Gateway must reside on different subnets.
—or—
Layer 4 switch
You may use a Layer 4 switch rather than a router.
To support WCCP, a Cisco switch requires the EMI or IP
services image of the 12.2SE IOS release (or later).
Websense Content Gateway must be Layer 2 adjacent
to the switch.
The switch must be able to rewrite the destination
MAC address of frames traversing the switch.
The switch must be able to match traffic based on the
Layer 4 protocol port (i.e., TCP port 80).
Websense recommends that you audit the software/firmware revisions of your
network gear to ensure that no known issues exist specific to Web proxy integrations.
This is especially important in transparent proxy deployments, where a switch or
router is required to redirect traffic to the proxy.
Software requirements are as follows:
Websense Content Gateway version 7.5 is certified on Red Hat® Enterprise
Linux™ 5, update 3 and update 4, base or Advanced Platform (32-bit only)
Although not certified, Websense, Inc. provides “best effort” support for newer
versions of Red Hat Enterprise Linux. Under “best effort” support, Websense
Technical Support makes a best effort to troubleshoot cases in standard fashion
unless the issue is deemed a Red Hat Enterprise Linux-specific issue, at which
point you must contact Red Hat directly for assistance.
RPM compat-libstdc++-33-3.2.3-47.3.i386.rpm (or higher version of this
package)
GNU C library (glibc) version 2.5-42 or later. Note that Red Hat Enterprise Linux
5, update 3 ships with glibc version 2.5-34. Be sure to update it to version 2.5-42
or later.
Websense Web filtering products, version 7.5
For an integration with Websense Data Security, you can use any 7.x version of
that software. Note, however, that for versions prior to v7.5, you must use ICAP.
Web browsers certified for use with Content Gateway Manager user interface:
Microsoft® Internet Explorer® 7 or 8
Mozilla® Firefox® 3.0.x - 3.5.x
See the Websense Content Gateway/Websense Web Security Gateway Installation
Guide for more details regarding software requirements.
Proxy deployment options
Websense Content Gateway is used in either an explicit or transparent proxy
deployment. With an explicit proxy deployment, client software is configured to send
a request for Internet content directly to Websense Content Gateway. In a transparent
proxy deployment, a client request for Web content is intercepted (usually by a router)
and sent to the proxy, and the client is unaware that it is communicating with a proxy.
Both options have advantages and disadvantages that should be investigated for
Websense Content Gateway deployment. See Explicit and transparent proxy
deployments for more information.
Other deployment options for the proxy are described in this section.
Proxy clusters
A Websense Content Gateway deployment can scale from a single node into multiple
nodes that form a cluster, improving system performance and reliability. Two types of
clusters are supported—management clustering and cross-cache clustering.
With management clustering, all the nodes in a cluster share configuration
information. A configuration change on one node is automatically made in all other
nodes.
Note
If you enable HTTPS content inspection (SSL) in a
management cluster, you must configure each node
manually for all SSL features.
Another type of clustering supported by the Content Gateway is cross-cache
clustering, a complex proxy deployment that allows any node in a proxy cluster to
share cache contents across the other nodes. This type of cluster also includes the
configuration sharing feature in management clustering previously described. As Web
content becomes increasingly dynamic, content caching becomes less effective at
enhancing system performance. Cross-cache clustering is not a recommended
deployment for Websense Content Gateway.
Clusters that are deployed with load balancing schemes that distribute requests based
on origin server IP or hostname (for example, with WCCP) cannot benefit from crosscache clustering, because 2 caches never receive requests for the same content. You
should not use cross-cache clustering with WCCP.
See Websense Content Gateway Online Help (in the chapter titled Clusters) for
information about configuring proxy clusters.
IP spoofing
When enabled, the IP spoofing feature directs the proxy to use the client IP address
when establishing a connection to an origin server, rather than the proxy’s IP address.
With this option, a request appears to be from the client, not the proxy. IP spoofing is
intended for transparent proxy deployments. You should note that if IP spoofing is
implemented, the client IP address is used for all HTTP requests in both transparent
and explicit proxy deployments.
You might want to implement this feature, for example, if an upstream network device
is used to log HTTP traffic, perform authentication, or access controls based on the
client IP address.
Note
When SSL decryption is enabled, HTTPS traffic does not
support IP spoofing.
For information about how to enable IP spoofing, see the chapter titled Transparent
Proxy Caching and ARM in Websense Content Gateway Online Help.
User authentication
Authentication is the process of verifying a user via a username and password. User
authentication may be configured on Websense Content Gateway or in TRITON Web Security.
Content Gateway authentication
The proxy can be configured for transparent user authentication with NTLM, in
which case users are not prompted for credentials, or for explicit (or manual)
authentication, in which case users are required to enter a username and password for
network access.
Note
Not all Web browsers support both transparent and explicit
authentication modes in Websense Content Gateway. See
Websense Content Gateway Online Help, in the chapter
titled Security, for specific browser limitations.
In the manual authentication process, Content Gateway prompts a user for proxy login
credentials when that user requests Internet content. After the user enters those
credentials, the proxy sends them to a directory server, which validates the data. If the
directory server accepts the user’s credentials, the proxy delivers the requested
content. Otherwise, by default the user’s request is denied. If enabled, a proxy Fail
Open option allows a user request to proceed after authentication failure and be
subject to IP-based filtering. See Websense Content Gateway Online Help for more
information about the Fail Open option.
The issue of proxy authentication is important in a deployment in which multiple
proxies are chained. Authentication by the proxy closest to the client is preferred, but
may not be possible given a particular network’s configuration. Other issues include
whether Content Gateway is chained with a third-party proxy and which proxy is
designated to perform authentication. See In a proxy chain for more information.
Websense Content Gateway supports the following proxy authentication methods:
NTLM (Windows NT® LAN Manager)
LDAP (Lightweight Directory Access Protocol)
RADIUS (Remote Authentication Dial-In User Service)
Content Gateway supports both transparent and explicit authentication for Windows®
NTLM authentication. LDAP and RADIUS support explicit authentication.
Support for multiple authentication realms is available for NTLM and LDAP
authentication. An authentication realm consists of a set of clients, identified by client
IP range or User-Agent, that must authenticate with a specific set of authentication
servers. Rules may be defined for both types of authentication realms, but only one
method (NTLM or LDAP) can be active at any time.
See Websense Content Gateway Online Help, in the chapter titled Security, for
detailed information about configuring all these proxy authentication options.
TRITON - Web Security authentication
You can configure user identification in TRITON - Web Security rather than on the
proxy. Methods of user identification include the use of Websense transparent
identification (XID) agents like Logon Agent or DC Agent, which identify users
transparently. Manual authentication, which requires users to enter login credentials,
can also be configured in TRITON - Web Security. See the TRITON - Web Security
Help, in the chapter titled User Identification, for details.
HTTPS content inspection
An optional SSL feature allows the transmission of secure data over the Internet.
When you use Websense Content Gateway with SSL enabled, HTTPS data can be
decrypted, inspected for policy, and then re-encrypted as it travels from the client to
the origin server and back. Enabling this feature also means that traffic from the server
to the client can be inspected for Web 2.0 and uncategorized sites. The SSL feature
includes a complete set of certificate-handling capabilities. See Websense Content
Gateway Online Help for information on managing certificates.
Deploying Content Gateway with SSL enabled may require the following
modifications to your system:
Creation of trusted Certificate Authority (CA) certificates for each proxy to use
for SSL traffic interception, and the installation of those certificates in each
trusted root certificate store used by proxied applications and browsers on each
client
In explicit proxy deployments, additional client configuration in the form of
Proxy Auto-Configuration (PAC) files or Web Proxy Auto-Discovery (WPAD)
In transparent proxy deployments, integration with WCCP v2-enabled network
devices
Note
HTTPS content inspection can also affect system hardware
resources like processing capacity and memory
requirements.
When the Content Gateway is configured for SSL to handle encrypted traffic,
category bypass settings can be used to specify categories of Web sites for which
decryption and inspection are bypassed. You can also maintain a list of hostnames or
IP addresses for which SSL decryption is not performed. See the chapter titled
Scanning and SSL Bypass Options in TRITON - Web Security Help for information
about enabling the SSL inspection bypass feature.
Handling special cases
Any Websense Content Gateway deployment must be able to handle Web site requests
and applications that are not compatible with the proxy or that should bypass the
proxy. For example, requests for data from some internal, trusted sites could be
configured to bypass the proxy, for system performance reasons. In explicit proxy
deployments, a PAC file can be used to list the traffic that is allowed to bypass proxy
inspection. In transparent proxy deployments, the proxy must be installed in a way
that allows static bypass. See the “Static bypass rules” section, in the chapter titled
Transparent Proxy Caching and ARM, in the Websense Content Gateway Online
Help.
The deployment should also be able to manage situations in which key fobs or tokens
are used to access the network and for cases of highly coupled client/server Web
applications. The type of proxy deployment determines how these situations are
handled.
Explicit and transparent proxy
deployments
Websense Content Gateway provides the following proxy deployment options:
Explicit proxy deployment, where the user’s client software is configured to send
requests directly to Websense Content Gateway
Transparent proxy deployment, where user requests are automatically redirected to a
Websense Content Gateway proxy, typically by a switch or router, on the way to their
eventual destination
Details about configuring explicit and transparent proxy options in Websense Content
Gateway can be found in Websense Content Gateway Online Help, in the chapters
titled Explicit Proxy Caching and Transparent Proxy Caching and ARM, respectively.
Explicit proxy deployment
Use of Websense Content Gateway in an explicit proxy deployment is an easy way to
handle Web requests from users. This type of deployment is recommended for simple
networks with a small number of users. Explicit proxy is also used effectively when
proxy settings can be applied by group policy. It requires minimal network
configuration, which can be an advantage for troubleshooting efforts.
For explicit proxy deployment, individual client browsers may be manually
configured to send requests directly to the proxy. They may also be configured to
download proxy configuration instructions from a Proxy Auto-Configuration (PAC)
file. A group policy that points to a PAC file for configuration changes is a best
practice for explicit proxy deployments. Another option is the use of Web Proxy AutoDiscovery (WPAD) to download configuration instructions from a WPAD server. See
Websense Content Gateway Online Help (Explicit Proxy Caching chapter) for a
sample PAC file and more information about how to implement these options.
Exception handling instructions can also be included in the PAC file or WPAD
instructions. For example, requests for trusted sites can be allowed to bypass the
proxy.
Disadvantages of explicit proxy deployment include a user’s ability to alter an
individual client configuration and bypass the proxy. To counter this, you can
configure the firewall to allow client traffic to proceed only through the proxy. Note
that this type of firewall blocking may result in some applications not working
properly.
You can also use a Group Policy Option (GPO) setting to prevent users from changing
proxy settings. If you cannot enforce group policy settings on client machines, this
type of configuration can be difficult to maintain for a large user base because of the
lack of centralized management.
Note
Non-browser client applications that cannot specify a
proxy server may not work with explicit proxy
deployment.
Transparent proxy deployment
In a transparent proxy deployment, the user’s client software (typically a browser) is
unaware that it is communicating with a proxy. Users request Internet content as
usual, without any special client configuration, and the proxy serves their requests.
The Adaptive Redirection Module (ARM) component of Websense Content Gateway
processes requests from a switch or router and redirects user requests to the proxy
engine. The proxy establishes a connection with the origin server and returns
requested content to the client. ARM readdresses returned content as if it came
directly from the origin server. See Websense Content Gateway Online Help
(Transparent Proxy Caching and ARM chapter) for more information.
Note that in a transparent proxy deployment, all Internet traffic from a client goes
through the proxy (not just traffic from Web browsers), including:
traffic tunneled over HTTP and HTTPS by remote desktop applications
instant messaging clients
software updaters for Windows and anti-virus applications
custom internal applications
Many of these programs are not developed with proxy compatibility in mind. For a
successful transparent proxy deployment, the network must be configured to allow the
proxy’s static bypass feature to work. See the “Static bypass rules” section, in the
chapter titled Transparent Proxy Caching and ARM, in the Websense Content
Gateway Online Help.
Because traffic management is centralized, users cannot easily bypass the proxy.
This type of deployment requires the implementation of at least one other network
device that is not required in the explicit proxy deployment. Added equipment
presents compatibility issues, as all network devices must work together smoothly and
efficiently. The overall system is often more complex and usually requires more
network expertise to construct and maintain.
The use of a Layer 4 switch or WCCP-enabled router to redirect traffic in a transparent
proxy deployment can provide redundancy and load distribution features for the
network. These devices not only route traffic intelligently among all available servers,
but can also detect whether a proxy is nonfunctional. In that case, the traffic is rerouted to other, available proxies.
Exception handling can be included in switch or router configuration. For example,
requests for data from some internal, trusted sites can be allowed to bypass the proxy.
Layer 4 switch
You can implement policy-based routing (PBR) for a transparent proxy deployment
with the use of a Layer 4 switch, which can be configured to redirect a request to the
proxy, as follows:
1. Create an access control list (ACL) that identifies the Web traffic that should be
intercepted.
2. Develop a route map to define how the intercepted Web traffic should be modified
for redirection.
3. Apply a “redirect to proxy” policy to the switch interface.
See Websense Content Gateway Online Help (Transparent Proxy Caching and ARM
chapter) for more information about the use of a Layer 4 switch.
WCCP-enabled router
WCCP is a protocol used to route client request traffic to a specific proxy. A WCCPenabled router can distribute client requests based on the proxy server’s IP address,
routing traffic to the proxy most likely to contain the requested information.
The router may use Generic Routing Encapsulation (GRE) to forward IP packets to
the proxy. GRE is a tunneling protocol that allows point-to-point links between
multiple traffic routing hops.
A router may also use Layer 2 (L2), which does not use GRE. Websense recommends
the use of L2 if the router supports it. With L2 redirection, Content Gateway must be
on the same subnet as the WCCP device (that is, Layer 2 adjacent).
A proxy and a router communicate via a set of WCCP “Here I am” and “I see you”
messages. A proxy that does not send a “Here I am” message for 30 seconds is
removed from service by the router, and client requests that would have been directed
to that proxy are sent to another proxy.
The following figure shows some components of Websense Content Gateway in a
transparent proxy deployment:
A comparison of how some activities are handled in explicit and transparent proxy
deployments appears in the following table:
Activity
Explicit Proxy
Deployment
Transparent Proxy
Deployment
Proxy Chain
Client HTTP
request
Direct connection to
proxy by browser to
port 8080 (default)
Redirected to proxy by
network device using
GRE encapsulation or
by rewriting the L2
destination MAC
address to the proxy’s
address
Direct connection to
parent proxy from child
proxy
Exception
management
Exclude site, CIDR,
etc., using browser
configuration
settings and PAC
file settings.
Static or dynamic
bypass rules
Child/parent proxy
configuration rules
Proxy
authentication
Proxy challenge
using 407 Proxy
Authentication
Required code
Challenge using
server-based
authentication scheme
(client is not aware of
proxy)
Proxies in a chain may
share credential
information, or a single
proxy in the chain can
perform authentication.
Redundancy
Proxy virtual IP pool
shared across
multiple proxies
WCCP pool with
multiple proxies
Parent/child
configuration points to
proxy virtual IP
addresses.
Proxy
management
Management
clustering
Management
clustering
Management clustering
Load
balancers
Supported
N/A
Supported
Special Deployment Scenarios
Websense Content Gateway can be deployed in proxy clusters with failover features
that contribute to high availability. The proxy can also be deployed in a chain, either
with other Websense Content Gateway proxies or third-party proxies. This section
describes some examples of these deployment scenarios.
Highly available Web proxy
A highly available Web proxy provides continuous, reliable system operation.
Minimizing system downtime increases user access and productivity.
Proxy high availability may be accomplished via a proxy cluster that uses various
failover contingencies. Such deployments may involve either an explicit or
transparent proxy configuration, load balancing, virtual IP addresses, and a variety of
switching options. This section summarizes some possibilities for highly available
Web proxy deployments.
Using explicit proxy
As previously mentioned for the explicit proxy deployment, clients are specifically
configured to send requests directly to a proxy. The configuration can be
accomplished manually, or via a PAC file or a WPAD server.
An explicit proxy deployment for high availability can benefit from the use of virtual
IP failover. IP addresses may be assigned dynamically in a proxy cluster, so that one
proxy can assume traffic-handling capabilities when another proxy fails. Websense
Content Gateway maintains a pool of virtual IP addresses that it distributes across the
nodes of a cluster. If Content Gateway detects a hard node failure (such as a power
supply or CPU failure), it reassigns IP addresses of the failed node to the operational
nodes.
Active/Standby
In the simple case of an active/standby configuration with 2 proxies, a single virtual IP
address is assigned to the virtual IP address “pool.” The virtual IP address is assigned
to one proxy, which handles the network traffic that is explicitly routed to it. A second
proxy, the standby, assumes the virtual IP address and handles network traffic only if
the first proxy fails.
This deployment assumes the proxy machines are clustered in the same subnet, and
management clustering is configured (that is, both proxies have the same
configuration). The following figure illustrates this deployment:
Active/Active
In an active/active configuration with 2 proxies, more than one virtual IP address is
assigned to the virtual IP address pool. At any point in time, one proxy handles the
network traffic that is explicitly directed to it. This deployment is scalable for larger
numbers of proxies.
Clients requesting the IP address of a proxy can be crudely distributed using round
robin DNS. Round robin DNS is not a true load balancing solution, because there is no
way to detect load and redistribute it to a less utilized proxy. Management clustering
should be configured.
An increase in the number of proxy machines makes the use of a PAC file or WPAD
for specifying client configuration instructions convenient. A PAC file may be
modified to adjust for proxy overloads, in a form of load balancing, and to specify
Web site requests that can bypass the proxy.
As with the active/standby configuration, an available proxy can assume a failed
proxy’s load. The following figure illustrates the active/active explicit proxy
configuration:
With load balancing
A load balancer is a network device that not only distributes specific client traffic to
specific servers, but also periodically checks the status of a proxy to ensure it is
operating properly and not overloaded. This monitoring activity is different from
simple load distribution, which routes traffic but does not account for the actual traffic
load on the proxy.
A load balancer can detect a proxy failure and automatically re-route that proxy’s
traffic to another, available proxy. The load balancer also handles virtual IP address
assignments. The following figure shows a load balancer added to an explicit proxy
configuration:
Using transparent proxy
In a transparent proxy deployment for high availability, traffic forwarding may be
accomplished using a Layer 4 switch or a WCCP-enabled router. Routers or switches
can redirect traffic to the proxy, detect a failed proxy machine and redirect its traffic to
other proxies, and perform load balancing.
Using a Layer 4 switch. In one simple form of transparent proxy, a hard-coded rule is
used to write a proxy’s Media Access Control (MAC) address as the destination
address in IP packets in order to forward traffic to that proxy. Traffic that does not
include the specified proxy address for forwarding is passed directly to its destination.
The following figure illustrates this deployment:
As described for the explicit proxy, virtual IP addresses can be used in this scenario to
enhance availability in case a proxy machine fails.
Using a WCCP-enabled router. WCCP is a service that is advertised to a properly
configured router, allowing that router to automatically direct network traffic to a
specific proxy. In this scenario, WCCP distributes client requests based on the proxy
server’s IP address, routing traffic to the proxy most likely to contain the requested
information.
In a proxy chain
Websense Content Gateway can be deployed in a network that contains multiple proxy
machines, including one or more third-party proxies. A proxy chain deployment can
involve different scenarios, depending on where Websense Content Gateway is
located in relation to the client. The proxy that is closest to the client is called the
downstream proxy. Other proxies are upstream.
In the following figure, one simple example of proxy chaining shows Websense
Content Gateway as the downstream proxy, and the other shows Websense Content
Gateway as the upstream proxy:
Basic deployment options for proxy chaining using Websense Content Gateway and a
third-party proxy are described in the following sections. See Appendix: Specific
proxy chain configuration procedures for specific instructions on using Blue Coat®
ProxySG® or Microsoft ISA server as the downstream proxy.
Websense Content Gateway is downstream
A simple deployment has Websense Content Gateway as the downstream proxy,
closest to the client. In this scenario, Websense Content Gateway security features are
well positioned for maximum protection and network performance.
In this scenario, use of Websense Content Gateway authentication to validate client
credentials is preferred. You must disable authentication on the third-party proxy.
However, if the upstream third-party proxy requires authentication, you must disable
authentication on Websense Content Gateway and enable the pass-through
authentication feature via an entry in the records.config file (in the /WCG/config/
directory by default). An example records.config entry is as follows:
CONFIG proxy.config.http.forward.proxy_auth_to_parent INT 1
You can then use an XID agent (for example, Logon Agent) to facilitate client
identification. Websense Content Gateway can additionally send the client IP address
to the upstream third-party proxy using the X-Forwarded-For HTTP header via an
entry in records.config. To enable this function, the following entry would be made:
CONFIG proxy.config.http.insert_squid_x_forwarded_for INT 1
The X-Forwarded-For HTTP header is the de facto standard for identifying the
originating IP address of a client connecting through an HTTP proxy. Some proxies do
not utilize the X-Forwarded-For header.
For information about installing and deploying XID agents, see the Websense Web
Security/Websense Web Filter installation and deployment guides.
Websense Content Gateway is upstream
When Websense Content Gateway is the upstream proxy, the downstream third-party
proxy can perform authentication and send client IP and username information in the
HTTP request headers. Websense Content Gateway authentication must be disabled.
In this scenario, caching must be disabled on the third-party proxy. Allowing the thirdparty proxy to cache Web content effectively bypasses Websense Content Gateway’s
filtering and inspection capabilities for any Web site that was successfully accessed
previously from the third-party proxy.
For an upstream Websense Content Gateway to identify users:
Enable authentication on the third-party proxy.
Designate Websense Content Gateway as the parent proxy in the third-party
proxy’s configuration.
Set the Read authentication from child proxy option in the Websense Content
Gateway Configure pane (Configure > My Proxy > Basic > Authentication).
This option allows Websense Content Gateway to read the X-Forwarded-For and
X-Authenticated-User HTTP headers. The downstream third-party proxy passes
the client IP address via the X-Forwarded-For header and the user domain and
username in the X-Authenticated-User header.
If the third-party proxy can send the X-Forwarded-For header but not the
X-Authenticated-User header, the following step is also required:
Deploy an XID agent to facilitate client identification by Websense Content
Gateway. For information about installing and deploying XID agents, see the
Websense Web Security/Websense Web Filter installation and deployment guides.
Websense Content Gateway can be configured to read authentication from the
following proxies in the downstream position:
Blue Coat ProxySG
210 and larger
Microsoft Internet Security and
Acceleration (ISA) server
2004 and larger
For detailed configuration instructions for Blue Coat ProxySG and Microsoft ISA
server, see Appendix: Specific proxy chain configuration procedures.
Proxy cache hierarchy
Another form of proxy chain is a flexible proxy cache hierarchy, in which Internet
requests not fulfilled in one proxy can be routed to other regional proxies, taking
advantage of their contents and proximity. For example, a cache hierarchy can be
created as a small set of caches for a company department or a group of company
workers in a specific geographic area.
In a hierarchy of proxy servers, Websense Content Gateway can act either as a parent
or child cache, either to other Websense Content Gateway systems or to other caching
products. Having multiple parent caches in a cache hierarchy is an example of parent
failover, in which a parent cache can take over if another parent has stopped
communicating.
As mentioned earlier, the increasing prevalence of dynamic, user-generated Web
content reduces the need for Content Gateway caching capabilities.
See Websense Content Gateway Online Help (Hierarchical Caching) for more
information on this topic.
SSL chaining
Routing SSL traffic in a proxy chain involves the same parent proxy configuration
settings used with other proxy-chained traffic. You identify the ports on which HTTPS
requests should be decrypted and policy applied when SSL is enabled in the Protocols
> HTTP > HTTPS Ports option in the Configure tab. Parent proxy rules established
in parent.config for HTTPS traffic (destination port 443) determine the next proxy in
the chain for that traffic.
Enable the Configure tab Content Routing > Hierarchies > HTTPS Requests
Bypass Parent option to disable SSL traffic chaining when all other traffic is chained.
If you want to exclude SLL traffic from the parent proxy and tunnel the traffic directly
to the origin server, enable the Tunnel Requests Bypass Parent option in the
Configure tab Content Routing > Hierarchies. This option can be used for any
tunneled traffic.
Appendix: Specific proxy chain
configuration procedures
With Blue Coat ProxySG
You can configure the Blue Coat proxy to send X-Forwarded-For and
X-Authenticated-User headers for Websense Content Gateway to read either by
manually editing a policy text file or defining the policy in a Blue Coat graphical
interface called Visual Policy Manager.
Note that for Blue Coat to service HTTPS requests properly with the following setup,
you must have a Blue Coat SSL license and hardware card.
Editing the local policy file
In the Blue Coat Management Console Configuration tab, click Policy in the left
column and select Policy Files. Enter the following code in the current policy text file,
using an Install Policy option:
<Proxy>
action.Add[header name for authenticated user](yes)
define action dd[header name for authenticated user]
set(request.x_header.X-Authenticated-User, "WinNT://
$(user.domain)/$(user.name)")
end action Add[header name for authenticated user]
action.Add[header name for client IP](yes)
define action dd[header name for client IP]
set(request.x_header.X-Forwarded-For,$(x-client-address))
end action Add[header name for client IP]
Using the Blue Coat graphical Visual Policy Manager
Before you configure the Blue Coat header policy, ensure that NTLM authentication is
specified in the Blue Coat Visual Policy Manager (Authentication > Windows SSO).
Set Websense Content Gateway as the forwarding host (in the Blue Coat Management
Console Configuration tab, Forwarding > Forwarding Hosts).
In the Blue Coat Management Console Configuration tab, click Policy and select
Visual Policy Manager. Click Launch and configure the header policy as follows:
1. In the Policy menu, select Add Web Access Layer and enter an appropriate
policy name in the Add New Layer dialog box.
2. Select the Web Access Layer tab that is created.
3. The Source, Destination, Service, and Time column entries should be Any (the
default).
4. Right-click the area in the Action column, and select Set.
5. Click New in the Set Action Object dialog box and select Control Request
Header from the menu.
6. In the Add Control Request Header Object dialog box, enter a name for the client
IP Action object in the Name entry field.
7. Enter X-Forwarded-For in the Header Name entry field.
8. Select the Set value radio button and enter the following value:
$(x-client-address)
9. Click OK.
10. Click New and select Control Request Header again.
11. In the Add Control Request Header Object dialog box, enter a name for the
authenticated user information Action object in the Name entry field.
12. Enter X-Authenticated-User in the Header Name entry field.
13. Select the Set value radio button and enter the following value:
WinNT://$(user.domain)/$(user.name)
14. Click OK.
15. Click New and select Combined Action Object from the menu.
16. In the Add Combined Action Object dialog box, enter a name for a proxy chain
header in the Name entry field.
17. In the left pane, select the previously created control request headers and click
Add.
18. Select the combined action item in the Set Action Object dialog box and click
OK.
19. Click Install Policy in the Blue Coat Visual Policy Manager.
With Microsoft Internet Security and Acceleration (ISA)
server
A Microsoft ISA server can be deployed as a downstream proxy from Websense
Content Gateway via a plug-in from Websense, Inc. This plug-in allows Websense
Content Gateway to read the X-Forwarded-For and X-Authenticated-User headers
sent by the downstream ISA server.
Two versions of the plug-in are available:
Websense-AuthForward32.dll for 32-bit ISA servers
Websense-AuthForward64.dll for 64-bit ISA servers.
Zip files for both versions are available for download at:
http://installers.websense.com/Downloads/files/v7.5/full/ISAPlugin
Install the plug-in as follows:
1. Copy the appropriate Websense-AuthForward.dll file (for 32-bit or 64-bit) to
the Microsoft ISA installation directory. The default directory for this file is
C:\Program Files\Microsoft ISA Server.
For the 32-bit version, install the following files in the ISA installation directory
in addition to Websense-AuthForward32.dll:
Microsoft.VC90.CRT.manifest
msvcm90.dll
msvcp90.dll
msvcr90.dll
2. Open a Windows command prompt and change directory to the Microsoft ISA
installation directory.
3. From the command prompt, type
regsvr32 Websense-AuthForward32.dll
(to register the 32-bit plug-in)
regsvr32 Websense-AuthForward64.dll
(to register the 64-bit plug-in)
4. Verify the plug-in was registered in the ISA management user interface (Start >
Programs > Microsoft ISA Server > ISA Server Management). In the
Configuration (for 32-bit) or System (for 64-bit) section, select Add-ins, then
click the Web-filter tab. The WsAuthForward plug-in should be listed.
To uninstall the plug-in, run the following command in a Windows command prompt
from the ISA installation directory.
regsvr32 /u Websense-AuthForward32.dll
(to unregister the 32-bit plug-in)
regsvr32 /u Websense-AuthForward64.dll
(to unregister the 64-bit plug-in)