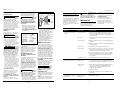
1
See Warranty on page 4 for important information about commercial use of this product.
Manual de Instrucciones
Garantía Limitada
DURACION: A partir de la fecha de compra por el comprador original tal como se especifica a continuación: Productos
Estándard (Standard Duty) - Un año, Productos Resistentes (Serious Duty) -Dos años, Productos Robustos (Extreme Duty)
- Tres años.
2. QUIEN OTORGA ESTA GARANTIA (EL GARANTE: Campbell Hausfeld / The Scott Fetzer Company 100 Production Drive,
Harrison, Ohio 45030 Teléfono: (800) 543-6400
3. QUIEN RECIBE ESTA GARANTIA (EL COMPRADOR): El comprador original (que no sea un revendedor) del producto
Campbell Hausfeld.
4. PRODUCTOS CUBIERTOS POR ESTA GARANTIA: Cualquier clavadora, grapadora, herramienta neumática, pistola
pulverizadora, inflador o accesorio neumático suministrado o fabricado por el Garante.
5. COBERTURA DE LA GARANTIA: Los defectos substanciales de material y fabricación que ocurran dentro del período de
validez de la garantía.
6. LO QUE NO ESTA CUBIERTO POR ESTA GARANTIA:
A. Las garantías implícitas, incluyendo aquellas de comercialidad E IDONEIDAD PARA FINES PARTICULARES, ESTAN
LIMITADOS A LO ESPECIFICADO EN EL PARRAFO DE DURACION. Si este producto es empleado para uso comercial,
industrial o para renta, la garantía será aplicable por noventa (90) días a partir de la fecha de compra. En algunos
estados no se permiten limitaciones a la duración de las garantías implícitas, por lo tanto, en tales casos esta
limitación no es aplicable.
B. CUALQUIER PERDIDA DAÑO INCIDENTAL, INDIRECTO O CONSECUENTE QUE PUEDA RESULTAR DE UN DEFECTO,
FALLA O MALFUNCIONAMIENTO DEL PRODUCTO CAMPBELL HAUSFELD. En algunos estados no se permite la
exclusión o limitación de daños incidentales o consecuentes, por lo tanto, en tales casos esta limitación o exclusión
no es aplicable
C. Cualquier falla que resulte de un accidente, abuso, negligencia o incumplimiento de las instrucciones de
funcionamiento y uso indicadas en el (los) manual(es) que se adjunta(n) al producto. Dichos accidentes, abusos por
parte del comprador, o falta de operar el producto siguiendo las instrucciones del manual de instrucciones
suministrado también debe incluir la desconexión o modificación de los instrumentos de seguridad. Si dichos
instrumentos de seguridad son desconectados, la garantía quedaría cancelada.
D. Los ajustes normales explicados en el(los) manual(es) suministrado(s) con el producto.
E. Artículos o servicios normalmente requeridos para el mantenimiento del producto, tales como: anillos en O,
resortes, amortiguadores, defensas, hojas de impulsor, fusibles, baterías, empaques, almohadillas o sellos, boquillas
de fluído, agujas, boquillas para rociar arena, lubricantes, mangueras de material, elementos filtrantes, álabes de
motores, abrasivos, hojillas, discos para cortar, cinceles, retenes para cinceles, cortadores, collarines, mandriles,
mordazas para remachadoras, brocas para desarmadores, almohadillas para lijar, soportes de almohadillas,
mecanismo de impacto o cualquier otro artículo desgastable que no se haya enumerado específicamente. Estos
artículos sólo estarán cubiertos bajo esta garantía por noventa (90) días a partir de la fecha de compra original. Los
artículos subrayados sólo están garantizados por defectos de material o fabricación.
7. RESPONSABILIDADES DEL GARANTE BAJO ESTA GARANTIA: Reparar o reemplazar, como lo decida el Garante, los
productos o componentes que estén defectuosos, se hayan dañado o hayan dejado de funcionar adecuadamente,
durante el período de validez de la garantía
8. RESPONSABILIDADES DEL COMPRADOR BAJO ESTA GARANTIA:
A. Suministrar prueba fechada de compra y la historia de mantenimiento del producto.
B. Entregar o enviar el producto o componente Campbell Hausfeld al Centro de Servicio autorizado Campbell Hausfeld
más cercano. Los gastos de flete, de haberlos, deben ser pagados por el comprador.
C. Seguir las instrucciones sobre operación y mantenimiento del producto, tal como se indica(n) en el (los) manual(es)
del propietario
9. CUANDO EFECTUARA EL GARANTE LA REPARACION O REEMPLAZO CUBIERTO BAJO ESTA GARANTIA: La reparación o
reemplazo dependerá del flujo normal de trabajo del centro de servicio y de la disponibilidad de repuestos.
Esta garantía limitada es válida sólo en los EE.UU., Canadá y México y otorga derechos legales específicos. Usted también
puede tener otros derechos que varían de un Estado a otro. o de un país a otro.
Operating Instructions
Please read and save these instructions. Read carefully before attempting to assemble, install, operate or maintain the product described.
Protect yourself and others by observing all safety information. Failure to comply with instructions could result in personal injury and/or
property damage! Retain instructions for future reference.
1
Sanders
BUILT TO LAST
Description
Sanders are air tools designed for
automotive applications on both flat
and contour surfaces.
Unpacking
When unpacking this product,
carefully inspect for any damage that
may have occurred during transit.
General Safety
Information
CALIFORNIA PROPOSITION 65
!
DANGER
You can create dust when
;;;;;;
;;;;;;
;;;;;;
;;;;;;
you cut, sand, drill or grind
;;;;;;
materials such as wood,
paint, metal, concrete, cement, or other
masonry. This dust often contains
chemicals known to cause cancer, birth
defects, or other reproductive harm.
Wear protective gear.
This manual contains information that
is very important to know and understand. This information is provided for
SAFETY and to PREVENT EQUIPMENT
PROBLEMS. To help recognize this
information, observe the following
symbols.
Danger indicates
!
an imminently
hazardous situation which, if not
avoided, will result in death or serious
injury.
DANGER
Warning indicates
!
a potentially
hazardous situation which, if not
avoided, could result in death or
serious injury.
WARNING
Caution indicates a
!
potentially
hazardous situation which, if not
avoided, may result in minor or
moderate injury.
CAUTION
Notice indicates
important
information, that if not followed, may
cause damage to equipment.
NOTICE
This product is a part of a high pressure
system and the following safety
precautions must be followed at all
times along with any other existing
safety rules.
1. Read all manuals
included with this
product carefully. Be
thoroughly familiar with
the controls and the
proper use of the equipment.
MANUAL
2. Only persons well acquainted with
these rules of safe operation should
be allowed to use the air tool.
!
CAUTION
Do not exceed the maximum
operating pressure of the air
tool (90 PSI). This can reduce
the life of the tool.
3. Do not exceed any pressure rating
of any component in the system.
Maximum operating pressure of 90
PSI is measured at the tool inlet
while the tool is running. The
pressure drop between the
compressor and tool needs to be
compensated for at the compressor.
4. Disconnect the air tool from air
supply before changing tools or
attachments, servicing and during
non-operation.
! WARNING
Safety glasses and ear
protection must be worn
during operation.
5. Do not wear loose fitting clothing,
scarves, or neck ties in work area.
Loose clothing may become caught
in moving parts and result in
serious personal injury.
6. Do not wear jewelry when
operating any tool. Jewelry may
become caught in moving parts and
result in serious personal injury.
7. Do not depress trigger when
connecting the air supply hose.
8. Always use attachments designed
for use with air powered tools. Do
not use damaged or worn
attachments.
9. Never trigger the tool when not
applied to a work object.
Attachments must be securely
attached. Loose attachments can
cause serious injury.
10. Protect air lines from damage or
puncture.
11. Never point an air tool at oneself or
any other person. Serious injury
could occur.
12. Check air hoses for weak or worn
conditions before each use. Make
sure all connections are secure.
! WARNING
Release all pressure from
the system before
attempting to install,
service, relocate or perform any
maintenance.
13. Keep all nuts, bolts and screws tight
and ensure equipment is in safe
working condition.
14. Do not put hands near or
under moving parts.
15. Always secure workpiece
in a vise or clamp.
Do not misuse this
product. Excessive
exposure to vibration, work in
awkward positions, and repetitive
work motions can cause injury to hands
and arms. Stop using any tool if
discomfort, numbness, tingling, or pain
occur, and consult a physician.
! WARNING
Operation
LUBRICATION
Proper lubrication is the owner’s
responsibility. Failure to lubricate the
air tool properly will dramatically
shorten the life of the tool and will
void the warranty.
REMINDER: Keep your dated proof of purchase for warranty purposes! Attach it to this manual or file it for safekeeping.
© 2002 Campbell Hausfeld/Scott Fetzer
For parts, product & service information
visit www.chpower.com
IN241202AV 11/02
Operating Instructions
Operation (Cont.)
This air tool
!
requires lubrication
before the initial use and before and
after each additional use.
CAUTION
Air tools require lubrication
throughout the life of the tool. Follow
the outlined procedures carefully.
Campbell Hausfeld air tool oil
(ST127000AV) is recommended because
this oil cleans, lubricates and inhibits
rust all in one step.
Manual de Instrucciones
supply before attaching the sanding
pad. Do not operate the sander if
sanding pad is not securely tightened.
Always replace a worn or damaged
pad. Serious injury could occur.
1. Lock the drive spindle in place
before attaching the sanding pad.
Rotate the spindle lock until the
spindle lock engages with the drive
spindle and hand-tighten the
sanding pad in a clockwise direction (See Figure 1).
AIR MOTOR LUBRICATION
The air motor must be lubricated
daily. An air motor cannot be oiled
too often.
Disconnect the
!
air tool from the
air supply before lubricating.
Drive
Spindle
WARNING
1. Disconnect the tool from the air
supply.
2. Turn the air tool upside down.
3. Simultaneously (at the same time),
pull the trigger and pour a
teaspoon of Campbell Hausfeld oil
in the air inlet.
After an air tool
!
has been lubricated, oil will discharge through the
exhaust port during the first few
seconds of operation. Thus, the exhaust port must be covered with a
towel before applying air pressure.
Failure to cover the exhaust port can
result in serious injury.
WARNING
4. Release the trigger and connect the
air tool to the air supply. Cover the
exhaust port with a towel then run
the air tool for 7 to 10 seconds. Oil
will discharge from the exhaust
port when air pressure is applied.
Continue to run the sander until no
oil is discharged. Wipe all residual
oil from the tool before use.
Spindle Lock
Pad
Assembly
Position
Operating
Position
Figure 1
2. Unlock the spindle before applying
air pressure.
NOTE: The spindle lock is for attaching
and removing the sanding pad only!
Do not operate the tool with the
spindle locked or the sander will stall
when pressure is applied to the pad.
ATTACHING SANDING DISCS/HIGH
SPEED SANDERS
3” or 6” resin discs with non-adhesive
backs are recommended. The discs
should have 7/8” diameter cutout
centers for proper attachment. For
best support When using discs larger
than 3", use all the backup pads of
equal size or smaller than the resin disc
itself (See Fig. 2). To install the resin
disc, follow the outlined procedures.
5-1/2”
Backup Pad
4-1/2” Backup Pad
3” Backup Pad
SPEED ADJUSTMENT
This sander is equipped with a
regulator for speed adjustment (See
Replacement Parts List for
Specifications).
ATTACHING SANDING PAD/DUAL
ACTION SANDERS
Adhesive backed discs are
recommended. To apply the sandpaper, align outside edge and press self
adhesive paper onto the pad. Change
sandpaper as needed.
! WARNING
Disconnect the air
tool from the air
Adapter
Lock
Down
Insert Holding
Tool Here
Figure 2
Disconnect the air
!
tool from the air
supply before attaching the sanding
disc. Do not operate the sander if
WARNING
www.chpower.com
2
sanding disc is not securely tightened
or serious injury could occur.
1. Assemble the backup pads as
shown in Figure 2. Make sure the
recessed center of the pads face
the sander.
2. Place the resin disc in front of the
appropriate size pad and push the
adapter lock down through the
center of the pad and discs.
3. Hand tighten the adapter
lockdown, then insert the holding
tool into the hole shown in Figure
2. Insert a large screwdriver into
the slotted hole on the adapter
lock down and securely tighten.
SANDING/DUAL ACTION SANDERS
Begin sanding with an abrasive grit
coarse enough to remove the high
spots and any excessive roughness.
Follow with a second sandpaper using
a grit one to two ranges finer.
Continue with successively finer grits
until the desired finish is obtained. Do
not change from a coarse grit to a very
fine grit in one step. In doing so, it is
difficult to remove swirl marks that
might have been made by the coarse
grit abrasive. Always use the finest grit
practical for the sanding operation.
Funcionamiento
(Continuación)
Utilizar
una
manguera de conexión flexible evita
que se accione el gatillo de la
herramienta en forma accidental,
cuando se conecta el aire presurizado
al sistema.
!
ADVERTENCIA
Asimismo, la vibración de la
herramienta desgasta los acopladores
rápidos en forma prematura.
Utilizar accesorios o mangueras de aire
que son muy pequeños puede crear
una caída de presión o reducir la
potencia de la herramienta. Se
recomienda el uso de accesorios de
9,5mm (3/8”) con roscas NPT de 6,4mm
(1/4”). La mayoría de compresores
vienen con una manguera corta, con
un D.I. de 6,4mm (1/4”). Para obtener
mayores beneficios y un desempeño
adecuado, utilice una manguera con
D.I. de 9,5mm (3/8”). Las mangueras de
más de 15m (15 pies) deben tener un
D.I. de 12,7mm (1/2”).
en vez de 7 a 10 segundos ya que la
herramienta necesita más aceite para
almacenarla.
Nunca
cargue la
Para mayor información sobre donde
puede ordenar repuestos,
comuníquese con el concesionario de
Campbell Hausfeld más cercano a su
domicilio. Sírvase suministrarnos la
siguiente información:
• Número del Modelo
• Código grabado en la herramienta
• Número y descripción del repuesto
Puede escribirnos a:
The Campbell Group
Attn: Parts Department
100 Production Drive
Harrison, Ohio 45030
!
ADVERTENCIA
herramienta sujetándola de la
manguera ni jale de ésta para moverla
o mover el compresor. Man-tenga la
manguera lejos del calor, aceite y
bordes contundentes. Reem-place la
manguera si está averiada, débil o
desgastada.
Mantenimiento
ALMACENAMIENTO
Debe lubricar la herramienta
neumática antes de almacenarla. Siga
las instrucciones para lubricar el pistón
neumático excepto el paso 4. Déjela
funcionar de 2 a 3 segundos sólamente
Guía de solución de poblemas
Problema
La herramienta
funciona demasiado
lenta o no funciona.
Causa(s) posible
Acción correctiva
1. Hay arena o goma en la
herramienta
1. Limpie la herramienta con aceite para herramientas hidráulicas
Campbell Hausfeld, solvente de goma o una mezcla de mitad de
aceite para motor SAE 10 y mitad de queroseno. Si no utiliza
aceite Campbell Hausfeld, lubrique la herramienta después de
limpiarla.
2. Lubrique la herramienta siguiendo las instrucciones sobre
lubricación que aparecen en este manual.
3a. Ajuste el regulador de la herramienta al máximo permitido (Si
es aplicable).
3b. Ajuste el regulador del compresor al máximo permitido por la
herramienta mientras ésta funciona libremente.
4. Apriete y selle los accesorios de la manguera si encuentra fugas.
2. No hay aceite en la
herramienta
3. Baja presión de aire
GRINDING/HIGH SPEED SANDERS
The coarse resin disc is used for
removing or smoothing over welds or
blending uneven metal surfaces. The
most common grit is 36 (Campbell
Hausfeld MP3264 discs).
4. Fugas en la manguera
de aire
5. Baja la presión
6. Posición muy baja del
regulador
5a. Asegúrese de que el tamaño de la manguera sea el apropiado.
Las mangueras largas o las herramientas que utilizan grandes
volúmenes de aire pueden requerir una manguera con un D.I.
de 1/2 pulgada o superior, según el tamaño total de la
manguera.
5b. No utilice varias mangueras conectadas con accesorios de
conexión rápida. Esto ocasiona la caída adicional de presión y
reduce la potencia de la herramienta. Conecte directamente las
mangueras.
6. Ajuste el regulador hasta que la herramienta alcance la
velocidad máxima.
1. Hay agua en el tanque
1.
Worn or damaged
sanding discs may
break apart causing serious injury.
Always replace discs as needed.
! WARNING
AIR HOSE
Refer to IN170102 Air Hose Hookup
Installation sheet for hookup
specifications.
NOTE: It is not recommended to install
a quick coupler between the sander
and the leader (whip) hose.
Información sobre
Repuestos
Sale humedad por la
herramienta
Use of a whip hose
!
prevents
accidental triggering of the tool when
pressurized air is connected to the
system.
WARNING
2. Hay agua en las
líneas/mangueras de aire
In addition, the tool’s vibration wears
out quick couplers prematurely.
La lijadora se detiene
cuando se aplica a la
superficie de trabajo.
El seguro del eje se
encuentra en la posición
de cerrado.
Vacíe el tanque. (Vea el manual del compresor de aire).
Lubrique la herramienta y hágala funcionar hasta que no haya
agua. Vuelva a lubricar la herramienta y hágala funcionar por
1 a 2 segundos.
2a. Instale un separador/filtro de agua (PA2121). NOTA: Los
separadores sólo trabajan adecuadamente cuando el aire que
pasa a través del separador está frío. Ubique el separador/
filtro lo más lejos posible del compresor.
2b. Instale un secador de aire.
2c. En el momento que ingrese agua a la herramienta, ésta se debe
aceitar inmediatamente.
Quite el seguro del eje (Ver figura 1).
11 Sp
Manual de Instrucciones
Funcionamiento
(Continuación)
Esta
!
herramienta requiere lubricación antes de
usarse por primera vez y antes y
después de cada uso adicional.
PRECAUCION
Las herramientas neumáticas requieren
lubricación durante su duración. Siga
cuidadosamente los procedi-mientos
señalados. Se recomienda utilizar el
aceite para herramienta neumática
Campbell Hausfeld (ST127000AV), ya
que este aceite limpia, lubrica e impide
la oxidación en un solo paso.
LUBRICACION DEL MOTOR
NEUMATICO
El motor neumático se debe lubricar
diariamente. Un motor neumático
nunca se lubricará en exceso.
Operating Instructions
papel de lija, alinee los bordes
externos y presione el papel adhesivo
contra el disco portalija. Cambie el
papel de lija según sea necesario.
Des!
conecte la
herramienta neumática del suministro
de aire antes de colocar el disco
portalija. No opere la lijadora si el
disco portalija no ha sido asegurado.
Reemplace siempre los discos dañados
o desgastados. Podría ocasionar
lesiones serias.
ADVERTENCIA
1. Asegure el eje guía en su posición
antes de acoplar el disco portalija.
Gire el seguro del eje hasta que
éste enganche con el eje guía y
ajuste con la mano el disco portalija
en el sentido de las agujas del reloj
(Véase Figura 1).
Eje guía
Desco!
necte la
herramienta neumática de la fuente de
suministro de aire antes de lubricarla.
PRECAUCION
1. Desconecte la herramienta de la
fuente de suministro de aire.
2. Coloque la herramienta al revés.
3. Simultaneamente (a la vez), oprima
el gatillo y vierta una cucharadita de
aceite Campbell Hausfeld en la
entrada de aire.
Después
!
que una
herramienta neumática se ha lubricado,
expulsará aceite por el orificio de
salida durante los primeros segundos
de funcionamiento. Por lo tanto, debe
cubrirle el orificio de salida con una
toalla antes de aplicarle presión de
aire. Si no cubre el orificio de salida
podría ocasionarle heridas graves.
ADVERTENCIA
4. Deje de oprimir el gatillo y conecte
la herramienta neumática a la
fuente de suministro de aire.
Cúbrale el orificio de salida con una
toalla (Vea la Figura 1). Deje que la
herramienta neumática funcione de
7 a 10 segundos. Al aplicarle presión
de aire la herramienta expulsará
aceite por el orificio de salida. Deje
que la herramienta funcionar hasta
que no expulse más aceite. Límpiele
todos los residuos de aceite antes de
comenzar a trabajar.
AJUSTE DE VELOCIDAD
Esta lijadora está equipada con un
regulador para ajuste de velocidad
(Véase la Lista de repuestos para
obtener las especificaciones).
ACOPLAMIENTO DE LOS DISCOS
PORTALIJAS / LIJADORAS DE DOBLE
ACCIÓN
Se recomienda utilizar los discos
recubiertos de adhesivo. Para aplicar el
Posición de
montaje del
disco portalija
Seguro
del eje
Posición de
operación
Figura 1
2. Desajuste el eje antes de aplicar
presión de aire.
NOTA: ¡El seguro del eje es sólo para
acoplar y retirar el disco portalija! No
opere la herramienta con el eje
asegurado o la lijadora se detendrá
cuando se aplique presión al disco
portalija.
ACOPLAMIENTO DE DISCOS
LIJADORES / LIJADORAS DE ALTA
VELOCIDAD
Se recomienda utilizar discos de resina
de 7,6cm (3”) o 15,2cm (6”) con
soportes no adhesivos. Los discos
deben tener centros punzonados con
un diámetro de 22,2mm (7/8”) para un
acoplamiento adecuado. Para lograr
un mejor respaldo cuando utilice discos
de más de 7,6cm (3”)., emplee todos
los discos portalijas del mismo tamaño
o más pequeños que el disco de resina
(Véase figura 2). Para instalar el disco
de resina, siga los procedimientos
señalados.
!
ADVERTENCIA Desconecte la
herramienta neumática del suministro
de aire antes de acoplar el disco
lijador. No opere la lijadora si el disco
no ha sido debidamente ajustado, o
podría ocasionar serios daños.
1. Monte los discos portalija de apoyo
tal como se muestra en la figura 2.
Asegúrese que el centro hendido
de los discos estén orientados hacia
Disco portalijas de apoyo
de 11,4cm (4-1/2”)
Disco portalija
de apoyo de
7,6cm (3”)
Disco
portalija de
apoyo de
14cm (5-1/2”)
Asegure el
adaptador
Inserte el porta
herramienta aquí
Operation (Cont.)
Using fittings or air hoses which are
too small can create a pressure drop
and reduce the power of the tool. A
3/8” (I.D.) fitting with 1/4” NPT threads
is recommended. Most compressors are
shipped with a short, 1/4” I.D. hose.
For proper performance and more
convenience, use a 3/8” I.D. hose.
Hoses longer than 50 feet should have
a 1/2” I.D.
Figura 2
la lijadora.
2. Coloque el disco de resina frente al
disco portalija de tamaño
adecuado, y empuje el seguro del
adaptador a través del centro del
disco portalija y los discos.
3. Ajuste con la mano el seguro del
adaptador, luego inserte la
herramienta en el agujero tal como
se muestra en la figura 2. Inserte
un destornillador grande en la
ranura sobre el seguro del
adaptador y ajústelo firmemente.
Symptom
Tool runs slowly or will not
operate.
Possible Cause(s)
Corrective Action
1. Grit or gum in tool
1. Flush the tool with Campbell Hausfeld air tool oil, gum
solvent, or an equal mixture of SAE 10 motor oil and
kerosene. If Campbell Hausfeld oil is not used, lubricate the
tool after cleaning
2. No oil in tool
2. Lubricate the tool according to the lubrication instructions
in this manual
3. Low air pressure
3a. Adjust the regulator on the tool to the maximum setting (If
applicable)
4. Air hose leaks
4. Tighten and seal hose fittings if leaks are found
5. Pressure drops
5a. Be sure the hose is the proper size. Long hoses or tools using
large volumes of air may require a hose with an I.D. of 1/2”
or larger depending on the total length of the hose
Moisture blowing out of tool
6. Regulator set too low
6. Adjust regulator until tool reaches maximum speed
1. Water in tank
1. Drain tank. (See air compressor manual). Oil tool and run
until no water is evident. Oil tool again and run 1-2 seconds
2. Water in the air
lines/hoses
2a. Install a water separator/filter (PA2121). NOTE: Separators
only work properly when the air passing through the
separator is cool. Locate the separator/filter as far as
possible from the compressor
2b. Install an air dryer
2c. Anytime water enters the tool, the tool should be oiled
immediately
Sander stops when applied to
work surface
Spindle lock is in the
locked position
Unlock spindle (See Figure 1)
www.chpower.com
3
10 Sp
For information regarding the
operation or repair of this product,
please call 1-800-543-6400. If you are
calling from Ohio or outside the
continental United States, please call
1-513-367-1182.
5b. Do not use multiple number of hoses connected together
with quick connect fittings. This causes additional pressure
drops and reduces the tool power. Directly connect the
hoses together
ADVERTENCIA
MANGUERA DE AIRE
Remítase a la hoja sobre instalación de
la manguera de aire IN170102 para
obtener las especificaciones sobre la
conexión.
NOTA: No se recomienda instalar un
acoplador rápido entre la lijadora y la
manguera guía (conexión flexible).
STORAGE
The air tool must be lubricated before
storing. Follow the air motor
lubrication instructions with an
Technical Service
3b. Adjust the compressor regulator to tool maximum while the
tool is running free
Los
discos
desgastados o dañados se pueden
romper ocasionando serios daños.
Reemplace los discos según sea
necesario.
!
Maintenance
exception to step 4. Run the sander for
only 2 to 3 seconds so more oil will
remain in the air tool when storing.
Troubleshooting Chart
LIJADO/LIJADORAS DE DOBLE
ACCIÓN
Inicie el lijado con un abrasivo de
arena lo suficientemente gruesa para
remover las elevaciones y aspereza
excesiva. Siga con un segundo papel
de lija, dos números más fino.
Continúe con papeles de lija más finos
hasta obtener el acabado deseado. No
cambie de un papel de lija grueso a
uno muy fino en un solo paso, ya que
esto dificultará posteriormente retirar
las marcas en forma de remolino que
podría haber causado el abrasivo de
arena gruesa. Utilice el papel de lija
más fino para la operación de lijado.
RECTIFICADO/LIJADORAS DE ALTA
VELOCIDAD
El disco de resina gruesa se utiliza para
retirar y suavizar las superficies
irregulares de metal o soldaduras. El
grano más común es 36 (discos
Campbell Hausfeld MP3264).
Never carry a tool
by the hose or pull
the hose to move the tool or a
compressor. Keep hoses away from
heat, oil and sharp edges. Replace any
hose that is damaged, weak or worn.
! WARNING
Ver la Garantía en página 12 para información importante sobre el uso comercial de este producto.
Manual de Instrucciones
Operating Instructions
Sírvase leer y guardar estas instrucciones.Lea con cuidado antes de tratar de armar, instalar, manejar o darle servicio al producto descrito en
este manual. Protéjase Ud. y a los demás observando todas las reglas de seguridad. El no seguir las instrucciones podría resultar en heridas y/o
daños a su propiedad. Guarde este manual como referencia.
Limited Warranty
DURATION: From the date of purchase by the original purchaser as follows: Standard Duty Products - One Year, Serious
Duty Products - Two Years, Extreme Duty Products - Three Years.
2. WHO GIVES THIS WARRANTY (WARRANTOR): Campbell Hausfeld / Scott Fetzer Company, 100 Production Drive,
Harrison, Ohio, 45030, Telephone: (800) 543-6400
3. WHO RECEIVES THIS WARRANTY (PURCHASER): The original purchaser (other than for purposes of resale) of the
Campbell Hausfeld product.
4. WHAT PRODUCTS ARE COVERED BY THIS WARRANTY: Any Campbell Hausfeld nailer, stapler, air tool, spray gun,
inflator or air accessory supplied or manufactured by Warrantor.
5. WHAT IS COVERED UNDER THIS WARRANTY: Substantial defects in material and workmanship which occur within the
duration of the warranty period.
6. WHAT IS NOT COVERED UNDER THIS WARRANTY:
A. Implied warranties, including those of merchantability and FITNESS FOR A PARTICULAR PURPOSE ARE LIMITED
FROM THE DATE OF ORIGINAL PURCHASE AS STATED IN THE DURATION. If this product is used for commercial,
industrial or rental purposes, the warranty will apply for ninety (90) days from the date of purchase. Some States
do not allow limitation on how long an implied warranty lasts, so the above limitations may not apply to you.
B. ANY INCIDENTAL, INDIRECT, OR CONSEQUENTIAL LOSS, DAMAGE, OR EXPENSE THAT MAY RESULT FROM ANY
DEFECT, FAILURE, OR MALFUNCTION OF THE CAMPBELL HAUSFELD PRODUCT. Some States do not allow the
exclusion or limitation of incidental or consequential damages, so the above limitation or exclusion may not apply
to you.
C. Any failure that results from an accident, purchaser’s abuse, neglect or failure to operate products in accordance
with instructions provided in the owner’s manual(s) supplied with product. Accident, purchaser's abuse, neglect or
failure to operate products in accordance with instructions shall also include the removal or alteration of any safety
devices. If such safety devices are removed or altered, this warranty is void.
D. Normal adjustments which are explained in the owner’s manual(s) provided with the product.
E. Items or service that are normally required to maintain the product, i.e. o-rings, springs, bumpers, debris shields,
driver blades, fuses, batteries, gaskets, packings or seals, fluid nozzles, needles, sandblast nozzles, lubricants,
material hoses, filter elements, motor vanes, abrasives, blades, cut-off wheels, chisels, chisel retainers, cutters,
collets, chucks, rivet jaws, screw driver bits, sanding pads, back-up pads, impact mechanism, or any other
expendable part not specifically listed. These items will only be covered for ninety (90) days from date of original
purchase. Underlined items are warranted for defects in material and workmanship only.
7. RESPONSIBILITIES OF WARRANTOR UNDER THIS WARRANTY: Repair or replace, at Warrantor’s option, products or
components which are defective, have malfunctioned and/or failed to conform within duration of the warranty period.
8. RESPONSIBILITIES OF PURCHASER UNDER THIS WARRANTY:
A. Provide dated proof of purchase and maintenance records.
B. Deliver or ship the Campbell Hausfeld product or component to the nearest Campbell Hausfeld Authorized Service
Center. Freight costs, if any, must be borne by the purchaser.
C. Use reasonable care in the operation and maintenance of the products as described in the owner’s manual(s).
9. WHEN WARRANTOR WILL PERFORM REPAIR OR REPLACEMENT UNDER THIS WARRANTY: Repair or replacement will be
scheduled and serviced according to the normal work flow at the servicing location, and depending on the availability
of replacement parts.
This Limited Warranty applies in the United States, Canada and Mexico only and gives you specific legal rights. You may
also have other rights which vary from state to state or country to country.
Lijadora
Neumática
1.
BUILT TO LAST
Descripción
Estas lijadoras son herramientas
neumáticas diseñadas para trabajar en
superficies planas y curvas de
automóviles.
Desempaque
Al desempacar este producto, revíselo
con cuidado para cerciorarse de que
esté en perfecto estado.
Informaciones
Generales de
Seguridad
PROPOSICIÓN DE CALIFORNIA 65
!
PELIGRO
Cuando corta lija, taladra o
;;;;;;
;;;;;;
;;;;;;
;;;;;;
;;;;;;
pule materiales como por
ejemplo madera, pintura,
metal, hormigón, cemento, u otro tipo
de mampostería se puede producir
polvo. Con frecuencia este polvo
contiene productos químicos que se
conocen como causantes de cáncer,
defectos congénitos u otros daños
reproductivos. Use equipo de
protección.
Este manual contiene información que
es muy importante que sepa y
comprenda. Esta información se la
suministramos como medida de
SEGURIDAD y para EVITAR
PROBLEMAS CON EL EQUIPO. Debe
reconocer los siguientes símbolos.
PELIGRO
Ésto le
!
indica
que hay una situación inmediata que
LE OCASIONARIA la muerte o heridas
de gravedad.
Ésto le
!
indica
que hay una situación que PODRIA
ocasionarle la muerte o heridas de
gravedad.
ADVERTENCIA
Ésto le
indica
que hay una situación que PODRIA
ocasionarle heridas no muy graves.
!
PRECAUCION
AVISO
www.chpower.com
4
Ésto le
indica
una información importante, que de no
seguirla, le podría ocasionar daños al
equipo.
Este producto es parte de un sistema
de alta presión y por lo tanto debe
seguir las siguientes medidas de
precaución al igual que cualquier otra
medida de seguridad.
1. Lea con cuidado todos los
manuales incluídos con
este producto.
Familiarícese con los
controles y el uso adecuado del
equipo.
2. La herramienta neumática sólo
debe ser usada por personas que
estén bien familiarizadas con las
reglas de seguridad de manejo.
MANUAL
!
PRECAUCION
Nunca exceda la capacidad
máxima de presión de la
herramienta neumática 90 PSI
(6,3 Kgs/cm2) . Ésto podría reducir la
duración de la herramienta.
3. No exceda ninguna capacidad
máxima de presión del sistema. La
presión máxima de trabajo de 6,21
bar se mide en la entrada de aire de
la herramienta con la herramienta
encendida. El compresor de aire
debe compensar la baja de presión
entre éste y la herramienta.
4. Desconecte la herramienta
neumática de la fuente de
suministro de aire antes de cambiar
de herramienta o accesorios, darle
servicio o cuando no la esté usando.
!
ADVERTENCIA
Debe ponerse anteojos de
seguridad y protegerse los
oídos para operar esta
herramienta.
5. No se ponga ropa muy holgada,
bufandas o corbatas, ya que éstas
se le podrían enredar en las piezas
en movimiento y ocasionarle
heridas graves.
6. No se ponga joyas para operar
ninguna herramienta neumática.
Éstas se le podrían enredar en las
piezas en movimiento y ocasionarle
heridas graves.
7. No oprima el gatillo cuando esté
conectando la manguera de
suministro de aire.
8. Siempre use accesorios que estén
diseñados para usarse con
herramientas neumáticas. No use
accesorios que estén dañados o
desgastados.
9. Nunca oprima el gatillo a menos
que la herramienta esté en la pieza
de trabajo. Los accesorios deben
estar bien conectados. Si los
accesorios están flojos le podrían
ocasionar heridas graves.
10. Proteja las líneas de aire contra
daños o perforaciones.
11. Nunca apunte la herramienta
neumática hacia Ud. u otras
personas. Ésto podría ocasionar
heridas de gravedad.
12. Antes de cada uso, revise las
mangueras a ver si están dañadas o
desgastadas. Cerciórese de que
todas las conexiones estén bien
apretadas.
!
ADVERTENCIA
Libere toda la presión del
sistema antes de tratar de
instalar, darle servicio, mover
a otro sitio o darle cualquier tipo de
mantenimiento.
13. Mantenga todas las tuercas, pernos
y tornillos bien apretados y
cerciórese de que el equipo esté en
buenas condiciones.
14. No coloque las manos
cerca o debajo de piezas
en movimiento.
15. Siempre coloque la pieza
en una prensa de tornillos
o abrazadera.
No haga
!
mal uso
de esto producto. La exposicón a
vibraciones excesivas, el trabajar en
posiciones anormales y los
movimientos repetitivos del trabajo
pueden causar daños a las manos y los
brazos. Si siente incomodidad, pérdida
de sensación, hormigueo o dolor,
suspenda el uso de cualquier
herramienta y consulte a un médico.
ADVERTENCIA
Funcionamiento
LUBRICACION
La lubricación adecuada de la
herramienta es la responsabilidad del
propietario. El no lubricarla
adecuadamente reducirá
drásticamente la duración de la
herramienta y anulará la garantía.
RECORDATORIO: ¡Guarde su comprobante de compra con fecha para fines de la garantía!
Adjúntela a este manual o archívela en lugar seguro.
© 2002 Campbell Hausfeld/Scott Fetzer
9 Sp
IN241202AV 11/02