1
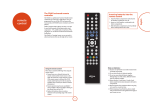
23425
AVR500/600 & AV888 — FAQ
Part 1 -Audio
Audio Source Setup
Correct setting of the audio source will speed up audio switching. Prior to v2.3, the default was auto, manually setting this to the input type used (HDMI,
digital, analogue) will greatly speed up audio switching time. NB This is configurable for each source within the input config menu. (Auto setting removed from
V2.3 onwards and must be set per source).
Set-top box setup when using HDMI
When using HDMI connection, set-top boxes should be connected using HDMI for video & optical/coaxial SPDIF for audio. The input video source should be
set to HDMI, the audio source digital. i.e Optical / SPDIF from the set top box.
Speakers assigned as Small during auto set-up
This is due to the in-room measured performance of the speaker i.e a speaker may be physically large but acoustically small in the listening room i.e -3dB
performance below 40Hz and the presence of a Subwoofer.
“Zip” noise
Intermittent very low level “zip” noise from all channels when digital data is not present although the input config menu is pointing the AVR at the Digital or
HDMI – this is not a failure or fault but the action of the DSP looking for valid input sampling frequency and a mechanism of the data error correction.
This can also be sometimes heard when switching inputs due to the ramp mute/unmute scheme used.
Room EQ guidance
When running EQ ensure that the microphone is placed at ear level at the listening position ideal equidistant from either left or right speaker and with the
Arcam badge facing forwards – avoid sitting the microphone on a pile of cushions as this may add artificial high frequency damping causing the AVR to boost
frequencies artificially.
Subwoofer distance is completely wrong when running Auto EQ
This will happen if the Subwoofer in the system has it’s own EQ DSP causing an audio delay on the LFE channel – hence the sub distance is increased to take
this extra delay into account. You should keep the measured distance for best bass timing.
No subwoofer output
When playing back from a 2 channel source and applying any of the Dolby (ProLogic) or DTS (Neo:6) modes, these sources do not contain a discrete .1 LFE
channel so if all speakers are set to large within the speaker sizes menu no bass management is performed and no low frequency audio will be directed to the
Subwoofer, low frequency audio will however be redirected to the subwoofer from any channels assigned as small at the pre-determined crossover point within
the speaker sizes menu.
PS3 format switching noise
When a PS3 changes sampling frequencies or channel numbers, there can sometimes be a double “pop”. To eliminate this, you should reduce the number of
options to:
Dolby Digital 5.1
DTS 5.1
Linear PCM 2 Ch 48kHz
Linear PCM 5.1 Ch 48kHz
Linear PCM 7.1 Ch 48kHz
Dolby Volume
The Dolby Volume leveler within the input configuration options is a global control and is used to set the desired volume level for the input. Any input that has
Dolby volume function set to on within the input config setup will match this desired gain setting.
Subwoofer Hum during input switching
This is a sign that the Subwoofer gain is set excessively high and the AVR’s Subwoofer trim is set low – in effect this causes the subwoofer to amplifier any
residual switching noise on the LFE channel – try setting the Subwoofers own gain to around half and recalibrate aim for +/- 3dB of the trim menus centre
point.
Audio playback from BD players with the screen in standby
For most BD player / display combinations, when used with a 3D model AVR in bypass mode, audio cannot be played over HDMI due to the player failing to
establish a link with the display that is in standby. To solve this, connect either the SPDIF/optical output of the player to the AVR and use this input for audioonly playback.
irDock/drDock configuration
From v2.26 (non 3D) and v3.06 (3D), the Dock input default is no longer limited to analogue as it was in previous versions. Direct video input is also possible.
If upgrading from earlier versions, please re-check your Dock input configuration.
Mac Mini audio problems
Abrupt and loud noises have been experienced when using a Mac Mini as a media centre during transitions between 2.0 & 5.1 encoded DTS or Dolby bistreams &
also PCM 5.1 & 7.1 streams. To prevent these HDMI audio problems from a Mac Mini, utilise the optical output (access via the headphone socket with appropriate
optical adaptor) and set the digital output preference to “Digital” and type to “Bitstream”.
Please note - it is also necessary to configure the AVR for an Audio source of digital rather than the default HDMI source.
23425
AVR500/600 & AV888 — FAQ
Part 2 -Video
Intermittent short term drop of video or total lack of video.
During movie playback (usually) at 1080p, and (3D models) if the video is present with the menu up, but not in bypass, this can be an indication that the data received
by the panel projector is on the edge of usability – try substituting the output cable if this is the longest run – if not try the input cable.
Also confirm the cable is capable of carrying high speed signals. In some older installations where existing cables are used to carry 1080i/720p signals these cables
may need to be replaced with high speed cables capable of 1080p/24 operation or in the case of 3D certified High Speed cables.
Remember HDMI cables become an integral part of the whole system not only sending video/audio signals but the all important HDCP protocol data.
HDMI video output setup (very important)
The default video output resolution setting is preferred. Many displays still request 1080i as their preferred resolution. If this is the case, a 1080p 24fps source will
result in no video. To correct this, change the output resolution from preferred to 1080p.
The default output frame rate is auto, which will only output frame rates the display indicates it is capable of in its EDID. Some displays do not indicate they can
handle 24fps signals in their EDID. If this is the case, then changing the output resolution to follow input will force a 24fps for such a source.
Video Source Setup
Correct setting of the video source will speed up video switching. Prior to v2.3, the default was auto, manually setting this to the input type used (HDMI, component,
S-video, composite) will greatly speed up video switching time. NB This is configurable for each source. (Auto setting removed from V2.3 onwards must be set per
source)
Green line on the side of the screen
In several cases, this has been shown in several cases to be due to the EDID information from the display requesting an incorrect sync polarity which shifts the image.
Types of displays showing this should be reported to the manufacturer and Arcam. This may be overcome on most panels/projectors by selecting the Overscan option
(screen zoom between 2 and 5%) on some Sony panels this is assigned per input.
Flicker on-screen or screen goes blank when selecting to play a Blu-ray from the navigation menu
This is due to the display device relocking to a different frame rate usually a transition from 1080p 60 to 1080p 24 – this is perfectly normal and an action of the panel/
projector relocking to the new frame rate.
Unable to set the source blu-ray player to 24fps
In some circumstance certain brands of blu-ray player may show the 24fps setting option as grayed out or unelectable this may be caused by the player not re-reading
the EDID back from the display device – in this instance you should.
1.
Physically disconnect the HDMI cable and then reinsert at the Blu-ray players output.
2.
Connect the player directly to the panel just for calibration of the 24fps setting.
Display in standby issues
Our automatic priority output switching system relies on correct implementation of the hotplug i.e the hotplug is used to indicate activity and should be low when the
panel is in standby. Some panels/projectors keep the hotplug high in standby causing us to believe that the device is still active hence not switching between output 1
to 2 or vice versa.
From revision of software (v2.0) IR codes are available for forcing HDMI1 (RC5 16-73), 2 (RC5 16-74), 1&2 (RC5 16-75) output modes for installers.
HDCP
HDCP authentication occurs every 2 seconds when protected content is played. In the event of HDCP failure the display will show a message generated by the
AVR600. HDCP authentication requires the entire system to authenticate and a failure is difficult to pin down to any one item in the chain.
Viera Link
It would appear that many Panasonic source devices such as Bluray/set top products have as default Viera link set to on – this may cause the player to ignore your
specified output resolution after a standby cycle i.e you have adjusted the output resolution and moved from auto to 1080p after standby cycle the player has reverted
to 1080i or another resolution – ensure that Viera link is switched off to cure this issue.
Switching of 3D video source material
If installing a 3D capable version of the AVR600/AV888 you must set the product to Video BYPASS. This option is found within the Video Output Resolution
settings. Please note video Bypass is only available on Output 1.
Changing Video output resolution from remote
Simply press the AMP button on the remote follow by Shift then within 1 sec press the Right arrow – you will see the current resolution display –press Shift and the
Right arrow again and the AVR will move to the next resolution.
Bypass of HDMI in standby
HDMI bypass when the unit is in standby (3D models) is not possible due to the HDMI PCB being powered down to save power.
Video drop out when going into and out of menu when using Bypass (3D only)
When changing between menu and normal video when using the bypass input, the HDMI chain needs to reconfigure. This can take some time (depending mainly
on the display). During this time the display is often completely blank and is normal.
Very long cable runs
When using long cable runs out of the AVR, it may be necessary to add a booster or long distance HDMI TxRx set. In the HDMI 1.4 board, if the cable run is too
long, this can show up as “hardware update required” in the video out bypass setting flickering on and off as the HDMI bypass device is overloaded with interrupts.
An example is:
PU-506-KIT (v1.4HDMI over single CAT5e HDBaseT TXRX set plus 2 way IR, RS232)
23425 AVR500/600 & AV888 — FAQ
Part 3 - Network
Network response is slow or dropping out
Check that the local network is not suffering from heavy traffic from other users (e.g. a PC using P2P filesharing software). This can cause slow response times to
request from the AVR to the vTuner service or uPnP server.
Also, heavy local traffic can cause the playback of files/internet radio stations to stop due to insufficient data bandwidth.
FLAC/other files do not appear when using uPnP (OK if played from USB)
Check the uPnP server supports the FLAC file format. E.g. At the time of writing Windows Media Player does not support FLAC files so if this is used as the uPnP
server, the AVR will not be made aware of any FLAC files stored. 3rd party CODECS and alternative uPnP server applications are available if required.
23425 AVR500/600 & AV888 — FAQ
Part 4 - CI
Remote input and trigger outputs
These are for use with Mono jacks and should be wired as the below diagram indicates. Please note: as is typical of this type of remote input external remote eyes such
as a Xantech Dinky Link will require an external +12v regulated power supply as recommended by the supplier.
RS232 loss of control (intermittent)
From Software version 2.6 onwards the AVR platform allows you to reassign the iPod RS232 interface as the RS232 control input / output port – this change has been
made due to a small number of reports that RS232 control is lost from Crestron/AMX systems – the iPod control interface has far greater immunity to spikes / glitches
and should be used when possible for Crestron / AMX interfaces..
Open Engineering menu (press and hold front panel menu button for +3 secs), scroll down to the option labeled RS232 control – now select iPod.
Software update is available from http://www.arcam.co.uk/extranethome/tor
AVR500/600 & AV888 — FAQ
Part 5 - HDMI fault-finding tips
23425
Simply taking an AVR out of the loop and connecting direct from source to panel to achieve a picture does not indicate that the Receiver in the middle is at fault..!!!
Random pixels on screen (noise) - an extreme case is shown below, but the effect can be more subtle
This is typically a problem caused by the cable either between the source component and AVR or most likely from the AVR to the Panel or PJ (the longer length)..
Call up the set up menu on the AVR. Is this stable and free of noise? If so the length between the AVR and panel is o.k and the source to AVR link is suspect..
If noise is still present or picture disappears completely then the link between the AVR and Panel may be the culprit try an alternative brand or shorter cable..
Other cable symptoms maybe more obvious and result in
•
No image, pink screen / blue screen or any other solid color including black (although the Panel appears to be receiving a picture)
•
Picture flashing – disappearing
Pink / Green / No picture
This may indicate a HDCP failure and may happen briefly during Movie playback…
Are all sources affected? – i.e A picture can be achieved from the Cable Box / Satellite receiver but not the BD player – this is unlikely to be an AVR failure if one
source is operational, take the cable connected to the operational source and connect this to the non-operational source i.e BD player can a picture now be seen?
Cause = Cable.
Still no picture?
Connect the BD player direct to the panel and if applicable set the video set-up options to 1080p (if applicable) rather than auto – now re-introduce into the AVR into
the system.
23425
AVR500/600 & AV888 — FAQ
Part 6 - Control your AV with a SKY+ remote
First find the code for your TV (see SKY+ Handbook or Online)
When you have your code:
1.
Cover the end of your SKY+ remote control with your hand (to prevent IR transmission) and press the tv button.
2.
Remove your hand, then hold select and the red button together until the LED blinks twice.
3.
Enter your four-digit setup code and press select.
4.
Cover the end of your SKY+ remote control and press sky.
If this works, test the remote by changing your TV volume. Please remember that some TV functions may not be supported by your Sky remote, but the basic
standby and volume functions should work once you've put your code in.
Programming your SKY+ remote to control your 23425 amplifier
ARCAM Amp Codes: 0669 or 0297
1.
Turn on you ARCAM amplifier. Cover the end of your SKY+ remote control and press the tv button.
2.
Remove your hand, then hold select and the zero (0) button together until the LED blinks twice.
3.
Enter one of the ARCAM four-digit setup codes. The LED should flash twice to confirm the code was entered successfully.
4.
Use the left navigation button on the SKY+ remote control to try and switch the AV Amplifier into standby. If the standby command works then the correct code has been selected. If not, then repeat steps 1 – 3 but using the alternative ARCAM code.
Controlling the Volume
If you are in SKY+ mode you can control EITHER the TV volume OR the AV Amp volume, depending on the punch through setting - but not BOTH.
When you are in TV mode, you can control BOTH volumes. Which one is controlled by the standard volume controls will be set as per the punch through setting
(see below). The other device will be controlled by the up/down cursor keys. Please note that the mute button on the SKY+ RCU does not map to the “mute” command on the ARCAM Amplifier (you can only control Volume + and Volume -).
Volume Punch Through
This allows you to control the volume of you ARCAM Amplifier while in both TV mode SKY+ mode.
To program punch through:
1.
Press the tv button
2.
Hold the select and the one (1) button until the LED blinks twice
To undo this feature:
1.
Press the tv button
2.
Hold the select and the two (2) button until the LED blinks twice
23425
AVR500/600 & AV888 — FAQ
Part 7 - Zone 2
What inputs can I listen to in Z2?
All inputs are available on Z2 but any external inputs must be connected via analogue. Internal inputs (tuners etc.) are converted to analogue internally.
What video inputs can I watch in Z2?
Any input that has a video input can be viewed in Z2 but again it must be connected via analogue. It should also be the same type of analogue input as you plan to use
on the output, s-video or composite.
I’m using S-video in Z2 and the picture is black and white, what gives?
Make sure the Z2 video output is set to s-video rather composite (default) in the “zone menu”.
How can I control Z2 from Z2?
There are two ways:
1. RS232 – there are explicit commands for Z2 available, refer to custom install notes on the TOR.
2. IR – There is a dedicated IR jack for Z2 on the back of the unit for use with dinky links or similar. This allows use of the supplied CR102 remote to be used in Z2.
Note that the remote needs to be set to AMP mode to enable it to control the AVR.
How can I control Z2 from Z1?
Again, there are two ways:
1. From the front panel – Press the zone button on the front of the unit so it shows the status of Z2, the remote and front panel will now control Z2. Note the remote
must be in AMP mode for this to work.
2. IR – Press shift followed by OK, this has the same effect as pressing the zone button on the front panel and allows control of the zone via the remote control.
I want Z2 to be a copy of Z1, make that happen!
Set the input in the Z2 menu to “follow Z1”, again any inputs that are required in Z2 must be connected via analogue to the AVR.
When I turn off Z1, will this turn off Z2?
No, the power state of each zone is independent from each other. If you do want to power down all zones when powering off Z1 then change the standby option in the
zone menu from LOCAL ONLY (default) to ALL OFF.
There is no OSD in Z2, what gives?
There isn’t one.