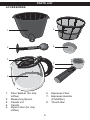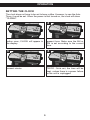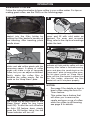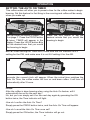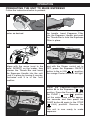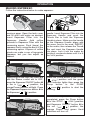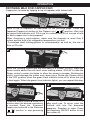
1
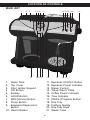
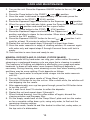
SAFETY PRECAUTIONS CAUTION RISK OF ELECTRIC SHOCK DO NOT OPEN CAUTION: TO REDUCE THE RISK OF ELECTRIC SHOCK, DO NOT REMOVE COVER (OR BACK). NO USER-SERVICEABLE PARTS INSIDE. REFER SERVICING TO QUALIFIED SERVICE PERSONNEL. DANGEROUS VOLTAGE The lightning flash with arrowhead symbol, within an equilateral triangle is intended to alert the user to the presence of uninsulated dangerous voltage within the product’s enclosure that may be of sufficient magnitude to constitute a risk of electric shock to persons. ATTENTION The exclamation point within an equilateral triangle is intended to alert the user to the presence of important operating and maintenance (servicing) instructions in the literature accompanying the appliance. IMPORTANT SAFEGUARDS appliances by a person responsible for their safety. 7. Children should be supervised to ensure that they do not play with the appliance. 8. Unplug from outlet when not in use and before cleaning. Allow to cool before putting on or taking off parts, and before cleaning the appliance. 9. Do not operate any appliance with a damaged cord or plug or after the appliance malfunctions, or has been damaged in any manner. Return appliance to an authorized service facility for examination, repair or adjustment. 10. The use of attachments not recommended by the appliance manufacturer may result in fire, electric shock or injury to persons. 11. Do not use outdoors. 12. Place appliance on flat surface or table, do not let cord hang over edge of table or counter, or touch hot surface. Before using the electrical appliance, the following basic precautions should always be followed including the following: 1. Read all instructions. 2. Do not let the coffee maker operate without water. 3. Make sure that your outlet voltage corresponds to the voltage stated on the rating label of the coffee maker. 4. To protect against fire, electric shock and injury to persons do not immerse cord, plug, or appliance in water or other liquid. 5. Close supervision is necessary when your appliance is operating. Do not leave the appliance in the standby state for a long time. 6. This appliance is not intended for use by persons (including children) with reduced physical, sensory or mental capabilities, or lack of experience and knowledge, unless they have been given supervision or instruction concerning use of the 1 IMPORTANT SAFEGUARDS 13. Do not place on or near a hot gas or electric burner, or in a heated oven. 14. Do not use appliance for other than intended use and place it in a dry environment. 15. Never use the coffee maker in the environment of high temperature or high magnetic field, unit could be damaged. And also never place other objects on the top of coffee maker. 16. To disconnect, turn any control to “Off”, remove plug from wall outlet. Always hold the plug. But never pull the cord. 17. Scalding may occur if the cover is opened during the brewing cycles. Be careful not to get burned by the steam. 18. Some parts of appliance are hot when operated (such as stainless decorated plate, drip tray shelf, top 19. 20. 21. 22. 23. cover, steam tube and frothing nozzle and so on), so do not touch with hand directly. Use handles or knobs only. The carafe is designed for use with this appliance. It must never be used on a range top. Do not clean container with cleansers, steel wool pads, or other abrasive material. Never leave the empty carafe on the keep warm plate otherwise the carafe is liable to crack. Never use the appliance if the carafe shows any signs of cracks or carafe has a loose or weakened handle. Only use the carafe with this appliance. Use carefully as the carafe is very fragile. Do not set a hot container on a hot or cold surface. SAVE THESE INSTRUCTIONS INSTRUCTIONS FOR THE AC CORD CONSUMER SAFETY INFORMATION: A. Before plugging in, check that your voltage corresponds to that of the appliance and that the AC Socket is grounded. B. If the power supply cord or the plug is damaged, do not use the appliance. To avoid any danger, it is imperative that you have the power supply cord replaced by an authorized technician. C. Do not remove the plug from the AC Socket by pulling on the cord. D. Notes on the cord plug: This appliance has a polarized plug, To reduce the risk of electric shock, this plug is intended to fit into a polarized outlet only one way, If the plug does not fit fully into the outlet, reverse the plug, If it still does not fit, contact a qualified electrician, Do not attempt to modify the plug in any way. This appliance is intended for household use only. The length of the cord used on this appliance was selected to reduce the hazards of becoming tangled in, or tripping over a longer cord. If a longer cord is necessary an approved extension cord may be used. The electrical rating of the extension cord must be equal to or greater than the rating of the oven. Care must be taken to arrange the extension cord so that it will not drape over the countertop or tabletop where it can be pulled on by children or accidentally tripped over. 2 POWER SOURCE AC USAGE Use the AC polarized line cord included with the unit for operation on AC power. Insert the plug into a conveniently AC Outlet located AC outlet having 120V, 60 Hz. NOTE: The AC plug supplied with the unit is polarized to help minimize the AC Plug possibility of electric shock. If the AC plug does not fit into a nonpolarized AC outlet, do not file or cut the wide blade. It is the user’s responsibility to have an electrician replace the obsolete outlet. BEFORE USING FOR THE FIRST TIME BEFORE FIRST USE: Before using the appliance for the first time, please perform the following: 1. Make sure you have read all the safety instructions on pages 1 and 2. 2. Remove the packing material from the unit. 3. Plug in the unit to an AC outlet having 120V, 60Hz. Please read pages 1 through 3 fully for details and safety precautions on connecting to an AC outlet. 4. Wash all washable items thoroughly. These can be washed in the dishwasher or warm, sudsy water. 5. Brew a full 10 cups of only fresh water through the system, as described on the next page. DO NOT ADD COFFEE GROUNDS. USE FRESH WATER. When all the water has brewed through, turn the unit off and discard the water in the carafe. Do not use the drip coffee and espresso functions simultaneously unless the unit is plugged into a 20 amp circuit, otherwise, circuit can be tripped. 3 LOCATION OF CONTROLS MAIN UNIT 1 2 3 14 45 6 7 8 9 101112 15 16 17 18 11. 12. 13. 14. 15. 16. 17. 18. 19. 20. 21. 1. 2. 3. 4. 5. 6. 7. 8. 9. Water Tank Top Cover Filter Holder Support ON Button Display HOUR Button MIN (Minute) Button Pump Button Espresso/Cappuccino Button 10. Heat Indicator 4 19 13 20 21 Espresso ON/OFF Button Espresso Power Indicator Steam Control “Keep Warm” Plate Coffee Power Indicator Time Indicator PROG (Program) Button Drip Tray Frothing Nozzle Drip Tray Shelf Steam Tube PARTS LIST ACCESSORIES 1 5 2 6 3 7 8 4 1. Filter Basket (for drip coffee) 2. Measuring Spoon 3. Carafe Lid 4. Carafe 5. Nylon Filter (for drip coffee) 6. Espresso Filter 7. Espresso Handle (Portafilter) 8. Thumb Bar 5 OPERATION SETTING THE CLOCK The clock does not have to be set to brew coffee. However, to use the Auto Timer, it must be set. When the power is first turned on, the clock will show “12:00AM”. 1 2 With the power off, press the PROG. button once; CLOCK will appear in the display. Press the HOUR button to set the present hour. Make sure the AM or PM is set according to the current time. 3 4 Press the MIN button to set the present minute. When done, press the PROG button TWICE. Once set, the time will be kept, unless there is a power failure or the unit is unplugged. 6 OPERATION BREWING COFFEE Follow the instructions below to brew coffee in your coffee maker. For tips on making great coffee, see the FAQ’s on the following page. 1 2 Open the top cover, place the filter basket into the filter holder by holding the filter basket’s handle up and inserting. After inserting, place handle down. Using the carafe, open the tank cover and fill with cold water as desired. For easy and accurate filling, refer to the cup level markings inside the tank. 3 4 Place the nylon filter into the filter holder and add coffee grinds with the measuring spoon. A spoon of coffee grinds can make a cup of top-grade coffee, but you can adjust as desired. Gently shake the coffee filter to distribute the coffee evenly. Set the carafe on the “Keep Warm” plate. Press the ON button; the red Power indicator will light and the coffee will start brewing. After coffee is finished brewing, serve and place the carafe back on the "keep warm" plate to keep coffee warm. Do not place carafe on "Keep Warm" plate until the filter basket is placed into the filter holder, otherwise the filter basket will not fit into place properly. 5 NOTES: • See page 9 for details on how to brew coffee using the Auto On Timer feature. • This maker has a feature that will allow you to remove the carafe and pour a cup of coffee while the coffee is still brewing, see page 8 for details. The coffee will be kept warm on the “Keep Warm” plate for two hours (Auto Off). To shut the unit off before the Auto Off feature does, simply press the ON button twice; the red Power indicator will turn off. 7 OPERATION INTERRUPT FEATURE (PAUSE 'N SERVE) This maker has a feature that will allow you to remove the carafe and pour a cup while the coffee is still brewing. 1 To activate this feature, simply remove the carafe from the “Keep Warm” plate and the coffee will stop dripping. NOTE: The carafe must be placed on the “Keep Warm” plate, under the filter basket within one minute to prevent the filter basket from overflowing. FAQS FOR BREWING COFFEE: How much coffee grounds should be used when making coffee? It depends on your taste, so experiment. However, your new coffee maker is designed to make good quality coffee using one level tablespoon of ground coffee per cup. What are the 3 most important factors in making great tasting coffee? 1. Cleanliness of Equipment - It is important to clean the carafe, carafe lid and filter basket. 2. Bean Quality - It is recommended to purchase in vacuum airtight packages. 3. Water Quality Can I reuse the coffee grounds? No, for the highest quality coffee it is not recommended to reuse coffee grounds. Discard coffee grounds from filter after each use. Any other tips for great tasting coffee? You can try different types of coffees and flavored creamers as desired. You can also spice up the coffee by adding a drop of pure extract, like almond, vanilla or mint. Can I reheat coffee in the microwave oven? Yes, but do not heat in the carafe. Pour in a microwave-safe mug and heat according to microwave instructions. 8 OPERATION SETTING THE AUTO ON TIMER This coffee maker will allow you to preset a time for the coffee maker to begin brewing. Set this feature for first thing in the morning and coffee will be ready when you wake up! 1 2 2 1 Set up maker as shown in steps 1 to 3 on page 7. Press the PROG button twice; TIMER will appear in the display. Press the HOUR button to set the desired hour that you would like brewing to begin. Press the MIN button to set the desired minute that you would like brewing to begin. NOTE: When setting the Timer hour, make sure the PM indicator is lit if setting for the PM, and make sure it is not lit if setting it for the AM. 3 Press the ON button twice; the Time indicator will light and after a few seconds, the current clock will appear. When the actual time matches the Auto On Time, the coffee maker will turn on and brew coffee. It will turn off automatically after 2 hours. FAQS: After the coffee is done brewing when using the Auto On feature, will it automatically be set for the next day? No, but you can simply set it for the next day again by pressing the ON button twice; the Time indicator will light. How do I confirm the Auto On Time? Simply press the PROG button twice, and the Auto On Time will appear. How do I cancel the Auto On Time once set? Simply press the ON button; the Time indicator will go out. 9 OPERATION PREHEATING THE UNIT TO MAKE ESPRESSO Follow the instructions below to preheat. 1 2 Open the tank cover and fill with cold water as desired. Pull the Thumb Bar so it is against the handle. Insert Espresso Filter into the Espresso Handle and push the Thumb Bar to hold the Espresso Filter in place. 3 4 Make sure the Espresso Handle aligns with the arrow (next to the word, INSERT) on the maker, then release the Thumb Bar and insert the Espresso Handle into the unit. Lock it in place by turning it counterclockwise until it is in the ‘lock’ position. Place a cup on the Espresso Shelf and with the Steam control set to OFF, press the Espresso ON/OFF button to the in ( ON ) position; the orange Power indicator will light. 5 Press the Espresso/Cappuccino button 1 to the Espresso ( ) position. Press the Pump button 2 to PUMP/ the PUMP ( ) position. Let the water come out for approx. five seconds and then press the PUMP button 2 again to the STOP ( STOP ) position. Remove the cup. The unit is now ready to make espresso. 2 1 10 OPERATION MAKING ESPRESSO Follow the instructions below to make espresso: 1 2 Preheat the unit as shown on the previous page. Open the tank cover and fill with cold water as desired. Insert Espresso Filter into the Espresso Handle. Add coffee grounds to Espresso Filter with the measuring spoon. Pack (tamp) the espresso firmly using the back of the measuring spoon. A spoon of coffee grinds can make a cup of top-grade espresso, but you can adjust as desired. Pull the Thumb Bar so it is against the handle. Insert Espresso Filter into the Espresso Handle and push the Thumb Bar to hold the Espresso Handle in place. Make sure the handle on the Espresso Handle aligns with the arrow (next to the word, INSERT) on the maker, then release the Thumb Bar and insert the Espresso Handle into place. Lock it into the maker by turning it counterclockwise until it is in the ‘lock’ position. 3 4 2 1 Place a cup on the Drip Tray Shelf and with the Steam control set to OFF, press the Espresso ON/OFF button 1 to the in ( ON ) position; the orange Power indicator will light. Press the Espresso/Cappuccino button 2 to the Espresso ( ) position. Press the Pump button to the STOP ( STOP) position until the green Heat indicator lights then press the Pump button to the PUMP ( ) position to start the PUMP/ brewing. 5 When the espresso brewing is completed, press the Pump button STOP ) position 1 to the STOP ( and Espresso ON/OFF button 2 to the out ( OFF ) position; the orange Power and green Heat indicators will turn off. 1 2 11 OPERATION FROTHING MILK FOR CAPPUCCINO Cappuccino is made by topping a cup of espresso with frothed milk. 1 Make a cup of espresso as described on the previous page. Press the Espresso/Cappuccino button to the Cappuccino ( ) position. Wait until the green Heat indicator is lit. Fill a cup or container with 3 to 4 ounces of milk for each cappuccino to be prepared. When choosing a cup/container, make sure the diameter is more than 3 inches and the milk is at refrigerator temperature (not hot). * A stainless steel frothing pitcher is recommended, as well as, the use of skim or 2% milk. 2 Insert the Frothing Device into the milk about 0.8 inches. Do NOT leave the steam nozzle above the milk level when making steam. SLOWLY rotate the Steam control counter-clockwise to allow the steam to escape. Rotating too quickly could damage the maker and cause injury. Rotate the Steam control to the OFF position when the green Heat indicator turns off to allow the unit to heat again. When the green Heat indicator lights, you can repeat this step. 3 4 2 1 Rotate the Steam control 1 to the OFF position when the desired consistency is reached. Press the Espresso/ Cappuccino button 2 to the Espresso ( ) position to stop generating steam. Clean Frothing Device immediately after each use. To serve, pour the frothed milk into the prepared espresso. Sweeten to taste. Press the Espresso ON/OFF button to turn the maker off. 12 CARE AND MAINTENANCE CLEANING YOUR COFFEE MAKER After brewing coffee, make sure the unit has completely cooled and then clean the coffee maker as follows: 1. Discard used coffee grounds. 2. Clean the carafe, carafe lid, filter basket, drip tray, drip tray shelf, frothing device, espresso filter, nylon filter, measuring spoon and espresso handle in either hot, sudsy water, or the top rack of a dishwasher. To remove stains on the carafe, scrub with baking soda or a mild cleanser. For hard to remove stains, fill the carafe with hot tap water and add 2 tablespoons of dishwasher detergent. Let it sit overnight, then wash and rinse. 3. Clean the coffee maker’s exterior and “Keep Warm” plate with a soft, damp cloth. Do not use abrasive cleaners or scouring pads, and never immerse the coffee maker in water. 4. Make a cleaning solution consisting of one part vinegar and two parts water, then fill water tank. 5. Turn the unit on to begin brewing but be sure no coffee was added to the coffee filter. The unit should brew your solution only. DO NOT CONSUME THIS LIQUID. 6. When finished brewing, turn the coffee maker off again and discard the cleaning solution. 7. Put the empty carafe back on the “Keep Warm” plate and turn the maker on for a complete drip coffee brew cycle to flush out the remaining cleaning solution. 8. Clean the carafe, carafe lid and filter basket in either hot, sudsy water, or the top rack of a dishwasher. CARING FOR YOUR CARAFE A damaged carafe may result in possible burns from hot liquid, so please follow the tips below to keep your carafe from breaking: • Do not allow liquid to evaporate from the carafe while on the “Keep Warm” plate, or heat the carafe when it is empty. • Never use abrasive scouring pads or cleansers, they will scratch and weaken the glass. • Do not place the carafe on or near a hot gas or electric burner, in a heated over or in a microwave oven. • Avoid rough handling and sharp blows to the carafe. MINERAL DEPOSITS AND CLOGGING (ESPRESSO MAKER) Mineral deposits left by hard water can clog your maker. Excessive steaming or a prolonged brewing cycle are signs that a cleaning is needed. The frequency of flushing out deposits is affected by your usage and water hardness. In areas of hard water, more frequent flushing of deposits is necessary. During cleaning, more steaming occurs than when brewing coffee, and there may be some spitting. Flush deposits as follows: 1. Insert four parts water to one part white vinegar into the water reservoir until full. 13 CARE AND MAINTENANCE 2. Turn on the unit. Press the Espresso ON/OFF button to the on ( ON ) position. PUMP/ 3. Press the Pump button to the PUMP ( ) position. 4. Once the water is delivered for approximately five seconds, press the STOP ) position. pump button to the STOP ( 5. Press the Espresso/Cappuccino button to the Espresso ( ) position. 6. When the green Heat indicator lights, press the Pump button to the PUMP ( ) position and make two 2oz cups of water. PUMP/ STOP) position. 7. Press the Pump button to the STOP ( 8. Press the Espresso/Cappuccino button to the Cappuccino ( ) position and allow to steam for two minutes. When done, rotate the Steam control to the OFF position. 9. Press the Espresso ON/OFF button to the out ( OFF ) position. Let it soak for at least 15 minutes to soften the deposits. 10.Restart the unit and repeat steps 2 through 8 at least three times. 11. Once the water reservoir is empty of cleaning solution, fill reservoir again with water only and repeat steps 2 through 8 several times until tank is empty. 12. Your machine is now clean and ready to use. MINERAL DEPOSITS AND CLOGGING (COFFEE MAKER) Mineral deposits left by hard water can clog your coffee maker. Excessive steaming or a prolonged brewing cycle are signs that a cleaning is needed. The frequency of flushing out deposits is affected by your usage and water hardness. In areas of hard water, more frequent flushing of deposits is necessary. During cleaning, more steaming occurs than when brewing coffee, and there may be some spitting. Flush deposits as follows: 1. Insert four parts water to one part white vinegar into the water reservoir until full. 2. Turn on the unit and place carafe of “Keep Warm” plate. 3. Press the ON button to turn the unit on. After a short while, the solution will start dripping into the carafe. 4. After approximately one cup has gone through, press the ON button twice to turn the unit off. 5. Let it soak for at least 15 minutes to soften the deposits. 6. Restart the unit and repeat steps 3 through 5. 7. When finished brewing, turn the coffee maker off again, discard the cleaning solution and the paper filter. 8. Put the empty carafe back on the “Keep Warm” plate and turn the maker on for a complete coffee brew cycle, using only water, to flush out the remaining cleaning solution. 9. Clean the carafe, carafe lid and filter basket in either hot, sudsy water, or the top rack of a dishwasher. 14 TROUBLESHOOTING GUIDE Before requesting service, please refer to the troubleshooting guide below. Many questions/problems you may be having will be answered simply. SYMPTOM Does not brew. SOLUTION • Make sure the AC cord is plugged into an AC outlet having 120V, 60Hz. • Make sure the ON button has been pressed. Coffee maker shuts off • This is normal, as the coffee maker has a built-in without pressing OFF. feature that will shut the unit off after 2 hours. • There is another high power item on the same circuit that is blowing the breaker. Only use one of the items at a time. Does not turn on when • The Auto feature has not been activated. auto time is reached. • The clock is not set. • The auto time has not been set properly. Filter basket overflows. • Too much ground coffee will clog the filter basket, try less coffee. • Use good quality filters only, as low quality filters will collapse. • When using the Interrupt feature, you must return the carafe back within 60 seconds, or the filter basket will overflow. • Make sure the filter basket is fully closed, and snapped in place. Brewing takes longer than usual. • Mineral deposits can build up in your coffeemaker. Periodic cleaning is necessary, see pages 13 and 14. 15 LIMITED WARRANTY Emerson Radio Corp. warrants manufacturing defects in original material, including original parts and workmanship, under normal use and conditions, for a period of one year from the date of original purchase in the U.S. With your dated proof of purchase, we will provide repair service at no charge for labor and parts at an authorized Depot Repair Facility, or replace the product in our discretion. For repair or replacement, pack your unit in a padded box, enclose your check or money order payable to Emerson Radio Corp. in the amount of $10.00 (not required by California residents) to cover shipping and handling costs, and enclose a copy of your proof of purchase. Send your unit to: Emerson Radio Returns Warehouse, Emerson Corp., 11500Statesman Philadelphia Street, 5101 Drive, Irving, TX 75063 Mira Loma Ca. 91752 This warranty does not cover damage from negligence, misuse, abuse, accident, failure to follow operating instructions, commercial use, rental, repairs by an unauthorized facility, or products purchased, used, serviced or damaged outside of the United States. THIS WARRANTY GIVES YOU SPECIFIC LEGAL RIGHTS, AND YOU MAY ALSO HAVE OTHER RIGHTS WHICH VARY FROM STATE TO STATE. AU898N The serial number can be fund on the bottom of the unit. We suggest that you record the serial number of your unit in the space below for future reference. Model Number: CCM901 Serial Number:__________________________________ 16 EMERSON Part No. CCM901-06272008-02 Printed In China