1
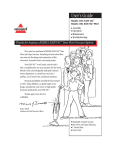
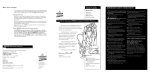
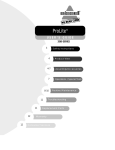
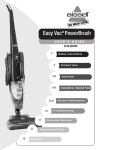
User’s Guide
Models 3101-0 EASY VAC™
Models 3102-0 EASY VAC™ PLUS
Assembly
■ Operation
■ Maintenance
■ Troubleshooting
■
Thanks for buying a BISSELL EASY VAC™ Bare Floor Vacuum System.
We’re glad you purchased a BISSELL EASY VAC™ Bare
Floor and Carpet vacuum. Everything we know about floor
care went into the design and construction of this
convenient, innovative home vacuuming system.
Your EASY VAC™ is well made, and we back it
with a comprehensive one-year warranty. We also stand
behind it with a knowledgeable, dedicated Consumer
Service department, so, should you ever have a
problem, you’ll receive fast, considerate assistance.
My great-grandfather invented the floor sweeper
in 1876. Today, BISSELL is a global leader in the
design, manufacture, and service of high quality
homecare products like your EASY VAC.™
Thanks again, from all of us
at BISSELL.
Mark J. Bissell
President and Chief Executive Officer
Detachable Canister Vacuum
Bare Floor and Carpet Cleaning
■ 5’ Stretch Hose
■ Crevice Tool
■
■
IMPORTANT SAFETY INSTRUCTIONS
WARNING: When using an elec-
trical appliance, basic precautions should
be observed, including the following: Read
all instructions before using your vacuum cleaner.
Always connect to a polarized outlet (left slot is
larger than right). Unplug from outlet when not
in use and before conducting maintenance.
■
■
■
■
WARNING: To reduce the risk of
fire, electric shock, or injury do not use
outdoors or on wet surfaces.
■ Do not modify the polarized plug to fit a nonpolarized outlet or extension cord
■ Do not leave vacuum cleaner when it is plugged in
■ Do not perform maintenance when vacuum
cleaner is plugged in
■ Do not use with damaged cord or plug
■ Do not unplug by pulling on cord. To unplug,
grasp the plug, not the cord
■ Do not pull or carry by cord, use cord as a
handle, close door on cord, pull cord around
sharp corners, run vacuum cleaner over cord,
or expose cord to heated surfaces
■ If appliance is not working as it should, has
been dropped, damaged, left outdoors or
dropped into water, return it to a Service Center
■ Do not allow children to operate vacuum
cleaner or use as a toy
■ Do not handle vacuum cleaner or plug with
wet hands
■ Do not put any object into ventilation openings,
use with blocked opening or restrict air flow
■ Do not use without filters in place
■ Do not expose hair, loose clothing, fingers or
body parts to openings
■ Do not pick up hot coals, cigarette butts,
matches or any hot or burning objects
■
■
■
■
■
■
■
Do not pick up hard or sharp objects such as
glass, nails, screws, coins, etc
Do not pick up toxic material (chlorine bleach,
ammonia, drain cleaner, etc.)
Do not use to pick up flammable or combustible
liquids such as gasoline, or use in areas where
they may be present
Do not use vacuum cleaner in an enclosed
space filled with vapors given off by oil base
paint, paint thinner, some moth proofing
substances, flammable dust, or other explosive
or toxic vapors
Do not use for any purpose other than described
in this User’s Guide
Use only manufacturer’s recommended Nozzles
and replacement parts
Use only on dry, indoor surfaces
Keep openings free of dust, lint, hair, etc
Turn off all controls before plugging or
unplugging vacuum cleaner
Be extra careful when cleaning stairs
Pay close attention when working around
children
SAVE THESE INSTRUCTIONS
FOR FUTURE USE.
WARNING: To reduce the risk
of electric shock, this appliance has a
polarized plug (one blade is wider than
the other). This plug will fit in a polarized
outlet only one way. If the plug does not
fit fully in the outlet, reverse the plug.
If it still does not fit, contact a qualified
electrician to install a proper outlet.
Do not change the plug in any way.
This model is for household use only.
2
Cord Hook
Detachable
Canister Handle
Handle Release Buttons
1.
QuickRelease
Cord Wrap
Hose Clip
Crevice Tool
Attachment
Clip
5’ Stretch Hose
Power
Cord
3.
Crevice Tool
Lightweight
Canister
Lower
Cord
Wrap
Hose Port
Dirt Cup
Floor Nozzle Surface Adjustment
Floor Brush
Bottom View - Floor Nozzle
2.
Detachable
Floor Nozzle
3
How to use this guide
This User’s Guide has been designed to help you
get the utmost satisfaction from your BISSELL
EASY VAC™ Bare Floor and Carpet Vacuum. You’ll
find assembly and operating instructions, safety
precautions, as well as maintenance and
troubleshooting instructions.
Please read this Guide thoroughly before assembling
your vacuum cleaner. Pay particular attention to the
assembly diagram, assembly instructions, and part
names. Locate and organize all parts before assembly.
Familiarize yourself with the parts and where they go.
Following this User’s Guide will greatly enhance your
ability to get the best performance from your BISSELL
EASY VAC™ for many years.
Your EASY VAC™ comes in four, easy to assemble components.
No tools are needed.
Detachable Canister Handle
Lightweight Detachable Canister
Floor Nozzle
Crevice Tool
WARNING:
Do not plug in your
vacuum cleaner until
you have completely
assembled it per the
following instructions
and are familiar with
all instructions and
operating procedures.
How to put it together
1. Attach Upright Handle to Canister Vacuum
Gently slide Handle over square end of Canister Vacuum, pushing until
buttons on Canister snap into place in opening on Handle. The Handle is
designed to attach and disassemble easily as you switch from upright to
canister style cleaning.
2. Attach Floor Nozzle to Canister Vacuum
Grasp Floor Nozzle with one hand, while holding Canister Vacuum firmly
with the other. With firm, even pressure, press Floor Nozzle into round
opening at end of Canister Vacuum. Continue pressing gently but firmly
until Floor Nozzle can go no further. As with the Upright Handle, the Floor
Nozzle is designed to attach and disassemble easily as you switch from level
floor to tool style cleaning.
Crevice Tool to Tool Clip
3. Attach
Slide narrow end of Crevice Tool over angled post on the side of the
Canister, then press round end of Tool into semi-circular grip located just
below the Quick Release Cord Wrap.
EASY VAC™ assembly is now complete.
4
How to use your BISSELL EASY VAC™
Power Cord Quick Release
The Power Cord is stored at the side of the Canister,
looped around two Cord Wraps. A molded clip on
the polarized plug allows it to be clipped to the
Power Cord during storage.
1. Remove the plastic plug guard and dispose or
recycle it.
2. Unclip polarized plug from Power Cord.
Upper and
3. Rotate the Upper Cord Wrap one-half turn
Lower Cord
right or left, and slip Power Cord from Upper
Wraps
and Lower Cord Wraps.
4. Connect Power Cord Plug with a polarized outlet.
5. To keep the Power Cord out of your way while
cleaning, place it in the cord hook at the top/back of the handle.
Power Switch
The Power Switch is located just below the hand grip. Move the switch to
position “ ” [down] to vacuum, and “ ” [up] to turn unit off when
cleaning is complete.
Upright floor cleaning
Index
Safety instructions . . . . . . . . . .2
Product view . . . . . . . . . . . . . .3
How to put it together . . . . . . .4
Index . . . . . . . . . . . . . . . . . . . .5
How to use your
BISSELL EASY VAC™ . . . . . . .5-6
Maintenance . . . . . . . . . . . . . .7
Troubleshooting . . . . . . . . . . . .8
Replacement parts . . . . . . . . . .9
Warranty . . . . . . . . . . . . . . . .10
Consumer services . . . . . . . . . .10
Floor Nozzle Adjustment
You can adjust the brush on the underside of the Floor Nozzle to clean
bare floors or carpeted areas.
Floor Nozzle
1. Move the lever on the Floor Nozzle to
Adjustment Lever
the left ( ) for bare floor vacuuming,
and the brush will adjust to slight
variations in floor height.
2. Move the lever to the right ( ) and the brush will lock in position
for more effective cleaning of carpeted surfaces.
Cleaning with the Canister
Your BISSELL EASY VAC™ is not only a convenient upright bare floor
and carpet cleaner, it’s also a versatile floor/above floor vacuum
cleaner when you detach the lightweight canister.
Floor Cleaning
1. Detach the Upright Handle by pressing your thumb and forefinger
on the lock buttons on Canister (using a “pinching” motion) while
gently pulling Handle off square end of Canister.
2. For floor surface cleaning, use the Floor Nozzle, following the
surface adjustment instructions.
3. For edge cleaning or cleaning small areas, you need only to:
■ Detach the Hose from the Hose Port at the bottom/ back of the
Canister. Press the lock button and pull the Hose from the Port,
then insert the Crevice Tool into the end of the Hose. The Crevice
Tool also can be placed in the round opening of the canister for
added versatility.
5
Cleaning with the Canister - continued
Above Floor Cleaning
Tip:
Before cleaning
under low furniture, check for
objects that
might block the
vacuum hose.
Do not pick up
hard or sharp
objects such as
glass, nails,
screws, coins,
paper clips, etc.
For quick and easy above floor cleaning:
1. Detach the Hose from the Hose Port at the bottom/back of the
Canister. Press the lock button and pull the Hose from the Port,
then insert the Crevice Tool into the end of the Hose.
To resume normal floor vacuuming:
1. Remove Crevice Tool and store in Crevice Tool Clip.
2. Reconnect Hose to the Hose Port, making certain it is locked
fully in place.
3. Attach Floor Nozzle and Upright Handle, following
instructions in “How To Put It Together,” page 4.
Emptying the Dirt Cup
Your EASY VAC™ features a translucent plastic Dirt Cup, so
you can easily see when it needs to be emptied. For best
performance, empty when debris reaches halfway up the cup.
1. Press the lock button down and forward
(away from the Canister Handle) while
lifting the upper portion of the Dirt Cup
away from the Canister.
2. Grasp the Filter frame and pull it straight
from the Cup. Empty the Cup, and check
both the filter and the Cup for cleanliness
and damage. You may wash the Cup with
warm (not hot) water and mild liquid dish
soap only. Rinse and dry thoroughly before
reattaching it.
3. If the surface of the filter looks dirty or
discolored, now’s the time to clean or
replace it. To clean the filter, remove any debris still clinging
to the filter. After a time, it will be necessary to replace your
filter. See “Routine Maintenance” for instructions.
4. With filter in place at the top of the Cup,* place the small
tab at the bottom of the Canister cavity, then press the upper
portion of the Cup into place until the lock button can
easily be pushed back into position.
*Push filter down tight to ensure gasket is in place.
6
Power Cord Storage
When you are done using your BISSELL
EASY VAC,™ store the Power Cord.
1. Turn EASY VAC™ off by moving
switch to “ ” position.
2. Unplug Power Cord by grasping the
polarized plug [NOT the cord) and
disconnect from outlet.
3. Loop Power Cord around Cord Wraps
on side of cleaner, making certain
Quick Release Cord Hook is pointed
up toward the Handle.
4. Clip molded plug to Power Cord
to secure.
Maintenance
To maintain maximum performance from your EASY VAC,™
perform these simple maintenance checks periodically.
WARNING:
For average household use, follow this maintenance schedule:
Weekly:
Check the debris level in the Dirt Cup and
empty if necessary.
Monthly:
Check the filter for wear and tear.
Remove debris from the filter. It may also
be necessary to use and old toothbrush to
clean off any debris. Replace as needed.
Replace Filter
As you vacuum, dirt and debris are deposited in the Dirt Cup
while air passes through the filter before being returned to
the room. This process enhances the vacuum path while
dramatically reducing dust, dirt, and potential allergens from
the air you breathe. Replacing the filter periodically enhances
vacuum power and air quality. To replace the filter:
1. Remove the Dirt Cup.
2. Grasp the filter frame and pull it straight from the Cup.
Empty the Cup.
3. Replace the filter. Push new filter into place at the top of the
Cup, place the small tab at the bottom of the Cup into the
slot at the bottom of the Canister cavity, then press the upper
portion of the Cup into place until the lock button snaps
into place. Use only BISSELL Style 6, #32047 Filters
[package of 2] in your BISSELL EASY VAC™ Model 3101-0.
4. EASY VAC™ PLUS Model #3102-0 features a high efficiency
3M Filtrete™ Filter. To keep your cleaner operating at peak
efficiency and to remove irritating allergens from your
home, you should change the FILTRETE™ filter every six
months. Use only BISSELL Style 6, #32046 Filters [package
of 2]. The cup-shaped filter lifts out from the top of the
Dirt Cup, and the new one fits into place.
You may purchase these filters:
■ at your local retailer
■ with the order form in this User’s Guide
■ by calling
BISSELL Consumer Services
1-800-237-7691
To
reduce the risk of electric
shock, turn Power Switch
OFF and disconnect
polarized plug from
electrical outlet before
performing maintenance.
Tip:
Vacuuming new
carpet or fine
powders such as
drywall dust may
clog the filter, so
check it more
frequently. Shake
out or replace
as necessary.
Filter for EASY-VAC™ Model 3101-0
FILTRETE™ Filter for EASY-VAC™ PLUS Model 3102-0
Monday - Friday
8 a.m. — 7 p.m. EST
Saturday
9 a.m. — 2 p.m. EST
■ or from the BISSELL website —
http://www.bissell.com
7
Troubleshooting
WARNING:
To reduce
the risk of injury from moving
parts, and/or electrical shock,
turn Power Switch OFF (position
“ ”) and disconnect polarized
plug from electrical outlet
before performing
troubleshooting checks.
Vacuum cleaner won’t run.
Possible Causes
Vacuum cleaner is not plugged in
Household fuse/breaker
Remedies
Check electrical plug
Check/replace fuse or reset breaker switch
Call BISSELL Consumer Services
Vacuum cleaner won’t pick up dirt.
Possible Causes
Dirt Cup is full
Filter dirty
Hose not secure in Hose Nozzle
Dirt Cup not sealed against Canister
Vacuum path clogged
8
Remedies
Empty Dirt Cup
Check and remove debris. Replace if necessary
Check fit and tighten
Open Dirt Cup, then press firmly until you
hear lock button snap into place
Visually check: (1) Floor Nozzle, (2) Hose Port,
(3) Crevice Tool and (4) Hose for hair, pine
needles, small toys, large pieces of paper that
may be obstructing the vacuum path.
Carefully remove blockage
Part Numbers and Descriptions
Item
1
2
3
4
5
6
7
8
Part No.
010-0031
010-0032
010-0033
010-0034
010-0035
010-0036
010-0037
010-0038
Part Name
Crevice Tool
Filter (Polyester Fiber, 2/package)
Filter (FILTRETE,™ 2/package)
Dirt Cup (Blue) EASY VAC™
Dirt Cup (Purple) EASY VAC™ PLUS
Upright Handle
Floor Nozzle
Floor Strip Brush
1
NOTE: Not all attachments pictured are included
with every model, but they are available.
To order replacement parts or additional
attachments call:
BISSELL Consumer Services
1-800-237-7691
Monday - Friday 8 a.m. — 7 p.m. EST
Saturday
9 a.m. — 2 p.m. EST
Or visit our Website @ http://www.bissell.com
Please have your model and part numbers of unit ready.
2&3
7
4&5
6
8
9
About your warranty
This warranty gives you specific legal rights, and you may also have other
rights which may vary from state to state. If you need additional instruction
regarding this warranty or have questions regarding what it may cover, call
BISSELL Consumer Services.
One Year Warranty
BISSELL Inc., upon receipt of the product, will repair or replace, free of charge,
any part which is defective or malfunctioning within one year of the purchase
date, provided that it is used for personal and not commercial or rental service.
If the vacuum cannot be repaired, BISSELL Inc. will replace the product or
refund the full price, at your option.
If your BISSELL product should require service:
1. Call BISSELL Consumer Services at 1-800-237-7691 and we will
give you the name and address of an authorized BISSELL Service
Center in your area.
2. If there is not an authorized BISSELL Service Center in
your area, one of our Service Representatives will be happy
to assist you. You can also visit the BISSELL website at
http://www.bissell.com to locate a Service Center near you.
— The product should be returned with a photocopy of
your proof of purchase. (Your dated sales receipt is your
warranty - send a photocopy, not the original.)
— Insure the product when shipping for your protection
from loss.
BISSELL Consumer Services
For information about repairs or replacement parts, or
questions about your warranty, call:
BISSELL Consumer Services
1-800-237-7691
Monday - Friday 8 a.m. — 7 p.m. EST
Saturday
9 a.m. — 2 p.m. EST
Visit our web site at http://www.bissell.com
Or write:
BISSELL INC
PO Box 3606
Grand Rapids MI 49544
ATTN: Consumer Services
When contacting BISSELL, have model number of unit available.
Please record your Model Number: ___________________
Please record your Purchase Date: ___________________
NOTE: Please keep your original sales receipt. It is your warranty.
10
©1998 BISSELL Inc
Grand Rapids, Michigan
All rights reserved. Printed in China.
Part Number 010-0039
Rev 12/98
Visit our web site at:
http://www.bissell.com