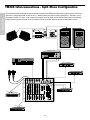
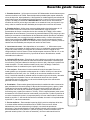
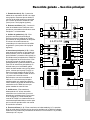
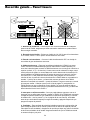
1
TM300
P O W E R E D
MIXER
OWNERS MANUAL
®
Table of Contents
ENGLISH
Introduction 3
TM300 Features 3
Guided Tour 5
Overview 5
Channels 6
Main Section 8
Rear Panel 11
Connecting the TM300 12
TM300 Interconnections - Stereo Configuration 13
TM300 Interconnections - Split Mono Configuration 14
Setting Up and Using the TM300 15
Setting the Correct Gain Structure 16
Grounding Techniques 18
Using Equalization 19
Using Pan 21
Using Aux Sends and Returns 22
Using Inserts 23
Using the Internal Effects Processor (DSP) 24
Specifications 58
FRANÇAIS
Introduction 25
Caractéristiques Techniques du TM300 25
Visite guidée 27
Les voies 27
Section principale 29
Face arrière 32
Installation et utilisation du TM300 33
Réglages de gain 34
Spécifications 58
DEUTSCHE
Einleitung 36
TM300 Merkmale 36
Übersicht 38
die Kanäle 38
Hauptabschnitt 40
Rückseite 43
Einstellung und Bedienung des TM300 44
Einstellung der Gain-Struktur 45
Technische Daten 58
ESPAÑOL
Introducción 47
Características de la TM300 47
Recorrido guiado 49
Canales 49
Sección principal 51
Panel trasero 54
Ajuste y uso de la TM300 55
Ajuste de la estructura de ganancia correcta 56
Especificaciones 58
Produced by On The Right Wavelength for Samson Technologies Corp.
Copyright 1999, Samson Technologies Corp.
Printed April 1999
Samson Technologies Corp.
575 Underhill Blvd.
P.O. Box 9031
Syosset, NY 11791-9031
Phone: 1-800-3-SAMSON (1-800-372-6766)
Fax: 516-364-3888
Introduction / TM300 Features
The Samson TM300 is a practical, full-featured 6-channel stereo powered mixer—
complete with built-in signal processing—all in a compact tabletop design. It’s ideal for
use in rehearsal studios, small club venues, lounges and other sound reinforcement
applications—in fact, it can be used wherever there are a number of microphone or
line-level sources that need to be mixed down to a stereo output. Simply hook it up to a
set of PA speakers and you’re ready to go!
In these pages, you’ll find an overview of TM300 features, followed by a guided tour of
its front and rear panels. Then we’ll describe how the TM300 should be connected to
your existing equipment (including a wiring diagram) and talk about the important topics
of gain structure and grounding techniques. Next, we’ll cover a number of specific
TM300 features (such as panning, equalization, auxiliary sends and returns, inserts and
using the onboard effects) in detail. Finally, we’ll wrap things up with full specifications.
You’ll also find a warranty card enclosed—please don’t forget to fill it out and mail it so
that you can receive online technical support and so we can send you updated
information about other Samson products in the future. Also, be sure to check out our
website (http://www.samsontech.com) for complete information about our full product
line.
SPECIAL NOTE: Should your TM300 ever require servicing, a Return Authorization
number (RA) is necessary. Without this number, the unit will not be accepted. Please
call Samson at 1-800-372-6766 for a Return Authorization number prior to shipping your
unit. Please retain the original packing materials and, if possible, return the TM300 in its
original carton and packing materials.
TM300 Features
The compact design of the TM300 belies its extraordinary versatility and excellent sound
quality. Here are some of its main features:
• Six independent channels, each with mic and line inputs. These allow you to blend
together a variety of source signals, including dynamic or condenser microphones,
keyboards, CD/tape players, etc. Standard XLR mic connectors (for microphone
inputs) and electronically balanced 1/4" jacks (for line-level inputs) are provided for
each channel. In addition, there is a dedicated stereo Tape input that provides dual
phono (RCA) jacks.
• Flexible switching allows the TM300 to be used either in standard stereo
configuration or in a unique “split mono” mode, where it can drive both main PA
speakers and onstage monitors simultaneously.
• Built-in stereo power amplifier delivers 150 watts per side into 4 ohms. Any standard
speaker cabinets (four, eight, or sixteen ohms) can be connected to the four
rear-panel 1/4" speaker output jacks.
• Power amp utilizes a variable-speed fan and bipolar design for maximum reliability
and long life.
• Onboard digital signal processor (DSP) with three high-quality effects.
3
ENGLISH
We know you don’t like reading owners manuals, but you’ve just purchased one of the
finest powered mixers around, and we want to tell you about it! So, before you plug in
and start making music, we’d like to suggest you take just a few moments out to scan
these pages. We’ll make it as painless as possible, we promise—and, who knows, you
might just pick up a tip or two.
ENGLISH
TM300 Features
• Phantom power switch enables you to use the TM300 with high-quality condenser
microphones. When turned on, 48 volts of phantom power is provided to the mic
connectors of all channels.
• Two Aux sends per channel (one pre-fader and the other post-fader) allow you to
route multiple signals to the internal DSP or to external signal processors.
• Dual stereo aux returns—with dedicated front-panel level controls—give you the
ability to blend in the return signal from the internal DSP and/or external signal
processors or other line-level devices without having to utilize input channels.
• Extensive equalization includes independent 3-band eq for each channel, with 15 dB
of cut or boost for low (100 Hz) and high (10 kHz) frequencies, and 12 dB of cut or
boost for the mid (1.8 kHz) frequency. In addition, a dual seven-band graphic master
equalizer allows you to “tune” the output of the TM300 to the particular room
environment you are in—particularly useful for eliminating ringing or feedback
problems. This graphic equalizer can be used in stereo or can be “split” so that one
side affects the main PA and the other side affects stage monitors.
• Constant level Pan controls for each channel that allow you to precisely place each
input signal in the left-right plane.
• Center detents for all Pan and EQ controls, making it easy to use the TM300 even in
low-light live performance situations.
• Continuously adjustable wide-range input Trim controls for each channel allow you
to precisely set the correct input and output gain structure.
• Independent 65 mm faders for each channel and for the stereo bus.
• Pre Fader Listen (PFL) soloing for each channel, allowing headphone monitoring of
individual channels, pre-fader (but post-EQ) without affecting the signal being output
either by the speaker or various line-level outputs.
• Front panel metering system includes a ten-segment level meter and allows you to
view at a glance the continuous levels of the main stereo output and/or Aux sends.
• Peak LEDs for each channel show you at a glance when an input signal is on the
verge of overloading.
• Dedicated status LEDs show main power and phantom power on/off.
• Separate Record out jacks (with dedicated level control) allow you to directly connect
the TM300 to any tape recorder. In addition, a handy Mono output jack provides a
line-level signal for connection to external monitor power amplifiers.
• An independent front-panel headphone output with dedicated volume control for
private monitoring of the main stereo output, Aux sends, or soloed channels.
• Main inserts and four channel inserts allow you to use outboard signal processors
such as equalizers, compressor/ limiters, or noise gates in a standard “effect loop.”
• Last but certainly not least, affordability. The TM300 has been designed from the
ground up to provide versatility and excellent sound quality at a cost-conscious price.
4
Guided Tour - Overview
The following illustration shows an overview of the front panel of the TM300:
2
3
4
5
6
TAPE IN
–10dB
MIC
MIC
MIC
MIC
MIC
R
MIC
MONO OUT+4dB
REC OUT
+4dBu
L
L
R
AUX RET1
AUX SEND 1
INSERT
+4dB
+4dB
INSERT
PEAK
M
E
0
E
0
E
0
PEAK
M
E
0
0
E
M
SAMSON
IC
+15
–15
+15
–15
+15
TRIM
0
–15
+15
AUX SEND 2
POST EQ
–6 –50
+14
–30
TRIM
0
N
0
0
–15
R
PEAK
M
–6 –50
+14
–30
TRIM
0
N
IC
–6 –50
+14
–30
TRIM
0
N
MAIN
L
AUX RET 2
PEAK
M
–6 –50
+14
–30
TRIM
0
N
IC
–6 –50
+14
–30
TRIM
INSERT
PEAK
M
IC
–6 –50
+14
–30
N
IC
LI
0
IC
LI
E
R
L/MONO
LINE
LI
INSERT
PEAK
N
LINE
LINE
LI
INSERT
LINE
LI
LINE
LI
LINE
–15
+15
–15
HIGH
HIGH
HIGH
HIGH
HIGH
0
0
0
0
0
0
RIGHT
AUX2
LEFT
AUX1
+4
+10
+15
HIGH
TAPE IN
POWER
+4
+4
+2
+2
REC OUT
0
0
0
0
–2
–2
–4
–4
–9
–9
–12
–12
PHANTOM
–12
+12
–12
MID
+12
–12
MID
0
+12
–12
MID
0
+12
–12
MID
0
+12
–12
MID
0
+10
+12
MID
0
+10
AUX RET 1
AUX RET2/REV
0
–15
+15
–15
LOW
+15
–15
LOW
+15
–15
LOW
+15
–15
LOW
OFF
+15
–15
LOW
0
+10
+15
METER HEADPHONE
SOURCE
+10
AUX SEND 1
LOW
AUX SEND 2
DSP
0
0
0
ON
0
0
0
0
0
–15
–15
–20
–20
–25
–25
L / R
AUX 1 / 2
VOCAL
+10
+10
+10
+10
+10
+10
AUX 1 PRE
AUX 1 PRE
AUX 1 PRE
AUX 1 PRE
AUX 1 PRE
AUX 1 PRE
6 CHANNEL 150 WATT STEREO MIXER
+10
REV TO AUX 1
AUX 1/MONITOR
L HALL
0
0
0
0
0
+10
+10
+10
+10
+10
AUX 2
AUX 2
AUX 2
AUX 2
EQ ON/OFF
LEFT
S HALL
+10
AUX 2
63Hz
160Hz 400Hz
1KHz
RIGHT
2.5KHz 6.4KHz 15KHz
AUX 2
+12dB
ON
L
L
R
L
R
L
R
L
R
L
R
L
0dB
R
PAN
PAN
PAN
PAN
PAN
PAN
PFL
PFL
PFL
PFL
PFL
PFL
-12dB
63Hz
160Hz 400Hz
1KHz
2.5KHz 6.4KHz 15KHz
+12dB
0
0
0
0
0
10
0
10
R
10
10
10
15
15
15
15
15
20
20
20
20
20
25
25
25
25
30
30
30
30
35
35
35
40
40
40
O
O
O
10
10
0
10
0dB
0
15
4
4
20
8
8
25
25
12
12
30
30
16
16
35
35
35
20
20
40
40
40
26
26
O
O
O
OO
OO
-12dB
63Hz
160Hz 400Hz
1KHz
2.5KHz 6.4KHz 15KHz
0
+10
LEVEL
HEADPHONE
1
2
3
4
5
6
Channels
L
–STEREO–
R
Main Section
5
ENGLISH
1
Guided Tour - Channels
1
MIC
2
LINE
3
INSERT
PEAK
E
N
0
4
M
IC
LI
ENGLISH
1
1: Mic inputs - Use these electronically balanced XLR jacks to connect microphones to
the TM300. These are intended to accept signal from low-level, low-impedance mics but
can also be used for signal from other sources (such as direct injection boxes) if the
channel’s Trim control (see #5 below) is turned down. WARNING: Do not connect a
channel’s microphone input if you already have something connected to its line input (see
#2 below); all channels are designed to accept only one source or the other.
5
–6 –50
+14
–30
TRIM
0
–15
+15
HIGH
0
6
–12
+12
MID
0
–15
2: Line inputs - Use these electronically balanced 1/4" jacks to connect line-level sources
such as synthesizers, drum machines, CD players, tape decks, or effects processors to
any of the TM300’s channels. We recommend the use of balanced three-conductor
cabling and Tip/Ring/Sleeve (TRS) plugs wherever possible (unbalanced two-conductor
plugs can also be inserted into these inputs, but you’ll get better signal quality and less
outside noise and hum if you use balanced lines). The “Connecting the TM300” section on
page 10 in this manual provides more information on how best to use channel inputs.
WARNING: Do not connect a channel’s line input if you already have something connected
to its microphone input (see #1 above); all channels are designed to accept only one
source or the other.
3: Channel Inserts - Provided in channels 1 - 4 only. Use these to insert an external
effects processor (such as outboard equalizer, compressor/limiter or noise gate) in an
“effects loop” configuration. These jacks accept 1/4" TRS plugs, with the ring carrying the
send signal and the tip carrying the return signal. Normally, this will be connected to a
Y-cord; see the “Connecting The TM300” section on page 10 in this manual for more
information and a wiring diagram.
+15
LOW
0
+10
AUX 1 PRE
7
4: Peak LED - This warning light indicates an overload situation. It lights whenever a
channel’s signal is 3 dB short of clipping. To stop it from lighting (and to eliminate the
accompanying sonic distortion), turn down the channel’s input Trim (see #5 below) or
reduce the amount of equalization boost (see #6 below).
0
+10
AUX 2
L
R
8
PAN
PFL
9
0
10
15
10
20
25
30
35
40
5: Trim - Determines the input level of the connected signal. This knob is continuously
adjustable from +14 dB to -30 dB (in the case of line-level inputs) or from -6 to -50 dB (in
the case of mic-level inputs). The input signal is boosted when the Trim control is turned
clockwise and is lowered (attenuated) when turned counterclockwise. For information on
how to properly set this for each channel, see the section on page 14 entitled “Setting The
Correct Gain Structure.”
6: Equalizer - These knobs determine the amount of boost or attenuation in each
frequency band (up to 15 dB for low and high frequencies, and up to 12 dB for the mid
frequency). The mid frequency control (centered at 1.8 kHz) utilizes a resonant (“bell”)
peaking curve, while the high and low frequency controls (centered at 10 kHz and 100 Hz,
respectively) utilize shelving curves. A center detent in each knob (at the “0” position)
indicates no boost or attenuation (that is, flat response). As each knob is turned clockwise
from the “0” position, the frequency area is boosted; as it is turned counterclockwise from
the “0” position, the frequency area is attenuated. For more information on the application
of EQ, see the “Using Equalization” section on page 17 in this manual.
O
1
7: Auxiliary sends - These knobs allow you to route signal to either or both of the
TM300’s two monophonic Auxiliary outputs. These are typically used to create submixes
(for example, a headphone cue mix) and to feed signal from single or multiple channels to
the internal DSP or outboard effects devices. At the “0” (2 o’clock) position, the signal is
routed with unity gain (that is, no boost or attenuation). As each knob is turned clockwise
from the “0” position, the signal is boosted; as it is turned counterclockwise from the “0”
position, it is attenuated. Aux send 1 is pre-eq and pre-fader; that is, the level of the signal
is determined solely by its Trim control (see #5 on the previous page). In contrast, Aux
6
Guided Tour - Channels
8: Pan - This knob allows you to place the input signal anywhere in the left-right
stereo spectrum, while keeping the overall signal level constant. When the knob
is placed at its center (detented) position, the signal is sent equally to both the
left and right speaker outputs. When moved left of center, less signal is sent to
the right output and more signal is sent to the left output (making the sound
appear left of center) and when moved right of center, less signal is sent to the
left output and more signal is sent to the right output (making the sound appear
right of center). To route a signal hard left or right, place the pan knob either
fully counterclockwise or fully clockwise. For more information, see the “Using
Pan” section on page 19 in this manual.
9: PFL (“Pre Fader Listen”) switch - When pressed in, the channel is soloed
in connected headphones (see #24 on page 8). Soloing is non-destructive; that
is, it has no effect on the main stereo output.
10: Channel Fader - This linear slider determines the signal level being sent to
the main output as well as affecting the signal level being routed to Aux send 2
(which is post-fader; Aux 1 is always pre-fader). In practice, you will use the
channel faders to continuously adjust the levels of the various signals being
blended together by the TM300. The “0” position of the fader indicates unity
gain (no level attenuation or boost). Moving the fader down from the “0” position
(towards “∞”) causes the signal to be attenuated (at the very bottom, it is
attenuated infinitely—in other words, there is no sound).
For best signal-to-noise ratio, all faders for channels carrying signal should
generally be kept at or near their “0” position. Channels that are unused should
have their faders kept all the way down at their “∞” (minimum) level. See the
“Setting the Correct Gain Structure” section on page 14 in this manual for more
information.
7
ENGLISH
send 2 is post-eq and post-fader; that is, the level of the signal is determined by
the channel’s Trim control, its EQ settings, and the position of its fader. Aux
send 2 is used for routing signal to the TM300’s internal DSP For more
information, see the “Using Aux Sends and Returns” and “Using the DSP”
sections on pages 20 and 22 in this manual.
Guided Tour - Main Section
1: Tape input (L, R) - Connect the outputs of a
tape or CD player to this set of dual phono jacks.
The volume of the incoming signal is controlled
by the Tape In level control (see #7 on the next
page).
ENGLISH
3
TAPE IN
–10dB
REC OUT
+4dB
L
R
MONO OUT+4dB
L
5
R
1
AUX RET1
AUX SEND 1
INSERT
+4dB
+4dB
2
R
L
R
MAIN
6
L/MONO
AUX RET 2
AUX SEND 2
POST EQ
4
SAMSON
11
7
0
LEFT
AUX1
RIGHT
AUX2
POWER
8
+4
+10
TAPE IN
0
9
+4
+4
+2
+2
12
REC OUT
0
0
0
-2
-2
-4
-4
13
PHANTOM
+10
AUX RET2/REV
OFF
14
ON
0
0
+10
-9
-9
-12
-12
METER HEADPHONE
SOURCE
+10
AUX SEND 1
AUX SEND 2
DSP
0
16
-15
-15
-20
-20
-25
-25
L/R
15
AUX 1/2
VOCAL
6 CHANNEL 150 WATT STEREO MIXER
+10
19
REV TO AUX 1
AUX 1/MONITOR
L HALL
17
EQ ON/OFF
LEFT
S HALL
63Hz
160Hz 400Hz
1KHz
RIGHT
20
2.5KHz 6.4KHz 15KHz
+12dB
18
ON
L
0dB
-12dB
63Hz
160Hz 400Hz
1KHz
21
2.5KHz 6.4KHz 15KHz
+12dB
10
10
0
0
R
22
4
4
8
8
12
12
0dB
-12dB
63Hz
160Hz 400Hz
1KHz
2.5KHz 6.4KHz 15KHz
0
23
+10
16
16
20
20
26
26
OO
OO
LEVEL
24
HEADPHONE
L
3: Record outputs (L, R) - This set of dual
phono jacks allow you to connect the output of
the TM300 to the inputs of a two-track recorder.
The volume of the incoming signal is controlled
by the Record Out level control (see #8 on the
next page). See the “Connecting the TM300”
section on page 10 in this manual for more
information.
+10
AUX RET 1
10
2: Aux Returns (1, 2) - Connect signal from
external stereo devices such as effects processors to these unbalanced 1/4" jacks. See the
“Connecting the TM300” section on page 10 and
the “Using Aux Sends and Returns” section on
page 20 in this manual for more information.
–STEREO–
R
4: Main Inserts (L, R) - Use these to insert an
external effects processor (such as outboard
equalizer, compressor/limiter or noise gate)
across the TM300’s main stereo output in an
“effects loop” configuration. This enables you to
process the entire mix simultaneously at unity
gain. The “Post EQ” pair of Main Inserts is
affected by both the seven-band graphic master
equalizer and stereo faders, while the “Pre EQ”
pair is not. These jacks accept 1/4" TRS plugs,
with the ring carrying the send signal and the tip
carrying the return signal. Normally, this will be
connected to a Y-cord; see the “Connecting The
TM300” section on page 10 in this manual for
more information and a wiring diagram. The Main
Inserts can also be used to link multiple TM300s
or to bring the output from another mixer into the
TM300 without taking up channel line inputs.
See the “Using Inserts” section on page 21 in
this manual for more information.
5: Mono Out - This unbalanced 1/4" jack provides a monophonic line-level output, unaffected
by the Stereo faders (see #22 on page 8). It can
be used to connect the TM300 to an external
monitor mixer/amplifier/speaker system so that
performers can receive an onstage monitor mix.
See the “Connecting the TM300” section on page
10 in this manual for more information.
6: Aux Sends (1, 2) - These unbalanced 1/4" jacks allow you to route signal from either
of the TM300’s two discrete Aux Sends to external devices such as effects processors.
Aux send1 is pre-fader, while Aux Send 2 is post-fader. See the “Using Aux Sends and
Returns” section on page 20 in this manual for more information.
8
Guided Tour - Main Section
7: Tape In Level - Controls the level of signal arriving at the Tape Input jacks (see #1 on the preceding page).
9: Auxiliary Return Level (1,2) - These knobs determine the input level of signal arriving via the TM300’s two stereo
Auxiliary return jacks (see #2 on the previous page). The “0” (2 o’clock) position of each knob indicates unity gain
(no level attenuation or boost). Moving each knob counterclockwise from the “0” position (towards “∞”) causes the signal
to be attenuated (at the fully counterclockwise position, it is attenuated infinitely—in other words, there is no sound).
Moving each knob clockwise from the “0” position (towards “+10”) causes the signal to be boosted by as much as 10 dB.
Note that, when the DSP On/Off switch (see #19 on the next page) is pressed in, the internal DSP signal is instead
routed to Aux Return 2, with the Aux Return Level 2 knob controlling the amount of “wet,” processed signal. For
information on how to properly set these, see the sections in this manual entitled “Setting the Correct Gain Structure,”
“Using the Aux Sends and Returns” and “Using DSP” (pages 14, 20 and 22).
10: Auxiliary Send Level (1,2) - These knobs determine the output level of signal being routed to the TM300’s two
stereo Auxiliary Send jacks (see #6 on the preceding page) and, in the case of Aux Send 2, to the internal DSP (see the
“Using DSP” section on page 22 in this manual). The “0” (2 o’clock) position of each knob indicates unity gain (no level
attenuation or boost). Moving each knob counterclockwise from the “0” position (towards “∞”) causes the send signal to
be attenuated (at the fully counterclockwise position, it is attenuated infinitely—in other words, there is no signal being
sent). Moving each knob clockwise from the “0” position (towards “+10”) causes the send signal to be boosted by as
much as 10 dB. For information on how to properly set these, see the sections in this manual entitled “Setting the
Correct Gain Structure” and “Using the Aux Sends and Returns” (pages 14 and 20).
11: Meter - This ten-segment bar meter shows either the Left/Right output level or the Aux 1/2 Send level, depending
upon the setting of the Meter Headphone Source switch (see #15 below). For optimum signal-to-noise ratio, try to adjust
all left/right and Aux send levels so that program material is usually at or around 0 dB, with occasional but not steady
excursions to the red “+” segments. For more information, see the sections in this manual entitled “Setting the Correct
Gain Structure” and “Using the Aux Sends and Returns” (pages 14 and 20).
12: Power LED - Lights steadily green whenever the TM300 is powered on.
13: Phantom LED - Lights steadily red when the Phantom Power switch (see #14 below) is engaged.
14: Phantom Power switch - When this switch is pressed in, the TM300 delivers 48 volts of phantom power to pins
2 and 3 of all XLR microphone connectors in all channels. WARNING: Only use this switch with the TM300 powered
down. Before turning phantom power on, be sure to disconnect all non-microphone signal sources (such as passive
direct injection boxes) from the XLR mic jacks. Although phantom power will have no adverse affect on connected
dynamic microphones, it should be used only when one or more condenser microphones are connected to the TM300.
Refer to the owners manual of your microphone to determine whether or not it requires 48 volts phantom
power—we cannot assume responsibility if you damage a mic by incorrectly applying phantom power. If you’re
not completely certain that one or more connected mics require 48 volts phantom power, leave this switch off (its out
position).
15: Meter / Headphone Source switch - When out (the “up” position), the Left/Right stereo output signal is routed to
the headphones jack (see #24 on the next page) and to the ten-segment meter (see #11 on the previous page).
When pressed in, the Aux send 1 and 2 output signals are routed to the headphones jack and to the ten-segment meter.
Note that, whenever any channel PFL switches are depressed (see #9 on page 5), the soloed channel(s) are instead
routed to the headphones jack (though not to the meter).
16: Rev To Aux 1 Level - This knob determines the level of signal being routed from the internal DSP to Aux Send 1.
It allows you to add reverb or other signal processing to the sound in onstage monitors or headphones connected to the
TM300 Aux Send 1 jack (when operating the TM300 in standard stereo configuration) or the right speaker outputs (when
operating the TM300 in “split mono” configuration; that is, when the Aux 1 / Monitor switch [see #19 on the next page] is
pressed in). For more information, refer to the wiring interconnection diagrams on pages 11 and 12 and to the sections
in this manual entitled “Using the Aux Sends and Returns” and “Using DSP” on pages 20 and 22.
9
ENGLISH
8: Record Out Level - Controls the level of signal being output by the Record Out jacks (see #3 on the preceding page).
Guided Tour - Main Section
ENGLISH
17: DSP select switches - Allows you to select any of three preset reverb effects for the onboard DSP: Vocal, Long Hall
(“L HALL”) or Short Hall (“S HALL”). For more information, see the “Using DSP” section on page 22 of this manual.
18: DSP On/Off switch - When pressed in (“On”), output signal from the internal DSP is routed to Aux Return 2. When
up (“Off”), Aux Return 2 instead receives signal from any device connected to the Aux Return 2 jacks. For more
information, see the “Using the Aux Sends and Returns” and “Using DSP” sections on pages 20 and 22 in this manual.
19: Aux 1 / Monitor switch - When pressed in, Aux send 1 is routed to the right side of the TM300’s power amplifier and
the stereo mix is automatically combined to mono and routed to the left side of the TM300’s power amplifier. This allows
the TM300 to be used in a “split mono” configuration, so that it can drive both main “Front Of House” PA speakers (from
the left speaker output ) and onstage monitors (from the right speaker output) without the need for any external power
amplifier. When used in a “split mono” configuration, the Rev To Aux 1 Level knob allows you to route signal from the
internal DSP to your onstage monitors (the signal can also be routed to Aux Return 2 for simultaneous use in the main PA
signal. For more information, see the “Using the Aux Sends and Returns” and “Using DSP” sections on pages 20 and 22
in this manual.
20: EQ On/ Off switches (L, R)- When pressed in (“On”), the equivalent side of the master seven-band graphic
equalizer is active; when out (“Off”), the equivalent side of the master seven-band graphic equalizer is inactive regardless
of the settings of the EQ sliders (see #21 below). Note that, when using the TM300 in a “split mono” configuration (that is,
when the Aux 1 / Monitor switch [see #19 above] is pressed in), the left side of the graphic equalizer affects the main
“Front Of House” PA speakers and the right side affects the onstage monitors, saving you the expense of having to use a
separate outboard graphic equalizer for your onstage monitors.
21: Graphic EQ sliders - These sliders allow you to add 12 dB of boost or attenuation to seven different frequency
areas. When a slider is at its center detented (“0 dB”) position, the selected frequency area is unaffected (it is said to be
flat). When a slider is moved up (above the “0 dB” position, towards the “+12 dB” position), the selected frequency area
is boosted, and when it is moved down (below the “0 dB” position, towards the “-12 dB” position), the selected frequency
area is attenuated. For more information, see the “Using Equalization” section on page 17 in this manual.
22: Stereo Faders - These linear sliders determine the relative level of the main left/right stereo outputs. The “0”
position of each fader indicates unity gain (no level boost or attenuation). Moving each fader below this position (towards
the “∞” position) causes the signal to be attenuated (at the very bottom, it is attenuated infinitely—in other words, there is
no sound). For best signal-to-noise ratio, both Stereo faders should generally be kept at or near the 0 level. For more
information, see the “Setting The Correct Gain Structure” section on page 14 in this manual.
23: Headphone Level - This knob sets the level of the signal sent to the headphone jack (see #24 below).
WARNING: To avoid possible damage to connected headphones (or, worse yet, to your ears!), always turn this all the
way off (to the fully counterclockwise “0” position) before plugging in a pair of headphones—then raise the level slowly
while listening. The Headphone Level has no effect on any other TM300 outputs.
24: Headphone jack - Connect any standard stereo headphones to this jack (via a 1/4" TRS plug) for private monitoring
of the stereo output, Aux sends, or soloed channels (depending upon the setting of the Meter Headphone Source switch
[see #15 on the preceding page] and whether or not any channel PFL switches have been pressed in). The built-in
TM300 headphone preamp delivers approximately 100 mw of power.
10
Guided Tour - Rear Panel
SAMSON
CAUTION
CAUTION:
DO NOT BLOCK AIRFLOW
ON
SERIAL NUMBER
OFF
RISK OF ELECTRIC SHOCK
DO NOT OPEN
AVIS;
RISQUE DE CHOC ELECTRIQUE
NE PAS OUVRIR
DO NOT EXPOSE THIS EQUIPMENT
TO RAIN OR MOISTURE.
SPEAKER
OUT
CAUTION: TO REDUCE THE
USE CLASS 2 WIRING
MINIMUM LOAD
IMPEDANCE 4 Ω
RISK OF FIRE, REPLACE ONLY
WITH SAME TYPE FUSE.
FUSE
8A/250V(115V)
4A/250V(230V)
AC INPUT
115V/230V,50/60Hz
780W
R
1
2
3
L
4
5
1: Vent - To ensure proper cooling of the TM300 power amplifier, make sure this vent is
unobstructed at all times.
2: Fuse holder - Holds an 8 A / 250 V fuse for 115 volt operation or a 4 A / 250 V fuse
for 230 volt operation
3: AC input - Connect the supplied heavy gauge 3-pin “IEC” power cable here.
4: Speaker Outputs - These are the TM300’s main outputs; use these four unbalanced
jacks (two of which carry the left signal and two of which carry the right) to connect the
TM300 to loudspeakers rated at 4 ohms or greater (that is, 4, 8, or 16 ohms). The
lower the ohm rating, the greater the power output. We recommend the use of 4 ohm
speakers for long-term usage. The TM300 delivers 150 watts of power per channel into
4 ohms at less than 1% THD (Total Harmonic Distortion). In order to ensure correct
phase correlation, the tip of the TM300 speaker jack should be connected to the “+” (hot)
input of your loudspeaker, and the sleeve of the TM300 speaker jack should be
connected to the “-” (ground) input of your loudspeaker. Note that, when the Aux 1 /
Monitor switch (see # 19 on page 8) is pressed in, the TM300 operates in a “split mono”
configuration, where the left speaker output carries the main stereo output (internally
mixed to mono) and the right speaker output carries Aux send 1.
5: Power on-off switch - As you may have guessed, this is what you use to turn the
TM300 on and off. If the TM300 is connected to external power amps (via its Main Insert
and/or Mono output jacks—see #4 and #5 on page 6 in this manual), turn it on before
you turn on the connected amps—and turn it off after the connected amps are turned off.
6: Fan - This variable-speed fan provides vital cooling to your TM300 power amp
(the hotter the amp gets, the faster the fan blows!). Make sure that cool, fresh air is
accessible at all times. Also, try to ensure that the TM300 is used in a dust-free
environment.
11
6
ENGLISH
POWER
TM300 6 CHANNEL 150WATT STEREO MIXER
ENGLISH
Connecting the TM300
The actual connections you’ll make to and from the TM300 will vary according to the
environment you use it in and the particular equipment you have. Here are a few basic
rules concerning TM300 connections that will apply in most situations:
• In general, it’s best to make all connections with the TM300 turned off. If you must
make connections with the power on, make sure that all faders are completely down
(at their “∞” position). If the TM300 is connected to any external power amplifiers,
turn them off first. Wait a few seconds for their power supplies to discharge and
then turn off all other connected equipment, turning the TM300 off last.
• Try to use balanced connectors and cabling wherever possible. These kind of
connections do a better job of rejecting extraneous noise and hum and generally
provide a cleaner signal. Although the TM300 will accept unbalanced connectors
throughout, it specifically provides electronically balanced inputs for all mono
channel line inputs. The wiring diagram below shows how 1/4" TRS
(Tip/Ring/Sleeve) connectors should be wired:
SLEEVE
TIP +
GROUND
RING -
TIP
RING
XLR connectors for mono channel mic-level inputs should be wired as follows:
3 - SIGNAL
1 GROUND
2 + SIGNAL
T TO MIC
Unbalanced cables use standard 1/4" phone connectors, wired as follows:
+ SIGNAL
+ SIGNAL
GROUND
GROUND
• Always make one connection at a time and then monitor the incoming signal. If you
hear a distinct hum or buzz, you may have a grounding problem with that particular
device. See the “Grounding Techniques” section on page 16 in this manual for
information on how to avoid grounding problems.
• NEVER connect a microphone and line level input to the same channel
simultaneously—use one or the other. You can have some channels connected to
microphones and others to line level signals (for example, you might want to plug
mics into channels 1 - 4 and line level signals into the remaining channels)—just
don’t have both kinds of inputs connected to the same channel.
• There are two “hidden” (or at least not so obvious) stereo inputs to the TM300; these
are the Auxiliary returns. Use these whenever you want to bring in stereo signals
that will not need to be equalized or otherwise processed.
• Channel and Main insert cables (sometimes called “Y-cords”) should terminate in
standard 1/4" TRS jacks (ring to send and tip to return), wired as follows:
TIP (RETURN)
RING (SEND)
SLEEVE (GROUND)
12
TM300 Interconnections - Stereo Configuration
The illustration below shows typical interconnections between the TM300 and other audio equipment when used in its
standard stereo configuration (that is, with the Aux 1 / Monitor switch [see #19 on page 8] out).
SAMSON
ENGLISH
POWER
TM300 6 CHANNEL 150WATT STEREO MIXER
CAUTION:
DO NOT BLOCK AIRFLOW
ON
SERIAL NUMBER
CAUTION
OFF
RISK OF ELECTRIC SHOCK
DO NOT OPEN
AVIS;
RISQUE DE CHOC ELECTRIQUE
NE PAS OUVRIR
DO NOT EXPOSE THIS EQUIPMENT
TO RAIN OR MOISTURE.
SPEAKER
OUT
CAUTION: TO REDUCE THE
USE CLASS 2 WIRING
MINIMUM LOAD
IMPEDANCE 4 Ω
RISK OF FIRE, REPLACE ONLY
WITH SAME TYPE FUSE.
FUSE
8A/250V(115V)
4A/250V(230V)
AC INPUT
115V/230V,50/60Hz
780W
R
L
CASSETTE or DAT
MIDI KEYBOARD
L
L
R
R
STEREO PARAMETRIC EQ
L
Tip
Ring Tip
Ring
R
STEREO COMPRESSOR
L
1
2
3
4
5
6
TAPE IN
–10dB
MIC
MIC
MIC
MIC
LINE
LINE
LINE
LINE
LINE
R
MIC
MONO OUT+4dB
REC OUT
+4dBu
L
MIC
L
R
AUX RET1
AUX SEND 1
INSERT
+4dB
+4dB
0
M
E
0
M
E
0
M
N
E
0
M
–6 –50
+14
–30
TRIM
0
N
E
0
M
SAMSON
–6 –50
+14
–30
TRIM
0
IC
+15
–15
+15
–15
+15
TRIM
0
–15
+15
AUX SEND 2
POST EQ
0
0
–15
R
PEAK
IC
N
–6 –50
+14
–30
TRIM
0
IC
N
–6 –50
+14
–30
TRIM
PEAK
LI
E
0
IC
N
–6 –50
+14
–30
TRIM
MAIN
L
AUX RET 2
PEAK
LI
M
LI
0
–6 –50
+14
–30
INSERT
PEAK
IC
LI
E
IC
N
INSERT
PEAK
LI
INSERT
PEAK
LI
INSERT
R
L/MONO
LINE
–15
+15
–15
HIGH
HIGH
HIGH
HIGH
HIGH
0
0
0
0
0
0
RIGHT
AUX2
LEFT
AUX1
+4
+10
+15
HIGH
TAPE IN
POWER
+4
+4
+2
+2
REC OUT
0
0
0
0
–2
–2
–4
–4
L
R
SIGNAL PROCESSOR
PHANTOM
–12
+12
–12
+12
–12
+12
–12
+12
–12
+12
–12
+10
+12
MID
MID
MID
MID
MID
MID
0
0
0
0
0
0
+10
AUX RET 1
AUX RET2/REV
0
–15
+15
–15
LOW
+15
–15
LOW
+15
–15
LOW
+15
–15
LOW
+15
–15
LOW
OFF
0
+10
+15
0
0
0
0
0
ON
–9
–9
–12
–12
METER HEADPHONE
SOURCE
+10
AUX SEND 1
LOW
AUX SEND 2
DSP
0
0
–15
–15
–20
–20
–25
–25
L / R
AUX 1 / 2
VOCAL
+10
+10
+10
+10
+10
+10
AUX 1 PRE
AUX 1 PRE
AUX 1 PRE
AUX 1 PRE
AUX 1 PRE
AUX 1 PRE
6 CHANNEL 150 WATT STEREO MIXER
+10
REV TO AUX 1
AUX 1/MONITOR
L HALL
Ring
0
Tip
0
+10
0
+10
AUX 2
0
+10
AUX 2
0
+10
AUX 2
EQ ON/OFF
LEFT
+10
AUX 2
S HALL
+10
AUX 2
RIGHT
63Hz
160Hz 400Hz
1KHz
2.5KHz 6.4KHz 15KHz
63Hz
160Hz 400Hz
1KHz
2.5KHz 6.4KHz 15KHz
AUX 2
+12dB
ON
SIGNAL PROCESSOR
L
L
R
L
R
L
R
L
R
L
R
L
0dB
R
PAN
PAN
PAN
PAN
PAN
PAN
PFL
PFL
PFL
PFL
PFL
PFL
-12dB
SAMSON
-15db
+15db
+15db
-15db
0
0
-15db
-15db
+12dB
+15db
+15db
0
0
0
0
0
0
0
0
10
10
10
10
10
10
15
15
15
15
15
15
10
10
R
0
0dB
0
4
-12dB
4
63Hz
20
20
20
20
20
20
8
8
25
25
25
25
25
25
12
12
160Hz 400Hz
1KHz
2.5KHz 6.4KHz 15KHz
0
30
30
30
30
30
30
16
35
35
35
35
35
35
20
20
40
40
40
40
40
40
26
26
O
O
O
O
O
OO
O
+10
16
LEVEL
OO
HEADPHONE
1
2
3
4
5
6
L
–STEREO–
R
Ring
Tip
SIGNAL PROCESSOR
13
SAMSON
SERVO - 240
Tip
Ring
Tip
Ring
R
The illustration below shows typical interconnections between the TM300 and other audio equipment when used in its
“split mono” configuration (that is, with the Aux 1 / Monitor switch [see #19 on page 8] pressed in). Note that , in this
conguration, the Rev To Aux 1 Level control (#16 on page 8) can be used to route internal DSP signal to the onstage
wedge monitors (the Aux 2 Return Level can still be used to route DSP signal to the main PA speakers as well).
POWER
TM300 6 CHANNEL 150WATT STEREO MIXER
SAMSON
CAUTION:
DO NOT BLOCK AIRFLOW
ON
SERIAL NUMBER
CAUTION
OFF
RISK OF ELECTRIC SHOCK
DO NOT OPEN
AVIS;
SPEAKER
OUT
CAUTION: TO REDUCE THE
RISQUE DE CHOC ELECTRIQUE
NE PAS OUVRIR
DO NOT EXPOSE THIS EQUIPMENT
TO RAIN OR MOISTURE.
USE CLASS 2 WIRING
MINIMUM LOAD
IMPEDANCE 4 Ω
RISK OF FIRE, REPLACE ONLY
WITH SAME TYPE FUSE.
FUSE
8A/250V(115V)
4A/250V(230V)
AC INPUT
115V/230V,50/60Hz
780W
R
L
CASSETTE or DAT
L
R
L
R
MIDI KEYBOARD
MONO COMPRESSOR
Tip
Ring
MONO COMPRESSOR
Tip
1
2
3
4
5
6
TAPE IN
–10dB
REC OUT
+4dBu
L
MIC
MIC
MIC
MIC
MIC
LINE
LINE
LINE
LINE
LINE
R
MIC
MONO OUT+4dB
L
R
AUX RET1
AUX SEND 1
INSERT
+4dB
+4dB
E
0
M
E
0
M
E
0
M
E
0
M
N
E
0
M
–6 –50
+14
–30
–6 –50
+14
–30
–6 –50
+14
–30
–6 –50
+14
–30
0
0
0
0
0
TRIM
TRIM
+15
–15
+15
–15
+15
–15
TRIM
+15
–15
AUX SEND 2
POST EQ
TRIM
0
–15
R
SAMSON
IC
N
–6 –50
+14
–30
0
TRIM
MAIN
L
PEAK
IC
N
IC
N
IC
IC
N
PEAK
–6 –50
+14
–30
TRIM
R
L/MONO
AUX RET 2
PEAK
LI
M
LINE
INSERT
PEAK
LI
0
LI
E
IC
N
INSERT
PEAK
LI
INSERT
PEAK
LI
INSERT
LI
ENGLISH
TM300 Interconnections - Split Mono Configuration
+15
–15
HIGH
HIGH
HIGH
HIGH
HIGH
0
0
0
0
0
0
RIGHT
AUX2
LEFT
AUX1
+4
+10
+15
HIGH
TAPE IN
POWER
+4
+4
+2
+2
REC OUT
0
0
0
0
–2
–2
–4
–4
PHANTOM
–12
+12
–12
+12
–12
+12
–12
+12
–12
+12
–12
+10
+12
MID
MID
MID
MID
MID
MID
0
0
0
0
0
0
+10
AUX RET 1
AUX RET2/REV
0
–15
+15
–15
LOW
+15
–15
LOW
+15
–15
LOW
+15
–15
LOW
+15
–15
LOW
OFF
0
+10
+15
0
0
0
0
0
ON
–9
–9
–12
–12
METER HEADPHONE
SOURCE
+10
AUX SEND 1
LOW
AUX SEND 2
DSP
0
0
–15
–15
–20
–20
–25
–25
L / R
AUX 1 / 2
VOCAL
+10
+10
+10
+10
+10
+10
AUX 1 PRE
AUX 1 PRE
AUX 1 PRE
AUX 1 PRE
AUX 1 PRE
AUX 1 PRE
6 CHANNEL 150 WATT STEREO MIXER
+10
REV TO AUX 1
AUX 1/MONITOR
L HALL
0
Ring
Tip
0
+10
0
+10
AUX 2
0
+10
AUX 2
0
+10
AUX 2
EQ ON/OFF
LEFT
+10
AUX 2
S HALL
+10
AUX 2
RIGHT
63Hz
160Hz 400Hz
1KHz
2.5KHz 6.4KHz 15KHz
63Hz
160Hz 400Hz
1KHz
2.5KHz 6.4KHz 15KHz
AUX 2
+12dB
ON
L
SIGNAL PROCESSOR
L
R
L
R
L
R
L
R
L
R
L
0dB
R
PAN
PAN
PAN
PAN
PAN
PAN
PFL
PFL
PFL
PFL
PFL
PFL
-12dB
SAMSON
-15db
+15db
0
+15db
-15db
0
-15db
-15db
+15db
+15db
0
0
+12dB
0
0
0
0
0
0
10
10
10
10
10
10
15
15
15
15
15
15
10
10
R
0
0dB
0
4
-12dB
4
63Hz
20
20
20
20
20
20
8
8
25
25
25
25
25
25
12
12
160Hz 400Hz
1KHz
2.5KHz 6.4KHz 15KHz
0
30
30
30
30
30
30
16
35
35
35
35
35
35
20
20
40
40
40
40
40
40
26
26
O
O
O
O
O
O
OO
OO
+10
16
LEVEL
HEADPHONE
1
2
3
4
5
6
L
–STEREO–
R
Ring
Tip
SIGNAL PROCESSOR
14
L
R
SIGNAL PROCESSOR
Ring
Setting Up and Using The TM300
Setting up your TM300 is a simple procedure which takes only a few minutes:
2. Before even plugging the TM300 into an AC socket, begin by making its speaker
connections. It is never a good idea to power up any amplifier that is not connected to
loudspeakers. Any loudspeakers with a minimum impedance load of 4 ohms (that is,
4 ohms or greater) can be used, but we recommend the use of 4 ohm speakers for
long-term usage. In order to ensure correct phase correlation, be sure that the
connection from the tip of the TM300 speaker jack goes to the “+” (hot) input of your
loudspeaker, and that the sleeve of the TM300 speaker jack is connected to the “-”
(ground) input of your loudspeaker.
2a. If you are planning to use the TM300 in a standard stereo configuration, make sure
the Aux 1 / Monitor switch is in its up (“out”) position and make connections between the
left speaker output(s) and your left main PA speaker(s) and between the right speaker
output(s) and your right main PA speakers. See page 11 for an example diagram.
2b. If you are planning to use the TM300 in a “split mono” configuration, make sure the
Aux 1 / Monitor switch is pressed in (“on”) and make connections between the left
speaker output(s) and your main PA speaker(s) and between the right speaker output(s)
and your onstage monitors. See page 12 for an example diagram.
3. Next, make all required connections to the various TM300 line-level outputs
(Record Out, Mono Out, and Aux Sends 1 and 2) and line-level inputs (Tape In, Aux
Returns 1 and 2). Do not make any insert connections at this time—these should be
made after the gain structure is correctly set (see pages 14 - 15).
4. Make the input connections to the mic or line inputs of the various channels.
WARNING: Do not connect a channel’s line input if you already have something
connected to its microphone input, or vice versa; each mono channel is designed to
accept only one source or the other.
5. Bring all channel faders and the left-right stereo faders completely down (to their “∞”
setting). Turn all Trim controls fully counterclockwise. Set the front-panel Phantom
switch to its “off” (out) position unless you are absolutely certain that all connected
microphones require 48 volt phantom power; if so, set the Phantom switch to its “on” (in)
position.
6. Plug the TM300 into any grounded AC socket using the supplied heavy gauge IEC
cord. Because of the special relay protection circuitry built into the TM300, you can even
plug it into the same power strip that other audio devices are connected to. You can
then turn on all devices at once with the single power strip on-off switch, with no danger
of damaging connected speakers by generating “thumps.”
7. Finally, press the rear panel Power switch in order to turn on the TM300.
The front-panel Power LED will go on.
15
ENGLISH
1. Remove all packing materials (save them in case of need for future service) and
decide where the TM300 is to be physically placed. Make sure that the rear vent and fan
are unobstructed and that there is good ventilation around the entire unit.
ENGLISH
Setting the Correct Gain Structure
You’re now ready to establish the correct gain structure—the key to getting the best
performance from the TM300, or from any mixer, for that matter. This is a simple
procedure that ensures optimum input and output levels so that no unnecessary noise
(caused by too low a signal) or overload distortion (caused by too high a signal) is
created. Here’s a step-by-step description of how to do so:
a. With all connections made (as described in the previous section) but with the power
off, bring all channel faders and the left-right stereo faders completely down (to their “∞”
setting).
b. Turn all channel Trim controls fully counterclockwise.
c. Place all channel equalizer knobs in their center detent “0” positions and turn off the
seven-band graphic master equalizer by setting the EQ On/Off switches to their “Off” (up)
position.
d. Set the Meter/Headphone Source switch up (to its “L/R” position); this will ensure that
the TM300 meter shows the continuous level of the Left/Right stereo output signal.
e. Turn all channel Aux Send knobs and the main section Aux Return knobs to their fully
counterclockwise (“∞”) position. Turn the main section Tape In and Rev To Aux 1 knobs
to their fully counterclockwise (“∞”) position.
f. Set both main section master Aux Send knobs to their “0” (2 o’clock) position.
g. Power up all devices connected to the TM300 channel line inputs and Aux Returns
and set their level controls to unity gain or, if there is no unity gain indicated on their
output control, to maximum. If you’ve got outboard effects processors connected to the
Aux Returns, make sure they are sending completely “wet” (processed) signal, with no
“dry” (unprocessed) signal mixed in.
h. If condenser microphones are connected to the TM300, turn on the Phantom switch.*
Finally, turn on the TM300’s main power.
i. Play an instrument connected to one of the TM300’s line inputs** and, while doing so,
raise the corresponding channel fader to the “0” position. You should see the segment
meter begin to move—adjust the input Trim control for that channel so that the “0”
segment lights frequently and the “+3” segment lights only occasionally. The Peak LED
for that channel should not flash at even the highest level input signals. If the incoming
signal seems too hot even with the input channel Trim all the way at its minimum setting,
you may need to lower the output level of the instrument, though this will rarely occur.
Conversely, if the signal is too low even with the Trim all the way up, something’s
definitely wrong: in all likelihood, the connecting audio cable is faulty.
j. Once you’ve set the optimum level in step (i) above, continue playing the instrument
and slowly raise the stereo left/right faders until you reach the desired listening level.
* CAUTION: Before turning phantom power on, be sure to verify that all connected
mic(s) and/or active DI boxes require 48 volts. Also, disconnect all other signal sources
(such as passive DI boxes) from the XLR mic jacks.
** If you’re using an instrument such as electric guitar or bass, connect it to the TM300
with a direct injection box to ensure correct impedance.
16
Setting the Correct Gain Structure
k. Repeat step (i) above for each instrument connected to TM300 channel line inputs.
m. The general idea behind using the internal DSP is to drive it as hot as possible (short
of overloading it) and to then use the Aux Return 2 control to carefully set the amount of
processed signal you want to hear. (Note: When operating the TM300 in a “split mono”
configuration, the Aux Return 2 control determines the amount of processed signal in the
main [left] output and the Rev To Aux 1 Level control determines the amount of
processed signal in the monitor [right] output.) Press in the DSP On/Off switch to
activate the internal DSP and then select one of the three preset reverb effects for the
DSP. Begin by setting the Aux Return 2 control to its “0” (2 o’clock) position (this can
later be adjusted if you want to hear more or less processed signal). Next, using a
channel that has already had its gain structure adjusted in step (i) or (k) above, play the
instrument (or sing into the microphone) connected to that channel while slowly turning
the Aux Send 2 knob for that channel clockwise until you hear the desired amount of
processed signal added to the dry signal. If you hear any distortion, lower the amount of
signal being sent to the DSP by turning that channel’s Aux send 2 knob (or the main Aux
Send 2 knob) counterclockwise. For more information, see the “Using the Aux Sends
and Returns” and “Using DSP” sections on pages 20 and 22 in this manual.
n. If you have any outboard signal processors connected to the Aux send jacks on the
rear panel, follow this step. Because outboard effects processors can sometimes be
quite noisy, it’s particularly important to maximize the amount of signal being sent to
them via the TM300 Aux Sends. As with the internal DSP, the idea is to drive these
devices as hot as possible (short of overloading them) and then to use the Aux Return
level to carefully adjust the amount of processed signal being blended with the dry
signal. To set optimum Aux Send levels, use a channel that has already had its gain
structure adjusted in step (i) or (k) above. Turn the Aux Send 1 knob for that channel to
its “0” (unity gain) position and then play the instrument (or sing into the microphone)
connected to that channel. Adjust the input levels of connected outboard effects
processors so that their meter shows incoming signal normally in the 0 vu range (with
just occasional higher excursions). Then it’s time to optimize the Aux Return level.
While continuing to play your instrument (or continuing to sing into the microphone),
slowly raise the Aux Return level control until you hear the desired amount of processed
signal added to the dry signal. Repeat for any external device connected to the Aux 2
Send jack (which is active only when the DSP On/Off switch is “off”). For more
information, see the “Using the Aux Sends and Returns” section on page 20 in this
manual.
o. The gain structure is now correctly set—you’ve optimized the level of all signals
coming into and out of the TM300, and the end result will be minimum noise and
distortion and maximum clean sound. You can now connect unity gain devices (such as
compressors, limiters, and noise gates) as needed to the channel and/or main inserts.
You’ll find that the majority of your mixes can be accomplished with most channel faders
at or near their 0 (unity gain) position and that the channel peak LEDs rarely if ever light
(remember, if they do light, it means that something is distorting!). If you need to make
adjustments to the overall level, use the main left/right stereo faders.
If you encounter difficulty with any aspect of setting up or using your TM300, you can call
Samson Technical Support (1-800-372-6766) between 9 AM and 5 PM EST.
17
ENGLISH
l. The procedure for setting optimum microphone levels is virtually identical; sing or
speak into the mic at the level you expect to use in performance while slowly raising the
fader for that channel to its “0” position. Then adjust the Trim control for that channel
while watching the segment meter and channel Peak LED. You should expect that
microphone inputs will require rather more in the way of Trim boost than line inputs.
ENGLISH
Grounding Techniques
Hum and buzz are the biggest enemies you face when interconnecting a large number of different pieces of
equipment to a central audio mixer. This is because each piece of equipment may operate at a marginally different
voltage (this difference is called potential) and, when two devices at slightly different potential are physically
connected with audio cabling, the end result can be nasty, extraneous noise (mind you, connecting two devices at
very different potential can result in a major electrical shock!).
However, there are several steps you can take to avoid grounding problems. First, assuming you have an isolated
electrical circuit that can handle the electrical demands of your mixer and all connected audio equipment (these
needs will usually be modest), you should always plug your mixer and all connected equipment into the same
circuit. If possible, nothing else but this equipment should be connected to that circuit. If you can’t do this, at least
avoid plugging your mixer and audio equipment into the same circuit that is already powering things like heavy
machinery, air conditioners, heaters, refrigerators, washing machines, neon signs or fluorescent light fixtures.
One particular culprit that will almost certainly create problems is the standard light dimmer (the kind that uses
silicon controlled rectifiers). Where low-level lighting is desired, use incandescent fixtures with autotransformer-type
dimmers (sometimes called Variacs) instead—these cost considerably more than the standard dimmer you’ll find at
your local hardware store, but are well worth the extra expense.
Three-prong plugs (such as the one used by the TM300) should always be used as is; don’t use adapters to lift the
ground (unless you’re using a “star ground network”—see below). If you hear hum or buzz from a device that uses
a two-prong plug (or an external two-prong AC/DC adapter), you can try reversing the plug in the socket. If that
doesn’t work, you may need to physically ground that device’s chassis by connecting a wire (called a strap) from it
to a grounded piece of metal. Some pieces of equipment have a screw-type ground post to which the strap can be
connected; if not, you can attach some kind of metallic binding post to the case itself. If you are using
rack-mounted audio devices and are experiencing hum or buzz, there’s a simple test to determine the source of the
problem: while keeping all devices powered on and connected with audio cabling, physically remove each device,
one by one, from the rack. If the hum disappears when a particular device is removed, you’ll know that device is
probably the culprit.
We also recommend that you use balanced audio cabling and connectors wherever possible. The TM300 provides
electronically balanced inputs for all channel line inputs. The wiring diagram in the “Connecting The TM300” section
of this manual (page 10) shows how 1/4" TRS (Tip/Ring/Sleeve) and XLR connectors should be wired for use with
these inputs and outputs.
In addition, you can minimize possible interference by planning your audio, electrical, and computer cable runs so
that they are as far apart from one another as possible and so they don’t run parallel to one another. If they have to
cross, try to ensure that they do so at a 90° angle (that is, perpendicular to one another). In particular, try to keep
audio cabling away from external AC/DC adapters.
If you’re using the TM300 in a fixed location such as a rehearsal studio, you may want to invest the time and money
into creating a star ground network. This is by far the best technique for avoiding grounding problems. It involves
using a formidable ground source such as a cold water pipe or a copper spike driven into the earth. A thick
grounding cable is connected to that source and then brought to a central distribution point; from there, individual
cables are connected to each piece of equipment. This setup also requires that you lift the ground plug of all
three-prong AC connectors, so there is the possibility of danger if it is done incorrectly. We strongly recommend
that you contract with a qualified professional to carry out this or any kind of electrical work.
Another, less common problem you may encounter is that of oscillation (a ringing tone), which, apart from being
annoying, is potentially dangerous to your speakers. This is generally caused either by poor outside wiring or by
returning a signal out of phase (most commonly from an outboard signal processor). If audible oscillation occurs, try
isolating each input signal by turning down all other inputs. If one signal alone is causing the problem, you should
be able to eliminate the oscillation by reversing that signal’s phase (many signal processors have a switch that
allows you to do this).
18
Using Equalization
0
Every naturally occurring sound consists of a broad range of pitches, or frequencies,
combined together in a unique way. This blend is what gives every sound its distinctive
tonal color. The EQ section in a mixer allows you to alter a sound by boosting or
attenuating specific frequency areas. The TM300 provides a seven-band graphic master
equalizer (more about this shortly) as well as independent three-band equalization
controls for each of its channels.
Each EQ knob is labeled with the maximum amount of cut or boost provided (± 15 dB in
the case of Low and High frequencies, and ±12 dB in the case of the Mid frequency).
The Mid frequency control utilizes a resonant (“bell”) peaking curve, while the Low and
High frequency controls utilize shelving curves. This means that, in the case of the Mid
EQ control, frequencies around 1.8 kHz are affected; in the case of the Low EQ control,
frequencies around or below 100 Hz are affected; and, in the case of the High EQ
control, frequencies around or above 10 kHz are affected. We provided these particular
frequency areas because they have maximum impact on musical signals—that’s why
they are sometimes known as “sweet spots.”
When an EQ knob is in its center detented position (“0”), it is having no effect. When it is
moved right of center, the selected frequency area is being boosted; when it is moved
left of center, the frequency area is being attenuated.
In most instances, the best way to approach equalization is to think in terms of which
frequency areas you need to attenuate, as opposed to which ones you need to boost
(boosting a frequency area also has the effect of boosting the overall signal; too much
EQ boost can actually cause overload). Be aware of the phenomenon of masking, where
loud sounds in one frequency range obscure softer sounds in the same range; by cutting
EQ “notches” in a loud signal, you can actually make room for a softer one to shine
through. And try not to think of EQ as a miracle worker—no amount of equalization can
put a singer in tune or remove the distortion from an overloaded input signal! The key is
to get the signal right in the first place, by using correct gain structure and mic
placement.
Although the specific EQ you will apply to a signal is very much a matter of personal
taste, here are a few general suggestions: Boosting the low frequency of instruments
such as bass drums or bass guitar will add warmth and make the sound “fatter”; conversely, you may want to attenuate the low frequency component of instruments such as
cymbals, high-hats, and shakers so as to “thin” them out. Boosting Mid frequencies can
be used to help bring out vocals or guitars, while attenuating them can help to reduce
“boxiness.” Be careful not to boost high frequencies too much or you risk adding hiss to
the signal, though just a touch can help add “shimmer” to an acoustic guitar, ride cymbal,
or high-hat. Finally, because the TM300 High and Low EQ utilize shelving curves,
attenuated High settings can be used to reduce hiss (which is composed almost
exclusively of high frequencies) or attenuated Low frequencies can be used to reduce
rumble (which is composed almost exclusively of low frequencies).
19
+15
-15
HIGH
0
-12
+12
MID
0
-15
+15
LOW
ENGLISH
One of the most exciting aspects of using a mixer such as the TM300 is the ability to
shape a sound, using a process called equalization. But there are few areas of audio
engineering more misunderstood than equalization, and, just as good EQ can really help
a sound, bad EQ can really hurt it, so read on...
Using Equalization
ENGLISH
AUX1/MONITOR
EQ ON/OFF
LEFT
63Hz
RIGHT
160Hz 400Hz 1KHz 2.5KHz 6.4KHz 15KHz
+12dB
0dB
-12dB
63Hz
160Hz 400Hz 1KHz 2.5KHz 6.4KHz 15KHz
+12dB
0dB
-12dB
63Hz
160Hz 400Hz 1KHz 2.5KHz 6.4KHz 12KHz
Seven-band graphic master equalizer
The seven-band graphic master equalizer affects the overall output signal of the TM300.
Its main function is to allow you to “tune” the device to the particular room environment
you are in. Perhaps its most important job is to enable you to eliminate ringing or
feedback problems caused when a microphone is too close to a loudspeaker. To
accomplish this, start with all seven bands flat (that is, all seven sliders at their detented
“0” center position). Then, one by one, raise each slider until you hear the feedback or
ringing markedly increase. This allows you to identify the problematic frequency area
(it will most commonly be one or more of the high mid-range or high frequency areas).
When you’ve located the problem area(s), it’s simply a matter of lowering that slider or
sliders below the 0 point until the ringing or feedback disappears. Don’t lower the
frequency area any further than you need to, or the quality of the overall sound may
suffer. If you don’t specifically need to utilize the TM300’s seven-band graphic master
equalizer in a particular environment, deactivate it by setting one or both EQ on/off
switches to their Off (up) position.
Note that, when the Aux 1 / Monitor switch is pressed in, the TM300 functions in a “split
mono” configuration. In this configuration, the left side of the graphic equalizer
processes the main stereo output (which is internally mixed to mono and routed to the
TM300’s left speaker outputs, normally connected to main PA speakers), while the right
side of the graphic equalizer processes the Aux 1 send output (which is internally routed
to the TM300’s right speaker outputs and normally connected to onstage monitors).
In this way, you can have separate equalization curves for both main (“Front Of House”)
PA speakers and your onstage monitors without the need to purchase an outboard
equalizer (or external power amplifier). See page 12 in this manual for an
interconnection diagram which shows this kind of usage.
20
Using Pan
Note that, when the TM300 is operated in a “split mono” configuration (that is, when the
Aux 1 / Monitor switch is pressed in), the stereo output is internally mixed to mono and
then routed to the left speaker outputs only. In this configuration, the channel Pan
controls are functionally inoperative.
You can use stereo panning creatively in a variety of ways: For example, you might want
to have guitars coming from one speaker and keyboards from another, or you might use
panning to “spread” the signal from a piano miked with two microphones—one over the
bass notes (panned left) and the other over the treble notes (panned right). By turning a
Pan knob while a signal is present, the sound appears to move in space (a process
known as dynamic panning)—this can be particularly effective when applied to sound
effects. In live performance, you may want to resist the temptation to pan anything
completely hard left or right, since some members of the audience not seated in the
center of the venue may miss some signal altogether. In these circumstances, you’re
best to use modest panning, with signals routed no further than the 9 o’clock and
3 o’clock positions.
21
L
R
PAN
ENGLISH
The final Main output of the TM300 is stereo—that is, there are discrete speaker output
jacks, labeled “left” and “right,” which will normally be routed to two (or two pairs of)
discrete speakers. Because of this, you will usually be working with a stereo field that
ranges from hard left to hard right. The TM300 provides six monophonic input channels,
each with its own dedicated Pan control. The Pan circuitry in the TM300 always keeps
the overall level constant, regardless of pan position. Here’s how it works: When the Pan
knob is placed at its center (detented) position, signal is sent equally to both left and right
outputs. When moved left of center, less signal is sent to the right output and more
signal is sent to the left output (making the sound appear left of center) and when moved
right of center, less signal is sent to the left output and more signal is sent to the right
output (making the sound appear right of center). To route a signal hard left or right,
place the pan knob either fully counterclockwise or fully clockwise.
ENGLISH
Using Aux Sends and Returns
The two Aux Sends provided by the TM300 allow you to combine the signal from multiple
channels and send the resulting mix to the internal Digital Signal Processor (DSP) and/or
to external devices such as effects processors.
0
∞
+10
AUX1 PRE
0
∞
+10
AUX2
Channel Aux Sends
0
0
∞
∞
+10
AUX RET 1
+10
AUX RET2/REV
0
0
∞
∞
+10
+10
AUX SEND 2
AUX SEND 1
Main section Aux Returns
and main Aux Sends
AUX SEND 1
+4dB
AUX SEND 2
Aux Send jacks
AUX RET1
+4dB
L/MONO
When a channel Aux Send knob is at its 2 o’clock “0” position, the signal is routed with
unity gain (that is, no boost or attenuation). As it is turned clockwise from the “0”
position, the signal is boosted; as it is turned counterclockwise from the “0” position, it is
attenuated. Aux Send 1 is post-eq but pre-fader; that is, the level of the signal is
determined solely by the channel’s Trim control and equalizer settings. In contrast,
Aux Send 2 is post-fader (and post-eq); that is, the level of the signal is affected by the
channel’s Trim control, equalizer settings, and fader position.
There are also two master Aux Send knobs, located in the TM300’s main section. These
control the overall level of the total mixed signal being routed to the internal DSP and/or
output from the two unbalanced 1/4" Aux Send jacks. Note that, when the TM300 is
operated in a “split mono” configuration (that is, when the Aux 1 / Monitor switch is
pressed in), the Aux Send 1 signal is internally routed to the right speaker outputs
(normally connected to onstage monitors). In this configuration, the master Aux 1 Send
knob acts as a master level control for the onstage monitor output. The Rev To Aux 1
Level control (see #16 on page 8) provides a means for adding reverb or other
processed signal from the internal DSP to onstage monitors or headphones connected to
the Aux Send 1 jacks (when operating the TM300 in standard stereo configuration) or to
the right speaker outputs (when operating the TM300 in “split mono” configuration).
The TM300 also provides two stereo Auxiliary Returns. Aux Return 1 allows you to
return signal from outboard devices connected to the Aux Return 1 jacks. Aux Return 2
can also be used to return signal from outboard devices, but only when the DSP On/Off
switch (see #18 on page 8) is off. If the DSP On/Off switch is pressed in (“on”), Aux
Return 2 is used to return signal from the internal DSP and the Aux Return 2 jacks
become inoperative. See the “Using DSP” section on page 22 in this manual for more
information.
R
AUX RET2
Aux Return jacks
Each of the stereo Aux Returns acts like a stereo channel. In practice, you’ll probably
want to use one or both of the Aux Returns to bring in signal from connected effects
processors. If the effects processors have stereo outputs, they should be connected to
both the left and right Aux Return inputs so that their stereo integrity is retained. If they
have mono outputs, you can route them to either the left or right inputs. In this way, you
can actually connect up to four monophonic devices to the TM300’s Aux Return section.
Note that signal arriving at the left Aux Return input is automatically panned hard left and
signal arriving at the right input is automatically panned hard right. The TM300 Aux
Return jacks are unbalanced 1/4" inputs.
22
Using Inserts
1
2
3
4
MIC
MIC
MIC
MIC
LINE
LINE
LINE
LINE
INSERT
INSERT
INSERT
ENGLISH
In addition to using Auxiliary Sends and Returns to access outboard devices, the TM300
also provides channel inserts for channels 1 - 4. These should be used when you want
to affect just one input signal, as opposed to signal from several inputs—most often, this
will be for dynamic processing purposes (such as outboard equalization,
compression/limiting, or noise gating). You can also use the channel insert sends as
post-eq (but pre-fader) direct outputs, if you need to route a single monophonic signal to
an external device such as a tape deck.
INSERT
Channel Inserts
The TM300 also provides two sets of main inserts—one “pre” graphic equalizer and
stereo fader, and the other “post” graphic equalizer and stereo fader. These allow you
to process the entire mix simultaneously (for example, “strapping” a stereo compressor
or gate across the mix) at unity gain.
All TM300 insert jacks (channel and main) accept 1/4" TRS plugs, with the ring carrying
the send signal and the tip carrying the return signal; this will normally be connected to a
Y-cord (see the “Connecting The TM300” section on page 10 in this manual for a wiring
diagram). This configuration is sometimes known as an “effects loop,” since the signal is
sent and returned over the same cable.
If nothing is plugged into the main or channel insert jacks, they have no effect—but if you
connect them to a passive device like a patchbay, you’ll need to normal (permanently
connect) or half-normal (connection is made unless overriden by a patch cord) the send
to the return. Note that channel insert signals are returned just before the channel
faders. For this reason, you’ll have to be careful to set the output of connected external
devices to unity gain.
23
INSERT
L
MAIN
POST EQ
Main Inserts
R
Using the Internal Digital Signal Processor (DSP)
ENGLISH
DSP
0
There’s probably no better way to enhance audio than with the judicious use of effects
such as reverb and echo. The TM300 has its own built-in Digital Signal Processor (DSP)
chip which provides three high-quality preset reverberation (“reverb”) effects.
VOCAL
+10
REV TO AUX 1
L HALL
S HALL
ON
DSP Controls
As discussed in the “Using The Aux Sends and Returns” section on page 20 in this
manual, each TM300 channel has its own discrete Aux Send 2 knob. This allows effects
to be applied only to certain signals and not just to the overall mix (applying effects to the
overall mix could make for a muddy sound). As each channel’s Aux Send 2 knob is
turned clockwise, signal from that channel is routed increasingly to the internal DSP (if
the DSP On/Off switch (see #18 on page 8) is pressed in [“on”]). Note that the TM300’s
master Aux Send 2 Level knob (#10 on page 7) sets the overall amount of level being
routed to the internal DSP. For best signal-to-noise ratio, you should use the master
Aux Send 2 Level knob and the channel Aux Send 2 knobs to drive the DSP as hot as
possible, short of overloading it.
To return signal from the internal DSP, use the Aux Return 2 knob in the TM300 main
section (see #9 on page 7) to set the amount of “wet,” processed signal you want to have
added to the overall mix. (Note: this knob sets the amount of signal returning from the
Aux Return 2 jacks instead when the DSP On/Off switch is off). When set to the fully
counterclockwise (“∞”) position, no signal is returned from the DSP, so you’ll hear only
“dry” signal. Turning the Aux Return 2 knob clockwise will cause more and more DSP
(“wet”) signal to be added to the overall mix. When set to the fully clockwise (“+10”)
position, the wet signal is boosted by 10 dB. Wet signal is returning at unity gain (that is,
with no boost or attenuation) when the knob set to the “0” position.
The Rev To Aux 1 Level control (see #16 on page 7) is used to return signal from the
internal DSP to onstage monitors or headphones connected to the Aux Send 1 jacks
(when operating the TM300 in standard stereo configuration) or to the right speaker
outputs (when operating the TM300 in “split mono” configuration—that is, when the
Aux 1 / Monitor switch is pressed in [see #19 on page 8]). See the “Using Aux Sends
and Returns” section on page 20 in this manual for more information.
The TM300 provides three preset reverb effects. As its name implies, the “VOCAL”
preset is designed specifically to enhance the sound of vocals, though it can also be
used to add extra body to instrument sounds. Large Hall (“L HALL”) is a digital
representation of a large hall and Small Hall (“S HALL”) is a digital representation of a
small hall, allowing you to place your performance in a sizable or intimate acoustic
space.
24
Introduction/caractéristiques du TM 300
Nous savons que vous n’aimez pas lire les modes d’emploi, mais vous venez juste d’acheter
l’un des mélangeurs amplifiés les plus sophistiqués du marché, et nous tenons à vous le faire
découvrir. Donc, avant de le brancher et de commencer à l’utiliser, nous vous suggérons de
prendre quelques minutes pour parcourir ces quelques pages. Nous essaierons de rendre cette
lecture aussi agréable que possible, et, qui sait, peut-être apprendrez-vous quelques astuces qui
pourront vous être utiles plus tard.
Le Samson TM300 est un mélangeur stéréo amplifié 6 voies pratique, complet avec effets
intégrés, et de format compact. Il est idéal en répétitions, dans les petites salles de concert, les
pianos-bars et autres applications de sonorisation. Vous pouvez l’utiliser partout où vous devez
faire un mixage stéréo avec un certain nombre de micros et/ou de sources de niveau ligne.
Branchez simplement une paire d’enceintes de sonorisation et vous voilà fin prêt !
REMARQUE : En cas de problème avec le TM300, vous devrez fournir le numéro d’autorisation
de retour pour toute réparation. Dans le cas contraire, votre appareil ne sera pas accepté.
Contactez votre revendeur Samson pour obtenir de plus amples renseignements. Nous vous
demandons de bien vouloir garder les cartons d’emballage afin d’être en mesure de nous
renvoyer le TM300 dans son emballage d’origine.
Caractéristiques Techniques
La conception compacte du TM300 ne laisse pas paraître tout de suite son extraordinaire
polyvalence ainsi que ses qualités sonores exceptionnelles. Voici quelques-unes de ses
caractéristiques :
• Six voies indépendantes avec entrées ligne et micro. Cela vous permet de mixer une grande
variété de sources sonores, comme par exemple des microphones dynamiques et électrostatiques, des claviers, des platines cassettes et CD, etc. Les connecteurs micros standards
XLR et les jacks 6,35 mm à symétrie électronique (entrées à niveau ligne) sont disponibles
sur chaque voie mono. Les voies stéréo sont équipées de deux connecteurs 6,35 mm
(niveau ligne). De plus, la console possède une entrée cassette stéréo Tape In spécifique
sous la forme de deux connecteurs de type RCA.
• La polyvalence du TM300 autorise une utilisation aussi bien en stéréo qu’en mode “ Split
mono ” : il vous est alors possible de l’utiliser à la fois pour la façade et les retours.
• Un amplificateur de puissance stéréo intégré délivrant 150 Watts par canal dans 4 Ohms permet l’utilisation de n’importe quelle enceinte standard (d’une impédance de 4, 8 ou 16 Ohms)
peut être reliée aux quatre connecteurs de sortie jack 6,35 mm situés sur la face arrière.
• L’amplificateur est refroidi par un ventilateur à vitesse variable et utilise une alimentation de
type symétrique pour vous assurer une fiabilité maximale et une durée de vie optimale.
• Un processeur de signaux numériques intégré (DSP) avec 3 effets de haute qualité.
• Un interrupteur d’alimentation fantôme qui vous permet d’utiliser Le TM300 avec des micros
électrostatiques de haute qualité. Une fois sous tension, l’alimentation fantôme 48 volts est
fournie aux connecteurs micros de toutes les voies.
25
FRANÇAIS
Dans ce manuel, vous trouverez une énumération des caractéristiques du TM300, suivie d’une
présentation des faces avant et arrière. Nous finirons par un récapitulatif sous forme d’annexe et
par les caractéristiques complètes. Vous trouverez également une carte de garantie ; n’oubliez
pas de la remplir et de nous l’envoyer car vous pouvez ainsi bénéficier de toute l’assistance technique dont vous aurez besoin. Cela nous permet également de vous envoyer les dernières informations remises à jour concernant les produits Samson. Pensez à consulter notre site Internet
(http://www.samsontech.com) pour une information complète sur toute notre gamme de produits.
Caractéristiques Techniques du TM300
• Deux départs auxiliaires stéréo par voie (l’un prélevé avant Fader et l’autre après) vous
permettent d’affecter plusieurs signaux au processeur d’effets interne ou vers les
processeurs externes.
• Deux retours auxiliaires stéréo, avec réglages de niveaux indépendants sur la face avant,
vous donnent la possibilité de mixer le signal de retour d’effet DSP interne et/ou des
processeurs de signaux externes (ou d’autres appareils de niveau ligne) sans avoir à
mobiliser inutilement des voies d’entrée.
FRANÇAIS
• Une égalisation complète 3 bandes indépendantes. De plus, un égaliseur graphique général
à sept bandes vous permet d’adapter le signal en sortie du TM300 aux conditions
particulières de la pièce à sonoriser. Cette particularité s’avère particulièrement utile pour
supprimer des problèmes de son ou de Larsen. Cet égaliseur graphique peut être utilisé en
stéréo ou être “partagé” de telle sorte qu’un canal de l’égaliseur traite la sonorisation
principale et que l’autre traite les retours de scène.
• Des réglages du panoramique à niveau constant sur chaque voie mono vous permettent de
placer avec précision chaque signal d’entrée sur le champ stéréophonique.
• Un cran central sur les potentiomètres d’égalisation et de panoramique, facilite l’utilisation du
TM300 même lors de concerts Live où la luminosité est souvent faible.
• Réglage d’adaptation de niveau d’entrée à gain variable de grande amplitude sur chaque
voie vous permettant d’adapter avec précision le niveau de l’instrument à l’étage d’entrée du
mélangeur.
• Faders indépendants de 65 mm sur chaque voie et sur le bus stéréo de sortie.
• Ecoute pré-Fader indépendante sur chaque voie, vous permettant de contrôler individuellement chaque voie à l’aide du casque et bénéficier d’un signal pré-Fader (mais postégaliseur) sans affecter le signal de sortie ou les différentes sorties de niveau ligne.
• Système d’affichage en face avant incluant un afficheur de niveau dix-segments vous
permettant de repérer au premier coup d’œil les niveaux de sortie stéréo et/ou de départs
auxiliaires.
• Leds d’écrêtage sur chaque voie vous indiquant d’un seul coup d’œil tout écrêtage du signal
sur une des entrées.
• Leds spécifiques indiquant si l’alimentation principale et l’alimentation fantôme sont activées
(On/Off).
• Connecteurs de sortie séparés pour l’enregistrement (avec réglage de niveau) vous
permettant de connecter directement n’importe quel enregistreur au TM300. De plus, un
connecteur principal de sortie mono fournit un signal de niveau ligne pour la connexion
d’amplis de puissance externes pour retour de scènes.
• Sortie casque indépendante en face avant avec réglage du volume indépendant pour une
écoute individuelle du signal de sortie stéréo principal, des départs auxiliaires ou des voies
placées en solo.
• Insertions sur les sorties principales et sur quatre voies, vous donnant la possibilité d’utiliser
des processeurs de signaux externes comme des égaliseurs, des compresseurs/limiteurs,
ou des noise gates (“ boucle d’effet ” standard).
• Et enfin, la dernière caractéristique mais certainement pas la moindre, son prix tout à fait
accessible. Le TM300 a été créé dans l’optique d’offrir un grand nombre de fonctions et une
excellente qualité sonore à un prix des plus abordables.
26
Visite Guidée – Les voies
1
MIC
2
LINE
3
INSERT
PEAK
E
N
0
4
M
IC
5
–6 –50
+14
–30
TRIM
0
3: Insertions de voies - Seulement sur les voies 1 à 4. Utilisez-les pour insérer un
processeur d’effets externe (comme un égaliseur, un compresseur/limiteur ou un Noise
Gate) dans l’une de ces voies (“ boucle d’effets ”). Ces connecteurs acceptent des jacks
stéréo 6,35 mm, dont la bague correspond au départ et la pointe au signal de retour.
Normalement, vous devez utiliser un câble en Y.
–15
+15
HIGH
0
6
–12
+12
MID
0
4: Témoin d’écrêtage - Ce témoin indique une surcharge. Il s’allume à chaque fois qu’un
signal de voie atteint 3 dB en dessous de l’écrêtage. Pour que le témoin s’éteigne (et pour
éviter toute distorsion), diminuez l’atténuateur d’entrée de voie (voir point n°5 ci-dessous)
ou réduisez le gain de l’égaliseur (voir point n°6 ci-dessous).
–15
+15
LOW
0
+10
AUX 1 PRE
7
5: Atténuateur - Il détermine le niveau du signal d’entrée. C’est un potentiomètre de gain
réglable de +14 dB à –20 dB (pour les entrées de niveau ligne) ou de –6 dB à –50 dB
(pour les entrées micro). Le signal d’entrée est amplifié lorsque vous tournez le potentiomètre vers la droite. Il est atténué lorsque vous le tournez vers la gauche. Sur les voies
stéréo, cette fonction est assurée par un sélecteur à trois positions : +4 dB, -2 dB et
–10 dB. Pour régler correctement chaque voie, reportez-vous à la section intitulée “
Réglages de gain” de la page 32.
6: Égaliseur - Ces potentiomètres déterminent le gain de chaque bande de fréquence
(jusqu’à 15 dB pour les basses et hautes fréquences, et jusqu’à 12 dB pour les médiums).
Le filtre des médiums (1,8 kHz) utilise une courbe en cloche, alors que les filtres des
hautes et basses fréquences (centrés respectivement sur 10 kHz et 100 Hz) utilisent des
correcteurs de type Baxendall. Un repère cranté en position centrale sur chaque
potentiomètre (position “ 0 ”) permet une réponse plate. Lorsque vous tournez les
potentiomètres vers la droite à partir de la position “ 0 ”, la plage de fréquence est
accentuée ; lorsque vous les tournez vers la gauche toujours à partir de la position “ 0 ”,
la plage de fréquence est atténuée.
0
+10
AUX 2
L
R
PFL
27
9
0
10
15
10
20
25
30
35
40
O
7: Départs auxiliaires - Ces potentiomètres vous permettent d’affecter un signal vers
l’une des deux sorties auxiliaires mono du TM300 ou vers les deux. Ils permettent
principalement de créer des sous-groupes (par exemple un mixage spécifique pour le
casque) ou d’affecter à la fois le signal d’une ou plusieurs voies à des processeurs d’effets
externes. En position “ 0 ”, le signal est transmis avec un gain de “ 1 ” (c’est-à-dire ni
accentuation ni atténuation). Lorsque vous tournez le potentiomètre vers la droite à partir
de la position “ 0 ”, le signal est accentué ; si vous le tournez vers la gauche (toujours à
partir de la position “ 0 ”) le signal est atténué. Le départ auxiliaire 1 est prélevé avant
8
PAN
1
FRANÇAIS
2: Entrées ligne - Utilisez ces connecteurs symétriques pour relier des sources de niveau
ligne (synthétiseurs, boîtes à rythmes, lecteurs CD, platines disque, processeurs d’effets)
aux voies du TM300. Nous vous recommandons d’utiliser les câbles symétriques à trois
conducteurs équipés de jacks stéréo (pointe/bague/corps) lorsque cela est possible (des
câbles asymétriques à deux conducteurs peuvent aussi être reliés à ces entrées, mais
vous obtiendrez une meilleure qualité sonore et moins de bruits extérieurs et de ronflement
induits si vous utilisez des lignes symétriques). ATTENTION : Veillez à ne rien connecter
à l’entrée ligne d’une voie si l’entrée micro est déjà utilisée (voir point n°1 ci-dessus) : les
voies sont conçues pour n’accepter qu’une seule des deux sources d’entrée.
1
LI
1: Entrées micro - Utilisez les connecteurs de type XLR (symétrie électronique) pour vos
micros au TM300. Ces entrées sont prévues pour recevoir des signaux de niveau micro
basse d’impédance, mais peuvent également être utilisées pour des signaux provenant
d’autres sources (boîtiers de direct par exemple) en baissant le niveau de l’atténuateur de
la voie (voir point n°5 ci-dessous). ATTENTION : Veillez à ne pas utiliser les entrées XLR
si les entrées lignes sont déjà utilisées (voir point n°2 ci-dessous) : les voies sont conçues
pour n’accepter qu’une seule des deux sources d’entrée.
Visite Guidée – Les voies
FRANÇAIS
égaliseur et avant Fader : le niveau du signal est donc uniquement déterminé
par le réglage de l’atténuateur d’entrée de la voie (voir point n°5 de la page
précédente). Au contraire, le départ auxiliaire 2 est prélevé après égaliseur et
après Fader : le niveau du signal est donc déterminé par le réglage de l’atténuateur de voie, par les réglages de l’égaliseur, et par la position du Fader. Le
départ auxiliaire 2 est également utilisé pour affecter le signal au processeur
d’effets interne du TM300.
8: Panoramique - Ce potentiomètre vous permet de positionner le signal
d’entrée sur le cahmp stéréo, tout en gardant le niveau général du signal
constant. Lorsque le potentiomètre est placé sur sa position centrale, le signal
est dirigé avec un niveau égal vers les deux sorties principales gauche et droite.
Si vous tournez le potentiomètre vers la gauche, le signal affecté vers la droite
est plus faible que celui affecté vers la gauche (le son est positionné à gauche).
Si vous tournez le potentiomètre vers la droite, c’est le contraire qui se produit.
Pour diriger un signal uniquement vers la gauche ou uniquement vers la droite,
tournez le potentiomètre de panoramique complètement à gauche ou
complètement à droite.
9: Interrupteur d’écoute pré-Fader - Une fois sélectionnée, la voie est placée
en solo dans le casque (voir point n°24 de la page 29). Placer une voie en solo
n’a pas d’incidence sur la sortie stéréo générale.
10: Fader - Ce potentiomètre linéaire détermine le niveau du signal affecté à la
sortie principale tout en réglant le niveau du signal affecté au départ auxiliaire 2
(prélevé après le Fader : le signal de l’auxiliaire 1 est toujours prélevé avant le
Fader). En pratique, vous devez utiliser les Faders pour régler les niveaux des
signaux mixés sur le TM300. La position “ 0 ” du Fader indique le gain unitaire
(ni atténuation ni accentuation du niveau). En descandant le Fader à partir de la
position “ 0 ” (vers “ ∞ ”) vous atténuez le niveau du signal (au minimum, le son
est coupé).
Afin d’obtenir un rapport signal/bruit optimal, tous les Faders des voies utilisées
doivent généralement être maintenus le plus prés possible de la position “ 0 ”.
Les Faders des voies inutilisées doivent rester au minimum (“ ∞ ”).
Reportez-vous à la section “ Réglages de gain ” de la page 32 pour obtenir
de plus amples informations.
28
Visite guidée – Section principale
1: Entrée Tape In (G, D) - Connectez les
sorties d’un lecteur cassette ou d’un lecteur
CD à ces deux connecteurs RCA. Le niveau
du signal d’entrée dépend du réglage du
niveau de l’entrée Tape (voir point n°7 à la
page suivante).
2: Retours auxiliaires (G, D) - Connectez le
signal provenant d’appareils stéréo externes
(comme des processeurs d’effets) à ces
connecteurs 6,35 mm asymétriques.
TAPE IN
–10dB
REC OUT
+4dB
L
R
MONO OUT+4dB
L
5
R
1
AUX RET1
AUX SEND 1
INSERT
+4dB
+4dB
2
R
L
R
MAIN
6
L/MONO
AUX RET 2
AUX SEND 2
POST EQ
4
SAMSON
11
7
0
LEFT
AUX1
RIGHT
AUX2
POWER
4: Insertions Principales (G, D) - À utiliser
pour insérer un processeur d’effets externe
(comme un égaliseur, un compresseur/limiteur ou un Noise Gate) sur la sortie stéréo
principale du TM300. Cela vous permet de
traiter le mixage dans son ensemble. Les
insertions Post Eq générales sont affectées
par l’égaliseur graphique à sept bandes intégré ainsi que par les Faders stéréo, contrairement aux insertions Pre Eq. Ces connecteurs sont au format jack stéréo 6,35 mm
(la bague transmet le signal départ et la
pointe le signal retour). Normalement, la connexion se fait avec un câble en Y. Les
Insertions sur les sorties générales peuvent
également être utilisées pour relier plusieurs
TM300 ou pour injecter la sortie d’un autre
mélangeur dans le TM300 sans passer par
les entrées ligne des voies.
8
+4
+10
TAPE IN
0
9
+4
+4
+2
+2
12
REC OUT
0
0
0
-2
-2
-4
-4
13
PHANTOM
+10
+10
AUX RET 1
10
AUX RET2/REV
OFF
14
ON
0
0
+10
-9
-12
-15
-15
-20
-20
-25
-25
METER HEADPHONE
SOURCE
+10
AUX SEND 1
AUX SEND 2
DSP
0
16
-9
-12
L/R
AUX 1/2
15
VOCAL
6 CHANNEL 150 WATT STEREO MIXER
+10
19
REV TO AUX 1
AUX 1/MONITOR
L HALL
17
EQ ON/OFF
LEFT
S HALL
63Hz
160Hz 400Hz
1KHz
RIGHT
20
2.5KHz 6.4KHz 15KHz
+12dB
18
ON
L
0dB
-12dB
63Hz
160Hz 400Hz
1KHz
21
2.5KHz 6.4KHz 15KHz
+12dB
10
10
0
0
R
22
4
4
8
8
12
12
0dB
-12dB
63Hz
160Hz 400Hz
1KHz
2.5KHz 6.4KHz 15KHz
0
23
+10
16
16
20
20
26
26
OO
OO
LEVEL
24
5: Sortie mono - Ce connecteur asymétrique
jack 6,35 mm offre une sortie ligne mono,
non affectée par les Faders des sorties
générales (voir point n°22 de la page 29).
Il peut être utilisé pour relier le TM300 à une
enceinte active, un amplificateur, une
console de retour afin que les musiciens
puissent bénéficier d’un mixage de retour
spécifique.
HEADPHONE
L
–STEREO–
R
6: Départs auxiliaires (1, 2) - Ces connecteurs asymétriques jacks 6,35 mm permettent
le routage du mixage du signal provenant de l’un des deux départs auxiliaires du TM300
vers des appareils extérieurs, comme des processeurs d’effets. Le départ auxiliaire 1 est
prélevé pre-Fader alors que le départ auxiliaire 2 est post-Fader.
29
FRANÇAIS
3: Sorties Enregistrement (G, D) - Ces
connecteurs RCA vous permettent de connecter la sortie du TM300 aux entrées d’un
enregistreur deux pistes. Le niveau du signal
dépend du réglage Record Out (voir point n°8
à la page suivante).
3
Visite guidée – Section principale
7: Tape In Level - Détermine le niveau du signal d’entrée Tape (voir point n°1 de la page précédente).
8: Niveau de sortie enregistrement Record Out - Détermine le niveau de sortie du signal disponible sur les RCA
(voir point n°3 de la page précédente) Record Out.
FRANÇAIS
9: Niveau de retour auxiliaire (1, 2) - Ces potentiomètres déterminent le niveau des signaux des deux retours auxiliaires du TM300 (voir point n°2 de la page précédente). La position “ 0 ” de chaque potentiomètre correspond au gain
unitaire (ni atténuation ni accentuation du niveau). Tournez les potentiomètres vers la gauche (vers “ ∞ ”) à partir de la
position “ 0 ” pour atténuer le signal (lorsqu’il est au minimum, aucun signal n’est disponible en retour d’effet). Tournezles vers la droite pour augmenter le gain (maximum de 10 dB). Notez que lorsque la touche de DSP (voir point n°19 de la
page suivante) est enfoncée, le signal du DSP interne est affecté au retour auxiliaire 2 ; le potentiomètre de niveau du
retour 2 détermine alors le niveau du signal traité. Pour obtenir de plus amples informations sur ces réglages, reportezvous aux section “ Réglages de gain ” de la page 32.
10: Niveau de départs auxiliaires (1,2) - Ces potentiomètres déterminent le niveau de sortie du signal affecté aux deux
jacks de départ auxiliaires stéréo du TM300 (voir point n°6 de la page 27) et, dans le cas du départ auxiliaire 2, vers le
processeur d’effets interne. La position “ 0 ” de chaque potentiomètre indique le gain unitaire. Tournez le potentiomètre
vers la gauche (vers “ ∞ ”) pour atténuer le niveau du signal de départ auxiliaire (au minimum, aucun signal n’est
envoyé). Tournez le potentiomètre vers la droite (vers la position “ + 10 ”) pour accentuer le signal avec un gain
maximum de 10 dB. Pour obtenir de plus amples informations sur ces réglages, reportez-vous aux section “ Réglages
de gain ” de la page 32.
11: Afficheur - Cet afficheur dix-segments signale soit le niveau de sortie gauche/droite, soit le niveau des départs
auxiliaires 1/2, en fonction du réglage de la touche Meter/Headphone Source (voir point n°15 ci-dessous). Pour obtenir
un rapport signal/bruit optimum, vous devez régler tous les niveaux de départs auxiliaires et gauche/droite de façon à ce
que le signal affiche un niveau d’environ “ 0 VU ” (avec quelques déplacements sur les segments rouges “ + ”).
Pour obtenir de plus amples renseignements, reportez-vous aux section “ Réglages de gain ” de la page 32.
12: Led de témoin d’alimentation (Power) - Couleur verte constante lorsque le TM300 est sous-tension.
13: Led de l’alimentation fantôme - Couleur rouge constante lorsque l’alimentation fantôme est activée (voir point n°14
ci-dessous).
14: Touche d’alimentation fantôme - Lorsque cette touche est enfoncée, le TM300 applique une alimentation fantôme
de 48 Volts aux broches 2 et 3 de tous les connecteurs XLR des voies mono. ATTENTION - N’utilisez cette touche que
lorsque le TM300 est hors tension. Avant d’activer l’alimentation fantôme, assurez-vous d’avoir déconnecté toutes les
sources autres que les micros (comme les boîtiers de direct passifs par exemple). Bien que l’alimentation fantôme n’ait
pas d’effet néfaste sur les micros dynamiques, il est préférable de ne l’utiliser que lorsqu’un ou plusieurs micros électrostatiques sont connectés au TM300. Reportez-vous au manuel d’utilisation de votre micro pour déterminer s’il
nécessite une alimentation fantôme 48 Volts (nous rejetons toute responsabilité en cas de dommage d’un micro
dû à une mauvaise utilisation de l’alimentation fantôme). Si vous ne savez pas si l’un ou tous les micros connectés
nécessitent une alimentation fantôme 48 Volts, laissez la touche en position haute.
15: Touche Meter/Headphone Source - Lorsque cette touche est relâchée (“ Off ”), le signal de sortie stéréo
gauche/droite peut être écouté au casque (voir point n°24 de la page suivante) et peut être visualisé sur l’afficheur dixsegments (voir point n°11 de la page précédente). Lorsqu’elle est enfoncée, les signaux de sortie 1 et 2 de départs
auxiliaires peuvent être écoutés au casque et peuvent être visualisés sur l’afficheur dix-segments. Notez qu’à chaque
fois que les touches des voies PFL sont enfoncées (voir point n°9 de la page 26), les voies placées en solo peuvent être
écoutées au casque (mais ne sont pas affichées).
16: Potentiomètre Rev To Aux 1 (Réverbération sur le bus auxiliaire 1) - Ce potentiomètre détermine le niveau du
signal provenant du processeur d’effets interne et affecté au départ Aux Send 1. Cela permet d’ajouter de la
réverbération ou tout autre effet aux signaux des retours de scènes connectés en sortie Aux Send 1 du TM300 (lorsque
celui-ci fonctionne en configuration stéréo standard), ou d’ajouter des effets aux signaux de la sortie haut-parleurs droite
lorsque le TM300 fonctionne en configuration “ Split mono ”. Lorsque la touche Aux 1/Monitor est enfoncée (voir point
n°19 de la page suivante). Pour obtenir de plus amples renseignements, reportez-vous aux schémas de câblage des
pages 11 et 12.
30
Visite guidée – Section principale
17: Sélection de banques d’effets - Permet de sélectionner n’importe laquelle des 3 banques de Presets pour le DSP
intégré : vocal, Long Hall (“ L HALL ”) ou Short Hall (“ S HALL ”).
18: Touche DSP On/Off - Lorsque cette touche est enfoncée (“ On ”), le signal de sortie provenant du DSP interne est
affecté au retour auxiliaire 2. Lorsque la touche est relâchée (“ Off ”), le retour auxiliaire 2 reçoit le signal provenant des
connecteurs jack de retours auxiliaires.
20: Touche EQ On/Off (G, D) - Lorsque cette touche est enfoncée (“ On ”), le canal correspondant de l’égaliseur
graphique sept bandes est actif. Lorsqu’elle est relâchée (“ Off ”), le canal correspondant de l’égaliseur graphique sept
bandes est inactif quels que soient les réglages de (voir point n° 22 ci-dessous). Notez que l’utilisation du TM300 en
configuration “ Split mono ” (c’est-à-dire lorsque la touche Aux 1/Monitor est enfoncée - voir point n° 22 ci-dessus), le
canal gauche de l’égaliseur graphique traite les enceintes de façade et le canal droit traite les retours de scène. Ceci
évite d’avoir à utiliser un égaliseur graphique externe pour les retours de scène.
21: Curseurs de l’égaliseur graphique - Ces curseurs offrent un gain de +/- 12 dB sur sept fréquences. Lorsqu’un
curseur se trouve à mi-course (sur “ 0 dB ”), la réponse en fréquence n’est pas affectée (la courbe de la réponse est
plate). Lorsqu’un curseur est poussé vers le haut (au-dessus de “ 0 dB ”, vers “ + 12 dB ”), la plage de fréquence est
accentuée. Lorsque le curseur est poussé vers le bas (au dessous de “ 0 dB ”, vers “ –12 dB ”), la plage de fréquence
est atténuée.
22: Faders stéréo - Ces potentiomètres linéaires déterminent le niveau des sorties stéréo gauche/droite. La position “ 0
” de chaque Fader indique le gain unitaire (pas d’accentuation ni d’atténuation du signal). Déplacez chaque Fader
au-dessous de cette position (vers “ ∞ ” ) pour atténuer le signal (au minimum, aucun signal n’est audible). Déplacez
chaque Fader au-dessus de cette position (vers “+ 10 dB ”) pour accentuer le niveau du signal avec un maximum de
10 dB. Afin d’obtenir un meilleur signal/bruit optimal, les deux Faders stéréo de sortie doivent généralement se trouver
sur ou prés de “ 0 ”. Pour obtenir de plus amples informations, reportez-vous à la section “ Réglages de gain ” de la
page 32.
23: Niveau casque - Ce potentiomètre détermine le niveau de la prise casque (voir point n°25 ci-dessous).
ATTENTION : Afin d’éviter tout endommagement éventuel du casque (ou encore pire, de vos oreilles !), tournez toujours ce potentiomètre au minimum avant de connecter le casque, puis augmentez doucement le niveau. Le niveau du
casque n’a aucune incidence sur les autres sorties du TM300.
24: Prise casque - Connectez n’importe quel type de casque stéréo standard à cette prise (connecteur jack stéréo 6,35
mm) pour une écoute individuelle de la sortie stéréo générale, des départs auxiliaires, ou des voies placées en solo à
l’aide des touches PFL (en fonction du réglage de la touche Meter/Headphone Source - voir point n° 15 de la page
précédente). Le préamplificateur casque intégré du TM300 délivre une puissance d’environ 100 mW.
31
FRANÇAIS
19: Touche Aux 1/Monitor - Lorsque cette touche est enfoncée, le signal du départ auxiliaire 1 est dirigé vers le canal
droit de l’amplificateur de puissance du TM300 et le mixage stéréo est automatiquement transformé en mono, puis
redirigé vers le canal gauche de l’amplificateur de puissance. Cela permet une utilisation “ Split mono ” du TM300, qui
alimente ainsi à la fois les enceintes de façades (à partir de la sortie gauche) et les retours de scène (à partir de la sortie
droite), sans avoir besoin d’un amplificateur de puissance externe. Lorsque le TM300 est utilisé en configuration “ Split
mono ”, le potentiomètre Rev To Aux 1 permet d’affecter le signal provenant du processeur d’effets interne aux retours
de scène (le signal peut également être affecté au retour auxiliaire 2 pour un traitement simultané du signal de la
sonorisation de façade).
Visite guidée – Face arrière
POWER
TM300 6 CHANNEL 150WATT STEREO MIXER
SAMSON
CAUTION
CAUTION:
DO NOT BLOCK AIRFLOW
ON
SERIAL NUMBER
OFF
RISK OF ELECTRIC SHOCK
DO NOT OPEN
AVIS;
RISQUE DE CHOC ELECTRIQUE
NE PAS OUVRIR
DO NOT EXPOSE THIS EQUIPMENT
TO RAIN OR MOISTURE.
SPEAKER
OUT
CAUTION: TO REDUCE THE
USE CLASS 2 WIRING
MINIMUM LOAD
IMPEDANCE 4 Ω
RISK OF FIRE, REPLACE ONLY
WITH SAME TYPE FUSE.
FUSE
8A/250V(115V)
4A/250V(230V)
AC INPUT
115V/230V,50/60Hz
780W
FRANÇAIS
R
1
2
3
L
4
5
6
1: Ventilation - Afin d’assurer un refroidissement efficace de l’amplificateur de puissance du TM300, assurez-vous que les orifices de ventilation ne sont jamais obstrués.
2: Support à fusible - Fusible 250 V/ 8 A pour un fonctionnement en 115 Volts ou
fusible 250 V/ 4 A pour une utilisation en 230 Volts.
3: Connecteur secteur - Utilisez le câble d’alimentation fourni pour relier le TM300 au
secteur.
4: Sorties haut-parleurs - Ces sorties sont les plus importantes du TM300 : utilisez les
quatre embases jack mono fournies (dont deux transmettent le signal de gauche et les
deux autres celui de droite) pour relier Le TM300 à des enceintes de 4 Ohms ou plus
(soit 4, 8 ou 16 Ohms). Plus l’impédance est faible, plus la puissance en sortie est
importante. Nous vous recommandons d’utiliser des enceintes de 4 Ohms. Le TM300
délivre une puissance de 250 Watts par canal dans 4 Ohms avec une distorsion harmonique totale inférieure à 1%. Afin d’éviter tout problème de mise en phase, la pointe
du jack haut-parleur du TM300 doit être connectée au “ + ” (point chaud) de votre
enceinte, et le corps du jack haut-parleur du TM300 doit être connecté au “ _ ” (masse)
de votre enceinte. Notez que, lorsque la touche Aux 1/Monitor (voir point n°20 de la
page 29) est enfoncée, Le TM300 fonctionne en configuration “ Split mono ”, et la sortie
haut-parleur gauche transmet alors le signal de sortie stéréo de façade (mixé intérieurement en mono). La sortie haut-parleur droite porte alors le signal Aux Send 1.
5: Interrupteur On/Off - Cet interrupteur permet de mettre le mélangeur TM300 sous
tension et hors tension. Si le TM300 est connecté à des amplificateurs de puissance
externes (via son insertion principale Main Insert et/ou ses jacks de sortie Mono - voir
point n° 4 et 5 de la page 27), mettez le mélangeur sous tension avant les amplificateurs
connectés et mettez-le hors tension après avoir mis les amplificateurs hors tension.
6: Ventilateur - Ce ventilateur à vitesse variable fournit le refroidissement indispensable
à l’amplificateur de puissance du TM300 (plus l’amplificateur chauffe, plus le ventilateur
tourne vite pour le refroidir !). Assurez-vous que le ventilateur dispose d’une source d’air
frais. Évitez également d’utiliser le TM300 dans un endroit trop poussiéreux.
32
Installation et utilisation du TM300
L’installation du mélangeur TM300 est une opération assez simple qui ne vous prendra
que quelques minutes.
1. Retirez tous les cartons et papiers d’emballage (gardez-les au cas où vous en auriez
besoin plus tard) et décidez de l’endroit où vous allez placer le TM300. Assurez-vous
que le ventilateur et les orifices de ventilation placés à l’arrière de l’appareil ne sont pas
obstrués et qu’il y a assez de place autour de l’appareil pour assurer une bonne
circulation de l’air.
2a. Si vous avez l’intention d’utiliser le TM300 en configuration stéréo standard,
assurez-vous que la touche Aux 1/Monitor est relâchée et connectez votre enceinte de
façade gauche à la sortie haut-parleur gauche et votre enceinte de façade droite à la
sortie haut-parleur droite. Reportez-vous à la page 11 pour consulter l’exemple.
2b. Si vous avez l’intention d’utiliser le TM300 en configuration “ Split mono ”,
assurez-vous que la touche Aux 1/Monitor est enfoncée et connectez votre enceinte
de façade à la sortie haut-parleur gauche et vos retours de scène à la sortie haut-parleur
droite. Reportez-vous à la page 12 pour consulter l’exemple.
3. Faites ensuite toutes les connexions relatives aux sorties de niveau ligne du TM300
(sortie enregistrement, sortie mono, et départs auxiliaires 1 et 2) et aux entrées de
niveau ligne (entrée Tape in, retours auxiliaires 1 et 2). Évitez de faire des connexions
d’insertions à ce moment-là, car elles doivent être effectuées une fois les gains
correctement réglés (voir pages 32 - 33).
4. Faites les connexions des entrées lignes et micros des différentes voies. Les signaux
de niveau ligne doivent être connectés aux voies stéréo 9/10 et 11/12..
ATTENTION : Ne connectez pas l’entrée ligne d’une voie si vous utilisez déjà l’entrée
micro des voies mono, ou vice-versa : chaque voie mono est conçue pour n’accepter
qu’une seule des deux sources.
5. Poussez tous les Faders des voies et les Faders stéréo gauche/droite au minimum
(vers “ ∞ ”). Tournez tous les atténuateurs au minimum sur “ +14 dB ”. Relâchez la
touche d’alimentation fantôme en face avant pour désactiver l’alimentation à moins que
vous ne soyez absolument certain que tous les micros connectés fonctionnent avec une
alimentation fantôme 48 Volts. Si c’est le cas, enfoncez la touche d’alimentation fantôme
pour activer l’alimentation.
6. Connectez le TM300 à n’importe quelle prise secteur en utilisant le câble
d’alimentation fourni. Grâce aux circuits de protection par relais spéciaux intégrés au
TM300, vous pouvez la connecter avec la même prise multiple que d’autres appareils
audio. Vous pouvez ainsi mettre sous-tension tous les appareils en même temps avec
un seul interrupteur, sans risque d’endommager les enceintes connectées (suppression
des transitoires dues à la mise sous tension).
7. Enfoncez enfin la touche Power située sur la face arrière pour mettre Le TM300 sous
tension. La Led d’alimentation située sur la face avant s’allume.
33
FRANÇAIS
2. Avant même de brancher le TM300 au secteur, commencez par y connecter les
enceintes. Il n’est jamais très conseillé de brancher un amplificateur qui n’est pas
connecté à des enceintes. Toute type d’enceinte avec une impédance minimale de 4
Ohms (c’est-à-dire 4 Ohms ou plus) peut être utilisée. Nous vous recommandons
d’utiliser des enceintes d’impédance 4 Ohms. Afin d’assurer une mise en phase correcte,
assurez-vous que la pointe du jack haut-parleur du TM300 est connectée au “ + ” (point
chaud) de votre enceinte, et que le corps du jack haut-parleur du TM300 est connecté au
“ _ ” (masse) de votre enceinte.
Réglages de gain
Vous êtes maintenant prêt pour régler correctement le gain. Ce réglage est la clef de la réussite
pour exploiter les meilleures performances de votre TM300 ou de n’importe quel mélangeur.
Ce réglage constitue une simple formalité qui assure des niveaux optimums d’entrées et de
sorties afin que des bruits inutiles (provoqués par un signal trop faible) ou une distorsion
(provoquée par la surcharge d’un signal trop fort) ne soient créés.
Voici ci-dessous une description détaillée étape par étape de la marche à suivre:
a. Une fois toutes les connexions faites (comme décrit dans la section précédente) mais
l’appareil sur arrêt (Off), poussez tous les Faders des voies mono et stéréo au minimum
(sur “ ∞ ”).
FRANÇAIS
b. Tournez tous les atténuateurs des voies complètement à gauche.
c. Placez tous les potentiomètres des égaliseurs de voies à mi-course sur la position “0 ” et
désactivez l’égaliseur graphique sept bandes en relâchent les touches Eq On/Off.
d. La touche Meter/Headphone doit être relâchée (sur la position “ L/R ”) afin que
l’afficheur du TM300 indique le niveau continu du signal de sortie stéréo gauche/droite.
e. Placez tous les potentiomètres de départs auxiliaires des voies et de retours auxiliaires de la
section principale au minimum (sur “ ∞ ”). Placez les potentiomètres de l’entrée Tape In et
Rev To Aux 1 au minimum (sur “ ∞ ”).
f. Placez les deux potentiomètres de départs auxiliaires de la section principale sur la position
“ 0 ”.
g. Mettez sous tension tous les appareils connectés aux retours auxiliaires et aux entrées ligne
des voies du TM300, puis réglez tous les niveaux sur le gain unitaire ou au maximum s’il n’y a
pas d’indication de gain unitaire sur le réglage.
h. Si vous utilisez des micros électrostatiques en entrée du TM300, enfoncez la touche de
l’alimentation fantôme*. Activez enfin l’interrupteur principal Power pour mettre le TM300 sous
tension.
i. Jouez d’un instrument connecté à l’une des entrées ligne du TM300** et, ce faisant, montez le
Fader de la voie correspondante jusqu’à la position “0 ”. Le segment de l’afficheur doit nor
malement commencer à bouger : réglez alors l’atténuateur d’entrée de cette voie afin que le
segment “ 0 ” s’allume fréquemment et que le segment “+ 3 ” s’allume seulement de temps en
temps. La Led d’écrêtage de cette voie ne doit pas s’allumer même au niveau le plus haut des
signaux d’entrée. Si le signal d’entrée semble trop élevé même lorsque l’atténuateur de voie
d’entrée est réglé au minimum (sur “+ 4 dB ”), diminuez le niveau de sortie de l’instrument. Cela
arrive cependant peu fréquemment. À l’inverse, si le signal est trop faible alors que l’atténuateur
est réglé au maximum, c’est qu’il y a un problème : selon toute probabilité, cela provient du
câble audio utilisé pour la connexion.
j. Une fois ce réglage effectué (i), continuez à jouer et montez doucement les Faders de sortie
gauche/droite jusqu’à obtenir le niveau d’écoute souhaité.
k. Répétez l’étape (i) ci-dessus pour chaque instrument connecté aux entrées ligne des voies
mono et stéréo du TM300.
* ATTENTION : Avant d’activer l’alimentation fantôme, assurez-vous que tous les micros
connectés et/ou les boîtiers de direct requièrent une alimentation 48 Volts externe.
** Si vous utilisez un instrument comme une guitare ou une basse électrique, connectez-la au
TM300 en utilisant un boîtier de direct afin d’adapter son impédance à celle du TM300.
34
Réglages de gain
l. Le réglage optimum des niveaux micros est quasiment identique : chantez ou parler dans le
micro au niveau souhaité tout en augmentant le Fader jusqu’à la position “ 0 ”. Régler ensuite
l’atténuateur de cette voie tout en surveillant l’afficheur et la Led d’écrêtage de la voie. Les
entrées micros requièrent généralement une atténuation moindre que les entrées ligne.
n. Si vous avez connecté un processeur de signaux externe aux jacks de départs auxiliaires
situés sur la face arrière, suivez les indications qui suivent. En raison des bruits de fond que
peuvent parfois provoquer les processeurs d’effets externes, il est particulièrement important
d’optimiser le niveau du signal qui leur est affecté via les départs auxiliaires du TM300. Comme
pour le processeur interne, vous devez faire en sorte que ces appareils reçoivent un signal aussi
élevé que possible avant écrêtage, puis utiliser le niveau du retour auxiliaire pour régler avec
précaution le niveau du signal traité mélangé au signal non traité. Afin de régler les niveaux de
retours auxiliaires de façon optimale, utilisez une voie dont le gain a déjà été réglé lors de l’étape
(i) ou (k) ci-dessus. Positionnez le potentiomètre de départ auxiliaire 1 de cette voie sur “ 0 ”
puis jouez une note sur l’instrument (ou chantez dans le micro) connecté à cette voie. Réglez les
niveaux d’entrée du processeur d’effets externe afin que l’afficheur indique un niveau voisin de
“ 0 ”. Il est alors temps d’optimiser le niveau du retour auxiliaire. Tout en continuant à jouer (ou
à chanter dans le micro), augmentez doucement le niveau du retour auxiliaire jusqu’à obtenir le
mélange signal traité/signal non traité recherché. Répétez ce réglage pour chaque appareil
externe connecté au jack auxiliaire 2 (qui est actif uniquement lorsque la touche DSP est
relâchée (sur “ Off ”).
o. Le gain est maintenant correctement réglé : vous avez optimisé le niveau de tous les signaux
qui entrent et sortent du TM300, et il en résulte un minimum de bruit de fond et de distorsion et
une netteté maximale du son. Vous pouvez maintenant connecter vos processeurs en insertion
de voie ou en insertion sur les généraux, selon vos besoins (compresseurs, limiteurs, noise
gate, etc.). Les appareils doivent fonctionner à niveau ligne et gain unitaire. Vous pouvez maintenant constater que la majorité de vos mixages peuvent être réalisés avec les Faders de voies
aux alentours du “ 0 ” (gain unitaire) et que les Leds d’écrêtage s’allument rarement. Souvenezvous que si elles s’allument, cela impliquent une distorsion !). Si vous avez besoin de régler le
niveau général, utilisez les Faders stéréo gauche/droite de la sortie générale.
Pour obtenir de plus amples informations concernant ce produit, contactez votre revendeur
SAMSON le plus proche.
35
FRANÇAIS
m. Le processeur interne doit recevoir un signal dont le niveau doit être aussi élevé que possible
avant écrêtage. Utilisez le réglage de retour auxiliaire 2 pour déterminer avec précaution la
quantité de signal traité que vous souhaitez mélanger au signal non traité. Remarque : Lorsque
le TM300 fonctionne en configuration “ Split mono ”, le réglage de retour auxiliaire 2 détermine
la quantité de signal traité affecté à la sortie principale (gauche), et le réglage du niveau de
réverbération de l’auxiliaire 1 détermine le niveau du signal traité affecté à la sortie des retours
de scène (droite). Enfoncez la touche DSP afin d’activer le processeur d’effets interne puis de
sélectionner la banque 1 et le paramètre 1 (en général une petite réverbération). Commencez
par régler le retour de niveau auxiliaire 2 sur “ 0 ” (vous pouvez ensuite modifier ce réglage si
vous souhaitez modifier le niveau signal traité/signal non traité). Ensuite, en utilisant une voie
dont le gain a déjà été réglé lors de l’étape (i) ou (k) ci-dessus, jouez avec l’instrument
connecté à cette voie (ou chantez dans le micro) en tournant doucement le potentiomètre du
départ auxiliaire 2 correspondant vers la droite, jusqu’à obtenir le réglage souhaité entre le signal
traité et le signal non traité. Si vous décelez une distorsion, diminuez le niveau du signal en
entrée du processeur interne en tournant le potentiomètre du départ auxiliaire 2 de la voie
incriminée vers la gauche (ou le potentiomètre principal du départ auxiliaire 2).
Einleitung / TM300 Merkmale
Wir wissen, daß Sie nicht gerne Benutzerhandbücher lesen, aber Sie haben gerade eines der
leistungsfähigsten Mischpulte erworben, und wir möchten Ihnen einiges darüber erzählen! Bevor
Sie es anschließen und anfangen zu spielen, sollten Sie einige Minuten dem Durchlesen dieser
Seiten widmen. Wir versuchen es so angenehm wie möglich zu gestalten - und, wer weiß, Sie
können vielleicht einige Tips ausfindig machen.
Der TM300 von Samson ist ein praktisches, vertikales, verstärktes 6-Kanal Stereo Mischpult —
mit eingebautem Effekt, in einem kompaktem Gehäuse. Er ist ideal bei Proben, in kleinen ClubRäumen, Piano-Bars und anderen Beschallungsverwendungen: Sie können ihn eigentlich überall, wo Sie eine Reihe von Mikrofonen- oder Line-Pegel-Quellen in Stereo zusammengemischt
werden müssen, benutzen. Schießen Sie einfach ein Paar Beschallungslautsprecher an, und Sie
sind endlich bereit!
DEUTSCHE
Auf diesen Seiten finden Sie einen Überblick der Mermale des TM300, gefolgt von einer
Übersicht der Vorder- und Rückseite. Zum Ende finden Sie noch alle technischnen Daten.
Vergessen Sie nicht die ebenfalls mitgelieferte Garantie-Karte auszufüllen und zurückzuschicken, um technische Unterstützung zu genießen, und auf den neuesten Stand gebrachte
Informationen über Samson’s Produkte zu erhalten. Lesen Sie auch unser Website
(http://www.samsontech.com), um komplette Informationen über unsere Produkt-Palette zu
bekommen.
BEMERKUNG: Sollte Ihr TM300 eine Wartung brauchen, müssen Sie eine RücksendungsBerechtigungsnummer besitzen. Ansonsten wird Ihr Gerät nicht angenommen. Wenn Sie Ihr
Gerät in den USA erworben haben, rufen Sie die Firma SAMSON unter 1-800-372-6766 an, um
die nötige Nummer zu erhalten. Wenden Sie sich ansonsten an ihren Fachhändler oder
Kundendienst. Verwahren Sie die ursprünglichen Verpackungsmaterialien, um notfalls den
TM300 in seiner Originalverpackung zurückzusenden.
TM300 Merkmale
Der kompakte Entwurf des TM300 läßt nicht seinen außerordentlichen Mehrzweckcharakter,
sowie seine unglaubliche Tonqualität durchscheinen. Hier einige seiner Haupt-Merkmale:
• Sechs unabhängige Kanäle mit Mikrofon- und Line-Eingänge. Das erlaubt Ihnen eine Vielzahl
von Signalquellen zu vermischen, wie z.B. Dynamik- und elektrostatische Mikrofone,
Keyboards, CD/Kassetten-Spieler, usw. Standard XLR Mikrofon-Anschlüsse (für MikrofonEingänge) und die elektronisch symmetrierten 6,35 mm Klinken (für Line-Pegel Eingänge)
besitzt jeder Kanal. Weiterhin besitzt das Pult einen spezifischen Stereo Kassetten-Eingang
mit zwei Anschlüsse der RCA-Art.
• Der Mehrzweckcharakter des TM300 ermöglicht eine Benutzung in Stereo, sowie auch in der
Mono-Art „Split Mono“. Es ist Ihnen daher erlaubt, ihn gleichzeitig mit
Beschallungslautsprechern und Onstage Monitoren zu benutzen.
• Ein eingebauter 150 Watt pro Kanal in 4 Ohm liefernder Stereo-Leistungsverstärker. Jeder
Standard Lautsprecher (mit einer Impedanz von 4, 8 oder 16 Ohm) kann mit den vier 6,35 mm
Klinkenausgangs-Anschlüssen auf der Rückseite verbunden werden.
• Der Verstärker wird durch einen Ventilator mit veränderlicher Geschwindigkeit gekühlt und
besitzt eine bipolare Auslegung, um Ihnen maximale Flexibilität zu gewährleisten, sowie eine
verlängerte Lebensdauer.
• Ein eingebauter digitaler Signal-Prozessor (DSP) mit drei hochwertigen Effekten.
• Ein Phantom-Netzschalter, der Ihnen erlaubt den TM300 mit hochwertigen elektrostatischen
Mikrofonen zu benutzen. Angeschaltet, wird den Mikrofon-Anschlüssen aller Kanäle eine
48 Volt Phantom-Speisung zugeführt.
36
TM300 Merkmale
• Zwei Stereo Aux-Abgänge pro Kanal (eine Pre- und der andere Post-Fader) ermöglicht Ihnen
mehrere Signale dem internen DSP oder externen Prozessoren zuzuführen.
• Zwei Stereo Aux-Rückführungen mit auf der Vorderseite befindlichen, unabhängigen PegelRegler, ermöglicht Ihnen das Signal des vom internen DSP und/oder von den Prozessoren der
externen Signale (oder anderen Line-Pegel Geräten) kommenden Rück-Effekts zu mischen,
ohne die Eingangskanäle zu verwenden.
• Eine komplette Equalisation, die einen unabhängigen 3-Band Equaliser auf jeden Kanal mit
einer Abschwächung/Anhebung von 15 dB für die Bässe (100 Hz) et die Hochtöne (10 kHz),
und eine Abschwächung/Anhebung von 12 dB für die mittleren (1,8 kHZ) Frequenzen.
Weiterhin, erlaubt Ihnen ein doppelter sieben-bändiger graphischer Haupt-Equaliser den
Ausgang des TM300 an den besonderen Raumbedingungen, die Sie umgeben anzupassen.
Dies ist besonders nützlich zur Aufhebung der Klang- und Feedback-Probleme. Dieser
graphischer Equaliser kann in Stereo benutzt werden, oder „gespalten“ werden, damit ein
Entzerrer die Hauptbeschallung bearbeitet und der andere das Stage Monitoring.
• Panorama-Regler mit konstantem Pegel auf jedem Kanal, die Ihnen erlauben, jedes
Eingangssignal auf dem stereophonen Feld genauenstens anzuordnen.
• Eine zentrale Rastung auf den Equalisation- und Panorama-Potentiometern erleichtert die
Bedienung des TM300 selbst bei schwachem Licht in Live-Konzerten.
• Umfangreicher Abgleichpotentiometer des Eingangspegels mit verstellbarer Verstärkung auf
jedem Kanal, die Ihnen ermöglichen den Instrument-Pegel an der Eingangsstufe des Pultes
genauestens einzustellen.
• Ein unabhängiger Pre-Fader Listening auf jedem Kanal, der Ihnen erlaubt, jeden Kanal unabhängig von den anderen mit Hilfe des Kopfhörers zu steuern und ein Pre-Fader Signal (aber
Post-Equaliser) zu besitzen, ohne das Ausgangssignal oder die anderen Line-Pegel Ausgänge
zu beeinflussen.
• Ein auf der Vorderseite befindliches Anzeigesystem, einschließlich einer zehn-stufigen PegelAnzeige ermöglicht Ihnen auf einem Blick die Stereo Hauptausgangspegel und/oder die AuxAbgänge wahrzunehmen.
• Spitzenbegrenzungs-LEDs auf jedem Kanal, die Ihnen auf einen Blick eine Übersteuerung des
Signals an einen der zwei Eingängen anzeigt.
• Spezifische LEDs zeigen Ihnen an, ob die Hauptspeisung und die Phantomspeisung
eingeschaltet ist.
• Separate Ausgangsanschlüsse für die Aufnahme (mit Pegel-Regler), die Ihnen ermöglichen
irgendein Aufzeichnungsgerät direkt mit dem TM300 zu verbinden. Weiterhin liefert ein Mono
Hauptausgangsanschluß ein Line-Pegel Signal für die Verbindung mit Leistungsverstärkern.
• Ein unabhängiger Kopfhörer-Ausgang auf der Vorderseite mit unabhängiger LautstärkeRegelung für ein individuelles Abhören des Stereo Hauptausgangssignals, der Aux-Abgänge
oder der in Solo eingestellten Kanäle.
• Haupt-Einführungen und vier Kanal-Einführungen, erlauben Ihnen die Signale externer
Prozessoren wie Equaliser, Kompressoren/Begrenzer oder Noise Gates (Standard „EffektSchleife“) zu benutzen.
• Und natürlich das letzte Merkmal, das aber nicht zu vergessen ist, seinen erschwinglichen
Preis. Der TM300 ist entwickelt worden, um Ihnen eine Vielzahl von Funktionen und eine
außerordentliche Klangqualität zu einem leicht erschwinglichen Preis zu verschaffen.
37
DEUTSCHE
• Unabhängige 65 mm Faders auf jedem Kanal und auf dem Stereo-Bus.
Überblick - die Kanäle
1
1
MIC
2
LINE
3
INSERT
0
4
M
IC
LI
PEAK
E
N
5
–6 –50
+14
–30
TRIM
0
–15
+15
1: Mikrofon-Eingänge - Benutzen Sie die XLR-Anschlüsse (elektronische Symmetrie),
um Ihre Mikros an den TM300 anzuschließen. Diese Eingänge sind für den Empfang der
Signale des Mikrofon- und Niedrigimpedanz-Pegels vorgesehen, können aber auch für ein
von anderen Quellen herrührendes Signal (Direct Injection Box), indem der Pegel des
Abgleichpotentiometers des Kanals (siehe unter Nr.5). ACHTUNG: Versichern Sie sich,
nicht die XLR-Eingänge zu benutzen, wenn die Line-Eingänge schon benutzt werden
(siehe unter Nr.2): die Kanäle sind entwickelt worden, um nur eine der zwei
Eingangsquellen anzunehmen.
2: Line-Eingänge - Benutzen Sie diese symmetrischen Anschlüsse, um die Line-Pegel
Quellen (Syntheziser, Rythmus-Boxen, CD-Players, Plattenspieler oder EffektProzessoren) mit den Kanälen des TM300 zu verbinden. Benutzen Sie wenn möglich die
symmetrischen Drei-Leiter-, mit Stereo-Klinken (Spitze/Ring/Schaft) besetzten Kabel
(unsymmetrische Zwei-Leiter-Kabel können ebenfalls mit diesen Eingängen verbunden
werden, aber Sie erhalten eine bessere Klangqualität und weiger Hintergrund- und
Brummgeräusche bei der Benutzung der symmetrischen Kabel). ACHTUNG: Versichern
Sie sich, nicht die XLR-Eingänge zu benutzen, wenn die Line-Eingänge schon benutzt
werden (siehe unter Nr.1): die Kanäle sind entwickelt worden, um nur eine der zwei
Eingangsquellen anzunehmen.
HIGH
0
6
–12
+12
MID
0
–15
+15
DEUTSCHE
LOW
3: Kanal-Einführungen - Nur für die Kanäle 1 - 4 bestimmt. Benutzen Sie diese, um
einen externen Effekt-Prozessor (wie ein nicht eingebauter Equaliser, ein
Komprossor/Begrenzer oder ein Noise Gate) in einer Konfirguration einer „Effekt-Schleife“
einzuführen. Diese Anschlüsse können 6,35 mm Stereo Klinken, dessen Ring dem Abgang
und die Spitze dem Rückführungssignal entspricht, aufnehmen. Normalerweise müssen
Sie ein Y-Kabel verwenden.
0
+10
AUX 1 PRE
7
0
+10
AUX 2
L
R
8
PAN
PFL
9
0
4: Spitzenbegrenzungs-LED - Diese LED zeigt eine Überladung an. Sie leuchtet,
jedesmal, wenn ein Kanal-Signal 3 dB unterhalbder Begrenzung erreicht. Damit die
Anzeige erlischt (und jede Verzerrung vermieden wird) sollten Sie den KanalAbgleichpotentiometers (siehe unter Nr.5) herunterdrehen oder die Equaliser-Verstärkung
(siehe unter Nr.6) vermindern.
5: Abgleichpotentiometer - Bestimmt Eingangspegel des angeschlossenen Signals. Der
Potentiometer ist von +14 dB bis -30 dB einstellbar (im Fall von Line-Pgel Eingängen),
oder von -6 dB bis -50 dB (im Fall von Mikrofon-Pegel Eingängen). Das Eingangssignal
wird verstärkt, wenn Sie den Regler nach rechts drehen. Es wird bei einer Linksdrehung
gedämpft. Zur richtigen Kanal-Einstellung, sehen Sie unter dem Abschnitt „Einstellung der
Gain-Struktur“ auf Seite 43.
10
15
10
20
25
30
35
40
O
6: Equaliser - Diese Potentiometer bestimmen den Gain jedes Frequnzbandes (bis zu 15
dB für die tiefen und hohen Frequenzen, und bis zu 12 dB für die mittleren). Der Filter der
mittleren Frequenzen (1,8 kHz) verwendet eine „Glocken“-Kurve, die Filter jedoch der
hohen und tiefen Frequenzen (jeweils auf 10 kHz und 100 Hz zentriert) benutzen
Anschlüsse der Baxendall-Art. Ein zentrierter Rastpunkt auf jedem Potentiometer („0”Position) zeigt an, daß keine Anhebung oder Abschwächung vorgenommen wird (Flat
Response). Wenn Sie die Regler von der „0“-Position ab nach rechts drehen, wird der
Frequenzbereich angehoben. Wenn Sie sie von der „0“-Position ab nach links drehen, wird
der Frequenzbereich abgeschwächt.
1
7: Aux-Abgänge - Diese Regler erlauben Ihnen, ein Signal einem der zwei Mono
Aux-Ausgänge des TM300 oder den zweien zuzuteilen. Sie ermöglichen insbesondere
Unter-Gruppen zu schaffen (z.B. ein besonderer Mix für den Kopfhörer) oder das Signal
eines oder mehreren Kanälen gleichzeitig einem nicht eingebauten Effekt-Prozessoren
zuzuteilen. In der „0-Position“ wird das Signal mit der Verstärkung „eins“ (d.h. keine
38
Überblick - die Kanäle
Anhebung oder Abschwächung) gesendet. Wenn Sie den Potentiometer von der
„0“-Position ab nach rechts drehen, wird das Signal angehoben, wenn Sie ihn
nach links drehen (wieder von der „0“-Position ab), wird das Signal
abgeschwächt. Der Aux-Abgang 1 wird vor dem EQ und dem Fader abgegriffen:
Der Signal-Pegel wird somit nur von der mit ihm verbundenen Einstellung des
Abgleichpotentiometers bestimmt (siehe unter Nr.5 auf der vorherigen Seite).
Der Aux-Abgang 2 wird im Gegenteil nach dem EQ und dem Fader abgegriffen:
der Signal-Pegel wird somit durch die Einstellung des KanalAbgleichpotentiometers, des EQs und durch die Position des Faders. Der AuxAbgang 2 wird ebenfalls benutzt, um das Signal dem internen DSP des TM300
zuzuteilen.
8: Panorama-Regler - Dieser Regler ermöglicht Ihnen das Eingangssignal dem
Stereo-Spektrum zuzuweisen, wobei der allgemeine Pegel des Signals konstant
gehalten wird. Wenn der Potentiometer in seine mittlere Position eingestellt ist,
wird das Signal mit mit gleichem Pegel den linken und rechten HauptAusgängen zugeführt. Wenn Sie ihn nach links drehen, ist das nach rechts
zugeteilte Signal schwächer, als jenes nach links zugeteilte (der Ton befindet
sich links). Wenn Sie den Regler nach rechts drehen, ereignet sich das
Gegenteil. Um ein Signal nach links oder rechts zu senden, drehen Sie den
Panorama-Regler ganz nach links oder ganz nach rechts.
9: Pre-Fader Listening-Schalter - Wenn er eingestellt sit, wird der Kanal in
Solo dem Kopfhörer zugeteilt (siehe Nr.24 auf Seite 40). Einen Kanal in Solo
zuzuteilen hat keine Auswirkung auf den Stereo Hauptausgang.
Für einen optimalen Geräuschspannungsabstand, müssen alle Faders der
benutzten Kanäle normalerweise so nah wie möglich an die „0“-Position
gehalten werden. Die Faders der unbenutzten Kanäle müssen auf deren
Minimum bleiben („∞”). Weitere Informationen erhalten Sie unter dem Abschnitt
„Einstellungen der Gain-Struktur“ auf Seite 43.
39
DEUTSCHE
10: Pre-Fader Listening - Dieser lineare Potentiometer bestimmt den
Signal-Pegel, der dem Haupt-Ausgang zugeteilt wird, während er dem
Aux-Abgang 2 zugeführte Signal-Pegel einstellt (nach dem Fader abgegriffen:
der Aux 1 wird immer vor dem Fader abgegriffen). Tatsächlich müssen Sie die
Faders, zur Einstellung der auf dem TM300 gemixten Signal-Pegel benutzen.
Die „0“-Position des Faders zeigt den Verstärkungsfaktor eins an (keine
Anhebung oder Abschwächung des Pegels). Die Bewegung des Faders von
der „0“-Position herab (nach „∞”), hat eine Abschwächung des Signals zur Folge
(im Minimum ist kein Ton hörbar).
Übersicht - Hauptabschnitt
1: Tape In Eingang (L,R) - Verbinden Sie die
Eingänge eines Kassetten- oder CD-Spielers mit
diesen zwei RCA-Anschlüssen. Die Lautstärke
des Eingangssignals hängt von der Einstellung
des Pegels des Eingang Tape ab (siehe Nr.7 auf
der folgenden Seite).
3
TAPE IN
–10dB
REC OUT
+4dB
L
R
MONO OUT+4dB
L
5
R
1
AUX RET1
AUX SEND 1
INSERT
+4dB
+4dB
2
R
L
R
MAIN
6
L/MONO
AUX RET 2
AUX SEND 2
POST EQ
4
SAMSON
11
7
0
LEFT
AUX1
RIGHT
AUX2
POWER
8
+4
+10
TAPE IN
+4
+4
+2
+2
12
REC OUT
0
9
0
0
0
-2
-2
-4
-4
-9
-9
13
PHANTOM
+10
+10
AUX RET 1
10
AUX RET2/REV
OFF
14
ON
0
0
+10
-12
-15
-20
-20
-25
-25
METER HEADPHONE
SOURCE
AUX SEND 2
DSP
0
16
-12
-15
+10
AUX SEND 1
L/R
AUX 1/2
DEUTSCHE
15
VOCAL
6 CHANNEL 150 WATT STEREO MIXER
+10
19
REV TO AUX 1
AUX 1/MONITOR
L HALL
17
EQ ON/OFF
LEFT
S HALL
63Hz
160Hz 400Hz
1KHz
RIGHT
20
2.5KHz 6.4KHz 15KHz
+12dB
18
ON
L
0dB
-12dB
63Hz
160Hz 400Hz
1KHz
21
2.5KHz 6.4KHz 15KHz
+12dB
10
10
0
0
R
22
2: Aux-Rückführungen (1,2) - Verbinden Sie
das Signal von externen Stereo-Geräten, wie
Effekt-Prozessoren, mit den unsymmetrischen
6,35 mm Anschlüssen.
4
4
8
8
12
12
0dB
-12dB
63Hz
160Hz 400Hz
1KHz
2.5KHz 6.4KHz 15KHz
0
23
+10
16
16
20
20
26
26
OO
OO
LEVEL
24
3: Ausgänge Record Out (L,R) - Dieser Satz
von doppelten RCA-Anschlüssen erlaubt Ihnen
den Ausgang des TM300 mit den Eingängen
eines zwei-spurigen Aufnahmegerätes zu
verbinden. Der Signal-Pegel hängt von der
Einstellung des Record Out ab (siehe unter Nr.8
auf der folgenden Seite).
4: Haupt-Einführungen (L,R) - Benutzen Sie
diese, um einen externen Effekt-Prozessors (wie
ein Equaliser, ein Kompressor/Begrenzer oder
ein Noise Gate) mit dem Haupt-Stereoausgang
des TM300 zu verbinden. Das erlaubt Ihnen, den
Mix zu bearbeiten, wobei Sie einen konstanten
Gain behalten. Der Ausgang „Post-Equaliser“ der
Hauptausgänge wird durch den graphischen
sechs-bändigen eingebauten EQ, sowie den
Stereo-Faders bestimmt, im Gegensatz zu den
Pre EQ Einführungen. Diese Anschlüsse sind
Stereo 6,35 mm Klinkenananschlüsse (der Ring
gibt das Abgangssignal weiter und die Spitze das
Rückführungssignal). Norweilerweise wird die
Verbindung mit dem Y-Kabel vorgenommen. Die
Einführungen auf den Haupt-Ausgängen können
ebenfalls zur Verbindung mehrerer TM300 oder
zur Injektion des Ausgangs eines anderen
Mischpultes in den TM300 dienen, ohne die LineEingänge der Kanäle zu benutzen.
HEADPHONE
L
–STEREO–
R
5: Mono-Ausgang - Dieser unsymmetrische
6,35 mm Klinkenanschluß besitzt einen Mono
Line-Ausgang, der nicht durch die Stereo-Faders
(siehe Nr.22 auf Seite 40) bedient wird. Er kann
zur Verbindung des TM300 mit einem aktiven
Lautsprecher, einem Verstärker, einem
Rückführungspult dienen, damit die Musiker
einen spezifischen Rückführungsmix nutzen
können.
6: Aux-Abgänge (1,2) - Dieser unsymmetrische 6,35 mm Klinkenanschluß, , erlaubt die
Zusendung von einem der zwei Aux-Abgänge herrührenden Signal-Mixes, externen
Geräten, wie Effekt-Prozessoren zuzuführen. Der Aux-Abgang 1 wird Pre-Fader
abgegeriffen, der Aux-Abgang 2 hingegen ist Post-Fader. Weitere Informationen
erhalten.
40
Übersicht - Hauptabschnitt
7: Tape In Pegel - Bestimmt den Pegel des Eingangssignals Tape (siehe Nr.1 der vorherigen Seite).
8: Pegel des Aufnahme-Ausgangs Record Out - Bestimmt den Pegel des verfügbaren Ausgangssignals auf den RCA
(siehe unter Nr. 3 der vorherigen Seite).
9: Aux-Rückführungspegel (1,2) - Diese Potentiometer bestimmen die von den zwei Aux-Rückführungen des TM500
herrührende Signalpegel (siehe unter Nr.2 der vorherigen Seite). Die „0“-Position jedes Reglers stimmt mit dem
Verstärkungsfaktor eins überein (keine Anhebung oder Abschwächung). Drehen Sie die Potentiometer von der „0“Position ab nach links, um das Signal abzuschwächen (wenn er im Minimum steht, wird kein Signal gesendet). Drehen
Sie sie nach rechts, um den Gain zu erhöhen (10 dB maximal). Merken Sie sich, daß wenn der DSP-Schalter eingestellt
ist (siehe Nr.19 auf der folgenden Seite), wird das interne DSP-Signal, der Aux-Rückführung 2 zugewiesen; der
Pegel-Potentiometer der Aux-Rückführung 2 bestimmt dann den Pegel des behandelten Signals. Weitere Informationen
über Einstellungen erhalten Sie unter „Einstellung der Gain-Struktur“ auf Seite 43.
10: Aux-Abgangspegel (1,2) - Diese Potentiometer bestimmen die den zwei Aux-Abgängen des TM300 zugeführten
Signalpegel (siehe unter Nr.6), und, im Fall des Aux-Abgangs 2 dem internen DSP zugeführten Signalpegel. Wenn Sie
die Regler von der „=„-Position ab nach links drehen, wird das Abgangssignal abgeschwächt (in der minimalen Position,
ist es völlig abgeschwächt, d.h kein Signal wird abgegeben). Wenn Sie ihn nach rechts drehen, erhöhen Sie den Gain
(10 dB maximal). Weitere Informationen erhalten Sie unter „Benuztung der Gain-Struktur“ auf Seite 43.
11: Anzeige - Diese zehn-stufige Anzeige gibt entweder den Ausgangspegel Rechts/Links an, oder den Pegel der
Aux-Abgänge 1/2, je nach der Einstellung des Meter Headphone Source Schalters (siehe unter Nr.15). Um einen
optimalen Geräuschspannungsabstand zu erhalten, stellen Sie alle Pegel der Rechts/Links- und Aux-Abgänge so ein,
daß das Signal einen ungefähren Pegel von 0 VU erreicht (mit möglichen Schwankungen gen den roten „+“-Anzeigen).
Weitere Informationen erhalten Sie unter „Einstellung der Gain-Struktur“ auf Seite 43.
13: Phantomspeisung-LED - Leuchtet rot, wenn die Taste der Phantomspeisung (siehe Nr.14) betätigt wurde.
14: Taste der Phantomspeisung - Wenn diese Taste hereingedrückt ist, benutzt der TM300 eine Phantomspeisung
von 48 Volt an den Pins 2 und 3 aller XLR-Mikrophonanschlüssen der Kanälen. ACHTUNG: Benutzen Sie diese Taste
nur, wenn der TM300 ausgeschaltet ist. Bevor Sie die Phantomspeisung aktivieren, versichern Sie sich, daß alle anderen
Signal-Quellen, außer die Mikrofons (wie z.B. die passiven Direct Injection Boxen) nicht angeschlossenen sind. Selbst
wenn die Phantomspeisung keine negativen Effekte auf das angeschlossene Dynamic-Mikrofon hat, ist es besser diese
zu benutzen, wenn nur ein oder mehrere elektrostatische Mikrofone mit dem TM300 verbunden sind. Lesen Sie das
Benutzerhandbuch Ihres Mikrofons, um festzustellen, ob er eine Phantomspeisung von 48 Volt benötigt (wir
übernehmen keine Verantwortung im Fall einer Beschädigung eines Mikros bei einer falschen Benutzung der
Phantomspeisung). Wenn Sie nicht wissen, ob einer oder alle angeschlossenen Mikrofone eine 48 Volt
Phantomspeisung benötigen, lassen Sie die Taste ausgeschaltet.
15: Meter / Headphone Source Schalter - Wenn dieser Schalter ausgeschaltet ist („Off“), kann das Signal des Stereo
Ausgangs Rechts/Links mit Hilfe des Kopfhörer-Anschlusses abgehört werden (siehe Nr.24 auf der folgenden Seite), und
auf der zehn-stufigen Anzeige beobachtet werden (siehe Nr.11 der vorgehenden Seite). Wenn er hereingedrückt wurde,
können die Ausgangssignale 1 und 2 der Aux-Abgänge mit dem Kopfhörer-Anschluß abgehört werden und auf der
zehn-stufigen Anzeige beobachtet werden.
16: Rev To Aux 1 Potentiometer - Dieser Regler bestimmt den Pegel des vom internen DSP-Prozessors kommenden
und dem Aux Send 1 zugeteiltem Signal. Das ermöglicht eine Reverberation oder eine andere Bearbeitung, den Signale
des Onstage Monitors, den Signalen des mit der Klinkenbuchse des Aux-Abgangs 1 Aux Send 1 des TM300 (wenn
dieser in der normalen Stereo Konfiguration arbeitet) verbundenen Kopfhörers, oder den Signalen des rechten
Lautsprecherausgangs zuzufügen, wenn der TM300 in der Konfiguration „Spilt Mono“ bedient wird, d.h. wenn die Taste
Aux 1/Monitor (siehe Nr.20 der folgenden Seite) hereingedrückt ist. Weitere Informationen erhalten Sie in den
Verkabelungsschemata der Seiten 11 und 12.
41
DEUTSCHE
12: Netzspeisung-LED (Power) - Leuchtet fortwährend grün, sobald der TM300 eingeschaltet ist.
Übersicht - Hauptabschnitt
17: DSP EInstellschalter - Ermöglicht Ihnen jeden der drei Preset Effekte für den eingebautem DSP einzustellen: Vocal,
Long Hall (“L HALL”) oder Short Hall (“SHALL”).
18: DSP On/Off Taste - Wenn diese hereingedrückt ist („On“), wird das vom internen DSP herrührende Ausgangssignal
der Aux-Rückführung 2 zugeteilt. Wenn sie es nicht ist („Off“), empfängt die Aux-Rückführung 2 stattdessen ein Signal
von irgendeines der an den Klinkenbuchsen der Aux-Rückführungen angeschlossenen Geräten.
19: Aux 1 / Monitor Taste - Wenn diese hereingedrückt ist, wird das Signal des Aux-Abgangs 1 dem rechten Kanal des
Leistungsverstärkers des TM300 zugeführt, und der Stereo Mix wird automatisch in Mono gewandelt, und dann dem
linken Kanal des Leistungsverstärkers zugeteilt. Das ermöglicht eine „Split Mono“ Benutzung des TM300, die gleichzeitig
die „Front Of House“-Beschallungslautsprecher (vom linken Ausgang aus) und die Onstage Monitoren (vom rechten
Ausgang aus) bedient, ohne einen externen Leistungsverstärker zu benötigen. Wenn er in der Konfiguration „Split Mono“
benutzt wird, ermöglicht der Rev To Aux 1 ein vom internen Effekt-Prozessor herrührendes Signal den Onstage
Monitoren zuzuführen (das Signal kann auch der Aux-Rückführung 2 zugesender werden, um eine gleichzeitige
Bearbeitung des Beschallungssignals vorzunehmen).
DEUTSCHE
20: EQ On/ Off Taste (L,R)- Wenn dieser Schalter hereingedrückt ist („On”), wird der jeweilige Kanal des sieben-Band
Masters graphischen Equalisers aktiviert. Wenn Sie nicht hereingedrückt ist („Off“), ist der jeweilige Kanal des siebenBand Masters graphischen Equalisers inaktiv, welche EQ-Einstellungen auch vorgenommen wurden (siehe unter Nr.22).
Merken Sie: Menn der TM300 in der „Split Mono“ Konfiguration bedient wird (d.h., wenn die Taste Aux 1/Monitor
hereingedrückt ist, siehe unter Nr.22), bedient der linke Kanal des graphischen Equalisers die HauptBeschallungslautsprecher, und der rechte Kanal die Onstage Monitoren. Das verhindert die Benutzung eines separaten
graphischen Equalisers für die Onstage Monitoren.
21: Graphischer EQ Schieber - Diese Schieber ermöglichen Ihnen eine Verstärkung von +/- 12 dB auf sieben
Frequenzen zu erhalten. Wenn ein Schieber sich in der Mitte befindet (auf „0“) wird der Frequezgang nicht beeinflußt
(die Gangkurve ist flach). Wenn der Schieber nach oben geschoben wird (über „0 dB“ hinaus gen „+ 12 dB“), wird der
Frequezgang angehoben. Wenn der Schieber nach unten geschoben wird (unter „0 dB“ gen „- 12 dB“), wird der
Frequenzgang abgeschwächt.
22: Stereo Faders - Diese linearen Potentiometer bestimmen den Pegel der Stereo Ausgänge Links/Rechts. Die „0“Position jedes Faders zeigt den Verstärkungsfaktor eins an (keine Anhebung, keine Abschwächung des Signals). Wenn
Sie den Fader über diese Position hinaus bewegen (gen „∞”), wird das Signal abgeschwächt (im Minimum wird kein
Signal vernommen). Um einen optimalen Geräuschspannungsabstand zu erhalten, sollten die zwei Faders sich in nahe
der „0“-Position halten. Weitere Informationen erhalten Sie unter „Einstellung der Gain-Struktur“ auf Seite 43.
23: Kopfhörerpegel - Dieser Potentiometer bestimmt den Signalpegel des Kopfhörer-Anschlusses (siehe Nr.25
hierunter). ACHTUNG: Um jede mögliche Beschädigung des Kopfhörers zu vermeiden (oder schlimmer noch, Ihrer
Ohren!), drehen Sie den Regler ganz herunter, bevor Sie den Kopfhörer anschließen, und heben Sie dann langsam den
Pegel. Der Kopfhörerpegel hat keine Auswirkungen auf die anderen Ausgänge des TM300.
24: Kopfhörer-Anschluß - Verbinden Sie irgendeinen normalen Stereo Kopfhörer mit diesem Anschluß
(Klinkenbuchsen-Anschluß 6,35 mm), um ein persönliches Abhören des Stereo-Ausgangs, der Aux-Abgänge oder der in
Solo mit Hilfe einer der PLF-Tasten (je nach der Einstellung des Schalters Meter/Headphone Source - siehe unter Nr.15
der vorhergehenden Seite) eingestellten Kanäle vorzunehmen. Der eingebauter Kopfhörer-Vorverstärker des TM300
liefert eine Leistung von ungefähr 100 mW.
42
Übersicht - Rückseite
POWER
TM300 6 CHANNEL 150WATT STEREO MIXER
SAMSON
CAUTION
CAUTION:
DO NOT BLOCK AIRFLOW
ON
SERIAL NUMBER
OFF
RISK OF ELECTRIC SHOCK
DO NOT OPEN
AVIS;
RISQUE DE CHOC ELECTRIQUE
NE PAS OUVRIR
DO NOT EXPOSE THIS EQUIPMENT
TO RAIN OR MOISTURE.
SPEAKER
OUT
CAUTION: TO REDUCE THE
USE CLASS 2 WIRING
MINIMUM LOAD
IMPEDANCE 4 Ω
RISK OF FIRE, REPLACE ONLY
WITH SAME TYPE FUSE.
FUSE
8A/250V(115V)
4A/250V(230V)
AC INPUT
115V/230V,50/60Hz
780W
R
1
2
3
L
4
5
6
1: Belüftung - Um eine wirksame Kühlung Ihres TM300 zu sichern, garantieren Sie,
daß die Belüftungsöffnungen immer freistehen.
2: Sicherungsfach - Eine 8 A / 250 V Sicherung für eine 115 Volt Bedienung, oder eine
4 A / 250 V Sicherung für eine 230 Volt Bedienung.
4: Lautsprecher-Ausgänge - Diese Ausgänge sind die wichtigsten Ausgänge des
TM300. Benutzen Sie die vier beigefügten unsymmetrschen Mono KlinkenbuchsenAnschlüsse (zwei für die linke Signalsendung und zwei für die rechte), um den TM300
mit 4 Ohm Lautsprechern oder mehr (d.h. 4, 8, oder 16 Ohm) zu verbinden. Je schwächer die Impedanz ist, desto größer ist die der Ausgangsleistung. Wir empfehlen die
Benutzung von 4 Ohm Lautsprechern für eine Langzeitbedienung. Der TM300 führt eine
Leistung von 150 Watt pro Kanal in 4 Ohm mit einer nichtlinearen Verzerrung von
weniger als 1%. Um eine Phasenopposition zu vermeiden, sollte die Spitze der
Lautsprecher-Klinkenbuchse des TM300 mit dem „+“ (heiß) Ihres Lautsprechers
verbunden werden, und der Schaft der Lautsprecher-Klinkenbuchse des TM300 mit dem
„-“ (Masse) Ihres Lautsprechers. Merken Sie sich, daß wenn die Taste Aux 1/Mono (sie
Nr.19 auf Seite 40) gedrückt wurde, arbeitet der TM300 in der Konfiguration „Split
Mono“, und der linke Lautsprecherausgang sendet das Signal des Stereo Ausgangs der
Vorderseite (wird intern in Mono gewandelt). Der rechte Lautsprecherausgang trägt dann
das Signal.
5: Power On-Off Schalter - Der TM300 wird mit diesem Schalter ein- und ausgeschaltet. Wenn der TM300 mit externen Leistungsverstärkern (via seiner Haupt-Einführung
Main Insert und/oder seinen Mono Ausgangsbuchsen, siehe Nr.4 und Nr.6 auf Seite 38)
verbunden ist, schalten Sie das Pult ein, bevor Sie die angeschlossenen Verstärker
einschalten, und schalten Sie ihn aus, nachdem Sie die angeschlossenen Verstärker
ausgeschaltet haben.
6: Ventilator - Dieser Ventilator mit variabler Geschwindigkeit bringt dem
Leistungsverstärker Ihres TM300 die nötige Kühlung (je heißer der Verstärker wird,
desto schneller bläst der Ventilator!). Versichern Sie sich, daß frische Luft jederzeit
verfügbar ist. Versuchen Sie den TM300 in einer staubfreien Umgebung zu bedienen.
43
DEUTSCHE
3: Netzanschluß - Schließen Sie hier das beigefügte Netzkabel an, um den TM300 mit
Strom zu versorgen.
Einstellung und Bedienung des TM300
Sie benötigen nur wenige Minuten, um Ihren TM500 betriebsfähig zu machen:
1. Entfernen Sie alle Verpackungsmaterialien (bewahren Sie diese jedoch für den Fall
auf, daß Sie sie noch einmal benötigen) und suchen Sie einen Standplatz für den TM300
aus. Versichern Sie sich, daß die Belüftungsöffnung der Rückseite und der Ventilator
nicht versperrt sind, und daß eine ausreichende Luftzufuhr gewährleistet ist.
2. Bevor Sie den TM300 an das Stromnetz anschließen, verbinden Sie zunächst die
Lautsprecher. Es ist niemals gut, einen nicht mit Lautsprecher verbundenen Verstärker
einzuschalten. Jeder Lautsprecher mit einer Impedanz von minimum 4 Ohm (d.h. 4 Ohm
oder mehr) kann verwendet werden. Wir empfehlen die Benutzung von 4 Ohm
Lautsprechern. Um eine richtige Synchronisierung zu sichern, versichern Sie sich, daß
die Spitze der Lautsprecher-Klinkenbuchse des TM300 mit „+“ (heiß) Ihres Lautsprecher,
und der Schaft der Lautsprecher-Klinkenbuchse des TM300 mit „-“ (Masse) Ihres
Lautsprechers verbunden ist.
DEUTSCHE
2a. Wenn Sie vorhaben, den TM300 in einer normalen Stereo Konfiguration zu
benutzen, versichern Sie sich, daß der Aux 1 / Monitor Schalter in die obere Position
(„Out”) eingestellt ist, und verbinden Sie Ihren linken Beschallungslautsprecher mit dem
linken Lautsprecherausgang und Ihren rechten Beschallungslautsprecher mit dem
rechten Lautsprecherausgang. Siehe Seite 11 für Beispiele.
2b. Wenn Sie vorhaben, den TM300 in einer “Split Mono” Konfiguration zu benutzen,
versichern Sie sich, daß der Aux 1 / Monitor Schalter auf “On” steht, und verbinden Sie
Ihren Beschallungslautsprecher mit dem linken Lautsprecherausgang und Ihre Onstage
Monitoren mit dem rechten Lautsprecherausgang. Siehe Seite 12 für Beispiele.
3. Unternehmen Sie nun alle notwendigen Verbindungen der verschiedenen Line-Pegel
Ausgänge des TM300 (Ausgänge Record Out, Mono Out, und Aux-Abgänge 1 und 2)
und der Line-Pegel Eingänge (Eingänge Tape In, Aux-Rückführungen 1 und 2).
Unternehmen Sie noch keine Einführungsverbindungen—diese sollten nach der
korrekten Einstellung der Gain-Struktur vorgenommen werden (siehe Seite 43 - 44).
4. Unternehmen Sie die Verbindungen der Mikrofon- oder Line-Eingänge der verschiedenen Kanäle. ACHTUNG: Verbinden Sie nicht einen Line-Eingang eines Kanals, wenn
Sie schon den Mikrofon-Eingang der Kanälen angeschlossen haben oder andersherum.
Jeder Mono Kanal wurde so ausgelegt, nur eine der zwei Quellen anzunehmen.
5. Bewegen Sie alle Kanal-Faders und die Stereo Faders Links/Rechts „∞” (Minimum).
Drehen Sie alle Abgleichpotentiometer ganz herunter. Drücken Sie den Schalter der
Phantomspeisung auf der Vorderseite wieder heraus, um die Speisung zu desaktivieren,
außer wenn Sie sicher sind, daß alle angeschlossenen Mikros mit einer
Phantomspeisung von 48 Volt funktionen. Wenn dies der Fall ist, drücken Sie den
Schalter der Phantomspeisung herin, um die Speisung zu aktivieren.
6. Schließen Sie den TM300 an irgendeinen Netzanschluß mit Hilfe des beiliegenden
Kabels. Dank der Schutzkreise durch spezifische eingebaute Relais, können Sie den
TM300 mit dem gleichen Multi-Anschluß anderer Audio-Geräten anschließen. Sie können somit alle Geräte gleichzeitig mit einem Schalter anschalten, ohne die
angeschlossenen Lautsprecher zu beschädigen (Aufhebung bei dem Anschalten hervortretenden momentanen Überspannungen).
7. Betätigen Sie zum Einschalten des TM500 den auf der Rückseite befindlichen
Netzschalter. Die Power-LED auf der Vorderseite leuchtet auf.
44
Einstellung der Gain-Struktur
Sie sind nun bereit den Gain korrekt einzustellen. Diese Einstellung ist notwendig, um die vielen
Möglichkeiten Ihres TM300 oder jedes Mischpults zu benutzen. Die Einstellung ist eine
Kleinigkeit, die optimale Eingangs- und Ausgangspegel versichert, damit unnötige Geräusche
(von einem zu schwachen Signal horvorgerufen) oder eine Verzerrung (von einer Überladung
eines zu starken Signals hervorgerufen) vermieden werden. Sie finden hierunter eine ausführliche Beschreibung der Bedienung:
a. Sobald alle Anschlüsse vorgenommen wurden (wie auf der vorhergehenden Seite dargestellt),
das Gerät aber abschaltet ist (Off), bewegen Sie die Faders der Mono und Stereo Kanäle auf Ihr
Minimum („∞”).
b. Drehen Sie alle Abgleichpotentiometer der Kanäle ganz nach links.
c. Stellen Sie alle EQ-Regler der Kanäle auf die mittlere Position („0“), und desaktivieren Sie den
graphischen sieben-bändigen Equaliser, indem Sie die Tasten EQ On/Off auf Off schalten.
d. Stellen Sie die Taste Meter/Headphone Source nach oben auf L/R-Position, damit die Anzeige
des TM300 den fortwährenden Pegel des Stereo Signalpegels Links/Rechts angibt.
e. Stellen Sie alle Potentiometer der Aux-Abgänge der Kanäle und Aux-Rückführungen des
Haupt-Teiles auf Ihre Minimums („∞”). Drehen Sie die Potentiometer des Eingangs Tape In und
Rev To Aux 1 auf „∞”.
f. Stellen Sie beide Potentiometer der Aux-Eingänge des Haupt-Teiles auf „0”.
g. Schalten Sie alle an den Aux-Rückführungen und Line-Eingängen der Kanäle des TM300
angeschlossenen Geräte an, und stellen Sie alle Pegel auf Verstärkung eins ode auf das
Maximum, wenn keine Abgaben über die Verstärkung eins der Einstellung angegeben werden.
i. Spielen Sie auf ein an einem der Line-Eingänge** des TM300 angeschlossenes Instrument,
und erhöhen Sie währendessen den Fader des jeweiliges Kanals bis zur „0“-Position. Die
Anzeige sollte sich normalerweise bewegen: regeln Sie dann den Abgleichpotentiometer dieses
Kanal-Eingangs, damit die „0“-Stufe öfters aufleuchtet und die „+ 3“-Stufe nur ab und zu. Die
Spitzenbegrenzungs-LED dieses Kanals darf selbst bei den höchsten Eingangssignalen nicht
aufleuchten. Wenn das Eingangssignal zu hoch zu sein scheint, selbst wenn der
Abgleichpotentiometer des Eingangskanals auf sein Minimum eingestellt ist,vermindern Sie den
Ausgangspegel des Instrumentes. Diese Situation kommt selten vor. Im Gegenteil aber, wenn
das Signal zu schwach ist, obwohl der Abgleichregler auf sein Maximum eingestellt ist, liegt ein
Problem vor: aller Wahrscheinlichkeit nach, kommt dies von das zur Verbindung verwendete
Audio-Kabel.
j. Wenn Sie erst die Einstellungen vorgenommen haben (i), fahren Sie mit dem Spielen fort, und
erhöhen Sie langsam die Faders des Ausgangs Links/Rechts, bis Sie den gewünschten
Hörpegel erreichen.
k. Wiederholen Sie den Schritt (i) hierüber für jedes an den Line-Eingängen der Mono- und
Stereo-Kanäle des TM300 angeschlossene Instrument.
* ACHTUNG: Bevor Sie die Phantomspeisung anschalten, versichern Sie sich, daß alle
angeschlossenen Mikrons und/oder Direct Injection Boxen eine externe 48 Volt Speisung
benötigen.
** Wenn Sie ein Instrument wie eine Gitarre oder einen elektrischen Bass benutzen, verbinden
Sie sie den TM300 mit Hilfe einer DI Box, um deren Impedanz die des TM300 anzupassen.
45
DEUTSCHE
h. Wenn Sie elektrostatische Mikrofone am Eingang des TM300 benutzen, drücken Sie die Taste
der Phantomspeisung herein.* Schalten Sie nun den Hauptschalter Power auf „On“, um den
TM300 einzuschalten.
Einstellung der Gain-Struktur
l. Die optimale Einstellung der Mikrofon-Pegel wird fasr identisch vorgenommen: Singen oder
sprechen Sie in das Mikro mit dem gewünschten Pegel, wobei Sie währendessen die Fader bis
zur „0“-Position erhöhen. Regeln Sie dann den Abgleichpotentiometer dieses Kanals, während
Sie die Anzeige und die Spitzenbegrenzungs-LED überwachen.
DEUTSCHE
m. Der interne Prozessor muß ein Signal aufnehmen, dessen Pegel vor der Spitzenbegrenzung
so hoch wie möglich ist. Benutzen Sie den Regler des Aux-Abgangs 2, um mit Vorsicht die
Menge des behandelten Signals zu bestimmen, die Sie mit dem nichtbehandelten Signal vermischen müssen. Bemerkung: Wenn der TM300 in der Konfiguration „Split Mono“ arbeitet, bestimmt
der Regler des Aux-Abgangs 2 die Menge des an dem Haupt-Eingang (links) zugeteilten behandelten Signals, und der Reverb-Pegelregler des Aux 1 bestimmt den Pegel des an dem Ausgang
der Onstage Monitoren (rechts) zugeteilten behandelten Signals. Drücken Sie die Taste DSP
herunter, um den internen Effekt-Prozessor zu aktivieren, und um anschließend die Bank 1 und
den Parameter 1 (im Allgmeinen ein kleiner Reverb) einzustellen. Fangen Sie an, den AuxRückführungspegel 2 auf „0“ einzustellen ( Sie können anschließend diese Einstellung ändern,
wenn Sie den Pegel des nichtbehandelten /behandelten Signals verändern möchten). Während
Sie dann einen Kanal, dessen Gain schon im Schritt (i) oder (k) eingestellt wurde, benutzen,
spielen Sie auf das an diesem Kanal anschlossene Instrument (oder singen Sie in das Mikro),
wobei Sie langsam den jeweiligen Potentiometer des Aux-Abgangs 2 nach rechts drehen, bis Sie
den gewünschten Ausgleich zwischen dem behandelten und nichtbehandelten Signal erreichen.
Wenn Sie eine Verzerrung bemerken, vermindern Sie den Pegel des Eingangssignals des internen Prozessors, indem Sie den Potentiometer des Aux-Abgangs 2 des jeweiligen Kanals nach
links drehen (oder der Haupt-Potentiometer des Aux-Abgansg 2).
Wenn Sie einen externen Effekt-Prozessors mit den Aux-Klinkenabgängen auf der Rückseite
verbunden haben, lesen Sie die folgenden Angaben. Wegen der Hintergrundgeräusche, die
manchmal von externen Effekt-Prozessoren hervorgerufen werden können, ist es besonders
wichtig, die durch die Aux-Abgänge des TM300 zugeteilten Signalpegel zu optimisieren. Wie bei
dem internen Prozessor müssen Sie versuchen, den Geräten ein vor der Spitzenbegrenzung
möglichst hohes Signal zuzusenden. Benutzen Sie dann den Pegel der Aux-Rückführung, um
mit Vorsicht den Pegel des behandelten Signals, das mit dem nichtbehandelten vermischt ist, zu
regeln. Um die Pegel der Aux-Rückführungen optimal einzustellen, benutzen Sie einen Kanal,
dessen Gain schon im vorhergehenden Schritt (i) oder (k) eingestellt wurde. Stellen Sie den
Potentiometer des Aux-Abgangs 1 dieses Kanals auf „0“, und spielen Sie dann eine Note mit
Ihrem an diesem Kanal angeschlossenen Instrument (oder singen Sie in das Mikro). Stellen Sie
die Eingangspegel des externen Effekt-Prozessors ein, damit die Anzeige einen Pegel nahe „0“
angibt. Es ist nun Zeit den Pegel der Aux-Rückführung zu optimisieren. Während Sie
weiterspielen (oder ins Mikrofon singen), erhöhen Sie langsam den Pegel der Aux-Rückführung,
bis Sie die gewünschte Mischung behandeltes/unbehandeltes Signal erreichen. Wiederholen Sie
diese Prozedur für jeden externen Apparat, der an die Aux-Klinke 2 (die nur aktiv ist, wenn die
DSP-Taste auf „Off“ steht) angeschlossenen ist.
o. Die Gain-Struktur ist nun korrekt eingestellt: Sie haben den Pegel aller eintretenden und austretenden Signale im TM300 optimiert. Das Ergebnis sind minimale Hintergrundgeräusche und
Verzerrungen und eine maximale Klarheit des Klangs. Sie können nun Ihre Kanaleinführungsoder Haupteinführungs-Prozessoren wie gewünscht anschließen (Komprossoren, Begrenzer,
Noise Gate, etc.). Die Geräte müssen mit Line-Pegel und Verstärkung eins bedient werden.
Sie können nun feststellen, daß die Mehrheit Ihrer Mix mit der Einstellung der Faders nahe „0“
(Verstärkung eins) durchgeführt werden können, und daß die Spitzenbegrenzungs-LEDs nur
selten aufleuchten. Erinnern Sie sich, wenn diese aufleuchten, wird auf eine Übersteuerung
hingewiesen! Wenn Sie den allgemeinen Pegel einstellen möchten, verwenden sie die Stereo
Faders Links/Rechts des Haupt-Ausgangs.
Weitere Angaben über dieses Produkt, erhalten Sie bei Ihrem nächsten Fachhändler SAMSON .
46
Introducción / Características de la TM300
Sabemos que no le gusta leer libros de instrucciones, pero lo que acaba de adquirir es una de
las más poderosas mesas de mezclas amplificadas del mundo, y queremos que la domine
totalmente! Por ello, antes de que comience a conectar cables y a hacer música, le
recomendamos que pierda unos pocos minutos en cuando menos ojear estas páginas.
Seremos lo menos pesados que nos sea posible, se lo prometemos - y, quien sabe, puede
que le enseñemos un par de trucos que no sepa.
El Samson TM300 es una mesa de mezclas autoamplificada muy práctica y totalmente equipada
con 6 canales stereo –completado con un procesado de señal interno - todo ello en un
compacto diseño de sobremesa. Resulta ideal para usarla en estudios de ensayo, pequeños
clubes, verbenas y otras aplicaciones de refuerzo de sonido – de hecho, puede usarla en
cualquier momento en que necesite realizar una mezcla a salida stereo de micrófonos o fuentes
con nivel de línea. Conéctela simplemente a un par de altavoces de PA y ya estará listo!
En estas páginas, encontrará un resumen general de las características de la TM300, junto con
un recorrido guiado por sus paneles frontal y trasero. Finalmente, se encontrará con secciones
como los apéndices de referencia así como todas las especificaciones. También encontrará una
tarjeta de garantía dentro del embalaje – le rogamos que no olvide rellenarla y devolvérnosla por
correo para que pueda recibir soporte técnico online y para que le podamos enviar información
actualizada en el futuro acerca de otros productos Samson. También, no olvide entrar en
nuestra página web (http://www.samsontech.com) para poder tener una información completa
de toda nuestra línea de productos.
NOTA ESPECIAL: Para el caso de que su TM300 tuviese que ser reparada, es necesario tener
un número de Autorización de Devolución (RA). Sin este número, la unidad no será aceptada en
nuestro servicio técnico. Si adquirió la unidad en los Estados Unidos, póngase en contacto con
Samson en el 1-800-372-6766 para que le faciliten un número de Autorización de Devolución
antes de enviar la unidad. Si compró este aparato en cualquier otro país, contacte con su distribuidor Samson local para que le de los detalles del proceso. Guarde siempre el embalaje original y los materiales de protección y, si es posible, devuelva la unidad dentro de este embalaje.
Características de la TM300
El diseño compacto de la TM300 oculta su extraordinaria versatilidad y su insuperable calidad
sonora. Aquí tiene algunas de sus características principales:
• Un conexionado flexible permite usar la TM300 tanto en una configuración stereo standard
como en un modo ‘mono dividido’ específico, en el que puede controlar tanto altavoces PA
como monitores de escenario de forma simultánea.
• Una etapa de potencia stereo interna desarrolla 150 watios por canal a 4 ohmnios. Puede
conectar cualquier caja standard (de cuatro, ocho o dieciséis ohmnios) a las cuatro clavijas de
salida de altavoces de 1/4" del panel trasero.
• La etapa de potencia utiliza un ventilador de velocidad variable así como un diseño bipolar
para conseguir la máxima precisión y durabilidad.
• Procesador digital de señal interno (DSP) con tres efectos de máxima calidad.
47
ESPAÑOL
• Seis canales independientes, cada uno de ellos con entradas de micro y de línea. Esto le
permite mezclar juntas una gran variedad de señales de origen, incluyendo señales de micros
dinámicos o condensadores, teclados, reproductores de cinta/CD, etc. Dispone en cada canal
de conectores de micro XLR standard (para las entradas de micro) y clavijas de 1/4"
balanceadas electrónicamente (para las entradas con nivel de línea). Además, hay unos
conectores duales de tipo phono (RCA) específicos para la entrada de cinta stereo.
Características de la TM300
• Un interruptor de alimentación fantasma le permite usar la TM300 con micrófonos
condensadores de alta calidad. Cuando se activa este interruptor, se suministran 48 voltios de
alimentación fantasma a los conectores de micro de todos los canales.
• Dos envíos auxiliares por canal (uno pre y el otro post-fader) le permiten dirigir señales
múltiples al DSP interno o a procesadores de señal exteriores.
• Unos retornos auxiliares stereo dobles – con controles de nivel específicos en el panel frontal
– le dan la posibilidad de mezclar la señal de retorno que viene del DSP interno y/o los
procesadores de señal exteriores u otras unidades con nivel de línea sin tener que utilizar los
canales de entrada.
• Una amplia ecualización que incluye EQ independiente de 3 bandas para cada canal, con 15
dB de corte o realce para las frecuencias graves (100 Hz) y agudas (10 kHz), y 12 dB de corte
o realce para las frecuencias medias (1.8 kHz). Además, un ecualizador gráfico master de
siete bandas le permite ‘afinar’ la salida de la TM300 al tipo de ambiente de sala concreto en
el que esté – lo cual es particularmente útil para eliminar los problemas de repiques o realimentaciones. Este ecualizador gráfico puede ser usado en stereo o puede ser ‘dividido’ de tal
forma que un lado afecte a la señal PA principal y el otro afecte a los monitores de escenario.
• Controles de panorama de nivel constante para cada canal mono que le permiten colocar con
total precisión cada una de las señales de entrada en el plano izquierda-derecha.
• Muescas centrales en todos los controles de panorama y EQ, que le hacen muy fácil usar la
TM300 incluso en las situaciones de actuaciones en vivo con menos iluminación que se pueda
imaginar.
• Controles de ajuste o Trim de entrada de rango amplio totalmente ajustables para cada uno de
los canales que le permite ajustar con precisión la estructura correcta de ganancia de entrada
y salida.
• Faders de 65 mm independientes para cada uno de los canales y para el bus stereo.
• Función de solo con escucha pre fader (PFL) para cada canal, que permite la monitorización
por auriculares de los canales individuales, pre-fader (pero post-EQ) sin afectar con ello a la
señal que esté siendo enviada al exterior tanto por los altavoces como por las diversas salidas
de nivel de línea.
ESPAÑOL
• Un sistema de medidores en el panel frontal que incluye un medidor de nivel de diez
segmentos y que le permite visualizar rápidamente los niveles continuos de la salida stereo
principal y/o de los envíos auxiliares.
• LEDs de picos para cada canal que le enseñan con solo un vistazo rápido cuando una señal
de entrada está en el límite de la sobrecarga.
• LEDs de estado específicos que muestran el estado on/off del encendido general y de la
alimentación fantasma.
• Conectores de salida de grabación aparte (con control de nivel específico) que le permiten
conectar directamente la TM300 a cualquier grabadora de cinta. Además de esto, dispone de
un útil conector de salida Mono que ofrece una señal de nivel de línea para la conexión a
etapas de potencia de monitorización exteriores.
• Una salida de auriculares independiente en el panel frontal con un control de volumen propio
para la monitorización en privado de la salida stereo principal, los envíos auxiliares o los
canales activados como solistas.
• Inserciones principales y cuatro inserciones de canal que le permiten usar procesadores de
señal exteriores como ecualizadores, compresores/limitadores, o puertas de ruido en un ‘bucle
de efectos’ standard.
• Y lo último pero no por ello menos importante, la comodidad. La TM300 ha sido diseñada
desde sus cimientos para ofrecer una versatilidad y una calidad de sonido excelentes a un
precio muy asequible.
48
Recorrido guiado: Canales
1
MIC
2
LINE
3
INSERT
PEAK
E
N
0
4
M
IC
2: Entradas de línea – Utilice estos conectores balanceados electrónicamente de 1/4"
para conectar fuentes de nivel de línea como sintetizadores, cajas de ritmos o
procesadores de efectos a cualquiera de los doce canales de la TM300. Utilice cables
balanceados de tres filamentos y conectores de punta/anillo/lateral (TRS) siempre que sea
posible (los conectores no balanceados de dos filamentos también pueden ser insertados
en estas entradas, pero conseguirá la mejor calidad de señal y el menor ruido exterior si
utiliza líneas balanceadas). PRECAUCION: No conecte nunca una entrada de línea de
canal si ya tiene algo conectado en su entrada de micro (vea el punto 1 anterior); todos los
canales han sido diseñados para aceptar solo una de las dos fuentes.
1
LI
1: Entradas de micro – Utilice estos conectores XLR balanceados electrónicamente para
conectar micrófonos a la TM300. Estas clavijas están pensadas para aceptar señales de
micros de bajo nivel, baja impedancia, si bien pueden ser usadas también para señales de
otras fuentes (como las unidades de inyección directa) si el control Trim de ese canal (vea
el punto 5 de abajo) es disminuido. PRECAUCION: No conecte nunca una entrada de
micrófono de canal si ya tiene algo conectado en su entrada de línea (vea el punto 2 siguiente); todos los canales han sido diseñados para aceptar solo una de las dos fuentes.
5
–6 –50
+14
–30
TRIM
0
3: Inserciones de canal – Sólo disponibles en los canales 1 - 4. Utilice estas tomas
para insertar un procesador de efectos exterior (como un ecualizador, compresor/limitador
o puerta de ruidos exterior) en cualquiera de los canales mono de la TM300 en una
configuración de ‘bucle de efectos’. Estas clavijas aceptan conectores TRS de 1/4", en los
cuales el anillo lleva la señal de envío y la punta la de retorno. Normalmente, estarán
conectados a un cable en Y.
–15
+15
HIGH
0
6
–12
+12
MID
0
–15
+15
LOW
4: Indicador LED de picos – Este piloto de aviso le indica una condición de sobrecarga.
Se ilumina siempre que una señal de canal está a 3 dB de la saturación. Para hacer que
no se ilumine (y eliminar la distorsión sónica que viene con ello), disminuya la posición del
mando de ajuste o Trim del canal de entrada (vea el punto 5 de abajo) o reduzca la
cantidad de realce de ecualización (vea el punto 6 de abajo).
0
+10
AUX 1 PRE
7
0
+10
5: Trim o ajuste – Determina el nivel de entrada de la señal conectada. Esto es un
mando giratorio que es ajustable continuamente de +14 dB a -30 dB (en el caso de las
entradsa de nivel de línea) o de –6 a –50 dB (en el caso de las entradas de nivel de
micro). La señal de entrada es realzada cuando el mando se gira a la derecha y atenuada
cuando se gira a la izquierda. Para ver más información acerca de cómo ajustar
correctamente esto en cada canal, vea la sección titulada ‘Ajuste de la estructura de
ganancia correcta’ en la página 54.
7: Envíos auxiliares – Estos mandos le permite dirigir la señal a cualquiera de las dos
o a ambas salidas auxiliares monofónicas de la TM300. Estos envíos se utilizan
habitualmente para crear submezclas (por ejemplo, una mezcla de pruebas de
auriculares) y para dar señal desde un canal individual o desde varios canales a unidades
de efectos exteriores. En la posición ‘0’ (las dos en punto), la señal es enviada con la
ganancia unitaria (es decir, sin realce ni atenuación). Al mover cada mando hacia la
49
L
R
8
PAN
PFL
9
0
10
15
10
20
25
30
35
40
O
1
ESPAÑOL
6: Ecualizador – Estos mandos giratorios determinan la cantidad de realce o atenuación
para cada banda de frecuencia (hasta 15 dB para las frecuencias grave y aguda, y hasta
12 dB para las frecuencias medias). El control de frecuencia media (con centro en 1.8
kHz) utilizan una curva de pico resonante (‘campana’), mientras que los controles de
frecuencia grave y aguda (con centros en 10 kHz y 100 Hz, respectivamente) usan curvas
de estantería. Una muesca central en cada mando (en la posición ‘0’) indica la posición de
no realce ni atenuación (es decir, la respuesta plana). Al mover cada mando a la derecha
desde su posición ‘0’, esa zona de frecuencia es realzada; al moverlo a la izquierda desde
la posición ‘0’, esa zona es atenuada.
AUX 2
Recorrido guiado: Canales
derecha desde la posición ‘0’, la señal es realzada; al mover cada mando hacia
la izquierda desde esta posición ‘0’, la señal es atenuada. El envío auxiliar 1 es
pre-eq y pre-fader; es decir, el nivel de la señal es determinado únicamente por
su control de ajuste o Trim (vea el punto 5 de la página anterior). En contraste
con esto, el envío auxiliar 2 es post-eq y post-fader; es decir, el nivel de señal es
determinado por el control Trim del canal, sus ajustes EQ y la posición de su
fader. El envío auxiliar 2 también se usa para dirigir la señal al DSP interno del
TM300.
8: Pan – Este mando le permite colocar la señal de entrada en cualquier punto
en el espectro stereo izquierda-derecha, manteniendo a la vez el nivel global de
la señal constante. Cuando el mando es colocado en su posición central (con
muesca), la señal es enviada por igual a las salidas principales izquierda y
derecha. Cuando lo desplaza desde el centro hacia la izquierda, una menor
cantidad de señal será enviada a la salida derecha y más a la izquierda
(haciendo que el sonido parezca estar a la izquierda del centro) y actuando a la
inversa cuando desplace el mando a la derecha de la muesca central. Para
dirigir una señal totalmente a la izquierda o la derecha, coloque el mando de
panorama o pan completamente a la izquierda o la derecha.
9: Interruptor PFL (‘escucha pre fader’) – Cuando lo pulse, el canal será
colocado como solista en los auriculares que tenga conectados (vea el punto 24
de la página 51). Este modo solista es no-destructivo; es decir, no tiene efecto
sobre la salida principal stereo.
ESPAÑOL
10: Fader de canal – Este mando deslizante lineal determina el nivel de señal
que está siendo enviado a la salida principal así como también afecta al nivel de
señal que esté siendo dirigido al envío auxiliar 2 (que es post-fader; es Aux 1 es
siempre pre-fader). En la práctica, utilizará los faders de canal para ajustar de
forma continua los niveles de las diversas señales que esté mezclando con la
TM300. La posición ‘0’ del fader indica la ganancia unitaria (sin realce ni
atenuación de nivel). El desplazar el fader hacia abajo desde la posición ‘0’
(hacia el ‘∞’) hace que la señal sea atenuada (abajo del todo, la señal es
atenuada infinitamente, o en otras palabras, no hay sonido).
Para conseguir la mejor relación señal-ruido, todos los faders de canales que
lleven señal deberían ser mantenidos en lo posible lo más cerca de sus
posiciones ‘0’. Los canales que no estén siendo usados deberían tener sus
faders totalmente abajo en su nivel “∞” (mínimo). Vea la sección ‘Ajuste de la
correcta estructura de ganancia’ en la página 54 de este manual para más
información.
50
Recorrido guiado – Sección principal
1: Entrada de cinta (L, R) – Conecte las
salidas de un reproductor de CD o de cinta a
este grupo de conectores phono duales. El
volumen de la señal entrante es controlado
por el control de nivel de entrada de cinta
(vea el punto 7 de la página siguiente).
2: Retornos auxiliares (1, 2) – Conecte la
señal de unidades stereo exteriores como
pueden ser procesadores de efectos a estas
clavijas de º” no balanceadas.
3
TAPE IN
–10dB
REC OUT
+4dB
L
R
MONO OUT+4dB
L
5
R
1
AUX RET1
AUX SEND 1
INSERT
+4dB
3: Salidas de grabación (L, R) – Este
grupo de conectores phono duales le
permiten conectar la salida de la TM300 a
las entradas de una grabadora de dos pistas.
El volumen de la señal entrante es
controlado por el control de nivel de salida
de grabación (vea el punto 8 de la página
siguiente).
R
L
R
MAIN
6
L/MONO
AUX RET 2
AUX SEND 2
POST EQ
4
SAMSON
11
7
0
LEFT
AUX1
RIGHT
AUX2
POWER
8
+4
+10
TAPE IN
0
9
+4
+4
+2
+2
12
REC OUT
0
0
0
-2
-2
-4
-4
13
PHANTOM
+10
+10
AUX RET 1
10
AUX RET2/REV
OFF
14
ON
0
0
+10
-9
-12
-15
-15
-20
-20
-25
-25
METER HEADPHONE
SOURCE
+10
AUX SEND 1
AUX SEND 2
DSP
0
16
-9
-12
L/R
AUX 1/2
15
VOCAL
6 CHANNEL 150 WATT STEREO MIXER
+10
19
REV TO AUX 1
AUX 1/MONITOR
L HALL
17
EQ ON/OFF
LEFT
S HALL
63Hz
160Hz 400Hz
1KHz
RIGHT
20
2.5KHz 6.4KHz 15KHz
+12dB
18
ON
L
0dB
-12dB
63Hz
160Hz 400Hz
1KHz
21
2.5KHz 6.4KHz 15KHz
+12dB
10
10
0
0
R
22
4
4
8
8
12
12
0dB
-12dB
63Hz
160Hz 400Hz
1KHz
2.5KHz 6.4KHz 15KHz
0
23
+10
16
16
20
20
26
26
OO
OO
LEVEL
24
HEADPHONE
L
–STEREO–
R
5: Salida mono – Esta entrada no
balanceada de 1/4" ofrece una salida
monofónica con nivel de línea, que no es
afectada por los faders stereo (vea el punto
22 en la página 51). Puede usarla para
conectar la TM300 a un sistema exterior de
mezclador/amplificador/altavoz monitor para
que los músicos puedan recibir una mezcla
de monitor de escenario.
6: Envíos auxiliares (1, 2) – Estas conexiones no balanceadas de 1/4" le permiten
dirigir la señal desde cualquiera de los dos envíos auxiliares de la TM300 a unidades
exteriores como pueden ser procesadores de efectos. El envio auxiliar 1 es pre-fader,
mientras que el 2 es post.
51
ESPAÑOL
4: Inserciones principales (L, R) – Utilice
estas tomas para insertar un procesador de
efectos exterior (como un ecualizador, compresor/limitador o puerta de ruidos exterior) a
las salidas stereo principales de la TM300 en
una configuración de ‘bucle de efecto’. Esto
le permite procesar la mezcla completa
simultáneamente a ganancia unitaria. El par
‘Post EQ’ de inserciones principales se ve
afectado tanto por el ecualizador gráfico
master de siete bandas como por los faders
stereo, mientras que la pareja ‘Pre EQ’ no.
Estos conectores aceptan clavijas TRS de
1/4", con el anillo llevando la señal de envío
y la punta con la señal de retorno.
Normalmente, esto será conectado a un
cable en Y. Las inserciones principales
también pueden ser usadas para enlazar
varios TM300 o para pasar la salida de otra
mezcladora a una TM300 sin tener que
perder entradas de canal de línea.
+4dB
2
Recorrido guiado – Sección principal
7: Nivel de entrada de cinta – Controla el nivel de la señal que llega a las tomas de entrada de cinta (vea el punto 1 de
la página anterior).
8: Nivel de salida de grabación – Controla el nivel de la señal que está siendo emitida por las conexiones de salida de
grabación (vea el punto 3 de la página anterior).
9: Nivel de retorno auxiliar (1,2) – Estos mandos giratorios determinan el nivel de entrada de la señal que llega a
través de las dos conexiones de retorno auxiliar stereo de la TM300 (vea el punto 2 de la página anterior). La posición ‘0’
(las dos en punto) para cada mando indica la ganancia unitaria (sin realce ni atenuación). El desplazar cada mando
hacia la izquierda desde la posición ‘0’ (hacia el ‘∞’) hace que la señal sea atenuada (en la posición de totalmente a la
izquierda, es atenuada infinitamente, o en otras palabras, no hay sonido). El desplazar el mando hacia la derecha de la
posición ‘0’ (hacia la posición ‘+10’) hace que la señal sea realzada hasta en 10 dB. Tenga en cuenta que, cuando el
interruptor DSP On/Off (vea el punto 19 de la página siguiente) es pulsado, la señal del DSP es dirigida al retorno
auxiliar 2, con el nivel del retorno auxiliar 2 controlando la cantidad de señal procesada o ‘húmeda’. Para ver más
información acerca de cómo ajustar correctamente estos mandos, vea las seccion de ‘Ajuste de la estructura de
ganancia correcta’ de la página 54.
10: Nivel de envío auxiliar (1,2) – Estos mandos determinan el nivel de salida de la señal que está siendo enviada a
los dos conectores de envío auxiliar stereo de la TM300 (vea el punto 6 de antes) y, en el caso del envío auxiliar 2, al
DSP interno. La posición ‘0’ de cada mando (las dos en punto) indica la ganancia unitaria (sin realce ni atenuación).
El desplazar cada mando hacia la izquierda desde la posición ‘0’ (hacia el ‘∞’) hace que la señal sea atenuada (en la
posición de totalmente a la izquierda, es atenuada infinitamente, o en otras palabras, no se envía sonido). El desplazar
el mando hacia la derecha de la posición ‘0’ (hacia la posición ‘+10’) hace que la señal sea realzada hasta en 10 dB.
Para ver más información acerca de cómo ajustar correctamente estos mandos, vea las seccion de ‘Ajuste de la
estructura de ganancia correcta’ de la página 54.
11: Medidor – Esta barra medidora de diez segmentos le muestra bien el nivel de salida izquierda/derecha o el nivel de
envío auxiliar 1/2, dependiendo del ajuste del interruptor de medidor / fuente de auricular (vea el punto 15 de abajo).
Para conseguir una relación señal-ruido óptima, intente ajustar todos los niveles izquierda/derecha y envíos auxiliares de
tal forma que el material de programa esté habitualmente sobre los 0 dB, con alguna excursión ocasional pero nunca
continua a los segmentos rojos ‘+’. Para ver más información, vea las seccion de ‘Ajuste de la estructura de ganancia
correcta’ de la página 54.
12: Interruptor LED Power – Se queda ilumina fijo siempre que la TM300 está encendida.
ESPAÑOL
13: Piloto LED Phantom – Se queda iluminado cuando se activa el interruptor de alimentación fantasma (vea el punto
14 de abajo).
14: Interruptor de alimentación fantasma – Cuando pulsa este interruptor, la TM300 envía 48 voltios de alimentación
fantasma a las puntas 2 y 3 de todos los conectores de micrófono XLR en todos los canales. PRECAUCION: Utilice
solo este interruptor cuando la TM300 esté apagada. Antes de encender la alimentación fantasma, asegúrese de
desconectar todas las fuentes de señal que no sean micrófonos (como las cajas pasivas de inyección directa) de las
clavijas XLR de micro. Aunque la alimentación fantasma no tendrá efectos negativos sobre los micros dinámicos
conectados, solo debería utilizarla cuando tenga conectados uno o más micrófonos condensadores a la TM300. Vea el
manual de instrucciones de su micrófono para determinar si necesita o no la alimentación fantasma de 48
voltios – no podemos asumir ninguna responsabilidad por los posibles daños en los micros derivados de la
incorrecta aplicación de esta alimentación fantasma. Si no está completamente seguro de que uno o más de sus
micros conectados requieran esta alimentación fantasma de 48 voltios, deje este interruptor en off (su posición exterior).
15: Interruptor de medidor / fuente de auriculares – Cuando esté fuera (la posición de ‘no pulsado’), la señal de
salida stereo izquierda/derecha es dirigida a la clavija de auriculares (vea el punto 24 de la página siguiente) y al
medidor de diez segmentos (vea el punto 11 en la página anterior). Cuando lo pulse, las señales de salida del envío
auxiliar 1 y 2 son dirigidas al conector de auriculares y al medidor de diez segmentos. Tenga en cuenta que, siempre
que cualquier interruptor PFL de canal esté en su posición exterior (sin pulsar – vea el punto 9 de la página 48), los
canales que estén en la opción solista serán dirigidos al conector de auriculares en vez (aunque no al medidor).
16: Nivel de reverb a auxiliar 1 – Este mando determina el nivel de la señal que está siendo dirigida desde el DSP
interno al envío auxiliar 1. Le permite añadir reverb u otro procesado de señal al sonido en los monitores de escenario o
52
Recorrido guiado – Sección principal
auriculares conectados en la clavija de envío auxiliar 1 de la TM300 (cuando esté usando la TM300 en la configuración
stereo standard) o en las salidas de altavoz derecho (cuando esté usando la TM300 en la configuración ‘mono dividido’;
es decir, cuando el interruptor Auxiliar 1 / Monitor [vea punto 20 de la página siguiente] esté pulsado). Para más
información, vea los diagramas de interconexión de cables de las páginas 11 y 12 .
17: Interruptores selectores DSP – Le permite elegir cualquiera de los tres efectos de reverb prefijados en el DSP
interno: Vocal, gran salón (‘L HALL’) o salón pequeño (‘SHALL’).
18: Interruptor reverb On/Off – Cuando esté pulsado (‘On’), la señal de salida del DSP interno es dirigida al retorno
auxiliar 2. Cuando está fuera (‘Off’), el retorno auxiliar 2 recibe en vez la señal de cualquier unidad que tenga conectada
a las tomas de retorno auxiliar 2.
19: Interruptor Auxiliar 1 / Monitor – Cuando está pulsado, el envío auxiliar 1 es dirigido al lado derecho de la etapa de
potencia de la TM300 y la mezcla stereo es combinada automáticamente a una señal mono y dirigida al lado izquierdo
de la etapa de potencia de la TM300. Esto permite que la TM300 sea usada en una configuración de ‘mono dividido’, de
tal forma que pueda manejar tanto los altavoces PA FOH principales (desde la salida de altavoz izquierda) y monitores
de escenario (desde la salida de altavoz derecha) sin la necesidad de ninguna etapa de potencia exterior. Cuando se
usa en una configuración ‘mono dividido’, el mando de nivel de reverb a auxiliar 1 le permite dirigir la señal que va desde
el DSP interno a sus monitores de escenario (la señal puede ser también dirigida al retorno auxiliar 2 para su uso
simultáneo en la señal PA principal).
20: Interruptores On/Off EQ (L, R)- Cuando están pulsados (‘On’), el lado equivalente del ecualizador gráfico master de
siete bandas está activo; cuando están fuera (‘Off’), el lado equivalente del ecualizador gráfico master de siete bandas
está inactivo sin tener en cuenta los ajustes de los mandos deslizantes del ecualizador (vea el punto 21 de abajo). Tenga
en cuenta que, cuando es usa la TM300 en una configuración de ‘mono dividido’ (es decir, cuando está pulsado el interruptor auxiliar 1 / Monitor [vea el punto 19 anterior]), el lado izquierdo del ecualizador gráfico afecta a los altavoces PA
‘FOH’ principales, mientras que el lado derecho afecta a los monitores de escenario, evitándole la necesidad de tener
que usar un ecualizador gráfico separado para sus monitores de escenario.
21: Mandos deslizantes de EQ gráfico – Estos mandos le permiten añadir 12 dB de realce o atenuación a siete áreas
de frecuencia distintas. Cuando uno de estos mandos está en su posición central de muesca (‘0 dB’), la zona de frecuencia elegida no se ve afectada (es decir, está plana). Cuando uno de estos mandos se desliza hacia arriba (por encima de
la posición ‘0 dB’, hacia la posición ‘+12 dB’), la zona de frecuencia elegida es realzada, y cuando es deslizada hacia
abajo (por debajo de la posición ‘0 dB’ hacia la posición ‘-12 dB’), la zona de frecuencias elegida es atenuada.
23: Nivel de auriculares – Este mando ajusta el nivel de la señal enviada al conector de auriculares (vea el punto 24 de
abajo). PRECAUCION: Para evitar posibles daños en los auriculares conectados (o, lo que sería peor, en sus oídos!),
disminuya totalmente este nivel (hasta la posición ‘0’ o totalmente a la izquierda) antes de conectar un par de auriculares
– y luego aumente el nivel lentamente mientras escucha el sonido. El nivel de auriculares no tiene efecto sobre las otras
salidas de la TM300.
24: Conector de auriculares – Conecte cualquier par de auriculares stereo standard a esta clavija (por medio de un
conector TRS de º”) para la escucha en privado de la salida stereo, envíos auxiliares, o los canales que estén activados
como solistas (dependiendo del ajuste que haya hecho en el interruptor de medidor / fuente de auriculares [vea el punto
15 de la página anterior] y tanto si los interruptor PFL de canal han sido pulsados como si no). El preamplificador de
auriculares interno de la TM300 desarrolla aproximadamente 100 mw de potencia.
53
ESPAÑOL
22: Faders stereo – Estos mandos deslizantes lineares determinan el nivel relativo de las salidas stereo
izquierda/derecha. La posición ‘0’ de cada fader indica la ganancia unitaria (sin realce ni atenuación). El desplazar cada
fader desde esta posición (hacia posición ‘∞’) hace que la señal sea atenuada (totalmente abajo, la señal es infinitamente atenuada, en otras palabras, no hay sonido). Para conseguir la mejor relación señal-ruido, debería mantener los
faders stereo sobre el nivel 0. Para más información, vea la sección ‘Ajuste de la estructura de ganancia correcta’ en la
página 54 de este manual.
Recorrido guiado – Panel trasero
POWER
TM300 6 CHANNEL 150WATT STEREO MIXER
SAMSON
CAUTION
CAUTION:
DO NOT BLOCK AIRFLOW
ON
SERIAL NUMBER
OFF
RISK OF ELECTRIC SHOCK
DO NOT OPEN
AVIS;
RISQUE DE CHOC ELECTRIQUE
NE PAS OUVRIR
DO NOT EXPOSE THIS EQUIPMENT
TO RAIN OR MOISTURE.
SPEAKER
OUT
CAUTION: TO REDUCE THE
USE CLASS 2 WIRING
MINIMUM LOAD
IMPEDANCE 4 Ω
RISK OF FIRE, REPLACE ONLY
WITH SAME TYPE FUSE.
FUSE
8A/250V(115V)
4A/250V(230V)
AC INPUT
115V/230V,50/60Hz
780W
R
1
2
3
L
4
5
6
1: Ranuras de ventilación – Para asegurar una correcta ventilación de la etapa de
potencia de la TM300, asegúrese que estas ranuras de ventilación no queden obstruidas en ningún momento.
2: Receptáculo del fusible – Encierra un fusible de 8 A / 250 V para el funcionamiento
a 115 voltios, o de 4 A / 250 V para el funcionamiento a 230 voltios
ESPAÑOL
3: Entrada corriente alterna – Conecte el cable de alimentación ‘IEC’ con clavija de
tres cables de gran resistencia a esta toma.
4: Salidas de altavoces – Estas son las salidas principales de la TM300; use estos
cuatro conectores no balanceados (dos de los cuales llevan la señal izquierda y los
otros dos la derecha) para conectar la TM300 a altavoces con una carga de 4 ohmnios o
superior (es decir, 4, 8, o 16 ohmnios). Cuanto menor sea la resistencia o carga, mayor
será la potencia de salida. Le recomendamos el uso de altavoces de 4 ohmnios por su
gran durabilidad. La TM300 desarrolla 150 watios de potencia por canal a 4 ohmnios
con menos de 1% THD (distorsión armónica total). Para asegurar una correcta correlación de fase, la punta del conector de altavoz de la TM300 debe ser conectado a la
entrada ‘+’ (activo) de su altavoz, y el lateral del conector de altavoz de la TM300
debería ser conectado a la entrada ‘-‘ (masa) del altavoz. Tenga en cuenta que, cuando
el interruptor auxiliar 1 / Monitor (vea el punto 19 de la página 51) está pulsado, la
TM300 funciona en una configuración ‘mono dividido’, en la que la salida de altavoz
izquierda lleva la salida stereo principal (mezclada internamente a mono) y la salida del
altavoz derecha lleva el envío auxiliar 1.
5: Interruptor on-off de encendido – Como ya puede haberse supuesto, este es el
interruptor que se utiliza para encender y apagar el TM300. Si la TM300 está conectada
a etapas de potencia exteriores (por medio de sus inserciones principales y/o conector
de salida mono – vea los puntos 4 y 5 en la página 49 de este manual), enciéndala
antes de que encienda las etapas que tenga conectadas y apáguela después de que
apague las etapas de potencia.
6: Ventilador – Este ventilador de velocidad variable proporciona la refrigeración vital
para la etapa de potencia de su TM300 (cuanto más se caliente la etapa de potencia,
más rápido irá este ventilador!). Asegúrese de que siempre haya una mínima circulación
de aire fresco alrededor de la unidad. Asegúrese también de que la TM300 sea usada
en entornos limpios y sin polvo.
54
Ajuste y uso de la TM300
El ajuste de la TM300 es un proceso muy sencillo que solo le llevará unos pocos minutos:
1. Quite todos los materiales de protección del embalaje (guárdelo por si fuese necesaria
cualquier reparación en el futuro) y decida dónde quiere colocar físicamente la TM300.
Asegúrese de que el ventilador y las ranuras de ventilación no queden obstruidas y que haya un
flujo de aire adecuado alrededor de toda la unidad.
2. Antes de conectar la TM300 a la salida de corriente CA, comience realizando sus conexiones
de altavoces. Nunca es una buena idea encender una etapa de potencia que no esté conectada
a altavoces. Puede usar cualquier tipo de altavoces con una impedancia de carga mínima de
4 ohmnios (es decir, 4 ohmnios o más), pero le recomendamos que use los altavoces de 4
ohmnios por su mayor durabilidad. Para asegurar una correcta correlación de fase, la punta del
conector de altavoz de la TM300 debe ser conectado a la entrada ‘+’ (activo) de su altavoz, y el
lateral del conector de altavoz de la TM300 debería ser conectado a la entrada ‘-‘ (masa) del
altavoz.
2a. Si piensa usar la TM300 en una configuración stereo standard, asegúrese de que el
interruptor auxiliar 1 / Monitor esté en su posición de no pulsado (‘fuera’) y haga las conexiones
entre la salida(s) de altavoz izquierda y su altavoz(ces) PA principal izquierdo y entre la salida de
altavoz derecho y su altavoz PA principal derecho. Vea la página 11 del manual para ver un
diagrama de ejemplo.
2b. Si piensa usar la TM300 en una configuración de ‘mono dividido’, asegúrese de que el
interruptor auxiliar 1 / Monitor esté pulsado (‘dentro’) y realice las conexiones entre la salida de
altavoz izquierdo y su altavoz (o altavoces) PA principal y entre la salida (o salidas) de altavoz
derecho y sus monitores de escenario. Vaya a la página 12 para ver un diagrama de ejemplo.
3. Después, realice todas las conexiones necesarias a las distintas salidas de nivel de línea de
la TM300 (salida de grabación, salida mono y envíos auxiliares 1 y 2) y entradas de nivel de
línea (entrada de cinta, retornos auxiliares 1 y 2). No realice ninguna conexión de inserción por
el momento – esto debe hacerse después de que haya ajustado correctamente la estructura de
ganancia (vea las páginas 54 – 55).
4. Haga las conexiones de entrada a las entradas de micro o de línea de los distintos canales.
PRECAUCION: En los canales mono, no conecte una entrada de línea de canal si ya ha
conectado algo en su entrada de micrófono, o al revés; cada uno de los canales mono ha sido
diseñado para aceptar solo una de estas dos fuentes.
6. Enchufe la TM300 en cualquier salida de corriente CA con toma de tierra usando el cable IEC
de alta resistencia que se incluye. Gracias a la especial circuitería de protección por relé montada internamente en la TM300, incluso puede conectar esta unidad en la misma regleta o salida a
la que estén enchufadas otras unidades audio sin ningún miedo. Con ello podrá encender todas
las unidades a la vez por medio del interruptor de encendido de la regleta, sin peligro de que se
dañen los altavoces que tenga conectados ni que se generen ‘chasquidos’.
7. Finalmente, pulse el interruptor de encendido del panel trasero para encender la TM300.
El piloto LED Power del panel frontal se encenderá.
55
ESPAÑOL
5. Baje todos los faders de canal y los faders stereo izquierda-derecha completamente abajo
(a su ajuste ‘∞‘). Coloque todos los controles de ajuste o Trim completamente a la izquierda.
Coloque el interruptor de alimentación fantasma del panel frontal en su posición ‘off’ (no pulsado) salvo que esté absolutamente seguro de que todos los micrófonos que tenga conectados
requieran alimentación fantasma de 48 voltios; si es así, coloque el interruptor Phantom en la
posición ‘on’ (pulsado).
Ajuste de la estructura de ganancia correcta
Ahora ya está preparado para establecer la estructura de ganancia correcta – la clave para obtener
el mejor rendimiento de la TM300, o de cualquier mesa de mezclas, en este aspecto. Esto es un
proceso muy sencillo que le asegura unos niveles óptimos de entrada y salida de tal forma que no
se creen ruidos innecesarios (producidos por señales demasiado bajas) ni distorsiones de
sobrecargas (producidas por señales demasiado altas). Esta es una descripción paso-a-paso de
cómo conseguirlo:
a. Una vez que haya realizado todas las conexiones (de la forma descrita en la sección anterior)
pero con la unidad apagada, coloque todos los faders de canal y los faders stereo izquierda-derecha
completamente abajo (en sus posiciones ‘∞’).
b. Coloque todos los controles Trim de canal completamente a la izquierda.
c. Sitúe todos los mandos de ecualizador de canal en sus posiciones de muesca central ‘0’ y
desactive el ecualizador gráfico master de siete bandas ajustando los interruptores EQ On/Off a sus
posiciones ‘Off’.
d. Coloque el interruptor de medidor / fuente de auriculares fuera (a su posición ‘L/R’); esto a
segurará que el medidor de la TM300 mostrará el nivel continuo de la señal de salida stereo izquierda/derecha.
e. Coloque todos los mandos de envío auxiliar de canal y los mandos de retorno auxiliar principal
en sus posiciones de totalmente a la izquierda (‘∞’). Sitúe los mandos de entrada de cinta y reverb a
auxiliar 1 de la sección principal en su posición de totalmente a la izquierda (‘∞’).
f. Coloque ambos mandos de envío auxiliar master de la sección principal en su posición ‘0’ (las dos
en punto).
g. Encienda todos los aparatos que tenga conectados a las entradas de línea de canal de la TM300
y retornos auxiliares y ajuste sus controles de nivel a la ganancia unitaria o, si no hay ganancia
unitaria en sus controles de salida, al máximo. Si tiene algún procesador de efectos exterior
conectado a los retornos auxiliares, asegúrese de que esté enviando señal completamente ‘húmeda’
(procesada), sin que tenga ninguna parte de señal ‘seca’ (sin procesar) mezclada.
ESPAÑOL
h. Si tiene micrófonos condensadores conectados a la TM300, active el interruptor Phantom*.
Finalmente, encienda la propia TM300.
i. Toque un instrumento de los que tiene conectados en una de las entradas de línea de la TM300**
y, mientras lo hace, aumente el fader del canal correspondiente hasta la posición ‘0’. Debería ver
que el medidor de segmentos comienza a moverse – ajuste el control Trim de entrada para ese
canal de tal forma que el segmento ‘0’ se ilumine frecuentemente y que el segmento ‘+3’ solo se ilumine de forma ocasional. El LED de picos de ese canal no debería encenderse incluso en las
señales de entrada de nivel más alto. Si la señal entrante parece que es demasiado activa (caliente)
incluso con el mando de ajuste o Trim del canal completamente al mínimo (+4 dB), puede que deba
disminuir el nivel de salida de su instrumento, aunque esto ocurrirá raras veces. Por el contrario, si la
señal es demasiado baja incluso con el control Trim colocado completamente arriba, es que algo
está definitivamente mal: en la mayoría de casos, será que el cable de conexión audio estará
dañado.
j. Una vez que haya ajustado el nivel óptimo en el paso anterior (i), continúe tocando el instrumento
mientras va aumentando poco a poco la posición de los faders stereo izquierda/derecha hasta que
consiga el nivel de escucha que quiera.
k. Repita el paso anterior (i) para cada instrumento que tenga conectado a las entradas de línea de
la TM300.
* PRECAUCION: Antes de activar la alimentación fantasma, asegúrese de que todos los micros
conectados y/o las cajas DI activas necesiten 48 voltios. Además, desconecte cualquier otra fuente
de señal (como cajas DI pasivas) de las clavijas de micro XLR.
** Si está usando un instrumento como una guitarra eléctrica o un bajo, conéctelo a la TM300 con
una caja de inyección directa para asegurar la impedancia correcta.
56
Ajuste de la estructura de ganancia correcta
l. El proceso para el ajuste de los niveles óptimos de micrófono es prácticamente idéntico; cante o
hable en el micro con el nivel que vaya a usar en la actuación mientras va aumentando lentamente
el fader de ese canal hasta la posición ‘0’. Después ajuste el control Trim de ese canal mientras
observa el medidor de segmentos y el LED de picos del canal. Lo normal es que tenga que aplicar
un poco más de realce en los controles Trim de los micros que el que pudo aplicar para las entradas
de líneas.
m. La idea general que hay detrás del uso del DSP interno es conseguir usar la señal lo más activa
posible (con cuidado de no sobrecargarla) y luego usar el control de retorno auxiliar 2 para ajustar
cuidadosamente la cantidad de señal procesada que quiera escuchar. (Nota: Cuando esté usando la
TM300 en una configuración ‘mono dividido’, el control de retorno auxiliar 2 determina la cantidad de
señal procesada que hay en la salida principal [izquierda] y el control Reverb a auxiliar 1 determina
la cantidad de señal procesada que hay en la salida de monitor [derecha]). Pulse el interruptor DSP
On/Off para activar el DSP interno y luego elija el banco 1, parámetro 1 (esta es una reverb pequeña
general) para el DSP. Comience ajustando el control de retorno auxiliar 2 a su posición ‘0’ (dos en
punto) (esto puede ser ajustado posteriormente si quiere escuchar más o menos señal procesada).
Después, utilizando un canal que ya tenga su estructura de ganancia ajustada según los pasos (i)
o (k) anteriores, toque el instrumento (o cante en el micrófono) conectado a ese canal mientras
aumenta lentamente la posición del mando de envío auxiliar 2 hacia la derecha hasta que escucha
la cantidad que quiera de señal procesada que se añade a la señal seca. Si escucha cualquier
distorsión, disminuya la cantidad de señal que está siendo enviada al DSP llevando el mando de
envío auxiliar 2 del canal (o el mando de envío auxiliar 2 principal) hacia la izquierda.
n. Si tiene cualquier tipo de procesadores de señal exteriores conectados en las clavijas de envío
auxiliar del panel trasero, siga este paso. Dado que los procesadores de efectos exteriores a veces
pueden resultar un poco ruidosos, resulta particularmente importante maximizar la cantidad de señal
que esté siendo enviada a ellos a través de los envíos auxiliares de la TM300. Como con el DSP
interno, la idea es hacer que estas unidades funcionen con la señal más activa posible (sin sobrecargarlas) y luego usar el nivel de retorno auxiliar para ajustar con cuidado la cantidad de señal procesada que esté siendo mezclada con la señal seca. Para ajustar unos niveles de envíos auxiliares
óptimos, utilice un canal cuya estructura de ganancia ya haya sido correctamente ajustada con los
pasos (i) o (k) anteriores. Suba el mando de envío auxiliar 1 para ese canal a la posición ‘0’ (ganancia unitaria) y luego toque en el instrumento (o cante en el micro) que tenga conectado a ese canal.
Ajuste los niveles de entrada de los procesadores de efecto conectados de tal forma que sus medidores visualicen la señal entrante normalmente en el rango de 0 vu (con solo alguna excursión
mayor ocasional). Entonces es el momento de optimizar el nivel de retorno auxiliar. Mientras sigue
tocando en su instrumento (o cantando en el micro), aumente lentamente el control de nivel de
retorno auxiliar hasta que consiga escuchar la cantidad deseada de señal procesada añadiéndose a
la señal seca. Repita esto para cualquier unidad exterior que tenga conectada a la clavija de retorno
auxiliar 2 (que solo está activa cuando el interruptor DSP On/Off está en ‘off’).
Para cualquier información técnica o asistencia, contacte con su distribuidor local de Samson.
Si adquirió la unidad en los Estados Unidos, puede ponerse en contacto con el Departamento de
Soporte Técnico de Samson (1-800-372-6766) entre las 9 AM y las 5 PM en horario del Este.
57
ESPAÑOL
o. La estructura de ganancia ya está ajustada correctamente – ha optimizado el nivel de todas las
señales que entran y salen de la TM300, y el resultado final de esto será el mínimo ruido y la
máxima claridad en el sonido. Ahora ya puede conectar unidades de ganancia unitaria (como
compresores, limitadores y puertas de ruido) como le sea necesario a las inserciones principales y/o
de canal. Ahora observará que la mayor parte de sus mezclas se pueden conseguir con la mayoría
de faders de canal en la posición 0 o prácticamente en ella (ganancia unitaria) y que el piloto LED de
picos de canal raramente se ilumina (recuerde, si se iluminan quiere decir que algo está produciendo
distorsión!). Si necesita hacer más ajustes del nivel global, utilice los faders stereo izquierda/derecha
principales.
Specifications
Mixer / Pre Amp Section:
1. Frequency Response (± 1 dB)
2. Total Harmonic Distortion (20 Hz to 20 kHz, trim minimum)
20 Hz - 20 kHz
0.02%
3. Maximum Voltage Gain
Mic to Post EQ Main Insert L,R
Mic to Aux Send 1,2
Mic to Mono Out
Line to Post EQ Main Insert L,R
Stereo to Post EQ Main Insert L,R
Aux Return to Post EQ Main Insert L,R
Tape In to Post EQ Main Insert L,R
+64 dB
+74 dB
+54 dB
+44 dB
+24 dB
+10 dB
+24 dB
4. Residual Noise (with DIN audio filter)
All Fader Min / Post EQ Main Insert L,R
All VR Min / Aux Send 1,2
Ch Fader Min, Master Fader Max
-90 dB
-90 dB
-75 dB
5. Equivalent Input Noise (-50 dB, Mic In pins 2,3 150 Ω,with DIN audio filter.) -127 dB
6. Crosstalk (@ 1 kHz, Trim Min.)
Channel to channel
Input to output
-70 dB
-70 dB
7. EQ Control
High (10 kHz)
Mid (1.8 kHz)
Low (100 Hz)
±15 dB
±12 dB
±15 dB
8. Graphic Equalizer
(63 Hz, 160 Hz, 400 Hz, 1 kHz, 2.5 kHz, 6.4 kHz, 15 kHz)
±12 dB
9. Phantom Power
+48 V
10. Signal Polarity (Phase)
same as Input
Power Amp Section:
1. Maximum Output Power (0.5% THD @ 1 kHz)
2. Total Harmonic Distortion (20 Hz to 20 kHz, 1/2 rated power)
3. Frequency Response (1 W/4 ohm, ±0.5 dB)
4. Signal To Noise Ratio
150 W / 4 ohm
0.2%
20 Hz - 20 kHz
> 100 dB
5. Channel Separation
75 dB
6. Output Offset Voltage
± 100 mV
General:
1. Dimensions (W x D x H)
491 x 349 x 139 mm
19.35 x 13.75 x 5.5 in
2. Weight
29.7 lb • 13.5 kg
3. Power Requirements
115 V ac 60 Hz for UL and CSA Version
230/240 V ac 50/60 Hz for BSI and Central Europe Version
100 V ac 50/60 Hz for Japan Version
4. Power Consumption
780 w
58