1
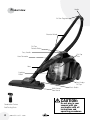
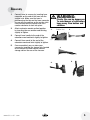
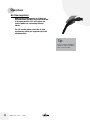
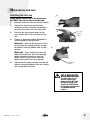
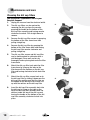
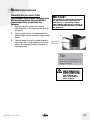
Easy Vac
™
Compact
USER’S GUIDE
40N8, 35F3 SERIES 220-240v
3
Safety Instructions
4
Product View
5
Assembly
6-8
Operations
9-12
Maintenance and Care
13
Troubleshooting
14
Consumer Services
15
Replacement Parts
16
Warranty
Thanks for buying a BISSELL Easy Vac Compact Bagless Canister Vacuum
We’re glad you purchased a BISSELL Easy Vac Compact bagless canister
vacuum. Everything we know about floor care went into the design and
construction of this complete, high-tech home cleaning system.
Your BISSELL canister vacuum is well made, and we back it with a limited
one year warranty. We also stand behind it with a knowledgeable,
dedicated Consumer Services department, so, should you ever have a
problem, you’ll receive fast, considerate assistance.
My great-grandfather invented the floor sweeper in 1876. Today, BISSELL is
a global leader in the design, manufacture, and service of high quality
homecare products like your BISSELL canister vacuum .
Thanks again, from all of us at BISSELL.
Mark J. Bissell
President and Chief Executive Officer
22
www.bissell.com
IMPORTANT SAFETY INSTRUCTIONS
When using an electrical appliance,
basic precautions should be observed,
including the following:
■ Remove plug from electrical outlet before cleaning or
Read all instructions
before using your
Canister VACUUM.
by the manufacturer or its service agent in order to
avoid a hazard.
■ Do not pick up toxic material (chlorine bleach,
ammonia, drain cleaner, petrol, etc.).
■ Do not use for any purpose other than described in
this User’s Guide.
■ Use only manufacturer’s recommended attachments.
■ Do not use with any opening blocked; keep free of
dust, lint, hair, and anything that may reduce air flow.
■ Keep appliance on a level surface.
■ Turn off all controls before unplugging.
■ Be extra careful when cleaning stairs.
■ This appliance is provided with double
insulation. Use only identical replacement parts.
■ Do not use without the dirt cup or a dust bag and
filters in place.
■ Pay close attention when working
around children.
WARNING:
To reduce
the risk of fire, electric shock,
or injury:
■ Use indoors only.
■ For dry pick up only.
■ Do not leave machine when it is plugged in.
■ Do not use with damaged cord or plug.
■ If appliance is not working as it should, has been
dropped, damaged, left outdoors, or dropped into
water, return it to a service agent.
■ Do not handle unit with wet hands.
■ Do not pull or carry by cord, use cord as a handle,
close door on cord, pull cord around sharp corners
or edges, run appliance over cord, or expose cord to
heated surfaces.
■ Do not unplug by pulling on cord. unplug by
grasping plug.
■ Do not run appliance over cord.
■ Do not handle plug or appliance with wet hands.
■ Do not expose hair, loose clothing, fingers or body
parts to openings or moving parts.
■ Do not pick up hot or burning objects such as
cigarettes, matches, or hot ashes.
■ Do not pick up flammable or combustible materials
(lighter fluid, petrol, kerosene, etc.) or use in the
presence of explosive liquids or vapour.
■ Do not use appliance in an enclosed space filled with
vapours given off by oil base paint, paint
thinner, some moth proofing substances, flammable
dust, or other explosive or toxic vapours.
■ Not intended for use by persons (including
children) with reduced physical, sensory or mental
capabilities, or lack of experience and knowledge,
unless they have been given supervision or
instruction concerning use of the appliance by a
person responsible for their safety
■ Young children should be supervised to ensure that they
do not play with the appliance.
www.bissell.com
maintaining the appliance.
■ If the supply cord is damaged, it must be replaced
SAVE THESE
INSTRUCTIONS.
This model is for HOUSEHOLD use only.
IMPORTANT
FOR OPERATION ON A 220-240 VOLT A.C. 50/60 Hz
POWER SUPPLY ONLY.
If your appliance is fitted with a nonrewireable BS
1363 plug it must not be used unless a 13 amp (ASTA
approved to BS 1362) fuse is fitted in the carrier
contained in the plug. (Spares may be obtained from
your BISSELL supplier). If for any reason the plug is cut
off, it must be disposed of, as it is an electric shock
hazard should it be inserted into a mains socket.
3
Product view
Handle
Air Flow Regulator
Extension Wands
Dirt Cup
Release Button
Carry Handle
Dirt Cup
Filter
Hose Connector
Hose
Emptying
Button
Easy Empty™
Dirt Cup
Multi-Surface
Floor Nozzle
Combination Crevice
Tool/Dusting Brush
4
www.bissell.com
Brush Switch
CAUTION:
Do not plug in your
vacuum until you
are familiar with all
instructions and
operating procedures.
Assembly
1.
Connect hose to vacuum by inserting hose
connector on the end of the hose into the
suction inlet. Make sure the hose is positioned so the tabs on the hose connector
line up with the notches on the suction inlet.
Once inserted into the suction inlet, turn
counter clockwise to lock into place.
2.
Attach extension wands section together
by inserting into one another and twisting
slightly to tighten.
3.
Connect hose handle to the end of the
extention wand and twist slightly to tighten.
4.
Connect floor nozzle to the end of the
extension wand and twist slightly to tighten.
5.
Once assembled, you can store your
vacuum by inserting the storage clip (located
on the back of the floor nozzle) into the storage slot on the rear of the vacuum.
Warning:
Plastic film can be dangerous.
To avoid danger of suffocation,
keep away from babies and
children.
1.
2.
3.
4.
www.bissell.com
Suction Inlet
5.
5
Operations
Power cord
The power cord is located at the rear of the
vacuum. Gently pull out the power cord,
watching for the yellow line. Stop pulling the
power cord once the yellow line is visible.
There is also a red line, which indicates the
end of the usable cord. Do not pull the power
cord out beyond the red line.
Automatic
Cord Rewind
Button
Automatic cord rewind
Your vacuum is equipped with an automatic
cord rewind. When cleaning is finished, press
the power button OFF and grasp the plug to
disconnect from the electrical outlet. Hold the
plug and press the automatic cord rewind
button to rewind the cord automatically.
CAUTION:
Be careful to avoid
Power button
Turn the power ON or OFF by pressing lightly
downward on the power button ( ).
caution:
Before using your vacuum,
make sure that the dirt cup
and all filters are in place.
Do not operate your vacuum
without the dirt cup and
filters.
6
www.bissell.com
injury as cord retracts
very quickly.
Power Button
Operations
Tip:
Special tools
Your BISSELL Easy Vac Compact is not only a
powerful carpet and rug vacuum cleaner, it’s
also a versatile bare floor and above floor
vacuum cleaner when you select one of the
special tools.
Floor nozzle:
Use to vacuum carpets, rugs and bare floors.
1.
Swivel head turns to get into tight spaces
and fits under cabinets.
1.
To vacuum carpets and rugs, push the brush
switch to the carpet position . This
will pull the brushes up into the floor nozzle.
2.
To vacuum bare floors, push the brush
switch to the bare floor position . This
will extend the brushes down from the floor
nozzle.
Before cleaning under
low furniture, check
area first for objects
that might harm the
unit or block the hose.
Brush Up
Brush Down
2.
Combination crevice tool/dusting brush:
Use the crevice tool in tight, narrow spaces.
Use the dusting brush to clean curtains, draperies, cushions and fabrics.
Tip:
Hair, string and small objects
can block the hose and tools.
Check them occasionally for
obstructions.
www.bissell.com
7
Operations
Air flow regulator
Open the air flow regulator by sliding the
regulator down towards the extension wand
to an open position. This will reduce the
suction power for vacuuming delicate
fabrics.
For full suction power, close the air flow
regulator by sliding the regulator up to the
closed position.
Tip:
Use the air flow regulator to
reduce air flow as needed
when using the tools.
8
www.bissell.com
Maintenance and care
Emptying the dirt cup
2.
Empty the dirt cup as soon as the dirt reaches
the “FULL” lines on the sides of the dirt cup.
1. Unplug the vacuum from the electrical outlet.
2.
Remove the hose by turning the hose
connector counter clockwise and pulling it
out from the suction inlet. Set hose aside.
3.
Press the dirt cup release button on the
carry handle and lift up to remove the dirt
cup.
4.
Choose an emptying method. Method #2 is
recommended for allergy suffers.
Method #1 – Hold the dirt cup over a trash
can and push the emptying button to open
the bottom. Close the bottom after the dirt
empties.
Method #2 – Place a plastic bag over the
bottom of the dirt cup. Push the emptying
button through the plastic to open the bottom. After the dust settles, close the bottom and remove the bag to discard.
5.
Replace the dirt cup by placing it back into the
vacuum and pushing down on the carry handle
until it snaps back into place.
3.
Dirt Cup
Release
Button
4.
Emptying
Button
WARNING:
To reduce the risk of
electric shock, turn
power switch OFF and
disconnect plug from
electrical outlet before
performing maintenance
or troubleshooting
checks.
www.bissell.com
9
Maintenance and care
Cleaning the dirt cup filters
Use only BISSELL replacement filters in your
Easy Vac Compact.
1. Unplug the vacuum from the electrical outlet.
10
2.
The dirt cup filters can be reached by
removing the dirt cup from the vacuum,
grasping the handle on the bottom of the
dirt cup filter assembly and turning counter
clockwise to unlock. Pull straight down to
remove.
3.
Remove the dirt cup filter screen by grasping
the bottom of the filter frame base and pulling straight up.
4.
Remove the dirt cup filter by grasping the
bottom of the filter frame base and turning
the dirt cup filter counter clockwise and pulling straight up.
5.
The dirt cup filter screen and dirt cup filter
can be hand washed in cold water with a
mild detergent. Rinse well and air dry thoroughly before placing back onto the filter
frame base.
6.
Attach the dirt cup filter back onto the filter
frame base by lining up the tabs on the
filter base with the notches on the dirt cup
filter and turning clockwise to lock back into
place.
7.
Attach the dirt cup filter screen back on to
the dirt cup filter by sliding it down over the
dirt cup filter, making sure that the tabs on
the bottom of the dirt cup filter screen line
up with the notches on the dirt cup filter.
8.
Insert the dirt cup filter assembly back into
the dirt cup by lining up the tabs on the
top of the dirt cup filter assembly with the
notches inside the top of the dirt cup and
turning the handle on the bottom of the dirt
cup filter assembly clockwise to lock into
place.
www.bissell.com
2.
3.
4.
Maintenance and care
Cleaning the pre-motor filter
The pre-motor filter protects the motor from
dirt and dust particles. Use only BISSELL
replacement filters in your Easy Vac
Compact.
1.
Remove the dirt cup from the vacuum,
following steps 1-3 of Emptying the dirt cup
on page 9.
2.
The pre-motor filter is located between the
power button and the automatic cord rewind
button.
3.
The pre-motor filter can be hand washed in
cold water with a mild detergent. Rinse well
and air dry thoroughly before placing back
into the vacuum.
NOTICE:
This product is intended for household
use only and not for commercial or
industrial use. Vacuuming of dust
from products like plaster, concrete or
ashes will damage the motor and void
the warranty.
3.
Washable PreMotor Filter
Tip:
For maximum cleaning performance,
check the filters often and clean or
replace if necessary.
WARNING:
Do not operate cleaner
with damp or wet
filters or without all
filters in place.
www.bissell.com
11
Maintenance and care
Replacing the post-motor filter
The post-motor filter assists in the filtration
process to return cleaner air to the room.
Use only BISSELL replacement filters in your
Easy Vac Compact.
1.
Unplug the vacuum from electrical outlet.
2.
Remove the filter door (located on the back
of the vacuum) by pushing down on the tab
and pulling out and away from the vacuum.
3.
The post-motor filter can be hand washed in
cold water with a mild detergent. Rinse well
and air dry thoroughly before placing back
into the vacuum.
4.
Replace the filter door by placing the tabs
on the bottom of the filter door into the
notches on the bottom of the post-motor
filter compartment and pushing the tab
forward back into the vacuum to lock into
place.
Clearing clogs from the dirt cup
1.
Unplug the vacuum from electrical outlet.
2.
Remove the dirt cup from the vacuum,
following steps 1-3 of Emptying the dirt cup
on page 9.
3.
Remove the dirt cup filter assembly from the
dirt cup, following step 2 of Clean the dirt
cup filter on page 10.
4.
Tap the dirt cup filter assembly over a
garbage container to remove any dirt or
debris from the dirt cup filter screen that
surrounds the dirt cup filter.
5.
Reach up into the dirt cup to clear any dirt or
debris from the dirt cup.
6.
Check to see if there are any clogs in the
suction inlet.
7 . After clearing any dirt or debris from the dirt
cup, replace the dirt cup filter assembly back
in the dirt cup following step 8 of Cleaning
the dirt cup filter on page 10.
12
www.bissell.com
2.
Troubleshooting
Vacuum cleaner won’t run
WARNING:
To reduce the risk of electric shock,
turn power OFF and disconnect
plug from electrical outlet before
performing maintenance or
troubleshooting.
Possible causes
Remedies
1. Vacuum cleaner is not plugged in
1. Check electrical plug
2. Power button is not pressed down
2. Press power button down
Vacuum cleaner won’t pick up or low suction
Possible causes
Remedies
1. Tools, hose and/or extension wands are blocked
1. Remove each part and check for blockages
2. Filters are dirty
2. Check and clean or replace all filters
3. Dirt cup is full
3. Empty dirt cup
4. Hose connector not securely attached to suction inlet
4. Make sure hose connector is locked into
suction inlet
5. Crack or hole in hose
5. Check hose and replace if needed
6. Air flow regulator is set to open or
minimum setting
6. Change to closed or maximum setting
7. Clog in the dirt cup
7. Clear clog from dirt cup following
instructions on page 12
Visible dust escaping from vacuum
Possible causes
Remedies
1. Dirt cup is full
1. Empty dirt cup
2. Filters missing or installed incorrectly
2. Check all filters for correct installation
3. Filters are dirty
3. Check and clean or replace all filters
4. Hose is blocked
4. Remove hose and check for
blockages
5. Hose connector not securely attached to suction inlet
5. Make sure hose connector is locked into
suction inlet
6. Crack or hole in hose
6. Check hose and replace if needed
Other maintenance or service not included in the manual should be performed by an
authorized service representative.
Thank you for selecting a BISSELL product.
Please do not return this product to the store.
www.bissell.com
13
BISSELL Consumer Services
If your BISSELL product should require service:
In the UK, Australia or New Zealand, call BISSELL Consumer Services at the numbers below and we will give you the
location of a BISSELL Authorized Service Center in your area. For all other countries, contact your local in country
distributor for questions, service, or repair.
If you have questions about your warranty or need replacement parts please contact the numbers below.
For UK inquiries:
Monday - Thursday 9 am — 5 pm
Friday
9 am — 4 pm
BISSELL Homecare (Overseas) Inc.
The Boat Yard
105 Straight Road
Old Windsor
Berkshire, SL4 2SE
United Kingdom
Telephone: 0844-888-6644
For Australian inquiries:
Monday - Friday 9 am — 5 pm
BISSELL Australia PTY LIMITED
42 Rocco Drive
Scoresby 3179
Victoria
Australia
Telephone: 1-800-811-183
For New Zealand inquiries:
Monday - Friday 9 am — 5 pm
Parex Industries Ltd.
5 Tolich Place
Henderson 0610
Auckland
New Zealand
Telephone: 0800-247-735
For all other inquiries:
Monday - Friday 8 am — 4 pm
BISSELL Homecare, Inc.
PO Box 1888
Grand Rapids, Michigan 49501 USA
Telephone: 01-616-453-4451
Fax: 01-616-453-1383
Or visit the BISSELL website - www.bissell.com
When contacting BISSELL, have model number of unit available.
Please record your Model Number: ___________________
Please record your Purchase Date: ___________________
Note: Please keep your original sales receipt. It provides proof of date of purchase in the event of a
warranty claim. See Warranty on page 16 for details.
Please do not return this product to the store.
14
www.bissell.com
Replacement parts - BISSELL Easy Vac Compact
Item
1
2
3
4
5
6
7
8
9
Part No.
Part Name
203-1531
Dirt Cup Filter Screen
203-1532
Dirt Cup Filter
203-1533
Dirt Cup Filter Frame Base
203-1534
Pre-Motor Filter
203-1535
Post-Motor Filter
203-1536
Floor Nozzle
203-1537Hose with Handle
203-1538Extension Wands (2)
203-1539
Combination Crevice Tool/Dusting Brush
1
2
3
4
5
6
7
8
9
www.bissell.com
15
Warranty - BISSELL Easy Vac Compact
This warranty gives you specific legal rights, and you may also have other rights which may vary from country
to country. If you need additional instruction regarding this warranty or have questions regarding what it may
cover, please contact BISSELL Consumer Services by telephone, or regular post as described below, or
contact your local in country distributor.
Limited One Year Warranty
Subject to the *EXCEPTIONS AND EXCLUSIONS identified below, BISSELL Homecare, Inc., will replace (with
new or remanufactured components), at BISSELL’s option, free of charge from the date of purchase by the
original purchaser, for one year any defective or malfunctioning part do to manufacturers defect.
This warranty applies to product used for personal, and not commercial or rental service. This warranty does
not apply to fans or routine maintenance components such as filters, belts, or brushes. Damage or malfunction
caused by negligence, abuse, or use not in accordance with the User’s Guide is not covered.
For UK inquiries:
Monday - Thursday 9 am — 5 pm
Friday
9 am — 4 pm
BISSELL Homecare (Overseas) Inc.
The Boat Yard
105 Straight Road
Old Windsor
Berkshire, SL4 2SE
United Kingdom
Telephone: 0844-888-6644
For New Zealand inquiries:
Monday - Friday 9 am — 5 pm
Parex Industries Ltd.
5 Tolich Place
Henderson 0610
Auckland
New Zealand
Telephone: 0800-247-735
For Australian inquiries:
Monday - Friday 9 am — 5 pm
BISSELL Australia PTY LIMITED
42 Rocco Drive
Scoresby 3179
Victoria
Australia
Telephone: 1-800-811-183
For all other inquiries:
Monday - Friday 8 am — 4 pm
BISSELL Homecare, Inc.
PO Box 1888
Grand Rapids, Michigan 49501 USA
Telephone: 01-616-453-4451
Fax: 01-616-453-1383
BISSELL HOMECARE INC. IS NOT LIABLE FOR INCIDENTAL OR CONSEQUENTIAL
DAMAGES OF ANY NATURE ASSOCIATED WITH THE USE OF THIS PRODUCT.
BISSELL’S LIABILITY WILL NOT EXCEED THE PURCHASE PRICE OF THE PRODUCT.
*EXCEPTIONS AND EXCLUSIONS FROM THE TERMS OF THE LIMITED WARRANTY
THIS WARRANTY IS EXCLUSIVE AND IN LIEU OF ANY OTHER WARRANTIES
EITHER ORAL OR WRITTEN. ANY IMPLIED WARRANTIES WHICH MAY ARISE
BY OPERATION OF LAW, INCLUDING THE IMPLIED WARRANTIES OF
MERCHANTABILITY AND FITNESS FOR A PARTICULAR PURPOSE, ARE LIMITED
TO THE ONE YEAR DURATION FROM THE DATE OF PURCHASE AS
DESCRIBED ABOVE.
16
www.bissell.com
©2010 BISSELL Homecare, Inc
Grand Rapids, Michigan
All rights reserved. Printed in China
Part Number 110-4186
Rev 1 /10
Visit our website at:
www.bissell.com