1
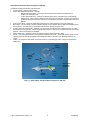
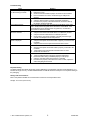
Diamondback 360® Orbital Atherectomy Device, Solid Crown, 30 µm, with 15 cm Travel Instructions for Use © 2011 Cardiovascular Systems, Inc. 90168-00.K Table of Contents List of Illustrations and Tables 2 Introduction 3 Diamondback 360 Orbital Atherectomy System (OAS) Description 3 Indications For Use 3 Contraindications, Restrictions, Warnings and Precautions 3 Contraindications 3 Restrictions 3 Warnings 3 Precautions 4 Clinical Summary 5 Diamondback 360 Orbital Atherectomy Device (DB 360) 6 Crown Size Selection 7 Diamondback Procedure 8 Background Information 8 Introducer Sheath 8 Guide Wire Placement 8 Equipment Set Up 8 Testing the Diamondback System Prior to Use 8 Procedure Steps 9 Discontinuing the Procedure and Device Removal 10 Troubleshooting 11 Expiration Dating 11 Storage and Usage 11 Appendix A – Platform Graphs 12 Appendix B – Maximum Orbit/Resulting Lumen Diameter 14 Appendix C - Recommended Introducer Sheath Sizes 15 Appendix D – Symbols 16 Appendix E – Disclaimer of Warranty 17 List of Illustrations and Tables Figure 1. Table 1. Title Page Diamondback 360 Orbital Atherectomy Device (DB 360) Title Page Crown Sizes © 2011 Cardiovascular Systems, Inc. 6 7 2 90168-00.K Introduction The following Instructions for Use describe the components and use of the Diamondback 360º Orbital Atherectomy System (OAS). Read these instructions thoroughly before using the OAS or any of its components. Review the contraindications, restrictions, warnings, and precautions carefully. Additional instructions and information may be found in the Orbital Atherectomy Controller Manual. Read all manuals and instructions completely before using the OAS or any components or performing any atherectomy procedure. Diamondback 360◦ Orbital Atherectomy System (OAS) Description The OAS is a percutaneous orbital atherectomy system designed to remove or reduce occlusive material and restore luminal patency by using a rotating, eccentric diamond-coated Crown. The system is available in an 0.014 inch platform for use with a 0.014 inch guide wire. The 0.014 OAS consists of the following CSI supplied components: • Diamondback 360 0.014 inch Orbital Atherectomy Device (DB 360). • Orbital Atherectomy Controller (Controller) – See Controller Manual. • 0.014 inch (0.3556mm) x 335 cm ViperWire™ Firm Guide Wire. (See guide wire Instructions For Use) Additional components, which are independently obtained, are listed below. Follow the original manufacturer’s instructions for each independently sourced component. • ViperSlide™ Lubricant (Rotaglide™ system lubricant also compatible – refer to IFU) • Introducer sheath (Note: See Appendix C for recommended sizes) • Standard compressed gas (medical air or nitrogen only) cylinder and compatible regulator or appropriate hospital compressed gas system. See the Controller Manual for more information about running the DB 360 from low pressure, house lines. • Normal saline for infusion. • Indications for Use The Diamondback 360° Orbital Atherectomy System is a percutaneous orbital atherectomy system indicated for use as therapy in patients with occlusive atherosclerotic disease in peripheral arteries and who are acceptable candidates for percutaneous transluminal atherectomy. The OAS supports removal of stenotic material from artificial arteriovenous dialysis fistulae (AV shunt). Contraindications, Restrictions, Warnings and Precautions Contraindications Use of the OAS is contraindicated in the following situations: • Guide wire cannot be passed across the peripheral lesion. • Use in coronary arteries. • Target lesion is within a bypass graft or stent. • Patient has angiographic evidence of thrombus; thrombolytic therapy must be instituted prior to atherectomy. • Patient has angiographic evidence of significant dissection at the treatment site. The patient may be treated conservatively to permit the dissection to heal before treating the lesion with the OAS. Restrictions • The OAS should only be used by physicians who are experienced in peripheral angioplasty at his or her institution and trained on the use of the OAS. • Caution: Federal Law (United States) restricts this device to sale by or on the order of a physician. Warnings • Reference vessel diameter at treatment area must be at least 1.5 mm in diameter. • If mechanical failure of the OAS occurs before or during the atherectomy procedure, discontinue use immediately and return the product to Cardiovascular Systems, Inc. Do not attempt to use a damaged DB 360, or other system component. Use of damaged components may result in system malfunction or patient injury. • The DB 360 should be used only with the CSI 0.014 inch (0.3556mm) x 335 cm Firm ViperWire guide wire. Follow CSI’s instructions related to guide wire use. • Always use fluoroscopic surveillance when advancing the guide wire to avoid misplacement, dissection, or perforation. The guide wire functions as the monorail over which the DB 360 tracks, it is imperative that the guide wire be initially placed through the stenotic lumen and not in a false channel. © 2011 Cardiovascular Systems, Inc. 3 90168-00.K • • • • • • • • • • • Handle the DB 360 and guide wire carefully. A tight loop, kink, or bend in the guide wire may cause damage and system malfunction during use. Never operate the DB 360 without normal saline solution (saline) infusion. Flowing saline is required for cooling and lubricating of the DB 360 turbine. Operation of the DB 360 without proper saline infusion may result in over heating and permanent damage to the DB 360 and possible patient injury. The Crown at the distal tip of the DB 360 rotates at very high speeds. Do not allow body parts or clothing to come into contact with the Crown. Physical injury or entanglement may occur. Never advance the rotating Crown to the point of contact with the guide wire spring tip. Distal detachment and embolization of the tip may result. Always advance the rotating, abrasive Crown by using the Crown Control Knob. Never advance the rotating Crown by advancing the DB 360 Control Handle. Guide wire buckling may occur and perforation or vascular trauma may result. Always keep the Crown advancing or retracting while it is at high rotational speeds. Do not allow the Crown to remain in one location for more than 2-3 seconds. Maintaining the Crown in one location while it is rotating at high speeds may lead to excessive tissue removal. Never force the Crown when rotational or translational resistance occurs; vessel perforation may occur. If resistance to motion is noted, retract the Crown and stop treatment immediately. Use fluoroscopy to analyze the situation. When treating a total occlusion – CTO – create a channel at low or medium speed before traversing the lesion at high speed. Crossing the total occlusion on high speed may cause the shaft and / or the guide wire to fracture due to excessive force. While advancing the Crown through the introducer sheath / guide catheter, do not activate Crown rotation. The Crown must not rotate while located within the introducer sheath / guide catheter. The maximum travel of the Crown Control Knob, and therefore the Shaft tip, is 6.0 inches (15 cm). Moving the Crown Control Knob forward will move the Shaft tip an equal distance toward the guide wire spring tip. When moving the Crown Control Knob, make sure there is sufficient distance between the guide wire spring tip and the distal end of the Shaft. If the distance between the Shaft tip and the guide wire spring tip is insufficient, the Shaft tip may contact the guide wire spring tip and may result in the guide wire spring tip being dislodged. Use contrast injections and fluoroscopic observation to monitor movement of the shaft tip in relation to the guide wire spring tip. Do not re-use device. If the device is re-used, the device may not function as intended and serious infection leading to potential harm and/or death could occur. Precautions • If the DB 360 sterile package appears damaged, or shelf life has expired, do not use, return to Cardiovascular Systems, Inc. • Follow standard hospital atherectomy policies and procedures including those related to anticoagulation and vasodilator therapy. • Safety and effectiveness for the treatment in vessels greater than 4.0 mm in diameter or of lesions greater than 10 centimeters in length has not been established. • Radiographic equipment for fluoroscopic observation should provide high-resolution images. Guide wires and catheters should only be manipulated under fluoroscopic observation. • Due to the torque responsiveness of the ViperWire Guide Wire, it is more difficult to handle than other commercially available guide wires used in peripheral angioplasty. Care should be exercised when using this guide wire. • Use only saline as the infusate. (Drugs, such as vasodilators, can be added to the infusate at the physician’s discretion). The Control Handle may malfunction if contrast or other substances are injected into the Control Handle infusion port. • Do not operate without lubricant at the lubricant manufacturer’s recommended concentrations. Maximum speeds may not be achieved without lubricant. • When moving the eccentric diamond-coated Crown back and forth across the lesion, employ a series of intermittent treatment events and rest periods. • Rest periods are recommended after 30 to 60 seconds of treatment with a maximum treatment time of 90 seconds. • When operating the DB 360 at rotational speeds less than 25,000 rpm or in Test mode, always grasp the guide wire firmly as it exits the Control Handle. Always use the wire Clip torquer or other approved torquer. • Monitor the saline fluid level during the procedure. Saline infusion is critical to DB 360 performance. Do not kink or crush the saline tubing. Flow of saline will be reduced. Check the saline tubing and connections for leaks during the procedure. © 2011 Cardiovascular Systems, Inc. 4 90168-00.K Clinical Summary The prospective multi-center Clinical Study of the Orbital Atherectomy System for the Treatment of Peripheral Vascular Stenosis [OASIS] was conducted to evaluate the safety and effectiveness of Orbital Atherectomy in patients with symptomatic PAD. 124 patients from 17 contributing centers were enrolled, and 201 lesions were treated with OA. Primary safety and efficacy endpoints (major clinical events at 30 days and acute debulking, respectively) were compared with pre-specified objective performance criteria (OPC). Non-inferiority to both primary endpoints was demonstrated (p < 0.05). The number of patients who met the primary efficacy objective using only the investigational device was 91/124 or 73.4%. The number of lesions in which the primary efficacy objective was met using only the investigational device was 125/201 or 62.2%. A summary of the Safety and Effectiveness is provided in the following table: OASIS: Summary of Safety and Effectiveness* (n= 124 patients, 201 lesions) Parameter Result Baseline information: Age, mean % male ABI, mean Reference vessel diameter Target lesion length 70.4 + 9.97 years 66.9 % 0.68 + 0.2 3.2 + 0.7 mm 29.8 + 26.5 mm Primary efficacy endpoint- mean decrease in diameter stenosis Baseline %DS Post- OA %DS Mean decrease 86.8 +11.8 % 25.5 + 20.8 % 61.7 + 23.4 % OPC = 55% Primary safety endpoint- number (%) of patients with at least 1 major complication within 30 days (n=124 patients with 30 day follow-up) Death Acute MI Major bleeding requiring surgery Major vascular complication requiring surgery Aneurysm or false aneurysm at insertion site Amputation, major Perforation Abrupt, or acute vessel closure requiring surgery Major dissection Distal embolization Thrombus formation at treatment site TVR/TLR through 30 days At least 1 major adverse event ABI- 30 days, mean 2/124 (1.6%) 1/124 (0.8%) 0/124 (0) 0/124 (0) 4/124 (3.2%) 0/124 (0) 2/124 (1.6%) 1/124 (0.8%) 0/124 (0) 1/124 (0.8%) 1/124 (0.8%) 0 10/124 (8.1%) 0.9 ± 0.18 OPC = 8% OA treatment time, mean 183.1 +/- 108.2 sec * Abbreviations: ABI= ankle brachial index; DS= diameter stenosis; OA= orbital atherectomy; OPC= objective performance criteria; MI= myocardial infarction; TVR/TLR- target vessel/lesion revascularization © 2011 Cardiovascular Systems, Inc. 5 90168-00.K Diamondback 360 Orbital Atherectomy Device (DB 360) The DB 360 includes the following subcomponents: • Control Handle – Supports the air turbine. • Triple Cable with Quick Connector – includes: o Optical Tachometer Fiber – Connects to the Controller and provides for measurement of Shaft/Crown rotational speed; o Turbine Gas Intake Hose – Delivers compressed gas from the Controller to the Control Handle; o Saline tubing – Used to deliver saline from the saline bag to the DB 360. A section of the tubing is positioned within the roller pump located on the Controller to provide the required saline flow to the DB 360. • Crown Control Knob – Allows for independent extension of the Crown allowing for accurate positioning. • Drive Shaft – The drive shaft or Shaft is a flexible, helically wound, stainless steel, multiple wire shaft that drives Crown rotation. The Shaft has a central lumen that allows for passage of a guide wire. • Eccentric diamond-coated Crown– Attached to the drive shaft and functions as the abrasive surface. It tracks and rotates over the guide wire, rotating at high speed to remove or reduce the occlusive tissue into microscopic particles. Various Crown sizes are available. • Saline Infusion Port – Allows for infusion of saline through the Sheath around the Shaft. • Sheath – The polyethylene Sheath covers the Shaft proximal to the Crown. The Sheath protects the shunt and vascular tissue from the spinning Shaft and permits flow of saline to the area of the abrading surface of the Crown. • Turbine – An internal Control Handle component, driven by compressed gas (air or nitrogen) and rotates the Shaft/Crown. Saline Tubing Sheath covering Shaft Crown Saline infusion port Triple Cable with Quick Connector Crown Control Knob Control Handle Figure 1. Diamondback 360 Orbital Atherectomy Device (DB 360) © 2011 Cardiovascular Systems, Inc. 6 90168-00.K Crown Size Selection Crown Sizes The eccentric diamond-coated Crown is available in diameters as listed in Table 1. Each Crown size has a specific nose length (nose length is the length of the drive shaft from the Crown to the shaft tip). Table 1. Crown Sizes Crown Size Nose Length (mm) 1.50 mm 10 1.75 mm 15 2.00 mm 15 2.25 mm 20 Selecting a Crown Size The most important factors in determining Crown orbit diameter and resulting lumen diameter are the proper selection of Crown size, rotation speed, and treatment duration (number of passes back and forth through the lesion). The eccentric diamond-coated Crown of the DB 360 is designed to remove a thin layer of the stenotic lesion with each pass through the lesion. Rapid rotation of the Crown creates centrifugal forces that press the eccentric diamondcoated Crown against the stenotic lesion. With each pass of the Crown, the diameter of the orbit increases while the centrifugal force decreases until a maximum orbit diameter is achieved. Actual final orbit and lumen diameter will depend on a variety of factors including the composition of the lesion, tortuousity of the vessel, and other factors. See Appendix A for a visual representation of the relationship of the number of passes through the treatment area and the resulting lumen diameter. The physician should select a Crown size based on its ability to cross the lesion and the minimum proximal reference vessel diameter within the treatment area. See Appendix B for the maximum orbit/resulting lumen diameter for each DB 360 Crown. © 2011 Cardiovascular Systems, Inc. 7 90168-00.K Diamondback 360 Orbital Atherectomy Procedure Background Information The eccentric diamond-coated Crown of the DB 360 is designed to remove a thin layer of the stenotic lesion with each pass through the lesion. It is recommended that debulking be initiated at Low speed. Frequent fluoroscopic visualization allows for controlled removal of the lesion. Increase rotational speed, as required, to increase the orbit diameter. Introducer Sheath An introducer sheath is used to access the target vessel. Care should be taken not to deform the DB 360 Crown/Shaft when inserting or removing it through the introducer’s hemostasis valve. See Appendix C for the recommended sheath size for the Crown size selected. Guide Wire Placement The recommended DB 360 guide wire is used to reach and cross the lesion or stenotic occlusion. It allows for proper positioning of the Crown and provides a center of rotation for the flexible drive shaft. Follow the instructions related to guide wire use. Equipment Set Up Refer to the Controller Manual for OAS Assembly and Setup instructions including setup of the DB 360. Ensure the system and all components are setup correctly prior to use. Testing the Diamondback Orbital Atherectomy System Prior to Use The DB 360 must be tested with the Shaft/Crown threaded over the guide wire before inserting the DB 360 into the vessel/shunt and performing the atherectomy procedure. Test the following prior to use: Check the flow of saline Set rotational speed of the Shaft/Crown Test ability to advance the Crown • • • Preparation for Testing 1. Ensure the Crown Control Knob is pushed fully proximal (away from the Shaft) and secured by turning it clockwise before threading the guide wire through the Shaft. 2. Grasp the proximal end of the guide wire and thread it through the hole in the Shaft tip distal to the Crown. 3. Continue feeding the guide wire into the Shaft until the guide wire appears at the rear of the Control Handle. 4. Grasp the exposed guide wire and pull it gently until the distal end of the guide wire spring tip is at least 4 inches (10 cm) from the end of the shaft. Note: If difficulty is encountered in guiding the wire through the Control Handle, loosen the Crown Control Knob by turning it counterclockwise and slide it back and forth while gently pushing the wire. This should ease the wire through the Control Handle. 5. 6. Attach a wire torquer to the guide wire a few centimeters beyond the end of the Control Handle. Make sure the compressed gas supply is turned on and the roller pump door closed. Check the Flow of Saline AND Set Rotational Speed of the Shaft/Crown. 1. For Controller Model OAC-100, turn the Pressure Control Knob on the front of the Controller counterclockwise until it stops. This will prevent the Crown from rapidly spinning if the Foot Pedal is accidentally depressed. 2. Depress the Fluid/Pump On/Off switch on the Controller. Saline will flow at low pump speed. 3. Check that the saline is flowing freely and check the saline tubing and connections for leaks. Note: Monitor the saline fluid level during the procedure. Saline infusion is critical to safe DB 360 performance. 4. Hold the Sheath a few centimeters from the Crown making sure the Crown is not in contact with any objects. 5. Hold the distal tip of the guide wire (not the guide wire spring tip). 6. For Controller Model OAC-100, turn the Pressure Control Knob clockwise to obtain a reading of 25,000 rpm For Controller Model DB-2000, press the Test Button. 7. Depress and release the Foot Pedal. Saline will flow at high pump speed. 8. Check that the flow of saline increased. 9. Within five seconds, depress and hold the Foot Pedal. The Shaft/Crown will rotate. 10. Release the Foot Pedal. Rotation of the Shaft/Crown will stop. After five seconds, saline flow will decrease to low pump speed. © 2011 Cardiovascular Systems, Inc. 8 90168-00.K Ability to Advance the Crown After setting the correct rotational speed of the Shaft/Crown, practice advancing the Crown while it is rotating. 1. Hold the Sheath a few centimeters from the Crown making sure that the Crown is not in contact with any objects. 2. Depress and release the Foot Pedal. Saline will flow at high pump speed. 3. Within five seconds, depress and hold the Foot Pedal. The Shaft/Crown will rotate. 4. While the Crown is rotating, slowly slide the Crown Control Knob back and forth and note the corresponding movement of the Crown along the guide wire. Procedure Steps 1. Gain vessel/shunt access by the operator’s preferred methodology. 2. Access the treatment site with an introducer sheath. 3. Use angiography to locate, visualize, and evaluate the lesion. 4. Approach and cross the lesion with the guide wire. 5. Ensure the Crown Control Knob is pushed fully back (away from the Shaft) and turned fully clockwise. 6. Thread the Shaft over the guide wire, if needed. 7. Activate the Fluid/Pump On/Off switch on the Controller. The saline will flow at low pump speed. 8. Advance the Shaft over the guide wire through a hemostasis valve. Note: If an adjustable hemostasis valve is used with the introducer sheath, it should be closed just enough to prevent blood loss around the sheath, but still allow the Shaft to slide through the valve. Excessive tightening of the hemostasis valve can crush the Sheath around the Shaft and restrict flow of saline through the Sheath. Care should be taken not to deform the DB 360 Crown/Shaft when inserting or removing it through the hemostasis valve. See Appendix C for recommended sheath size for the Crown Size selected. 9. Under fluoroscopic guidance, gently advance the Crown over the guide wire to a point immediately proximal to the lesion. Note: While advancing or withdrawing the DB 360, rotation at speeds less than 25,000 rpm may facilitate movement of the Shaft over the guide wire. Grasp the guide wire as it exits the Control Handle to prevent guide wire rotation. 10. Inject contrast and verify that the size of the Crown is compatible with the vessel/shunt diameter. 11. Verify that the guide wire spring tip is distal to the lesion and is not in danger of contacting the rotating Shaft tip. Note: A minimum distance of 4 inches (10 cm) must be observed throughout treatment between the proximal end of the guide wire spring tip and distal tip of the OAD Shaft to prevent damage to the guide wire spring. Advance the guide wire further proximal if necessary. Never bring the OAD shaft into contact with the guide wire spring tip. 12. Select the rotational speed beginning with the Low speed setting. See Appendix B for speed settings for each Crown size. a. Controller Model OAC-100, turn the Pressure Control Knob clockwise to obtain the desired speed setting. b. Controller Model DB-2000, select the appropriate speed as indicated on the handle. Note: The maximum orbit diameter is primarily a function of Crown size, rotational speed and number of passes through the lesion. It is recommended that debulking be initiated at the Low speed setting. Frequent fluoroscopic visualization allows for controlled removal of the lesion. Increase rotational speed, as required, to increase the orbit diameter. 13. Depress and release the Foot Pedal. Saline will flow at high pump speed. 14. Within five seconds, depress the Foot Pedal again and hold. The Shaft/Crown will rotate. 15. Check the Rotational Speed display and verify that the Shaft/Crown is rotating at the selected speed. 16. Turn the Crown Control Knob counterclockwise to loosen and advance it slowly to begin atherectomy of the lesion. Always hold the Crown Control Knob during Crown/Shaft rotation. Observe the Crown’s progress fluoroscopically. 17. Move the Crown Control Knob to move the Crown back and forth across the lesion. Employ a series of intermittent treatment events and rest periods. © 2011 Cardiovascular Systems, Inc. 9 90168-00.K Rest periods are recommended after 30 to 60 seconds of treatment time with a maximum treatment time of 90 seconds. Do not leave the rotating Crown in one location for more than 2-3 seconds. Use contrast injections through the introducer sheath to evaluate the results angiographically. Stop Crown rotation by releasing the Foot Pedal. To begin Crown rotation again: a. Depress and release the Foot Pedal to start the flow of saline at high pump speed. b. Within five seconds, depress the Foot Pedal again and hold. The Shaft/Crown will rotate. 18. If luminal patency is not adequate, one or more of the following options may be selected: Continue to treat the lesion by moving the Crown across the lesion as described above. Increase the rotational speed of the Shaft/Crown. 19. To increase rotational speed to Medium: a. Controller Model OAC-100: turn the Pressure Control Knob clockwise to desired speed setting while closely monitoring the Rotational Speed and Turbine Pressure displays. b. Controller Model DB-2000, select the appropriate speed as indicated on the handle. c. Continue to periodically monitor the Rotational Speed and Turbine Pressure displays. Repeat Step 17. d. For additional treatment, increase speed to the High setting. Repeat Step 17. 20. To increase rotational speed on the DB-2000 by using the Up and Down Arrows, select a Speed setting. Increase or decrease in increments of 10,000 rpms by selecting the arrows. The selected rpms will read out in the therapy window. 21. If luminal patency is not adequate, consider selecting and DB 360 with a larger Crown size. 22. Evaluate luminal patency. 23. Perform a final angiogram. Discontinuing the Procedure and Device Removal To discontinue treatment: 1. Release the Foot Pedal to stop Shaft/Crown rotation. 2. Retract the Crown proximal to the lesion. 3. Remove the DB 360. 4. Stop the Fluid/Pump. 5. Remove the guide wire and introducer sheath according to standard hospital procedures. 6. Treat the puncture site according to standard hospital procedures. 7. Discard the DB 360 according to hospital protocol. 8. Turn off the Controller following Controller instructions for use. © 2011 Cardiovascular Systems, Inc. 10 90168-00.K Troubleshooting Issue The Crown stops rotating during the atherectomy procedure. Blood is observed in the Sheath. Crown/Shaft fractures. The desired rotational speed cannot be reached. Variable or unstable rotational speed is displayed. No Crown activation No saline flow Solution Discontinue treatment immediately. Retract the Crown. Check the Control Handle for proper connection to the Controller. If the connections are correct, use fluoroscopy to analyze the situation. 1. Discontinue treatment. 2. Verify the saline infusion is properly connected and flowing. 3. If the device is properly connected and blood continues to flow up the sheath, replace the DB 360. The coiled tip of the guide wire may keep the Crown/Shaft on the guide wire. Gently remove the guide wire to retrieve the Crown/Shaft. If the Crown/Shaft becomes dislodged from the guide wire, use standard procedures to retrieve the Shaft. 1. Discontinue treatment. 2. Verify that the Turbine Gas Intake Hose is not kinked or pinched. 3. Verify that the Gas Intake Hose is not kinked or pinched. 4. Check that the gas cylinder regulator is properly set and the gas cylinder has adequate volume and pressure. 1. Discontinue treatment. 2. Verify that the Optical Tachometer Fiber is properly connected to the Controller. 3. Verify that the end of the Optical Tachometer Fiber is clean. 1 Discontinue treatment. 2. Verify that the Optical Tachometer Fiber is properly connected to the Controller. 3. Verify that the end of the Optical Tachometer Fiber is clean. 4. Check that controller is on 1. Discontinue or don’t initiate treatment. 2. Verify the saline infusion is properly connected and flowing. 3. Ensure that saline tubing is installed properly in roller pump 4. Verify the controller saline infusion button is activated 5. If the device is properly connected and no flow is noted, replace the saline tubing/bag and/or device 1. 2. 3. 4. Expiration Dating The Diamondback 360 Orbital Atherectomy Device (DB 360) is provided sterile (ethylene oxide sterilization). It is intended for single-use only. DO NOT RESTERILIZE. The DB 360 should be used prior to the expiration dating on the packaging. Storage and Use Conditions Each 0.014 platform DB 360 has a functional life of 8 minutes of total operational time. Storage: 10 to 40 ºC (50 to 104 ºF) © 2011 Cardiovascular Systems, Inc. 11 90168-00.K Appendix A – Platform Graphs 1.50mm 30µm Solid Crown Orbit Results Low (80 krpm) Med (140 krmp) High (200 krpm) 4 Pin Diameter(mm) 3.5 3 Treated Simulated 2.0x Vessel 2.5 2 1.5 0 5 10 15 20 25 30 35 40 45 50 55 60 65 70 75 80 85 90 Number of passes (~1 minute 10 passes) 1.75mm 30µm Solid Crown Orbit Results Low (80 krmp) Med (140 krmp) High (200 krmp) 4.25 Pin Diameter(mm) 3.75 3.25 Treated Simulated 2.0x Vessel 2.75 2.25 1.75 0 5 10 15 20 25 30 35 40 45 50 55 60 65 70 75 80 85 90 Number of passes(~1 minute 10 passes) © 2011 Cardiovascular Systems, Inc. 12 90168-00.K 2.00mm 30µm Solid Crown Orbit Results Low (80 krpm) Med (120 Krpm) High (160 Krpm) 5.5 5 Pin diameter(mm) 4.5 4 3.5 Treated Simulated 2.0x Vessel 3 2.5 2 0 5 10 15 20 25 30 35 40 45 50 55 60 65 70 75 80 85 90 Number of passes (~1 minute 10 passes) 2.25mm 30µm Solid Crown Orbit Results Low(60 Krpm) Med (90 Krpm) High(120) 4.75 Pin Diameter(mm) 4.25 Treated Simulated 2.0x Vessel 3.75 3.25 2.75 2.25 0 10 20 30 40 50 60 70 80 90 Numberr of passes(~1 minute 10 passes) © 2011 Cardiovascular Systems, Inc. 13 90168-00.K Appendix B - Maximum Orbit/Resulting Lumen Diameter Table 3 shows the maximum orbit/resulting lumen diameter for each DB 360 Crown at incremental rotational speeds for 50 passes (about 5 minutes of treatment time.) To demonstrate that the orbit of the DB 360 has a maximum limit, Table 4 summarizes the results at the maximum sanding time for each DB 360 Crown diameter (maximum rotational speed for 90 passes, about 8 minutes of treatment time). Quantitative angiography is recommended to determine the minimum vessel diameter. Table 3. 0.014” DB 360 Crown Size and Rotational Speed: 50 Pass Maximum Diameters Crown Size 1.50 mm 1.75 mm 2.00 mm 2.25 mm Rotational Speed Maximum Lumen Diameter * Average +2 Standard Deviations 80,000 rpms 2.62 140,000 rpms 3.63 200,000 rpms 3.69 80,000 rpms 4.79 140,000 rpms 4.20 200,000 rpms 4.80 80,000 rpms 5.16 120,000 rpms 5.38 160,000 rpms 5.43 60,000 rpms 4.91 90,000 rpms 5.48 120,000 rpms 5.57 Table 4. 0.014” DB 360 Crown Size and Rotational Speed: 90 Pass Maximum Diameters Crown Size Rotational Speed Maximum Lumen Diameter** 1.50 mm 200,000 rpms 3.38 1.75 mm 200,000 rpms 3.96 2.00 mm 160,000 rpms 5.00 2.25 mm 120,000 rpms 5.08 *These lumens are based on in vitro test results at approximately 5 minutes of treatment time (50 passes) at a rate of approximately 1cm per second of travel speed, actual clinical results may vary. **These lumens are based on in vitro test results at approximately 8 minutes of treatment time (90 passes) at a rate of 1cm per second, actual clinical results may vary. Note: A pass is defined as once down and back across the lesion. Orbit data presented is based on a 3 cm pass distance at a travel rate of 1cm per second. © 2011 Cardiovascular Systems, Inc. 14 90168-00.K Appendix C - Recommended Introducer Sheath Sizes Crown Size Diamondback 360 Maximum Outer Diameter Recommended Introducer Sheath Internal Diameter 1.50 mm (0.062 inches) 1.8 mm (0.070 inches) 0.079 inches (6 F) 1.75 mm (0.070 inches) 1.8 mm (0.070 inches) 0.079 inches (6 F) 2.00 mm (0.079 inches) 2.0 mm (0.079 inches) 0.079 inches (6 F) 2.25 mm (0.089 inches) 2.25 mm (0.089 inches) 0.089 inches (7 F) © 2011 Cardiovascular Systems, Inc. 15 Guide Catheter See Guide Catheter Manufacturers Specifications for Lumen Diameter 90168-00.K Appendix D: Symbols Model Number Lot Number Use By Date Refer to the Instructions For Use Do not re-use Sterilized with Ethylene Oxide Manufacturer Contains phthalate: bis (2-ethylhexyl) phthalate (DEHP) © 2011 Cardiovascular Systems, Inc. 16 90168-00.K Appendix E - DISCLAIMER OR WARRANTY DISCLAIMER OF WARRANTY Although Cardiovascular Systems, Inc. (CSI) uses reasonable care n the manufacture of its devices, they are used in difficult environment within the human body with many biological differences between individual patients CSI has no control over the conditions under which this device is used, condition of the patient, methods of administration or handling after the device leaves CSI’s possession. THEREFORE, CSI DISCLAIMS ALL WARRANTIES WHETHER EXPRESSED OR IMPLIED, WRITTEN OR ORAL, INCLUDING BUT NOT LIMITED TO ANY WARRANTIES OF MERCHANTABILITY OF FITNESS FOR A PARTICULAR PURPOSE. CSI DOES NOT WARRANT EITHER FOR A GOOD EFFECT OR AGAINST ALL ILL EFFECT FOLLOWING ITS USE. CSI (INCLUDING ITS AFFILIATED ENTITIES, OWNERS, DIRECTORS, OFFICERS, EMPLOYEES, AGENTS AND VENDORS) SHALL NOT BE LIABLE FOR ANY DIRECT, INDIRECT, INCIDENTAL OR CONSEQUENTIAL LOSS, DAMAGE, OR EXPENSE ARISING FROM OR RELATED TO THE USE OF THIS DEVICE. No person has authority to bind CSI to any representation, warranty, or liability except as set forth in this Disclaimer of Warranty. CSI may, at its sole discretion, replace any device that is determined to have been out of specification at the time of shipment. The exclusions, disclaimers, and limitations set forth in this Disclaimer of Warranty are not intended to, and shall not be construed as to, contravene mandatory provisions of any applicable law or regulation. If any part of this Disclaimer of Warranty is held to be illegal or unenforceable by a court of competent jurisdiction, the part shall be modified so as to be enforceable to the maximum extent possible. If the part cannot be modified, then that part may be severed and the other parts of this Disclaimer of Warranty shall remain in full force and effect. ® ® Diamondback 360 and CSI are registered trademarks of Cardiovascular Systems, Inc. ViperWire™ is a trademark of Cardiovascular Systems, Inc. Rotaglide™ Lubricant is a trademark of Boston Scientific, Inc. Cardiovascular Systems, Inc. St. Paul, Minnesota 55112 USA Telephone: 651.259.1600 www.CSI360.com C0413 European Authorized Representative: MedPass International Limited Windsor House - Barnett Way – Barnwood Glouster GL4 3RT United Kingdom © 2011 Cardiovascular Systems, Inc. 17 90168-00.K